warning light MINI Clubman 2016 (Mini Connected) Repair Manual
[x] Cancel search | Manufacturer: MINI, Model Year: 2016, Model line: Clubman, Model: MINI Clubman 2016Pages: 246, PDF Size: 5.21 MB
Page 204 of 246

3.Continue turning the wiper blade all the
way so that it pops out of the holder.
4.Press the new wiper blade into the holder
until you hear it snap into place.
5.Fold the wipers in.
Lamp and bulb replace‐
ment
General information
Lights and bulbs make an essential contribution
to vehicle safety.
The manufacturer of the vehicle recommends
that you have appropriate work performed by a
dealer’s service center or another qualified
service center or repair shop if you are unfami‐
liar with it or if it has not been described here.
A spare lamp box is available from a dealer’s
service center or another qualified service cen‐
ter or repair shop.
Information
Lights and bulbs
WARNING
Bulbs can get hot during operation. Con‐
tact with the bulbs can cause burns. There is
risk of injuries. Only change bulbs after they
have cooled off.◀
WARNING
Work on switched-on lighting systems
can cause short circuits. There is risk of injuries
or risk of property damage. When working on
the lighting system, switch off the lamps in
question. If necessary, heed the bulb manufac‐
turer's instructions.◀
CAUTION
Dirty bulbs have a reduced service life.
There is risk of property damage. Do not hold
new bulbs with your bare hands. Use a clean
cloth or something similar, or hold the bulb by
its base.◀
Light-emitting diodes (LEDs)
Some items of equipment use light-emitting di‐
odes installed behind a cover as a light source.
These light-emitting diodes, which are related
to conventional lasers, are officially designated
as Class 1 light-emitting diodes.
WARNING
Too intensive brightness can irritate or
damage the retina of the eye. There is risk of
injuries. Do not look directly into the headlights
or other light sources. Do not remove the LED
covers.◀
Headlight glass
Condensation can form on the inside of the ex‐
ternal lights in cool or humid weather. When
driving with the lights switched on, the conden‐
sation evaporates after a short time. The head‐
light glass does not need to be changed.
If despite driving with the lights switched on,
increasing humidity forms, e. g. water droplets
in the lamp, the manufacturer of your vehicle
recommends having it checked by a dealer’s
service center or another qualified service cen‐
ter or repair shop.
Seite 204MOBILITYReplacing components204
Online Edition for Part no. 01 40 2 964 571 - X/15
Page 213 of 246
site side. For this, place the wheel chock
behind the front wheel diagonally across.
3.Loosen the wheel lug bolts a half turn.
Jacking up the vehicle
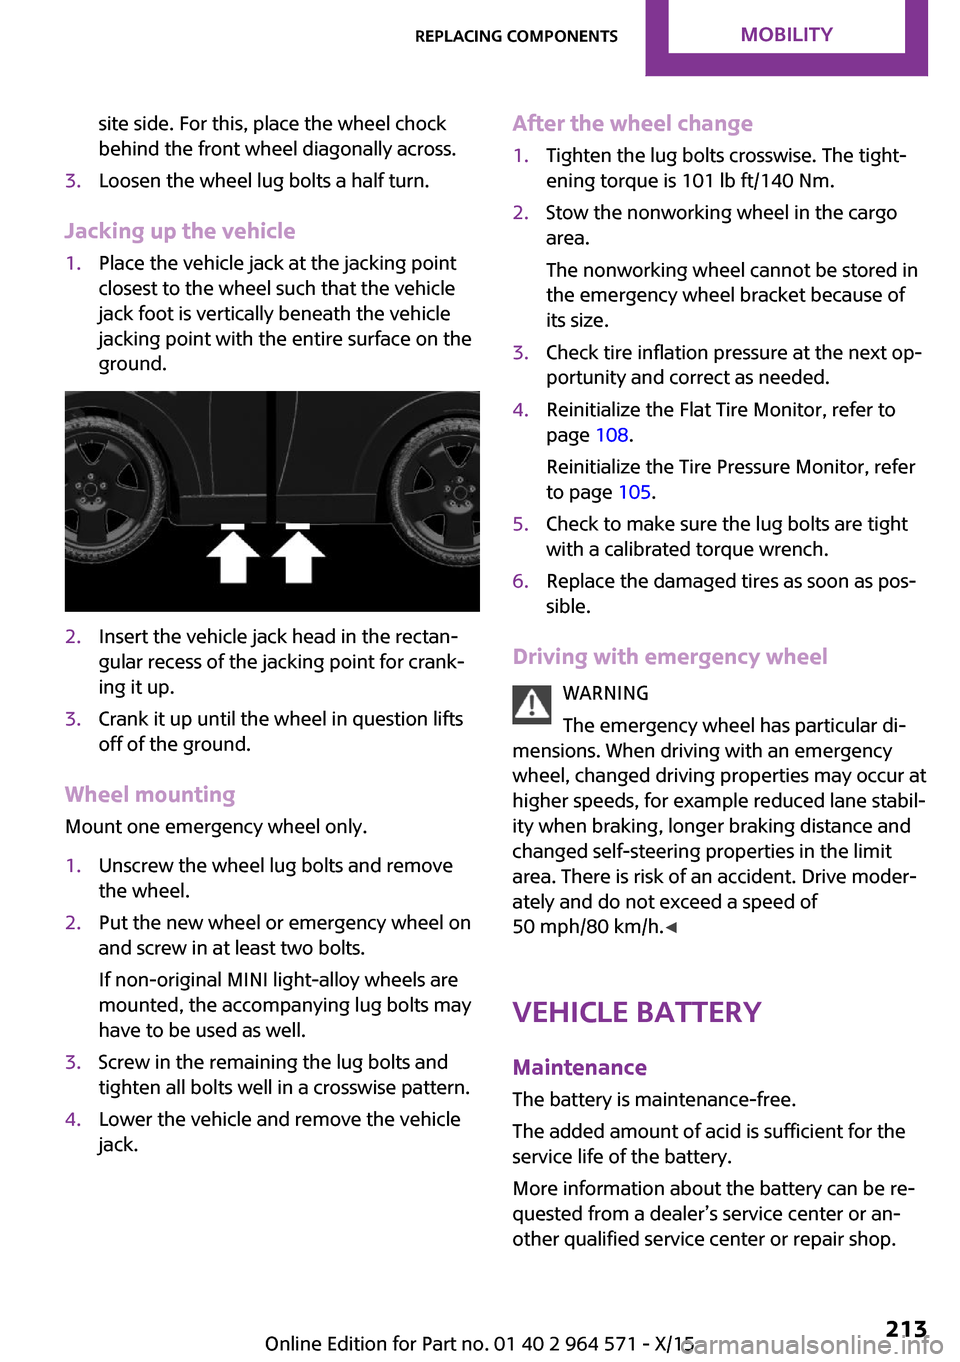
1.Place the vehicle jack at the jacking point
closest to the wheel such that the vehicle
jack foot is vertically beneath the vehicle
jacking point with the entire surface on the
ground.
2.Insert the vehicle jack head in the rectan‐
gular recess of the jacking point for crank‐
ing it up.
3.Crank it up until the wheel in question lifts
off of the ground.
Wheel mounting
Mount one emergency wheel only.
1.Unscrew the wheel lug bolts and remove
the wheel.
2.Put the new wheel or emergency wheel on
and screw in at least two bolts.
If non-original MINI light-alloy wheels are
mounted, the accompanying lug bolts may
have to be used as well.
3.Screw in the remaining the lug bolts and
tighten all bolts well in a crosswise pattern.
4.Lower the vehicle and remove the vehicle
jack.
After the wheel change1.Tighten the lug bolts crosswise. The tight‐
ening torque is 101 lb ft/140 Nm.
2.Stow the nonworking wheel in the cargo
area.
The nonworking wheel cannot be stored in
the emergency wheel bracket because of
its size.
3.Check tire inflation pressure at the next op‐
portunity and correct as needed.
4.Reinitialize the Flat Tire Monitor, refer to
page 108.
Reinitialize the Tire Pressure Monitor, refer
to page 105.
5.Check to make sure the lug bolts are tight
with a calibrated torque wrench.
6.Replace the damaged tires as soon as pos‐
sible.
Driving with emergency wheel
WARNING
The emergency wheel has particular di‐
mensions. When driving with an emergency
wheel, changed driving properties may occur at
higher speeds, for example reduced lane stabil‐
ity when braking, longer braking distance and
changed self-steering properties in the limit
area. There is risk of an accident. Drive moder‐
ately and do not exceed a speed of
50 mph/80 km/h.◀
Vehicle battery
Maintenance
The battery is maintenance-free.
The added amount of acid is sufficient for the
service life of the battery.
More information about the battery can be re‐
quested from a dealer’s service center or an‐
other qualified service center or repair shop.
Seite 213Replacing componentsMOBILITY213
Online Edition for Part no. 01 40 2 964 571 - X/15
Page 217 of 246

Starting aid terminals
WARNING
If the jumper cables are connected in the
incorrect order, sparks formation can occur.
There is risk of injuries. Pay attention to the cor‐
rect order during connection.◀
The starting aid terminal in the engine com‐
partment acts as the battery's positive terminal.
Open the cover of the starting aid terminal.
The body ground or a special nut acts as the
battery negative terminal.
Connecting the cables
1.Pull off the lid of the starting aid terminal.2.Attach one terminal clamp of the positive
jumper cable to the positive terminal of the
battery, or to the corresponding starting aid
terminal of the vehicle providing assistance.
3.Attach the terminal clamp on the other end
of the cable to the positive terminal of the
battery, or to the corresponding starting aid
terminal of the vehicle to be started.
4.Attach one terminal clamp of the negative
jumper cable to the negative terminal of
the battery, or to the corresponding engine
or body ground of assisting vehicle.
5.Attach the second terminal clamp to the
negative terminal of the battery, or to the
corresponding engine or body ground of
the vehicle to be started.
Starting the engine
Never use spray fluids to start the engine.
1.Start the engine of the assisting vehicle and
let it run for several minutes at an increased
idle speed.
2.Start the engine of the vehicle that is to be
started in the usual way.
If the first starting attempt is not successful,
wait a few minutes before making another
attempt in order to allow the discharged
battery to recharge.
3.Let both engines run for several minutes.4.Disconnect the jumper cables in the reverse
order.
Check the battery and recharge if needed.
Tow-starting and towing
Information
WARNING
Due to system limits, individual functions
can malfunction during tow-starting/towing
with the Intelligent Safety systems activated,
for example approach control warning with
light braking function. There is risk of an acci‐
dent. Switch all Intelligent Safety systems off
prior to tow-starting/towing.◀
Switching off Intelligent Safety systems, refer to
page 110.
Seite 217Breakdown assistanceMOBILITY217
Online Edition for Part no. 01 40 2 964 571 - X/15
Page 219 of 246
CAUTION
When lifting the vehicle by the tow fitting
or body and chassis parts; damage can occur
on vehicle parts. There is risk of property dam‐
age. Lift vehicle using suitable means.◀
Towing other vehicles
Information
WARNING
If the approved gross vehicle weight of
the towing vehicle is lighter than the vehicle to
be towed, the tow fitting can tear off or it will
not be possible to control the vehicle's re‐
sponse. There is risk of an accident! Make sure
that the gross vehicle weight of the towing ve‐
hicle is heavier than the vehicle to be towed.◀
CAUTION
If the tow bar or tow rope is attached in‐
correctly, damage to other vehicle parts can oc‐
cur. There is risk of property damage. Correctly
attach the tow bar or tow rope to the tow fit‐
ting.◀
▷Switch on the hazard warning system, de‐
pending on local regulations.
▷If the electrical system has failed, clearly
identify the vehicle being towed by placing
a sign or a warning triangle in the rear win‐
dow.
Tow bar
The tow fittings used should be on the same
side on both vehicles.
Should it prove impossible to avoid mounting
the tow bar at an offset angle, please observe
the following:
▷Maneuvering capability is limited going
around corners.
▷The tow bar will generate lateral forces if it
is secured with an offset.
Tow rope
When starting to tow the vehicle, make sure
that the tow rope is taut.
To avoid jerking and the associated stresses on
the vehicle components when towing, always
use nylon ropes or nylon straps.
CAUTION
If the tow bar or tow rope is attached in‐
correctly, damage to other vehicle parts can oc‐
cur. There is risk of property damage. Correctly
attach the tow bar or tow rope to the tow fit‐
ting.◀
Tow fitting
General information
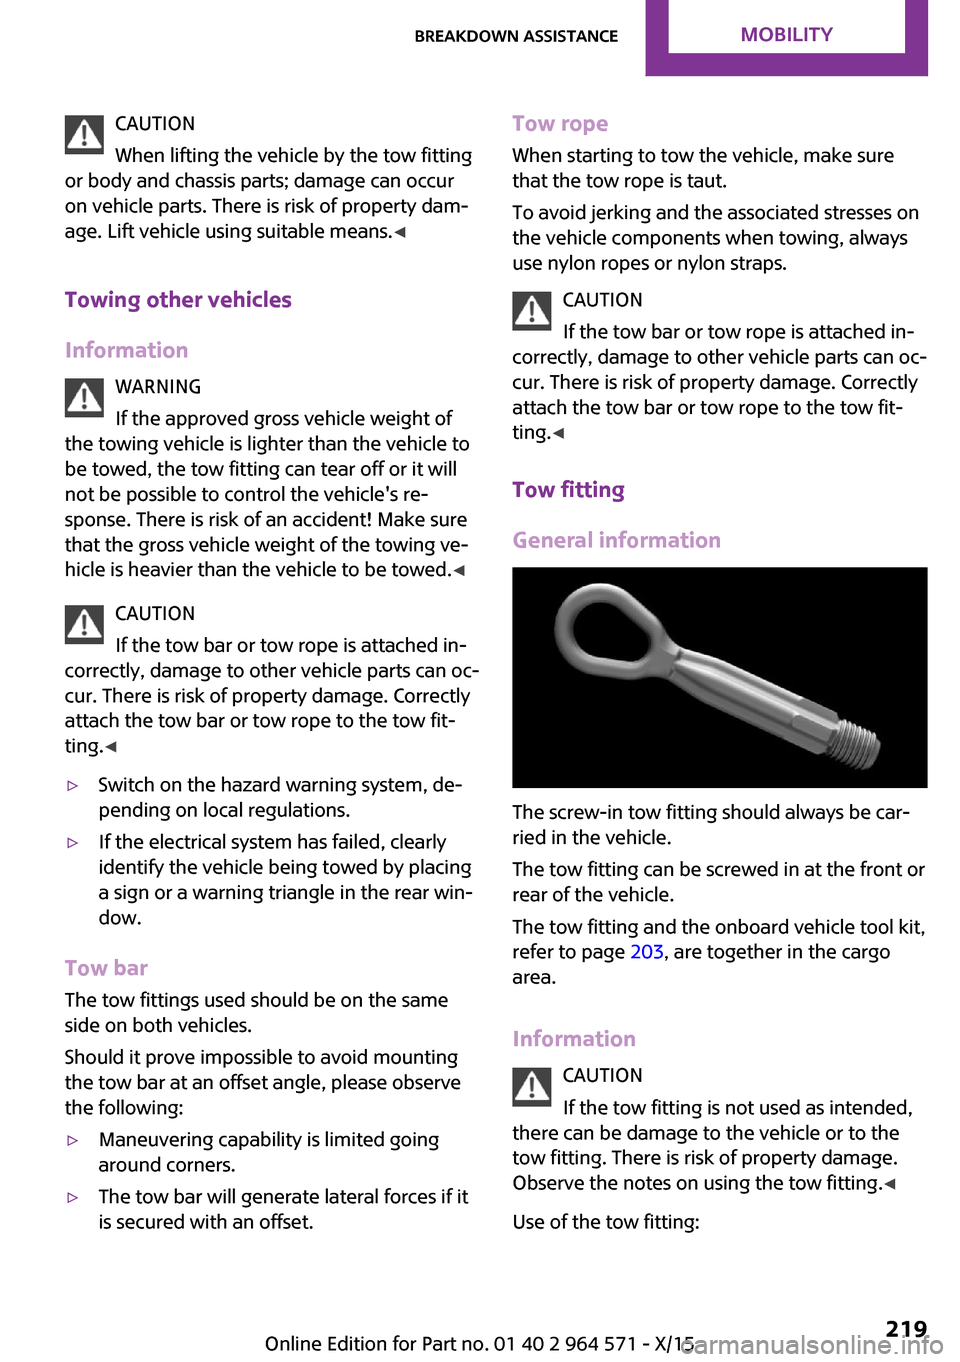
The screw-in tow fitting should always be car‐
ried in the vehicle.
The tow fitting can be screwed in at the front or
rear of the vehicle.
The tow fitting and the onboard vehicle tool kit,
refer to page 203, are together in the cargo
area.
Information
CAUTION
If the tow fitting is not used as intended,
there can be damage to the vehicle or to the
tow fitting. There is risk of property damage.
Observe the notes on using the tow fitting.◀
Use of the tow fitting:
Seite 219Breakdown assistanceMOBILITY219
Online Edition for Part no. 01 40 2 964 571 - X/15
Page 222 of 246

Manual transmission:1.Drive into the car wash.2.Shift to neutral.3.Switch the engine off.4.Switch on the ignition.
Steptronic transmission:
1.Drive into the car wash.2.Engage selector lever position N.3.Make sure that the parking brake is re‐
leased.
4.Press the Start/Stop button to switch off the
engine.
In this way, the ignition remains switched
on, and two Check-Control messages are
displayed.
A signal sounds when you leave the vehicle
while in selector lever position N.
The vehicle cannot be locked from the outside
when in selector lever position N. A signal is
sounded when an attempt is made to lock the
vehicle.
To start the engine with manual transmission:
1.Press on the clutch pedal.2.Press the Start/Stop button.
To start the engine with Steptronic transmis‐
sion:
1.Depress the brake pedal.2.Press the Start/Stop button.
Headlights
▷Do not rub dry and do not use abrasive or
acidic cleansers.
▷Soak areas that have been dirtied e. g.,
from insects, with shampoo and wash off
with water.
▷Thaw ice with de-icing spray; do not use an
ice scraper.
After washing the vehicle
After washing the vehicle, apply the brakes
briefly to dry them; otherwise, braking action
can be reduced and corrosion of the brake
discs can occur.
Completely remove all residues on the win‐
dows, to minimize loss of visibility due to
smearing and to reduce wiper noises and wiper
blade wear.
Vehicle care
Car care products
The manufacturer of your vehicle recommends
using care and cleaning products from MINI.
WARNING
Cleansers can contain substances that are
dangerous and harmful to your health. There is
risk of injuries. When cleaning the interior, open
the doors or windows. Only use products in‐
tended for cleaning vehicles. Follow the instruc‐
tions on the container.◀
Vehicle paint
Regular care contributes to driving safety and
value retention. Environmental influences in
areas with elevated air pollution or natural con‐
taminants, such as tree resin or pollen can af‐
fect the vehicle's paintwork. Tailor the fre‐
quency and extent of your car care to these
influences.
Aggressive substances such as spilled fuel, oil,
grease or bird droppings must be removed im‐
mediately to prevent the finish from being al‐
tered or discolored.
Leather care
Remove dust from the leather often, using a
cloth or vacuum cleaner.
Otherwise, particles of dust and road grime
chafe in pores and folds, and lead to increased
Seite 222MOBILITYCare222
Online Edition for Part no. 01 40 2 964 571 - X/15
Page 224 of 246

microfiber cloth. Dampen cloth lightly with wa‐
ter.◀
Safety belts
Dirty belt straps impede the reeling action and
thus have a negative impact on safety.
WARNING
Chemical cleansers can destroy the safety
belt webbing. Missing protective effect of the
safety belts. There is risk of injuries or danger to
life. Use only a mild soapy solution for cleaning
the safety belts.◀
Use only a mild soapy solution, with the safety
belts clipped into their buckles.
Do not allow the switchs to retract the safety
belts until they are dry.
Carpets and floor mats
WARNING
Objects in the driver's floor area can limit
the pedal distance or block a depressed pedal.
There is risk of an accident. Stow objects in the
vehicle such that they are secured and cannot
enter into the driver's floor area. Use floor mats
that are suitable for the vehicle and can be
safely attached to the floor. Do not use loose
floor mats and do not layer several floor mats.
Make sure that there is sufficient clearance for
the pedals. Ensure that the floor mats are se‐
curely fastened again after they were removed,
for example for cleaning.◀
Floor mats can be removed from the car's inte‐
rior for cleaning.
If the floor carpets are very dirty, clean with a
microfiber cloth and water or a textile cleaner.
To prevent matting of the carpet, rub back and
forth in the direction of travel only.
Sensor/camera lenses
To clean sensors and camera lenses, use a cloth
moistened with a small amount of glass deter‐
gent.
Displays/Screens/Projection lenses
CAUTION
Chemical cleansers, moisture or fluids of
any kind can damage the surface of displays
and screens. There is risk of property damage.
Clean with a clean, antistatic microfiber cloth.◀
CAUTION
The surface of displays can be damaged
with improper cleaning. There is risk of prop‐
erty damage. Avoid pressure that is too high
and do not use any scratching materials.◀
Clean with a clean, antistatic microfiber cloth.
For stubborn soiling on the projection lens of
the Head-up Display, dampen the microfiber
cloth with alcohol. Extending projection lens,
refer to page 94.
Long-term
When the vehicle is shut down for longer than
three months, special measures must be taken.
Further information is available from a dealer’s
service center or another qualified service cen‐
ter or repair shop.
Seite 224MOBILITYCare224
Online Edition for Part no. 01 40 2 964 571 - X/15
Page 236 of 246
Everything from A to Z
Index
A
ABS, Antilock Brake Sys‐
tem 117
Acceleration Assistant, see
Launch Control 77
Accessories and parts 8
ACC, see camera-based cruise
control 121
Activated-charcoal filter 144
Active Cruise Control, see
camera-based cruise con‐
trol 121
Additives, oil 197
Adjustments, seats/head re‐
straints 50
Adjustments, steering
wheel 59
After washing vehicle 222
Airbags 101
Airbags, indicator/warning
light 102
Air circulation, see Recircu‐
lated-air mode 140, 143
Air conditioner 139
Air, dehumidifying, see Cool‐
ing function 140, 142
Air distribution,
manual 140, 143
Air flow, air conditioner 140
Air flow, automatic climate
control 143
Air pressure, tires 182
Air vents, see Ventilation 144
Alarm system 44
Alarm triggering 44
Alarm, unintentional 45
All around the center con‐
sole 16
All around the roofliner 17
All around the steering
wheel 14
All-season tires, see Winter
tires 188
Alternating-code hand-held
transmitter 147
Alternative oil types 197
Antifreeze, washer fluid 73
Antilock Brake System,
ABS 117
Anti-slip control, see DSC 117
App, MINI Motorer’s Guide 6
Approved axle load 229
Arrival time 89
Ash tray 150
Assistance when driving
off 120
Assist system, see Intelligent
Safety 110
AUTO intensity 143
Automatic car wash 221
Automatic climate con‐
trol 141
Automatic Curb Monitor 58
Automatic deactivation, Front-
seat passenger airbags 103
Automatic headlight con‐
trol 97
Automatic locking 44
Automatic recirculated-air
control 143
Automatic transmission with
Steptronic 75
AUTO program, automatic cli‐
mate control 142
AUTO program, intensity 143
Auto Start/Stop function 66
Average fuel consumption 89
Average speed 89
Axle loads, weights 229
B
Backrest curvature, see Lum‐
bar support 51, 52
Band-aids, see First-aid
kit 216
Battery replacement, vehicle
battery 214
Battery, vehicle 213
Being towed, see Tow-starting
and towing 217
Belts, safety belts 53
Beverage holder, cu‐
pholder 156
Bonus range, GREEN
Mode 171
Bottle holder, see Cu‐
pholder 156
Brake assistant 117
Brake discs, break-in 162
Brake pads, break-in 162
Braking, hints 163
Breakdown assistance 216
Break-in 162
Brightness of Control Dis‐
play 92
Bug light 205
Bulb replacement 204
Bulb replacement, front 205
Bulb replacement, rear 207
Bulb replacement, side 211
Bulbs and lights 204
Button, Start/Stop 64
Bypassing, see Jump-start‐
ing 216
C
California Proposition 65
Warning 8
Seite 236REFERENCEEverything from A to Z236
Online Edition for Part no. 01 40 2 964 571 - X/15
Page 238 of 246
Direction indicator, see Turn
signals 70
Display, electronic, instrument
cluster 80
Display, engine tempera‐
ture 89
Display lighting, see Instru‐
ment lighting 99
Displays 79
Displays, cleaning 224
Disposal, coolant 200
Disposal, vehicle battery 214
Distance control, see PDC 129
Distance to destination 89
Divided screen view, split
screen 23
Door lock, see Remote con‐
trol 34
Drive mode, GREEN
Mode 169
Drive-off assistant 120
Drive-off assistant, see
DSC 117
Driving Dynamics Control 119
Driving Excitement, SPORT 90
Driving instruction, GREEN
Mode 171
Driving instructions, break-
in 162
Driving mode 119
Driving notes, general 163
Driving stability control sys‐
tems 117
Driving style analysis 173
Driving tips 163
DSC Dynamic Stability Con‐
trol 117
DTC Dynamic Traction Con‐
trol 118
Dynamic Damping Con‐
trol 119
Dynamic Stability Control
DSC 117
Dynamic Traction Control
DTC 118
E
Electronic displays, instrument
cluster 80
Electronic oil measure‐
ment 195
Electronic Stability Program
ESP, see DSC 117
Emergency detection, remote
control 35
Emergency release, fuel filler
flap 178
Emergency start function, en‐
gine start 35
Emergency wheel, compact
wheel, see Emergency
wheel 212
Energy Control 85
Engine, automatic Start/Stop
function 66
Engine, automatic switch-
off 66
Engine compartment 193
Engine compartment, working
in 193
Engine coolant 199
Engine idling when driving,
coasting 172
Engine oil 195
Engine oil, adding 196
Engine oil additives 197
Engine oil change 197
Engine oil filler neck 196
Engine oil types, alterna‐
tive 197
Engine oil types, suitable 197
Engine start during malfunc‐
tion 35
Engine start, jump-start‐
ing 216
Engine start, see Starting the
engine 65
Engine stop 65
Engine temperature, dis‐
play 89
Entering a car wash 221
Equipment, interior 146
Error displays, see Check Con‐
trol 80
ESP Electronic Stability Pro‐
gram, see DSC 117
Exchanging wheels/tires 187
Exhaust system 163
Exterior mirror, automatic
dimming feature 58
Exterior mirrors 57
External start 216
External temperature dis‐
play 84
External temperature warn‐
ing 84
Eyes for securing cargo 166
F
Failure message, see Check
Control 80
False alarm, see Unintentional
alarm 45
Fan, see Air flow 140, 143
Favorites buttons, onboard
monitor 24
Filler neck for engine oil 196
Fine wood, care 223
First-aid kit 216
Flat tire, changing wheels 212
Flat Tire Monitor FTM 108
Flat tire, repairing 188
Flat tire, Tire Pressure Monitor
TPM 104
Flat tire, warning
lamp 105, 108
Flooding 163
Floor carpet, care 224
Floor mats, care 224
Fogged up windows 141
Folding back rear seat back‐
rests 153
Fold-out position, windshield
wipers 73
Foot brake 163
Front airbags 101
Seite 238REFERENCEEverything from A to Z238
Online Edition for Part no. 01 40 2 964 571 - X/15
Page 239 of 246
Front-end collision warning
with City Braking func‐
tion 111
Front fog lights 99
Front-seat passenger airbags,
automatic deactivation 103
Front-seat passenger airbags,
indicator lamp 103
FTM Flat Tire Monitor 108
Fuel 180
Fuel consumption, see Aver‐
age fuel consumption 89
Fuel filler flap 178
Fuel gauge 84
Fuel lid 178
Fuel quality 180
Fuel recommendation 180
Fuel, tank capacity 230
Fuse 214
G
Garage door opener, see Uni‐
versal Integrated Remote
Control 146
Gasoline 180
Gear change, Steptronic trans‐
mission 75
Gear shift indicator 86
General driving notes 163
Glare shield 150
Glass sunroof, refer to Panor‐
amic glass sunroof 47
Glove compartment 155
GREEN Mode 169
GREEN Mode, bonus
range 171
GREEN Mode driving style
analysis 173
GREEN Mode indicator 169
GREEN - program, driving dy‐
namics 119
GREEN tip 171
Gross vehicle weight, ap‐
proved 229
Ground clearance 164
H
Halogen headlights 205
Handbrake, see Parking
brake 68
Hand-held transmitter, alter‐
nating code 147
Hazard warning flashers 216
Head airbag 101
Headlight control, auto‐
matic 97
Headlight courtesy delay fea‐
ture 97
Headlight flasher 71
Headlight glass 204
Headlights, care 222
Head restraints 50
Head restraints, front 54
Head restraints, rear 55
Head-up Display 93
Head-up Display, standard
view 94
Heavy cargo, stowing 166
High-beam Assistant 98
High beams 71
High beams/low beams, see
High-beam Assistant 98
Hills 164
Hill start assistant, see Drive-
off assistant 120
Holder for beverages 156
Homepage 6
Hood 193
Horn 14
Hot exhaust system 163
HUD Head-up Display 93
Hydroplaning 163
I
Ice warning, see External tem‐
perature warning 84
Icy roads, see External tem‐
perature warning 84
Identification marks, tires 184
Identification number, see ve‐
hicle identification num‐
ber 10
Ignition key, see Remote con‐
trol 34
Ignition off 64
Ignition on 64
Illuminated ring, central in‐
strument cluster 92
Indication of a flat
tire 105, 108
Indicator lamp, see Check
Control 80
Individual air distribu‐
tion 140, 143
Individual settings, see Per‐
sonal Profile 36
Inflation pressure, tires 182
Inflation pressure warning,
tires 108
Info display, refer to On-Board
computer 88
Information 6
Initialize, Tire Pressure Moni‐
tor TPM 105
Initializing, Flat Tire Monitor
FTM 108
Instrument cluster 79
Instrument cluster, electronic
displays 80
Instrument lighting 99
Integrated key 34
Integrated Owner's Manual in
the vehicle 29
Intelligent Safety 110
Intensity, AUTO program 143
Interior equipment 146
Interior lights 99
Interior lights during unlock‐
ing 37
Interior lights with the vehicle
locked 38
Interior mirror, automatic
dimming feature 59
Interior mirror, manually dim‐
mable 59
Seite 239Everything from A to ZREFERENCE239
Online Edition for Part no. 01 40 2 964 571 - X/15
Page 241 of 246
MINI Motorer’s Guide app 6
Minimum tread, tires 186
Mirror memory 56
Mirrors 57
Mobile communication devi‐
ces in the vehicle 163
Mobility System 189
Mode, GREEN Mode 169
Modifications, technical, refer
to Own Safety 7
Moisture in headlight 204
Monitor, refer to Control Dis‐
play 18
Mounting of child restraint
systems 61
Multifunction steering wheel,
buttons 14
Multimedia, refer to
Integrated Owner's Manual
N
Navigation, refer to Integrated
Owner's Manual
Neck restraints, front, see
Head restraints 54
Neck restraints, rear, see
Head restraints 55
New wheels and tires 187
No-touch opening of the split
doors 42
O
OBD Onboard Diagnos‐
tics 202
Obstacle marking, rearview
camera 133
Octane rating, see Recom‐
mended fuel grade 180
Odometer 84
Office, refer to Integrated
Owner's Manual
Oil 195
Oil, adding 196
Oil additives 197
Oil change 197
Oil change interval, service re‐
quirements 85
Oil filler neck 196
Oil types, alternative 197
Oil types, suitable 197
Old batteries, disposal 214
On-board computer 88
On-board computer, refer to
On-board computer 88
Onboard Diagnostics
OBD 202
Onboard monitor 18
Onboard monitor operating
concept 18
Onboard vehicle tool kit 203
Opening/closing via door
lock 39
Opening/closing with remote
control 37
Open the split doors with no-
touch activation 42
Operating menus, onboard
monitor 18
Optional equipment, standard
equipment 7
Outside air, see Automatic re‐
circulated-air control 143
Own safety 7
P
Paint, vehicle 222
Panoramic glass sunroof 47
Parallel parking assistant 134
Park Distance Control
PDC 129
Parked-car ventilation 144
Parked vehicle, condensa‐
tion 164
Parking aid, see PDC 129
Parking assistant 134
Parking brake 68
Parking lights 96
Parts and accessories 8
Passenger side mirror, tilting
downward 58
Pathway lines, rearview cam‐
era 133
PDC Park Distance Con‐
trol 129
Performance Control 118
Personal Profile 36
Person warning with City light
braking function 114
Phone, refer to Integrated
Owner's Manual
Pinch protection system, glass
sunroof 48
Pinch protection system, win‐
dows 46
Plastic, care 223
PostCrash 116
Power failure 214
Power windows 46
Prescribed engine oil
types 197
Pressure, tire air pressure 182
Pressure warning, tires 108
Profile, see Personal Pro‐
file 36
Protective function, glass sun‐
roof 48
Protective function, win‐
dows 46
Push-and-turn switch, see
Controller 19
R
Radiator fluid 199
Radio-operated key, see Re‐
mote control 34
Radio ready state 64
Radio, refer to Integrated
Owner's Manual
Rain sensor 72
Rear fog lights 99
Rear lights 207
Rearview camera 132
Rearview mirror 57
Seite 241Everything from A to ZREFERENCE241
Online Edition for Part no. 01 40 2 964 571 - X/15