Led MINI COOPER 2012 Owners Manual
[x] Cancel search | Manufacturer: MINI, Model Year: 2012, Model line: COOPER, Model: MINI COOPER 2012Pages: 207, PDF Size: 3.18 MB
Page 5 of 207
Notes
4
Notes
Using this Owner's
Manual
We have tried to make all the information in this
Owner's Manual easy to find. The fastest way to
find specific topics is to refer to the detailed
index at the back of the manual. If you wish to
gain an initial overview of your vehicle, you will
find this in the first chapter.
Should you wish to sell yo ur MINI at some time in
the future, remember to hand over this Owner's
Manual to the new owner; it is an important part
of the vehicle.
Additional sources of information
Should you have any other questions, your MINI
dealer will be glad to advise you at any time.
You can find more information about the MINI,
for example on its technology, on the Internet at
www.MINI.com.
Symbols used
Indicates precautions that must be
followed precisely in order to avoid the
possibility of personal injury and serious
damage to the vehicle. <
Indicates information that will assist you in
gaining the optimum benefit from your
vehicle and enable you to care more effectively
for your vehicle. <
Refers to measures that can be taken to
help protect the environment. <
< Marks the end of a specific item of informa-
tion.
"..." Identifies radio display texts used to select
individual functions.
Symbols on vehicle components
Indicates that you should consult the rele-
vant section of this Owner's Manual for
information on a particular part or assembly.
Vehicle equipment
The manufacturer of your MINI is the Bayerische
Motoren Werke Aktien gesellschaft, BMW AG.
This Owner's Manual describes all models as well
as all production, country and special equip-
ment that is offered in the model range. Equip-
ment is also described that is not available
because of, for example, selected options or
country version. This also applies to safety
related functions and systems. For equipment
and models that are not described in this
Owner's Manual, please see the supplementary
Owner's Manuals that are provided.
Status of this Owner's
Manual at time of
printing
The high level of safety and quality of the MINI
vehicles is ensured through continuous develop-
ment. In rare cases, there may be differences
between the description and the vehicle.
For your safety
Maintenance and repair
Advanced technology, e.g. the use of
modern materials and high-performance
electronics, requires specially adapted mainte-
nance and repair methods. Therefore, have the
necessary work on your MI NI only carried out by
a MINI dealer or a work shop that has specially
trained personnel workin g in accordance with
Online Edition for Part no. 01 40 2 914 744 - \251 07/12 BMW AG
Page 6 of 207
Notes
5
the specifications of the MINI manufacturer. If
this work is not carried out properly, there is a
danger of subsequent damage and related
safety hazards.<
Parts and accessories
For your own safety, use genuine parts
and accessories approved by the manu-
facturer of the MINI.
When you purchase accessories tested
and approved by the manufacturer of the MINI
and Original MINI Parts, you simultaneously
acquire the assurance that they have been thor-
oughly tested by the manufacturer of the MINI
to ensure optimum performance when installed
on your vehicle.
The manufacturer of the MINI warrants these
parts to be free from defects in material and
workmanship.
The manufacturer of the MINI will not accept any
liability for damage result ing from installation of
parts and accessories not approved by the
manufacturer of the MINI.
The manufacturer of the MINI cannot test every
product made by other manufacturers to verify
if it can be used on a MINI safely and without risk
to either the vehicle, its operation, or its occu-
pants.
Original MINI Parts, MINI Accessories and other
products approved by the manufacturer of the
MINI, together with professional advice on using
these items, are available from all MINI dealers.
Installation and operation of accessories that
have not been approved by the manufacturer of
your MINI, such as alarms, radios, amplifiers,
radar detectors, wheels, suspension compo-
nents, brake dust shield s, telephones, including
operation of any mobile phone from within the
vehicle without using an externally mounted
antenna, or transceiver equipment, for instance,
CBs, walkie-talkies, ham radios or similar acces-
sories, may cause extensiv e damage to the vehi-
cle, compromise its safe ty, interfere with the
vehicle's electrical s y s t e m o r a f f e c t t h e v a l i d i t y o f the MINI Limited Warranty. See your MINI dealer
for additional information.
<
Maintenance, replacement, or repair of
the emission control devices and systems
may be performed by any automotive repair
establishment or individu al using any certified
automotive part. <
California Proposition 65 warning
California law requires us to issue the following
warning:
Engine exhaust and a wide variety of
automobile components and parts,
including components foun d in the interior fur-
nishings in a vehicle, contain or emit chemicals
known to the State of California to cause cancer
and birth defects and reproductive harm. In
addition, certain fluids co ntained in vehicles and
certain products of component wear contain or
emit chemicals known to the State of California
to cause cancer and birth defects or other repro-
ductive harm.
Battery posts, terminals and related accessories
contain lead and lead compounds. Wash your
hands after handling.
Used engine oil contains chemicals that have
caused cancer in laboratory animals. Always
protect your skin by washing thoroughly with
soap and water.<
Service and warranty
We recommend that you read this publication
thoroughly.
Your MINI is covered by the following warran-
ties:
> New Vehicle Limited Warranty
> Rust Perforation Limited Warranty
> Federal Emissions System Defect Warranty
> Federal Emissions Performance Warranty
> California Emission Control System Limited
Warranty
Online Edition for Part no. 01 40 2 914 744 - \251 07/12 BMW AG
Page 7 of 207
Notes
6
Detailed information about these warranties is
listed in the Service and Warranty Information
Booklet for US models or in the Warranty and
Service Guide Booklet for Canadian models.
Your vehicle has been specifically adapted and
designed to meet the particular operating con-
ditions and registration requirements in your
country and continental region in order to
deliver the full driving pleasure while the vehicle
is operated under those conditions. If you wish
to operate your vehicle in another country or
region, you may be requ ired to adapt your
vehicle to meet different prevailing operating
conditions and registration requirements. You
should also be aware of any applicable warranty
limitations or exclusions for such country or
region. In such a case, please contact Customer
Relations for further information.
Maintenance
Maintain the vehicle regularly to sustain road
safety, operational reliability and the New
Vehicle Limited Warranty.
Specifications for required maintenance mea-
sures:
> MINI Maintenance System
> Service and Warranty Information Booklet
for US models
> Warranty and Service Guide Booklet for
Canadian models
If the vehicle is not ma intained according to
these specifications, this could result in serious
damage to the vehicle. Such damage is not cov-
ered by the MINI New Vehicle Limited Warranty.
Data memory
A variety of electronic components in your vehi-
cle include data storage devices, which store
technical information on the condition of your
vehicle, events and errors, either temporarily or
permanently. In general, this technical informa-
tion documents the condition of a component, a
module, a system or the surroundings: >
Operating conditions of system compo-
nents, e.g., fill levels.
> Status messages regarding the vehicle and
of its individual comp onents, such as wheel
rpm/vehicle speed, response delay, lateral
acceleration.
> Malfunctions and defects in the major
system components, such as the lights and
brakes.
> Responses of the vehicle in special driving
situations, such as th e deployment of an
airbag, the utilization of stability control
systems.
> Environmental conditio ns, such as tempera-
ture.
These data are exclusively of a technical nature
and are used for the detection and correction of
errors, as well as the optimization of vehicle
functions. Motion profiles of traveled routes can
not be deduced from these data. If services are
required, such as repair services, service pro-
cesses, warranty claims an d quality assurance,
then this technical info rmation can be read out
by employees of service departments, including
the manufacturer, from the event and error data
storage devices by usin g special diagnostic
equipment. There, if necessary, you will receive
further information. Afte r remedying an error,
the information in the error memory is deleted
or progressively overwritten.
When using the vehicle, situations are conceiv-
able in which this techni cal data, in conjunction
with other information, su ch as accident reports,
vehicle damage, witness statements, etc. - pos-
sibly with the assistance of an expert - could be
traced to particular individuals. Additional func-
tions that are agreed upon contractually with
the customer, such as vehi cle tracking in case of
emergency, permit the transmission of certain
vehicle data from the vehicle.
Online Edition for Part no. 01 40 2 914 744 - \251 07/12 BMW AG
Page 13 of 207
AT A GLANCECockpit
12
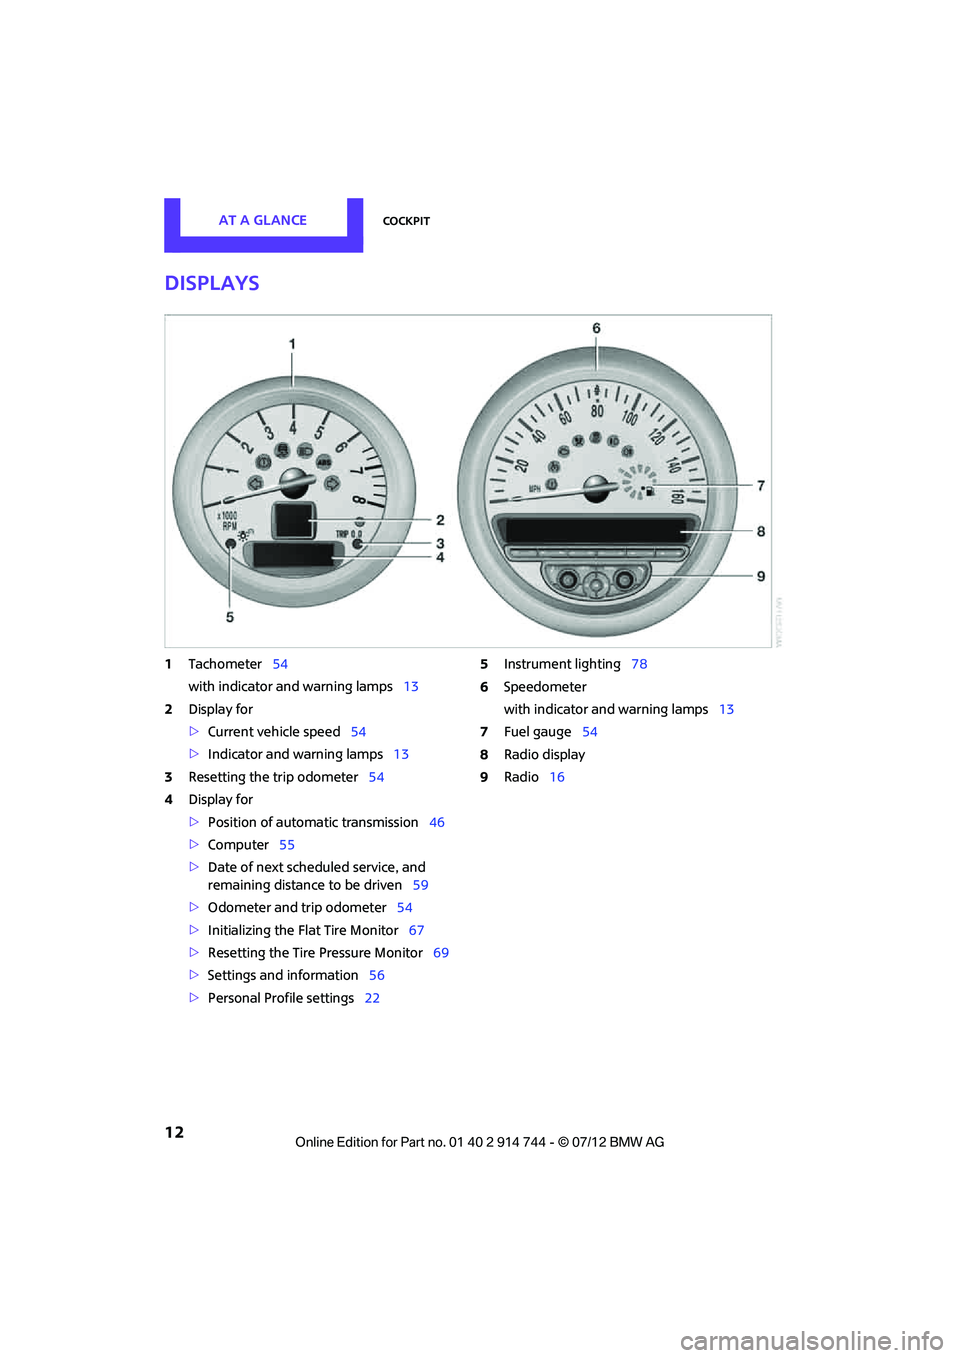
Displays
1Tachometer 54
with indicator and warning lamps 13
2 Display for
>Current vehicle speed 54
> Indicator and warning lamps 13
3 Resetting the trip odometer 54
4 Display for
>Position of automatic transmission 46
> Computer 55
> Date of next scheduled service, and
remaining distance to be driven 59
> Odometer and trip odometer 54
> Initializing the Fl at Tire Monitor 67
> Resetting the Tire Pressure Monitor 69
> Settings and information 56
> Personal Prof ile settings22 5
Instrument lighting 78
6 Speedometer
with indicator and warning lamps 13
7 Fuel gauge 54
8 Radio display
9 Radio 16
Online Edition for Part no. 01 40 2 914 744 - \251 07/12 BMW AG
Page 18 of 207
RadioAT A GLANCE
17
5Changing stations, tracks
>Changing stations
> Changing tracks on the CD player
6 Display
7 Selecting functions
>Turn: to select menu items or set values
> Press: to confirm selection or store
settings
8 Establishing/ending voice connections
9 Calling up settings menu
10 Selecting frequency manually
11 CD slot
12 Ejecting CD
Menu navigation
Radio and telephone functions can be called up
by using the buttons on the radio and menus.
Calling up settings menu
Press the MENU button
> Settings
> Computer
> MINI phone numbers
> Telephone
Calling up the audio menu
Press the MODEbutton
> Radio
> HD Radio
> Satellite radio
> CD player
> External audio devi ce, e.g., MP3 player
> USB audio interface
Selecting a menu item
Menu items can be selected by using the knob
on the right, the MODEbutton or function
buttons.
Using the knob on the right
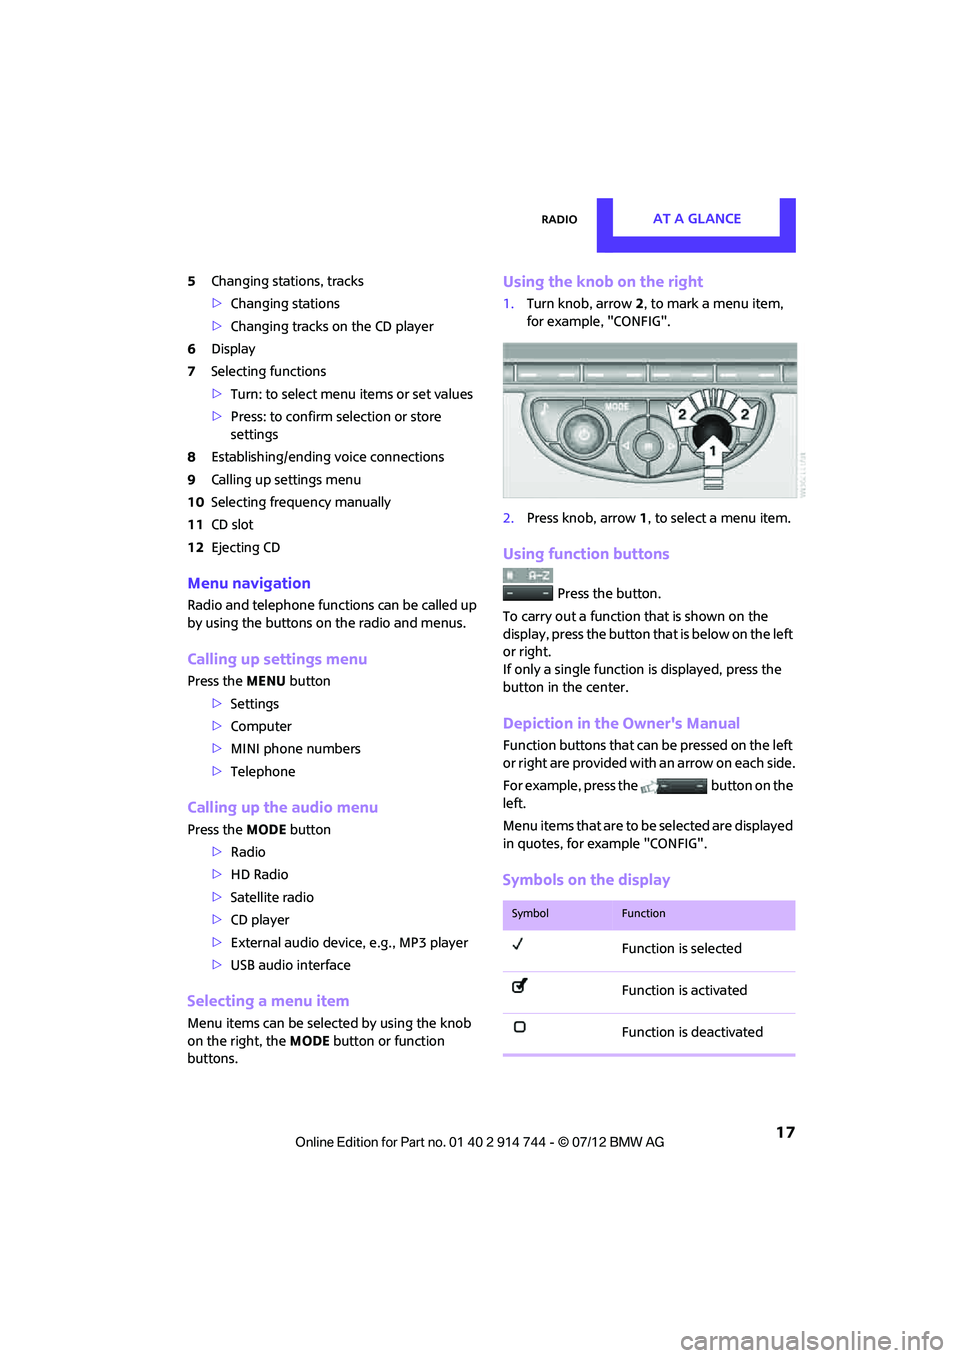
1. Turn knob, arrow 2, to mark a menu item,
for example, "CONFIG".
2. Press knob, arrow 1, to select a menu item.
Using function buttons
Press the button.
To carry out a function that is shown on the
display, press the button that is below on the left
or right.
If only a single function is displayed, press the
button in the center.
Depiction in the Owner's Manual
Function buttons that can be pressed on the left
or right are provided with an arrow on each side.
For example, press the button on the
left.
Menu items that are to be selected are displayed
in quotes, for example "CONFIG".
Symbols on the display
SymbolFunction
Function is selected
Function is activated
Function is deactivated
Online Edition for Part no. 01 40 2 914 744 - \251 07/12 BMW AG
Page 23 of 207
CONTROLSOpening and closing
22
Opening and closing
Vehicle equipment
In this chapter, all production, country, and
optional equipment that is offered in the model
range is described. Equipment is also described
that is not available because of, for example,
selected options or coun try version. This also
applies to safety relate d functions and systems.
Keys/remote controls
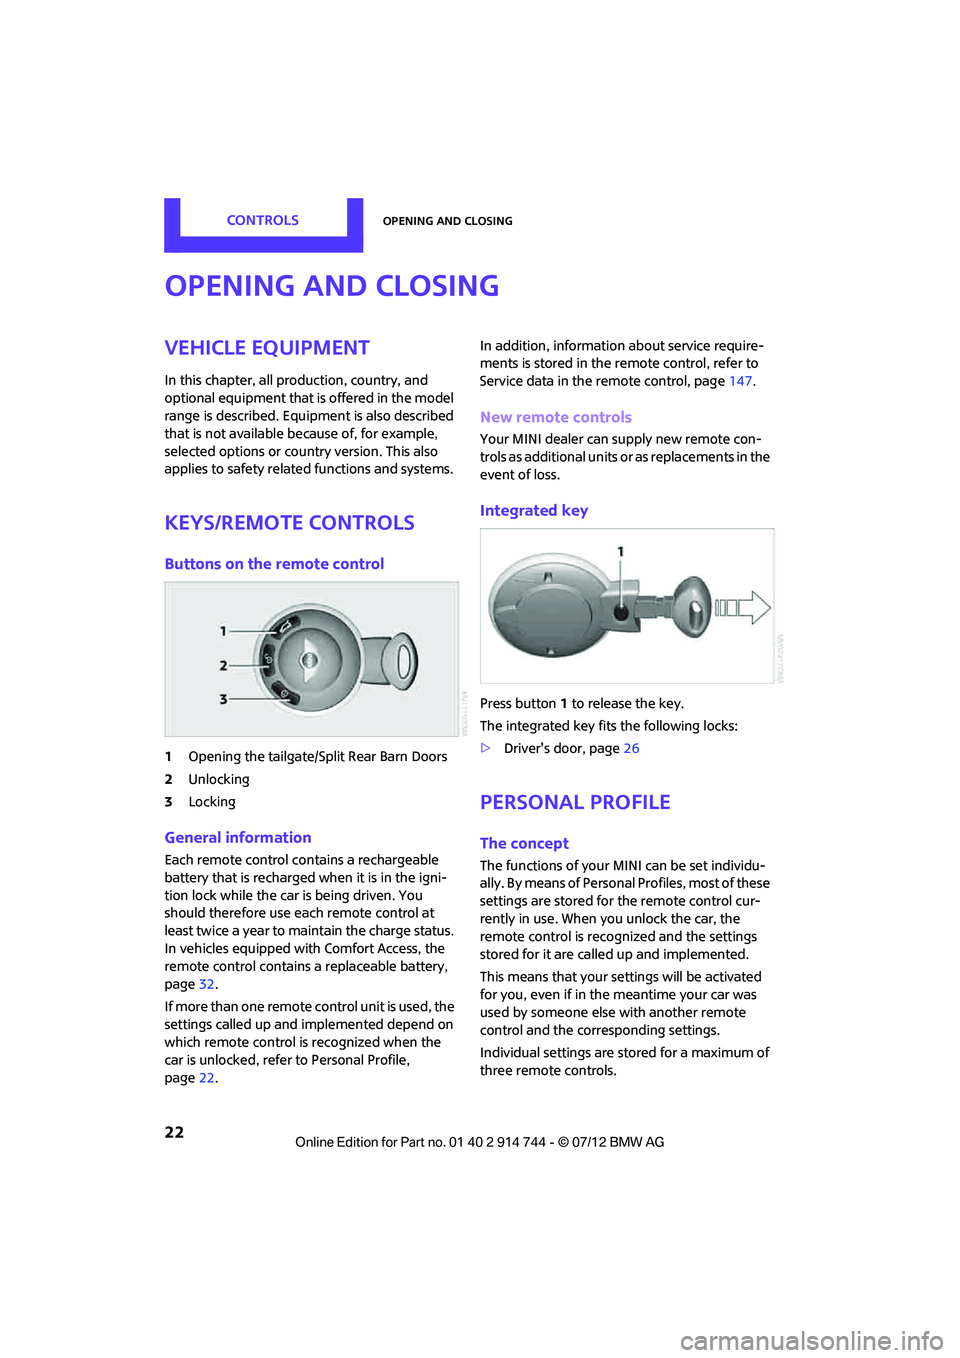
Buttons on the remote control
1Opening the tailgate/Split Rear Barn Doors
2 Unlocking
3 Locking
General information
Each remote control co ntains a rechargeable
battery that is recharged when it is in the igni-
tion lock while the car is being driven. You
should therefore use each remote control at
least twice a year to maintain the charge status.
In vehicles equipped with Comfort Access, the
remote control contains a replaceable battery,
page 32.
If more than one remote control unit is used, the
settings called up and implemented depend on
which remote control is recognized when the
car is unlocked, refer to Personal Profile,
page 22. In addition, information about service require-
ments is stored in the remote control, refer to
Service data in the remote control, page
147.
New remote controls
Your MINI dealer can supply new remote con-
trols as additional units or as replacements in the
event of loss.
Integrated key
Press button1 to release the key.
The integrated key fits the following locks:
> Driver's door, page 26
Personal Profile
The concept
The functions of your MINI can be set individu-
ally. By means of Personal Profiles, most of these
settings are stored for the remote control cur-
rently in use. When you unlock the car, the
remote control is recognized and the settings
stored for it are called up and implemented.
This means that your settings will be activated
for you, even if in the meantime your car was
used by someone else with another remote
control and the corresponding settings.
Individual settings are stored for a maximum of
three remote controls.
Online Edition for Part no. 01 40 2 914 744 - \251 07/12 BMW AG
Page 25 of 207
CONTROLSOpening and closing
24
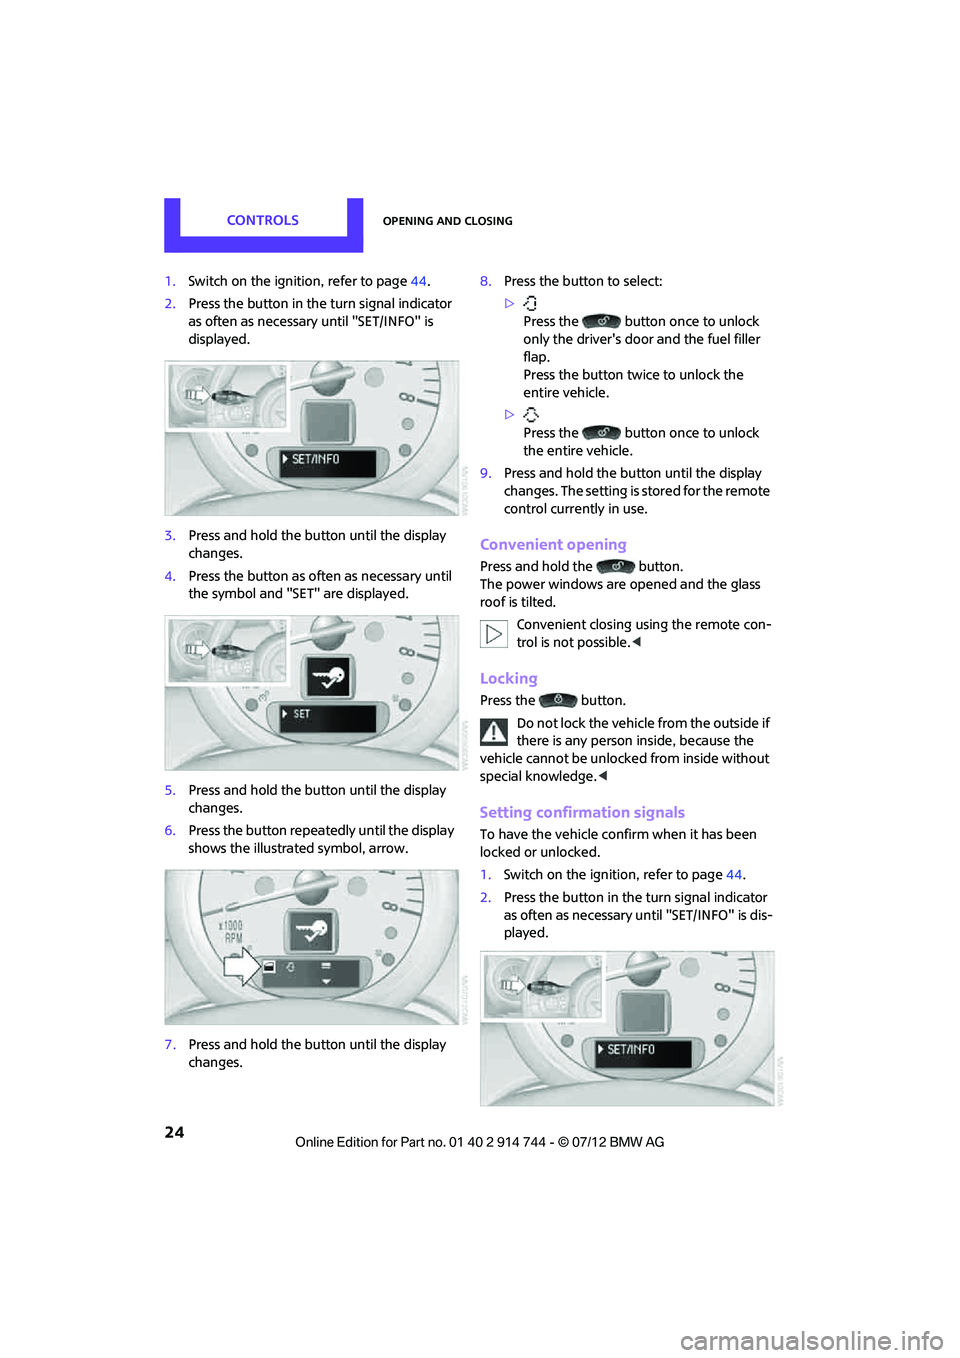
1.Switch on the ignition, refer to page 44.
2. Press the button in the turn signal indicator
as often as necessary until "SET/INFO" is
displayed.
3. Press and hold the button until the display
changes.
4. Press the button as often as necessary until
the symbol and "SET" are displayed.
5. Press and hold the button until the display
changes.
6. Press the button repeatedly until the display
shows the illustra ted symbol, arrow.
7. Press and hold the button until the display
changes. 8.
Press the button to select:
>
Press the button once to unlock
only the driver's door and the fuel filler
flap.
Press the button twice to unlock the
entire vehicle.
> Press the button once to unlock
the entire vehicle.
9. Press and hold the button until the display
changes. The setting is stored for the remote
control currently in use.
Convenient opening
Press and hold the button.
The power windows are opened and the glass
roof is tilted.
Convenient closing using the remote con-
trol is not possible. <
Locking
Press the button.
Do not lock the vehicle from the outside if
there is any person inside, because the
vehicle cannot be unlocked from inside without
special knowledge. <
Setting confirmation signals
To have the vehicle confirm when it has been
locked or unlocked.
1.Switch on the ignition, refer to page 44.
2. Press the button in the turn signal indicator
as often as necessary until "SET/INFO" is dis-
played.
Online Edition for Part no. 01 40 2 914 744 - \251 07/12 BMW AG
Page 27 of 207

CONTROLSOpening and closing
26
Rules. Operation is subject to the following two
conditions:
>This device must not cause harmful inter-
ference, and
> This device must accept any interference
received, including in terference that may
cause undesired operation.
Any unauthorized modifications or
changes to these devices could void the
user's authority to operate this equipment. <
Using the door lock
You can set which parts of the car are unlocked,
page23.
Depending upon the equipment, it is possible
that only the driver's side door is unlocked or
locked using the door lock. Do not lock the vehicle from the outside if
there is any person inside, because the
vehicle cannot be unlocked from inside without
special knowledge. <
Locking doors and tailgate together
To lock all doors, the fuel filler flap, and the tail-
gate/Split Rear Barn Doors together:
1.With the doors closed, press the interior
central locking button, page 26, to lock the
vehicle.
2. Unlocking and opening the driver or passen-
ger door, page 26.
3. Locking the vehicle:
>Lock the driver's door with the integrated
key via the door lock, or >
press the safety lock button on the pas-
senger's door and close the door from
the outside.
Manual operation
In the event of an electrical malfunction, the
driver's door can be unlocked or locked by
turning the integrated key in the door lock to the
end positions.
Opening and closing:
from inside
The switch locks or unlocks the doors and tail-
gate/Split Rear Barn Doors when the doors are
closed, but the anti-theft system is not activated.
The fuel filler flap remains unlocked.
Unlocking and opening
> Either unlock the doors together using the
switch for the central locking system and
then pull the door handle above the armrest
or
> pull on the door handle of either door twice:
the first time unlocks the door, the second
time opens it.
Locking
>Press the switch or
> press down the safety lock button of a door.
To prevent you from being locked out, the
open driver's door cannot be locked using
the lock button.
Online Edition for Part no. 01 40 2 914 744 - \251 07/12 BMW AG
Page 31 of 207
CONTROLSOpening and closing
30
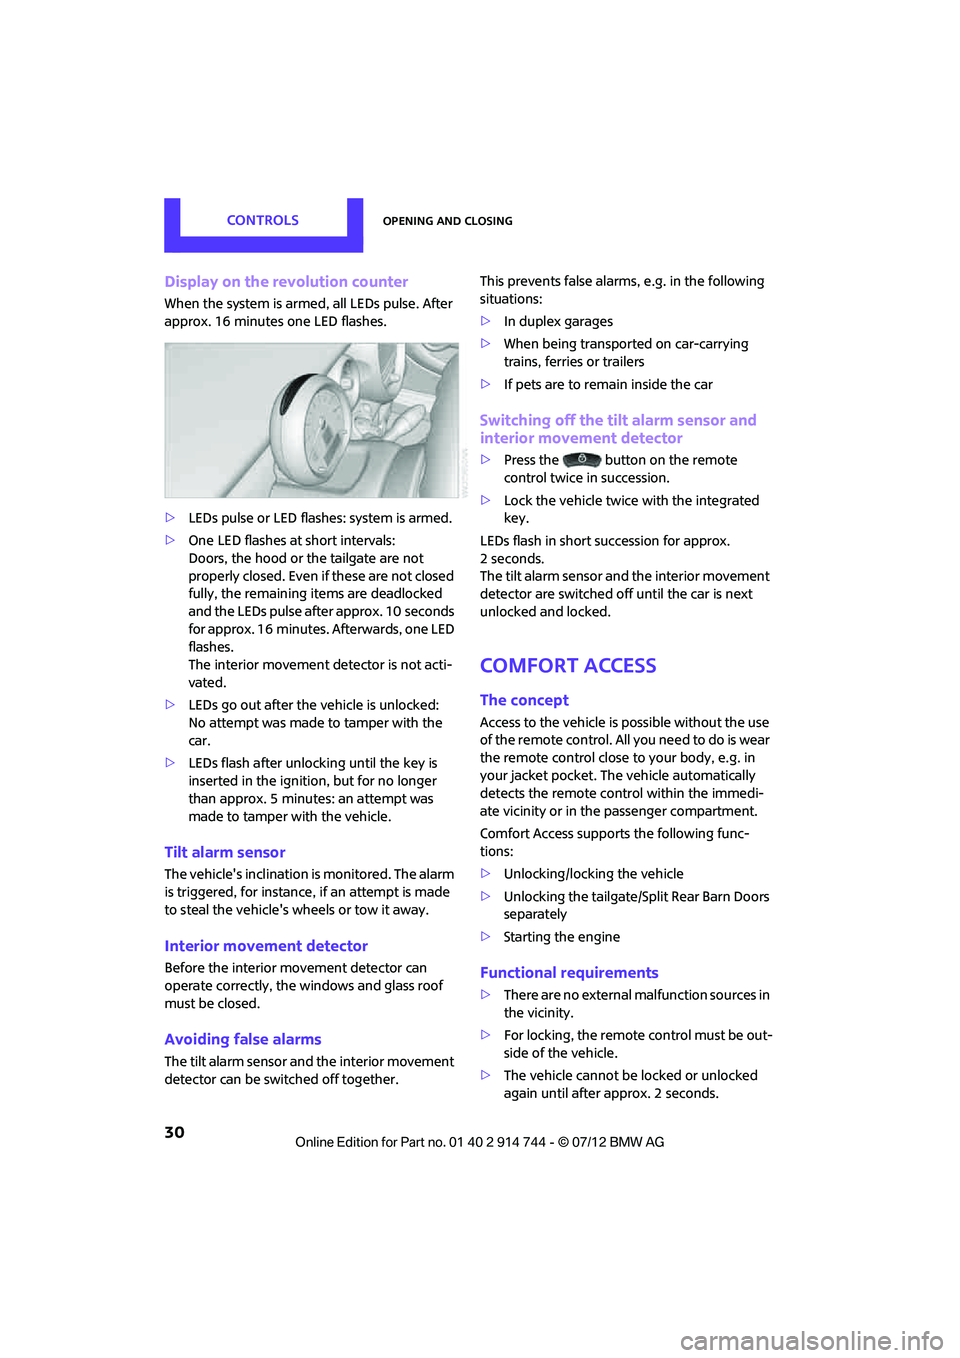
Display on the revolution counter
When the system is armed, all LEDs pulse. After
approx. 16 minutes one LED flashes.
>LEDs pulse or LED flashes: system is armed.
> One LED flashes at short intervals:
Doors, the hood or the tailgate are not
properly closed. Even if these are not closed
fully, the remaining items are deadlocked
and the LEDs pulse after approx. 10 seconds
for approx. 16 minutes. Afterwards, one LED
flashes.
The interior movement detector is not acti-
vated.
> LEDs go out after the vehicle is unlocked:
No attempt was made to tamper with the
car.
> LEDs flash after unlocking until the key is
inserted in the ignition, but for no longer
than approx. 5 minutes: an attempt was
made to tamper with the vehicle.
Tilt alarm sensor
The vehicle's inclination is monitored. The alarm
is triggered, for instance, if an attempt is made
to steal the vehicle's wheels or tow it away.
Interior movement detector
Before the interior movement detector can
operate correctly, the windows and glass roof
must be closed.
Avoiding false alarms
The tilt alarm sensor and the interior movement
detector can be switched off together. This prevents false alarms, e.g. in the following
situations:
>
In duplex garages
> When being transported on car-carrying
trains, ferries or trailers
> If pets are to remain inside the car
Switching off the tilt alarm sensor and
interior movement detector
>Press the button on the remote
control twice in succession.
> Lock the vehicle twice with the integrated
key.
LEDs flash in short succession for approx.
2seconds.
The tilt alarm sensor and the interior movement
detector are switched off until the car is next
unlocked and locked.
Comfort Access
The concept
Access to the vehicle is possible without the use
of the remote control. All you need to do is wear
the remote control close to your body, e.g. in
your jacket pocket. The vehicle automatically
detects the remote control within the immedi-
ate vicinity or in the passenger compartment.
Comfort Access support s the following func-
tions:
> Unlocking/locking the vehicle
> Unlocking the tailgate/S plit Rear Barn Doors
separately
> Starting the engine
Functional requirements
>There are no external malfunction sources in
the vicinity.
> For locking, the remote control must be out-
side of the vehicle.
> The vehicle cannot be locked or unlocked
again until after approx. 2 seconds.
Online Edition for Part no. 01 40 2 914 744 - \251 07/12 BMW AG
Page 36 of 207
AdjustmentsCONTROLS
35
Adjustments
Vehicle equipment
In this chapter, all production, country, and
optional equipment that is offered in the model
range is described. Equipment is also described
that is not available because of, for example,
selected options or count ry version. This also
applies to safety related functions and systems.
Sitting safely
The ideal sitting positi on can make a vital
contribution to relaxed, fatigue-free driving. In
conjunction with the safety belts, the head
restraints and the airbags, the seated position
has a major influence on yo ur safety in the event
of an accident. To ensure that the safety systems
operate with optimal efficiency, we strongly
urge you to observe the instructions contained
in the following section.
For additional information on transporting
children safely, refer to page 41.
Airbags
Always maintain an adequate distance
between yourself and the airbags. Always
grip the steering wheel on the rim, with your
hands in the 3 o'clock and 9 o'clock positions, to
minimize the risk of inju ry to the hands or arms
in the event of the airbag being deployed.
No one and nothing should come between the
airbags and the seat occupant.
Do not use the cover of the front airbag on the
front passenger side as a storage area. Ensure
that the front passenger is correctly seated, e.g.
that no feet or legs are propped against the
dashboard. Otherwise, leg injury could result if
the front airbag suddenly deployed.
Make sure that passeng ers keep their heads
away from the side airbag and do not lean
against the cover of the head airbag; otherwise injuries can occur when the airbags are
deployed.
<
Even if you follow all the instructions, injuries
resulting from contact with airbags cannot be
fully excluded, depending on the circumstances.
The ignition and inflation noise may provoke a
mild hearing loss in ex tremely sensitive indivi-
duals. This effect is usually only temporary.
For airbag locations as well as additional infor-
mation, refer to page 72.
Head restraint
A correctly adjusted head restraint reduces the
risk of neck injury in the event of an accident.
Adjust the head rest raint in such a way
that its center is at approx. ear level.
Otherwise, there is an increased risk of injury in
the event of an accident. <
Head restraints, refer to page 37.
Safety belt
Before every drive, make sure that all occupants
wear their safety belts. Airbags complement the
safety belt as an additi onal safety device, but
they do not represent a substitute.
Number of safety belts
Never allow more th an one person to
wear a single safety belt. Never allow
infants or small children to ride in a passenger's
lap.
Make sure that the belt in the lap area sits low
across the hips and does not press against the
abdomen. The safety belt must not rest against
the throat, run across sh arp edges, pass over
hard or fragile objects or be pinched. Fasten the
safety belt so that it is pulled taut across the lap
and shoulder, fitting the body snugly without
any twists. Otherwise, the belt could slide over
the hips in the event of a frontal collision and
injure the abdomen. Avoid wearing bulky
Online Edition for Part no. 01 40 2 914 744 - \251 07/12 BMW AG