height MINI Hardtop 2 Door 2005 Owner's Manual
[x] Cancel search | Manufacturer: MINI, Model Year: 2005, Model line: Hardtop 2 Door, Model: MINI Hardtop 2 Door 2005Pages: 165, PDF Size: 2.32 MB
Page 44 of 165
42
SEAT ADJUSTMENTImportant adjustment information
Never try to adjust your seat while operating the vehicle. The seat could
respond with an unexpected movement,
and the ensuing loss of vehicle control
could lead to an accident.
While driving, do not recline the backrest
too far toward the rear. This especially
applies to the front passenger side. If you
do so, there is a risk that you will slide
under the safety belt in an accident, thus
reducing the protection provided by the
safety belt.<
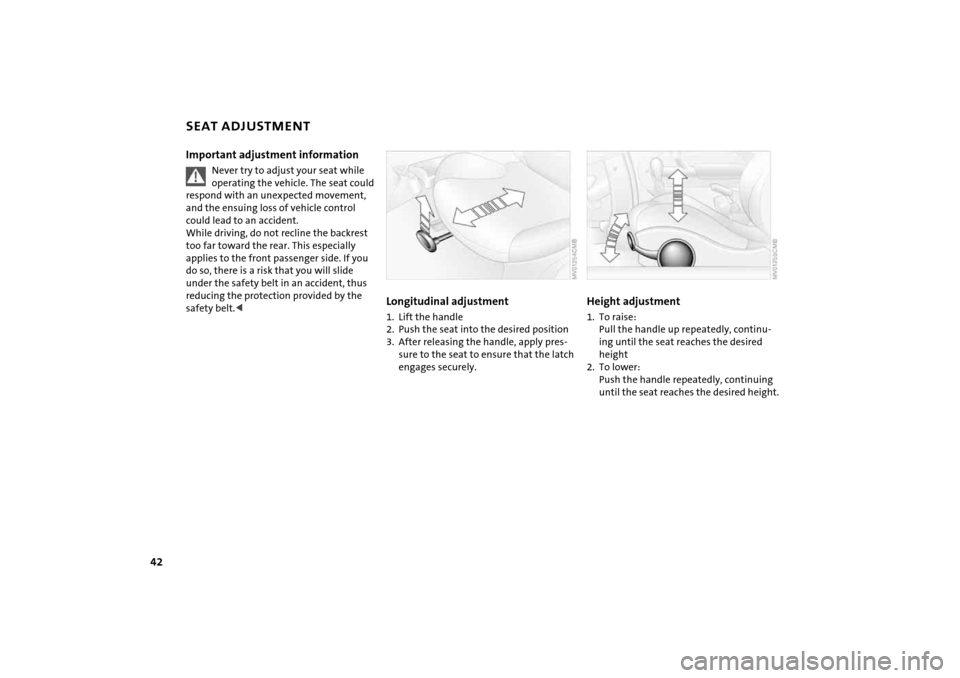
Longitudinal adjustment1. Lift the handle2. Push the seat into the desired position3. After releasing the handle, apply pres
-
sure to the seat to ensure that the latch
engages securely.
Height adjustment 1. To raise:
Pull the handle up repeatedly, continu
-
ing until the seat reaches the desired
height
2. To lower:
Push the handle repeatedly, continuing
until the seat reaches the desired height.
Page 45 of 165
43
OVERVIEW REPAIRS OPERATIONCONTROLS DATA INDEX
SEAT ADJUSTMENT
HEAD RESTRAINTS
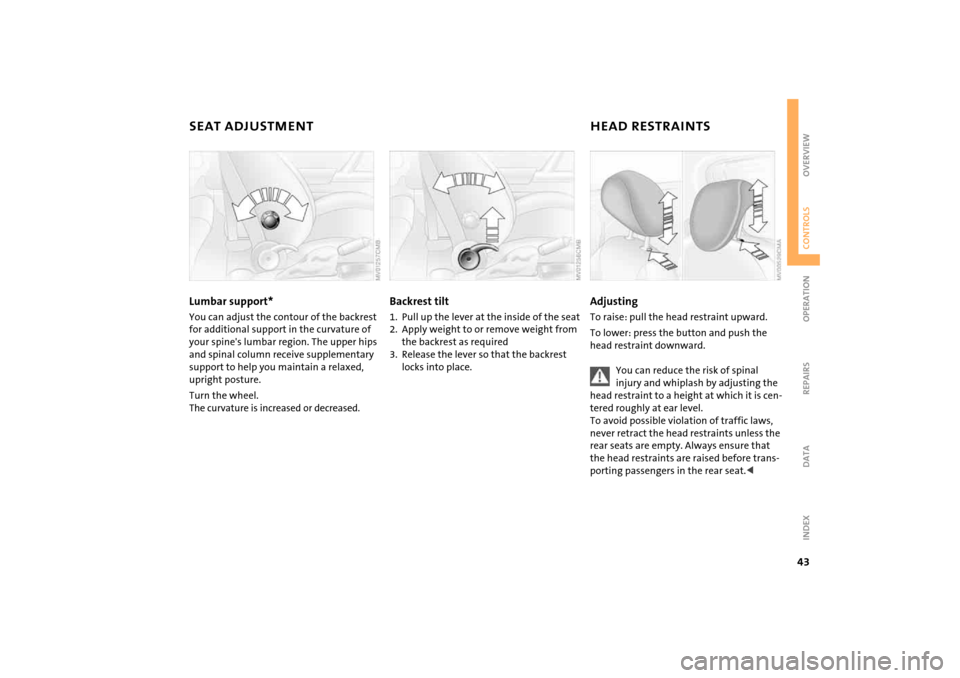
Lumbar support* You can adjust the contour of the backrest
for additional support in the curvature of
your spine's lumbar region. The upper hips
and spinal column receive supplementary
support to help you maintain a relaxed,
upright posture. Turn the wheel.
The curvature is increased or decreased.
Backrest tilt 1. Pull up the lever at the inside of the seat2. Apply weight to or remove weight from
the backrest as required3. Release the lever so that the backrest
locks into place.
AdjustingTo raise: pull the head restraint upward.To lower: press the button and push the
head restraint downward.
You can reduce the risk of spinal injury and whiplash by adjusting the
head restraint to a height at which it is cen
-
tered roughly at ear level.
To avoid possible violation of traffic laws,
never retract the head restraints unless the
rear seats are empty. Always ensure that
the head restraints are raised before trans
-
porting passengers in the rear seat.<
Page 47 of 165
45
OVERVIEW REPAIRS OPERATIONCONTROLS DATA INDEX
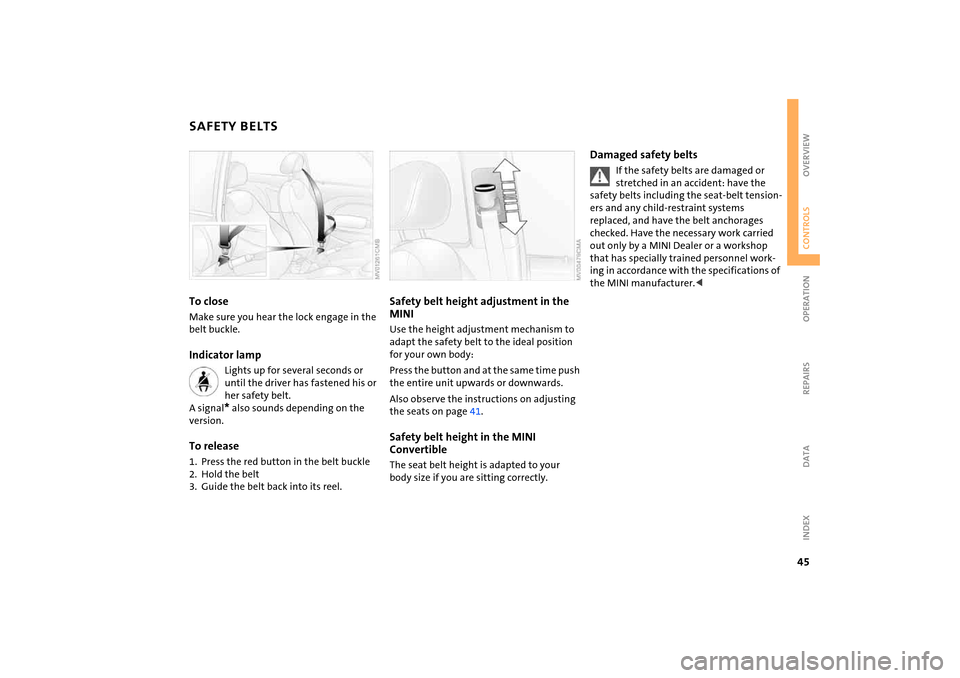
SAFETY BELTS To closeMake sure you hear the lock engage in the
belt buckle.Indicator lamp
Lights up for several seconds or until the driver has fastened his or
her safety belt.
A signal
* also sounds depending on the
version.
To release1. Press the red button in the belt buckle2. Hold the belt3. Guide the belt back into its reel.
Safety belt height adjustment in the MINI Use the height adjustment mechanism to
adapt the safety belt to the ideal position
for your own body:Press the button and at the same time push
the entire unit upwards or downwards.Also observe the instructions on adjusting
the seats on page
41.
Safety belt height in the MINI
Convertible The seat belt height is adapted to your
body size if you are sitting correctly.
Damaged safety belts
If the safety belts are damaged or stretched in an accident: have the
safety belts including the seat-belt tension
-
ers and any child-restraint systems
replaced, and have the belt anchorages
checked. Have the necessary work carried
out only by a MINI Dealer or a workshop
that has specially trained personnel work
-
ing in accordance with the specifications of
the MINI manufacturer.<
Page 50 of 165
48
VEHICLE MEMORY
TRANSPORTING CHILDREN SAFELY
>Setting units for outside temperature
and fuel consumption display, refer to
page
66
>Setting units for display of temperatures
specified for automatic climate control
system, refer to page
80
>Volume control PDC, refer to page
74
>Acoustic alarm for starting PDC activa
-
tion, refer to page
74.
This symbol alerts you to Vehicle Memory functions in the Owner's
Manual.
ate slightly differently from the descrip
-
tions used in this Owner's Manual. If you
decide to sell your vehicle one day, please
remember to have the memory functions
reset to their default configuration.<
The proper place for childrenChildren should always sit in the rear:Accident research shows that the safest
place for children in a vehicle is in the rear
seat.Older children should be tightly secured
with a safety belt, after they have out
-
grown a booster seat that is appropriate for
their age, height and weight.
A child sitting in the rear seat and not properly restrained may place his or
her head on or near the airbag, if so
equipped. For example, a child – even
though belted in – may fall asleep with his
or her head against the side airbag. It may
be difficult for a driver to ensure that chil
-
dren in the rear seat will remain properly
positioned at all times and do not place
their heads on or near the side airbag.
Therefore, we recommend that the rear
side airbags, if provided, be deactivated if
you plan to transport children in the rear
seat.
years of age and
children less than 5
ft / 150
cm tall
should always ride in the rear and the
restraint systems should be secured with
the vehicle's safety belts.
system that has first been properly
restrained. We strongly urge you to care
-
fully read and comply with the instructions
for installation and use provided by the
child-restraint's manufacturer whenever
you use such a device.All rear seating positions in your vehicle
meet the recommendations of SAE
J1819,
an industry-recommended practice for
securing child-restraint systems in motor
vehicles.
Exception for the front passenger seat
Should it one day be necessary to use a child-restraint system on the front
passenger seat, the airbags on the front
passenger side must be deactivated. Other
-
wise, there is a significant risk of injury to
children if the airbags deploy, even if they
are seated in a child-restraint system. Have
the front passenger airbags permanently
deactivated only by your MINI Dealer or a
workshop that has specially trained per
-
sonnel working in accordance with the
specifications of the MINI manufacturer.<
Page 107 of 165
105
OVERVIEW REPAIRSOPERATIONCONTROLS DATA INDEX
BONNET
Do not attempt to service your vehi
-
cle if you do not have the required
technical background. If you are not famil
-
iar with the regulations to be observed,
have the necessary work on your vehicle
carried out only by a MINI Dealer or a work
-
shop that has specially trained personnel
working in accordance with the specifica
-
tions of the MINI manufacturer.
Work that is improperly carried out could
result in consequential damage and pose
safety hazards.<
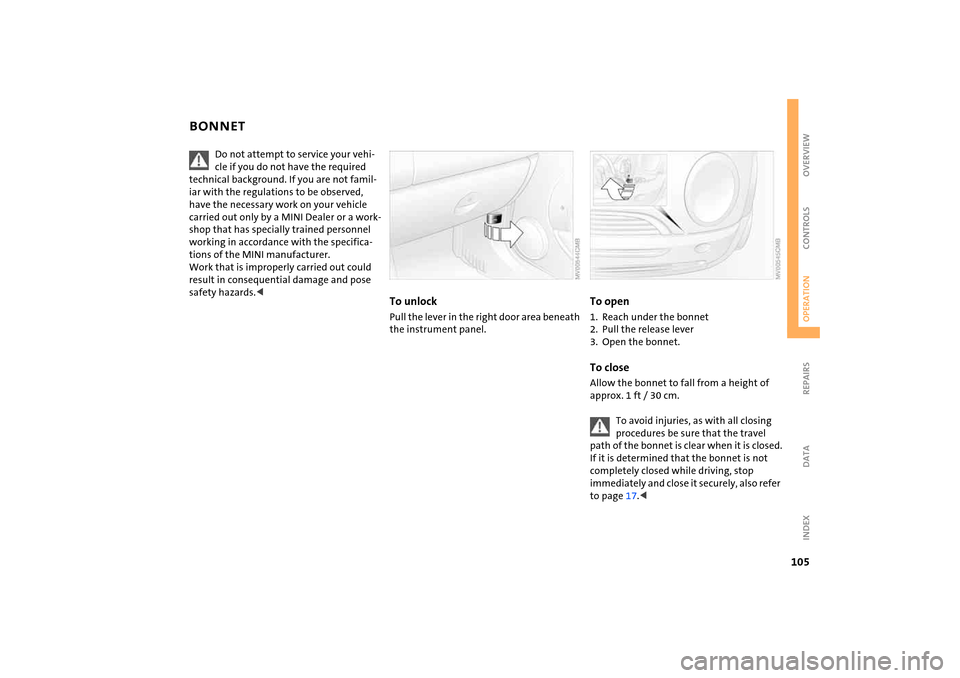
To unlockPull the lever in the right door area beneath
the instrument panel.
To open1. Reach under the bonnet2. Pull the release lever3. Open the bonnet.To closeAllow the bonnet to fall from a height of
approx.
1 ft / 30
cm.
To avoid injuries, as with all closing procedures be sure that the travel
path of the bonnet is clear when it is closed.
If it is determined that the bonnet is not
completely closed while driving, stop
immediately and close it securely, also refer
to page
17.<
Page 129 of 165

127
OVERVIEW REPAIRSOPERATION CONTROLS DATA INDEX
SPACE-SAVER SPARE TIRE
*
CHANGING TIRES
9.
Pull out the space-saver spare tire towards the rear underneath the vehi
-
cle
10. Position the space-saver spare tire with
the valve facing upwards11. Unscrew the valve extension from the
valve of the space-saver spare tire12. Unscrew the dust cap from the exten
-
sion and place it on the valve of the
space-saver spare tire.Due to its different dimensions, the damaged wheel cannot be placed in
the recess for the space-saver spare tire.<
Driving with the space-saver spare tireDrive cautiously. Do not exceed a speed of
50 mph
/ 80
km/h.
You must expect changes in vehicle han
-
dling such as lower track stability during
braking, longer braking distances and
changes in self-steering properties when
close to the handling limit. These effects
are more pronounced when driving with
winter tires.
Only one space-saver spare tire may be mounted at one time. Reinstall a
wheel and tire of the original size as soon
as possible.
soon as possible and have the new wheel/
tire assembly balanced.<
Additional safety measures in the event of a tire change:
Change the tire only on a level, firm surface
which is not slippery.
The vehicle or the jack could slip sideways
on soft or slippery support surfaces, such as
snow, ice, flagstones, etc..
Do not use a wooden block or similar object
as a support base for the jack, as this would
prevent it from extending to its full support
height and reduce its load-carrying capac
-
ity.
Do not lie under the vehicle or start the
engine when the vehicle is supported by
the jack – risk of fatal injury.
125
.<
1. For vehicles with a space-saver spare
tire:
Place the folding chock behind the front
wheel on the other side of the vehicle;
on downward inclines, place it in front of
this wheel. If the wheel is changed on a
surface with a more severe slope, take
additional precautions to secure the
vehicle from rolling
2. Loosen the lug bolts by a half turn.
Page 154 of 165
EVERYTHING FROM A TO Z
152
Gasoline gauge, refer to Fuel
gauge
63, 64
Gasoline, refer to Fuel
quality
94
Gear indicator, with
Continuously Variable
automatic Transmission
(CVT)
56
Gearshift lever
Continuously Variable
automatic Transmission
(CVT)
54
manual transmission
53
Gearshifts, with Continuously
Variable automatic
Transmission (CVT)
54
General driving notes
93
Glass sunroof, electric
33
convenience operation
27
opening and closing in the
event of an electrical
malfunction
34
remote control
26
Glove compartment
81
Gross weight, refer to
Weights
143
, 144
H Handbrake, refer to Parking
brake
53
Hazard warning flashers
12
Head airbags
72
Head restraints
43
Headlamp flasher
58
indicator lamp
19
Headlamp range control,
dynamic, xenon lamps
57
Headlamp washer
reservoir
108
capacity, refer to
Capacities
145
Headlamp washer system
cleaning headlamps
60
washer fluid
108
Headlamps
bulb replacement
122
care
114
Heated mirrors
46
Heated rear window
air conditioning system
76
automatic climate control
79
Heating
75
exterior mirrors
46
rear window
76, 79
seats
46
windshield
76, 79
Heavy load, refer to Loading
88
Height adjustment
seats
42
steering wheel
46
Height, refer to
Dimensions
141
, 142
High beams
58
bulb replacement
122
headlamp flasher
58
indicator lamp
19
High Performance Synthetic
Oil, refer to Engine oil
109
alternative oils
109
capacity
145
recommended oils
109
specified oils
109
Holders for beverages
81
Horn
12
Hot exhaust system
93
Hydraulic brake
96
Hydroplaning
93
I Ice warning
66
Ignition
51
Ignition key
24
Ignition lock
51
Illuminated vanity mirror
47
Imitation leather
114
Imprint
2
Index
148
Indicator and warning lamps,
overview
16
Indicator/warning lamp
Airbags
73
ASC
68
brakes
111
coolant temperature
64
DSC
69
fasten safety belts
45
Flat Tire Monitor
72
fog lamps
58
reserve fuel capacity
63, 64
Individual air distribution
80
Individual settings, refer to
Vehicle Memory
47
Inflation pressure monitor,
refer to Flat Tire Monitor
71
Inflation pressure, refer to Tire
inflation pressure
97
Inspection
65
Instrument cluster, refer to
Display elements
13
Instrument lighting
58
Instrument panel, refer to
Cockpit
12
Integrated universal remote
control
83
Interior lamp, remote
control
26
Interior lamps
59
Interior rearview mirror
47
automatic dimming
47
Page 157 of 165
EVERYTHING FROM A TO Z
155
OVERVIEW REPAIRS OPERATION CONTROLS DATA INDEX
R Radiator, refer to Coolant
110
Radio, refer to separate Owner's Manual
Rain sensor
59
Range
66
Reading lamps
59
Rear backrest, foldable
85, 86
Rear fog lamp
58
bulb replacement
124
indicator lamp
58
Rear lamps, bulb
replacement
123
Rear seats, adjusting head
restraints
43
Rear shelf, refer to Luggage
compartment cover
85
Rear turn signal indicators, bulb
replacement
123
Rear window wiper
60
replacement
121
Rearview mirror
46
Recirculated air mode
air conditioning system
76
automatic climate control
79
Reclining seat, refer to Backrest
tilt
43
Refueling
94
fuel filler door
94
Remaining distance for
service
65
Remaining distance, refer to
Range
66
Remote control
25, 26
garage door opener
83
malfunction
27
Remote control key, refer to
Master keys with remote
control
24
Replacement key
24
Replacement of tires
changing tires
125
new wheels and tires
102
Reporting safety defects
9
Reserve indicator light, refer to
Fuel gauge
63, 64
Reservoir, washing
systems
108
Restraint systems
for children
48
refer to Safety belts
45
Retaining straps
88
Reverse
Continuously Variable
automatic Transmission
(CVT)
55
manual transmission
54
Roller sun blind
34
Roof load, refer to
Weights
143
, 144
Roof-mounted luggage rack
89
Rope, refer to Towing and Tow-
starting
137
RSC Runflat System
Component, refer to
Run Flat tires
101
Run Flat tires
101
tire failure
101
tire inflation pressure
98
tire replacement
102
winter tires
103
Runflat System Component
(RSC), refer to Run Flat
tires
101
Runflat Tyres, refer to Run Flat
tires
101
S Safety belt height
adjustment
45
Safety belts
45
care
115
height adjustment
45
indicator lamp
17, 45
safe seating position
41
Safety lock buttons, doors,
refer to Locking
28
Safety systems, refer to
Airbags
72
All Season traction Control
(ASC)
68
Antilock Brake System
(ABS)
70
Brake system
70
Dynamic Stability Control
(DSC)
69
Safety tires, refer to
Run Flat tires
101
Screwdriver, refer to Onboard
tool kit
120
Seat adjustment
42
Seat heating
46
Seat-belt tensioner, refer to
Safety belts
45
Seats
heating
46
safe seating position
41
Securing loads, refer to Loading
cargo
86
Securing the load
88
Securing the vehicle
from inside
28
from outside
26
Selector lever positions,
Continuously Variable
automatic Transmission
(CVT)
54