service MINI Hardtop 2 Door 2005 Owner's Manual
[x] Cancel search | Manufacturer: MINI, Model Year: 2005, Model line: Hardtop 2 Door, Model: MINI Hardtop 2 Door 2005Pages: 165, PDF Size: 2.32 MB
Page 4 of 165
CONTENTS
2
© 2004 Bayerische Motoren Werke
Aktiengesellschaft
Munich, Germany
Reprinting, including excerpts, only with the
written consent of BMW AG, Munich.
Order No. 01 41 0 158 427
US English VI/04
Printed in Germany
Printed on environmentally friendly paper,
bleached without chlorine, suitable for recycling.NOTES About this Owner's Manual
6
Additional sources of information
6
Symbols used
6
Your individual vehicle
6
Editorial notice
7
For your own safety
7
Symbol on vehicle parts
8
Service and warranty
8
Reporting safety defects
9
OVERVIEWCockpit
12
Display elements
13
Display elements with navigation system
or Cockpit Chrono Pack
14
Indicator and warning lamps
16
Multifunction steering wheels
20
CONTROLSOpening and closing:Keys
24
Central locking system
24
Opening and closing: from outside
25
Opening and closing: from inside
28
Tailgate
29
Electric power windows
31
Glass sunroof, electric
33
Roller sun blind
34
Folding roof
35
Convertible top
35
Wind deflector
39
Adjustments:Safe seating position
41
Seat adjustment
42
Head restraints
43
Entry to the rear
44
Safety belts
45
Seat heating
46
Steering wheel
46
Mirrors
46
Vehicle Memory
47
Transporting children safely
48
Page 5 of 165
3OVERVIEW REPAIRS OPERATION CONTROLS DATA INDEX
Driving:Ignition lock
51
Starting the engine
51
Switching off the engine
52
Parking brake
53
Manual transmission
53
Continuously Variable automatic
Transmission (CVT)
54
Parking lamps/Low beams
57
signal/Headlamp flasher
58
Instrument lighting
58
Fog lamps
58
Interior lamps
59
Washer/wiper system
59
Cruise control
61
Everything under control:Odometer
63
Clock
63
Fuel gauge
63
Coolant temperature gauge
64
Tachometer
65
Service interval display
65
Onboard computer
66
Technology for safety and driving
convenience:All Season traction Control (ASC)
68
Dynamic Stability Control (DSC)
69
Antilock Brake System (ABS)
70
Flat Tire Monitor
71
Airbags
72
Park Distance Control (PDC)
74
Controlling the climate for pleasant
driving:Air conditioning system
75
Automatic climate control
78
Interior conveniences:Glove compartment
81
Ashtray, drinks holders
81
Cigarette lighter, 12 V power supply
82
Integrated universal remote control
83
Loading and transporting cargo:Luggage compartment in the MINI
85
Luggage compartment in the MINI Convertible
86
Loading cargo
86
Roof-mounted luggage rack
89
OPERATION, CARE, MAINTENANCESpecial operating instructions:Break-in procedures
92
General driving notes
93
Refueling
94
Brake system
96
Wheels and tires:Tire inflation pressure
97
Tire coding
99
Tire condition
100
Run Flat tires
101
New wheels and tires
102
Snow chains
104
Page 6 of 165
CONTENTS
4
In the engine compartment:Bonnet
105
Engine compartment:
MINI COOPER and
MINI
COOPER
CONVERTIBLE
106
MINI COOPER S and
MINI
COOPER
S CONVERTIBLE
107
Washer fluid
108
Engine oil
108
Coolant
110
Brake fluid
111
Maintenance and care:MINI Maintenance System
112
OBD socket
113
Caring for your vehicle
113
Vehicle storage
116
OWNER SERVICE PROCEDURESReplacement procedures:Onboard tool kit
120
Wiper blades
120
Lamps and bulbs
121
Repairing a flat tire
125
Space-saver spare tire
125
Changing tires
127
MINI Mobility System
129
Battery
132
Fuses
133
Giving and receiving assistance:Jump-starting
134
Towing and tow-starting
136
TECHNICAL DATAEngine data
140
Dimensions:
MINI
141
MINI Convertible
142
Weights:
MINI
143
MINI Convertible
144
Capacities
145
Page 10 of 165
8
NOTESParts and accessories:
For your own safety, use genuine parts and accessories approved by
the manufacturer of the MINI.
When you purchase accessories tested
and
approved by the manufacturer of the
MINI and Original MINI Parts, you simulta
-
neously acquire the assurance that they
have been thoroughly tested by the manu
-
facturer of the MINI to ensure optimum
performance when installed on your vehi
-
cle.
The manufacturer of the MINI warrants
these parts to be free from defects in mate
-
rial and workmanship.
The manufacturer of the MINI will not
accept any liability for damages resulting
from installation of parts and accessories
not approved by the manufacturer
of the
MINI.
The manufacturer of the MINI cannot test
every product from other manufacturers to
verify if it can be used on a MINI safely and
without risk to either the vehicle, its opera
-
tion, or its occupants.
Original MINI Parts, MINI Accessories and
other products approved by the manufac
-
turer of the MINI, together with profes
-
sional advice on using these items, are
available from all MINI Dealers.
Installation and operation of non-MINI
approved accessories such as alarms,
radios, amplifiers, radar detectors, wheels,
suspension components, brake dust
shields, telephones, including operation of
any portable cellular phone from within
the vehicle without using an externally
mounted antenna, or transceiver equip
-
ment, e.g. CB, walkie-talkie, ham radio or
similar, may cause extensive damage to the
vehicle, compromise its safety, interfere
with the vehicle's electrical system or affect
the validity of the MINI Limited Warranty.
See your MINI Dealer for additional infor
-
mation.<
Maintenance, replacement, or repair of the emission control devices and
systems must be performed by an autho
-
rized MINI Dealership or individual using
certified MINI parts.
-
ual for information on a particular part or
assembly.
Service and warrantyThis manual is supplemented by a Service
and Warranty Information Booklet for US
models or a Warranty and Service Guide
Booklet for Canadian models.We recommend that you read this publica
-
tion thoroughly.Your MINI is covered by the following war
-
ranties:>New Vehicle Limited Warranty>Rust Perforation Limited Warranty>Federal Emissions System Defect War
-
ranty>Federal Emissions Performance War
-
ranty>California Emission Control System Lim
-
ited Warranty.Detailed information about these warran
-
ties is listed in the Service and Warranty
Information Booklet for US models or in the
Warranty and Service Guide Booklet for
Canadian models.
Page 13 of 165

OVERVIEW
CONTROLS
OPERATION, CARE, MAINTENANCE
OWNER SERVICE PROCEDURES
INDEX TECHNICAL DATA
11
OVERVIEW REPAIRS OPERATION CONTROLS DATA INDEX
Page 15 of 165
13
OVERVIEW REPAIRS OPERATION CONTROLS DATA INDEX
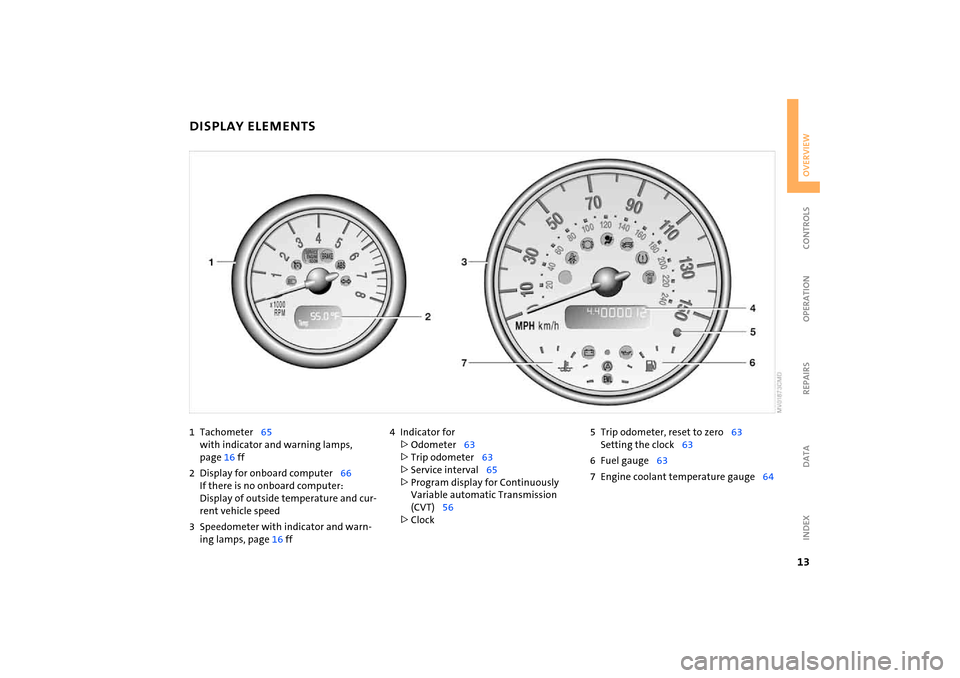
1 Tachometer
65
with indicator and warning lamps,
page
16 ff
2 Display for onboard computer
66
If there is no onboard computer:
Display of outside temperature and cur
-
rent vehicle speed3 Speedometer with indicator and warn
-
ing lamps, page
16 ff
4 Indicator for>Odometer
63
>Trip odometer
63
>Service interval
65
>Program display for Continuously
Variable automatic Transmission
(CVT)
56
>Clock
5 Trip odometer, reset to zero
63
Setting the clock
63
6 Fuel gauge
63
7 Engine coolant temperature gauge
64
DISPLAY ELEMENTS
Page 16 of 165
14
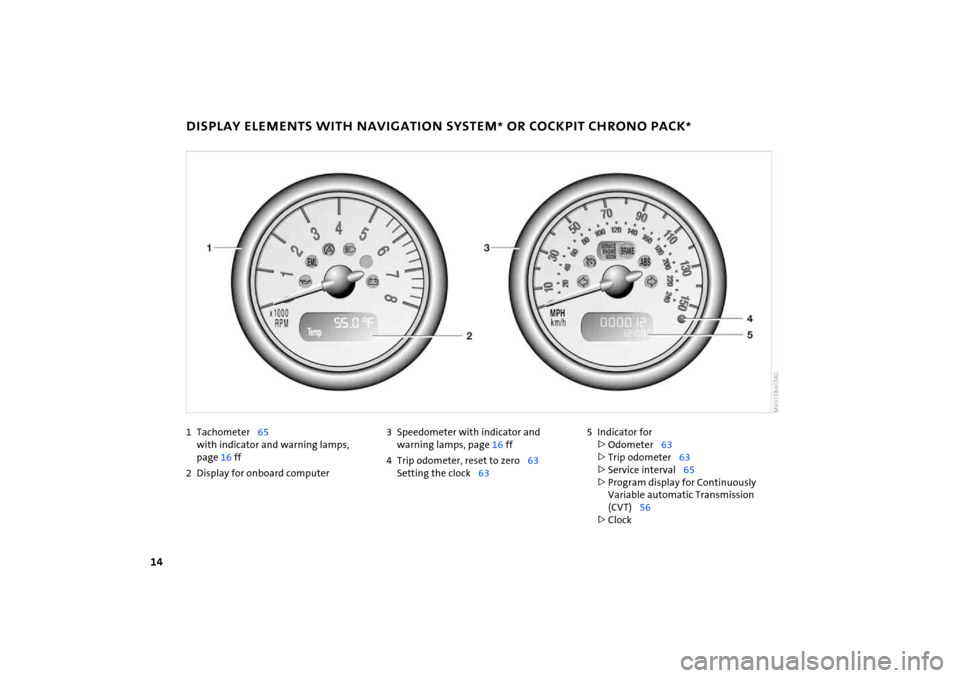
1Tachometer
65
with indicator and warning lamps,
page
16 ff
2 Display for onboard computer
3 Speedometer with indicator and
warning lamps, page
16 ff
4 Trip odometer, reset to zero
63
Setting the clock
63
5 Indicator for>Odometer
63
>Trip odometer
63
>Service interval
65
>Program display for Continuously
Variable automatic Transmission
(CVT)
56
>Clock
DISPLAY ELEMENTS WITH NAVIGATION SYSTEM
* OR COCKPIT CHRONO PACK
*
Page 25 of 165
OVERVIEW
CONTROLS
OPERATION, CARE, MAINTENANCE
OWNER SERVICE PROCEDURES
INDEX TECHNICAL DATA
23
OVERVIEW REPAIRS OPERATIONCONTROLS DATA INDEX
Controls
Page 67 of 165

65
OVERVIEW REPAIRS OPERATIONCONTROLS DATA INDEX
TACHOMETER
SERVICE INTERVAL DISPLAY
Do not operate the engine with the needle in the red overspeed zone of the gauge.To protect the engine, the power is reduced
when you approach a certain engine speed
in this sector.
Remaining distance for serviceThe distance remaining before the next
scheduled service is displayed in miles
/
kilometers for a short period with the igni
-
tion key in position 1 or higher. The display
also indicates whether an engine oil service
and/or an inspection is due.
The onboard computer bases its calcula
-
tions of the remaining distance on your
driving style in the period immediately pre
-
ceding your data request. The remaining
distance display counts backwards in steps
of 35
miles / 50
km to the next service. A
flashing message and a minus sign in front
of the display that again begins counting
forwards mean that the service interval has
been exceeded.
Please schedule an appointment with your
MINI Dealer or a workshop that has spe
-
cially trained personnel working in accor
-
dance with the specifications of your MINI
manufacturer.For more information on the service inter
-
val display, refer to page
112
.
Page 70 of 165
68
ALL SEASON TRACTION CONTROL (ASC)
*
The conceptThis system optimizes driving stability and
traction, especially when just starting off,
when accelerating or when cornering. ASC recognizes the danger present in trac
-
tion loss and will increase driving stability
and traction by reducing the engine's out
-
put and, if necessary, by applying the
brakes to the front wheels. ASC is operational each time you start the
engine. It contains the following functions:>Antilock Brake System (ABS)>Cornering Brake Control (CBC)>Electronic Brake Force Distribution (EBD).
The laws of physics cannot be repealed, even with ASC. An appropri
-
ate driving style always remains the
responsibility of the driver. Avoid using the
additional safety margin provided by the
system as an excuse for taking unnecessary
risks.
Do not make any modifications to the ASC
system. Allow only authorized technicians
to perform service procedures on the
ASC.<
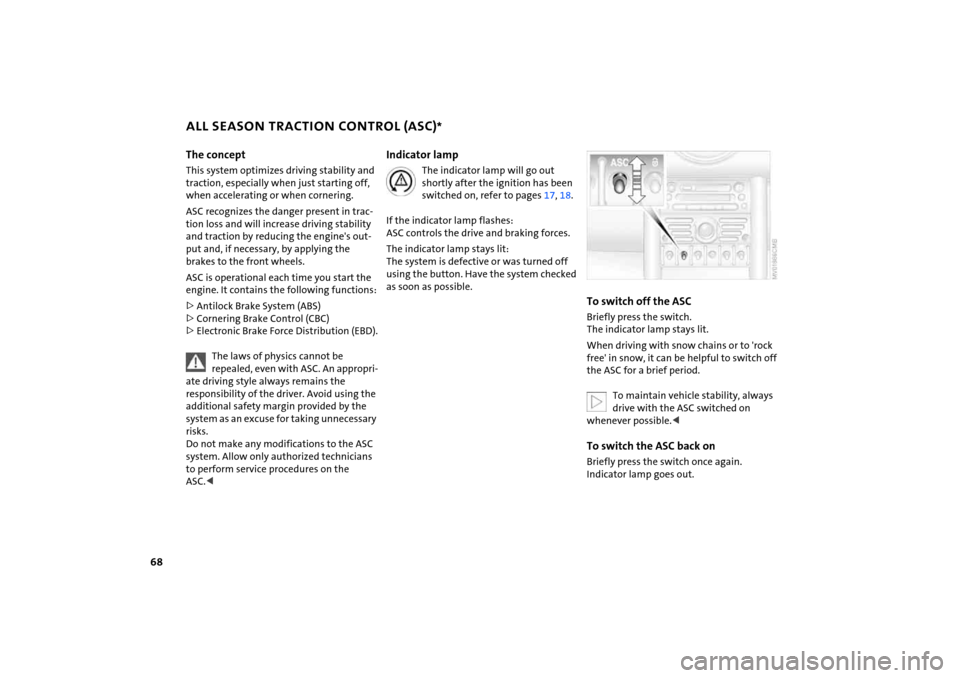
Indicator lamp
The indicator lamp will go out shortly after the ignition has been
switched on, refer to pages
17, 18
.
If the indicator lamp flashes:
ASC controls the drive and braking forces.The indicator lamp stays lit:
The system is defective or was turned off
using the button. Have the system checked
as soon as possible.
To switch off the ASCBriefly press the switch.
The indicator lamp stays lit.When driving with snow chains or to 'rock
free' in snow, it can be helpful to switch off
the ASC for a brief period.
To maintain vehicle stability, always drive with the ASC switched on
whenever possible.<
To switch the ASC back onBriefly press the switch once again.
Indicator lamp goes out.