cooling MITSUBISHI 3000GT 1991 Service Manual
[x] Cancel search | Manufacturer: MITSUBISHI, Model Year: 1991, Model line: 3000GT, Model: MITSUBISHI 3000GT 1991Pages: 1146, PDF Size: 76.68 MB
Page 28 of 1146

00-24GENERAL - Master Troubleshooting
MASTER TROUBLESHOOTING
MOOWWENGINE OVERHEATS
Symptom
Engine overheatsProbable cause
Cooling system
faulty
, incorrect ignition timing
Reference page
14-3
11-13
v’.ENGINE WILL NOT CRANK OR CRANKS SLOWLY
Symptom
Engine will not crankor cranks slowly
Probable cause
Starting system faulty
Reference page
16-15ENGINE WILL NOT START OR HARD TO START (CRANKS OK)
1 Symptom
Engine will not start or hard to
start (Cranks OK)Probable causeNo fuel supply to injector
injection system problems
Ignition system problems
Vacuum leaksl Purge control valve hosel Vacuum hosesl Intake manifoldl Air intake plenuml Throttle bodyl EGR valve
Reference page
-
-
16-25
17-3
Compression too low
11-15
d
1 TSB Revision1
Page 36 of 1146
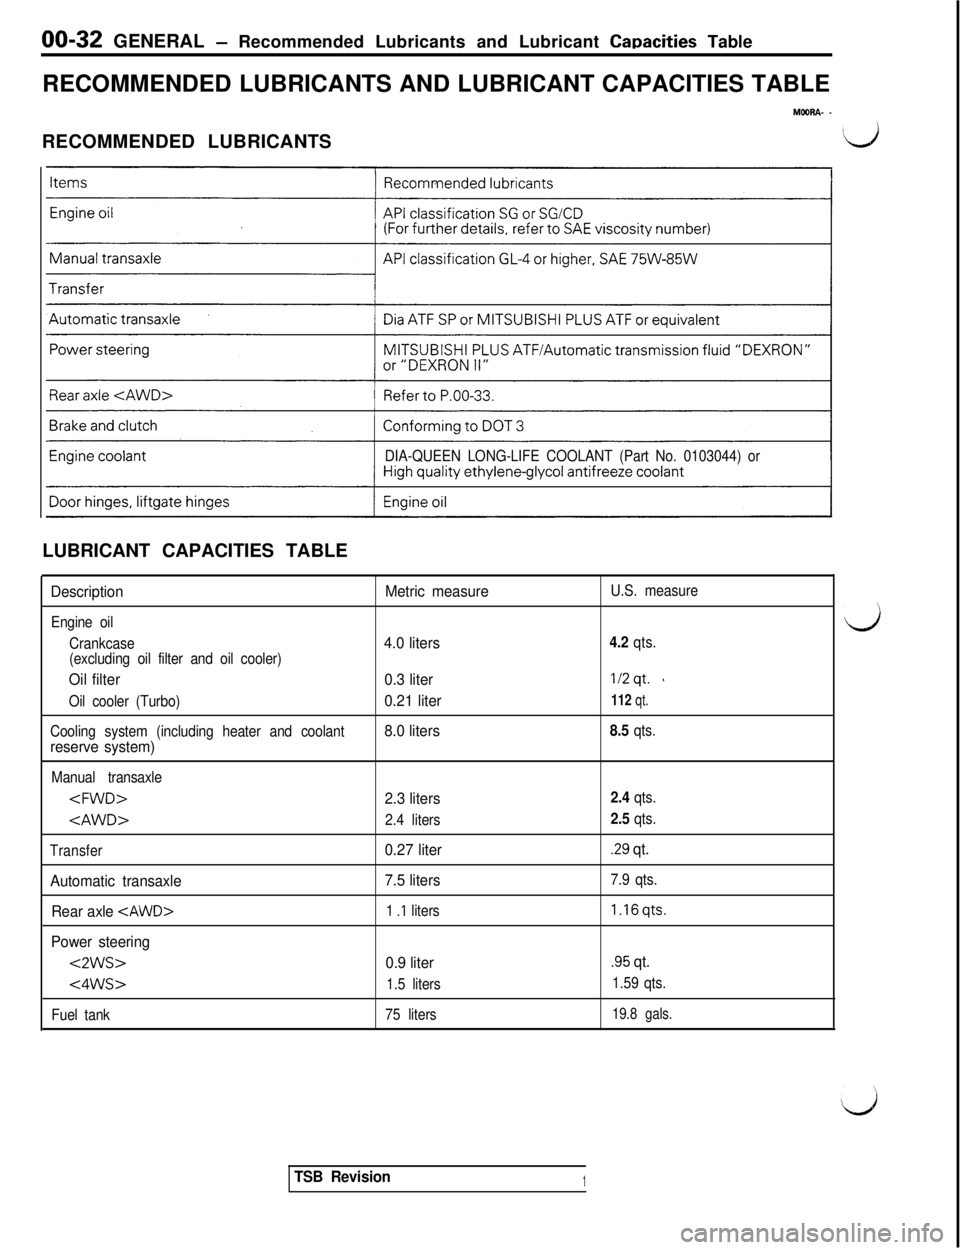
00-32 GENERAL - Recommended Lubricants and Lubricant Capacities Table
RECOMMENDED LUBRICANTS AND LUBRICANT CAPACITIES TABLE
MOORA- -RECOMMENDED LUBRICANTS
\L/
DIA-QUEEN LONG-LIFE COOLANT (Part No. 0103044) orLUBRICANT CAPACITIES TABLE
Description
Engine oil
Crankcase
(excluding oil filter and oil cooler)
Oil filter
Oil cooler (Turbo)
Cooling system (including heater and coolant
reserve system)
Manual transaxle
Transfer
Automatic transaxle
Rear axle
Power steering
<2ws>
<4ws>
Fuel tank
Metric measureU.S. measure
4.0 liters4.2 qts.
0.3 liter1/2qt. s
0.21 liter112 qt.
8.0 liters8.5 qts.
2.3 liters2.4 qts.
2.4 liters
2.5 qts.
0.27 liter.29 qt.
7.5 liters
7.9 qts.
1
.I liters1.16qts.
0.9 liter
.95 qt.
1.5 liters1.59 qts.
75 liters
19.8 gals.
TSB Revision1
d
Page 38 of 1146
00-34 GENERAL - Recommended Lubricants and Lubricant Capacities Table
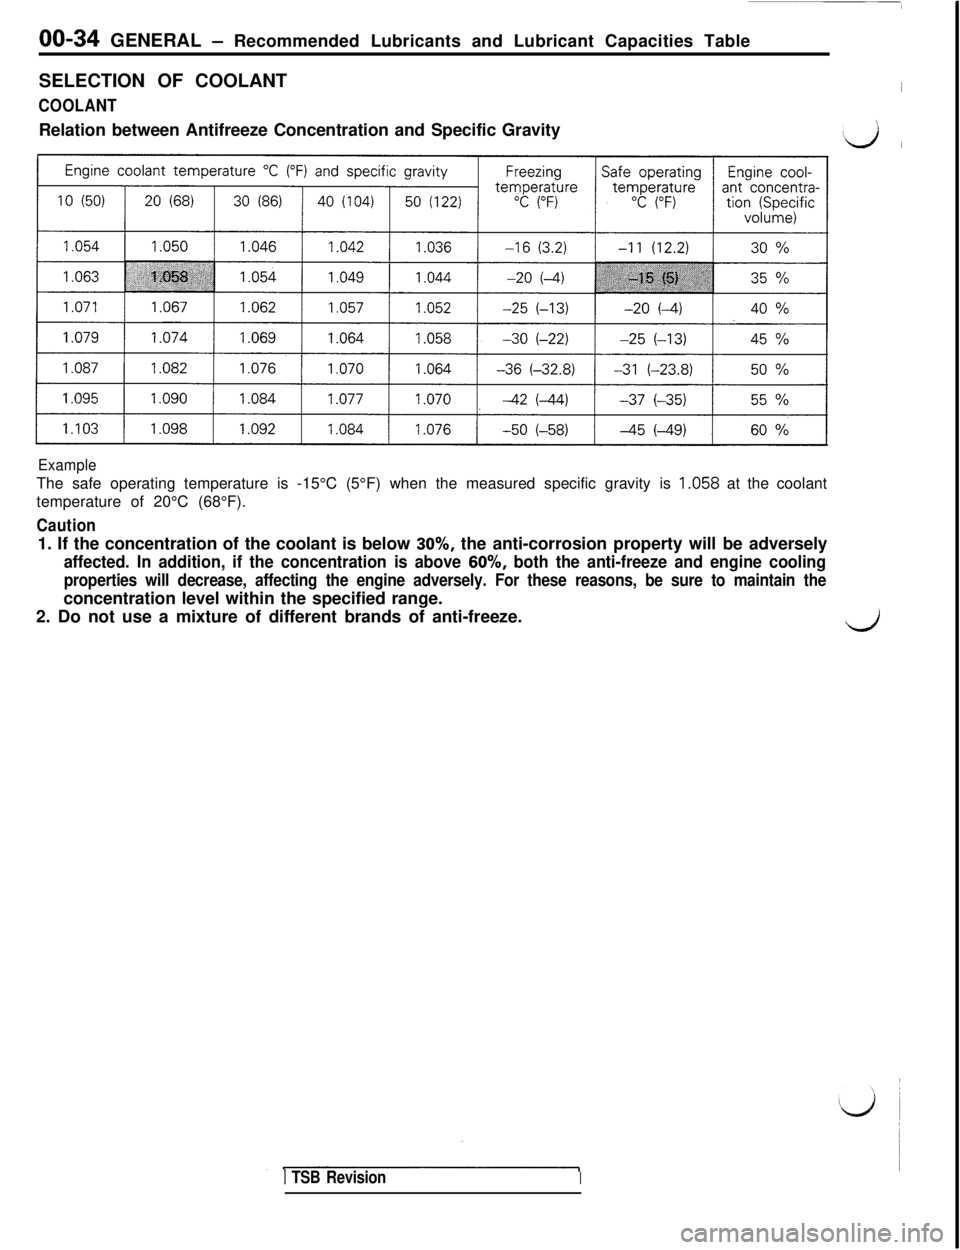
SELECTION OF COOLANT
COOLANTRelation between Antifreeze Concentration and Specific Gravity
I
\
‘d I
ExampleThe safe operating temperature is -15°C (5°F) when the measured specific gravity is 1.058 at the coolant
temperature of 20°C (68°F).
Caution1. If the concentration of the coolant is below 30%, the anti-corrosion property will be adversely
affected. In addition, if the concentration is above 60%, both the anti-freeze and engine cooling
properties will decrease, affecting the engine adversely. For these reasons, be sure to maintain theconcentration level within the specified range.
2. Do not use a mixture of different brands of anti-freeze.
-/‘.
1 TSB RevisionI
Page 45 of 1146
GENERAL - Maintenance Service00-41
Good
t-lVA0283
I04FOOOd(4) Check the oil filter for clogging and damage and replace if
necessary.
(5) Clean drain plug and tighten drain plug with gasket to 30
-35 Nm (22
- 25 ft.lbs.).
(6) Clean both gasket surfaces of transaxle case and oil pan.
(7) Install oil pan with new gasket and tighten oil pan bolts to
10 - 12 Nm (7.5 - 8.5 ft.lbs.).
(8) Pour 4.5 liters (4.8 qts.) of specified ATF into case through
dipstick hole. [Total quantity of ATF required is approx. 7.5
liters (7.9 qts.). Actually however, approx. 4.5 liters (4.8 qts.)
of fluid can be replaced because rest of fluid remains in
torque converter.]
Specified fluid: Dia ATF SP or MITSUBISHI PLUS ATF or
equivalent(9) Start engine and allow to idle for at least two minutes.
Then, with parking brake on, move selector lever momen-
tarily to each position, ending in “N” Neutral position.
(lO)Add sufficient ATF to bring fluid level to lower mark.
Recheck fluid level after transaxle is at normal operating
temperature. Fluid level should be between upper and
lower marks of “HOT” range. Insert dipstick fully to prevent
dirt from entering transaxle.
11. ENGINE COOLANT (Change)
MOOSBEHCheck the cooling system parts, such as radiator, heater, and
oil cooler hoses, thermostat and connections for leakage and
damage.
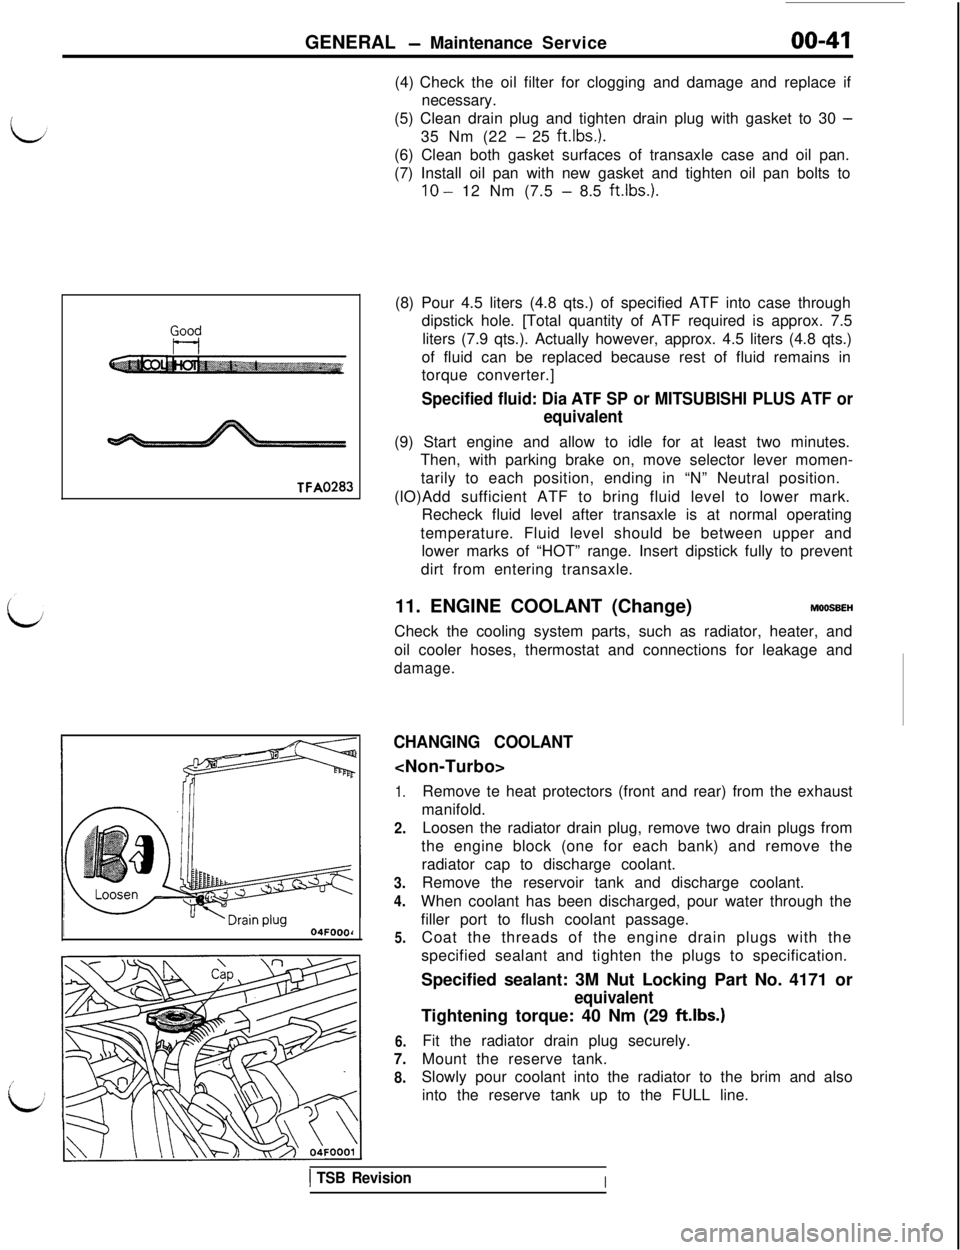
CHANGING COOLANT
1.
2.
3.
4.
5.
6.
7.
8.Remove te heat protectors (front and rear) from the exhaust
manifold.
Loosen the radiator drain plug, remove two drain plugs from
the engine block (one for each bank) and remove the
radiator cap to discharge coolant.
Remove the reservoir tank and discharge coolant.
When coolant has been discharged, pour water through the
filler port to flush coolant passage.
Coat the threads of the engine drain plugs with the
specified sealant and tighten the plugs to specification.
Specified sealant: 3M Nut Locking Part No. 4171 or
equivalentTightening torque: 40 Nm (29
ftlbs.)Fit the radiator drain plug securely.
Mount the reserve tank.
Slowly pour coolant into the radiator to the brim and also
into the reserve tank up to the FULL line.
1 TSB RevisionI
Page 63 of 1146
ENGINE - Service Adiustment ProceduresII-13
I_ ianltion tlminaI!H Connector for Igdpstment 6rown)
4tll II -7FUO9371IGNITION TIMING ADJUSTMENTMllFLAF
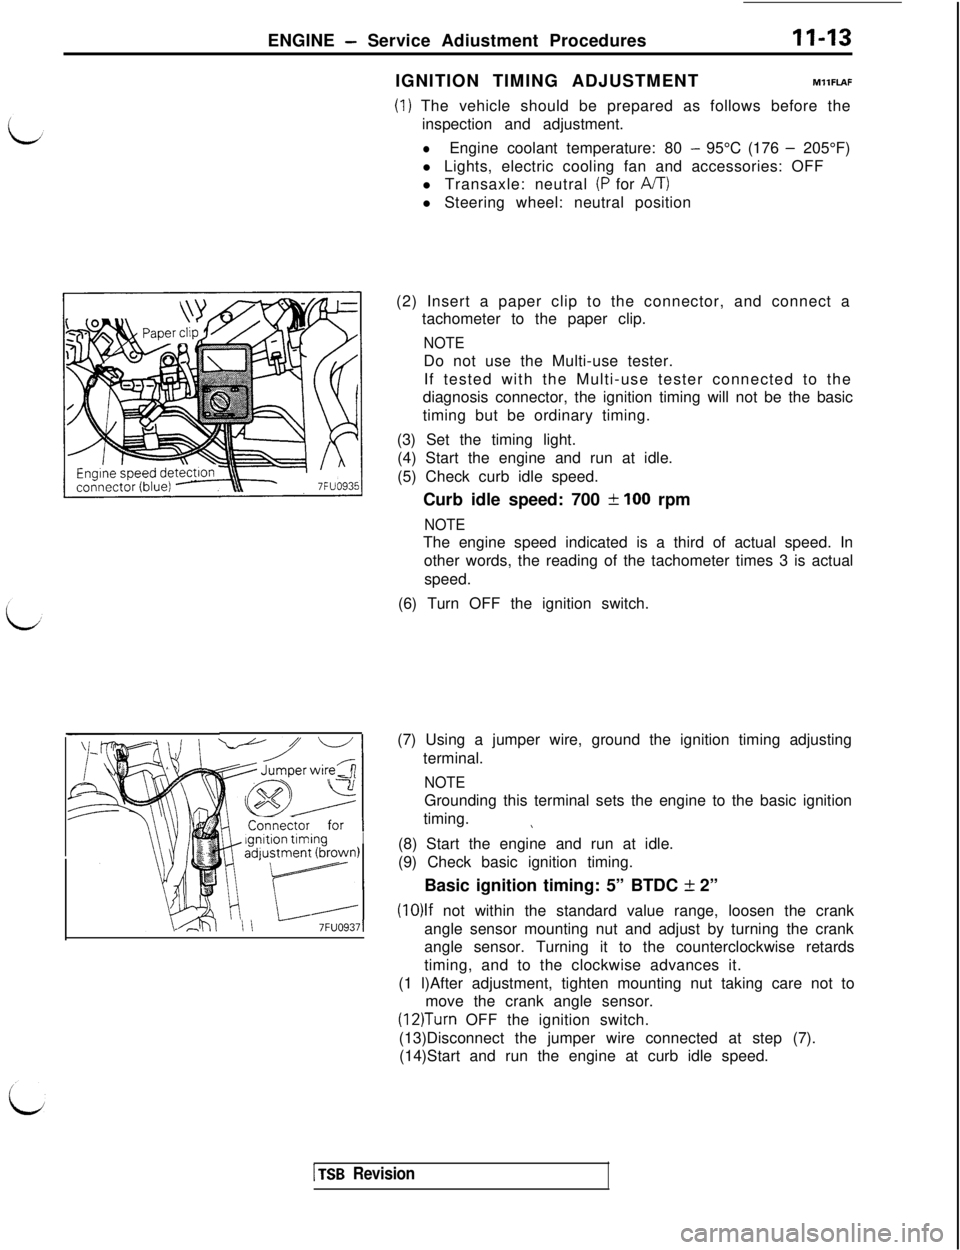
(1) The vehicle should be prepared as follows before the
inspection and adjustment.
lEngine coolant temperature: 80 - 95°C (176 - 205°F)
l Lights, electric cooling fan and accessories: OFF
l Transaxle: neutral
(P for A/T)l Steering wheel: neutral position
(2) Insert a paper clip to the connector, and connect a
tachometer to the paper clip.
NOTEDo not use the Multi-use tester.
If tested with the Multi-use tester connected to the
diagnosis connector, the ignition timing will not be the basic
timing but be ordinary timing.
(3) Set the timing light.
(4) Start the engine and run at idle.
(5) Check curb idle speed.
Curb idle speed: 700
f 100 rpm
NOTEThe engine speed indicated is a third of actual speed. In
other words, the reading of the tachometer times 3 is actual
speed.
(6) Turn OFF the ignition switch.
(7) Using a jumper wire, ground the ignition timing adjusting
terminal.
NOTEGrounding this terminal sets the engine to the basic ignition
timing.
\(8) Start the engine and run at idle.
(9) Check basic ignition timing.
Basic ignition timing: 5” BTDC
k 2”
(10)lf not within the standard value range, loosen the crank
angle sensor mounting nut and adjust by turning the crank
angle sensor. Turning it to the counterclockwise retards
timing, and to the clockwise advances it.
(1 l)After adjustment, tighten mounting nut taking care not to
move the crank angle sensor.
(12)Turn OFF the ignition switch.
(13)Disconnect the jumper wire connected at step (7).
(14)Start and run the engine at curb idle speed.
1 TSB Revision
Page 64 of 1146
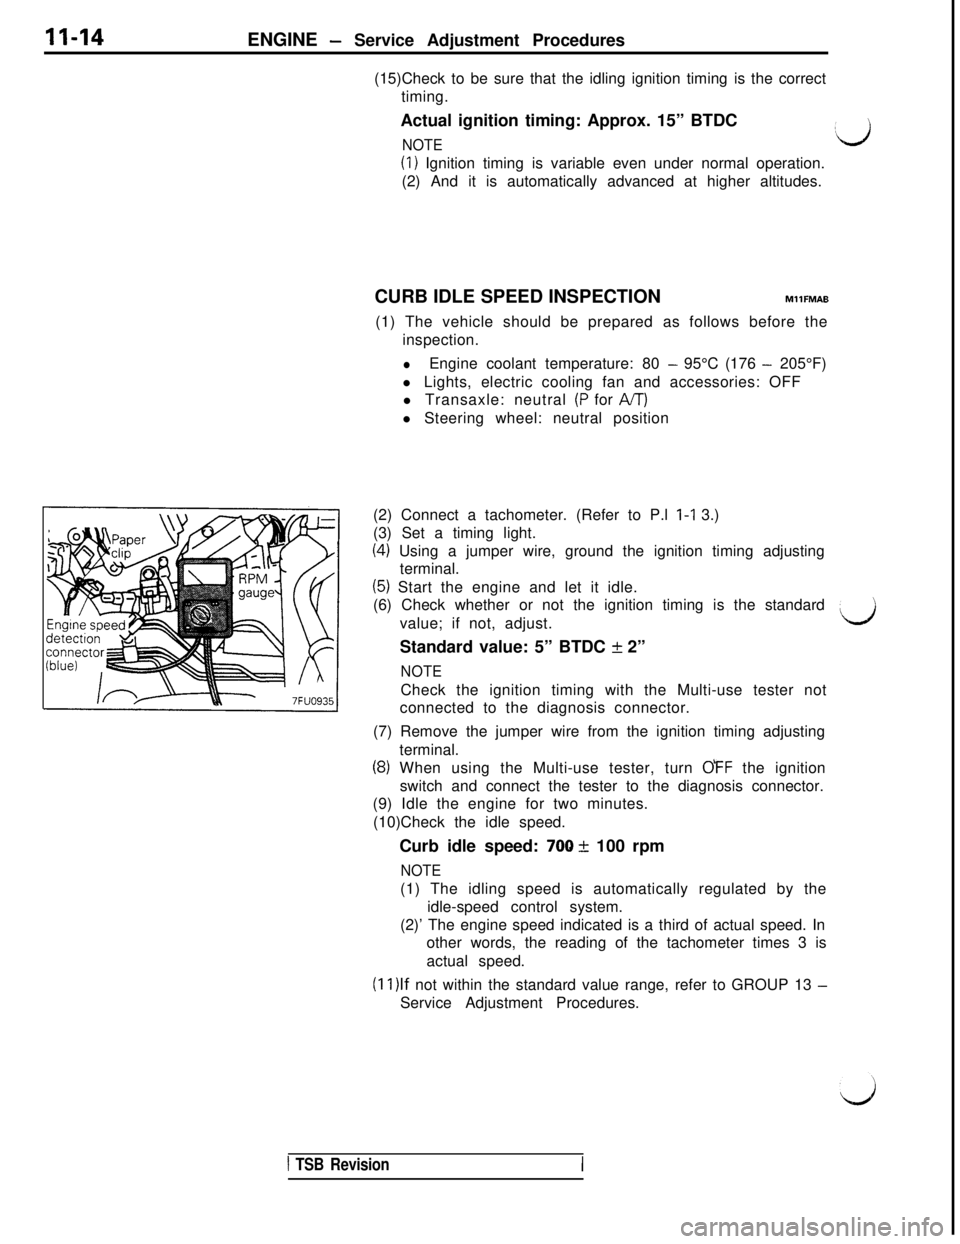
11-14ENGINE - Service Adjustment Procedures
(15)Check to be sure that the idling ignition timing is the correct
timing.
Actual ignition timing: Approx. 15” BTDC
NOTE:d
(1) Ignition timing is variable even under normal operation.
(2) And it is automatically advanced at higher altitudes.
CURB IDLE SPEED INSPECTIONMllFMAB
(1) The vehicle should be prepared as follows before the
inspection.
lEngine coolant temperature: 80 - 95°C (176 - 205°F)
l Lights, electric cooling fan and accessories: OFF
l Transaxle: neutral
(P for A/T)l Steering wheel: neutral position
(2) Connect a tachometer. (Refer to P.l l-1 3.)
(3) Set a timing light.
(4) Using a jumper wire, ground the ignition timing adjusting
terminal.
(5) Start the engine and let it idle.
(6) Check whether or not the ignition timing is the standard
value; if not, adjust.
Standard value: 5” BTDC + 2”
NOTECheck the ignition timing with the Multi-use tester not
connected to the diagnosis connector.
(7) Remove the jumper wire from the ignition timing adjusting
terminal.
(8) When using the Multi-use tester, turn OFF the ignition
switch and connect the tester to the diagnosis connector.
(9) Idle the engine for two minutes.
(10)Check the idle speed.
Curb idle speed:
700 + 100 rpm
NOTE(1) The idling speed is automatically regulated by the
idle-speed control system.
(2)’ The engine speed indicated is a third of actual speed. In
other words, the reading of the tachometer times 3 is
actual speed.
(1l)lf not within the standard value range, refer to GROUP 13 -Service Adjustment Procedures.
d
1 TSB RevisionI
Page 66 of 1146
11-16ENGINE - Service Adjustment Procedures
MANIFOLD VACUUM INSPECTION
MllFNAR
(1) The vehicle should be repaired as follows before the
inspection.
lEngine coolant temperature: 80 - 95°C (176 - 205°F)‘dl Lights, electric cooling fan, and accessories: OFF
l Transaxle: Neutral
(P for A/T)l Steering wheel: neutral position
(2) Connect a tachometer. (Refer to P.l l-l 3.)
(3) Disconnect the vacuum hose from the nipple for taking off
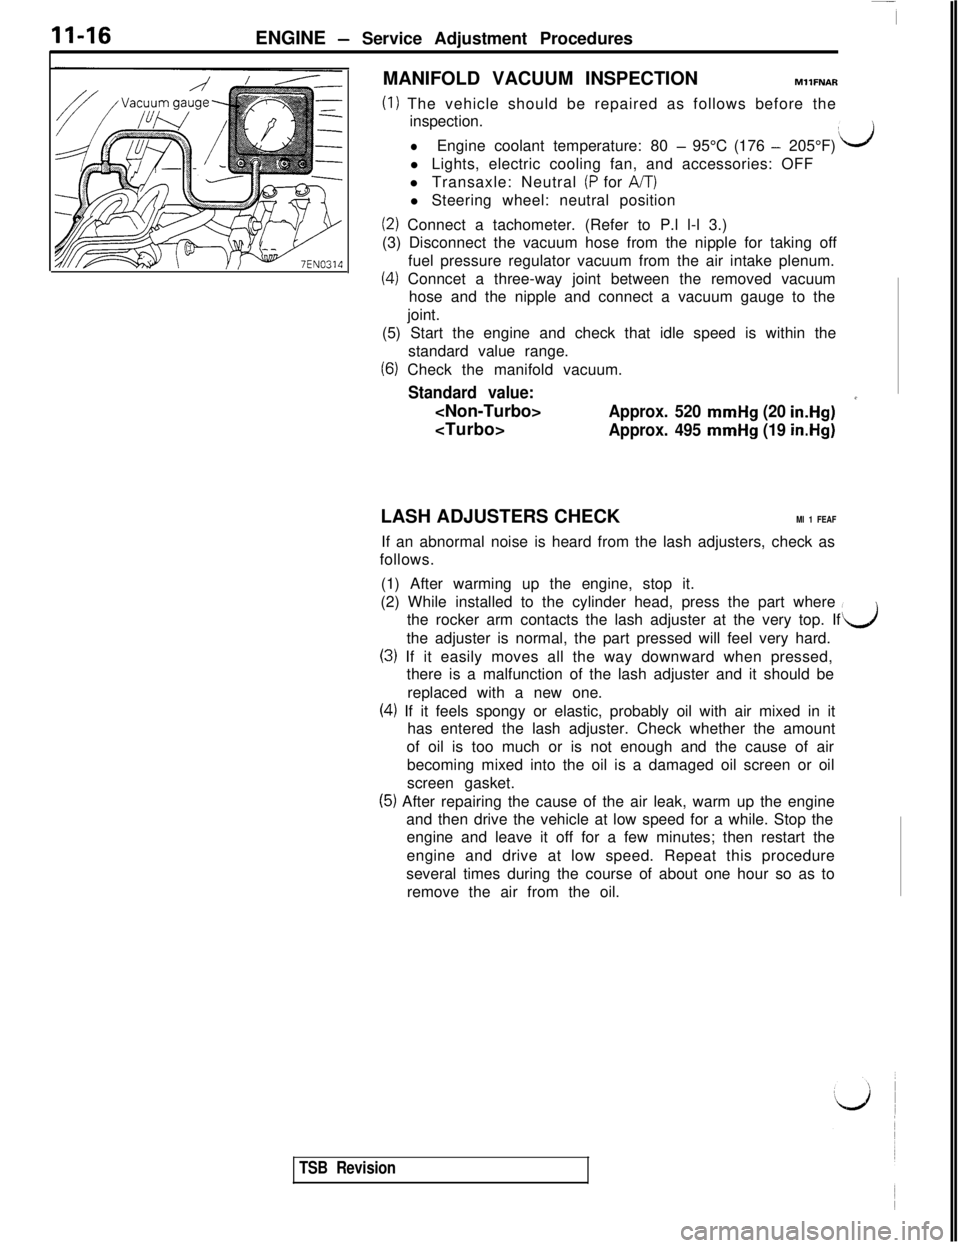
fuel pressure regulator vacuum from the air intake plenum.
(4) Conncet a three-way joint between the removed vacuum
hose and the nipple and connect a vacuum gauge to the
joint.
(5) Start the engine and check that idle speed is within the
standard value range.
(6) Check the manifold vacuum.
Standard value:
*
Approx. 495 mmHg (19 in.Hg)LASH ADJUSTERS CHECK
Ml 1 FEAFIf an abnormal noise is heard from the lash adjusters, check as
follows.
(1) After warming up the engine, stop it.
(2) While installed to the cylinder head, press the part where
the rocker arm contacts the lash adjuster at the very top. If
the adjuster is normal, the part pressed will feel very hard.
d
(3) If it easily moves all the way downward when pressed,
there is a malfunction of the lash adjuster and it should be
replaced with a new one.
(4) If it feels spongy or elastic, probably oil with air mixed in it
has entered the lash adjuster. Check whether the amount
of oil is too much or is not enough and the cause of air
becoming mixed into the oil is a damaged oil screen or oil
screen gasket.
(5) After repairing the cause of the air leak, warm up the engine
and then drive the vehicle at low speed for a while. Stop the
engine and leave it off for a few minutes; then restart the
engine and drive at low speed. Repeat this procedure
several times during the course of about one hour so as to
remove the air from the oil.
TSB Revision
Page 137 of 1146
SERVICE ADJUSTMENT PROCEDURES
MlBFHSU
BASIC IDLE SPEED ADJUSTMENT
NOTE(1) The basic idle speed has been factory-adjusted with the
speed adjusting screw (SAS) and does not normally require
adjustment.(2) If the adjustment is required, first check that the ignition
plug, injector,
ISC servo, and compression pressure are
normal.
(1) Before starting the inspection and adjustment procedures,set the vehicle in the following conditions:
l
Engine coolant temperature: 80 to 95°C (176 to 205°F)l Lights, electric cooling fan, accessories: OFF
lTransaxle: Neutral (P range on vehicles with automatic
transaxle)l Steering wheel: Straightforward position
(2) When using the multi-use tester, connect it to the diagnosis
connector.
NOTEThe connection of the multi-use tester grounds the
self-
diagnosis/data transmission selector terminal.
(3) When not using the multi-use tester, proceed as follows:
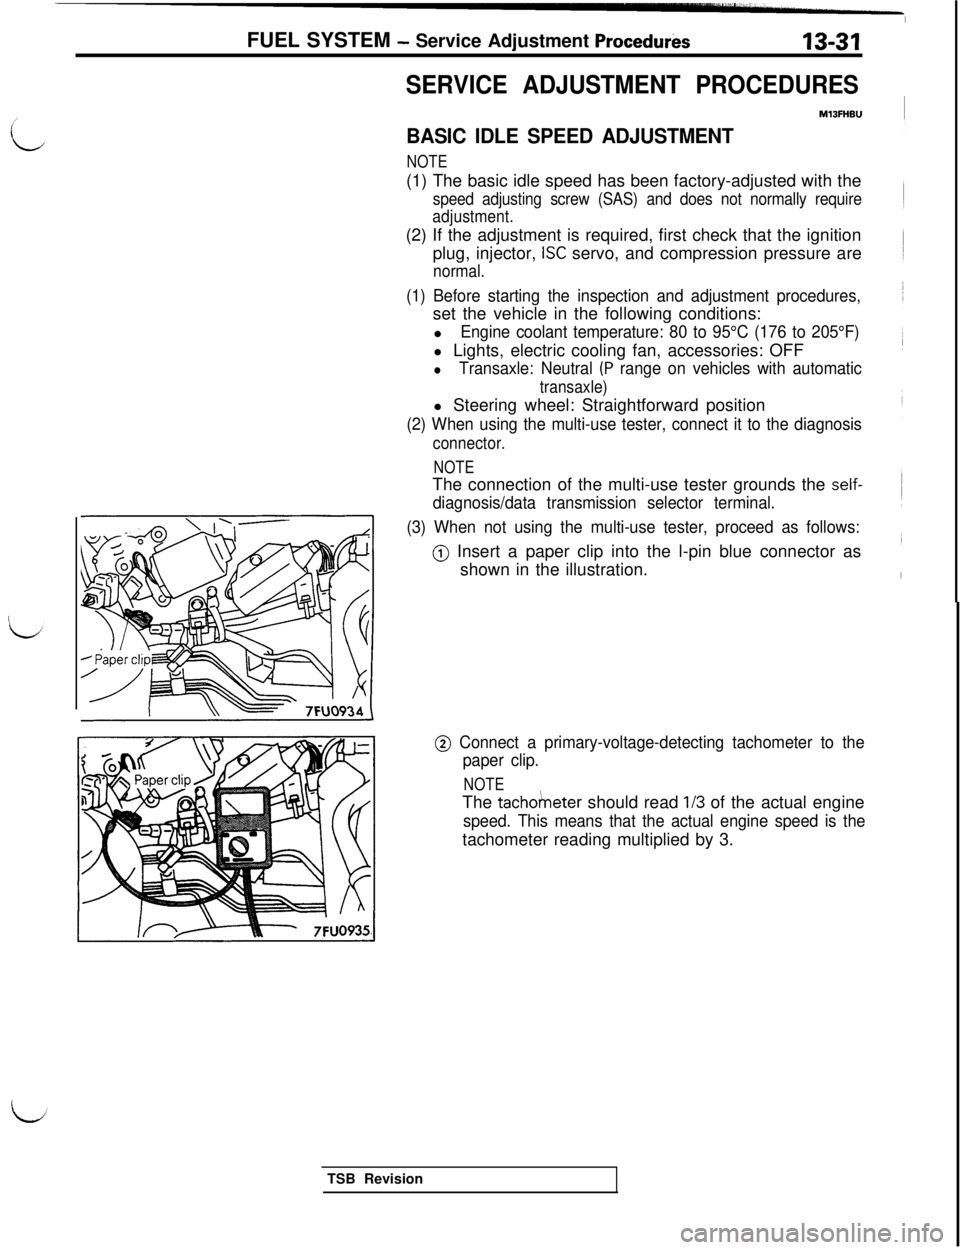
@) Insert a paper clip into the l-pin blue connector as
shown in the illustration. FUEL SYSTEM
- Service Adjustment Procedurks13-31
i
@ Connect a primary-voltage-detecting tachometer to the
paper clip.
NOTEThe
tacho/neter should read l/3 of the actual engine
speed. This means that the actual engine speed is thetachometer reading multiplied by 3.
TSB Revision
Page 161 of 1146
FUEL SYSTEM - On-vehicle Inspection of MPI Components13-55
INSPECTIONUsing Multi-use Tester
Function
Data readingtern No. Data display
12Sensor airvolume(frequency)
Check conditionEngine stateStandard value
l Engine coolant tem-
700 rpm (Idle)25-50 Hzperature: 80 to 95°C
(176 to 205°F)2,000 rpm70-IOOHzl Lights and accessories:OFFRacingFrequency increasesl Transaxle: Neutralwith racing(P range for vehiclewith AIT)l Steering wheel: Neutral
NOTEWhen the vehicle is new [within initial operation of about 500 km (300 miles)], the air flow sensor output frequency maybe about 10% higher.
Function
Data listItem No. Data displayCheck conditionsEngine conditionsStandard value
34Reset signall Engine warm up700 rpm (Idle)ON
condition2,000 rpmOFF
L;
FunctionItem No. Data display
Data list37Volumetric
efficiencyCheck conditionEngine stateStandard valuel Engine coolant tem-700 rpm (Idle)20-35%
perature: 80 to 95°C
(176 to 205°F)
l Lights, electric cooling2,000 rpm15-30%
fan and accessory opera-tion: OFFl Transaxle: NeutralRacingFrequency increases
(P range for vehiclewith racingwith &T)
l Steering wheel: Neutral
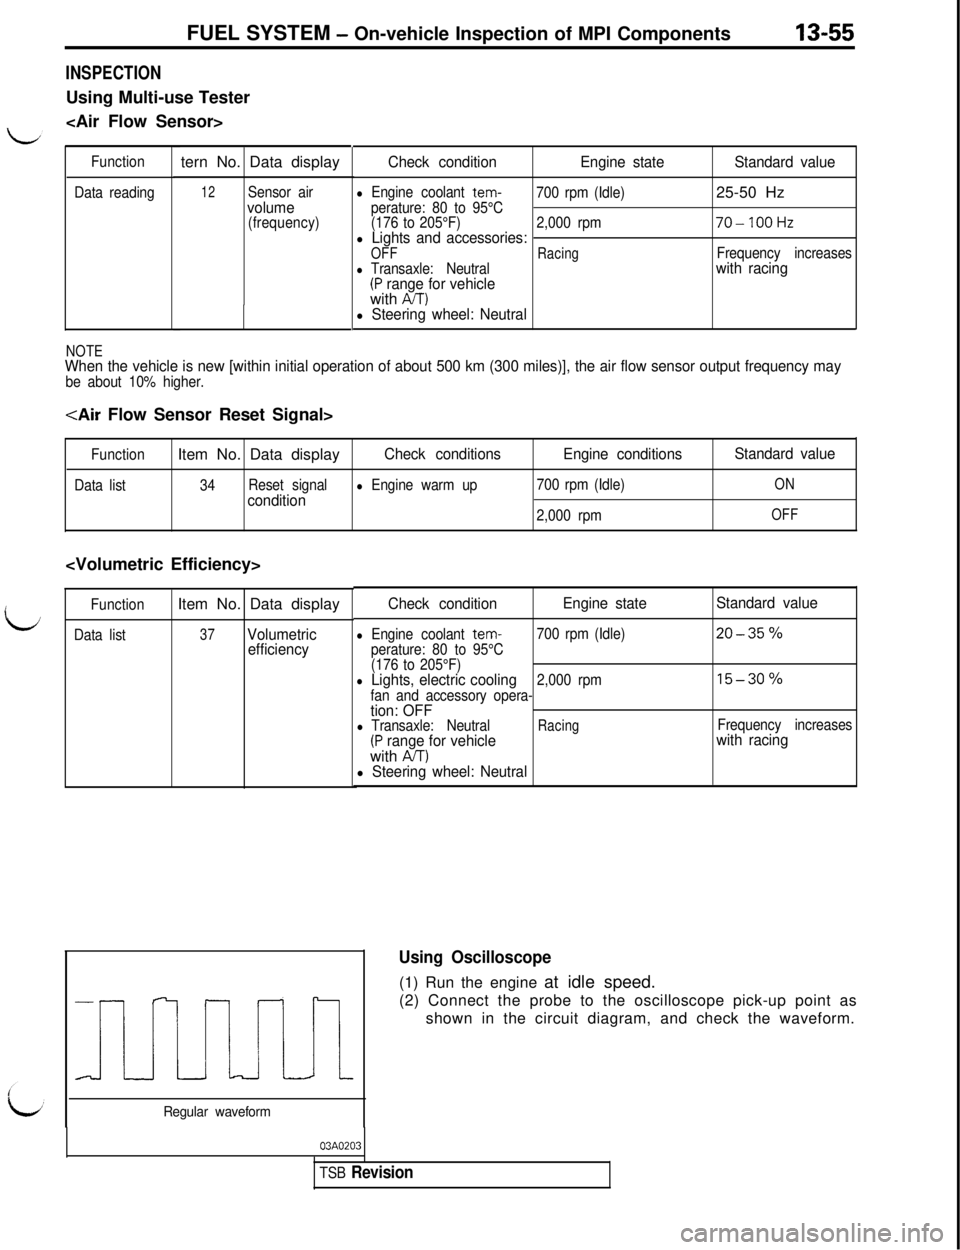
Using Oscilloscope(1) Run the engine at idle speed.
(2) Connect the probe to the oscilloscope pick-up point as
shown in the circuit diagram, and check the waveform.
Regular waveform
03A0203
TSB Revision
Page 208 of 1146
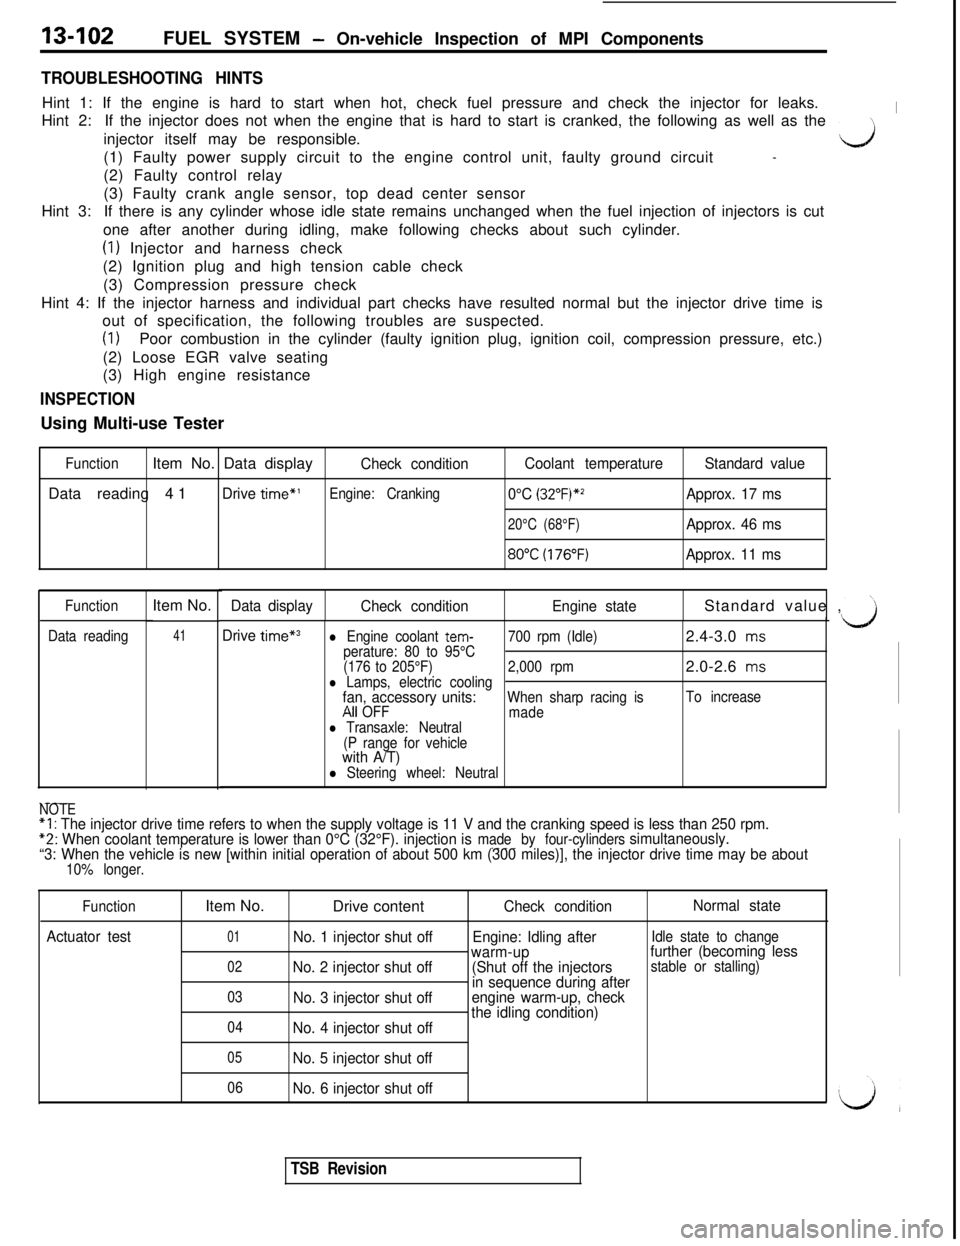
13-102FUEL SYSTEM - On-vehicle Inspection of MPI Components
TROUBLESHOOTING HINTSHint 1: If the engine is hard to start when hot, check fuel pressure and check the injector for leaks.
Hint 2:If the injector does not when the engine that is hard to start is cranked, the following as well as the
Iinjector itself may be responsible.
(1) Faulty power supply circuit to the engine control unit, faulty ground circuit
\-J
-(2) Faulty control relay
Hint 3:(3) Faulty crank angle sensor, top dead center sensor
If there is any cylinder whose idle state remains unchanged when the fuel injection of injectors is cut
one after another during idling, make following checks about such cylinder.
(1) Injector and harness check
(2) Ignition plug and high tension cable check
(3) Compression pressure check
Hint 4: If the injector harness and individual part checks have resulted normal but the injector drive time is
out of specification, the following troubles are suspected.
(1)Poor combustion in the cylinder (faulty ignition plug, ignition coil, compression pressure, etc.)
(2) Loose EGR valve seating
(3) High engine resistance
INSPECTIONUsing Multi-use Tester
FunctionItem No. Data displayCheck conditionCoolant temperatureStandard valueData reading 41
Drive time”’Engine: Cranking0°C (32”F)*zApprox. 17 ms
20°C (68°F)Approx. 46 ms
8O"C(176"F)Approx. 11 ms
Function
Data readingItem No.Data display
41Drive time*3l Engine coolant tem-perature: 80 to 95°C700 rpm (Idle)2.4-3.0 ms
(176 to 205°F)2,000 rpm2.0-2.6
msl Lamps, electric coolingfan, accessory units:When sharp racing isTo increaseAll OFF
madel Transaxle: Neutral
(P range for vehicle
with A/T)l Steering wheel: Neutral
Check conditionEngine stateStandard value ,
.---NOTE“I : The injector drive time refers to when the supply voltage is 11 V and the cranking speed is less than 250 rpm.*2: When coolant temperature is lower than 0°C (32°F). injection ismade by four-cylinders.---simultaneously.
“3: When the vehicle is new [within initial operation of about 500 km (300 miles)], the injector drive time may be about
10% longer.
Function
Actuator testItem No.
Drive content
Check conditionNormal state
01No. 1 injector shut offEngine: Idling afterIdle state to change
02No. 2 injector shut offwarm-up
(Shut off the injectorsfurther (becoming less
in sequence during afterstable or stalling)
03
No. 3 injector shut offengine warm-up, check
04No. 4 injector shut offthe idling condition)
05No. 5 injector shut off
06No. 6 injector shut off
TSB Revision