engine MITSUBISHI 3000GT 1992 2.G Workshop Manual
[x] Cancel search | Manufacturer: MITSUBISHI, Model Year: 1992, Model line: 3000GT, Model: MITSUBISHI 3000GT 1992 2.GPages: 738, PDF Size: 35.06 MB
Page 521 of 738

Downloaded from www.Manualslib.com manuals search engine CHASSIS ELECTRICAL - Meters and Gauaes
i
L/
IGNISW17
2B-\1
28-l
2B-\I
2B-‘1
(A-67)
2B-Y
STARTING
SUPPLEMENTAL
~E~&~J$NT
----------.+OFFIN
13
i
G-B
3(c-02) 3--
G-B
1.25B-Y
+MFI SYSTEM
'(D-15)DIODE
1.25B-Yu
I
IGNITIONSWITCH(IG1)
J/B
ml
0
15A“6
(D-44)
0.85B-W
B-W(130.85B-W
METER AND
GAUGESB-WTURN-SIGNAL LIGHT
r----+$30AND HAZARD LIGHT
i B-W
9
i;yEKNATION
(D-04)
HRlOM05AB
TSB Revision
Page 522 of 738
Downloaded from www.Manualslib.com manuals search engine 54-26CHASSIS ELECTRICAL - Meters and Gauges
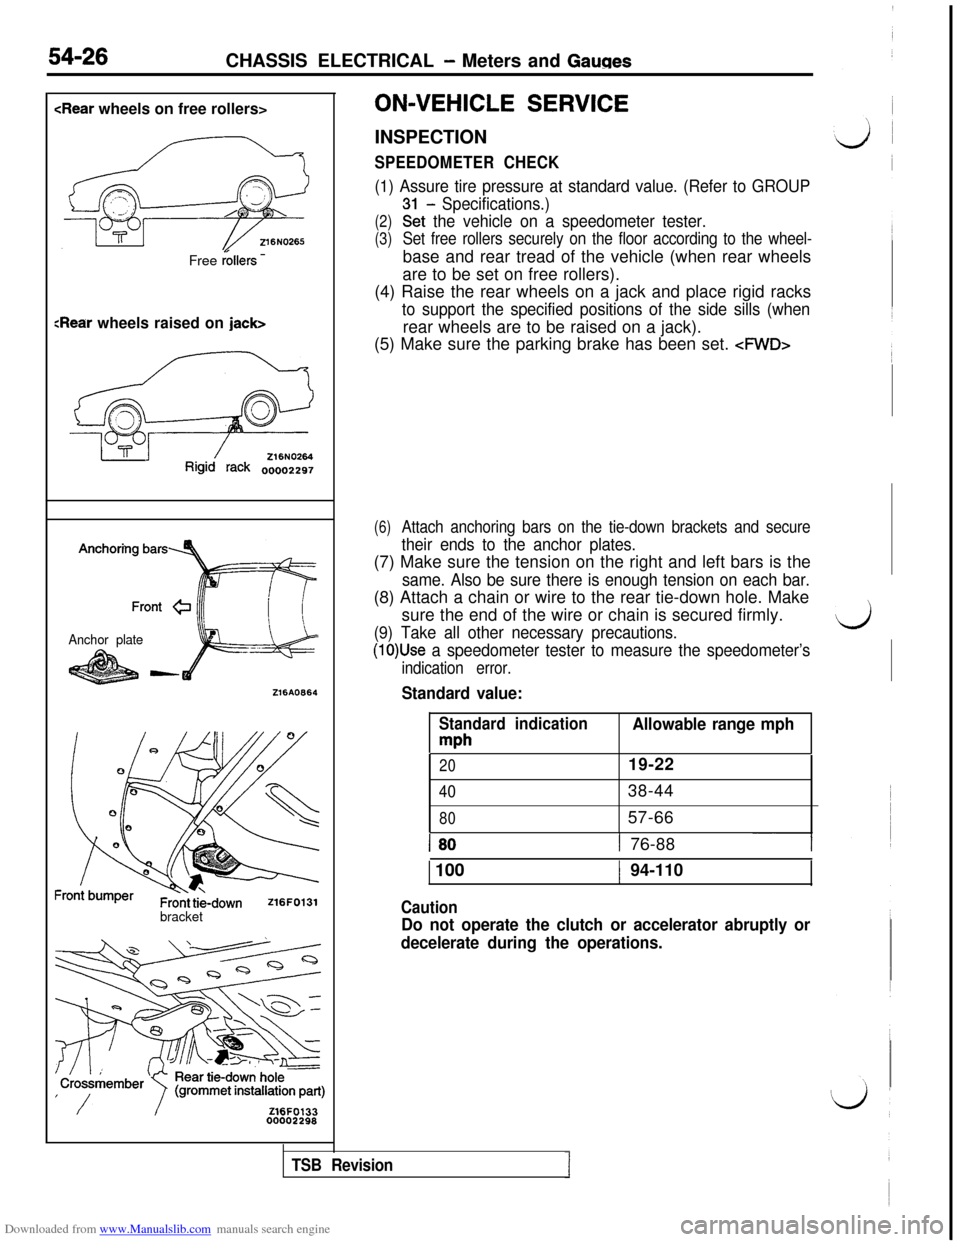
Free
r&Hers -
Sear wheels raised on jack>
?qi&%!g
Rigid rack oooo2297
Anchor plate
-w216AO864
bracket
/IZ16FO13300002298ON-VEHICLE
SERVICEINSPECTION
SPEEDOMETER CHECK
(1) Assure tire pressure at standard value. (Refer to GROUP
- Specifications.)
(2)Gt the vehicle on a speedometer tester.
(3)Set free rollers securely on the floor according to the wheel-base and rear tread of the vehicle (when rear wheels
are to be set on free rollers).
(4) Raise the rear wheels on a jack and place rigid racks
to support the specified positions of the side sills (whenrear wheels are to be raised on a jack).
(5) Make sure the parking brake has been set.
cPWD>
(6)Attach anchoring bars on the tie-down brackets and secure
their ends to the anchor plates.(7) Make sure the tension on the right and left bars is the
same. Also be sure there is enough tension on each bar.(8) Attach a chain or wire to the rear tie-down hole. Make
sure the end of the wire or chain is secured firmly.
(9) Take all other necessary precautions.
(1O)Use a speedometer tester to measure the speedometer’s
indication error.
Standard value:
Standard indication
mph
Allowable range mph
2019-22
4038-44
8057-66
1 801 76-88--I
1 100
Caution
1 94-110
Do not operate the clutch or accelerator abruptly or
decelerate during the operations.
d
TSB Revision
Page 523 of 738
Downloaded from www.Manualslib.com manuals search engine I,;CHASSIS ELECTRICAL
- Meters and Gauges54-27
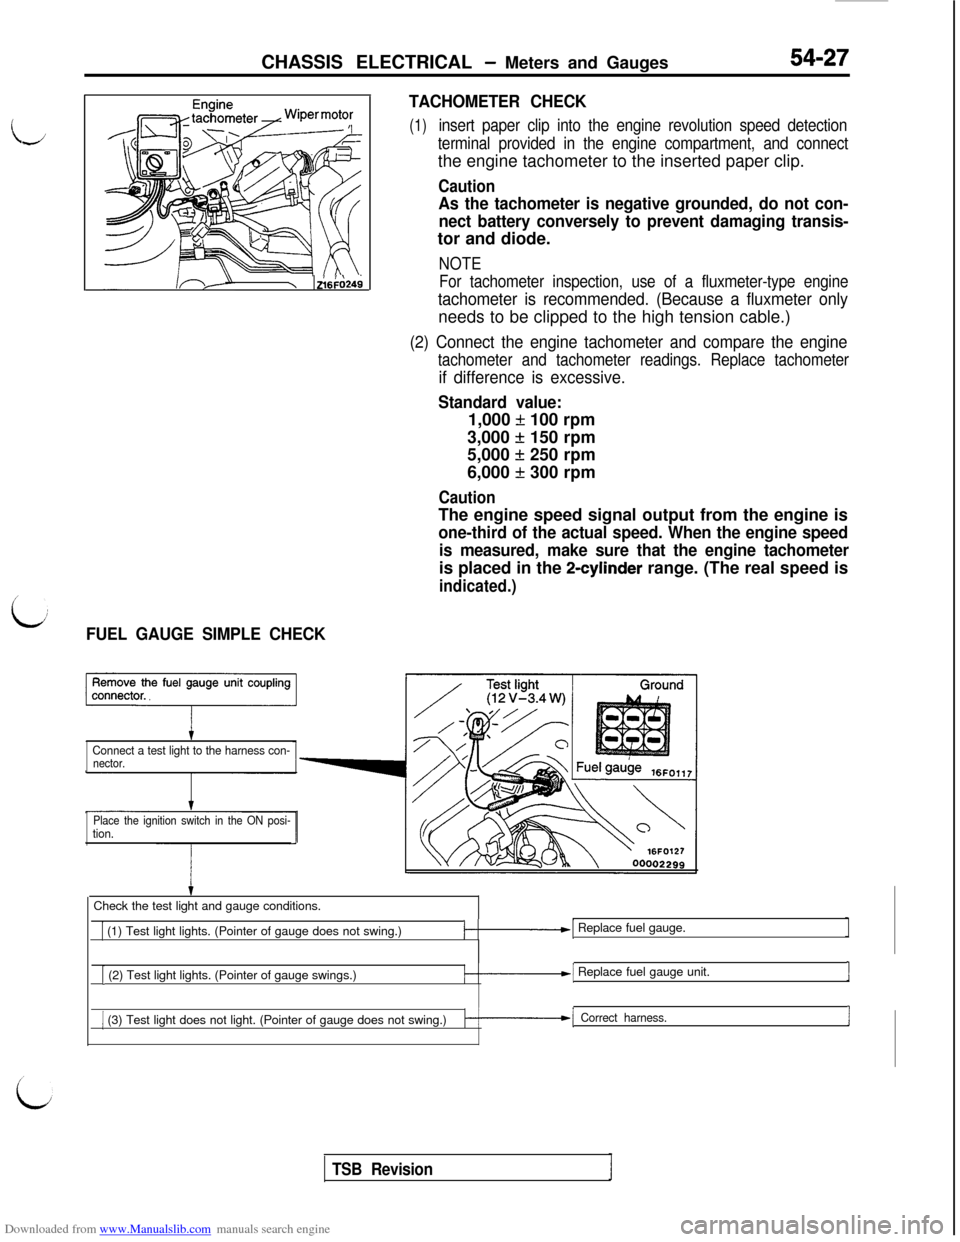
c I\\ zl6F024;
L:FUEL GAUGE SIMPLE CHECKTACHOMETER CHECK
(1)insert paper clip into the engine revolution speed detection
terminal provided in the engine compartment, and connectthe engine tachometer to the inserted paper clip.
Caution
As the tachometer is negative grounded, do not con-
nect battery conversely to prevent damaging transis-tor and diode.
NOTE
For tachometer inspection, use of a fluxmeter-type engine
tachometer is recommended. (Because a fluxmeter onlyneeds to be clipped to the high tension cable.)
(2) Connect the engine tachometer and compare the engine
tachometer and tachometer readings. Replace tachometer
if difference is excessive.
Standard value:1,000
f 100 rpm
3,000
+ 150 rpm
5,000
f 250 rpm
6,000
f 300 rpm
CautionThe engine speed signal output from the engine is
one-third of the actual speed. When the engine speed
is measured, make sure that the engine tachometeris placed in the
2-cylinder range. (The real speed is
indicated.)
Connect a test light to the harness con-nector.
Place the ignition switch in the ON posi-
tion.Check the test light and gauge conditions.
1 (1) Test light lights. (Pointer of gauge does not swing.)/-.-I Replace fuel gauge.
[ (2) Test light lights. (Pointer of gauge swings.)/-.--I Replace fuel gauge unit.1
1 (3) Test light does not light. (Pointer of gauge does not swing.)k-1 Correct harness.I
TSB Revision
Page 524 of 738
Downloaded from www.Manualslib.com manuals search engine 54-28CHASSIS ELECTRICAL - Meters and Gauges
16FO11500002300
16Fo255 00002383
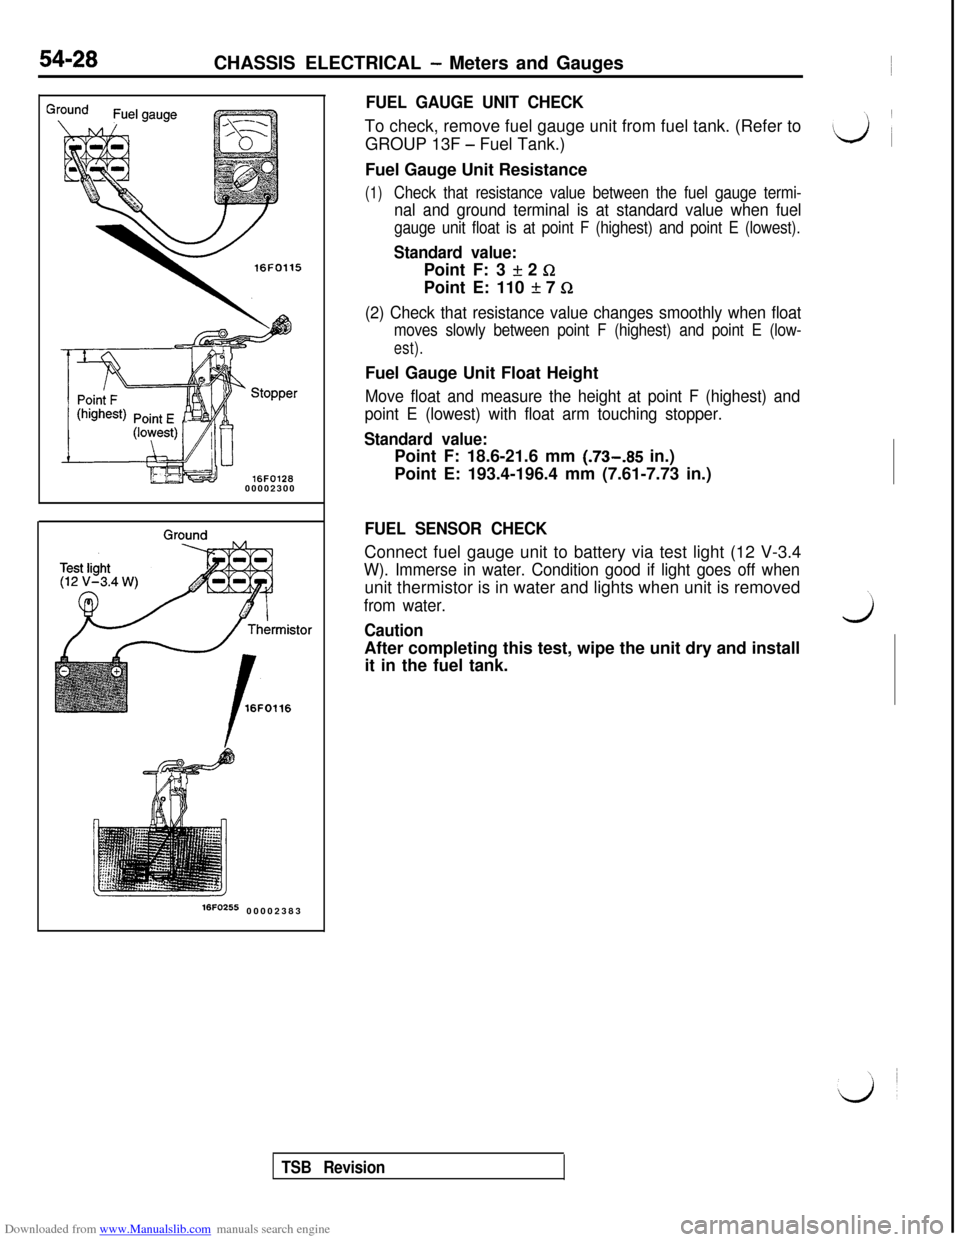
FUEL GAUGE UNIT CHECKTo check, remove fuel gauge unit from fuel tank. (Refer to
GROUP 13F
- Fuel Tank.)
Fuel Gauge Unit Resistance
(1)Check that resistance value between the fuel gauge termi-
nal and ground terminal is at standard value when fuel
gauge unit float is at point F (highest) and point E (lowest).
Standard value:Point F: 3
If: 2 GPoint E: 110
It 7 Q
(2) Check that resistance value changes smoothly when float
moves slowly between point F (highest) and point E (low-
est).Fuel Gauge Unit Float Height
Move float and measure the height at point F (highest) and
point E (lowest) with float arm touching stopper.
Standard value:Point F: 18.6-21.6 mm (.73-.85 in.)
Point E: 193.4-196.4 mm (7.61-7.73 in.)
FUEL SENSOR CHECKConnect fuel gauge unit to battery via test light (12 V-3.4
W). Immerse in water. Condition good if light goes off whenunit thermistor is in water and lights when unit is removed
from water.
CautionwAfter completing this test, wipe the unit dry and install
it in the fuel tank.
TSB Revision
Page 525 of 738
Downloaded from www.Manualslib.com manuals search engine CHASSIS ELECTRICAL - Meters and Gauaes
i
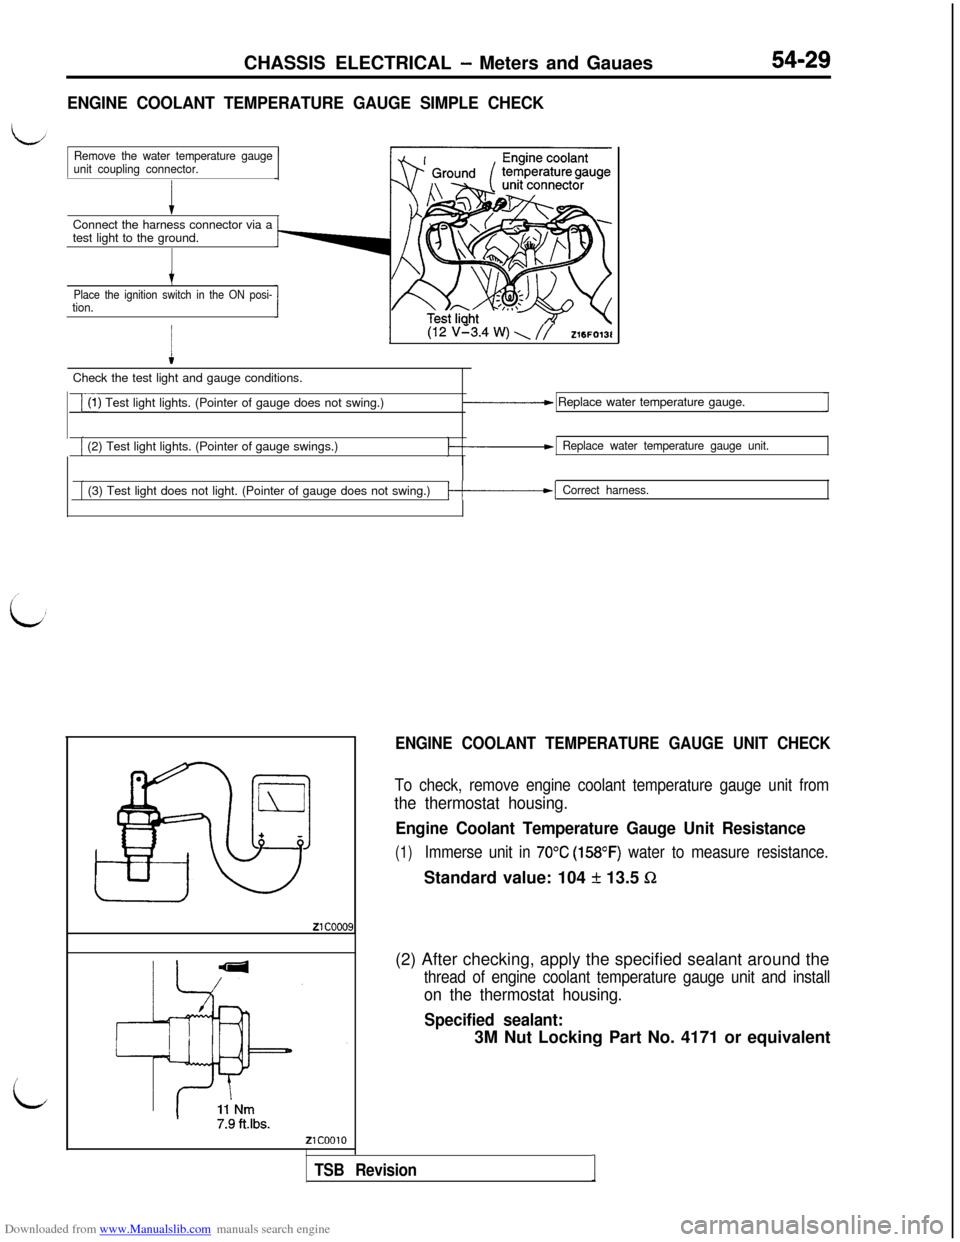
ENGINE COOLANT TEMPERATURE GAUGE SIMPLE CHECKConnect the harness connector via a
test light to the ground.
Remove the water temperature gauge
unit coupling connector.
t
Place the ignition switch in the ON posi-tion.
I
(12 v’3.4 w) \ //Z16FO13lCheck the test light and gauge conditions.
i(1) Test light lights. (Pointer of gauge does not swing.)_____c Replace water temperature gauge.
[ (2) Test light lights. (Pointer of gauge swings.)Replace water temperature gauge unit.
[ (3) Test light does not light. (Pointer of gauge does not swing.)/-------I Correct harness.
ENGINE COOLANT TEMPERATURE GAUGE UNIT CHECK
To check, remove engine coolant temperature gauge unit from
the thermostat housing.
Engine Coolant Temperature Gauge Unit Resistance
(1)Immerse unit in 70°C (158OF) water to measure resistance.Standard value: 104
f 13.5 Sz(2) After checking, apply the specified sealant around the
thread of engine coolant temperature gauge unit and install
on the thermostat housing.
Specified sealant:3M Nut Locking Part No. 4171 or equivalent
TSB RevisionI
Page 526 of 738
Downloaded from www.Manualslib.com manuals search engine 54-30CHASSIS ELECTRICAL - Meters and Gauges
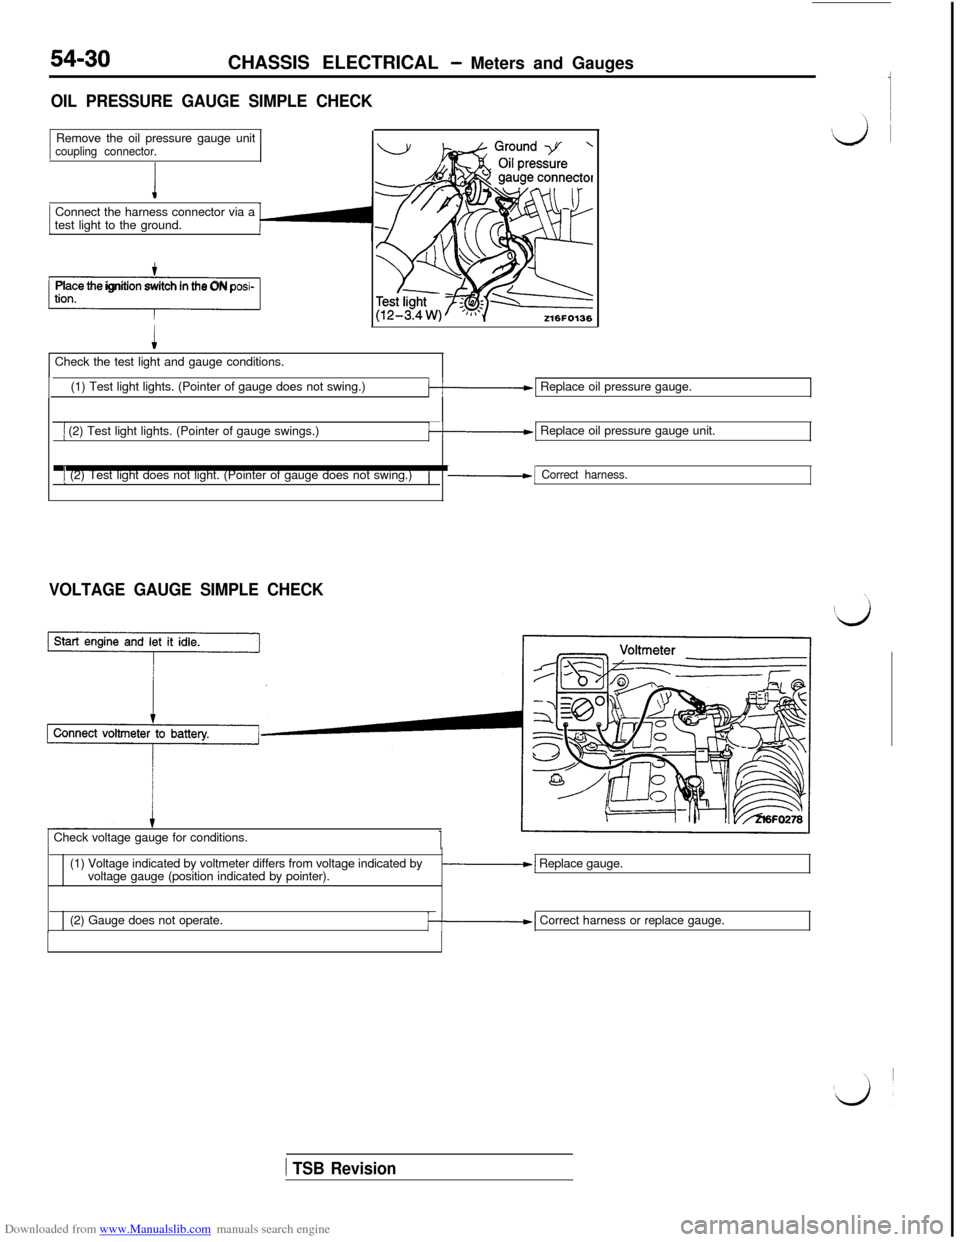
OIL PRESSURE GAUGE SIMPLE CHECKRemove the oil pressure gauge unit
coupling connector.Connect the harness connector via a
test light to the ground.
-1Place the ignition switch in the ON posi-Check the test light and gauge conditions.
(1) Test light lights. (Pointer of gauge does not swing.)
k-1 Replace oil pressure gauge.
1 (2) Test light lights. (Pointer of gauge swings.)k-1 Replace oil pressure gauge unit.
1 (2) Test light does not light. (Pointer of gauge does not swing.)/-1 Correct harness.
VOLTAGE GAUGE SIMPLE CHECKCheck voltage gauge for conditions.
(1) Voltage indicated by voltmeter differs from voltage indicated by
voltage gauge (position indicated by pointer).
-1 Replace gauge.
(2) Gauge does not operate.
/--I Correct harness or replace gauge.
1 TSB Revision
Page 527 of 738
Downloaded from www.Manualslib.com manuals search engine CHASSIS ELECTRICAL - Meters and Gauges54-31
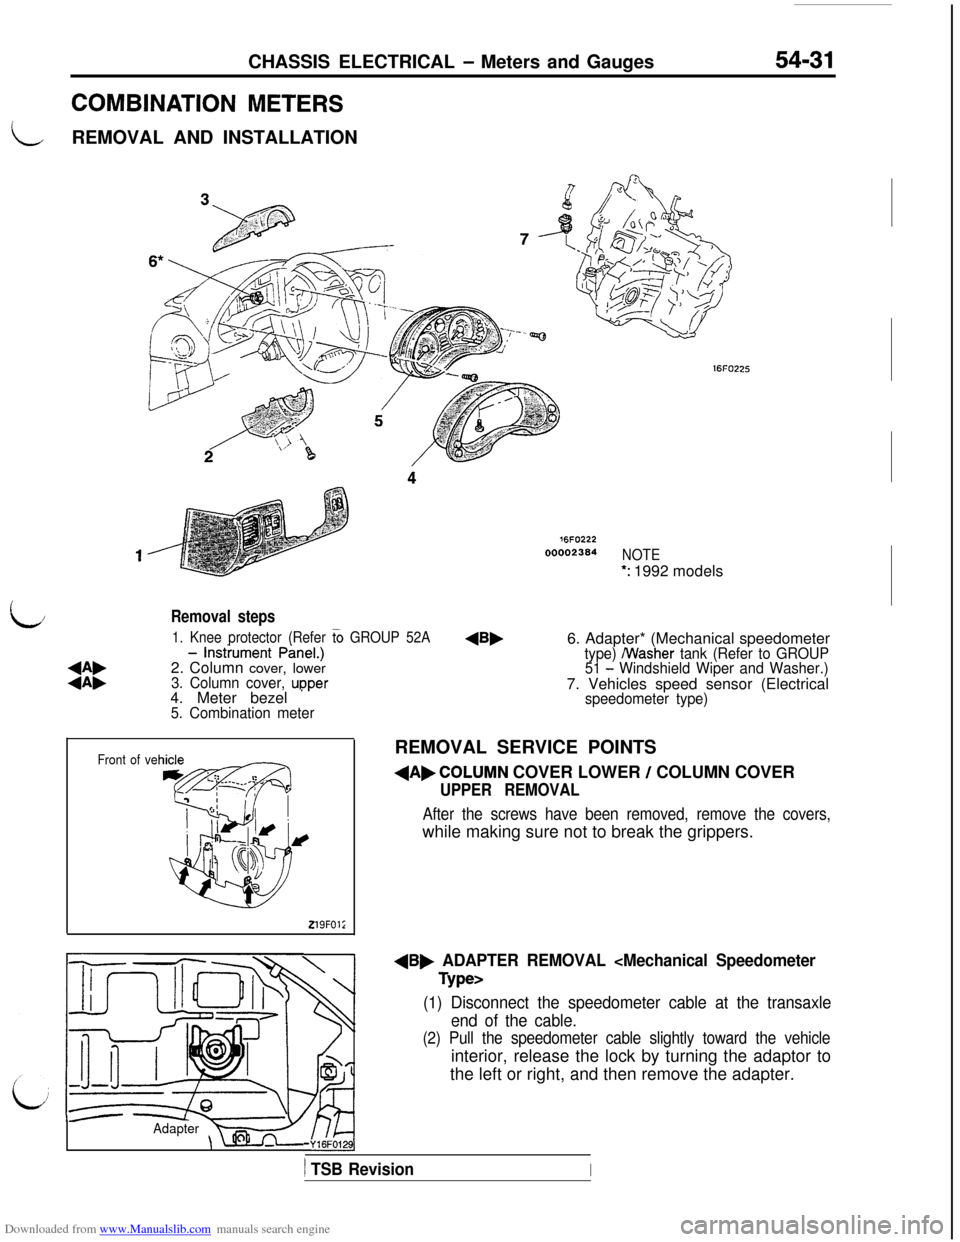
COMBINATION METERS
LREMOVAL AND INSTALLATION
76FO22200002364
NOTE
*: 1992 models
L/
:i:
- lnstiument PineI.)
2. Column cover, lower
3. Column cover, upper 1. Knee protector (Refer
G GROUP 52A4. Meter bezel
* ’5. Combination meter
Removal steps6. Adapter* (Mechanical speedometer
type) /Washer tank (Refer to GROUP
51 - Windshield Wiper and Washer.)7. Vehicles speed sensor (Electrical
Front of ve
219FOl;
speedometer type)REMOVAL SERVICE POINTS
dAbCOLUMN COVER LOWER / COLUMN COVER
UPPER REMOVAL
After the screws have been removed, remove the covers,while making sure not to break the grippers.
dB, ADAPTER REMOVAL
(1) Disconnect the speedometer cable at the transaxle
end of the cable.
(2) Pull the speedometer cable slightly toward the vehicleinterior, release the lock by turning the adaptor to
the left or right, and then remove the adapter.
Adapter-Y16FO129],
) TSB RevisionI
Page 528 of 738
Downloaded from www.Manualslib.com manuals search engine 54-32CHASSIS ELECTRICAL - Meters and Gauges
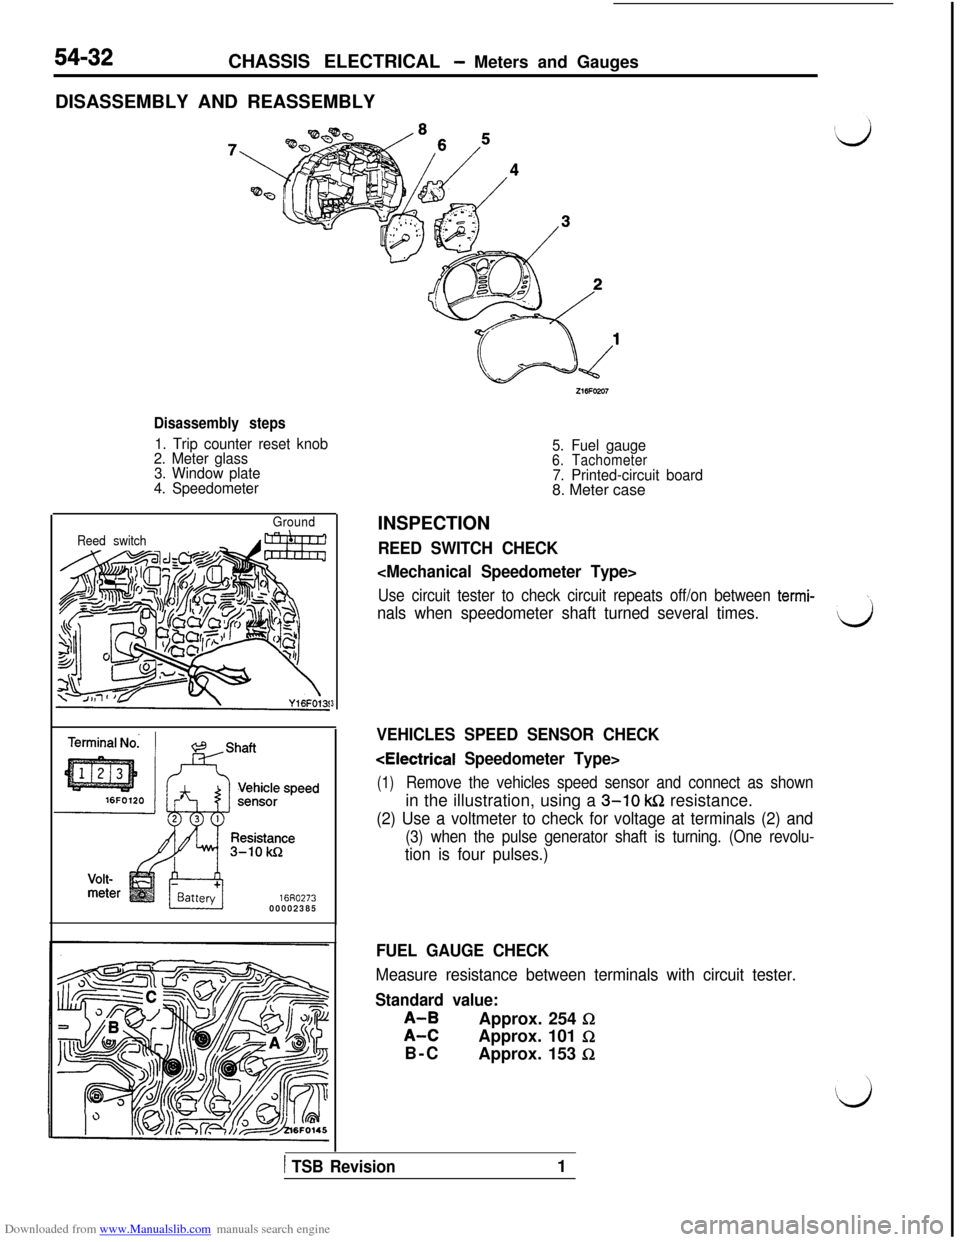
DISASSEMBLY AND REASSEMBLY
Disassembly steps
1. Trip counter reset knob
2. Meter glass
3. Window plate
4. Speedometer
Ground
Reed switch
16R027300002385
3
5. Fuel gauge6. Tachometer7. Printed-circuit board8. Meter case
INSPECTION
REED SWITCH CHECK
Use circuit tester to check circuit repeats off/on between termi-\
nals when speedometer shaft turned several times.d
VEHICLES SPEED SENSOR CHECK
(1)Remove the vehicles speed sensor and connect as shownin the illustration, using a
3-10 k&2 resistance.
(2) Use a voltmeter to check for voltage at terminals (2) and
(3) when the pulse generator shaft is turning. (One revolu-
tion is four pulses.)
FUEL GAUGE CHECK
Measure resistance between terminals with circuit tester.
Standard value:
;I;Approx. 254 0Approx. 101
I2B-C
Approx. 153
fi
1 TSB Revision1
Page 529 of 738
Downloaded from www.Manualslib.com manuals search engine CHASSIS ELECTRICAL - Meters and Gauges
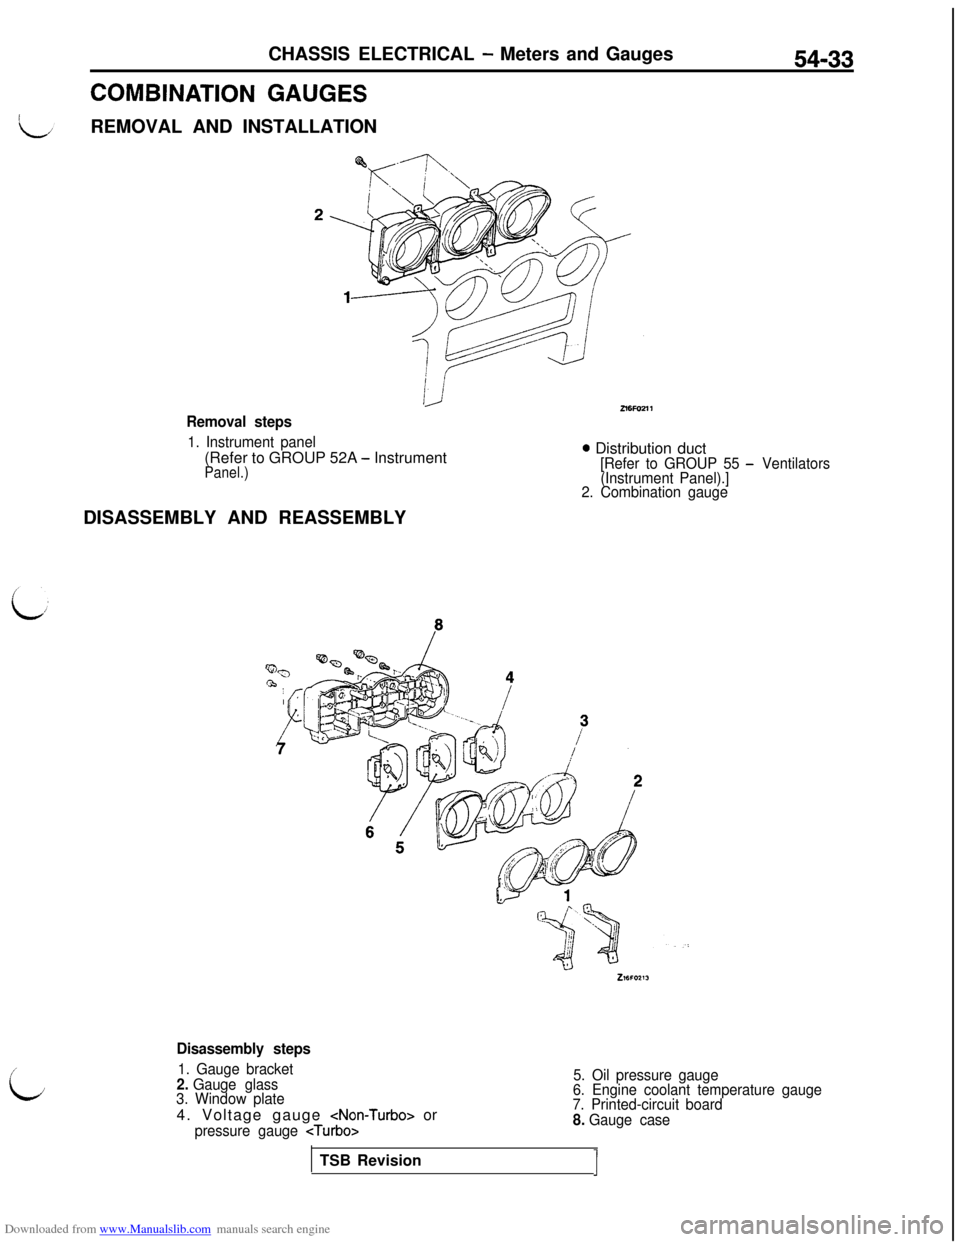
COMBINATION GAUGESREMOVAL AND INSTALLATION
54-33
Removal steps
1. Instrument panel(Refer to GROUP 52A
- InstrumentPanel.)
0 Distribution duct[Refer to GROUP 55 - Ventilators
(Instrument Panel).]
2. Combination gaugeDISASSEMBLY AND REASSEMBLY
i;
Disassembly steps
1. Gauge bracket2. Gauge glass
3. Window plate4. Voltage gauge
pressure gauge
5. Oil pressure gauge
6. Engine coolant temperature gauge
7. Printed-circuit board
8. Gauge caseTSB Revision
J
Page 530 of 738
Downloaded from www.Manualslib.com manuals search engine 54-34CHASSIS ELECTRICAL - Meters and Gauges216FO14C
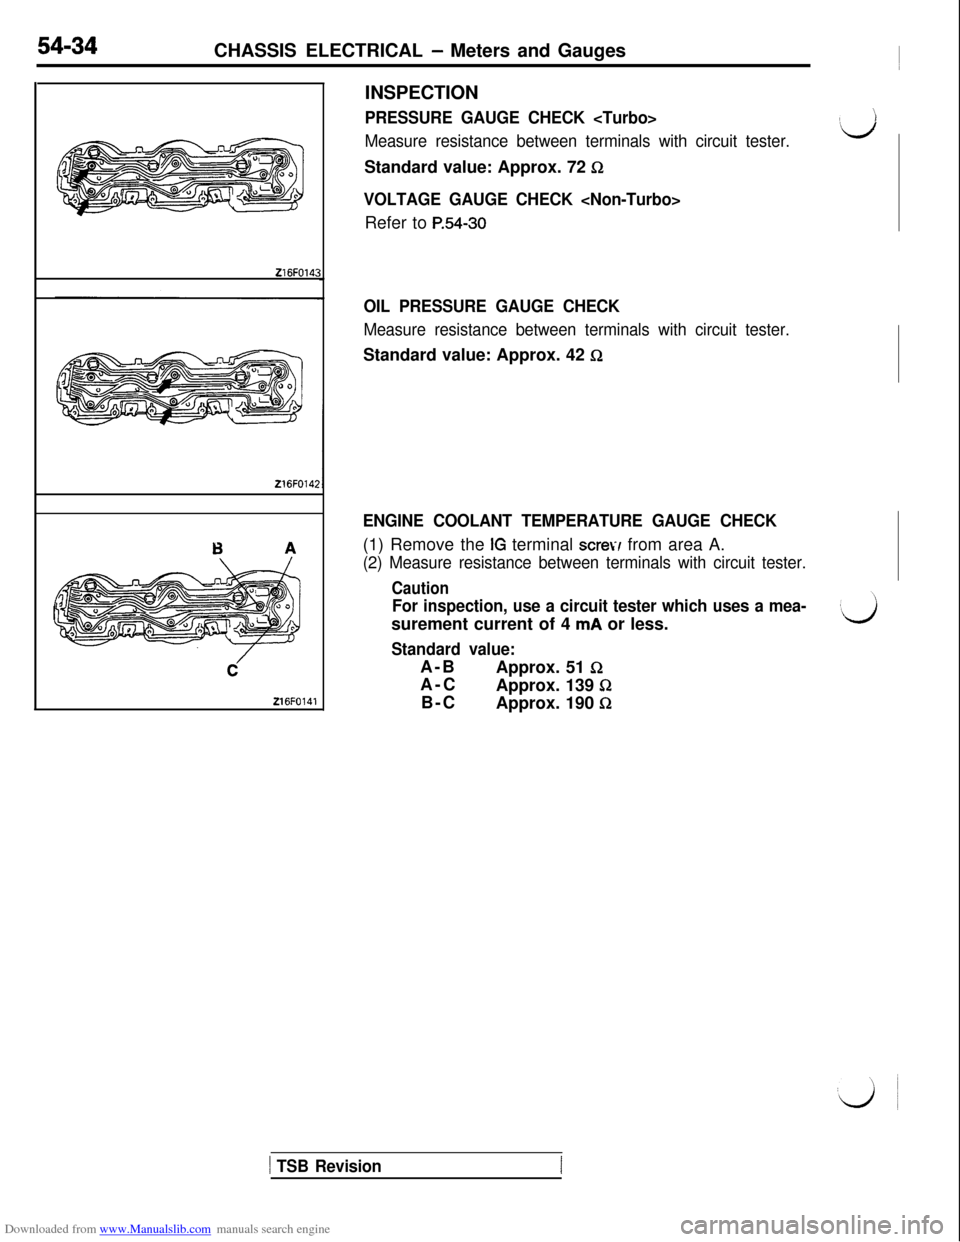
216FO14:216FO141INSPECTION
PRESSURE GAUGE CHECK
Measure resistance between terminals with circuit tester.Standard value: Approx. 72
&2
VOLTAGE GAUGE CHECK
P.54-30
OIL PRESSURE GAUGE CHECK
Measure resistance between terminals with circuit tester.Standard value: Approx. 42
Q
ENGINE COOLANT TEMPERATURE GAUGE CHECK(1) Remove the
IG terminal scre\;/ from area A.
(2) Measure resistance between terminals with circuit tester.
Caution
For inspection, use a circuit tester which uses a mea-surement current of 4
mA or less.
Standard value:A-B
Approx. 51
SzA-C
Approx. 139
QB-C
Approx. 190
R
1 TSB Revision