SPEED MITSUBISHI 380 2005 Owners Manual
[x] Cancel search | Manufacturer: MITSUBISHI, Model Year: 2005, Model line: 380, Model: MITSUBISHI 380 2005Pages: 1500, PDF Size: 47.87 MB
Page 1319 of 1500

TRACTION CONTROL SYSTEM (TCL) DIAGNOSIS
TRACTION CONTROL SYSTEM (TCL)13C-40
SIGNAL TERMINAL NO. NORMAL CONDITION
ABS (A-02) SENSOR
FR wheel speed sensor
(A-01)9 2 Less than 2 ohms
10 1 Less than 2 ohms
RR wheel speed sensor
(D-30)8 1 Less than 2 ohms
19 2 Less than 2 ohms
FL wheel speed sensor
(A-04)16 2 Less than 2 ohms
5 1 Less than 2 ohms
RL wheel speed sensor
(D-31)6 1 Less than 2 ohms
17 2 Less than 2 ohms
Page 1320 of 1500
TRACTION CONTROL SYSTEM (TCL) DIAGNOSIS
TRACTION CONTROL SYSTEM (TCL)13C-41
VOLTAGE AND SIGNAL CHECK AT ABS-ECU
(A-02) USING OSCILLOSCOPE
NOTE: If the ABS-8 ECU or the active wheel speed
sensor are disconnected, or if the wiring is an open/
short circuit, the ABS 8 ECU will shut off power sup-
ply to the respective wheel speed sensor. All other
wheel speed sensors will operate normally. To
restore the power supply, the ignition switch must be
turned to the "OFF" position then to the "ON" position
again..
WHEEL SPEED SENSOR AIR GAP:
Sensor air gap: (0.2mm - 0.85mm).
.
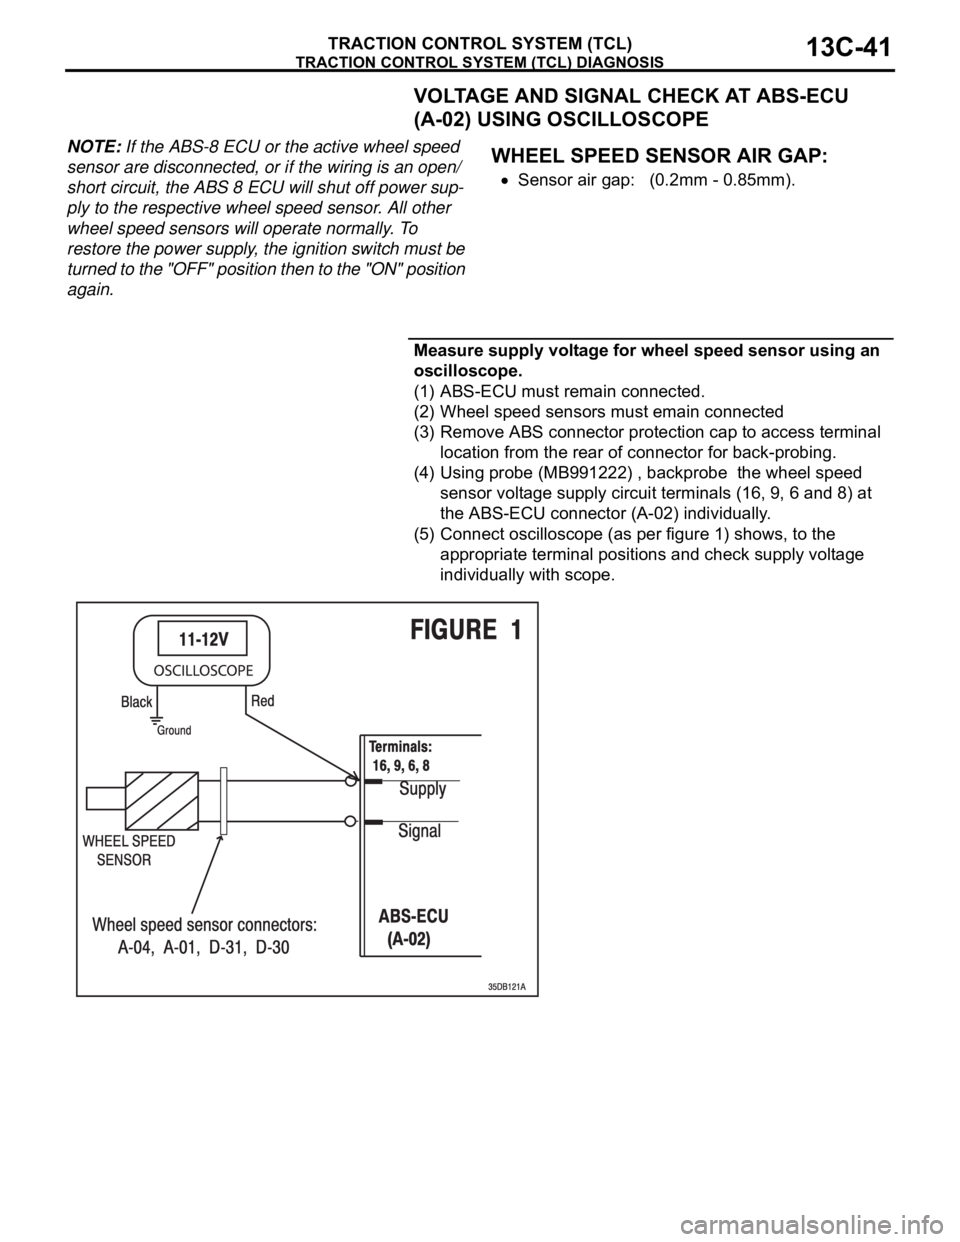
Measure supply voltage for wheel speed sensor using an
oscilloscope.
(1) ABS-ECU must remain connected.
(2) Wheel speed sensors must emain connected
(3) Remove ABS connector protection cap to access terminal
location from the rear of connector for back-probing.
(4) Using probe (MB991222) , backprobe the wheel speed
sensor voltage supply circuit terminals (16, 9, 6 and 8) at
the ABS-ECU connector (A-02) individually.
(5) Connect oscilloscope (as per figure 1) shows, to the
appropriate terminal positions and check supply voltage
individually with scope.
Page 1322 of 1500
TRACTION CONTROL SYSTEM (TCL) DIAGNOSIS
TRACTION CONTROL SYSTEM (TCL)13C-43
(7) The recommended Supply Voltage at terminals 16, 9, 6,
and 8 are:
Set value: 10.0Volts - 14.5Volts
Q: Is the supply voltage within the set value?
YES : Check wheel speed sensor signal at ABS-ECU using
an oscillopscope
NO :
Refer to Power supply systemP.35B-63
Refer to Motor supply systemP.35B-48
Refer to Valve relay systemP.35B-56
Measure wheel speed sensor signals using an
oscilloscope.
NOTE: To check connections of the wheel speed sensors,
remove the rear seat to access the rear wheel speed sen-
sor connectors, and remove inner front guard (splash
shield) to access the front wheel speed sensors.
(1) Wheel speed sensor must remain connected to measure
active sensor.
(2) ABS-ECU must remain connected.
(3) Remove ABS connector protection cap to access terminal
location from the rear of connector for back-probing.
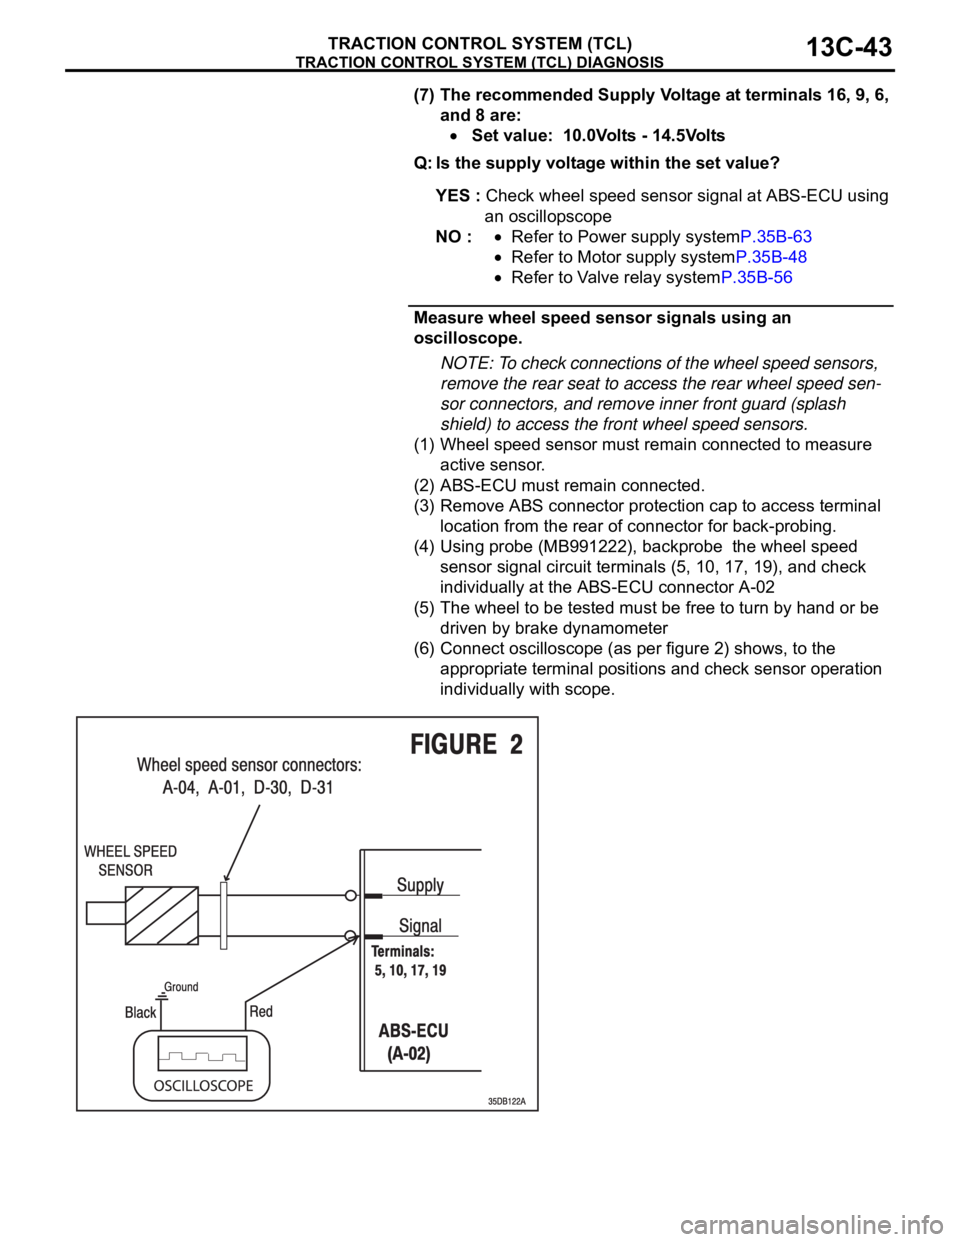
(4) Using probe (MB991222), backprobe the wheel speed
sensor signal circuit terminals (5, 10, 17, 19), and check
individually at the ABS-ECU connector A-02
(5) The wheel to be tested must be free to turn by hand or be
driven by brake dynamometer
(6) Connect oscilloscope (as per figure 2) shows, to the
appropriate terminal positions and check sensor operation
individually with scope.
Page 1323 of 1500
TRACTION CONTROL SYSTEM (TCL) DIAGNOSIS
TRACTION CONTROL SYSTEM (TCL)13C-44
Connect oscilloscope to FL sensor signal terminal (5) at
ABS-ECU (A-02)
Connect oscilloscope to FR sensor signal terminal (10)
at ABS-ECU (A-02)
Connect oscilloscope to RL sensor signal terminal (17)
at ABS-ECU (A-02)
Connect oscilloscope to RR sensor signal terminal (19)
at ABS-ECU (A-02)
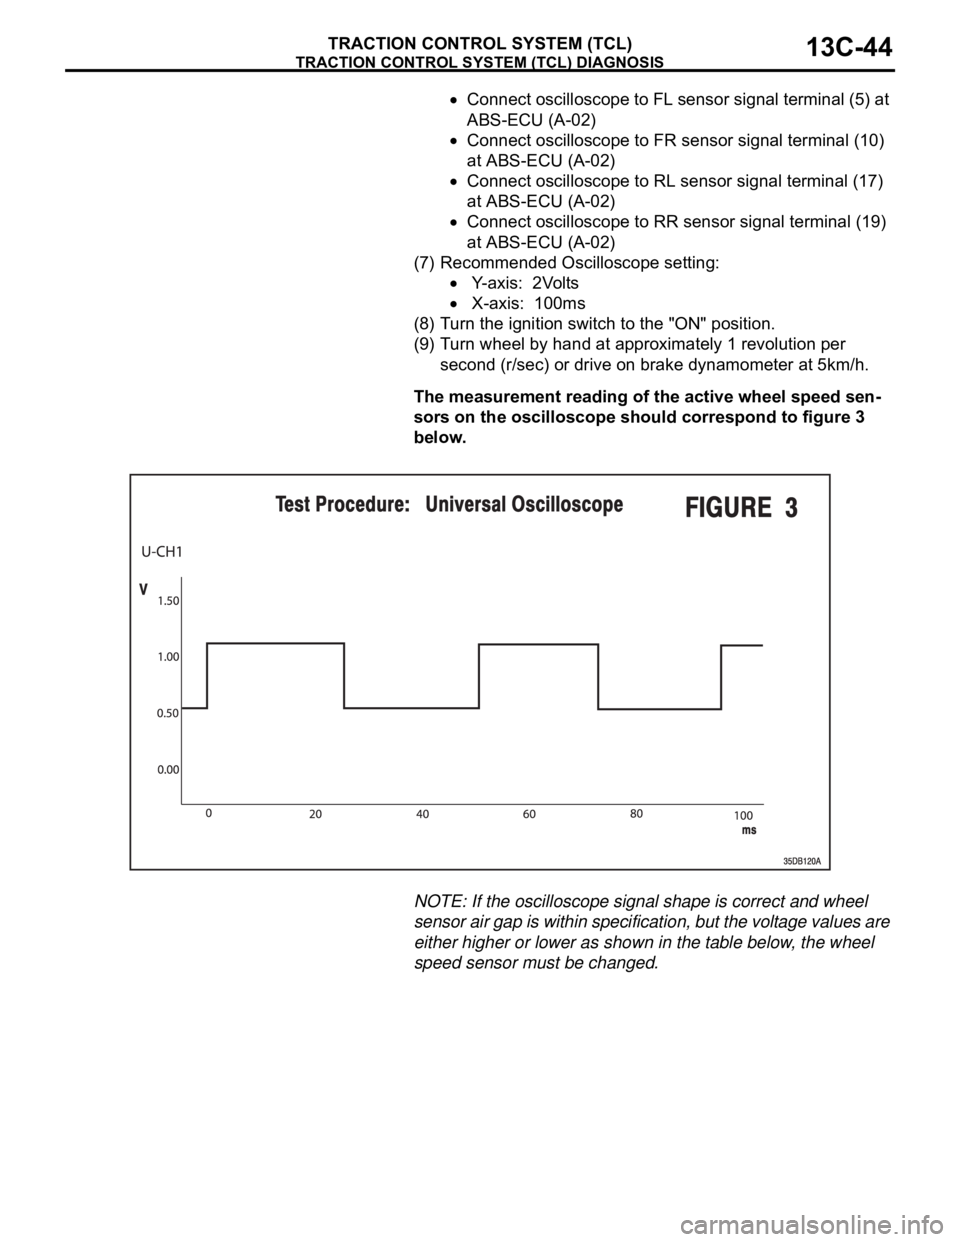
(7) Recommended Oscilloscope setting:
Y-axis: 2Volts
X-axis: 100ms
(8) Turn the ignition switch to the "ON" position.
(9) Turn wheel by hand at approximately 1 revolution per
second (r/sec) or drive on brake dynamometer at 5km/h.
The measurement reading of the active wheel speed sen-
sors on the oscilloscope should correspond to figure 3
below.
NOTE: If the oscilloscope signal shape is correct and wheel
sensor air gap is within specification, but the voltage values are
either higher or lower as shown in the table below, the wheel
speed sensor must be changed.
Page 1324 of 1500
SPECIAL TOOLS
TRACTION CONTROL SYSTEM (TCL)13C-45
SPECIAL TOOLSM1136000600024
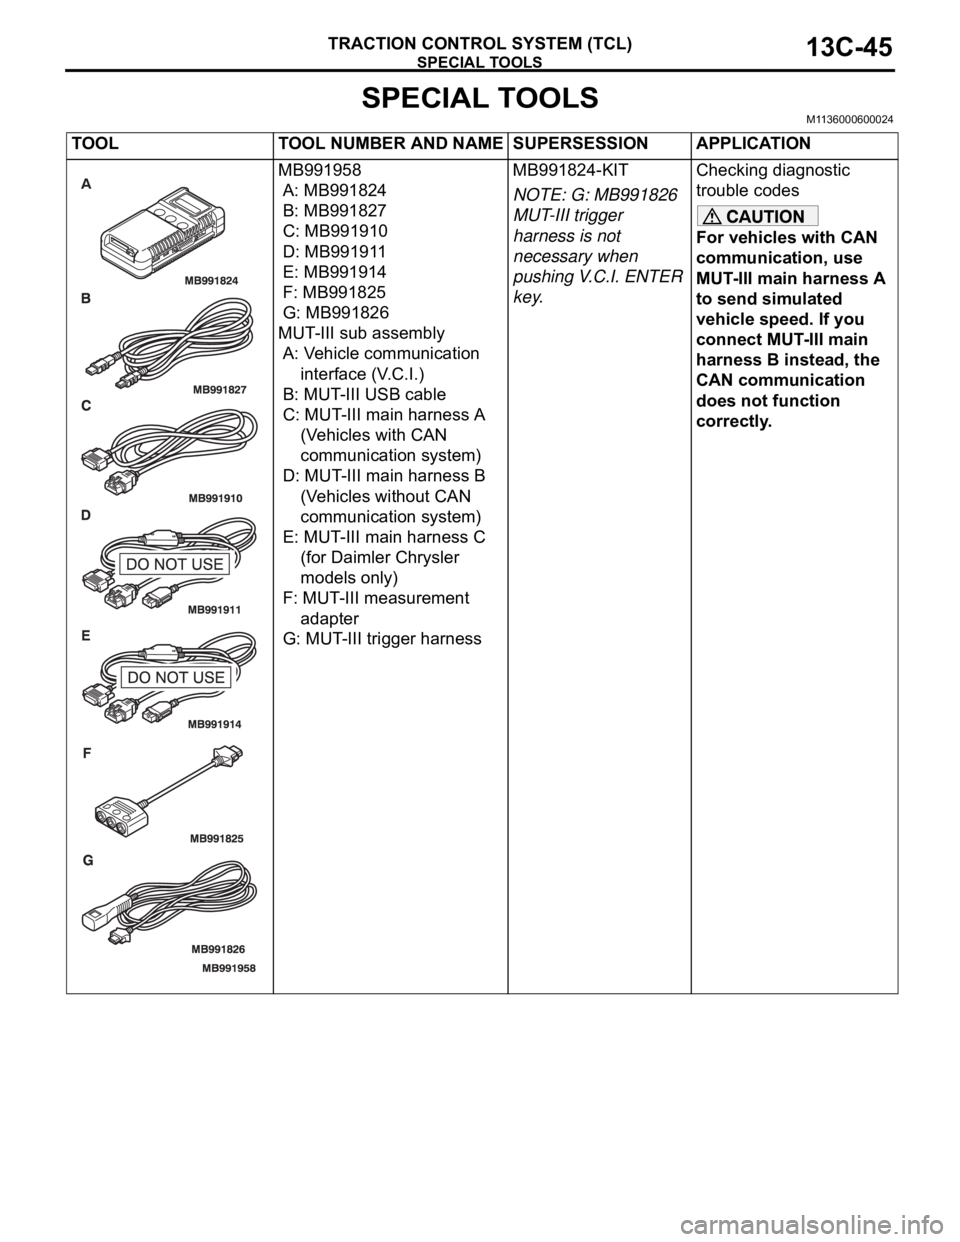
TOOL TOOL NUMBER AND NAME SUPERSESSION APPLICATION
MB991958
A: MB991824
B: MB991827
C: MB991910
D: MB991911
E: MB991914
F: MB991825
G: MB991826
MUT-III sub assembly
A: Vehicle communication
interface (V.C.I.)
B: MUT-III USB cable
C: MUT-III main harness A
(Vehicles with CAN
communication system)
D: MUT-III main harness B
(Vehicles without CAN
communication system)
E: MUT-III main harness C
(for Daimler Chrysler
models only)
F: MUT-III measurement
adapter
G: MUT-III trigger harnessMB991824-KIT
NOTE: G: MB991826
MUT-III trigger
harness is not
necessary when
pushing V.C.I. ENTER
key.Checking diagnostic
trouble codes
For vehicles with CAN
communication, use
MUT-III main harness A
to send simulated
vehicle speed. If you
connect MUT-III main
harness B instead, the
CAN communication
does not function
correctly.
Page 1327 of 1500
ON-VEHICLE SERVICE
TRACTION CONTROL SYSTEM (TCL)13C-48
To prevent damage to diagnostic tool MB991958, always
turn the ignition switch to the "LOCK" (OFF) position
before connecting or disconnecting diagnostic tool
MB991958.
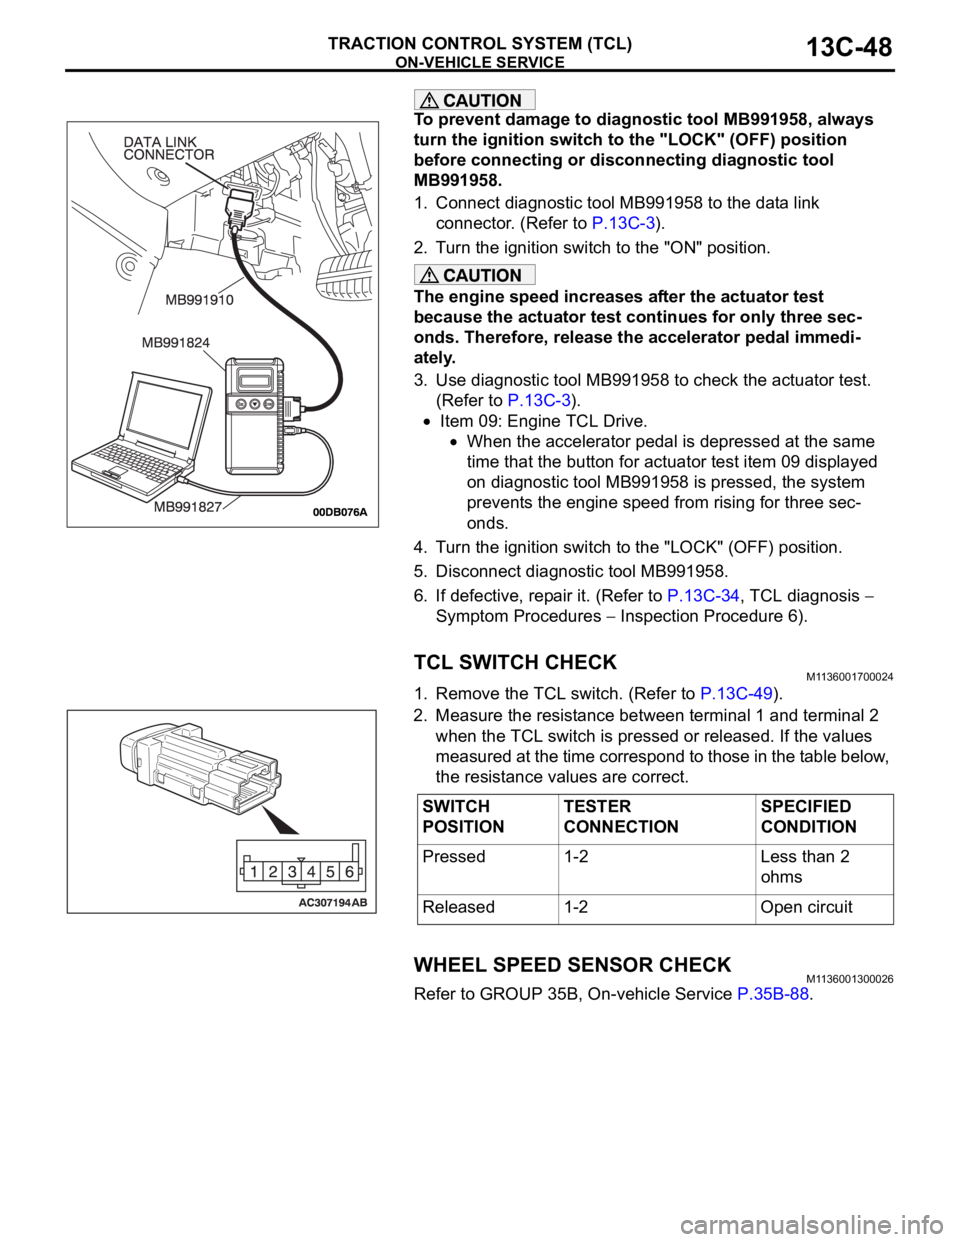
1. Connect diagnostic tool MB991958 to the data link
connector. (Refer to P.13C-3).
2. Turn the ignition switch to the "ON" position.
The engine speed increases after the actuator test
because the actuator test continues for only three sec-
onds. Therefore, release the accelerator pedal immedi-
ately.
3. Use diagnostic tool MB991958 to check the actuator test.
(Refer to P.13C-3).
Item 09: Engine TCL Drive.
When the accelerator pedal is depressed at the same
time that the button for actuator test item 09 displayed
on diagnostic tool MB991958 is pressed, the system
prevents the engine speed from rising for three sec-
onds.
4. Turn the ignition switch to the "LOCK" (OFF) position.
5. Disconnect diagnostic tool MB991958.
6. If defective, repair it. (Refer to P.13C-34, TCL diagnosis
Symptom Procedures
Inspection Procedure 6).
TCL SWITCH CHECKM1136001700024
1. Remove the TCL switch. (Refer to P.13C-49).
2. Measure the resistance between terminal 1 and terminal 2
when the TCL switch is pressed or released. If the values
measured at the time correspond to those in the table below,
the resistance values are correct.
WHEEL SPEED SENSOR CHECKM1136001300026
Refer to GROUP 35B, On-vehicle Service P.35B-88.
SWITCH
POSITIONTESTER
CONNECTIONSPECIFIED
CONDITION
Pressed 1-2 Less than 2
ohms
Released 1-2 Open circuit
Page 1328 of 1500
TCL SWITCH
TRACTION CONTROL SYSTEM (TCL)13C-49
TCL SWITCH
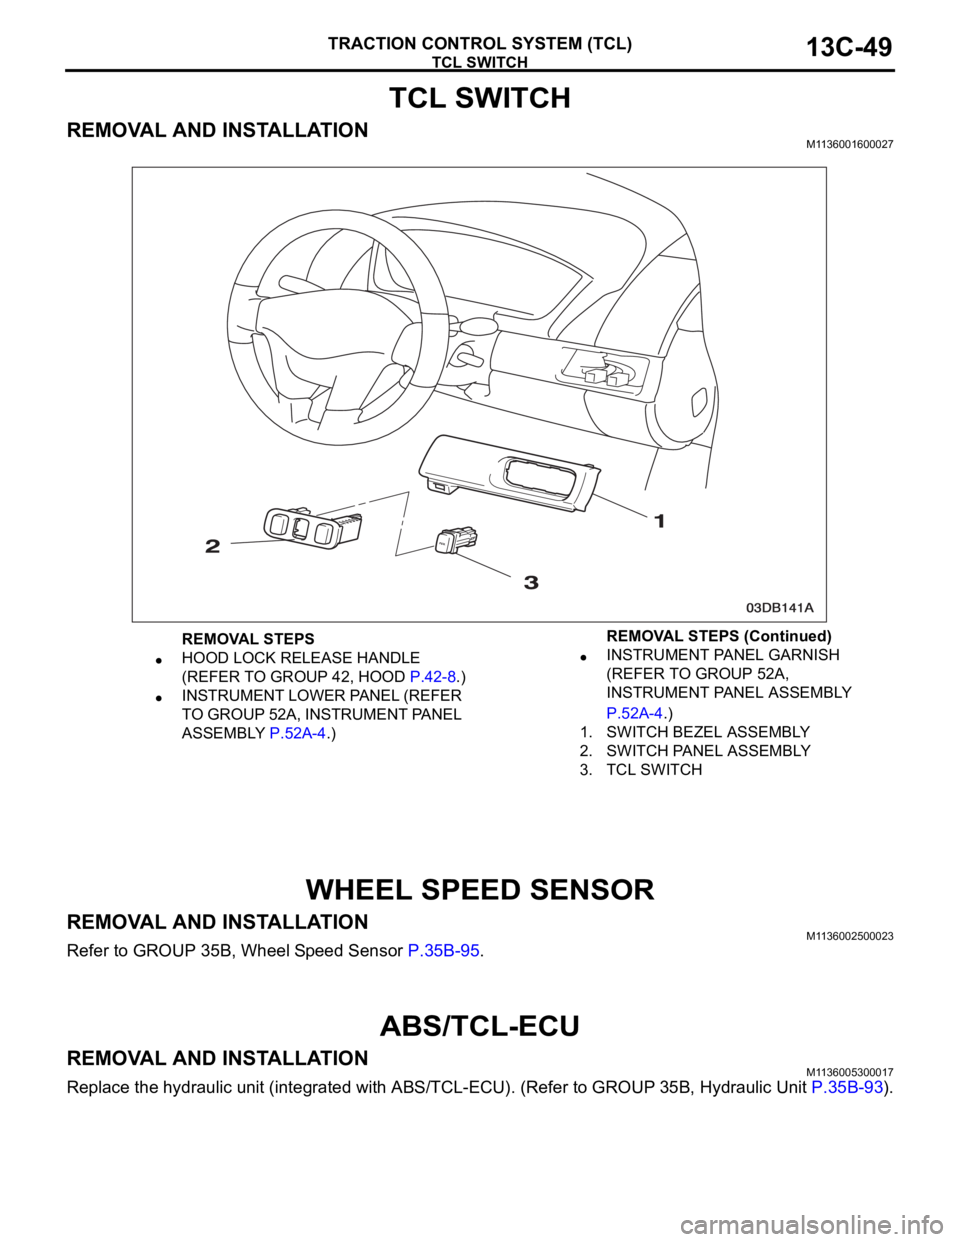
REMOVAL AND INSTALLATIONM1136001600027
WHEEL SPEED SENSOR
REMOVAL AND INSTALLATIONM1136002500023
Refer to GROUP 35B, Wheel Speed Sensor P.35B-95.
ABS/TCL-ECU
REMOVAL AND INSTALLATIONM1136005300017
Replace the hydraulic unit (integrated with ABS/TCL-ECU). (Refer to GROUP 35B, Hydraulic Unit P.35B-93).
REMOVAL STEPS
HOOD LOCK RELEASE HANDLE
(REFER TO GROUP 42, HOOD P.42-8.)
INSTRUMENT LOWER PANEL (REFER
TO GROUP 52A, INSTRUMENT PANEL
ASSEMBLY P.52A-4.)
INSTRUMENT PANEL GARNISH
(REFER TO GROUP 52A,
INSTRUMENT PANEL ASSEMBLY
P.52A-4.)
1. SWITCH BEZEL ASSEMBLY
2. SWITCH PANEL ASSEMBLY
3. TCL SWITCH REMOVAL STEPS (Continued)
Page 1339 of 1500
ENGINE CONTROL
ENGINE AND EMISSION CONTROL17-8
SPECIAL TOOLM1171000600045
TOOL TOOL NUMBER AND
NAMESUPERSESSION APPLICATION
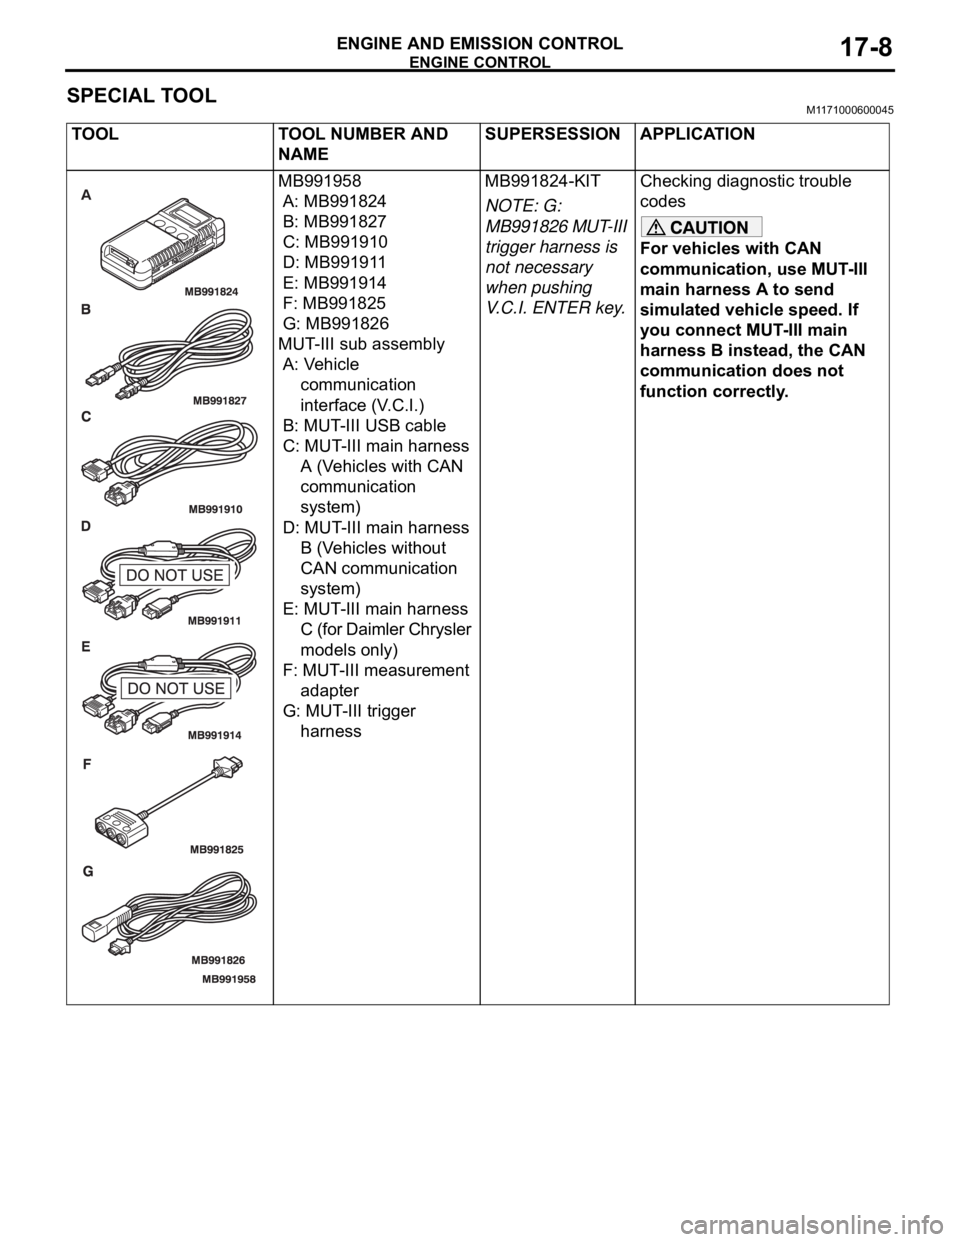
MB991958
A: MB991824
B: MB991827
C: MB991910
D: MB991911
E: MB991914
F: MB991825
G: MB991826
MUT-III sub assembly
A: Vehicle
communication
interface (V.C.I.)
B: MUT-III USB cable
C: MUT-III main harness
A (Vehicles with CAN
communication
system)
D: MUT-III main harness
B (Vehicles without
CAN communication
system)
E: MUT-III main harness
C (for Daimler Chrysler
models only)
F: MUT-III measurement
adapter
G: MUT-III trigger
harnessMB991824-KIT
NOTE: G:
MB991826 MUT-III
trigger harness is
not necessary
when pushing
V.C.I. ENTER key.Checking diagnostic trouble
codes
For vehicles with CAN
communication, use MUT-III
main harness A to send
simulated vehicle speed. If
you connect MUT-III main
harness B instead, the CAN
communication does not
function correctly.
Page 1341 of 1500
AUTO-CRUISE CONTROL
ENGINE AND EMISSION CONTROL17-10
AUTO-CRUISE CONTROL
GENERAL DESCRIPTIONM1172000100281
By using the auto-cruise control system, the driver
can select and maintain a desired cruising speed
[between 40 km/h (25 mph) and 200 km/h (124
mph)] without depressing the accelerator pedal.NOTE: If engine speed reaches and exceeds 6000
r/min the Auto Cruise Control System will be can-
celled automatically.
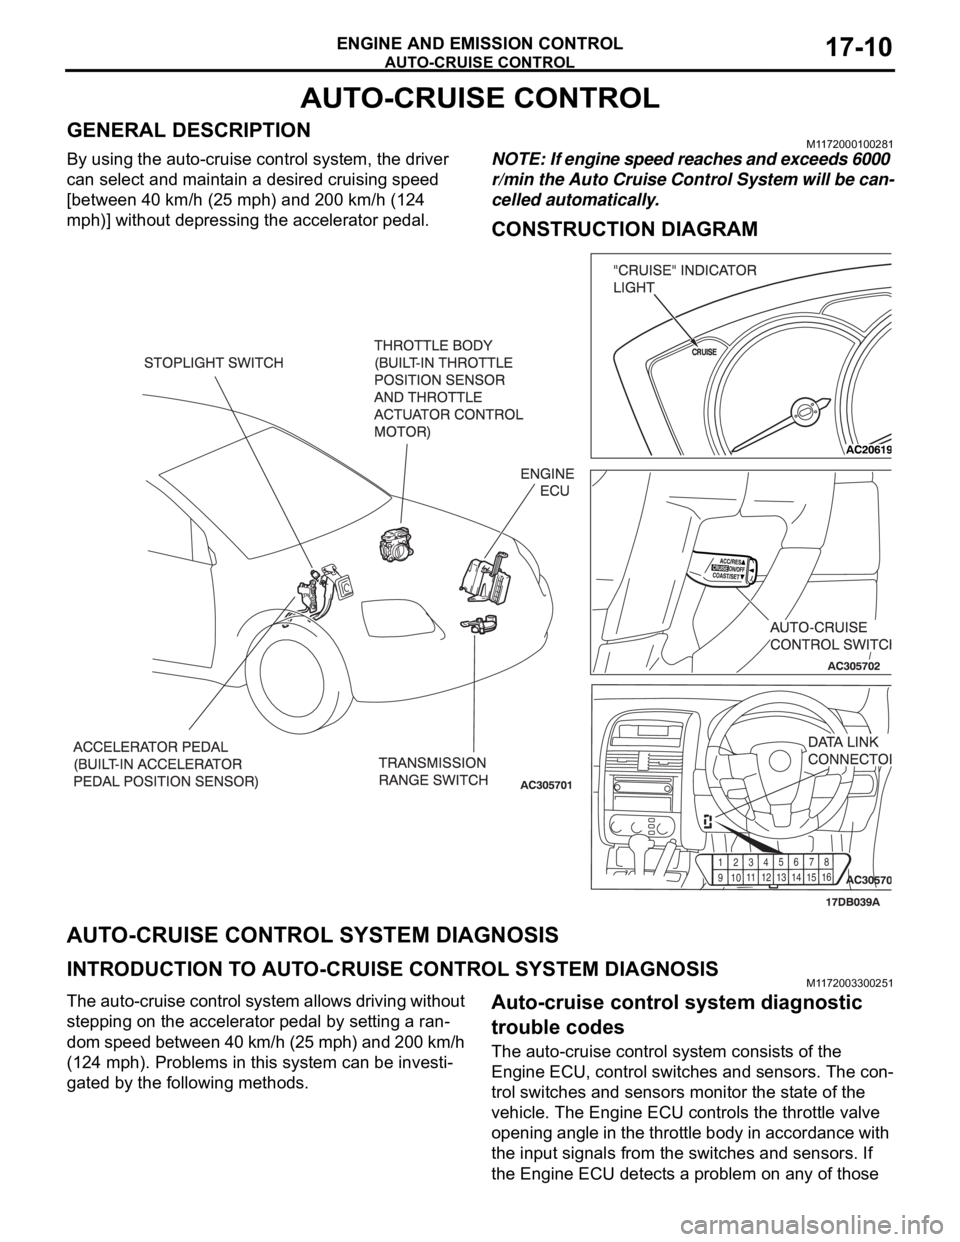
CONSTRUCTION DIAGRAM
AUTO-CRUISE CONTROL SYSTEM DIAGNOSIS
INTRODUCTION TO AUTO-CRUISE CONTROL SYSTEM DIAGNOSISM1172003300251
The auto-cruise control system allows driving without
stepping on the accelerator pedal by setting a ran-
dom speed between 40 km/h (25 mph) and 200 km/h
(124 mph). Problems in this system can be investi-
gated by the following methods.Auto-cruise control system diagnostic
trouble codes
The auto-cruise control system consists of the
Engine ECU, control switches and sensors. The con-
trol switches and sensors monitor the state of the
vehicle. The Engine ECU controls the throttle valve
opening angle in the throttle body in accordance with
the input signals from the switches and sensors. If
the Engine ECU detects a problem on any of those
91
01
1
12
1
31
41
5
16 123
456
78
Page 1346 of 1500
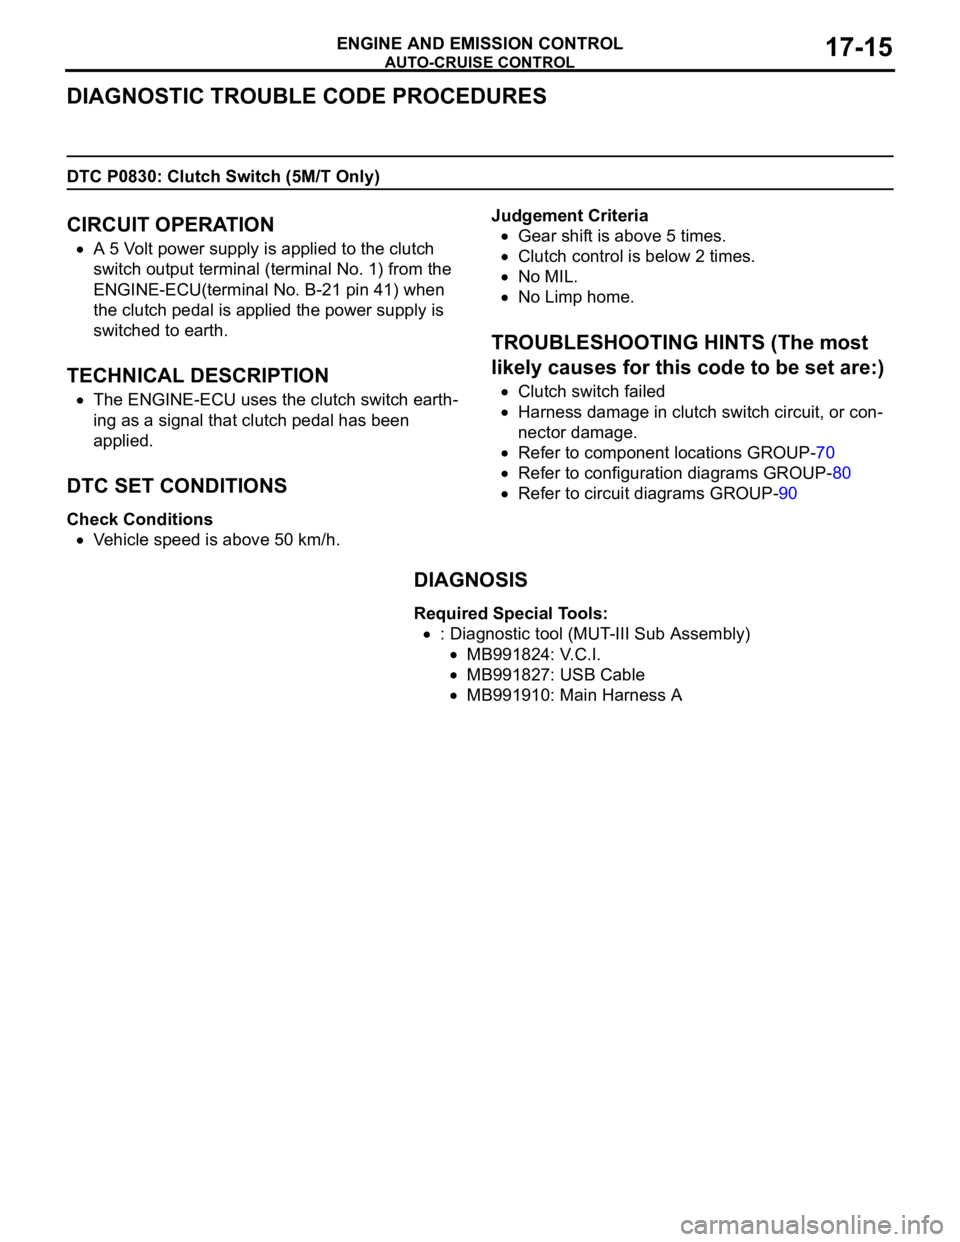
AUTO-CRUISE CONTROL
ENGINE AND EMISSION CONTROL17-15
DIAGNOSTIC TROUBLE CODE PROCEDURES
DTC P0830: Clutch Switch (5M/T Only)
.
CIRCUIT OPERATION
A 5 Volt power supply is applied to the clutch
switch output terminal (terminal No. 1) from the
ENGINE-ECU(terminal No. B-21 pin 41) when
the clutch pedal is applied the power supply is
switched to earth.
.
TECHNICAL DESCRIPTION
The ENGINE-ECU uses the clutch switch earth-
ing as a signal that clutch pedal has been
applied.
.
DTC SET CONDITIONS
Check Conditions
Vehicle speed is above 50 km/h.Judgement Criteria
Gear shift is above 5 times.
Clutch control is below 2 times.
No MIL.
No Limp home.
.
TROUBLESHOOTING HINTS (The most
likely causes for this code to be set are:)
Clutch switch failed
Harness damage in clutch switch circuit, or con-
nector damage.
Refer to component locations GROUP-70
Refer to configuration diagrams GROUP-80
Refer to circuit diagrams GROUP-90
DIAGNOSIS
Required Special Tools:
: Diagnostic tool (MUT-III Sub Assembly)
MB991824: V.C.I.
MB991827: USB Cable
MB991910: Main Harness A