RADIO MITSUBISHI COLT 2008 Owner's Manual (in English)
[x] Cancel search | Manufacturer: MITSUBISHI, Model Year: 2008, Model line: COLT, Model: MITSUBISHI COLT 2008Pages: 450, PDF Size: 14.57 MB
Page 25 of 450
General information5
4. To fill with fuel correctly mainly depends on correct han-dling of the fuel filler gun. Do not tilt the gun. Insert the
gun in the tank port as far as it will go.
5. When the gun stops automatically, withdraw it halfway in the tank port. After the second automatic stop, do not fill
with any more fuel.
6. To close, turn the fuel tank filler tube cap slowly clock-
wise until you hear a clicking sound, then gently push the
fuel tank filler door closed.Installation of accessories
E00200300413
We recommend you to consult your MITSUBISHI MOTORS
Authorized Service Point.
● The installation of accessories, optional parts, should only
be carried out within the limits prescribed by law in your
country, and in accordance wi th the guidelines fitting
instructions and warnings contained within the documents
accompanying the parts or accessories.
● Improper installation of electrical components may cause
an electrical fire if incorrect ly fitted. Please refer to the
“Modification/alterations to th e electrical or fuel systems”
section within this owner’s manual.
● Using a cellular phone or radio set inside the vehicle with-
out an external antenna may cause electrical system inter-
ference, which could lead to unsafe vehicle operation.
● Tyres and wheels which do no t meet specifications must
not be used.
Refer to the “Specifications ” section for information
regarding wheel and tyre sizes.
CAUTION!
● A label which reads “UNLEADED FUEL ONLY” is
attached to the fuel tank f iller lid of vehicles which
can only operate on unlead ed petrol. Serious engine
and catalytic converter damage will result if leaded
petrol is put into these ve hicles, and this must conse-
quently never be attempted.
CAUTION!
● To avoid fuel spillage and overfilling, do not “top-
off” the fuel tank.
CAUTION!
●If you need to replace the fuel tank filler tube cap,
use only the cap specified for your vehicle model.
Page 34 of 450
1-6 Locking and unlocking
1
To unlock
Press the UNLOCK switch (2) to unlock all the doors and the
tailgate.
If they are unlocked while the room lamp is not illuminated,
the room lamp will be turned on for approximately 15 seconds
and the turn-signal lamps will blink twice.
NOTE● If the UNLOCK switch (2) is pressed and any of the doors
or tailgate is not opened within approximately 30 seconds:
relocking will automatically occur.
● It is possible to modify the functions as follows:
For further information, contact your MITSUBISHI
MOTORS Authorized Service Point.
• The time from pressing of the UNLOCK switch (2) to
the moment of automatic locking can be changed.
• The confirmation function (f lashing of the turn-signal
lamps) can be set to operate only when the doors and
tailgate are locked or only when the doors and tailgate
are unlocked.
• The confirmation function (which indicates locking or unlocking of the doors and ta ilgate with the flash of the
turn-signal lamps) can be deactivated.
• The number of times the turn-signal lamps are flashed by the confirmation function can be changed.
Operation of the Dead Lock System
For vehicles with a Dead Lock System, the Dead Lock System
can be set using the remote controller.
(Refer to “Dead Lock System’’ on page 1-10.)
NOTE● For vehicles with a Dead Lo ck System, the keyless entry
system will not work while the key is in the ignition
switch.
● Pressing the LOCK switch (1) has no effect (no locking
takes place) if a door or the tailgate is open.
● The remote control switch will operate within about 4m
from the vehicle. However, the operating range of the
remote control switch may chan ge if the vehicle is located
near a TV transmitting tower, power station, or radio
broadcasting station.
● If the turn-signal lamps flash 9 times when you press the
remote control switch, the battery may have run down.
Have the battery replaced by a MITSUBISHI MOTORS
Authorized Service Point.
● If your remote control switch is lost or damaged, please
contact your MITSUBISHI MOTORS Authorized Service
Point for a replacement remote control switch.
● If you wish to add a remote control switch, please contact
your MITSUBISHI MOTORS Authorized Service Point.
A maximum of eight remote control switches are availa-
ble for your vehicle.
Page 138 of 450
3-18 Instruments and controls
3
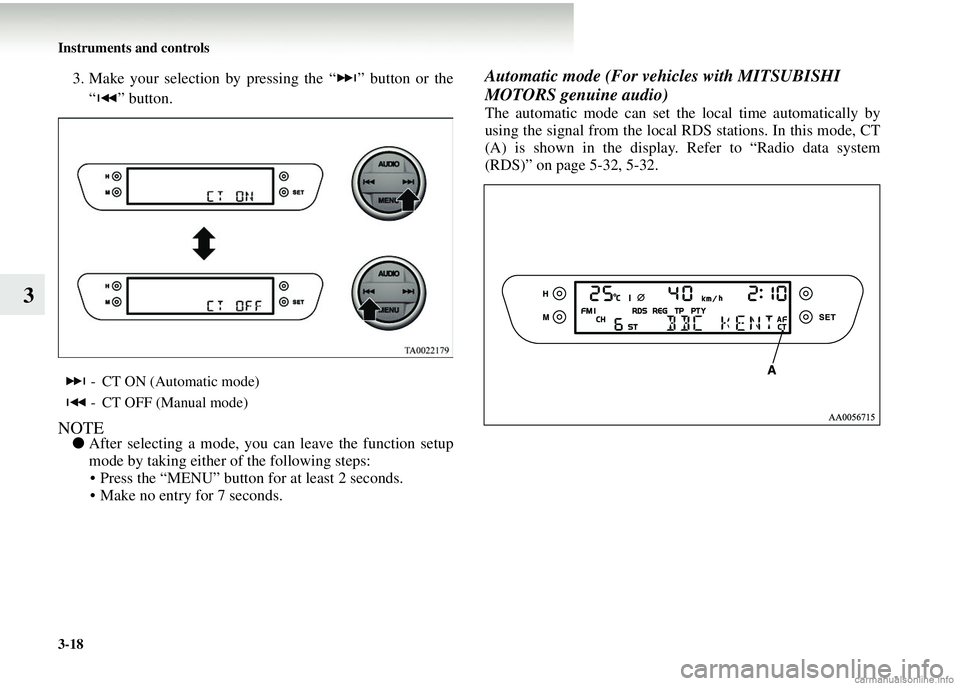
3. Make your selection by pressing the “ ” button or the“ ” button.
NOTE● After selecting a mode, you can leave the function setup
mode by taking either of the following steps: • Press the “MENU” button for at least 2 seconds.
• Make no entry for 7 seconds.
Automatic mode (For ve hicles with MITSUBISHI
MOTORS genuine audio)
The automatic mode can set the local time automatically by
using the signal from the local RDS stations. In this mode, CT
(A) is shown in the display. Refer to “Radio data system
(RDS)” on page 5-32, 5-32.
- CT ON (Automatic mode)
- CT OFF (Manual mode)
Page 139 of 450
Instruments and controls3-19
3
Manual mode
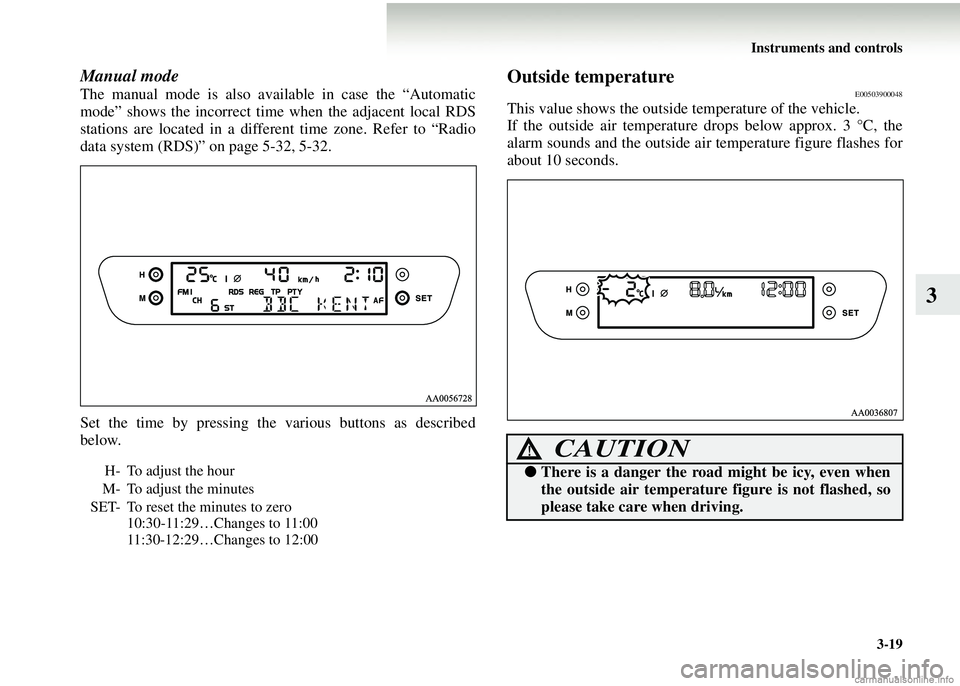
The manual mode is also available in case the “Automatic
mode” shows the incorrect time when the adjacent local RDS
stations are located in a different time zone. Refer to “Radio
data system (RDS)” on page 5-32, 5-32.
Set the time by pressing the various buttons as described
below.
Outside temperatureE00503900048
This value shows the outside temperature of the vehicle.
If the outside air temperature drops below approx. 3 °C, the
alarm sounds and the outside ai r temperature figure flashes for
about 10 seconds.
H- To adjust the hour
M- To adjust the minutes
SET- To reset the minutes to zero 10:30-11:29…Changes to 11:00
11:30-12:29…Changes to 12:00
CAUTION!
●There is a danger the road might be icy, even when
the outside air temperature figure is not flashed, so
please take care when driving.
Page 180 of 450
4-14 Starting and driving
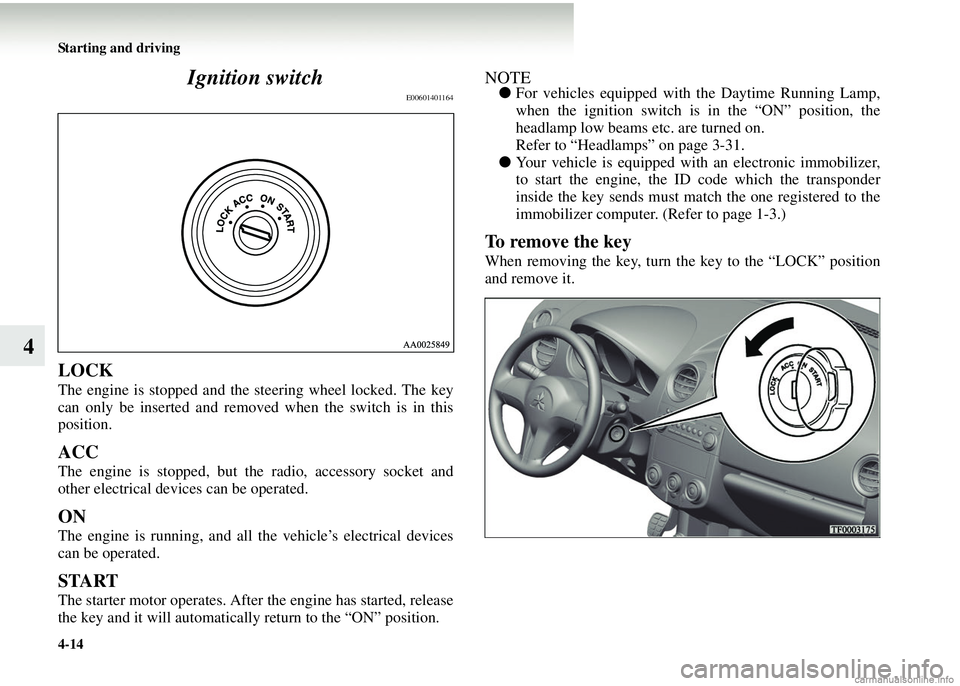
4Ignition switch
E00601401164
LOCK
The engine is stopped and the
steering wheel locked. The key
can only be inserted and removed when the switch is in this
position.
ACC
The engine is stopped, but th e radio, accessory socket and
other electrical devices can be operated.
ON
The engine is running, and all the vehicle’s electrical devices
can be operated.
START
The starter motor operates. After the engine has started, release
the key and it will automatically return to the “ON” position.
NOTE● For vehicles equipped with the Daytime Running Lamp,
when the ignition switch is in the “ON” position, the
headlamp low beams etc. are turned on.
Refer to “Headlamps” on page 3-31.
● Your vehicle is equipped with an electronic immobilizer,
to start the engine, the ID code which the transponder
inside the key sends must match the one registered to the
immobilizer computer. (Refer to page 1-3.)
To remove the key
When removing the key, turn the key to the “LOCK” position
and remove it.
Page 217 of 450
5
For pleasant driving
Ventilators . . . . . . . . . . . . . . . . . . . . . . . . . . . . . . .5- 2
Heater* . . . . . . . . . . . . . . . . . . . . . . . . . . . . . . . . . .5- 7
Automatic air conditioning* . . . . . . . . . . . . . . . . .5- 13
Important operation tips for the air conditioning . .5- 22
Air purifier . . . . . . . . . . . . . . . . . . . . . . . . . . . . . . .5- 23
LW/MW/FM electronic tuning radio with CD player* . . . . . . . . . . . . . . . . . . . . . . . . .5- 24
Steering wheel remote control switch* . . . . . . . . .5- 52
Error codes . . . . . . . . . . . . . . . . . . . . . . . . . . . . . . .5- 54
Handling compact discs . . . . . . . . . . . . . . . . . . . . .5- 56
Antenna . . . . . . . . . . . . . . . . . . . . . . . . . . . . . . . . .5- 59
Sun visors . . . . . . . . . . . . . . . . . . . . . . . . . . . . . . . .5- 59
Vanity mirror . . . . . . . . . . . . . . . . . . . . . . . . . . . . .5- 60
Accessory socket . . . . . . . . . . . . . . . . . . . . . . . . . .5- 60
Interior lamps . . . . . . . . . . . . . . . . . . . . . . . . . . . . .5- 61
Storage spaces . . . . . . . . . . . . . . . . . . . . . . . . . . . .5- 64
Cup holder . . . . . . . . . . . . . . . . . . . . . . . . . . . . . . .5- 69
Rear shelf panel* . . . . . . . . . . . . . . . . . . . . . . . . . .5- 70
Coat hooks* . . . . . . . . . . . . . . . . . . . . . . . . . . . . . .5- 72
Luggage hooks (5-door models)* . . . . . . . . . . . . .5- 72
Luggage net (5-door models)* . . . . . . . . . . . . . . . .5- 73
Page 240 of 450
5-24 For pleasant driving
5LW/MW/FM electronic tuni
ng radio with CD player
*
E00708501022
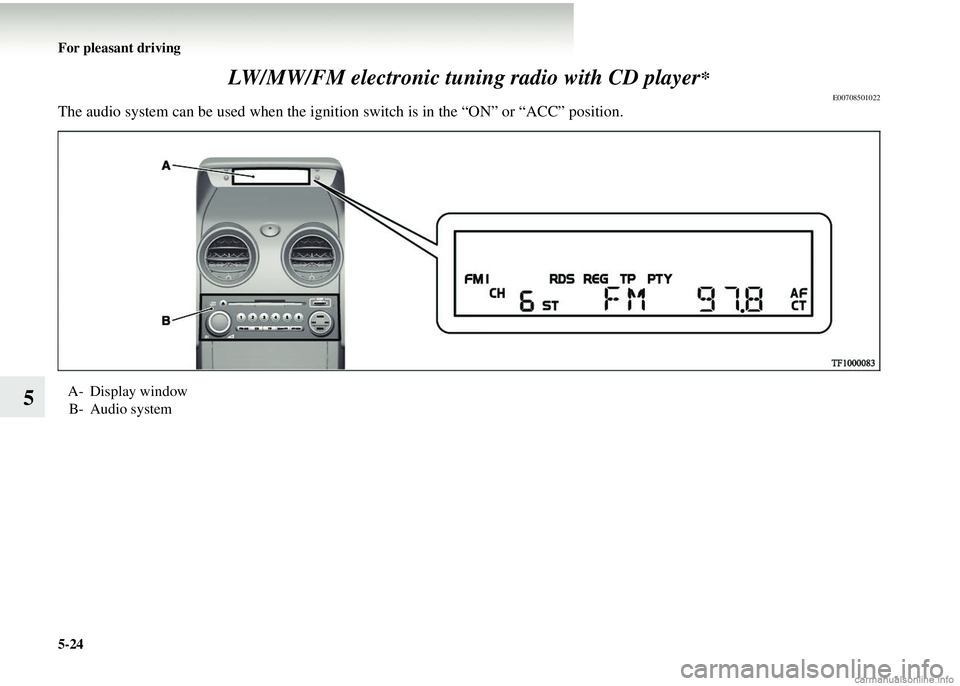
The audio system can be used when the igni tion switch is in the “ON” or “ACC” position.
A- Display window
B- Audio system
Page 243 of 450
For pleasant driving5-27
5
To adjust the volumeE00708700085
VOL (Volume control)
Turn the VOL knob (2) clockwise to increase the volume;
anticlockwise to decrease the vo lume. The status will be dis-
played in the display (6).
To adjust the toneE00708800334
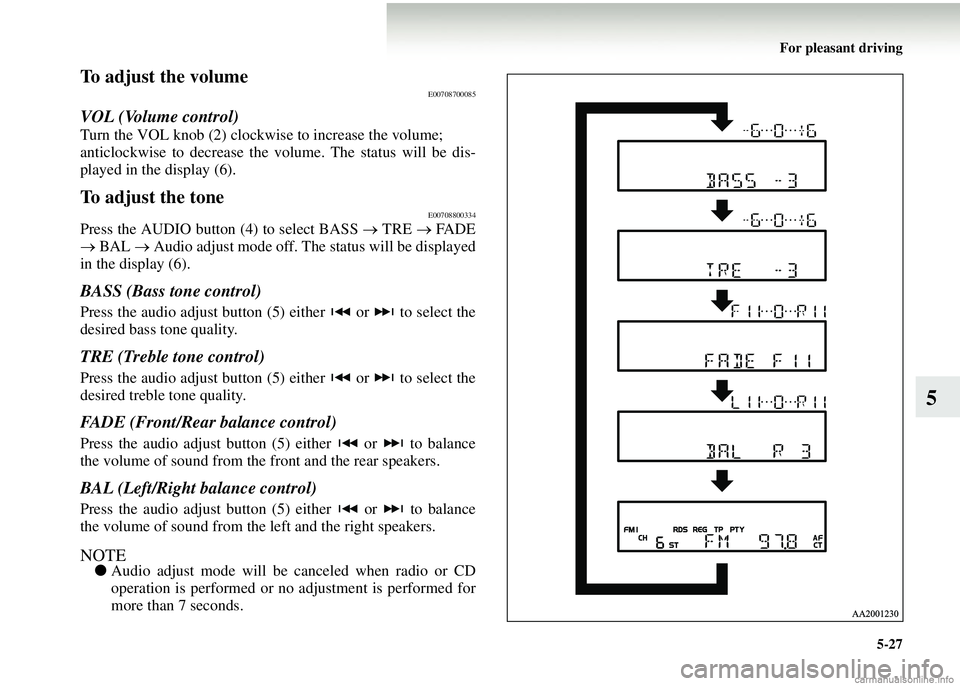
Press the AUDIO button (4) to select BASS → TRE → FA D E
→ BAL → Audio adjust mode off. The status will be displayed
in the display (6).
BASS (Bass tone control)
Press the audio adjust button (5) either or to select the
desired bass tone quality.
TRE (Treble tone control)
Press the audio adjust button (5) either or to select the
desired treble tone quality.
FADE (Front/Rear balance control)
Press the audio adjust button (5) either or to balance
the volume of sound from the front and the rear speakers.
BAL (Left/Right balance control)
Press the audio adjust button (5) either or to balance
the volume of sound from the left and the right speakers.
NOTE● Audio adjust mode will be canceled when radio or CD
operation is performed or no adjustment is performed for
more than 7 seconds.
Page 245 of 450
For pleasant driving5-29
5
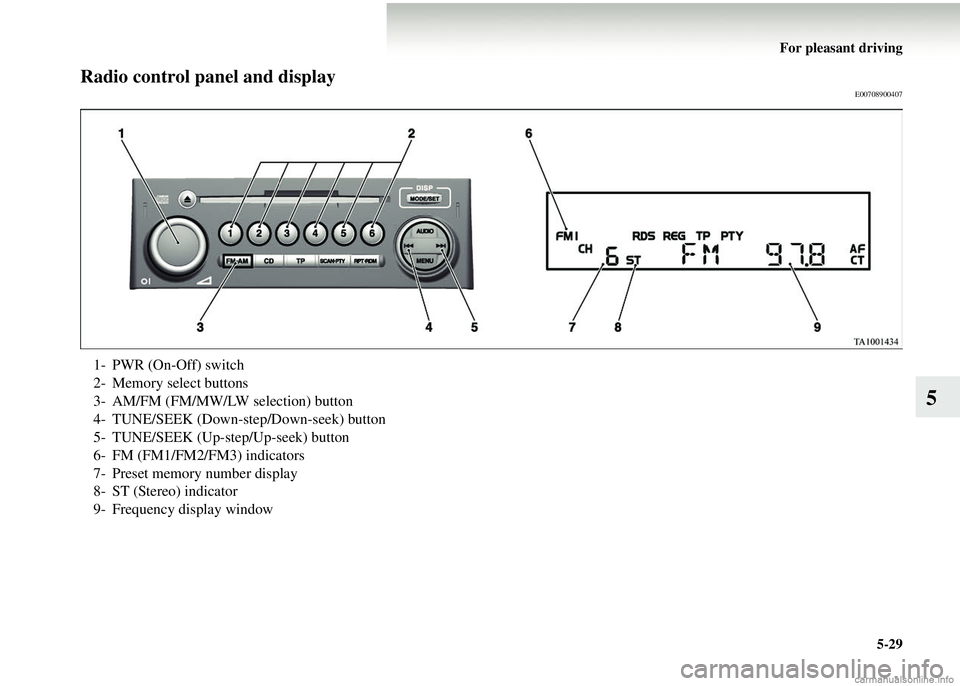
Radio control panel and displayE00708900407
1- PWR (On-Off) switch
2- Memory select buttons
3- AM/FM (FM/MW/LW selection) button
4- TUNE/SEEK (Down-step/Down-seek) button
5- TUNE/SEEK (Up-step/Up-seek) button
6- FM (FM1/FM2/FM3) indicators
7- Preset memory number display
8- ST (Stereo) indicator
9- Frequency display window
Page 246 of 450
5-30 For pleasant driving
5
To listen to the radioE00709000346
1. Press the PWR switch (1) to turn the audio system on andoff.
Press the AM/FM button (3) to turn on the radio if a CD is
being played.
2. Press the AM/FM button (3) to select the desired band.
3. Press the TUNE/SEEK button (4 or 5) to tune to a station,
or press one of the memory select buttons (2) to recall a
station memorised for that button.
To tune the radioE00709100073
Automatic tuning
After keeping the TUNE/SEEK button (4 or 5) depressed until
it beeps, release the button, an d the selected station reception
will start.
Manual tuning
The frequency changes every time the TUNE/SEEK button (4
or 5) is pressed. Press the button to select the desired station.
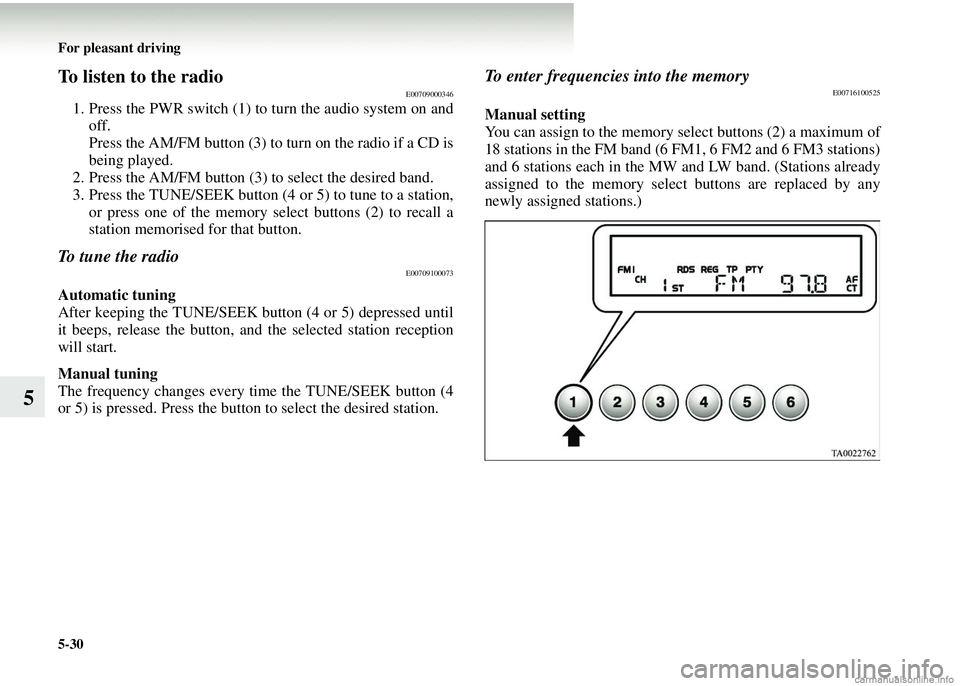
To enter frequencies into the memoryE00716100525
Manual setting
You can assign to the memory select buttons (2) a maximum of
18 stations in the FM band (6 FM1, 6 FM2 and 6 FM3 stations)
and 6 stations each in the MW and LW band. (Stations already
assigned to the memory select buttons are replaced by any
newly assigned stations.)