display MITSUBISHI COLT 2011 (in English) User Guide
[x] Cancel search | Manufacturer: MITSUBISHI, Model Year: 2011, Model line: COLT, Model: MITSUBISHI COLT 2011Pages: 274, PDF Size: 17.88 MB
Page 86 of 274
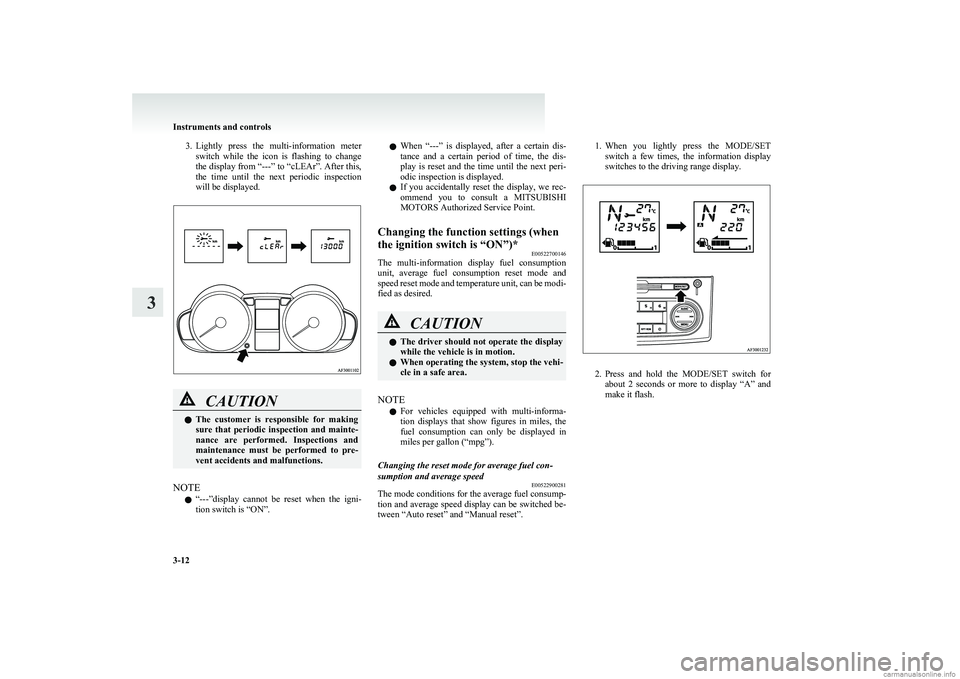
3.Lightly press the multi-information meter
switch while the icon is flashing to change
the display from “---” to “cLEAr”. After this,
the time until the next periodic inspection
will be displayed.CAUTIONl The customer is responsible for making
sure that periodic inspection and mainte-
nance are performed. Inspections and
maintenance must be performed to pre-
vent accidents and malfunctions.
NOTE
l “
---”display cannot be reset when the igni-
tion switch is “ON”.
l When “---” is displayed, after a certain dis-
tance and a certain period of time, the dis-
play is reset and the time until the next peri-
odic inspection is displayed.
l If you accidentally reset the display, we rec-
ommend you to consult a MITSUBISHI
MOTORS Authorized Service Point.Changing the function settings (when
the ignition switch is “ON”)* E00522700146
The multi-information display fuel consumption
unit, average fuel consumption reset mode and
speed reset mode and temperature unit, can be modi-
fied as desired.
CAUTIONl The driver should not operate the display
while the vehicle is in motion.
l When operating the system, stop the vehi-
cle in a safe area.
NOTE
l For vehicles equipped with multi-informa-
tion displays that show figures in miles, the
fuel consumption can only be displayed in
miles per gallon (“mpg”).
Changing the reset mode for average fuel con-
sumption and average speed E00522900281
The mode conditions for the average fuel consump-
tion and average speed display can be switched be-
tween “Auto reset” and “Manual reset”.
1. When you lightly press the MODE/SET
switch a few times, the information display
switches to the driving range display.
2. Press and hold the MODE/SET switch for
about 2 seconds or more to display “A” and
make it flash.
Instruments and controls
3-12
3
Page 87 of 274
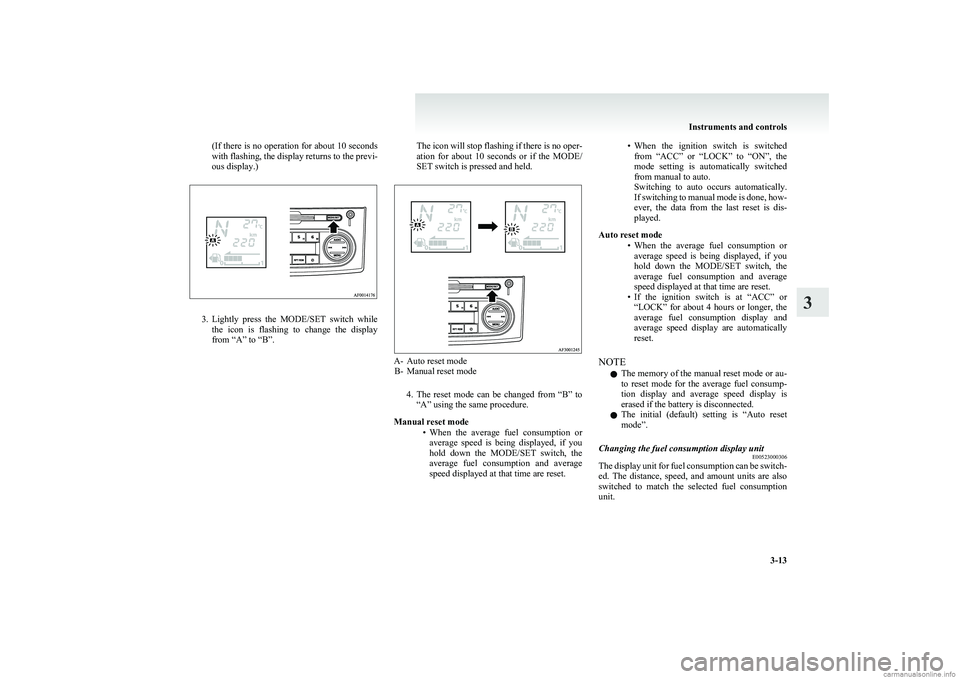
(If there is no operation for about 10 seconds
with flashing, the display returns to the previ-
ous display.)
3. Lightly press the MODE/SET switch while
the icon is flashing to change the display
from “A” to “B”.
The icon will stop flashing if there is no oper-
ation for about 10 seconds or if the MODE/
SET switch is pressed and held.
A- Auto reset mode B- Manual reset mode
4.The reset mode can be changed from “B” to
“A” using the same procedure.
Manual reset mode •When the average fuel consumption or
average speed is being displayed, if you
hold down the MODE/SET switch, the
average fuel consumption and average
speed displayed at that time are reset.
• When the ignition switch is switched
from “ACC” or “LOCK” to “ON”, the
mode setting is automatically switched
from manual to auto.
Switching to auto occurs automatically.
If switching to manual mode is done, how-
ever, the data from the last reset is dis-
played.
Auto reset mode •When the average fuel consumption or
average speed is being displayed, if you
hold down the MODE/SET switch, the
average fuel consumption and average
speed displayed at that time are reset.
• If the ignition switch is at “ACC” or
“LOCK” for about 4 hours or longer, the
average fuel consumption display and
average speed display are automatically
reset.
NOTE l The memory of the manual reset mode or au-
to reset mode for the average fuel consump-
tion display and average speed display is
erased if the battery is disconnected.
l The initial (default) setting is “Auto reset
mode”.Changing the fuel consumption display unit E00523000306
The display unit for fuel consumption can be switch-
ed. The distance, speed, and amount units are also
switched to match the selected fuel consumption
unit.
Instruments and controls
3-13
3
Page 88 of 274
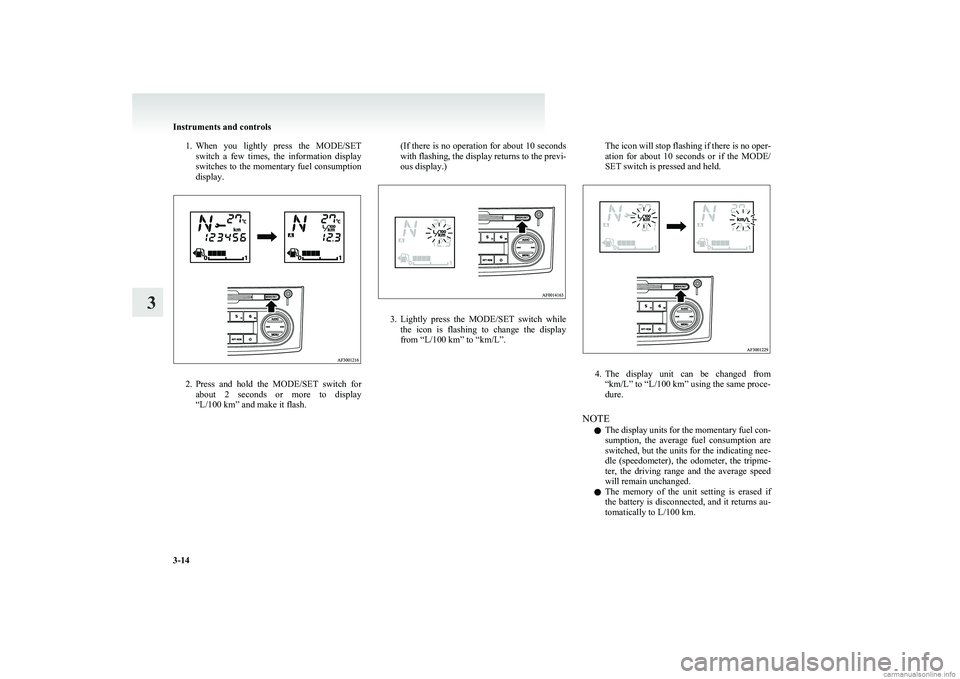
1.When you lightly press the MODE/SET
switch a few times, the information display
switches to the momentary fuel consumption
display.
2. Press and hold the MODE/SET switch for
about 2 seconds or more to display
“L/100 km” and make it flash.
( If there is no operation for about 10 seconds
with flashing, the display returns to the previ-
ous display.)
3. Lightly press the MODE/SET switch while
the icon is flashing to change the display
from “L/100 km” to “km/L”.
The icon will stop flashing if there is no oper-
ation for about 10 seconds or if the MODE/
SET switch is pressed and held.
4. The display unit can be changed from
“km/L” to “L/100 km” using the same proce-
dure.
NOTE l The display units for the momentary fuel con-
sumption, the average fuel consumption are
switched, but the units for the indicating nee-
dle (speedometer), the odometer, the tripme-
ter, the driving range and the average speed
will remain unchanged.
l The memory of the unit setting is erased if
the battery is disconnected, and it returns au-
tomatically to L/100 km.
Instruments and controls
3-14
3
Page 89 of 274
Changing the temperature unitE00523100206
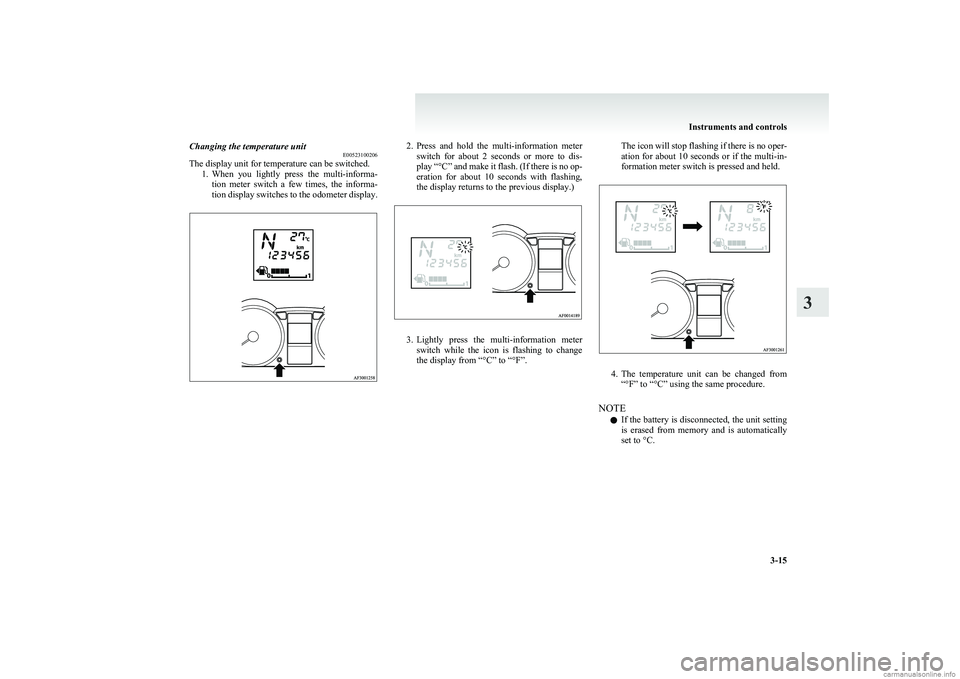
The display unit for temperature can be switched.
1.When you lightly press the multi-informa-
tion meter switch a few times, the informa-
tion display switches to the odometer display.2. Press and hold the multi-information meter
switch for about 2 seconds or more to dis-
play “ °C” and make it flash. (If there is no op-
eration for about 10 seconds with flashing,
the display returns to the previous display.)
3. Lightly press the multi-information meter
switch while the icon is flashing to change
the display from “°C” to “°F”.
The icon will stop flashing if there is no oper-
ation for about 10 seconds or if the multi-in-
formation meter switch is pressed and held.
4. The temperature unit can be changed from
“°F” to “°C” using the same procedure.
NOTE l If the battery is disconnected, the unit setting
is erased from memory and is automatically
set to °C.
Instruments and controls
3-15
3
Page 108 of 274
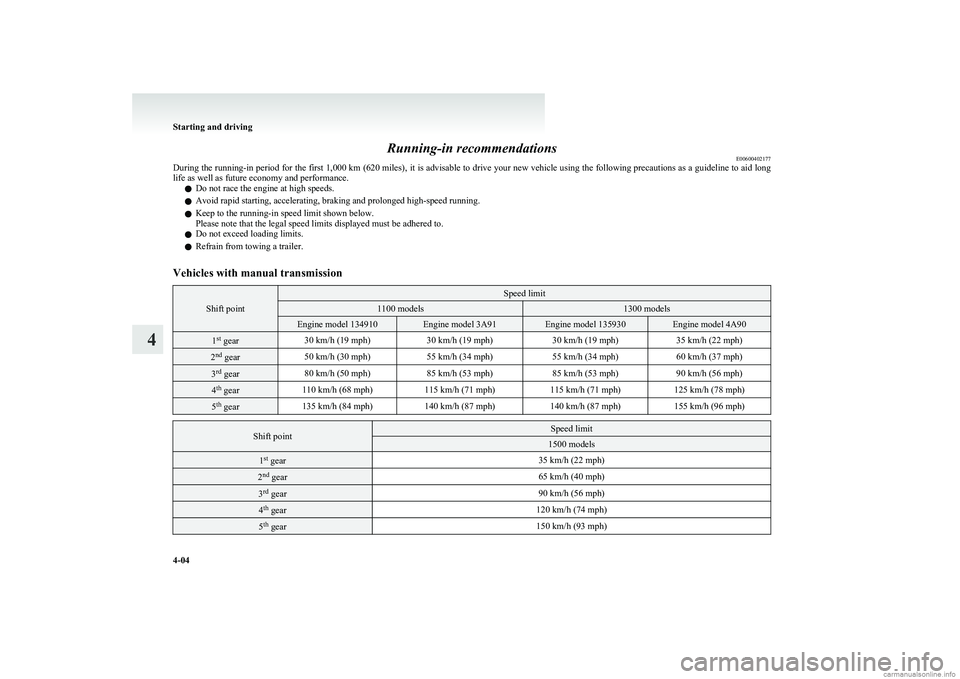
Running-in recommendationsE00600402177
During the running-in period for the first 1,000 km (620 miles), it is advisable to drive your new vehicle using the following precautions as a guideline to aid long
life as well as future economy and performance.
l Do not race the engine at high speeds.
l Avoid rapid starting, accelerating, braking and prolonged high-speed running.
l Keep to the running-in speed limit shown below.
Please note that the legal speed limits displayed must be adhered to.
l Do not exceed loading limits.
l Refrain from towing a trailer.Vehicles with manual transmission
Shift point
Speed limit1100 models1300 modelsEngine model 134910Engine model 3A91Engine model 135930Engine model 4A901st
gear30 km/h (19 mph)30 km/h (19 mph)30 km/h (19 mph)35 km/h (22 mph)2nd
gear50 km/h (30 mph)55 km/h (34 mph)55 km/h (34 mph)60 km/h (37 mph)3rd
gear80 km/h (50 mph)85 km/h (53 mph)85 km/h (53 mph)90 km/h (56 mph)4th
gear110 km/h (68 mph)115 km/h (71 mph)115 km/h (71 mph)125 km/h (78 mph)5th
gear135 km/h (84 mph)140 km/h (87 mph)140 km/h (87 mph)155 km/h (96 mph)Shift pointSpeed limit1500 models1st
gear35 km/h (22 mph)2nd
gear65 km/h (40 mph)3rd
gear90 km/h (56 mph)4th
gear120 km/h (74 mph)5th
gear150 km/h (93 mph)
Starting and driving
4-04
4
Page 116 of 274
CAUTIONlDo not run the engine at high rpm or
drive the vehicle at high speed until the en-
gine has had a chance to warm up.
l Release the ignition key as soon as the en-
gine starts to avoid damaging the starter
motor.
l If your vehicle is equipped with a turbo-
charger, do not stop the engine immedi-
ately after high-speed or uphill driving.
First allow the engine to idle to give the
turbocharger a chance to cool down.Starting the engine E00601702005
This vehicle is equipped with an electronically con-
trolled fuel injection system which is automatically
controlled. When starting the engine, do not de-
press the accelerator pedal.
The starting procedure is as follows:
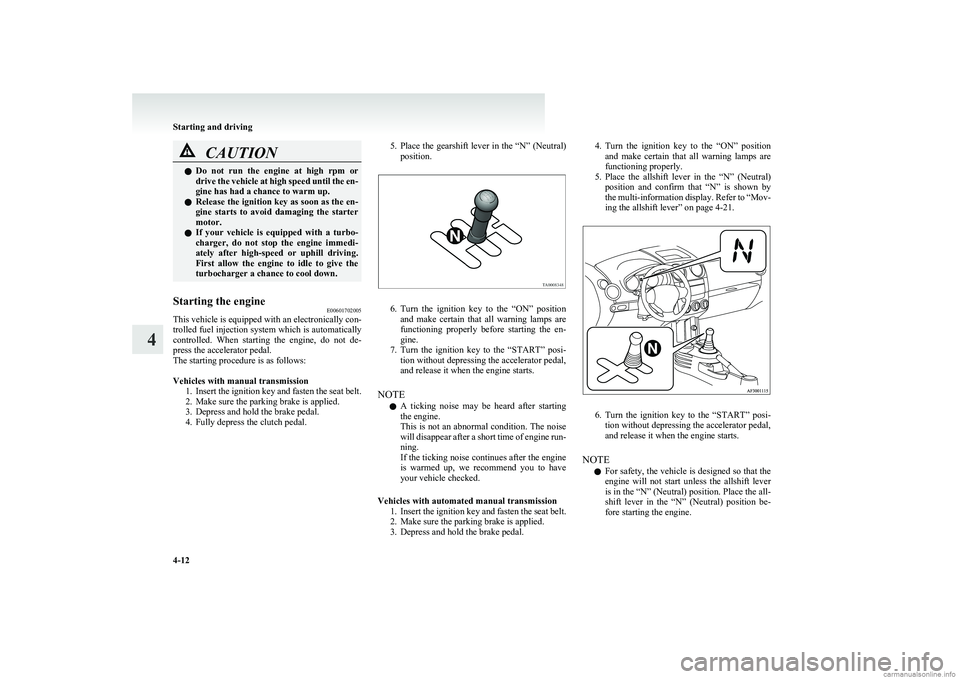
Vehicles with manual transmission 1.Insert the ignition key and fasten the seat belt.
2. Make sure the parking brake is applied.
3. Depress and hold the brake pedal.
4. Fully depress the clutch pedal.
5. Place the gearshift lever in the “N” (Neutral)
position.
6. Turn the ignition key to the “ON” position
and make certain that all warning lamps are
functioning properly before starting the en-
gine.
7. Turn the ignition key to the “START” posi-
tion without depressing the accelerator pedal,
and release it when the engine starts.
NOTE l A ticking noise may be heard after starting
the engine.
This is not an abnormal condition. The noise
will disappear after a short time of engine run-
ning.
If the ticking noise continues after the engine
is warmed up, we recommend you to have
your vehicle checked.
Vehicles with automated manual transmission 1.Insert the ignition key and fasten the seat belt.
2. Make sure the parking brake is applied.
3. Depress and hold the brake pedal.
4. Turn the ignition key to the “ON” position
and make certain that all warning lamps are
functioning properly.
5. Place the allshift lever in the “N” (Neutral)
position and confirm that “N” is shown by
the multi-information display. Refer to “Mov-
ing the allshift lever” on page 4-21.
6. Turn the ignition key to the “START” posi-
tion without depressing the accelerator pedal,
and release it when the engine starts.
NOTE l For safety, the vehicle is designed so that the
engine will not start unless the allshift lever
is in the “N” (Neutral) position. Place the all-
shift lever in the “N” (Neutral) position be-
fore starting the engine.
Starting and driving
4-12
4
Page 117 of 274
lIf you turn the ignition key to the “START”
position when the gearshift is not in the “N”
(Neutral) position, the multi-information dis-
play will behave as follows to indicate that
the engine will not start. •Gearshift in “S” (Stand by) position: An
“A” or “1” will be shown. Or “0” will flash.
• Gearshift in “R” (Reverse) position: An
“R” will be shown. Or “0” will flash.
Confirm that “N” is shown by the multi-infor-
mation display.Auto Stop & Go (AS&G) system* E00627400022
The Auto Stop & Go (AS&G) system automatical-
ly stops and restarts the engine without operating
the ignition switch when the vehicle is stopped,
such as at a traffic light or in a traffic jam, to re-
duce exhaust gases, increase fuel efficiency.CAUTIONl If the vehicle will be stopped for a long
time or if you will leave the vehicle unat-
tended, turn the ignition switch to the
“LOCK” position to stop the engine.Automatically stopping the engine E00627500010
The Auto Stop & Go (AS&G) system is automati-
cally activated when the ignition switch is turned to
the “ON” position.
You can deactivate the system by pressing the “Au-
to Stop & Go (AS&G) OFF” switch.
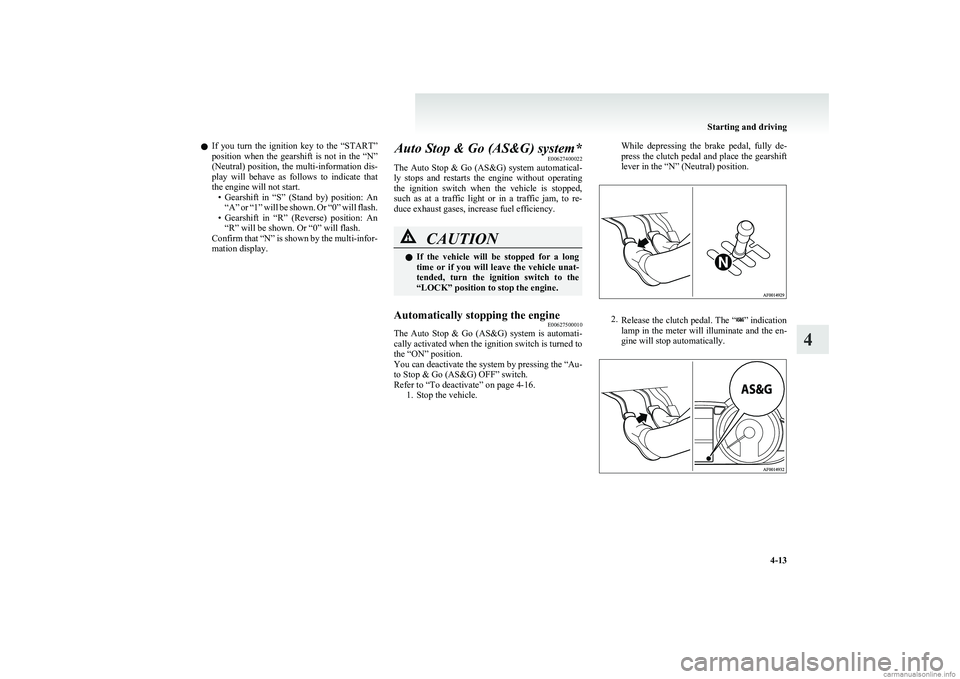
Refer to “To deactivate” on page 4-16. 1. Stop the vehicle.
While depressing the brake pedal, fully de-
press the clutch pedal and place the gearshift
lever in the “N” (Neutral) position.
2. Release the clutch pedal. The “” indication
lamp in the meter will illuminate and the en-
gine will stop automatically.
Starting and driving
4-13
4
Page 123 of 274
Automated manual transmissionE00612500038
An automated manual transmission is a transmis-
sion in which operation of the clutch and shifting
of gears are performed automatically under electron-
ic control. The transmission has 6 forward gears
and 1 reverse gear.
It is possible to choose between an automatic mode
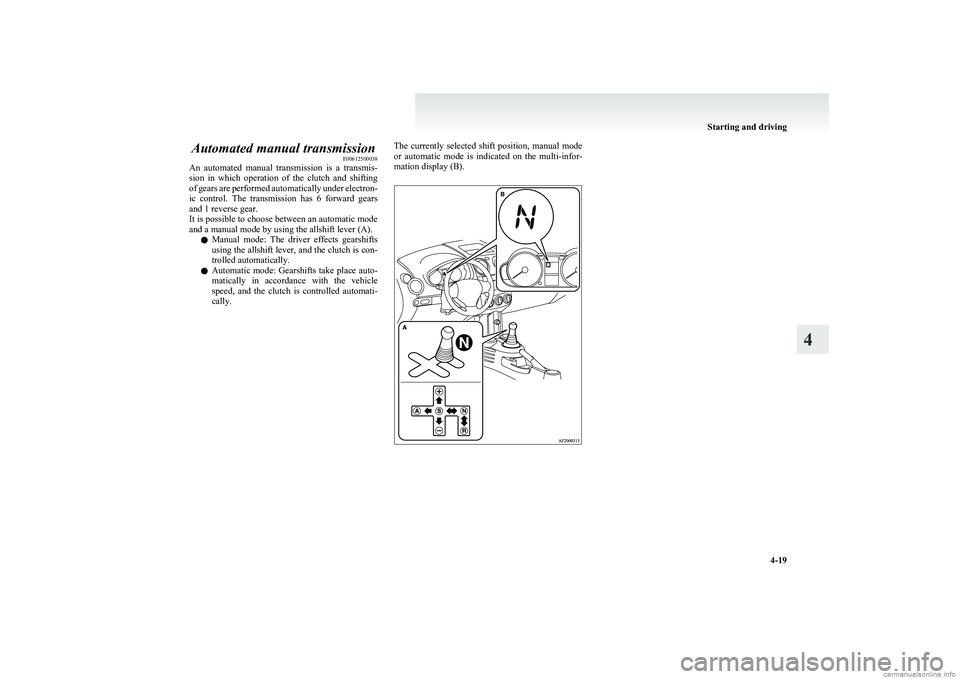
and a manual mode by using the allshift lever (A).
l Manual mode: The driver effects gearshifts
using the allshift lever, and the clutch is con-
trolled automatically.
l Automatic mode: Gearshifts take place auto-
matically in accordance with the vehicle
speed, and the clutch is controlled automati-
cally.The currently selected shift position, manual mode
or automatic mode is indicated on the multi-infor-
mation display (B).
Starting and driving
4-19
4
Page 124 of 274
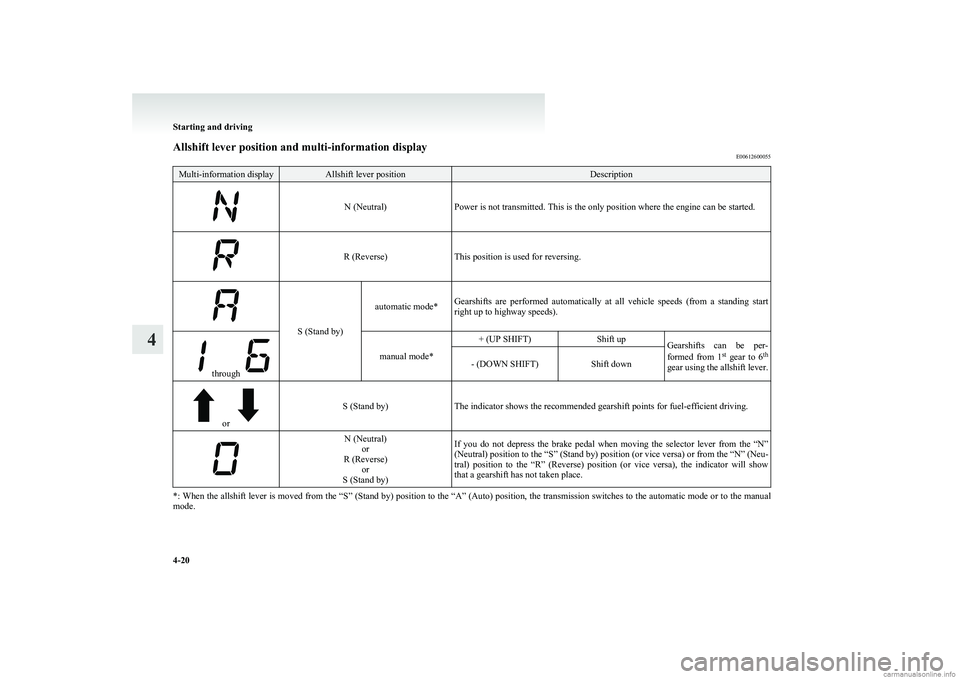
Allshift lever position and multi-information displayE00612600055Multi-information displayAllshift lever positionDescription
N (Neutral)Power is not transmitted. This is the only position where the engine can be started.R (Reverse)This position is used for reversing.
S (Stand by)
automatic mode*Gearshifts are performed automatically at all vehicle speeds (from a standing start
right up to highway speeds).
through
manual mode*
+ (UP SHIFT)Shift upGearshifts can be per-
formed from 1 st
gear to 6 th
gear using the allshift lever.- (DOWN SHIFT)Shift down
or
S (Stand by)The indicator shows the recommended gearshift points for fuel-efficient driving.
N (Neutral) or
R (Reverse) or
S (Stand by)If you do not depress the brake pedal when moving the selector lever from the “N”
(Neutral) position to the “S” (Stand by) position (or vice versa) or from the “N” (Neu-
tral) position to the “R” (Reverse) position (or vice versa), the indicator will show
that a gearshift has not taken place.
*: When the allshift lever is moved from the “S” (Stand by) position to the “A” (Auto) position, the transmission switches to the automatic mode or to the manual
mode.
Starting and driving
4-20
4
Page 125 of 274
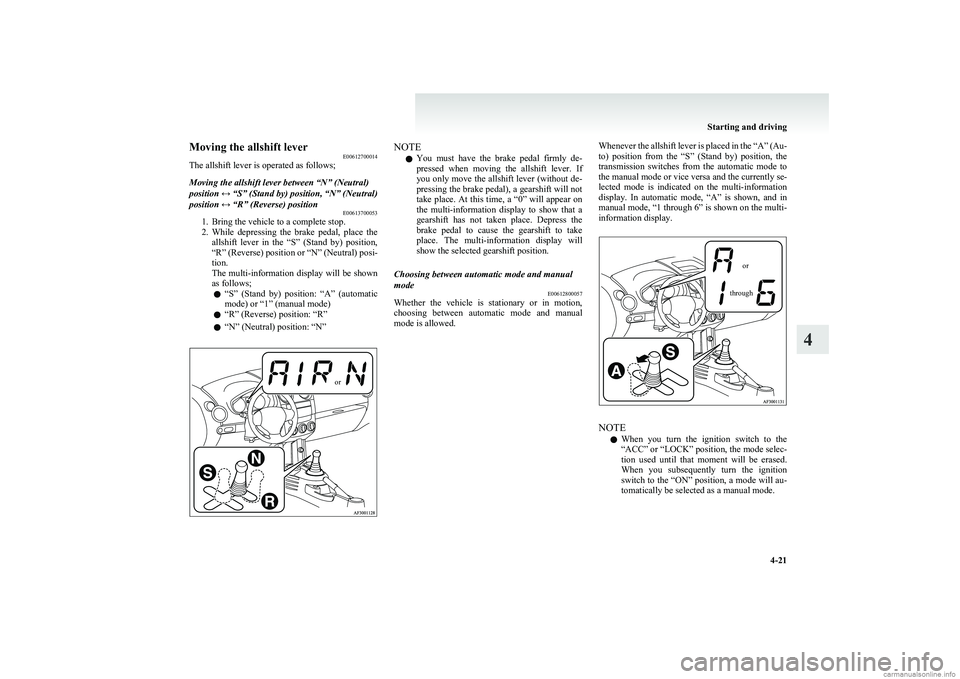
Moving the allshift leverE00612700014
The allshift lever is operated as follows;Moving the allshift lever between “N” (Neutral)
position ↔ “S” (Stand by) position, “N” (Neutral)
position ↔ “R” (Reverse) position E00613700053
1. Bring the vehicle to a complete stop.
2. While depressing the brake pedal, place the
allshift lever in the “S” (Stand by) position,
“R” (Reverse) position or “N” (Neutral) posi-
tion.
The multi-information display will be shown
as follows;
l “
S” (Stand by) position: “A” (automatic
mode) or “1” (manual mode)
l “R” (Reverse) position: “R”
l “N” (Neutral) position: “N”
orNOTE
l You must have the brake pedal firmly de-
pressed when moving the allshift lever. If
you only move the allshift lever (without de-
pressing the brake pedal), a gearshift will not
take place. At this time, a “0” will appear on
the multi-information display to show that a
gearshift has not taken place. Depress the
brake pedal to cause the gearshift to take
place. The multi-information display will
show the selected gearshift position.Choosing between automatic mode and manual
mode E00612800057
Whether the vehicle is stationary or in motion,
choosing between automatic mode and manual
mode is allowed.
Whenever the allshift lever is placed in the “A” (Au-
to) position from the “S” (Stand by) position, the
transmission switches from the automatic mode to
the manual mode or vice versa and the currently se-
lected mode is indicated on the multi-information
display. In automatic mode, “A” is shown, and in
manual mode, “1 through 6” is shown on the multi-
information display.orthrough
NOTE
l When you turn the ignition switch to the
“ACC” or “LOCK” position, the mode selec-
tion used until that moment will be erased.
When you subsequently turn the ignition
switch to the “ON” position, a mode will au-
tomatically be selected as a manual mode.
Starting and driving
4-21
4