CD player MITSUBISHI DIAMANTE 1900 Repair Manual
[x] Cancel search | Manufacturer: MITSUBISHI, Model Year: 1900, Model line: DIAMANTE, Model: MITSUBISHI DIAMANTE 1900Pages: 408, PDF Size: 71.03 MB
Page 204 of 408
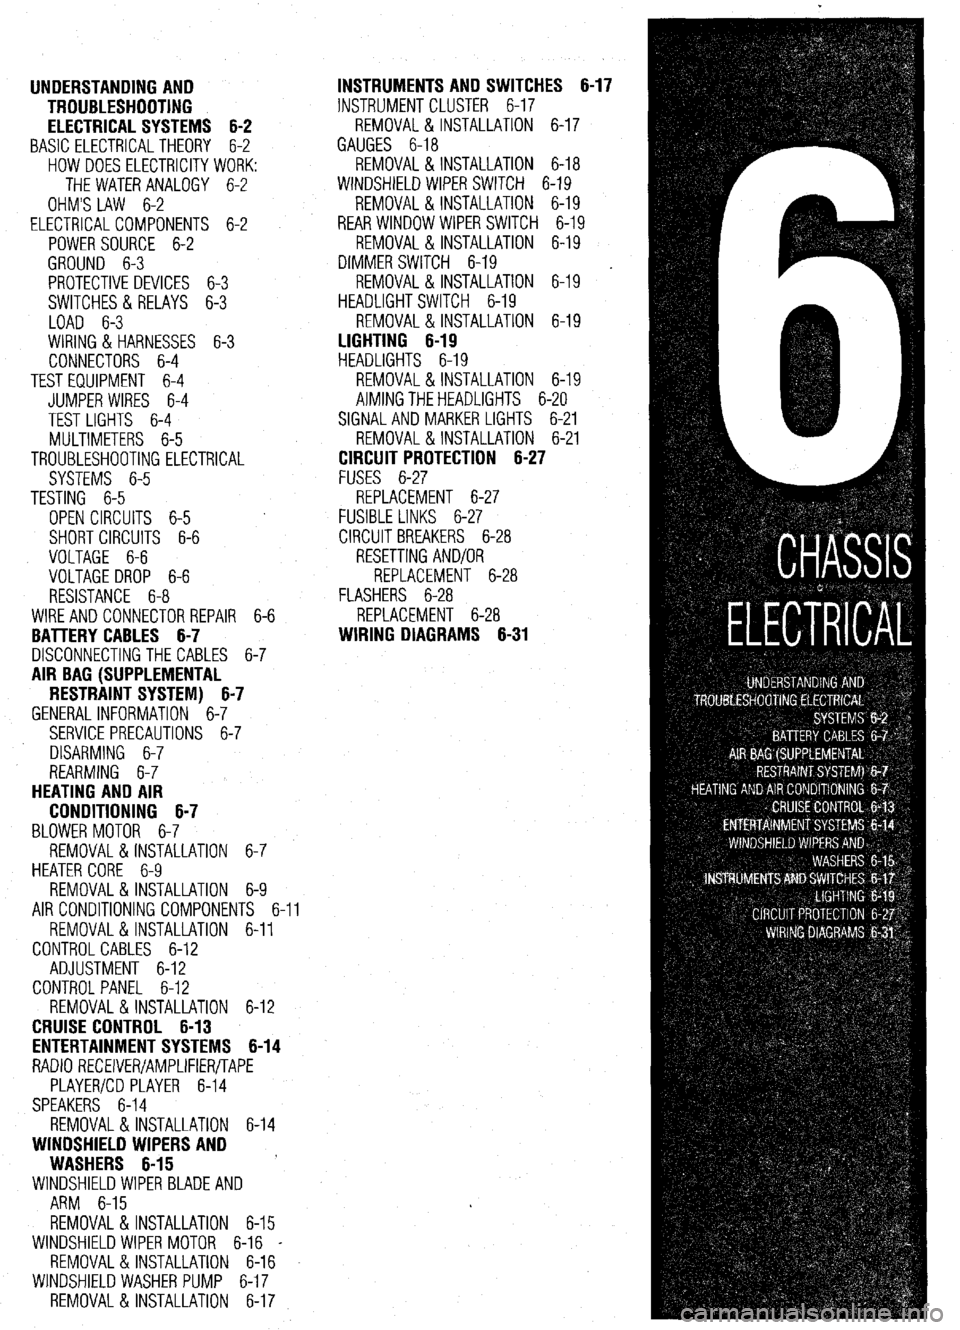
UNDERSTANDING AND
TROUBLESHOOTING
ELECTRICAL SYSTEMS 6-2
BASIC ELECTRICALTHEORY 6-2
HOW DOES ELECTRICITY WORK:
THEWATERANALOGY 6-2
OHM'S LAW 6-2
ELECTRICALCOMPONENTS 6-2
POWERSOURCE 6-2
GROUND 6-3
PROTECTIVE DEVICES 6-3
SWITCHES&RELAYS 6-3
LOAD 6-3
WIRING & HARNESSES 6-3
CONNECTORS 6-4
TEST EQUIPMENT 6-4
JUMPER WIRES 6-4
TEST LIGHTS 6-4
MULTIMETERS 6-5
TROUBLESHOOTING ELECTRICAL
SYSTEMS 6-5
TESTING 6-5
OPEN CIRCUITS 6-5
SHORT CIRCUITS 6-6
VOLTAGE 6-6
VOLTAGE DROP 6-6
RESISTANCE 6-8
WIRE AND CONNECTORREPAIR 6-6
BATTERY CABLES 6-7
DISCONNECTING THE CABLES 6-7
AIR BAG (SUPPLEMENTAL
RESTRAINT SYSTEM) 6-7
GENERALINFORMATION 6-7
SERVICE PRECAUTIONS 6-7
DISARMING 6-7
REARMING 6-7
HEATING AND AIR
CONDITIONING 6-7
BLOWER MOTOR 6-7
REMOVAL &INSTALLATION 6-7
HEATER CORE 6-9 INSTRUMENTS AND SWITCHES 6-17
INSTRUMENTCLUSTER 6-17
REMOVAL &INSTALLATION 6-17
GAUGES 6-18
REMOVAL&INSTALLATION 6-18
WINDSHIELD WIPER SWITCH 6-19
REMOVAL&INSTALLATION 6-19
REARWINDOWWIPERSWITCH 6-19
REMOVAL &INSTALLATION 6-19
DIMMER SWITCH 6-19
REMOVAL & INSTALLATION 6-19 .
HEADLIGHT SWITCH 6-19
REMOVAL & INSTALLATION 6-19
LIGHTING 6-19
HEADLIGHTS 6-19
REMOVAL &INSTALLATION 6-19
AIMINGTHEHEADLIGHTS 6-20
SIGNAL AND MARKER LIGHTS 6-21
REMOVAL &INSTALLATION 6-21
CIRCUIT PROTECTION 6-27
FUSES 6-27
REPLACEMENT 6-27
FUSIBLE LINKS 6-27
CIRCUIT BREAKERS 6-28
RESETTING AND/OR
REPLACEMENT 6-28
FLASHERS 6-28
REPLACEMENT 6-28
WIRING DIAGRAMS 6-31
REMOVAL & INSTALLATION 6-9
AIR CONDITIONING COMPONENTS 6-11
REMOVAL & INSTALLATION 6-11
CONTROLCABLES 6-12
ADJUSTMENT 6-12
CONTROL PANEL 6-12
REMOVAL & INSTALLATION 6-12
CRUISE CONTROL 6-13
ENTERTAINMENT SYSTEMS 6-14
RADIO RECEIVER/AMPLIFIER/TAPE
PLAYER/CD PLAYER 6-14
SPEAKERS 6-14
REMOVAL & INSTALLATION 6-14
WINDSHIELD WIPERS AND
WASHERS 6-15
WINDSHIELD WIPER BLADE AND
ARM 6-15
REMOVAL & INSTALLATION 6-15
WINDSHIELD WIPER MOTOR 6-16 _
REMOVAL &INSTALLATION 6-16
WINDSHIELD WASHER PUMP 6-17
REMOVAL &INSTALLATION 6-17
Page 215 of 408
6-12 CHASSIS ELECTRICAL
personal injury or death, and because of the legal
ramifications of servicing these components without
the proper EPA certification and experience. Cost,
personal injury or death, environmental damage, and
legal considerations (such as the fact that it is a fed-
eral crime to vent refrigerant into the atmosphere),
dictate that the A/C comoonents on your vehicle 4. Move the air selection controi lever to the RE-
CIRC position. Move the air selection damper FULLY
INWARD and connect the cable to the lever. Adjust as
required. C. Push the outer cable in the direction of the
arrow so that there is no looseness, then secure
should be serviced only’by a Motor Vehicle Air Con-
ditioning (MVAC) trained, and EPA certified automo-
REMOVAL&INSTALLATION tive technician. with the clip.
d. Set the knob for the air outlet changeover
on the control to the DEF position.
e. Set the air outlet changeover damper lever
of the heater unit to the DEF position, then attach
the cable to the lever pin.
f. Push the outer cable in the direction of the
arrow so there is no loosen&s, then secure it
with the clip. *If your vehicle’s A/C system uses R-12 re-
frlgerant and is in need of recharging, the
AK system can be converted over to R-Ma
refrigerant (less environmentally harmful
and expensive). Refer to Section 1 for addi-
tional information on R-12 to R-134a eonver-
sions, and for additional considerations
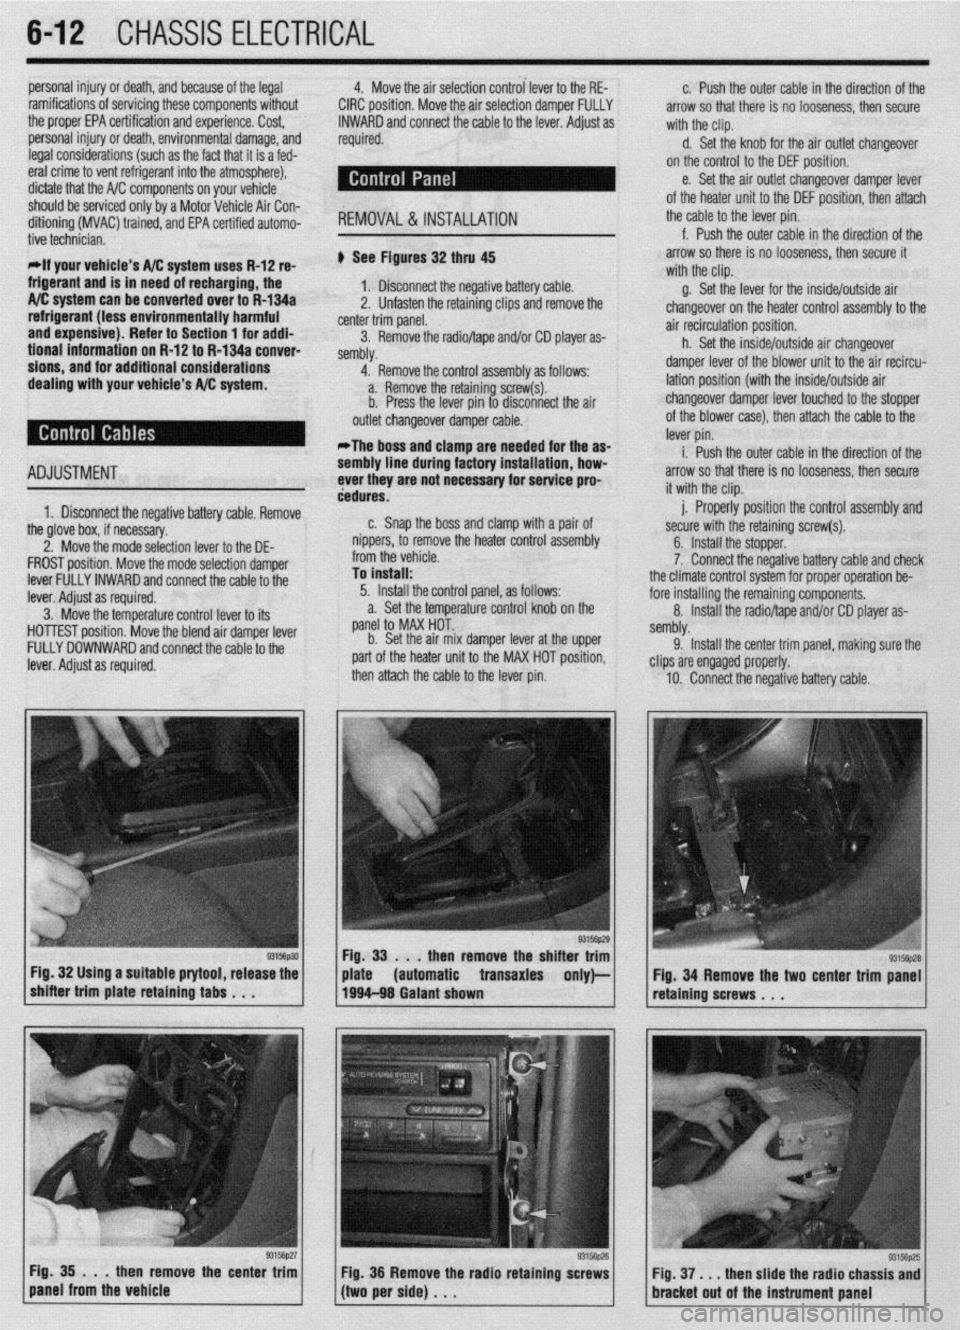
dealing with your vehicle’s A/C system. ti See Figures 32 thru 45
1. Disconnect the negative battery cable.
2, Unfasten the retaining clips and remove the
center trim panel.
3. Remove the radioltape and/or CD player as-
sembly,
4. Remove the control assembly as follows:
a. Remove the retaining screw(s).
b. Press the lever pin to disconnect the air
outlet changeover damper cable.
*The boss and clamp are needed for the as-
ADJUSTMENT
1. Disconnect the negative battery cable. Remove sembly line d
ever they are
dedures.
n Cnan i luring factory installation, how-
not necessary for service pro-
the glove box, if necessary,
2. Move the mode selection lever to the DE-
FROST position. Move the mode selection damper
lever FULLY INWARD and connect the cable to the
lever. Adiust as required.
3. M&e tht
3 temperature control lever to its
HOlli
5ST position. Move the blend air damper lever
FULL’t
’ DOWNWARD and connect the cable to the
lever. i
4djust as required. b,. dIIal, the boss and clamp with a pair of
nippers, to remove the heater control assembly
from the vehicle.
To install:
5. Install the control panel, as follows:
a. Set the temperature control knob on the
panel to MAX HOT..
b. Set the air mix damper lever at the upper
part of the heater unit to the MAX HOT position,
then attach the cable to the lever pin.
then remove the shi
Fig. 32 Using a suitable prytool, release the
automatic transaxles
93156p27 Fig. 35 . . .
then remove the center trim
panel from the vehicle
/(twiperside)... y Fig 36 Remove the radio retaining screws g. Set the lever for the inside/outside air
changeover on the heater control assemblv to the
air recirculation position.
h. Set the inside/outside air changeover
damper lever of the blower unit to the air recircu-
lation position (with the inside/outside air
changeover damper lever touched to the stopper
of the blower case), then attach the cable to the
lever pin.
i. Push the outer cable in the direction of the
arrow so that there is no looseness, then secure
it with the clip.
j. Properly position the control assembly and
secure with the retaining screw(s).
6. Install the stopper.
7. Connect the negative battery cable and check
the climate control system for proper operation be-
fore installing the remaining components.
8. Install the radio/tape and/or CD player as-
sembly.
9. Install the center trim oanel, makina sure the
clips are engaged properly. -
10. Connect the negative battery cable.
Fig. 34 Remove the two center trim panel
retaining screws . . .
Fig. 37, . . then slide the radio chassis and
bracket out of the instrument Dane1
Page 217 of 408
6-14 CHASSIS ELECTRICAL
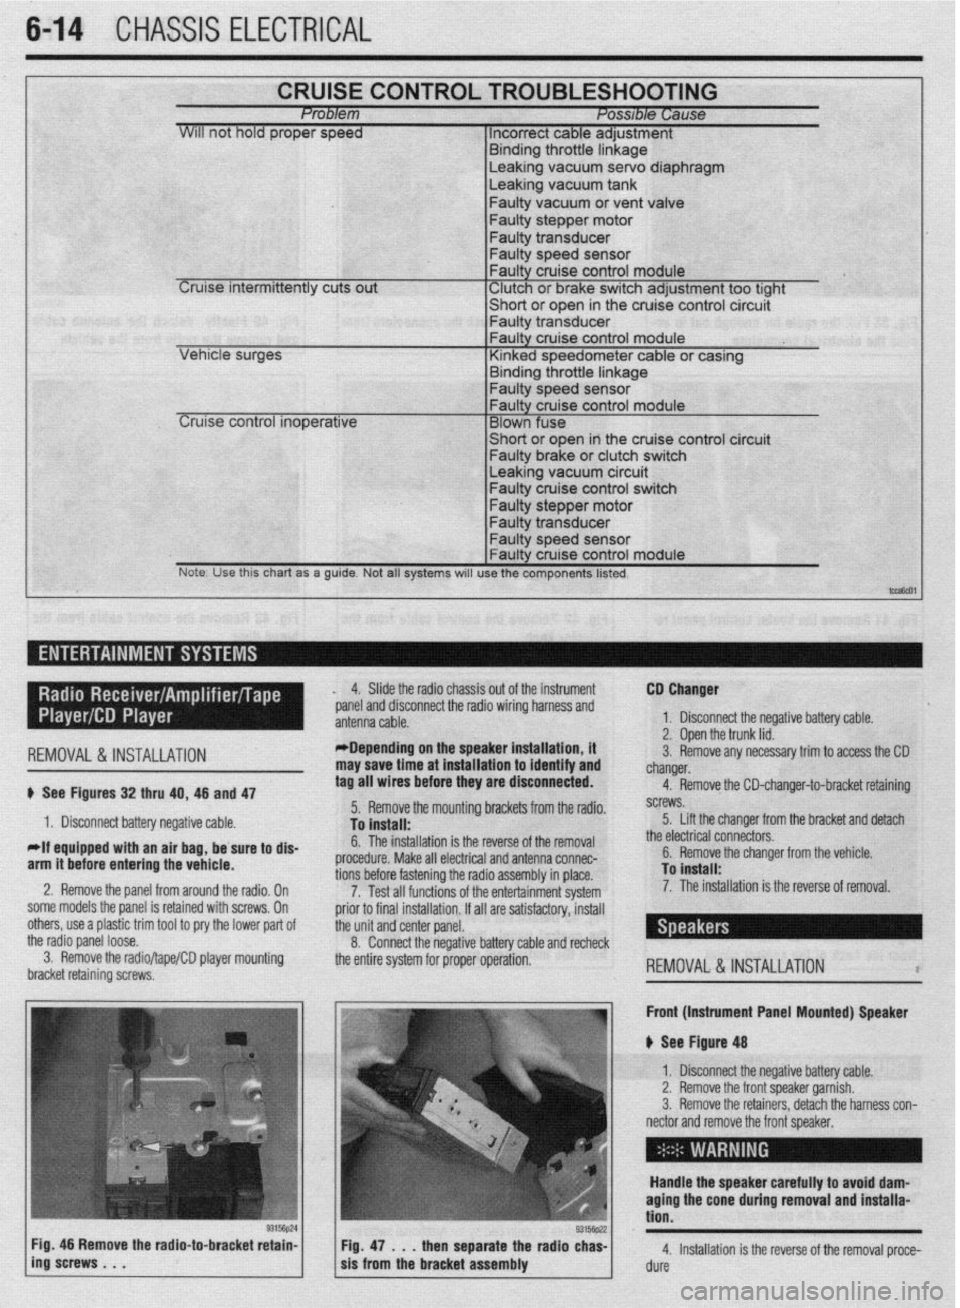
CRUISE CONTROL TROUBLESHOOTING Problem Posable Cause
WIII not hold proper speed 1 Incorrect cable adjustment
F.~. _I.~_ - 1L .-AL‘- I. I -
Cruise intermittently cuts out
trrnarng Inrome nnKage Leaking vacuum servo diaphragm
Leaking vacuum tank
Faulty vacuum or vent valve
Faulty stepper motor
Faulty transducer
Faulty speed sensor
Faulty cruise control module
‘ Clutch or brake switch adjustment too tight -chnrt *r nna* in the cruise control circuit
cer VI I”, . vt “y”‘,
I- Faulty transdu
Leaking vacuum circuit Faulty cruise control switch
Faulty stepper motor
Note. Use this chart as a guide. Not all systems will use the components listed.
t-,
I ,-- ,
REMOVAL&INSTALLATION
# See Figures 32 thru 40, 46 and 47
1. Disconnect battery negative cable.
*If equipped with an air bag, be sure to dis-
arm it before entering the vehicle.
2. Remove the panel from around the radio, On
some models the panel is retained with screws, On
others, use a plastic trim tool to pry the lower pad of
the radio panel loose.
3. Remove the radio/tape/CD player mounting
bracket retaining screws, 4. Slide the radio chassis out of the instrument
*panel and disconnect the radio wiring harness and
*Depending on the speaker installation, it
may save time at installation to identify and
tag all wires before they are disconnected.
5. Remove the mounting brackets from the radio.
To install:
6. The installation is the reverse of the removal
procedure. Make all electrical and antenna connec-
tions before fastening the radio assembly in place.
7. Test all functions of the entertainment system
prior to final installation. If all are satisfactory, install
the unit and center panel.
8. Connect the negative battery cable and recheck
the entire system for proper operation. CD Changer
1. Disconnect the negative battery cable.
2. Open the trunk lid.
3. Remove any necessary trim to access the CD
changer.
4. Remove the CD-changer-to-bracket retaining
screws.
5. Lift the changer from the bracket and detach
the electrical connectors.
6. Remove the changer from the vehicle.
To install:
7. The installation is the reverse of removal.
REMOVAL&INSTALLATION l
Front (Instrument Panel Mounted) Speaker
u See Figure 48
1. Disconnect the negative battery cable.
2. Remove the front speaker garnish.
3. Remove the retainers, detach the harness con-
nector and remove the front speaker,
Handle the speaker carefully to avoid dam-
aging the cone during removal and installa-
tion.
4. Installation is the reverse of the removal proce-
dure
Page 357 of 408
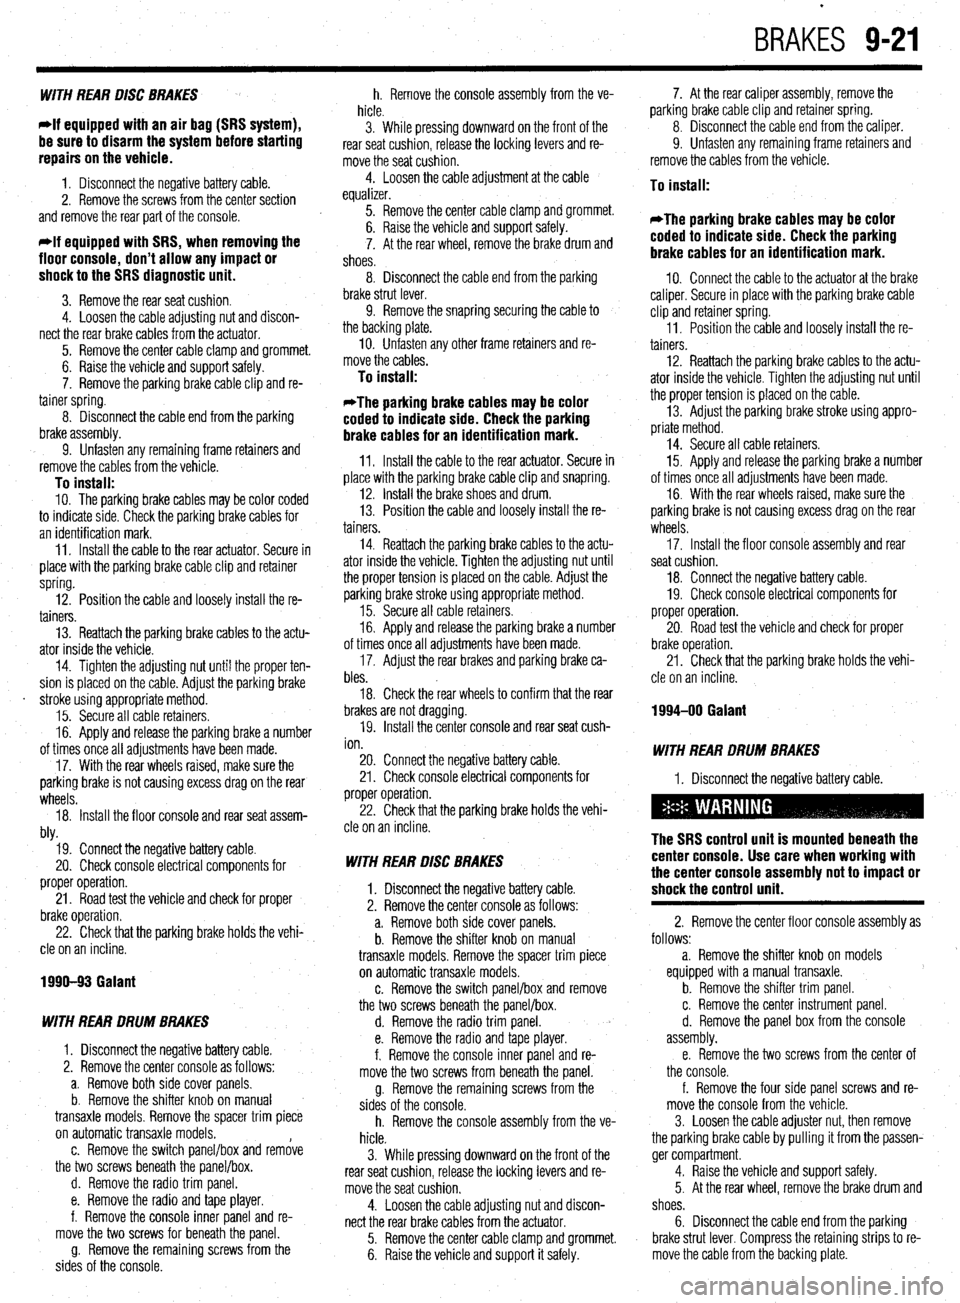
BRAKES 9-21
WITH REAR DISC BRAKES
*If equipped with an air bag (SRS system),
be sure to disarm the system before starting
repairs on the vehicle.
1. Disconnect the negative battery cable.
2. Remove the screws from the center section
and remove the rear part of the console.
*If equipped with SRS, when removing the
floor console, don’t allow any impact or
shock to the SRS diagnostic unit.
3. Remove the rear seat cushion.
4. Loosen the cable adjusting nut and discon-
nect the rear brake cables from the actuator.
5. Remove the center cable clamp and grommet.
6. Raise the vehicle and support safely.
7. Remove the parking brake cable clip and re-
tainer spring.
8. Disconnect the cable end from the parking
brake assembly.
9. Unfasten any remaining frame retainers and
remove the cables from the vehicle.
To install: IO. The parking brake cables may be color coded
to indicate side. Check the parking brake cables for
an identification mark.
11. Install the cable to the rear actuator. Secure in
place with the parking brake cable clip and retainer
spring.
12. Position the cable and loosely install the re-
tainers.
13. Reattach the parking brake cables to the actu-
ator inside the vehicle.
14. Tighten the adjusting nut until the proper ten-
sion is placed on the cable. Adjust the parking brake
. stroke using appropriate method.
15. Secure all cable retainers.
16. Apply and release the parking brake a number
of times once all adjustments have been made.
17. With the rear wheels raised, make sure the
parking brake is not causing excess drag on the rear
wheels.
18. Install the floor console and rear seat assem-
bly.
19. Connect the negative battery cable.
20. Check console electrical components for
proper operation.
21. Road test the vehicle and check for proper
brake operation.
22. Check that the parking brake holds the vehi-
cle on an incline.
1990-93 Galant
WITH REAR DRUM BRAKES
1. Disconnect the negative battery cable.
2. Remove the center console as follows:
a. Remove both side cover panels.
b. Remove the shifter knob on manual
transaxle models. Remove the spacer trim piece
on automatic transaxle models.
c. Remove the switch panel/box and remove
the two screws beneath the panel/box.
d. Remove the radio trim panel.
e. Remove the radio and tape player.
f. Remove the console inner panel and re-
move the two screws for beneath the panel.
g. Remove the remaining screws from the
sides of the console. h. Remove the console assembly from the ve-
hicle.
3. While pressing downward on the front of the
rear seat cushion, release the locking levers and re-
move the seat cushion.
4. Loosen the cable adjustment at the cable
equalizer.
5. Remove the center cable clamp and grommet.
6. Raise the vehicle and support safely.
7. At the rear wheel, remove the brake drum and
shoes.
8. Disconnect the cable end from the parking
brake strut lever.
9. Remove the snapring securing the cable to
the backing plate.
IO. Unfasten any other frame retainers and re-
move the cables.
To install:
*The parking brake cables may be color
coded to indicate side. Check the parking
brake cables for an identification mark.
11. Install the cable to the rear actuator. Secure in
place with the parking brake cable clip and snapring.
12. Install the brake shoes and drum.
13. Position the cable and loosely install the re-
tainers
14. Reattach the parking brake cables to the actu-
ator inside the vehicle. Tighten the adjusting nut until
the proper tension is placed on the cable. Adjust the
parking brake stroke using appropriate method.
15. Secure all cable retainers.
16. Apply and release the parking brake a number
of times once all adjustments have been made.
17. Adjust the rear brakes and parking brake ca-
bles.
18. Check the rear wheels to confirm that the rear
brakes are not dragging.
19. Install the center console and rear seat cush-
ion.
20. Connect the negative battery cable.
21. Check console electrical components for
proper operation.
22. Check that the parking brake holds the vehi-
cle on an incline.
WITH REAR DISC BRAKES
1. Disconnect the negative battery cable.
2. Remove the center console as follows:
a. Remove both side cover panels.
b. Remove the shifter knob on manual
transaxle models. Remove the spacer trim piece
on automatic transaxle models.
c. Remove the switch panel/box and remove
the two screws beneath the panel/box.
d. Remove the radio trim panel.
e. Remove the radio and tape player.
f. Remove the console inner panel and re-
move the two screws from beneath the panel.
g. Remove the remaining screws from the
sides of the console.
h. Remove the console assembly from the ve-
hicle.
3. While pressing downward on the front of the
rear seat cushion, release the locking levers and re-
move the seat cushion.
4. Loosen the cable adjusting nut and discon-
nect the rear brake cables from the actuator.
5. Remove the center cable clamp and grommet.
6. Raise the vehicle and support it safely. 7. At the rear caliper assembly, remove the
parking brake cable clip and retainer spring.
8. Disconnect the cable end from the caliper.
9. Unfasten any remaining frame retainers and
remove the cables from the vehicle.
To install:
*The parking brake cables may be color
coded to indicate side. Check the parking
brake cables for an identification mark.
IO. Connect the cable to the actuator at the brake
caliper. Secure in place with the parking brake cable
clip and retainer spring.
11. Position the cable and loosely install the re-
tainers.
12. Reattach the parking brake cables to the actu-
ator inside the vehicle. Tighten the adjusting nut until
the proper tension is placed on the cable.
13. Adjust the parking brake stroke using appro-
priate method.
14. Secure all cable retainers.
15. Apply and release the parking brake a number
of times once all adjustments have been made.
16. With the rear wheels raised, make sure the
parking brake is not causing excess drag on the rear
wheels.
17. Install the floor console assembly and rear
seat cushion.
18. Connect the negative battery cable.
19. Check console electrical components for
proper operation.
20. Road test the vehicle and check for proper
brake operation.
21. Check that the parking brake holds the vehi-
cle on an incline.
1994-00 Galant
WITH REAR DRUM BRAKES
1. Disconnect the negative battery cable.
The SRS control unit is mounted beneath the
center console. Use care when working with
the center console assembly not to impact or
shock the control unit.
2. Remove the center floor console assembly as
follows:
a. Remove the shifter knob on models
equipped with a manual transaxle.
b. Remove the shifter trim panel.
c. Remove the center instrument panel.
d. Remove the panel box from the console
assembly.
e. Remove the two screws from the center of
the console.
f. Remove the four side panel screws and re-
move the console from the vehicle.
3. Loosen the cable adjuster nut, then remove
the parking brake cable by pulling it from the passen-
ger compartment.
4. Raise the vehicle and support safely.
5. At the rear wheel, remove the brake drum and
shoes.
6. Disconnect the cable end from the parking
brake strut lever. Compress the retaining strips to re-
move the cable from the backing plate.
Page 372 of 408
10-4 BODYANDTRIM
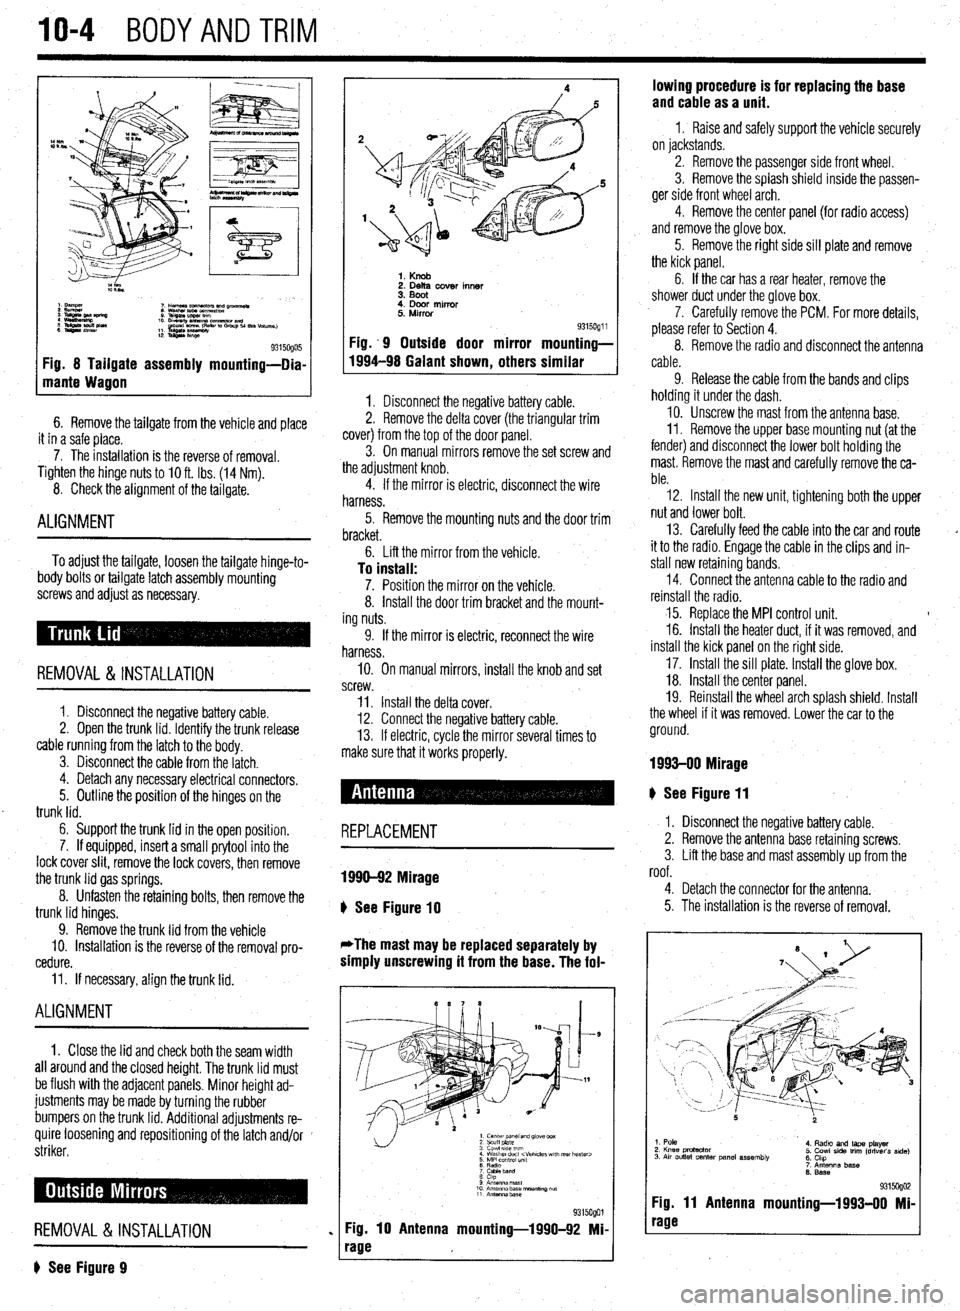
Fig. 8 Tailgate assembly mounting-Dia-
mante Wagon
6. Remove the tailgate from the vehicle and place
it in a safe place.
7. The installation is the reverse of removal.
Tighten the hinge
nuts to IO ft. Ibs. (14 Nm).
8. Check the alignment of the tailgate.
ALIGNMENT
To adjust the tailgate, loosen the tailgate hinge-to-
body bolts or tailgate latch assembly mounting
screws and adjust as necessary.
REMOVAL &INSTALLATION
1. Disconnect the negative battery cable.
2. Open the trunk lid. Identify the trunk release
cable running from the latch to the body.
3. Disconnect the cable from the latch.
4. Detach any necessary electrical connectors.
5. Outline the position of the hinges on the
trunk lid.
6. Support the trunk lid in the open position.
7. If equipped, insert a small prytool into the
lock cover slit, remove the lock covers, then remove
the trunk lid gas springs.
8. Unfasten the retaining bolts, then remove the
trunk lid hinges.
9. Remove the trunk lid from the vehicle
10. Installation is the reverse of the removal pro-
cedure.
11. If necessary, align the trunk lid.
ALIGNMENT
1. Close the lid and check both the seam width
all around and the closed height. The trunk lid must
be flush with the adjacent panels. Minor height ad-
justments may be made by turning the rubber
bumpers on the trunk lid. Additional adjustments re-
quire loosening and repositioning of the latch and/or
striker.
REMOVAL &INSTALLATION
? See Figure 9
1. Knob 2. Delta cover inner
3. Boot
4. Door mirror
5. Mirror
Fig. .9 Outside door mirror
1994-98 Galant shown
, others 9315oQ1 i mounting-
similar
1. Disconnect the negative battery cable.
2. Remove the delta cover (the triangular trim
cover) from the top of the door panel.
3. On manual mirrors remove the set screw and
the adjustment knob.
4. If the mirror is electric, disconnect the wire
harness.
5. Remove the mounting nuts and the door trim
bracket.
6. Lift the mirror from the vehicle.
To install: 7. Position the mirror on the vehicle.
8. Install the door trim bracket and the mount-
ing nuts.
9. If the mirror is electric, reconnect the wire
harness.
IO. On manual mirrors, install the knob and set
screw.
11. Install the delta cover.
12. Connect the negative battery cable.
13. If electric, cycle the mirror several times to
make sure that it works properly.
# See Figure 11
REPLACEMENT
1990-92 Mirage
b
See Figure 10
*The mast may be replaced separately by
simply unscrewing it from the base. The fol-
1. center panel and glove box
2 scuff plate
3 cowl 51ae wm
4 Washer duct
7 CaMeband
8 cap
9 Anrsnna mast
10 Antenna base “ourmng ““f
11 Antennz.base
%i%Qol
Fig. 10 Antenna mounting-1990-92 Mi-
rage lowing procedure is for replacing the base
and cable as a unit.
1 I Raise and safely support the vehicle securely
on jackstands.
2. Remove the passenger side front wheel.
3. Remove the splash shield inside the passen-
ger side front wheel arch.
4. Remove the center panel {for radio access)
and remove the glove box.
5. Remove the right side sill plate and remove
the kick panel.
6. If the car has a rear heater, remove the
shower duct under the glove box.
7. Carefully remove the PCM. For more details,
please refer to Section 4.
8. Remove the radio and disconnect the antenna
cable.
9. Release the cable from the bands and clips
holding it under the dash.
10. Unscrew the mast from the antenna base.
II. Remove the upper base mounting nut (at the
fender) and disconnect the lower bolt holding the
mast. Remove the mast and carefully remove the ca-
ble.
12. Install the new unit, tightening both the upper
nut and lower bolt.
13. Carefully feed the cable into the car and route
it to the radio. Engage the cable in the clips and in-
stall new retaining bands.
14. Connect the antenna cable to the radio and
reinstall the radio.
15. Replace the MPI control unit. t
16. Install the heater duct, if it was removed, and
install the kick panel on the right side.
17. Install the sill plate. Install the glove box.
18. Install the center panel.
19. Reinstall the wheel arch splash shield. Install
the wheel if it was removed. Lower the car to the
ground.
1993-00 Mirage
I. Disconnect the negative battery cable.
2. Remove the antenna base retaining screws.
3. Lift the base and mast assembly up from the
roof.
4. Detach the connector for the antenna.
5. The installation is the reverse of removal.
1. Pole
2. Knee protactor
3. Air outlet center panel assembly 4. Radto and laps player
5. Cowl side trim (driver’s side)
6. Chp
7. Antenna base
6. Base
931 !iogo2 Fig. 11 Antenna mounting-1993-00 Mi-
rage
Page 373 of 408
BODYANDTRIM IO-5
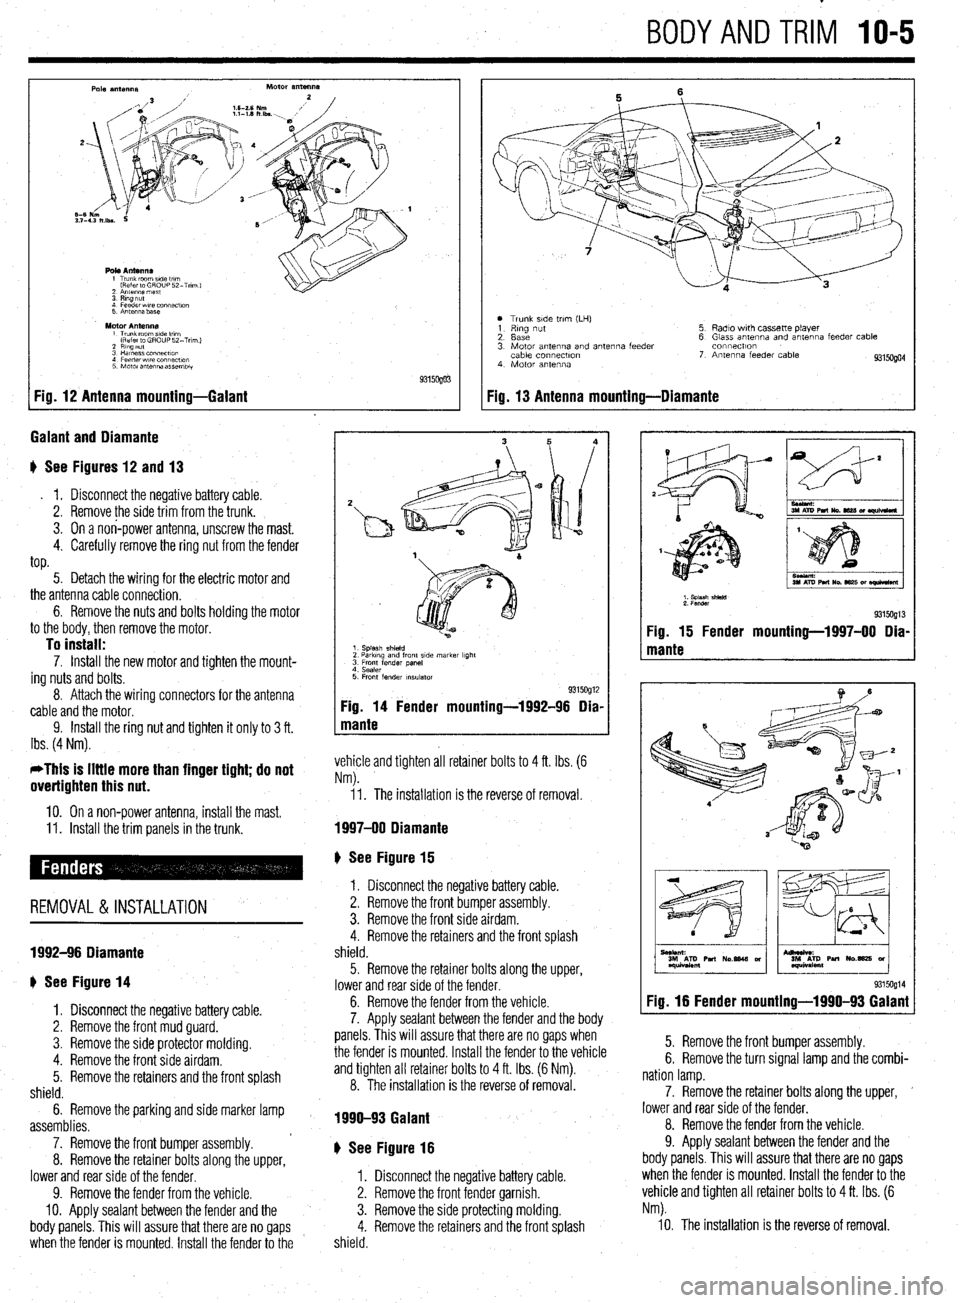
Pole antenna Motor antenna
Pob Antennr
1 Trunk man side tram
Refer to GHOUP 52-Tnm.1
2 Antenna mast
3 Amg nut
4 Feeder wre connect,~n
5 Antenna base
Motor Antenna 1 Trunk mom side trim
(Refer to GROUP 52-Trim )
2 Ring nut
3 Harness connect,~n
4 Feeder wre connectu~n
5 Motor antenna assembly
Fig. 12 Antenna mounting-Galant 9315ogo3
;alant and Diamante
+ See Figures 12 and 13
. 1. Disconnect the negative battery cable.
2. Remove the side trim from thetrunk.
3. On a non-power antenna, unscrew the mast.
4. Carefully remove the ring nut from the fender
top.
5. Detach the wiring for the electric motor and
the antenna cable connection.
6. Remove the nuts and bolts holding the motor
to the body, then remove the motor.
To install: 7. Install the new motor and tighten the mount-
ing nuts and bolts.
8. Attach the wiring connectors for the antenna
cable and the motor.
9. Install the ring nut and tighten it only to 3 ft.
Ibs. (4 Nm).
*This is little more than finger tight; do not
overtighten this nut.
IO. On a non-power antenna, install the mast.
11. Install the trim panels in the trunk.
REMOVAL&INSTALLATION
1992-96 Diamante
+ See Figure 14
1. Disconnect the negative battery cable.
2. Remove the front mud guard.
3. Remove the side protector molding.
4. Remove the front side airdam.
5. Remove the retainers and the front splash
shield.
6. Remove the parking and side marker lamp
assemblies.
7. Remove the front bumper assembly.
8. Remove the retainer bolts along the upper,
lower and rear side of the fender.
9. Remove the fender from the vehicle.
IO. Apply sealant between the fender and the
body panels. This will assure that there are no gaps
when the fender is mounted. Install the fender to the
0 Trunk side tnm (LH)
1 Rmg nut
2. Base
3. Motor antenna and antenna feeder
cable connectlon
4 Motor antenna 5 Radio with cassette player
6 Glass antenna and antenna feeder cable
connectton
7. Antenna feeder cable
9315Ogo4
Fig. 13 Antenna mounting-Diamante
1. Splash shield
2 Parkmg and front side marker light
3 Front fender panel 4. Sealer
5 Front fender insulator 9315OglZ Fig. 14 Fender mounting-1992-96 Dia-
mante
vehicle and tighten all retainer bolts to 4 ft. Ibs. (6
Nm).
11. The installation is the reverse of removal.
1997-00 Diamante
) See Figure 15
1. Disconnect the negative battery cable.
2. Remove the front bumper assembly.
3. Remove the front side airdam.
4. Remove the retainers and the front splash
shield.
5. Remove the retainer bolts along the upper,
lower and rear side of the fender.
6. Remove the fender from the vehicle.
7. Apply sealant between the fender and the body
panels. This will assure that there are no gaps when
the fender is mounted. Install the fender to the vehicle
and tighten all retainer bolts to 4 ft. Ibs. (6 Nm).
8. The installation is the reverse of removal.
1990-93 Galant
b See Figure 16
1. Disconnect the negative battery cable.
2. Remove the front fender garnish.
3. Remove the side protecting molding.
4. Remove the retainers and the front splash
shield.
I
I
1. splash shWd
2. Fender
931sog13 Fig. 15 Fender mounting-1997-00 Dia-
mante
9315og14 Fig. 16 Fender mounting-1990-93 Galant
5. Remove the front bumper assembly.
6. Remove the turn signal lamp and the combi-
nation lamp.
7. Remove the retainer bolts along the upper, ’
lower and rear side of the fender.
8. Remove the fender from the vehicle.
9. Apply sealant between the fender and the
body panels. This will assure that there are no gaps
when the fender is mounted. Install the fender to the
vehicle and tighten all retainer bolts to 4 ft. Ibs. (6
Nm).
10. The installation is the reverse of removal.
Page 375 of 408
BODYANDTRIM IO-7
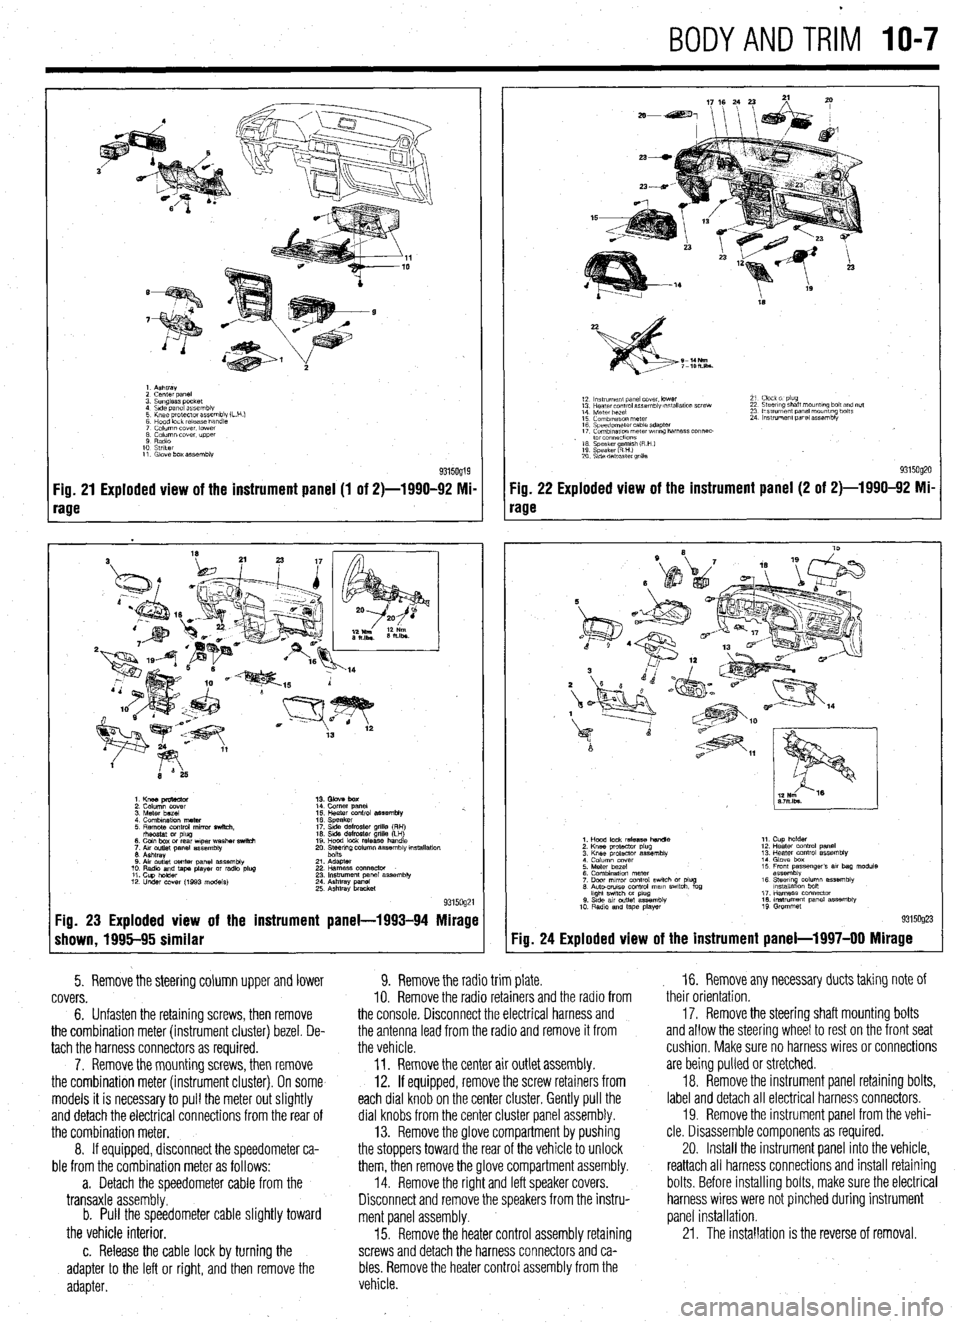
1. Ashtray
2 cenrer DaneI
3. Sunglass pocket
4 Side panel assembly
5 Knee protector assembly (L
6 Hood lock release handle
7 Column cover. lower
8 Column cover. upper
9 Radio
10 Striker
11. Glove box assembly
Fig. 21 Exploded view of the instrument panel (1 of 2)-1990-92 Mi-
rage
1. Knee pmtector
2. Column cover
3. Meter bezel
4. Combination meter
5. Remote control mirror switch.
rhsostat or plug
6. Coin box or rear wper washer switch
7. Aw outlet panel assembly
6. Ashtray
0. Air outlet center panel assembly
10. Radio and tape player or radio plug
11. Cup holder
12. Under COW (1993 models) 14. Comer panel
15. Heater control assembly %.
16. Speaker
17. Side defroster grille (RH)
16. Side defroster grille (LH)
19. Hood lock release handle
20. Ee$ng column assembly mstallation
21. Adapter
22 Harness oonnector
23. Instrument panel assembly
24. Ashtray panel
25. Ashtray bracket
9315og21 Fig. 23 Exploded view of the instrument panel-1993-94 Mirage
shown, 1995-95 similar
5. Remove the steering column upper and lower
covers.
6. Unfasten the retaining screws, then remove
the combination meter (instrument cluster) bezel. De-
tach the harness connectors as required.
7. Remove the mounting screws, then remove
the combination meter (instrument cluster). On some
models it is necessary to pull the meter out slightly
and detach the electrical connections from the rear of
the combination meter.
8. If equipped, disconnect the speedometer ca-
ble from the combination meter as follows:
a. Detach the speedometer cable from the
transaxle assembly.
b. Pull the speedometer cable slightly toward
the vehicle interior.
c. Release the cable lock by turning the
adapter to the left or right, and then remove the
adapter.
18
S-14Nm
7-lOh.lbs.
12 ln~v~rnent panel cover. lower
13 Hearer control assembly w,tallatlon screw
14 Meter bezel
15 Combination meter
16 Speedometer cable adapter
17 Comblnawn meterwr~ng harness connec-
. to1 co”“ectlo”s
16 Speaker amlsh (R H )
19 Speaker RHI e
20 S\de defroster grllla 21 Clock 01 plug
22 Steering shaft mount,ng bolt and nut
23 Ins!rument panel mounting bolts
24 Instrument panel assembly
9315og20 Fig. 22 Exploded view of the instrument panel (2 of 2)-1990-92 Mi-
rage
Fig. 24
1. Hood lock release handle
2. Knee protactor plug
3. Knee protector assembly
4 Column cover
5. Meter bezel
6. Combination meter
7. Door mrror control swich or plug
6. Auto-CNISO control mam swtch. fog
hght swtch M plug
0. Stde av outlet assembly
10 Radio and tape player 11. Cup holder
12. Heater control panel
13. Heater control assembly
14. Glove box
15 Front passenger’s 81, bag module
assembly
16. Steerq column assembly
lnstallatlon bon
17. Harness connector
16. Instrument panel assembly
19 Grommet
Exploded view of the instrument panel-l 997-00 Mirage
9. Remove the radio trim plate.
IO. Remove the radio retainers and the radio from
the console. Disconnect the electrical harness and
the antenna lead from the radio and remove it from
the vehicle.
11. Remove the center air outlet assembly.
12. If equipped, remove the screw retainers from
each dial knob on the center cluster. Gently pull the
dial knobs from the center cluster panel assembly.
13. Remove the glove compartment by pushing
the stoppers toward the rear of the vehicle to unlock
them, then remove the glove compartment assembly.
14. Remove the right and left speaker covers.
Disconnect and remove the speakers from the instru-
ment panel assembly.
15. Remove the heater control assembly retaining
screws and detach the harness connectors and ca-
bles. Remove the heater control assembly from the
vehicle. , 16. Remove any necessary ducts taking note of
their orientation,
17. Remove the steering shaft mounting bolts
and allow the steering wheel to rest on the front seat
cushion, Make sure no harness wires or connections
are being pulled or stretched.
18. Remove the instrument panel retaining bolts,
label and detach all electrical harness connectors.
19. Remove the instrument panel from the vehi-
cle. Disassemble components as required.
20. Install the instrument panel into the vehicle,
reattach all harness connections and install retaining
bolts. Before installing bolts, make sure the electrical
harness wires were not pinched during instrument
panel installation.
21. The installation is the reverse of removal.
Page 376 of 408
IO-8 BODYANDTRIM
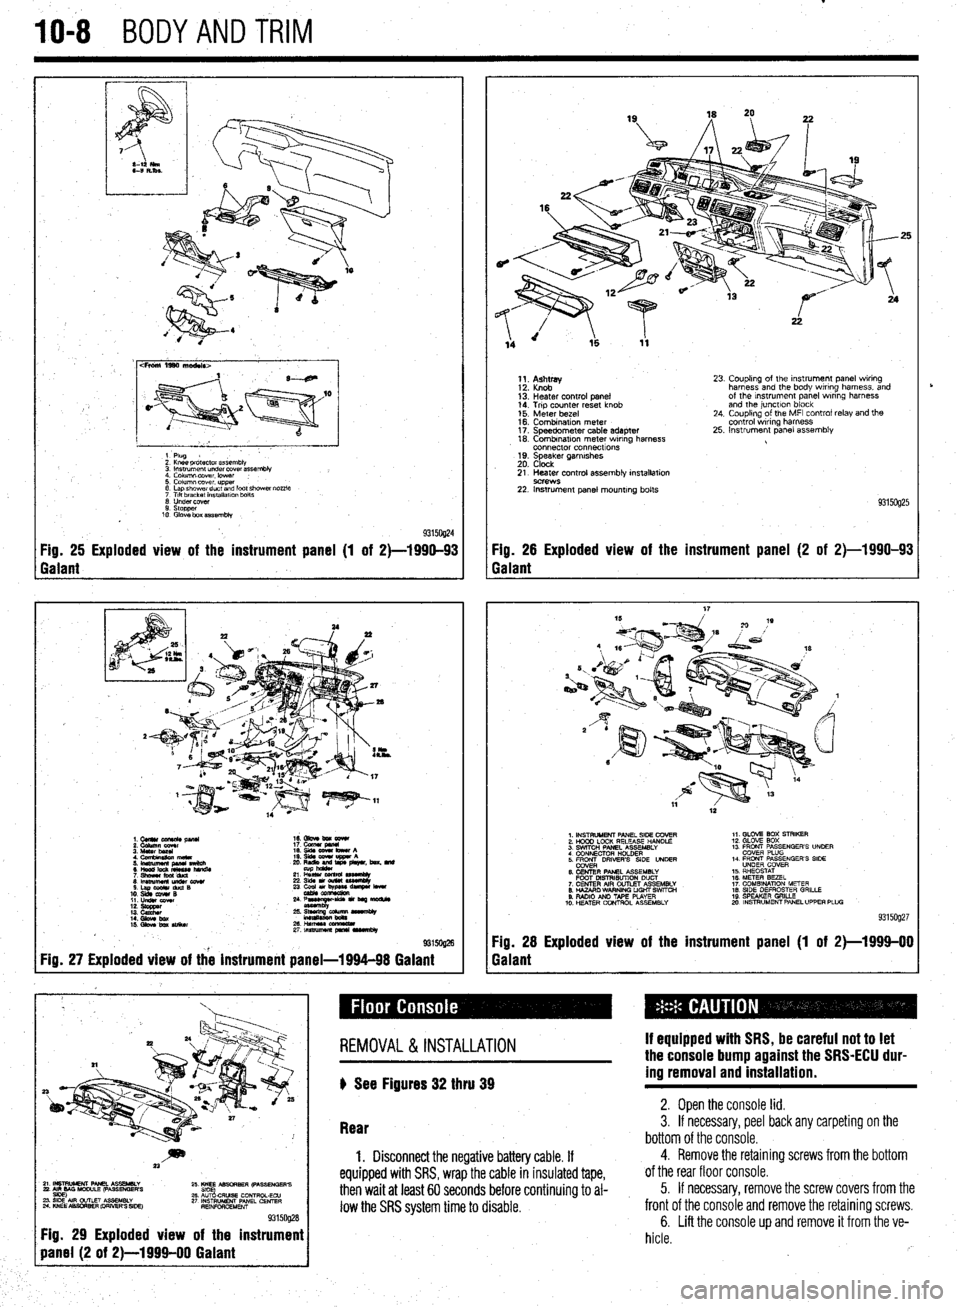
cFroni 1990 ma&Is>
1 Plug
2 Knee pr&ctor assembb
3 lnsuumen~ under covet assembly
4. Column lxwer. lower :
5. Column cover upper
6 Lap shower duct and foot shcwai nozzle
7 Ttlt bracket installalm bolts
0 Undercover
9. stopper
10 Glove box assembly
93150@4 Fig. 25 Exploded view of the instrument panel (1 of 2)-1990-93 Fig. 26 Exploded view of the instrument panel (2 of 2)-1990-93
Galant Galant
1.CUllUCU+RC&pllU 16. Gbve bm eewr
i: iiiikz!!T 17. cucw gmnl
4. Cfnnbinuion meta 19. qds cww bww A
5 ‘~fiJzg%L L: ,“zr&, beat. md
21 L% sssemuy
8lmwmemu&cowr 236&1ou(W~
S.LapOdrduQB
10. slds cw4# B 23 ~u,~e-
11. LIdsI corn
::: s%ZZ
14. Gbw bx / ;:+q-=:-
kmasa
IS. Gkw ba SIiikw 2&HWSSCCl!ZL
2rtnsmlmuapr*lrvrnbly
@ma
Fig. 27 Exploded view of the instrument panel-1994-98 Galant
1;. p;;w
13: Heater control panel
14. Trip counter reset knob
15. Meter bezel
16. Combination meter
17. Speedometer cable adapter
18. Combrnatron meter wiring harness
connector connecttons
19. Speaker garnrshes
20. Clock 23. Coupling of the Instrument panel wiring
harness and the body wiring harness, and
of the Instrument panel wrring harness
and the junctlon block
24. Coupling of the MFI control relay and the
control wiring harness
25. Instrument panel assembly
21. Heater control assembly installation
9C?WS 22. Instrument panel mounting bolts
93150925
1. INSTRUMENT PANEL SIDE COVER
2. HOOD LOCK RELEASE HANDLE
3. SWITCH PANEL ASSEMBLY
4 CONNECTOR H+DER
5. ER DRIVERS SIDE UNDER
6. CENTER PANEL ASSEMBLY
FOOT MSTRISUTION DUCT
7. CENTER AIR OUTLET ASSEMBLY
8. HAZARO WARNING LIGHT SWfTCti
9. RADIO AN0 TAPE PLAYER
10. H!ZATER CONTROL ASSEMBLY 1,. GLOV2 BOX STRIKER
12. GLOVE SOX
13 FRONT PASSENGER’S UNOER
COVER PLUG
14. FRONT PASSENGER’S SIDE
UNDER COVER
15. RHEOSTAT
16. METER BEZEL
17. COMBINATION METER
18. SIDE DEFROSTER GRILLE
19 SPEAKER GRILLE
mo. INSTRUMENT PANEL UPPER PLUG
93159927
Fig. 28 Exploded view of the instrument panel (1 of 2)-1999-00
Galant
~~~~~~~~~
Fig. 29 Exploded view of the instrument
REMOVAL &INSTALLATION
) See Figures 32 thru 39 If equipped with SRS, be careful not to let
the console bump against the SRS-ECU dur-
ing removal and installation.
Rear 2. Open the console lid. 3. If necessary, peel back any carpeting on the
bottom of the console.
1. Disconnect the negative battery cable. If
equipped with SRS, wrap the cable in insulated tape,
then wait at least 60 seconds before continuing to al-
low the SRS system time to disable.
4. Remove the retaining screws from the bottom
of the rear floor console.
5. If necessary, remove the screw covers from the
front of the console and remove the retaining screws.
6. Lift the console up and remove it from the ve-
hicle.
rb
Page 377 of 408
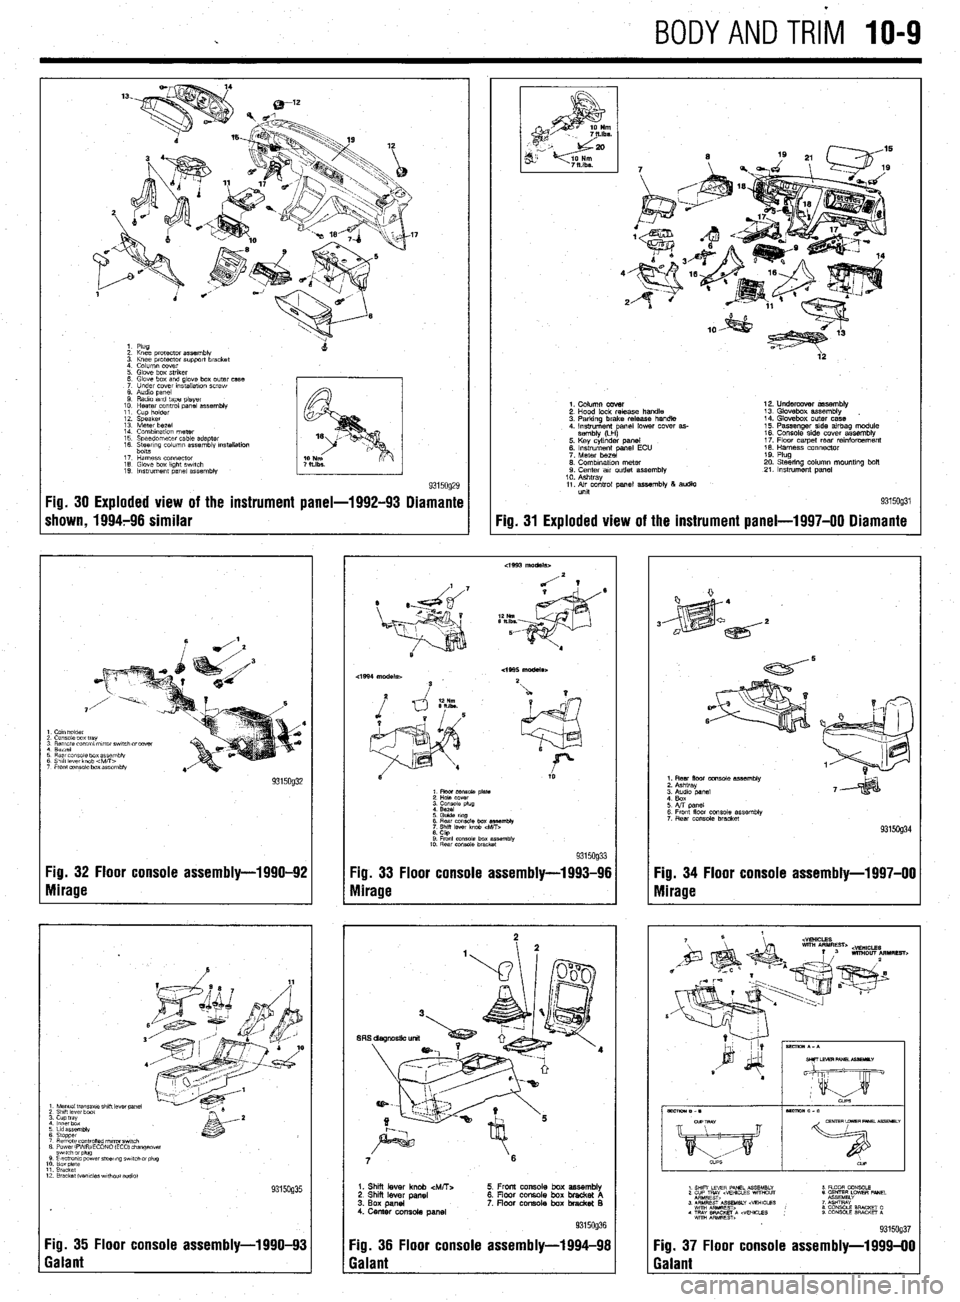
c BODYANDTRi'l IO-9
:: k% protector assembly
3. Knee protector support bracket
4. Column cover
5 Glove box striker
6 Glove box and glove box outer case
7 Under cover mstallatmn screw
8. Audio panel
9 Radio and tape player
10 Heater control panel
assembly 11 Cup holder
12. Speaker
13 Meter bezel
14 Combination meter
15 Speeoometer cable adapter
16 %&rrng column assembly rnstallatioh
17 Harness connector
18. Glove box kght swatch
19. Instrument panel assembly
9315og29 Fig. 30 Exploded view of the instrument panel-1992-93 Diamante
shown, 1994796 similar
I Cam holder
2 Console box tray
3 Remote control mrror swatch drcover
1 Berrel
3 Rear cms~ie box assembly
3 Shift lever knob 4vitT>
7 Front eonsale box assembly
Fig. 32 Floor console assembly-1990-92
Yg. 33 Floor console assembly-1993-96
Nlirage
Mirage
1 Manual tmnsaxle shrft lever panel 2 Shrft lever boat 3. cup tray 4 lnnerbdx
6 Lrd assembly
6 Stopper 7 Remote cO”trOned nl,rrorSwl,Ch 8 PowerlFVWECONO (EC01 changeover
12 Bracket Wvcles wrthout addlo)
Fig. 35 Floor console assembly-l 990-93
Galant
4’
2
ia
9315og31 Fig. 31
Exploded view of the instrument
panel-l 997-00 Diamante
1. Column cover
2. Hood lock release handle
3. Parking brake release handle
4. Instrument anal lower cover as-
sembly (LH
P 5. Key cylinder panel
6. instrument panel ECU
7. Meter bezel
0. Combination meter 9. Center air outlet assembly
10. Ashtray
11. Air control panel assembly 8 audio
unit 12. Undercover assembly
13. Glovebox assembly
14. Glovebox outer case
15. Passenger side airbag module
16. Console side cover assemblv
17. Flow carpet rear rainforcem&t
18. Harness connector
19. Plug
20. Steering column mountlng bolt
21. Instrument panel
6 Rear cmsole box es%mbly
7
Shrff lever knob
6. CtQ 9 Front console box assembfk
10. Rear console bracket 9315og33
7 6
1. Shii lever knob &ATT:.
2. Shi lever panel
3. Box panel
4. Center console panel 5. Front console box assembly
6. Floor console box bracket A
7. floar console box bradret B
Fig. 36 Floor console assembly-1994-98
Galant
1. Rear floor console assembly
2. Ashtray
6. Front floor console assembly
7 Rear console bracket
Fig. 34 Floor console assembly-1997-00
Mirage
Fig. 37 Floor console assembly-l 999-00
Galant
Page 406 of 408
l
II-24 MASTER INDEX
ADJUSTMENT 8-25
REMOVAL &INSTALLATION 8-25
HYDRAULIC CONTROL UNIT 9-25
REMOVAL & INSTALLATION 9-25
IDLE AIR CONTROLMOTOR 4-9
OPERATION 4-9
REMOVAL&INSTALLATION 4-9
TESTING 4-9
IDLESPEED 1-28
PREVENTIVEMAINTENANCE 1-28
SYSTEM INSPECTION 1-29
SYSTEMSERVlCE&REPAlR 1-28
IGNITION LOCK CYLINDER 8-29
REMOVAL & INSTALLATION 8-29
IGNITION SWITCH 8-30
REMOVAL & INSTALLATION 8-30
IGNITION COIL(s) 2-5
REMOVAL&INSTALLATION 2-6
TESTING . 2-5
IGNITION COIL 2-3
REMOVAL&INSTALLATION 2-3
TESTING 2-3
IGNITION TIMING l-25
GENERALINFORAMTION l-25
INSPECTION&ADJUSTMENT l-26
INSIDE REAR VIEW MIRROR
IO-IO
REPLACEMENT IO-IO
INSPECTION 3-55
REPLACEMENT 3-56
INSTRUMENT CLUSTER 6-17
REMOVAL&INSTALLATION 6-I;
INSTRUMENTPANEL IO-6
REMOVAL &INSTALLATION IO-6
INSTRUMENTS AND SWITCHES 6-17
INTAKE MANIFOLD 3-7
REMOVAL &INSTALLATION 3-7
INTAKEAIRTEMPERATURESENSOR 4-10
OPERATION 4-10
REMOVAL&INSTALLATION 4-11
TESTING 4-11
INTERIOR 1 O-6
JACKING I-46
. JACKING PRECAUTIONS 1-47
JUMP STARTING A DEAD BATTERY 1-44
JUMPSTARTING PRECAUTIONS l-45
JUMPSTARTING PROCEDURE l-45
KNUCKLE,HUB, AND BEARING 8-13
REMOVAL &INSTALLATION 8-13
LIGHTING 6-19
LOWER BALLJOINT 8-10
INSPECTION 8-10
REMOVAL & INSTALLATION 8-10
LOWER CONTROLARM 8-10
REMOVAL&INSTALLATION 8-10
LOWER CONTROL ARMS 8-23
REMOVAL & INSTALLATION 8-23
MACPHERSONSTRUTAND COILSPRING
8-7
OVERHAUL 8-7
REMOVAL & INSTALLATION 8-7
MAINTENANCEORREPAIR? l-2
MANIFOLDABSOLUTEPRESSURESENSOR
4-12
OPERATION 4-12
REMOVAL&INSTALLATION 4-13
TESTING 4-12
MANUAL RACK AND PINION STEERING GEAR
8-31
REMOVAL & INSTALLATION 8-31
MANUALTRANSAXLEASSEMBLY 7-2
REMOVAL & INSTALLATION. 7-2
MANUAL TRANSAXLE 7-2 MANUALTRANSAXLE l-35
DRAIN &REFILL l-36
FLUID RECOMMENDATIONS l-35
LEVEL CHECK l-35
MASSAIRFLOWSENSOR 4-11
OPERATION 4-11
REMOVAL&INSTALLATION 4-11
TESTING 4-11
MASTER CYLINDER 9-3
BRAKE PEDALADJUSTMENTS 9-4
REMOVAL & INSTALLATION 9-3
MULTI-POINT FUEL INJECTION SYSTEM (MPI) 5-3
DBD-1 TROUBLE CODES 4-26
OBD-II TROUBLE CODES 4-27
OIL PAN 3-30
REMOVAL & INSTALLATION 3-30
OIL PUMP 3-33
REMOVAL & INSTALLATION 3-33
OIL PRESSURESENDING UNIT 2-12@T
REMOVAL&INSTALLATION 2-1.2
TESTING 2-12
OUTSIDE MIRRORS IO-3
REMOVAL&INSTALLATION IO-3
OXYGENSENSOR 4-8
OPERATION 4-8
REMOVAL&INSTALLATION 4-8
TESTING 4-8
PARK/NEUTRAL POSITIONSWITCH 7-10
ADJUSTMENT 7-10
REMOVAL & INSTALLATION 7-10
PARKING BRAKE 9-20
PCVVALVE l-15
REMOVAL&INSTALLATION I-15
PINION SEAL 7-16
REMOVAL &INSTALLATION 7-16
POWER BRAKEBOOSTER 9-5
REMOVAL &INSTALLATION 9-5
POWER RACK AND PINION STEERING GEAR 8-32
REMOVAL &INSTALLATION 8-32
POWERSEATMOTOR IO-11
REMOVAL & INSTALLATION IO-11
POWER STEERING PUMP 8-34
REMOVAL & INSTALLATION 8-34
SYSTEM BLEEDING 8-36
POWER TRANSlSTOR(IGNITION MODULE) 2-7
REMOVAL&INSTALLATION 2-7
POWERSTEERING PUMP l-42
FLUID RECOMMENDATIONS l-42
LEVELCHECK l-42
POWER TRANSlSTOR(Ignition Module) 2-4
REMOVAL&INSTALLATION 2-4
PRESSURERELIEFVALVE 5-9
REMOVAL&INSTALLATION 5-9
PROPORTIONING VALVE 9-6
REMOVAL & INSTALLATION 9-6 *
RADIATOR 3-18
REMOVAL &INSTALLATION 3-18
RADIO RECEIVER/AMPLIFIER/TAPE PLAYER/CD PLAYER 6-14
READING CODES 4-26
WITHASCANTOOL 4-26
WITHOUTASCANTOOL 4-27
READING CODES 4-27
WITHASCANTOOL 4-27
WITHOUTASCANTOOL 4-27
REAR AXLE DIFFERENTIAL 7-15
REAR HALFSHAFTAND SEAL 7-15
REMOVAL&INSTALLATION 7-15
REAR MAIN SEAL 3-54
REMOVAL & INSTALLATION 3-54