horn MITSUBISHI ECLIPSE 1990 Service Manual
[x] Cancel search | Manufacturer: MITSUBISHI, Model Year: 1990, Model line: ECLIPSE, Model: MITSUBISHI ECLIPSE 1990Pages: 391, PDF Size: 15.27 MB
Page 6 of 391
o-2GENERAL - Technical Features
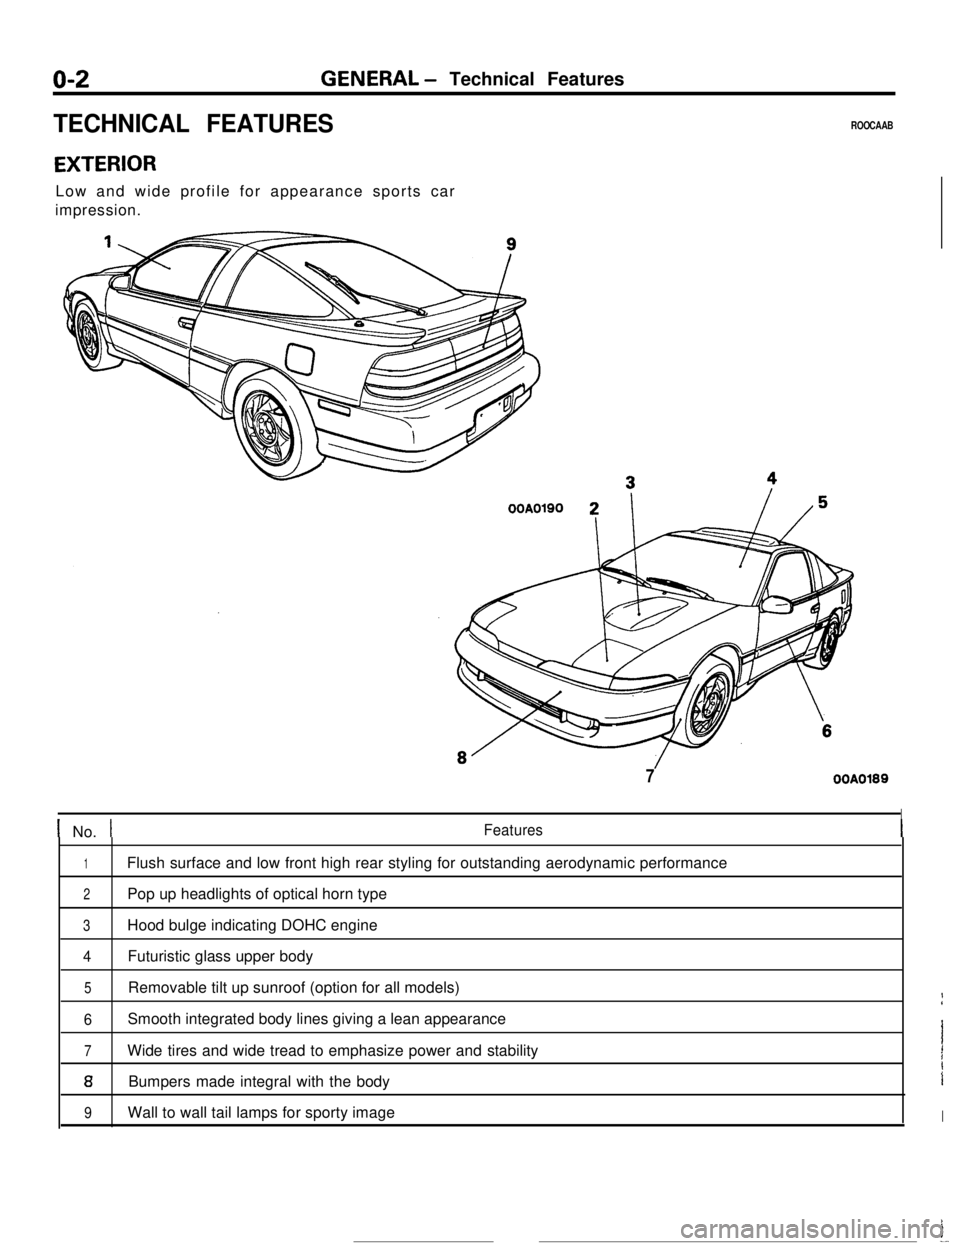
TECHNICAL FEATURESROOCAAB
EXTERIORLow and wide profile for appearance sports car
impression.
OOA0190 2
7OOA0189
I
1 No. tFeatures
1Flush surface and low front high rear styling for outstanding aerodynamic performance
2Pop up headlights of optical horn type
3Hood bulge indicating DOHC engine
4Futuristic glass upper body
5Removable tilt up sunroof (option for all models)If
6Smooth integrated body lines giving a lean appearance
7Wide tires and wide tread to emphasize power and stabilityI1
aBumpers made integral with the bodyi
9Wall to wall tail lamps for sporty imageIi
--
Page 12 of 391
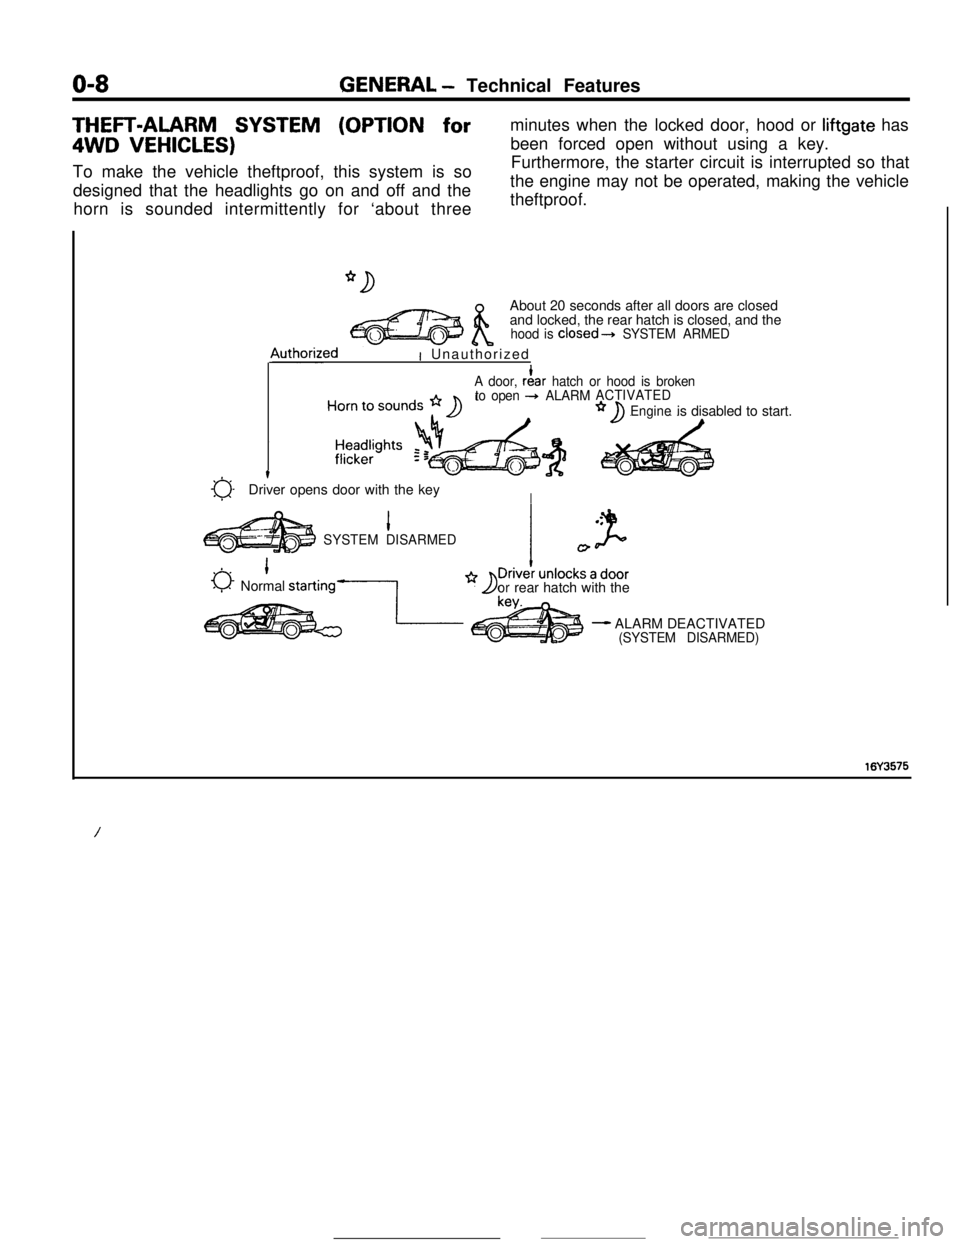
O-8GENERAL - Technical FeaturesTHEFT-ALARM SYSTEM (OPTION for4WD
VEHICLES)To make the vehicle theftproof, this system is so
designed that the headlights go on and off and the
horn is sounded intermittently for ‘about threeminutes when the locked door, hood or liftgate has
been forced open without using a key.
Furthermore, the starter circuit is interrupted so that
the engine may not be operated, making the vehicle
theftproof.
About 20 seconds after all doors are closed
and locked, the rear hatch is closed, and the
hood is closed---t SYSTEM ARMED4uthorized
I Unauthorized
A door, rf!ar hatch or hood is broken
to open + ALARMACTIVATED
Engineis disabled to start.
a-t
Driver opens door with the keyI
1SYSTEM DISARMED
0 1Normal starting-1
I
orrear hatch with the
- ALARM DEACTIVATED(SYSTEM DISARMED)
16Y3575
/
Page 55 of 391
ELECTRICAL - Fuses8-3q
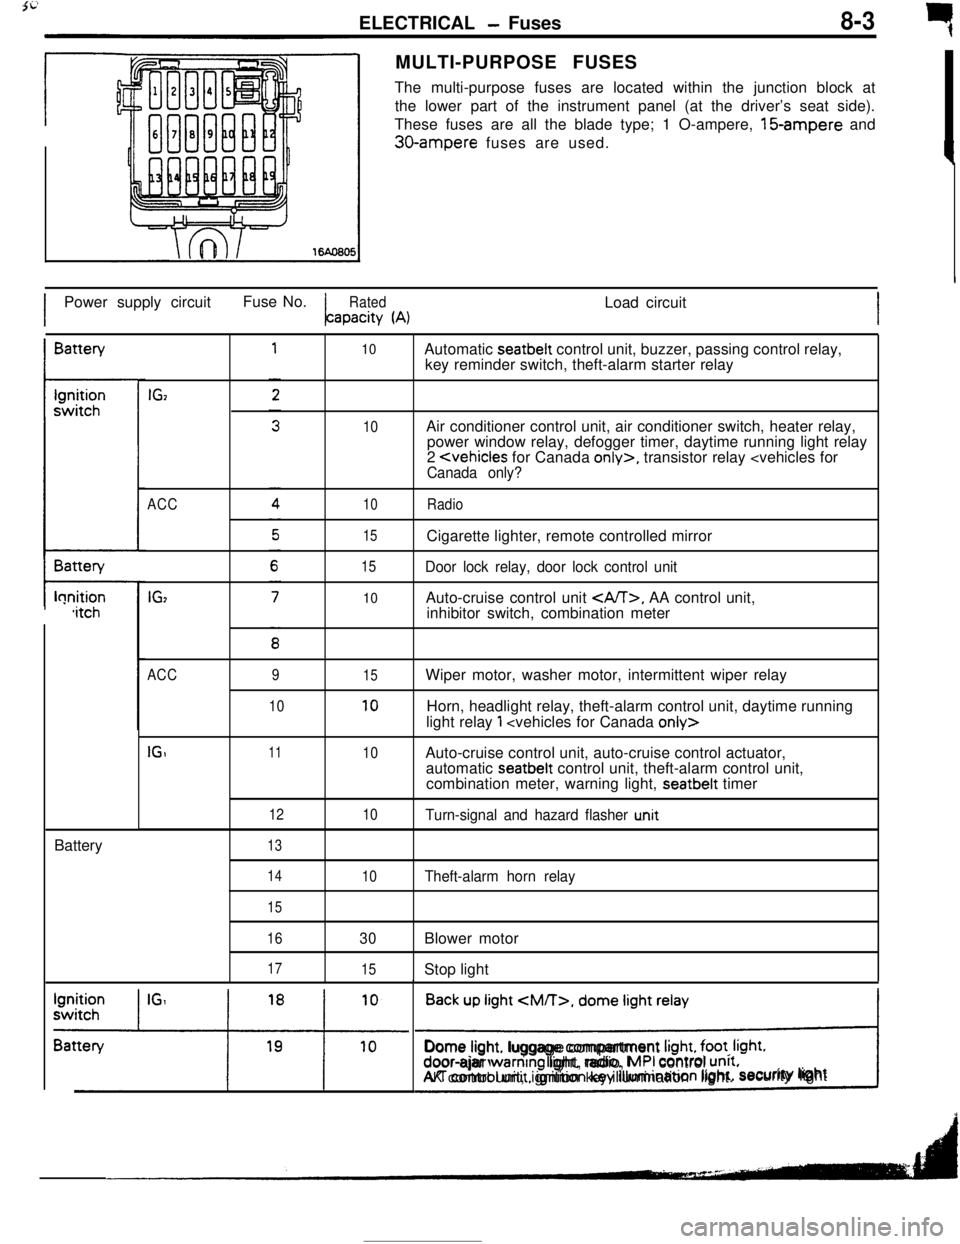
rMULTI-PURPOSE FUSES
The multi-purpose fuses are located within the junction block at
the lower part of the instrument panel (at the driver’s seat side).
These fuses are all the blade type; 1 O-ampere, 15-ampere and
30-ampere fuses are used.
IPower supply circuitFuse No.
RatedLoad circuitapacity
(A)IBattery
t-lonition,itchBattery
IGz
ACC
IG,
10
10
10
15
15
10Automatic seatbelt control unit, buzzer, passing control relay,
key reminder switch, theft-alarm starter relay
Air conditioner control unit, air conditioner switch, heater relay,
power window relay, defogger timer, daytime running light relay
2
Door lock relay, door lock control unitAuto-cruise control unit
, AA control unit,
inhibitor switch, combination meter
ACC
IGI9
1011
12
1315
10
10
10Wiper motor, washer motor, intermittent wiper relay
Horn, headlight relay, theft-alarm control unit, daytime running
light relay
1
automatic seatbelt control unit, theft-alarm control unit,
combination meter, warning light, seatbelt timer
Turn-signal and hazard flasher u.nit
14
15
16
17
10Theft-alarm horn relay
30Blower motor
15Stop light
Back up light
CM/T>, dome light relay
!Dome light. luggage compartment
Irght, foot. Irght.door-ajar warntng light, radio, MPI control unrt.AK control unit, ignition key illumination light.security lightI
Page 65 of 391
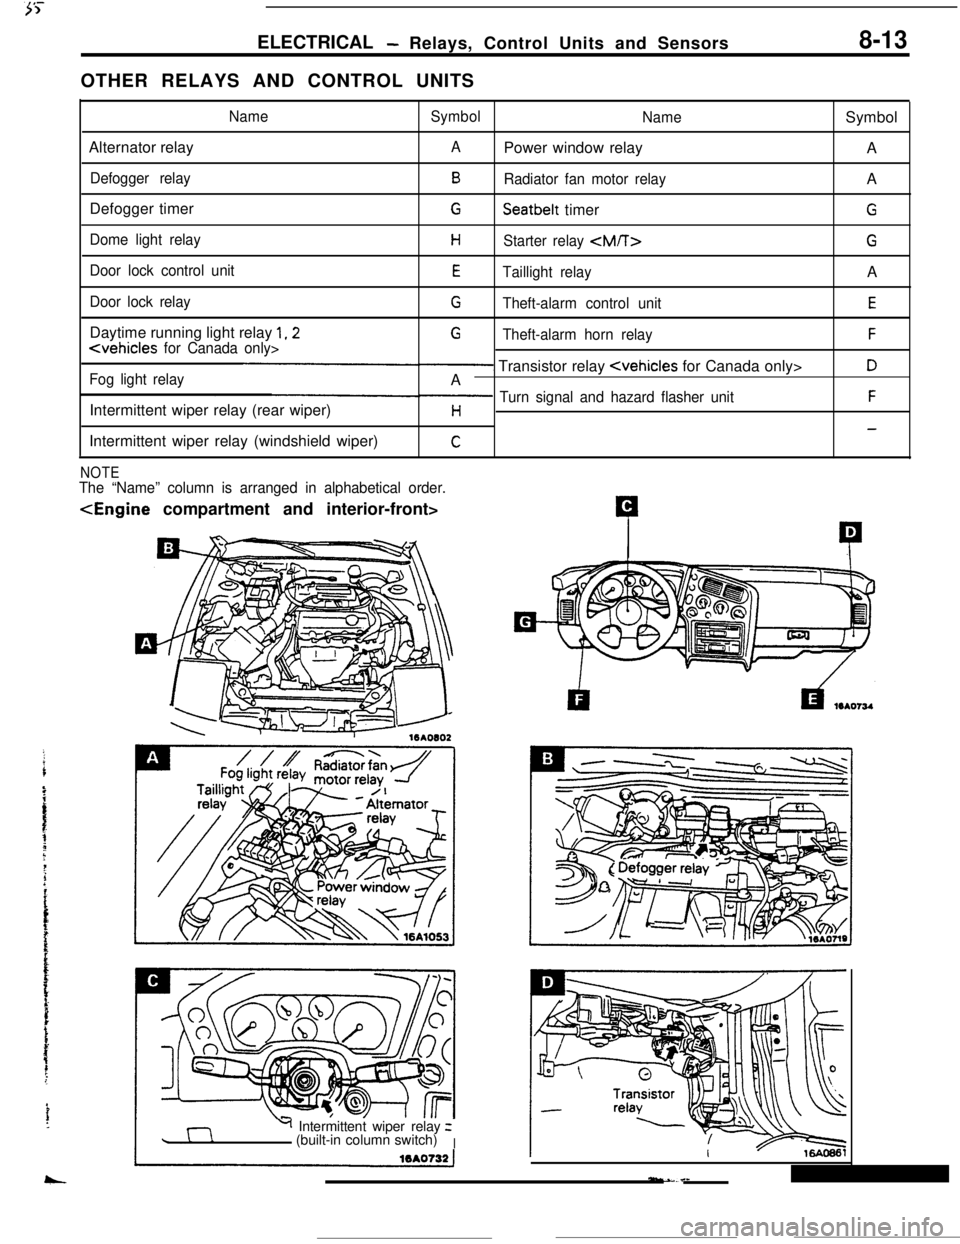
ELECTRICAL- Relays, Control Units and Sensors8-13OTHER RELAYS AND CONTROL UNITS
NameSymbol
NameSymbol
Alternator relay
APower window relay
A
Defogger relayBRadiator fan motor relayA
Defogger timer
GSeatbelt timerG
Dome light relayHStarter relay
Door lock control unitETaillight relayA
Door lock relayGTheft-alarm control unitEDaytime running light relay
1,2G
Fog light relay- Transistor relay
Intermittent wiper relay (rear wiper)
p Turn signal and hazard flasher unitFH-Intermittent wiper relay (windshield wiper)
C
NOTEThe “Name” column is arranged in alphabetical order.
Y Intermittent wiper relayz
(built-in column switch)
I
Page 66 of 391
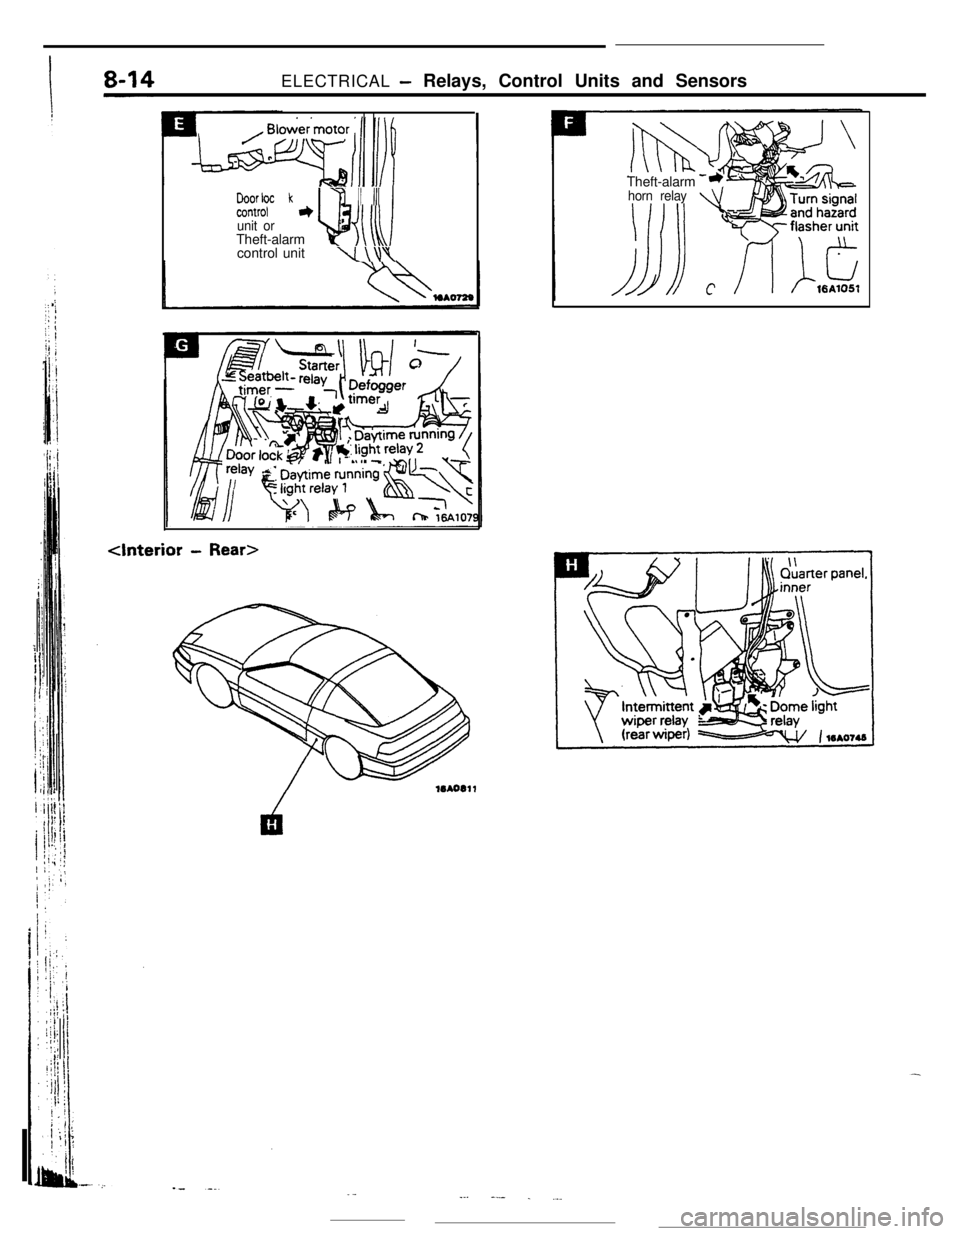
ELECTRICAL - Relays, Control Units and Sensors
b%YrF k7 II III~
unit orTheft-alarmucontrol unit
\I\\\
horn relay
._--. --- . ._.
Page 69 of 391
ELECTRICAL - Lighting8-17
Front turnsignal light
(Optical horn)
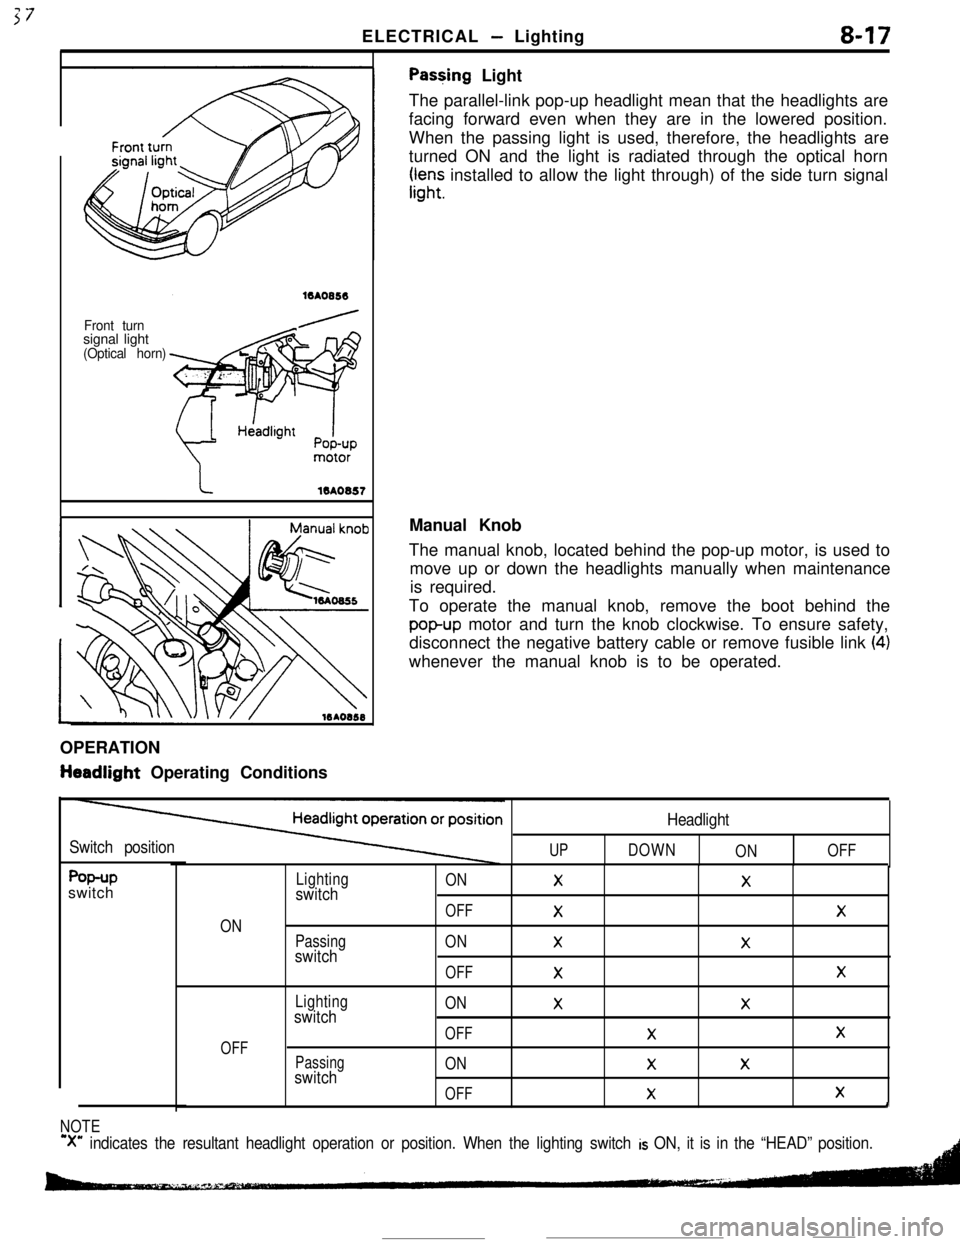
Pas+ing Light
The parallel-link pop-up headlight mean that the headlights are
facing forward even when they are in the lowered position.
When the passing light is used, therefore, the headlights are
turned ON and the light is radiated through the optical horn
rr,“;; installed to allow the light through) of the side turn signal
OPERATION
tieadlight Operating ConditionsManual Knob
The manual knob, located behind the pop-up motor, is used to
move up or down the headlights manually when maintenance
is required.
To operate the manual knob, remove the boot behind the
popup motor and turn the knob clockwise. To ensure safety,
disconnect the negative battery cable or remove fusible link
(4)whenever the manual knob is to be operated.
Switch positionUP
Headlight
DOWN
ONOFF
f%+Pswitch
ON
OFF
Lightingswitch
Passingswitch
Lightingswitch
Passingswitch
ONXX
OFF
XX
ONXX
OFF
XX
ONXX
OFFXX
ONXX
OFF
XXI
NOTE
‘X” indicates the resultant headlight operation or position. When the lighting switch is ON, it is in the “HEAD” position.
Page 84 of 391
8-32ELECTRICAL - Theft-alarm System
THEFT-ALARM SYSTEM
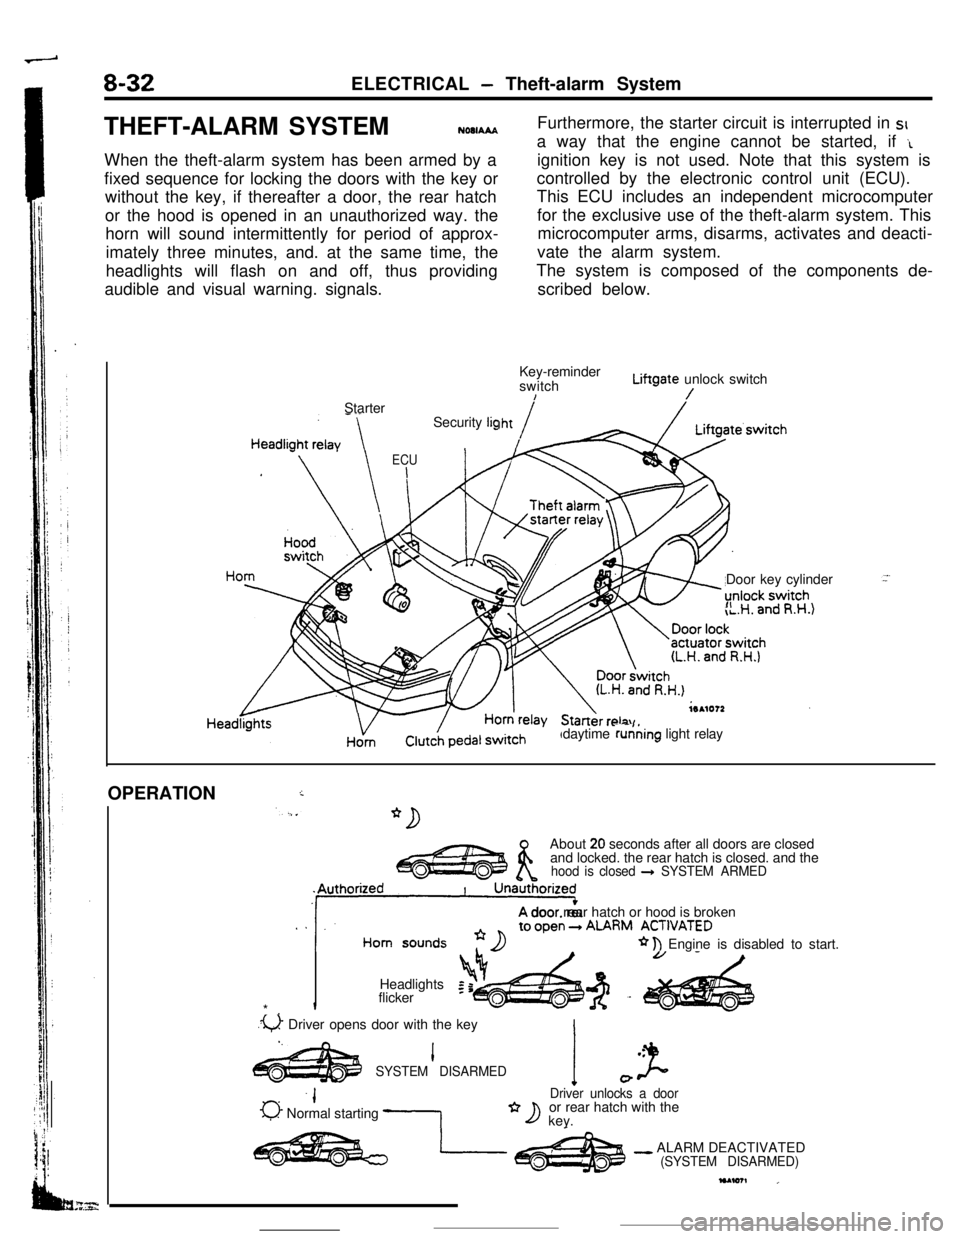
NOOIAAAWhen the theft-alarm system has been armed by a
fixed sequence for locking the doors with the key or
without the key, if thereafter a door, the rear hatch
or the hood is opened in an unauthorized way. the
horn will sound intermittently for period of approx-
imately three minutes, and. at the same time, the
headlights will flash on and off, thus providing
audible and visual warning. signals.Furthermore, the starter circuit is interrupted in SIa way that the engine cannot be started, if
‘Lignition key is not used. Note that this system is
controlled by the electronic control unit (ECU).
This ECU includes an independent microcomputer
for the exclusive use of the theft-alarm system. This
microcomputer arms, disarms, activates and deacti-
vate the alarm system.
The system is composed of the components de-
scribed below.
Key-reminder
switchLiftgate unlock switch
!/Starter
Door key cylinder
”daytime running light relay Security
lig
ECU
I
HornOPERATION
iAbout
20 seconds after all doors are closed
and locked. the rear hatch is closed. and the
hood is closed + SYSTEM ARMED
. .‘11A door rear hatch or hood is brokenALARM ACT,“ATED
* n Engine is disabled to start.
Headlights
Iflicker
*.
.u Driver opens door with the key
I.l .
SYSTEM DISARMEDI J-0
-IDriver unlocks a door
0 Normal starting -1or rear hatch with the*D key.
- ALARM DEACTIVATED(SYSTEM DISARMED)
Page 85 of 391
ELECTRICAL - Theft-alarm System8-33ARMING THE SYSTEM
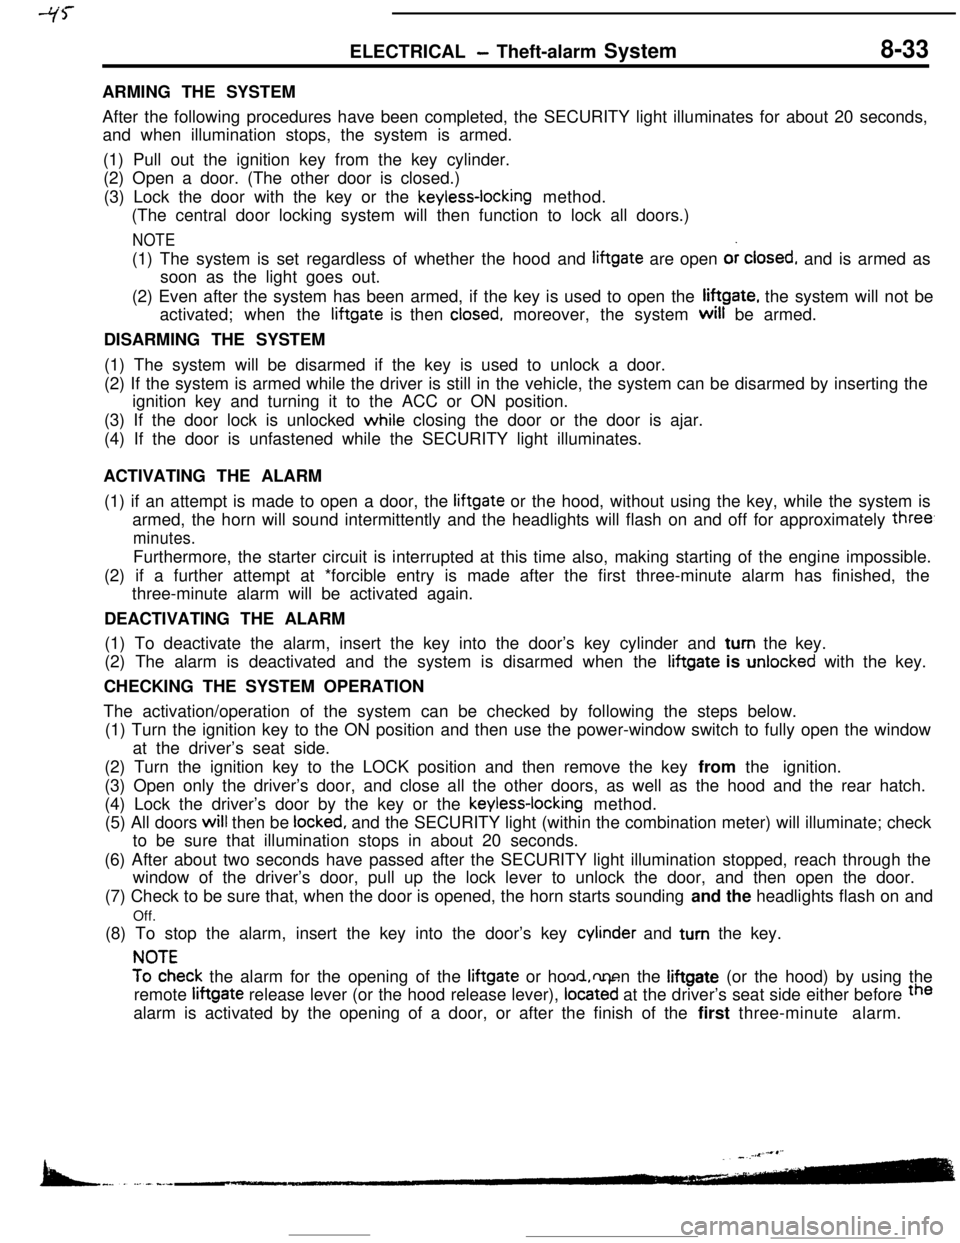
After the following procedures have been completed, the SECURITY light illuminates for about 20 seconds,
and when illumination stops, the system is armed.
(1) Pull out the ignition key from the key cylinder.
(2) Open a door. (The other door is closed.)
(3) Lock the door with the key or the
keyless-locking method.
(The central door locking system will then function to lock all doors.)
NOTE(1) The system is set regardless of whether the hood and liftgate are open or
closed, and is armed as
soon as the light goes out.
(2) Even after the system has been armed, if the key is used to open the liftgate, the system will not be
activated; when the liftgate is then
closed, moreover, the system will be armed.
DISARMING THE SYSTEM
(1) The system will be disarmed if the key is used to unlock a door.
(2) If the system is armed while the driver is still in the vehicle, the system can be disarmed by inserting the
ignition key and turning it to the ACC or ON position.
(3) If the door lock is unlocked while closing the door or the door is ajar.
(4) If the door is unfastened while the SECURITY light illuminates.
ACTIVATING THE ALARM
(1) if an attempt is made to open a door, the liftgate or the hood, without using the key, while the system is
armed, the horn will sound intermittently and the headlights will flash on and off for approximately
three,
minutes.Furthermore, the starter circuit is interrupted at this time also, making starting of the engine impossible.
(2) if a further attempt at *forcible entry is made after the first three-minute alarm has finished, the
three-minute alarm will be activated again.
DEACTIVATING THE ALARM
(1) To deactivate the alarm, insert the key into the door’s key cylinder and turn the key.
(2) The alarm is deactivated and the system is disarmed when the iiftgate is unlocked with the key.
CHECKING THE SYSTEM OPERATION
The activation/operation of the system can be checked by following the steps below.
(1) Turn the ignition key to the ON position and then use the power-window switch to fully open the window
at the driver’s seat side.
(2) Turn the ignition key to the LOCK position and then remove the key from the ignition.
(3) Open only the driver’s door, and close all the other doors, as well as the hood and the rear hatch.
(4) Lock the driver’s door by the key or the
keyless-locking method.
(5) All doors will then be
locked, and the SECURITY light (within the combination meter) will illuminate; check
to be sure that illumination stops in about 20 seconds.
(6) After about two seconds have passed after the SECURITY light illumination stopped, reach through the
window of the driver’s door, pull up the lock lever to unlock the door, and then open the door.
(7) Check to be sure that, when the door is opened, the horn starts sounding and the headlights flash on and
Off.
(8) To stop the alarm, insert the key into the door’s key cylinder and turn the key.
!?iEeck the alarm for the opening of the liftgate or hood open the liftgate (or the hood) by using the
remote liftgate release lever (or the hood release lever),
located at the driver’s seat side either before the
alarm is activated by the opening of a door, or after the finish of the first three-minute alarm.