ACC MITSUBISHI ECLIPSE CROSS 2020 Owner's Manual (in English)
[x] Cancel search | Manufacturer: MITSUBISHI, Model Year: 2020, Model line: ECLIPSE CROSS, Model: MITSUBISHI ECLIPSE CROSS 2020Pages: 427, PDF Size: 78.05 MB
Page 315 of 427
Parking 6-6 Driving safety
6
N00629601398
When parking on a hill, set the parking brake, and turn the front wheels toward the curb on adownhill, or away from the curb on an uphill. If necessary, apply chocks to the wheels. Be sure that the parking brake is firmly setwhen parked and that the selector lever is inthe “P” (PARK) position. When parking on a hill, it is important to set the parking brake before moving the selectorlever to the “P” (PARK) position. This pre- vents loading the parking brake against the transaxle. When this happens, it is difficult tomove the selector lever out of the “P” (PARK) position. Never leave the engi
ne running while you
take a short nap or rest. Also, never leave theengine running in a closed or poorly venti- lated place.
Your front bumper can be damaged if you scrape it over curbs or parking stop blocks. Be careful when traveling up or down steep slopes where your bumper can scrape theroad. Always carry the key and lock all doors and the liftgate when leaving the vehicle unat- tended. Always try to park your vehicle in a well litarea.
More effort could be required to turn the steering wheel. Refer to “Electric power steering system (EPS)” on page 5-84.
N00629901450
It is very important to know how much weight your vehicle can carry. This weight is called the vehicle capacity weight andincludes the weight of all occupants, cargo (including the roof load), non-factory- installed options, and the tongue weight ofthe trailer, if any, being towed. The tire and loading information placard located on the driver’s door sill of your vehicle will showhow much weight it may properly carry. It is important to familiarize yourself with the following terms before loading your vehicle:
Parking Parking on a hill Parking with the engine run- ning
WA R N I N G Leaving the engine running risks injury or death from accidentally moving the selec- tor lever or the accumulation of toxic exhaust fumes in the passenger compart- ment.
Where you park
WA R N I N G Do not park your vehicle in areas where combustible materials such as dry grass or leaves can come in contact with a hot exhaust, since a fire could occur.
When leaving the vehicle
Do not keep the steering wheel fully turned for a long time Loading information
WA R N I N G Never overload your vehicle. Overloading can damage your vehicle, adversely affect vehicle performance, including handlingand braking, cause tire failure, and result in an accident.
BK0277700US.bo
ok 6 ページ 2019年3月8日 金曜日 午前9時23分
Page 316 of 427
Loading information Driving safety 6-7
6
Vehicle maximum load on the tire: load on an individual tire that is determined by distributing to each axle its share of the maximum loaded vehicle weight anddividing by two. Vehicle normal load on the tire: load on an individual tire that is determined by dis-tributing to each axle its share of the curb weight, accessory weight, and normal occupant weight and dividing by two. Maximum loaded vehicle weight: the sum of - (a) Curb weight; (b) Accessory weight;(c) Vehicle capacity weight; and (d) Production options weight. Curb weight: the weight of a motor vehi- cle with standard equipment including the maximum capacity of fuel, oil, and cool- ant. Accessory weight: the combined weight (in excess of those standard items which may be replaced) of automatic transaxle,power steering, power brakes, power win- dows, power seats, radio, and heater, to the extent that these items are available asfactory-installed equipment (whether installed or not). Vehicle capacity weight: the rated cargo and luggage load plus 150 lbs (68 kg) * times the vehicle’s designated seating capacity.
Production options weight: the combined weight of those installed regular produc- tion options weighing over 5 lbs (2.3 kg) in excess of those standard items whichthey replace, not previously considered in curb weight or accessory weight, includ- ing heavy duty brakes, ride levelers, roofrack, heavy duty battery, and special trim. Normal occupant weight: 150 lbs (68 kg) * times the number of specified occupants (3 in the case of your vehicle) Occupant distribution: Occupant distribu- tion within the passenger compartment (In your vehicle the distribution is 2 in front,1 in rear seat)
N00630101423
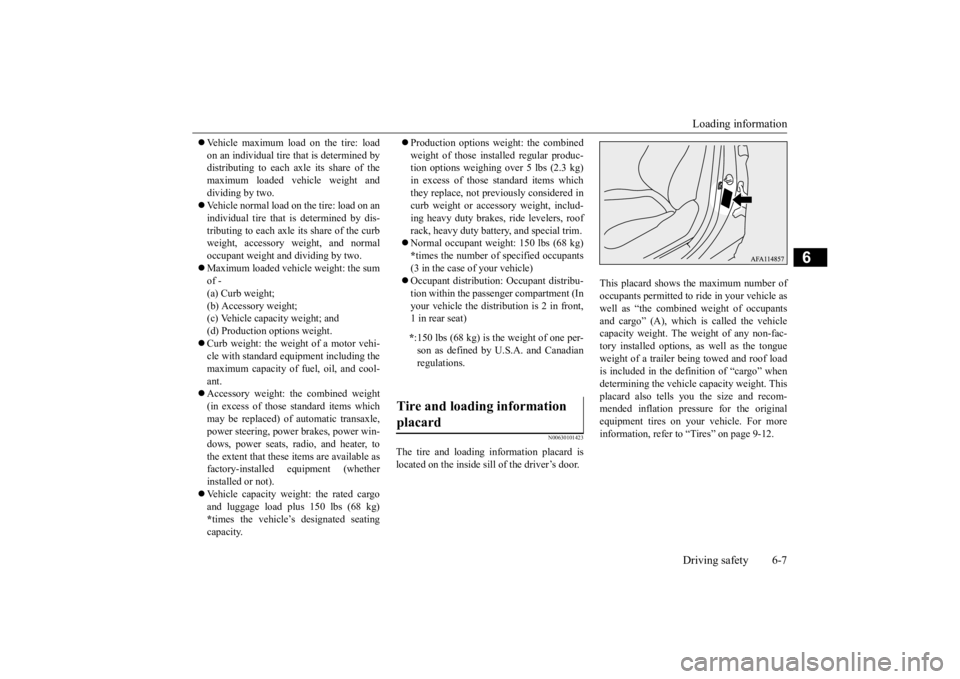
The tire and loading information placard is located on the inside sill of the driver’s door.
This placard shows the maximum number of occupants permitted to ride in your vehicle aswell as “the combined weight of occupants and cargo” (A), which is called the vehicle capacity weight. The weight of any non-fac-tory installed options, as well as the tongue weight of a trailer being towed and roof load is included in the definition of “cargo” whendetermining the vehicle capacity weight. Thisplacard also tells you the size and recom- mended inflation pressure for the original equipment tires on your vehicle. For moreinformation, refer to “Tires” on page 9-12.
* :150 lbs (68 kg) is the weight of one per- son as defined by U.S.A. and Canadianregulations.
Tire and loading information placard
BK0277700US.bo
ok 7 ページ 2019年3月8日 金曜日 午前9時23分
Page 318 of 427
Loading information Driving safety 6-9
6
NOTE
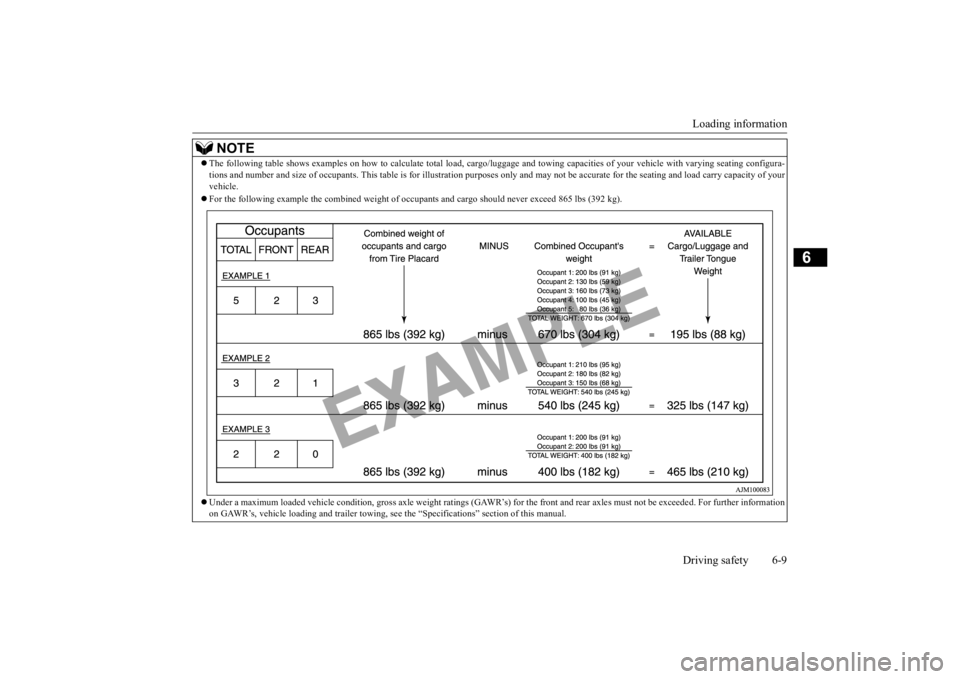
The following table shows examples on how to calculate total lo
ad, cargo/luggage and towing capaciti
es of your vehicle with var
ying seating configura-
tions and number and size of occupants. This
table is for illustration purposes only
and may not be accurate for the seating an
d load carry capacity of your
vehicle. For the following example the combined weight of
occupants and cargo should never exceed 865 lbs (392 kg).
Under a maximum loaded vehicle condition, gross axle weight rati
ngs (GAWR’s) for the front and r
ear axles must not be exceeded.
For further information
on GAWR’s, vehicle loading and trailer towing,
see the “Specifications” section of this manual.
BK0277700US.bo
ok 9 ページ 2019年3月8日 金曜日 午前9時23分
Page 319 of 427
Cargo loads 6-10 Driving safety
6
N00629700435 N00630301122
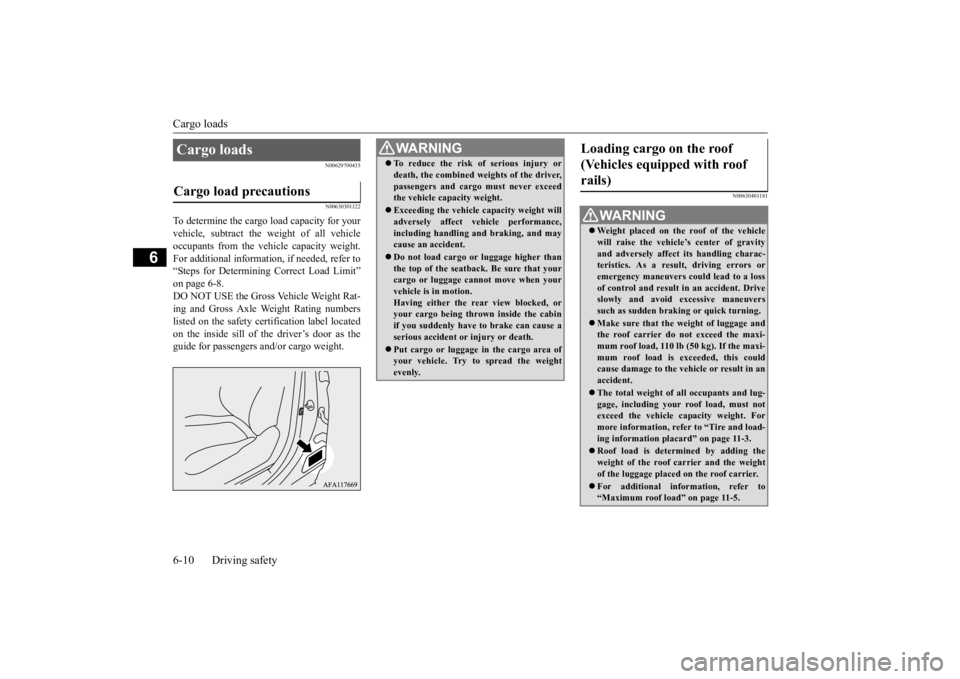
To determine the cargo load capacity for your vehicle, subtract the weight of all vehicleoccupants from the vehicle capacity weight. For additional information, if needed, refer to “Steps for Determining Correct Load Limit”on page 6-8.DO NOT USE the Gross Vehicle Weight Rat- ing and Gross Axle Weight Rating numbers listed on the safety certification label locatedon the inside sill of the driver’s door as the guide for passengers and/or cargo weight.
N00630401181
Cargo loads Cargo load precautions
WA R N I N G To reduce the risk of serious injury or death, the combined weights of the driver, passengers and cargo must never exceed the vehicle capacity weight. Exceeding the vehicle capacity weight will adversely affect vehicle performance, including handling and braking, and maycause an accident. Do not load cargo or luggage higher than the top of the seatback. Be sure that your cargo or luggage cannot move when your vehicle is in motion.Having either the rear view blocked, or your cargo being thrown inside the cabin if you suddenly have to brake can cause aserious accident or injury or death. Put cargo or luggage in the cargo area of your vehicle. Try to spread the weight evenly.
Loading cargo on the roof (Vehicles equipped with roof rails)
WA R N I N G Weight placed on the roof of the vehicle will raise the vehicle’s center of gravity and adversely affect its handling charac-teristics. As a result, driving errors or emergency maneuvers could lead to a loss of control and result in an accident. Driveslowly and avoid excessive maneuvers such as sudden braking or quick turning. Make sure that the weight of luggage and the roof carrier do not exceed the maxi- mum roof load, 110 lb (50 kg). If the maxi-mum roof load is exceeded, this could cause damage to the ve
hicle or result in an
accident. The total weight of all occupants and lug- gage, including your roof load, must notexceed the vehicle capacity weight. For more information, refer to “Tire and load- ing information placard” on page 11-3. Roof load is determined by adding the weight of the roof carrier and the weight of the luggage placed on the roof carrier. For additional information, refer to “Maximum roof load” on page 11-5.
BK0277700US.bo
ok 10 ページ 2019年3月8日 金曜日 午前9時23分
Page 348 of 427
Air purifier
Comfort controls 7-23
7
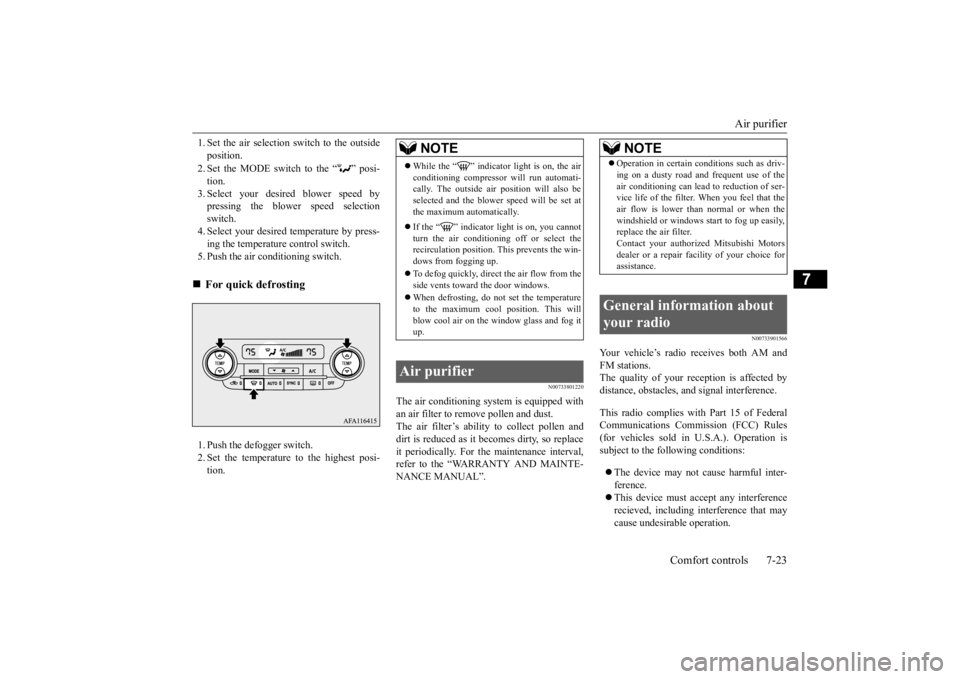
1. Set the air selection switch to the outside position. 2. Set the MODE switch to the “ ” posi- tion.3. Select your desired blower speed by pressing the blower speed selection switch.4. Select your desired temperature by press- ing the temperature control switch. 5. Push the air conditioning switch. 1. Push the defogger switch. 2. Set the temperature to the highest posi-tion.
N00733801220
The air conditioning system is equipped withan air filter to remove pollen and dust.The air filter’s ability to collect pollen and dirt is reduced as it becomes dirty, so replace it periodically. For the maintenance interval,refer to the “WARRANTY AND MAINTE- NANCE MANUAL”.
N00733901566
Your vehicle’s radio receives both AM andFM stations. The quality of your reception is affected bydistance, obstacles, and signal interference. This radio complies with Part 15 of Federal Communications Commission (FCC) Rules (for vehicles sold in U.S.A.). Operation issubject to the following conditions: The device may not cause harmful inter- ference. This device must accept any interference recieved, including interference that may cause undesirable operation.
For quick defrosting
NOTE
While the “ ” indicator light is on, the air conditioning compressor will run automati- cally. The outside air position will also be selected and the blower speed will be set atthe maximum automatically. If the “ ” indicator light is on, you cannot turn the air conditioning off or select therecirculation position. This prevents the win- dows from fogging up. To defog quickly, direct
the air flow from the
side vents toward the door windows. When defrosting, do not set the temperature to the maximum cool position. This will blow cool air on the window glass and fog itup.
Air purifier
NOTE
Operation in certain conditions such as driv- ing on a dusty road and frequent use of the air conditioning can lead to reduction of ser- vice life of the filter.
When you feel that the
air flow is lower than normal or when thewindshield or windows start to fog up easily, replace the air filter. Contact your authorized Mitsubishi Motorsdealer or a repair facility of your choice for assistance.
General information about your radio
BK0277700US.bo
ok 23 ページ 2019年3月8日 金曜日 午前9時23分
Page 353 of 427
If the vehicle breaks down 8-2 For emergencies
8
N00836301230
If your vehicle breaks down on the road, move to the shoulder and turn on the hazardwarning flashers. If there is no shoulder, or the shoulder is not safe, drive in the right lane slowly with the hazard
lights flashing, until
you come to a safe stopping place. Keep the flashers flashing. If the engine stops, there will be no power assist to the steering and brakes, making these difficult to use. The brake booster will not work, so the brakes will not grip well. The brake pedalwill be harder to press than usual. Since there is no power steering assist, the steering wheel will be hard to turn.
Get help from your passengers, bystanders, etc. to push the vehicl
e and move it to a safe
area.
N00860700087
If the operation mode cannot be changed to OFF, perform the following procedure. 1. Move the selector lever to the “P” (PARK) position, and then change theoperation mode to OFF. 2. One of the other causes could be low bat- tery voltage. If this occurs, the keylessentry system and the F.A.S.T.-key opera- tion will also not operate. Contact an authorized Mitsubishi Motors dealer or arepair facility of your choice.
N00836401840
If the engine cannot be started because thebattery is weak or dead, you can start it with the battery from another vehicle using jumper cables.
1. Take off any metal jewelry such as watch bands or bracelets that might create anaccidental electrical contact. 2. Position the vehicles close enough together so that the jumper cables canreach, but be sure the vehicles aren’t touching each other. 3. Set the parking brake firmly on your vehi- cle and move the selector lever into the “P” (PARK) position.
If the vehicle breaks down If the engine stops/fails When the engine fails at the intersection
If the operation mode can- not be changed to OFF (vehicles equipped with the F.A.S.T.-key) Jump-starting the engine
WA R N I N G To reduce the risk of igniting flammable gas that may be emitted from the battery, carefully read this section before jump- starting the vehicle. Do not try to start your vehicle by pushing or towing. This can cause an accident resulting in serious injury or death andcan damage the vehicle.NOTE
Do not use jumper cables if they have dam- age or corrosion.CAUTION Check the other vehicle. It must have a 12- volt battery. If the other system isn’t 12-volt, both systems can be damaged.
BK0277700US.bo
ok 2 ページ 2019年3月8日 金曜日 午前9時23分
Page 357 of 427
How to change a tire 8-6 For emergencies
8
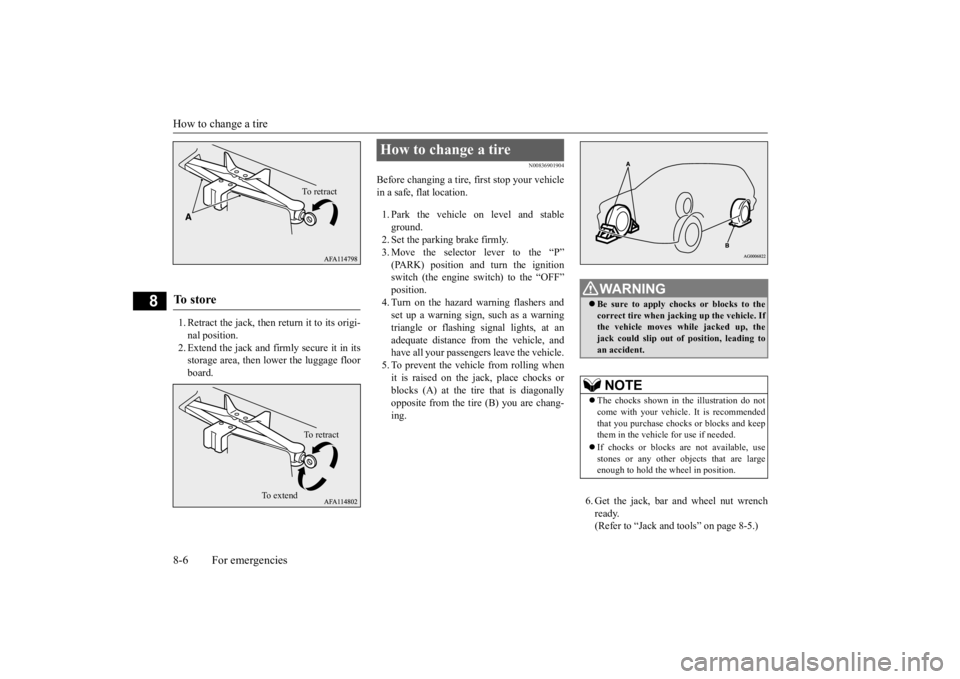
1. Retract the jack, then return it to its origi- nal position.2. Extend the jack and firmly secure it in its storage area, then lo
wer the luggage floor
board.
N00836901904
Before changing a tire, first stop your vehiclein a safe, flat location. 1. Park the vehicle on level and stable ground. 2. Set the parking brake firmly. 3. Move the selector lever to the “P”(PARK) position and turn the ignitionswitch (the engine switch) to the “OFF” position. 4. Turn on the hazard warning flashers andset up a warning sign, such as a warning triangle or flashing signal lights, at an adequate distance from the vehicle, andhave all your passengers leave the vehicle. 5. To prevent the vehicle from rolling when it is raised on the jack, place chocks orblocks (A) at the tire that is diagonally opposite from the tire (B) you are chang- ing.
6. Get the jack, bar and wheel nut wrench ready. (Refer to “Jack and tools” on page 8-5.)
To s t o r e
To r e t r a c tTo r e t r a c t
To e x t e n d
How to change a tire
WA R N I N G Be sure to apply chocks or blocks to the correct tire when jacking up the vehicle. If the vehicle moves while jacked up, thejack could slip out of position, leading to an accident.NOTE
The chocks shown in the illustration do not come with your vehicle. It is recommended that you purchase chocks or blocks and keep them in the vehicle for use if needed. If chocks or blocks are not available, use stones or any other objects that are largeenough to hold the wheel in position.
BK0277700US.bo
ok 6 ページ 2019年3月8日 金曜日 午前9時23分
Page 358 of 427
How to change a tire
For emergencies 8-7
8
N00849601341
The compact spare tire is stored under the luggage floor board of the luggage compart-ment. It is designed to save space in the lug- gage compartment. Its lighter weight makes it easier to use if a flat tire occurs.
N00849701384
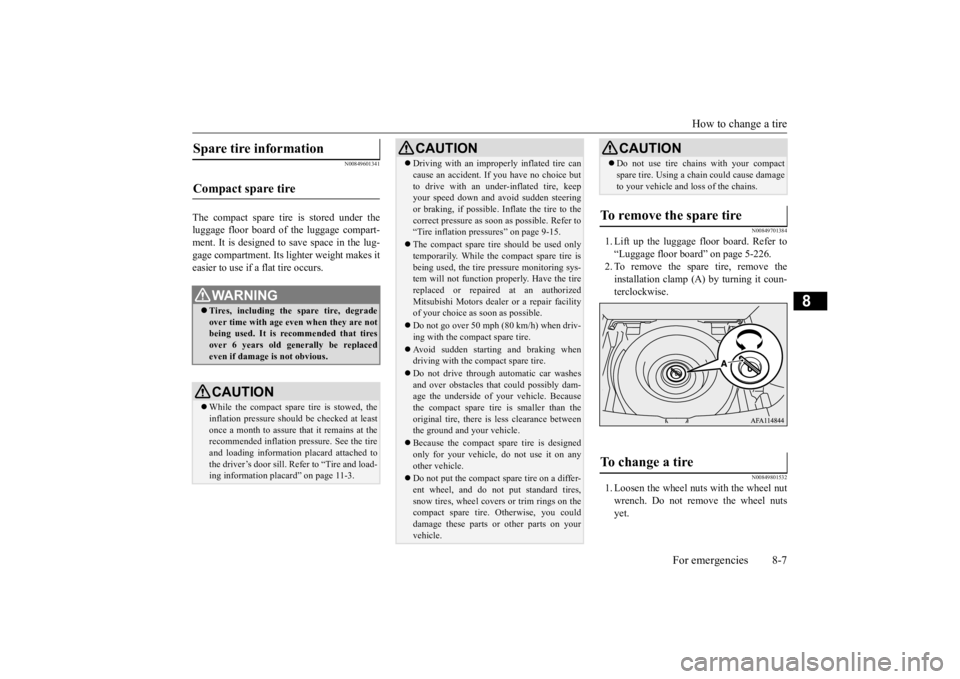
1. Lift up the luggage floor board. Refer to“Luggage floor board” on page 5-226.2. To remove the spare tire, remove theinstallation clamp (A) by turning it coun- terclockwise.
N00849801532
1. Loosen the wheel nuts with the wheel nut wrench. Do not remove the wheel nuts yet.
Spare tire information Compact spare tire
WA R N I N G Tires, including the spare tire, degrade over time with age even when they are notbeing used. It is recommended that tires over 6 years old generally be replaced even if damage is not obvious.CAUTION While the compact spare tire is stowed, the inflation pressure should be checked at least once a month to assure that it remains at therecommended inflation pressure. See the tire and loading information placard attached to the driver’s door sill. Refer to “Tire and load- ing information placard” on page 11-3.
Driving with an improperly inflated tire can cause an accident. If you have no choice but to drive with an under-inflated tire, keep your speed down and avoid sudden steering or braking, if possible
. Inflate the tire to the
correct pressure as soon as possible. Refer to “Tire inflation pressures” on page 9-15. The compact spare tire should be used only temporarily. While the compact spare tire is being used, the tire pressure monitoring sys-tem will not function properly. Have the tire replaced or repaired at an authorized Mitsubishi Motors dealer or a repair facilityof your choice as soon as possible. Do not go over 50 mph (80 km/h) when driv- ing with the compact spare tire. Avoid sudden starting and braking when driving with the compact spare tire. Do not drive through automatic car washes and over obstacles that could possibly dam- age the underside of your vehicle. Because the compact spare tire is smaller than theoriginal tire, there is less clearance between the ground and your vehicle. Because the compact spare tire is designed only for your vehicle, do not use it on any other vehicle. Do not put the compact spare tire on a differ- ent wheel, and do not put standard tires, snow tires, wheel covers or trim rings on the compact spare tire. Otherwise, you coulddamage these parts or other parts on your vehicle.CAUTION
Do not use tire chains with your compact spare tire. Using a chain could cause damage to your vehicle and loss of the chains.
To remove the spare tire To change a tire
CAUTION
BK0277700US.bo
ok 7 ページ 2019年3月8日 金曜日 午前9時23分
Page 360 of 427
How to change a tire
For emergencies 8-9
8
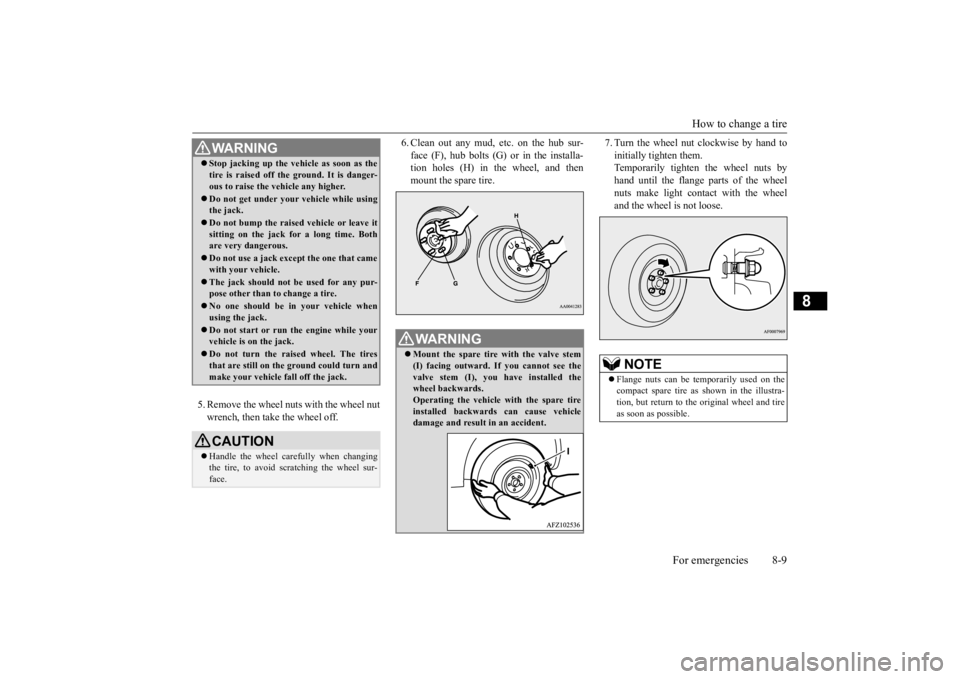
5. Remove the wheel nuts with the wheel nut wrench, then take the wheel off.
6. Clean out any mud, etc. on the hub sur- face (F), hub bolts (G) or in the installa- tion holes (H) in the wheel, and then mount the spare tire.
7. Turn the wheel nut clockwise by hand to initially tighten them. Temporarily tighten the wheel nuts by hand until the flange parts of the wheelnuts make light contact with the wheel and the wheel is not loose.
WA R N I N G Stop jacking up the vehicle as soon as the tire is raised off the ground. It is danger- ous to raise the vehicle any higher. Do not get under your vehicle while using the jack. Do not bump the raised vehicle or leave it sitting on the jack for a long time. Both are very dangerous. Do not use a jack except the one that came with your vehicle. The jack should not be used for any pur- pose other than to change a tire. No one should be in your vehicle when using the jack. Do not start or run the engine while your vehicle is on the jack. Do not turn the raised wheel. The tires that are still on the ground could turn and make your vehicle fall off the jack.CAUTION Handle the wheel carefully when changing the tire, to avoid scratching the wheel sur- face.
WA R N I N G Mount the spare tire with the valve stem (I) facing outward. If you cannot see the valve stem (I), you have installed the wheel backwards.Operating the vehicle with the spare tire installed backwards can cause vehicle damage and result in an accident.
NOTE
Flange nuts can be temporarily used on the compact spare tire as shown in the illustra- tion, but return to the original wheel and tire as soon as possible.
BK0277700US.bo
ok 9 ページ 2019年3月8日 金曜日 午前9時23分
Page 361 of 427
How to change a tire 8-10 For emergencies
8
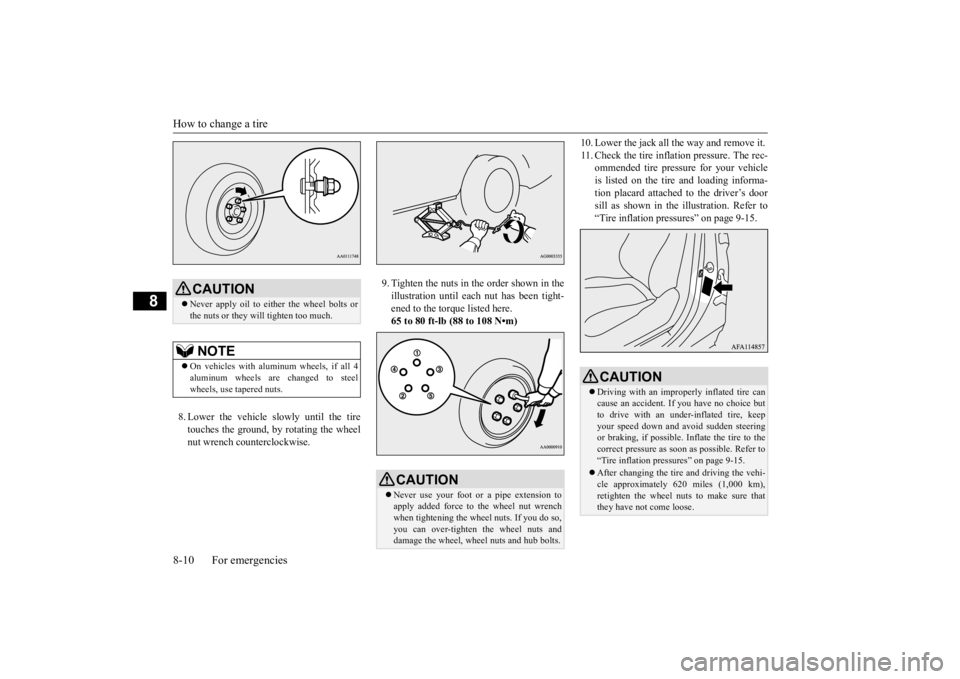
8. Lower the vehicle slowly until the tire touches the ground, by rotating the wheel nut wrench counterclockwise.
9. Tighten the nuts in the order shown in the illustration until each nut has been tight- ened to the torque listed here.65 to 80 ft-lb (88 to 108 N•m)
10. Lower the jack all the way and remove it. 11. Check the tire inflation pressure. The rec-
ommended tire pressure for your vehicle is listed on the tire and loading informa-tion placard attached to the driver’s door sill as shown in the illustration. Refer to “Tire inflation pressures” on page 9-15.
CAUTION Never apply oil to either the wheel bolts or the nuts or they will tighten too much.NOTE
On vehicles with aluminum wheels, if all 4 aluminum wheels are changed to steel wheels, use tapered nuts.
CAUTION Never use your foot or a pipe extension to apply added force to the wheel nut wrenchwhen tightening the wheel nuts. If you do so, you can over-tighten the wheel nuts and damage the wheel, wheel nuts and hub bolts.
CAUTION Driving with an improperly inflated tire can cause an accident. If
you have no choice but
to drive with an under-inflated tire, keep your speed down and avoid sudden steering or braking, if possible
. Inflate the tire to the
correct pressure as soon as possible. Refer to “Tire inflation pressures” on page 9-15. After changing the tire and driving the vehi- cle approximately 620 miles (1,000 km), retighten the wheel nuts to make sure thatthey have not come loose.
BK0277700US.bo
ok 10 ページ 2019年3月8日 金曜日 午前9時23分