steering MITSUBISHI ECLIPSE CROSS 2020 (in English) Service Manual
[x] Cancel search | Manufacturer: MITSUBISHI, Model Year: 2020, Model line: ECLIPSE CROSS, Model: MITSUBISHI ECLIPSE CROSS 2020Pages: 427, PDF Size: 78.05 MB
Page 323 of 427
Trailer towing 6-14 Driving safety
6
Towing a trailer requires a certain amount of experience. Before setting out for the open road, you’llwant to get to know your trailer. Acquaint
yourself with the feel
of handling and braking
with the added weight of the trailer. Always keep in mind that the vehicle you are driving is now a good deal longer and not nearly asresponsive as your vehicle is without a trailer. Before you start, check the trailer hitch, safety chains, tires and mirror adjustment. Be sure your vehicle’s tires are inflated to the cold inflation pressure listed in the manual.You’ll find these numbers on the tire and loading information placard at the sill of the driver’s door.Refer to “Tire inflation pressures” on page 9-15. Stay at least twice as far behind the vehicle ahead as you would when driving your vehi-cle without a trailer. This can help you avoid situations that require heavy braking and sud- den turns.
You’ll need more passing distance up ahead when you’re towing a trailer. And, becauseyou’re a good deal longer, you’ll need to go much farther beyond the passed vehicle before you can return to your lane. Hold the bottom of the steering wheel with one hand. Then, to move the trailer to the left, just move that hand to the left. To move thetrailer to the right, move your hand to the right. Always back up slowly and, if possible, have someone guide you. When you’re turning with a trailer, make wider than normal turns to help prevent thetrailer from striking shoulders, curbs, road signs, trees or other objects.
Operating hints
WA R N I N G If you have a rear window open and you tow a trailer with your vehicle, carbon monoxide gas which you cannot see or smell could come into your vehicle. It cancause unconsciousness or death. Refer to “Exhaust system” on page 9-22. To maximize your safety when towing atrailer:• Have your exhaust system inspected forleaks, and make necessary repairs before starting on your trip.• Keep the rear windows closed.• If exhaust does come into your vehicle through a window or another opening, drive with your front, main heating or cooling system on and with the blower onany speed. This will bring fresh, outside air into your vehicle. Do not use recircu- lation because it only recirculates the airinside your vehicle. Refer to “Air selec- tion switch” on page 7-9.
Driver preparation
Vehicle preparation Tire Following distance
Passing Backing up Making turns
CAUTION Making sharp turns while towing a trailer could cause the trailer to come in contact with the vehicle. Your vehicle could be dam- aged. Avoid making sharp turns while tow-ing a trailer.
BK0277700US.bo
ok 14 ページ 2019年3月8日 金曜日 午前9時23分
Page 353 of 427
If the vehicle breaks down 8-2 For emergencies
8
N00836301230
If your vehicle breaks down on the road, move to the shoulder and turn on the hazardwarning flashers. If there is no shoulder, or the shoulder is not safe, drive in the right lane slowly with the hazard
lights flashing, until
you come to a safe stopping place. Keep the flashers flashing. If the engine stops, there will be no power assist to the steering and brakes, making these difficult to use. The brake booster will not work, so the brakes will not grip well. The brake pedalwill be harder to press than usual. Since there is no power steering assist, the steering wheel will be hard to turn.
Get help from your passengers, bystanders, etc. to push the vehicl
e and move it to a safe
area.
N00860700087
If the operation mode cannot be changed to OFF, perform the following procedure. 1. Move the selector lever to the “P” (PARK) position, and then change theoperation mode to OFF. 2. One of the other causes could be low bat- tery voltage. If this occurs, the keylessentry system and the F.A.S.T.-key opera- tion will also not operate. Contact an authorized Mitsubishi Motors dealer or arepair facility of your choice.
N00836401840
If the engine cannot be started because thebattery is weak or dead, you can start it with the battery from another vehicle using jumper cables.
1. Take off any metal jewelry such as watch bands or bracelets that might create anaccidental electrical contact. 2. Position the vehicles close enough together so that the jumper cables canreach, but be sure the vehicles aren’t touching each other. 3. Set the parking brake firmly on your vehi- cle and move the selector lever into the “P” (PARK) position.
If the vehicle breaks down If the engine stops/fails When the engine fails at the intersection
If the operation mode can- not be changed to OFF (vehicles equipped with the F.A.S.T.-key) Jump-starting the engine
WA R N I N G To reduce the risk of igniting flammable gas that may be emitted from the battery, carefully read this section before jump- starting the vehicle. Do not try to start your vehicle by pushing or towing. This can cause an accident resulting in serious injury or death andcan damage the vehicle.NOTE
Do not use jumper cables if they have dam- age or corrosion.CAUTION Check the other vehicle. It must have a 12- volt battery. If the other system isn’t 12-volt, both systems can be damaged.
BK0277700US.bo
ok 2 ページ 2019年3月8日 金曜日 午前9時23分
Page 358 of 427
How to change a tire
For emergencies 8-7
8
N00849601341
The compact spare tire is stored under the luggage floor board of the luggage compart-ment. It is designed to save space in the lug- gage compartment. Its lighter weight makes it easier to use if a flat tire occurs.
N00849701384
1. Lift up the luggage floor board. Refer to“Luggage floor board” on page 5-226.2. To remove the spare tire, remove theinstallation clamp (A) by turning it coun- terclockwise.
N00849801532
1. Loosen the wheel nuts with the wheel nut wrench. Do not remove the wheel nuts yet.
Spare tire information Compact spare tire
WA R N I N G Tires, including the spare tire, degrade over time with age even when they are notbeing used. It is recommended that tires over 6 years old generally be replaced even if damage is not obvious.CAUTION While the compact spare tire is stowed, the inflation pressure should be checked at least once a month to assure that it remains at therecommended inflation pressure. See the tire and loading information placard attached to the driver’s door sill. Refer to “Tire and load- ing information placard” on page 11-3.
Driving with an improperly inflated tire can cause an accident. If you have no choice but to drive with an under-inflated tire, keep your speed down and avoid sudden steering or braking, if possible
. Inflate the tire to the
correct pressure as soon as possible. Refer to “Tire inflation pressures” on page 9-15. The compact spare tire should be used only temporarily. While the compact spare tire is being used, the tire pressure monitoring sys-tem will not function properly. Have the tire replaced or repaired at an authorized Mitsubishi Motors dealer or a repair facilityof your choice as soon as possible. Do not go over 50 mph (80 km/h) when driv- ing with the compact spare tire. Avoid sudden starting and braking when driving with the compact spare tire. Do not drive through automatic car washes and over obstacles that could possibly dam- age the underside of your vehicle. Because the compact spare tire is smaller than theoriginal tire, there is less clearance between the ground and your vehicle. Because the compact spare tire is designed only for your vehicle, do not use it on any other vehicle. Do not put the compact spare tire on a differ- ent wheel, and do not put standard tires, snow tires, wheel covers or trim rings on the compact spare tire. Otherwise, you coulddamage these parts or other parts on your vehicle.CAUTION
Do not use tire chains with your compact spare tire. Using a chain could cause damage to your vehicle and loss of the chains.
To remove the spare tire To change a tire
CAUTION
BK0277700US.bo
ok 7 ページ 2019年3月8日 金曜日 午前9時23分
Page 361 of 427
How to change a tire 8-10 For emergencies
8
8. Lower the vehicle slowly until the tire touches the ground, by rotating the wheel nut wrench counterclockwise.
9. Tighten the nuts in the order shown in the illustration until each nut has been tight- ened to the torque listed here.65 to 80 ft-lb (88 to 108 N•m)
10. Lower the jack all the way and remove it. 11. Check the tire inflation pressure. The rec-
ommended tire pressure for your vehicle is listed on the tire and loading informa-tion placard attached to the driver’s door sill as shown in the illustration. Refer to “Tire inflation pressures” on page 9-15.
CAUTION Never apply oil to either the wheel bolts or the nuts or they will tighten too much.NOTE
On vehicles with aluminum wheels, if all 4 aluminum wheels are changed to steel wheels, use tapered nuts.
CAUTION Never use your foot or a pipe extension to apply added force to the wheel nut wrenchwhen tightening the wheel nuts. If you do so, you can over-tighten the wheel nuts and damage the wheel, wheel nuts and hub bolts.
CAUTION Driving with an improperly inflated tire can cause an accident. If
you have no choice but
to drive with an under-inflated tire, keep your speed down and avoid sudden steering or braking, if possible
. Inflate the tire to the
correct pressure as soon as possible. Refer to “Tire inflation pressures” on page 9-15. After changing the tire and driving the vehi- cle approximately 620 miles (1,000 km), retighten the wheel nuts to make sure thatthey have not come loose.
BK0277700US.bo
ok 10 ページ 2019年3月8日 金曜日 午前9時23分
Page 362 of 427
Towing
For emergencies 8-11
8
N00832300033
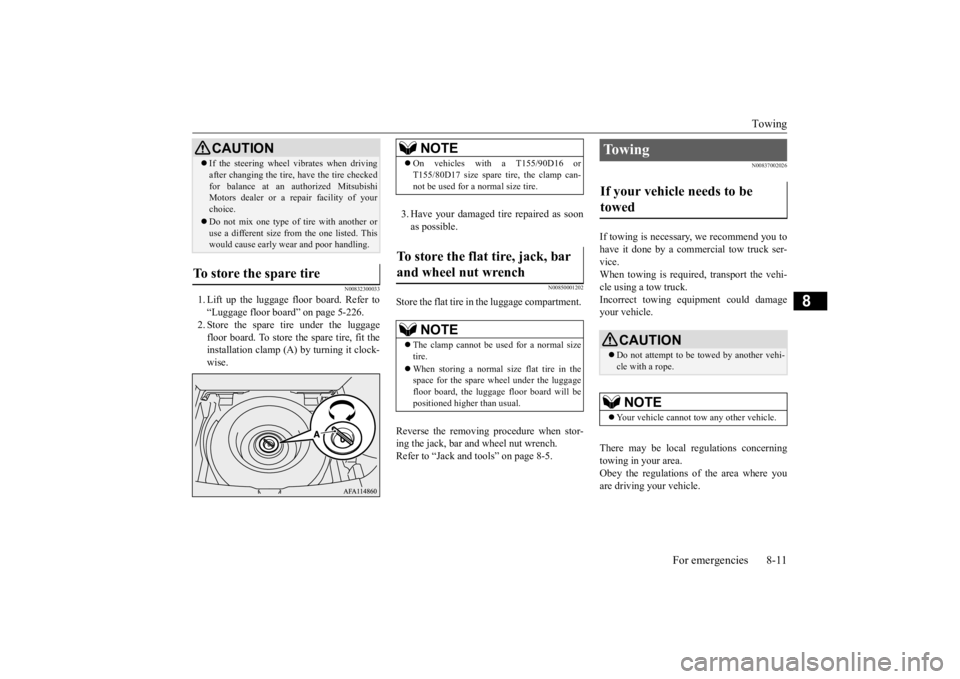
1. Lift up the luggage floor board. Refer to “Luggage floor board” on page 5-226. 2. Store the spare tire under the luggagefloor board. To store the spare tire, fit the installation clamp (A) by turning it clock- wise.
3. Have your damaged tire repaired as soon as possible.
N00850001202
Store the flat tire in the luggage compartment. Reverse the removing procedure when stor- ing the jack, bar and wheel nut wrench. Refer to “Jack and tools” on page 8-5.
N00837002026
If towing is necessary, we recommend you to have it done by a commercial tow truck ser- vice. When towing is required, transport the vehi-cle using a tow truck.Incorrect towing equipment could damage your vehicle. There may be local regulations concerning towing in your area. Obey the regulations of the area where you are driving your vehicle.
If the steering wheel vibrates when driving after changing the tire, have the tire checked for balance at an authorized Mitsubishi Motors dealer or a repair facility of your choice. Do not mix one type of tire with another or use a different size from the one listed. Thiswould cause early wear and poor handling.
To store the spare tire
CAUTION
NOTE
On vehicles with a T155/90D16 or T155/80D17 size spare tire, the clamp can- not be used for a normal size tire.
To store the flat tire, jack, bar and wheel nut wrench
NOTE
The clamp cannot be us
ed for a normal size
tire. When storing a normal size flat tire in the space for the spare wheel under the luggagefloor board, the luggage floor board will be positioned higher than usual.
To w i n g If your vehicle needs to be towed
CAUTION Do not attempt to be towed by another vehi- cle with a rope.NOTE
Your vehicle cannot tow any other vehicle.
BK0277700US.bo
ok 11 ページ 2019年3月8日 金曜日 午前9時23分
Page 381 of 427
Tires 9-16 Vehicle care and maintenance
9
Economy The wrong tire pressure can cause uneven wear patterns in the tire tread. These abnormal wear patterns will reduce thetread life, and the tire will have to be replaced sooner. Too little pressure also makes it harder forthe tire to roll, and this uses up more fuel. Ride comfort and vehicle stability The superior riding experience built intoyour vehicle partly depends on the correcttire pressure. Too much pressure gives an uncomfortable and jarring ride. Too little pressure feels as if your vehicle is slow torespond. Unequal tire pressures can make steering your vehicle uneven and unpredictable.
The tire pressure for your vehicle under nor- mal driving conditions is listed on the placard attached to the driver’s door sill. (Refer to “Tire and loading information plac-ard” on page 11-3.) The recommended infl
ation pressures under
normal driving conditions should be used forthe tires listed below.
Tire pressures should be checked, and adjusted if necessary, at least once a month. Pressures should be checked more often whenever weather temperatures changeseverely, because tire pressures change with outdoor temperatures. The pressures listed are always “cold inflation pressure”.Cold inflation pressure is measured after the vehicle has been parked for at least three hours or is driven less than 1 mile (1.6 km)after having been parked for three hours.Cold inflation pressure must not go above the maximum values molded into the tire side- wall. After driving several miles, your tireinflation pressure may increase 2 to 6 psi (14 to 41 kPa) from the cold inflation pressure. Do not let air out of the tires to get back to thespecified cold pressure, or your tires will be too low. Check your tires each time you refuel. If onetire looks lower than the others, check the pressure for all of them. You should also take the following safety pre-cautions:
Keep your tires inflated to the recom- mended pressures. (See the tire and load- ing information placard attached to the driver’s door sill.) Stay within the recommended load limits. Make sure that the weight of any load in your vehicle is evenly distributed. Drive at safe speeds. After filling your tires to the correct pres- sure, check them for damage and airleaks. Be sure to reinstall the caps on thevalve stems.
N00939601509
Item
Tire size
Front
Rear
Normal tire
P215/70R16 P225/55R18
240 KPA, 35 PSI
240 KPA, 35 PSI
Compact spare tire
T155/90D16 T155/80D17
420 KPA, 60
PSI
Item
Tire size
Front
Rear
Replacing tires and wheels
CAUTION Avoid using different si
ze tires from the one
listed and the combined use of different types of tires, as this can affect drivingsafety. Refer to “Tires and wheels” on page 11-7. On all-wheel drive vehicles, always use tires of the same size, same type, and same brand, and which have no wear differences. Usingtires that differ in size, type, brand or the degree of wear, will increase the differential oil temperature, resulting in possible damage to the driving system. Further, the drive train will be subjected to excessive loading, possi-bly leading to oil leakage, component sei- zure, or other serious problems.
BK0277700US.bo
ok 16 ページ 2019年3月8日 金曜日 午前9時23分
Page 387 of 427
For cold and snowy weather 9-22 Vehicle care and maintenance
9
N00941800093
Check the following parts for damage and grease leaks: Ball joint boots of the suspension and steering linkage Bellows on both ends of the drive shaft
N00942201118
The best way to keep carbon monoxide gas from entering inside your vehicle is to have the engine exhaust system properly serviced. Have a competent mechanic inspect the com-plete exhaust system and nearby body areas for broken, damaged, deteriorated, or mispo- sitioned parts if you notice any of the follow-ing: A change in the sound of the exhaust sys- tem The smell of exhaust fumes inside the vehicle
The underside or rear of the vehicle is damaged
Also check the exhaust system each time the vehicle is raised for lubrication, oil changes, or required service. Any open seams or looseconnections could let dangerous exhaust fumes seep into the luggage and passenger compartments. Check for holes or exhaust gas leaks caused by corrosion or damage. Check the joints and connections for looseness or exhaust gas leaks. Check the rubber hangers and brackets for damage.
N00942501124
The hood lock release mechanism and hood safety catch should be checked, cleaned, and oiled when needed for easy movement and toprevent rust and wear. Use Multipurpose Grease NLGI Grade 2 spar
ingly for all sliding
parts of the hood latch and release lever.Work the grease into the hood lock mecha-
nism until all the movable surfaces are cov- ered. Also, put a light coat of the same grease on the safety catch wherever moving parts touch.
N00942601141
The ventilation slots in front of the wind- shield should be brushed clear after a heavy snowfall so that the operation of the heatingand ventilation systems will not be impaired. To prevent freezing of the weatherstripping on the doors, engine hood, etc., they should be treated with silicone grease. It is a good idea to carry a shovel or a short- handled spade in the vehicle during the win- ter so that you can clear away snow if you get stranded. A small hand-brush for sweeping
Ball joint, steering linkage seals, drive shaft boots Exhaust system
WA R N I N G Carbon monoxide gas from your vehicle’s exhaust is poisonous. Breathing these fumes can cause unconsciousness or death.
Check for any of the following conditions: Hood lock release mechanism and safety catch
For cold and snowy weather Ventilation slots Weatherstripping Additional equipment (For regions where snow is encoun-tered)
BK0277700US.bo
ok 22 ページ 2019年3月8日 金曜日 午前9時23分
Page 390 of 427
Fuses
Vehicle care and maintenance 9-25
9
* : Fusible link Some fuses may not be installed on your vehicle, depending on the vehicle model or specifications. The table above shows the main equip- ment corresponding to each fuse.
The fuse block does not contain spare 7.5 A, 25 A or 30 A fuses. If one of these fusesburns out, substitute with the following fuse.7.5 A: 10 A spare fuse 25 A: 20 A spare fuse 30 A: 30 A audio system amplifier fuseWhen using a substitute fuse, replace with a fuse of the correct capacity as soon as possi- ble.
No.
Sym- bol
Electrical system
Capac-ity
1
Electric parking
brake
30 A
*
2
Electric parking
brake
30 A
*
3
Anti-lock braking
system
40 A
*
4
Anti-lock braking
system
30 A
*
5 Power seat 30 A
*
6 Heated seats 30 A 7Starter30 A
*
8
Heated steering
wheel
15 A
9 Headlight washer 20 A 10 Security horn 20 A 11 Automatic transaxle 20 A 12 Horn 10 A 13 Sunshade 20 A14 Front fog lights 15 A 15
Daytime running
lights
10 A
16 Air conditioner 10 A
17 Engine control unit 7.5 A 18 Alternator 7.5 A 19 Radiator fan motor 40 A
*
20
Audio system ampli-
fier
30 A
21 — — — 22 IOD IOD 30 A 23
Air conditioning condenser fan motor
30 A
*
24
Battery current sen-
sor
7.5 A
25
/
Electric parking brake/Adaptive Cruise Control
(ACC)
7.5 A
26
Headlight (high beam) (right)
10 A
27
Headlight (high beam) (left)
10 A
28 Turbo actuator 20 A 29 ENG/POWER 20 A 30 Fuel pump 15 A31 Ignition coil 10 ANo.
Sym- bol
Electrical system
Capac-ity
32 Injector 20 A 33 ETV 15 A #1 — Spare fuse 10 A #2 — Spare fuse 15 A#3 — Spare fuse 20 ANo.
Sym- bol
Electrical system
Capac-ity
BK0277700US.bo
ok 25 ページ 2019年3月8日 金曜日 午前9時23分
Page 396 of 427
Replacement of light bulbs
Vehicle care and maintenance 9-31
9
N00943401508
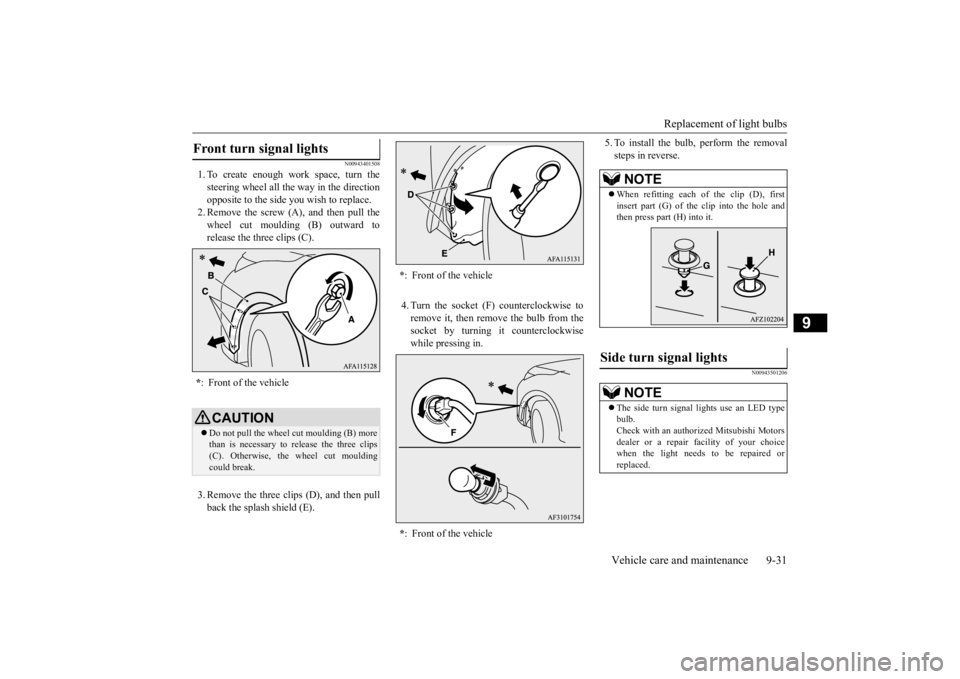
1. To create enough work space, turn the steering wheel all the way in the directionopposite to the side you wish to replace. 2. Remove the screw (A), and then pull the wheel cut moulding (B) outward torelease the three clips (C). 3. Remove the three clips (D), and then pull back the splash shield (E).
4. Turn the socket (F) counterclockwise to remove it, then remove the bulb from thesocket by turning it counterclockwise while pressing in.
5. To install the bulb, perform the removal steps in reverse.
N00943501206
Front turn signal lights * : Front of the vehicleCAUTIONDo not pull the wheel cut moulding (B) more than is necessary to release the three clips(C). Otherwise, the wheel cut moulding could break.
* : Front of the vehicle * : Front of the vehicle
NOTE
When refitting each of the clip (D), first insert part (G) of the clip into the hole andthen press part (H) into it.
Side turn signal lights
NOTE
The side turn signal lights use an LED type bulb. Check with an authorized Mitsubishi Motors dealer or a repair facility of your choice when the light needs to be repaired or replaced.
BK0277700US.bo
ok 31 ページ 2019年3月8日 金曜日 午前9時23分
Page 397 of 427
Replacement of light bulbs 9-32 Vehicle care and maintenance
9
N00943601991
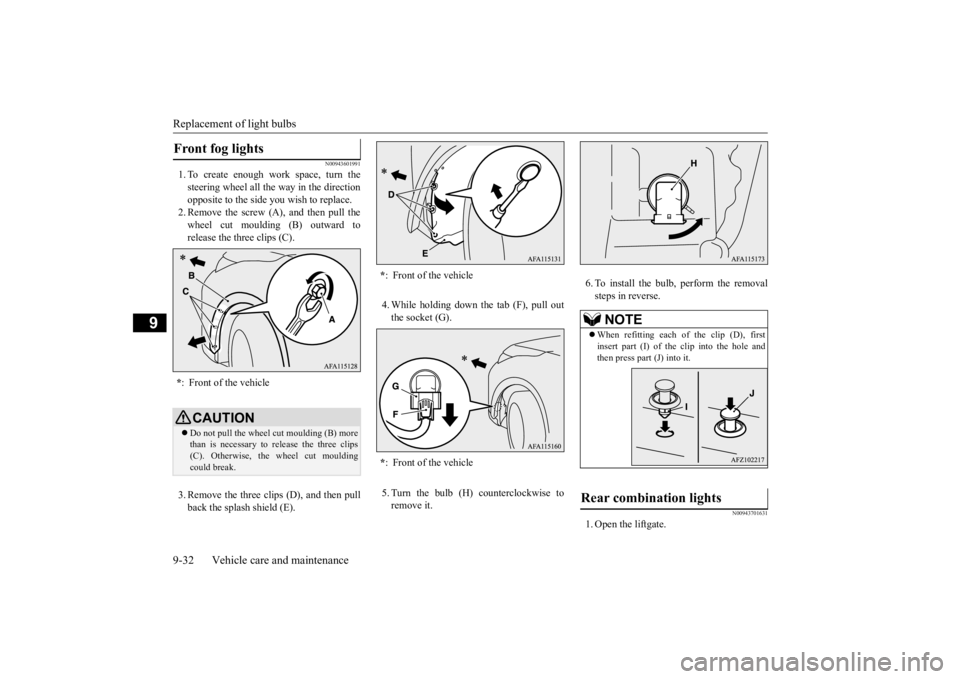
1. To create enough work space, turn the steering wheel all the way in the directionopposite to the side you wish to replace. 2. Remove the screw (A), and then pull the wheel cut moulding (B) outward torelease the three clips (C). 3. Remove the three clips (D), and then pull back the splash shield (E).
4. While holding down the tab (F), pull out the socket (G). 5. Turn the bulb (H) counterclockwise to remove it.
6. To install the bulb, perform the removal steps in reverse.
N00943701631
1. Open the liftgate.
Front fog lights * : Front of the vehicleCAUTIONDo not pull the wheel cut moulding (B) more than is necessary to release the three clips(C). Otherwise, the wheel cut moulding could break.
* : Front of the vehicle * : Front of the vehicle
NOTE
When refitting each of the clip (D), first insert part (I) of the clip into the hole and then press part (J) into it.
Rear combination lights
BK0277700US.bo
ok 32 ページ 2019年3月8日 金曜日 午前9時23分