wheel MITSUBISHI ECLIPSE CROSS 2020 (in English) Manual PDF
[x] Cancel search | Manufacturer: MITSUBISHI, Model Year: 2020, Model line: ECLIPSE CROSS, Model: MITSUBISHI ECLIPSE CROSS 2020Pages: 427, PDF Size: 78.05 MB
Page 374 of 427
Transfer oil (All-wheel drive models) Vehicle care and maintenance 9-9
9
Use only “Mitsubishi Motors Genuine CVTF-J4” transmission fluid to ensure opti-mum transmission performance. Do not use any fluid additives to the trans- mission.
N00938401308
Whenever the transfer oil level is checked,add oil as necessary to maintain the proper level. Fill with the oil according to the fol-lowing table.
N00915201295
Whenever the oil level is checked, add oil asnecessary to maintain the proper level.Fill with the oil according to the table below.
N00938601401
The windshield and rear window washer fluid reservoir is in the engine compartment.
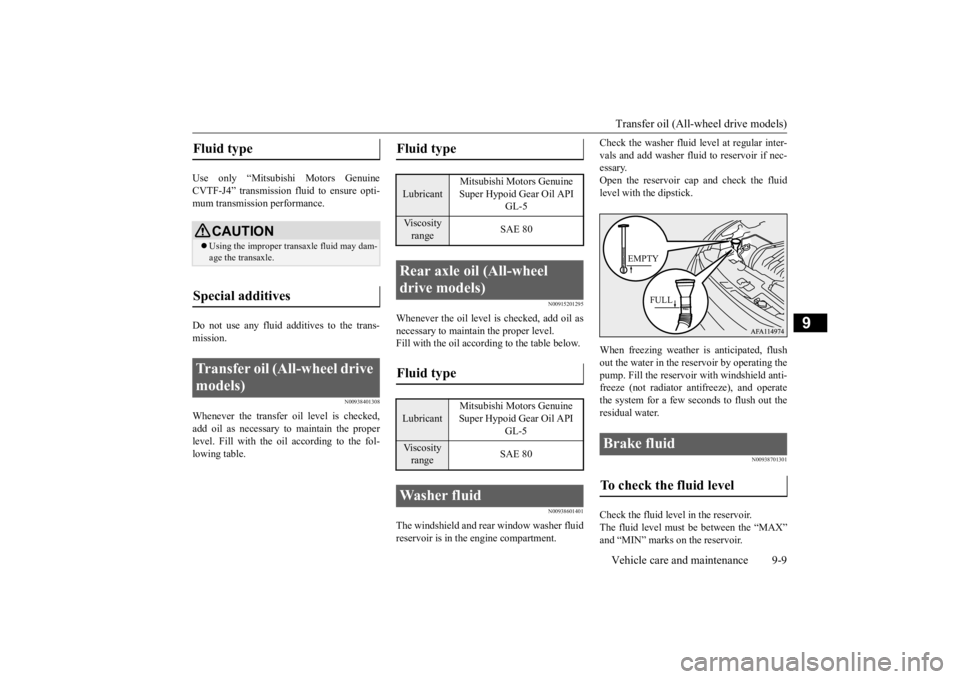
Check the washer fluid level at regular inter- vals and add washer fluid to reservoir if nec- essary. Open the reservoir cap and check the fluidlevel with the dipstick. When freezing weather is anticipated, flush out the water in the reservoir by operating thepump. Fill the reservoir with windshield anti-freeze (not radiator antifreeze), and operate the system for a few seconds to flush out the residual water.
N00938701301
Check the fluid level in the reservoir.The fluid level must be between the “MAX”and “MIN” marks on the reservoir.
Fluid type
CAUTION Using the improper transaxle fluid may dam- age the transaxle.
Special additives Transfer oil (All-wheel drive models)
Fluid type Lubricant
Mitsubishi Motors Genuine Super Hypoid Gear Oil API
GL-5
Viscosity range
SAE 80
Rear axle oil (All-wheel drive models) Fluid type Lubricant
Mitsubishi Motors Genuine Super Hypoid Gear Oil API
GL-5
Viscosity range
SAE 80
Washer fluid
Brake fluid To check the fluid level
FULL
EMPTY
BK0277700US.bo
ok 9 ページ 2019年3月8日 金曜日 午前9時23分
Page 380 of 427

Tires
Vehicle care and maintenance 9-15
9
EXAMPLE: DOT MA L9 ABCD 1504
The treadwear grade is a comparative rating based on the wear rate of the tire when tested under controlled conditions on a specified government test course. For example, a tiregraded 150 would wear one and one-half (11/2) times as well on the government course
as a tire graded 100. The relative performance of tires depends upon the actual conditions oftheir use, however, and may depart signifi- cantly from the norm due to variations in driving habits, service practices and differ-ences in road characteristics and climate. The traction grades, from highest to lowest, are AA, A, B and C. Those grades represent the tire’s ability to stop on wet pavement asmeasured under controlled conditions on specified government test surfaces of asphalt and concrete. A tire marked C may have poortraction performance.
The temperature grades are A (the highest), B and C, representing the tire’s resistance to the generation of heat and its ability to dissipate heat when tested under controlled conditionson a specified indoor laboratory test wheel. Sustained high temperature can cause the material of the tire to degenerate and reducetire life, and excessive temperature can lead to sudden tire failure. The grade C corre- sponds to a level of performance which allpassenger car tires must meet under the Fed-eral Motor Vehicle Safety Standard No. 109. Grades B and A represent higher levels of performance on the laboratory test wheel thanthe minimum required by law.
N00939302008
Proper tire inflation pressure is essential forthe safe and satisfactory operation of your vehicle. The wrong tire pressure will cause problems in three major areas: Safety Too little pressure increases flexing in the tire and can cause tire failure. Too much pressure can cause a tire to lose its abilityto cushion shock. Objects on the road and potholes could then cause tire damage that may result in tire failure.
DOT
Department of Transporta- tion This symbol certifies that the tire is in compliance with the U.S. Department of Trans- portation tire safety stan-dards, and is approved for highway use.
MA
Code representing the tire manufacturing location. (2 digits)
L9 ABC D
Code representing the tire size. (2 digits)Code used by tire manufac- turer. (1 to 4 digits)
15
Number representing the week in which the tire was manufactured. (2 digits)
04
Number representing the year in which the tire was manufactured. (2 digits)
Treadwear, Traction and Temper- ature Grades Treadwear Traction
TemperatureTire inflation pressures
BK0277700US.bo
ok 15 ページ 2019年3月8日 金曜日 午前9時23分
Page 381 of 427
Tires 9-16 Vehicle care and maintenance
9
Economy The wrong tire pressure can cause uneven wear patterns in the tire tread. These abnormal wear patterns will reduce thetread life, and the tire will have to be replaced sooner. Too little pressure also makes it harder forthe tire to roll, and this uses up more fuel. Ride comfort and vehicle stability The superior riding experience built intoyour vehicle partly depends on the correcttire pressure. Too much pressure gives an uncomfortable and jarring ride. Too little pressure feels as if your vehicle is slow torespond. Unequal tire pressures can make steering your vehicle uneven and unpredictable.
The tire pressure for your vehicle under nor- mal driving conditions is listed on the placard attached to the driver’s door sill. (Refer to “Tire and loading information plac-ard” on page 11-3.) The recommended infl
ation pressures under
normal driving conditions should be used forthe tires listed below.
Tire pressures should be checked, and adjusted if necessary, at least once a month. Pressures should be checked more often whenever weather temperatures changeseverely, because tire pressures change with outdoor temperatures. The pressures listed are always “cold inflation pressure”.Cold inflation pressure is measured after the vehicle has been parked for at least three hours or is driven less than 1 mile (1.6 km)after having been parked for three hours.Cold inflation pressure must not go above the maximum values molded into the tire side- wall. After driving several miles, your tireinflation pressure may increase 2 to 6 psi (14 to 41 kPa) from the cold inflation pressure. Do not let air out of the tires to get back to thespecified cold pressure, or your tires will be too low. Check your tires each time you refuel. If onetire looks lower than the others, check the pressure for all of them. You should also take the following safety pre-cautions:
Keep your tires inflated to the recom- mended pressures. (See the tire and load- ing information placard attached to the driver’s door sill.) Stay within the recommended load limits. Make sure that the weight of any load in your vehicle is evenly distributed. Drive at safe speeds. After filling your tires to the correct pres- sure, check them for damage and airleaks. Be sure to reinstall the caps on thevalve stems.
N00939601509
Item
Tire size
Front
Rear
Normal tire
P215/70R16 P225/55R18
240 KPA, 35 PSI
240 KPA, 35 PSI
Compact spare tire
T155/90D16 T155/80D17
420 KPA, 60
PSI
Item
Tire size
Front
Rear
Replacing tires and wheels
CAUTION Avoid using different si
ze tires from the one
listed and the combined use of different types of tires, as this can affect drivingsafety. Refer to “Tires and wheels” on page 11-7. On all-wheel drive vehicles, always use tires of the same size, same type, and same brand, and which have no wear differences. Usingtires that differ in size, type, brand or the degree of wear, will increase the differential oil temperature, resulting in possible damage to the driving system. Further, the drive train will be subjected to excessive loading, possi-bly leading to oil leakage, component sei- zure, or other serious problems.
BK0277700US.bo
ok 16 ページ 2019年3月8日 金曜日 午前9時23分
Page 382 of 427
Tires
Vehicle care and maintenance 9-17
9
N00939700141
The following maintenance steps are recom- mended: Check tire pressures regularly. Have regular maintenance done on the wheel balance and front and rear suspen-sion alignment.
Rotate your tires regularly as described in the “Tire rotation” section on page 9-17.
N00939800184
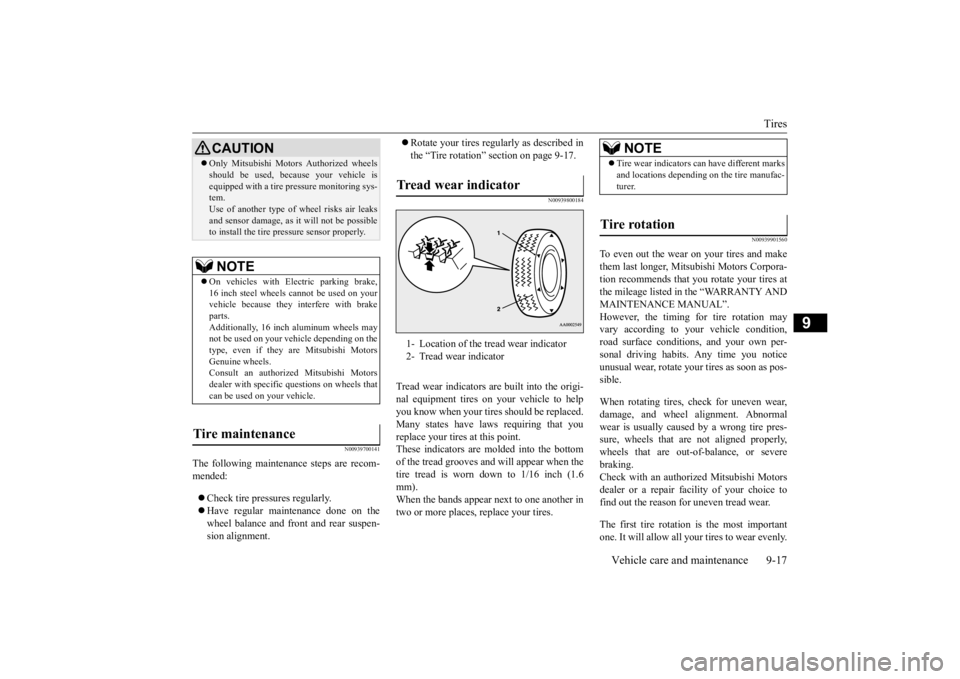
Tread wear indicators are built into the origi- nal equipment tires on your vehicle to help you know when your tires should be replaced.Many states have laws requiring that you replace your tires at this point. These indicators are molded into the bottomof the tread grooves and will appear when the tire tread is worn down to 1/16 inch (1.6 mm).When the bands appear next to one another in two or more places, replace your tires.
N00939901560
To even out the wear on your tires and make them last longer, Mitsubishi Motors Corpora-tion recommends that you rotate your tires at the mileage listed in the “WARRANTY AND MAINTENANCE MANUAL”.However, the timing for tire rotation may vary according to your vehicle condition, road surface conditions, and your own per-sonal driving habits. Any time you notice unusual wear, rotate your tires as soon as pos- sible. When rotating tires, check for uneven wear, damage, and wheel alignment. Abnormal wear is usually caused by a wrong tire pres- sure, wheels that are not aligned properly,wheels that are out-of-balance, or severe braking. Check with an authorized Mitsubishi Motorsdealer or a repair faci
lity of your choice to
find out the reason for uneven tread wear. The first tire rotation is the most important one. It will allow all your tires to wear evenly.
Only Mitsubishi Motors Authorized wheels should be used, because your vehicle is equipped with a tire pressure monitoring sys- tem. Use of another type of wheel risks air leaksand sensor damage, as it will not be possible to install the tire pressure sensor properly.NOTE
On vehicles with Electric parking brake, 16 inch steel wheels cannot be used on yourvehicle because they interfere with brake parts. Additionally, 16 inch aluminum wheels maynot be used on your vehicle depending on the type, even if they are Mitsubishi Motors Genuine wheels.Consult an authorized Mitsubishi Motors dealer with specific questions on wheels that can be used on your vehicle.
Tire maintenance
CAUTION
Tread wear indicator 1- Location of the tread wear indicator 2- Tread wear indicator
NOTE
Tire wear indicators can have different marks and locations depending on the tire manufac- turer.
Tire rotation
BK0277700US.bo
ok 17 ページ 2019年3月8日 金曜日 午前9時23分
Page 383 of 427
Tires 9-18 Vehicle care and maintenance
9
N00940001460
In some areas of the country, snow tires are required for winter driving. If snow tires are required in your area, you must choose snowtires of the same size and type as the original tires provided with your vehicle. Snow tires
should also be installed on all four wheels. Otherwise your safety and vehicle handling can be reduced. Even where laws may permit it, never exceedthe maximum speed rating of the tire.
N00940101139
CAUTION A compact spare tire can be installed tempo- rarily in place of a tire that has been removedduring the tire rotation. However, it must not be included in the regular tire rotation sequence.
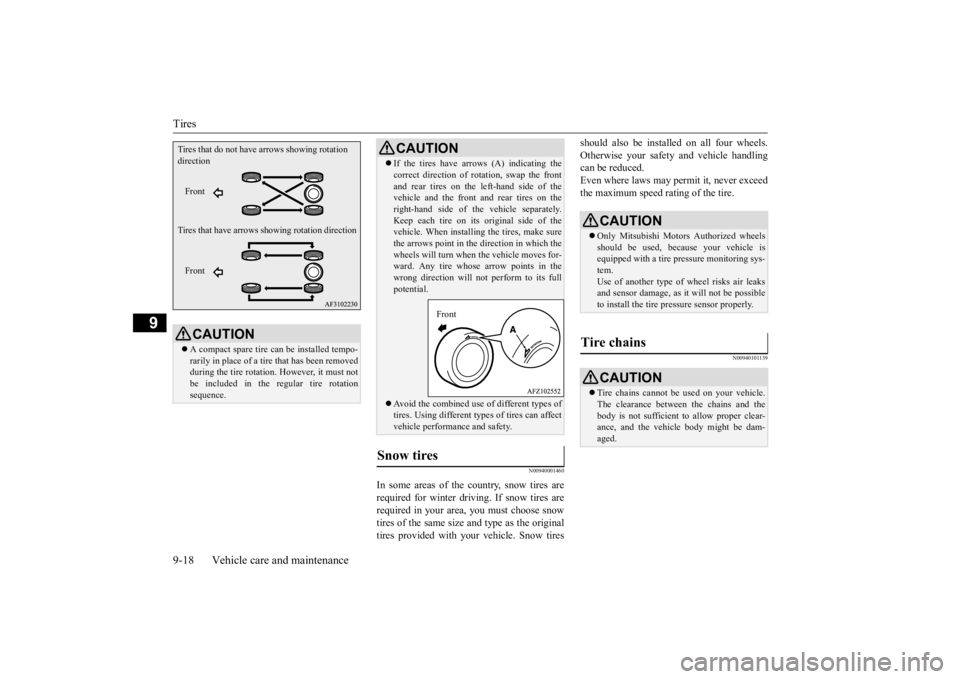
Tires that do not have arrows showing rotation direction Tires that have arrows
showing rotation direction
Front Front
If the tires have arrows (A) indicating the correct direction of rotation, swap the front and rear tires on the left-hand side of the vehicle and the front and rear tires on the right-hand side of the vehicle separately.Keep each tire on its original side of the vehicle. When installing the tires, make sure the arrows point in the direction in which thewheels will turn when the vehicle moves for- ward. Any tire whose arrow points in the wrong direction will not perform to its fullpotential. Avoid the combined use of different types of tires. Using different types of tires can affectvehicle performance and safety.
Snow tires
CAUTION
Front
CAUTION Only Mitsubishi Motors Authorized wheels should be used, because your vehicle is equipped with a tire pressure monitoring sys-tem. Use of another type of wheel risks air leaks and sensor damage, as it will not be possibleto install the tire pressure sensor properly.
Tire chains
CAUTION Tire chains cannot be used on your vehicle. The clearance between the chains and thebody is not sufficient to allow proper clear- ance, and the vehicle body might be dam- aged.
BK0277700US.bo
ok 18 ページ 2019年3月8日 金曜日 午前9時23分
Page 386 of 427
General maintenance
Vehicle care and maintenance 9-21
9
N00941000040
Check the hose surfaces for any heat and mechanical damage, hard and brittle rubber,cracking, tears, cuts and abrasions. Pay spe- cial attention to the hoses closest to high heat sources such as the exhaust manifold. Checkall the hose connections, such as clamps and couplings, to make sure they are secure and that there are no leaks. If you see any wear ordamage, replace the hoses immediately.
N00950100050
Have the valve clearance checked at anauthorized Mitsubishi Motors dealer at themileage specified in the “WARRANTY AND MAINTENANCE MANUAL”. If the engine sounds abnormally loud, haveadjustments made by an authorized Mitsubishi Motors dealer.
N00941300173
Check these regularly for damage or leaks in the fuel lines and connections. Check the fuel tank filler cap for damage or looseness. Pay special attention to the fuel lines closest to
high heat sources such as the exhaust mani- fold.
N00941400187
If the fuel-vapor vent line is clogged or dam- aged, the fuel-vapor mixture will escape, pol- luting the air.Have the system checked at an authorized Mitsubishi Motors dealer at the mileage spec- ified in the “WARRANTY AND MAINTE-NANCE MANUAL”.
N00941501299
The next pages list the maintenance servicerecommended by Mitsubishi Motors Corpo- ration. In addition to the general maintenance that needs to be perfor
med at the times listed,
there are other parts which do not usually need regular maintenance. But, if any of these parts stops working prop- erly, your vehicle performance could suffer.Have these items checked if you notice a problem with them. If you have any questions, see your autho- rized Mitsubishi Motors
dealer for assistance.
N00941600059
Good brakes are essential for safe driving. Check the brake pads for wear. For good braking performance, replace the brake padswith the same type pads as the originals.
N00941700076
Brake hoses and tubing should be checkedfor: Severe surface cracking, scuffing or worn spots. If the fabric casing of the hose is showing through any cracks or worn spotsin the rubber hose cover, the hose should be replaced. The brakes can fail if the hose wears through. Improper installation may cause twisting, or wheel, tire or chassis interference.
Fuel hoses Intake valve clearance Fuel system (tank, pipe line and connection, and fuel tank filler cap)
WA R N I N G If you see a fuel leak or if you smell fuel, do not run the engine. Any spark (includ- ing from the ignition), flame or smokingmaterial could cause an explosion or fire. Call an authorized Mitsubishi Motors dealer or a repair facility of your choicefor assistance.
Evaporative emission control system (except evaporative emission canister) General maintenance
Disc brake pads Brake hoses
BK0277700US.bo
ok 21 ページ 2019年3月8日 金曜日 午前9時23分
Page 389 of 427
Fuses 9-24 Vehicle care and maintenance
9
* : Fusible link Some fuses may not be installed on your vehicle, depending on the vehicle model or specifications. The table above shows the main equip- ment corresponding to each fuse.
Passenger compartment fuse loca- tion table No.
Sym- bol
Electrical system
Capac-ity
1
Power window con-
trol
30 A
*
2 Defogger 30 A
*
3 Heater 30 A 4 Windshield wipers 30 A 5 Door locks 25 A 6— — — 7 12 V power outlet 15 A
8 Rear window wiper 15 A 9 Sunroof 20 A 10 Ignition switch 10 A 11 Option 10 A 12
Hazard warning
flasher
15 A
13 4-wheel drive system 10 A14
Stop lights (Brake lights)
15 A
15 Gauges 10 A 16 SRS airbag 7.5 A 17 Radio 15 A 18 Control unit relay 7.5 A 19
Interior lights (Room lights)
15 A
20 Back-up lights 7.5 A21
Heated outside rearview mirrors
7.5 A
22
Outside rearview
mirrors
10 A
23
Cigarette lighter/ 12 V power outlet
15 A
No.
Sym- bol
Electrical system
Capac-ity
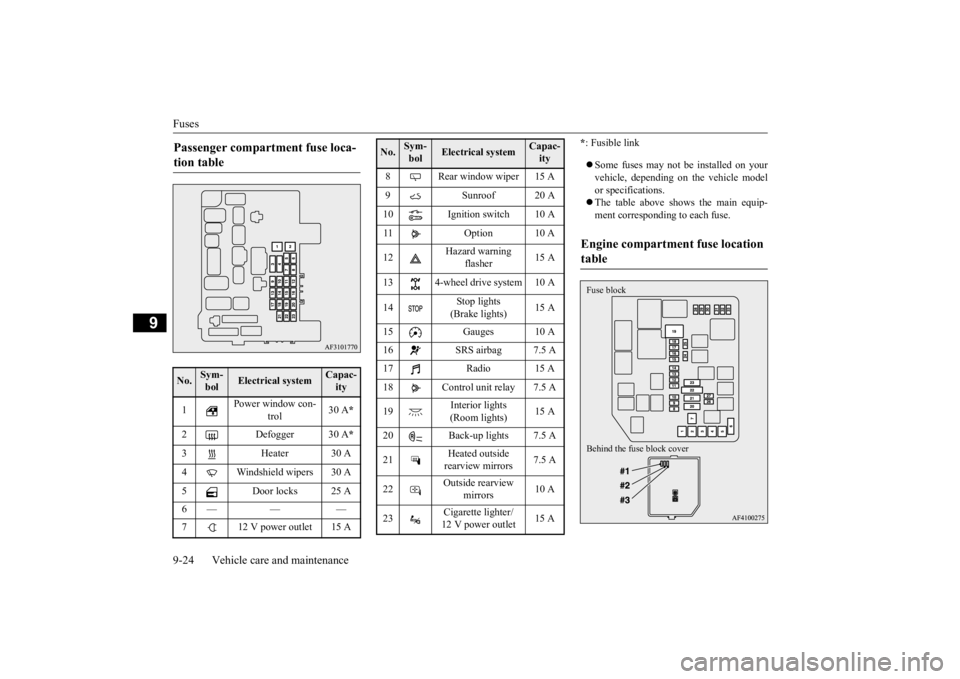
Engine compartment fuse location table Behind the fuse block cover Fuse block
BK0277700US.bo
ok 24 ページ 2019年3月8日 金曜日 午前9時23分
Page 390 of 427
Fuses
Vehicle care and maintenance 9-25
9
* : Fusible link Some fuses may not be installed on your vehicle, depending on the vehicle model or specifications. The table above shows the main equip- ment corresponding to each fuse.
The fuse block does not contain spare 7.5 A, 25 A or 30 A fuses. If one of these fusesburns out, substitute with the following fuse.7.5 A: 10 A spare fuse 25 A: 20 A spare fuse 30 A: 30 A audio system amplifier fuseWhen using a substitute fuse, replace with a fuse of the correct capacity as soon as possi- ble.
No.
Sym- bol
Electrical system
Capac-ity
1
Electric parking
brake
30 A
*
2
Electric parking
brake
30 A
*
3
Anti-lock braking
system
40 A
*
4
Anti-lock braking
system
30 A
*
5 Power seat 30 A
*
6 Heated seats 30 A 7Starter30 A
*
8
Heated steering
wheel
15 A
9 Headlight washer 20 A 10 Security horn 20 A 11 Automatic transaxle 20 A 12 Horn 10 A 13 Sunshade 20 A14 Front fog lights 15 A 15
Daytime running
lights
10 A
16 Air conditioner 10 A
17 Engine control unit 7.5 A 18 Alternator 7.5 A 19 Radiator fan motor 40 A
*
20
Audio system ampli-
fier
30 A
21 — — — 22 IOD IOD 30 A 23
Air conditioning condenser fan motor
30 A
*
24
Battery current sen-
sor
7.5 A
25
/
Electric parking brake/Adaptive Cruise Control
(ACC)
7.5 A
26
Headlight (high beam) (right)
10 A
27
Headlight (high beam) (left)
10 A
28 Turbo actuator 20 A 29 ENG/POWER 20 A 30 Fuel pump 15 A31 Ignition coil 10 ANo.
Sym- bol
Electrical system
Capac-ity
32 Injector 20 A 33 ETV 15 A #1 — Spare fuse 10 A #2 — Spare fuse 15 A#3 — Spare fuse 20 ANo.
Sym- bol
Electrical system
Capac-ity
BK0277700US.bo
ok 25 ページ 2019年3月8日 金曜日 午前9時23分
Page 396 of 427
Replacement of light bulbs
Vehicle care and maintenance 9-31
9
N00943401508
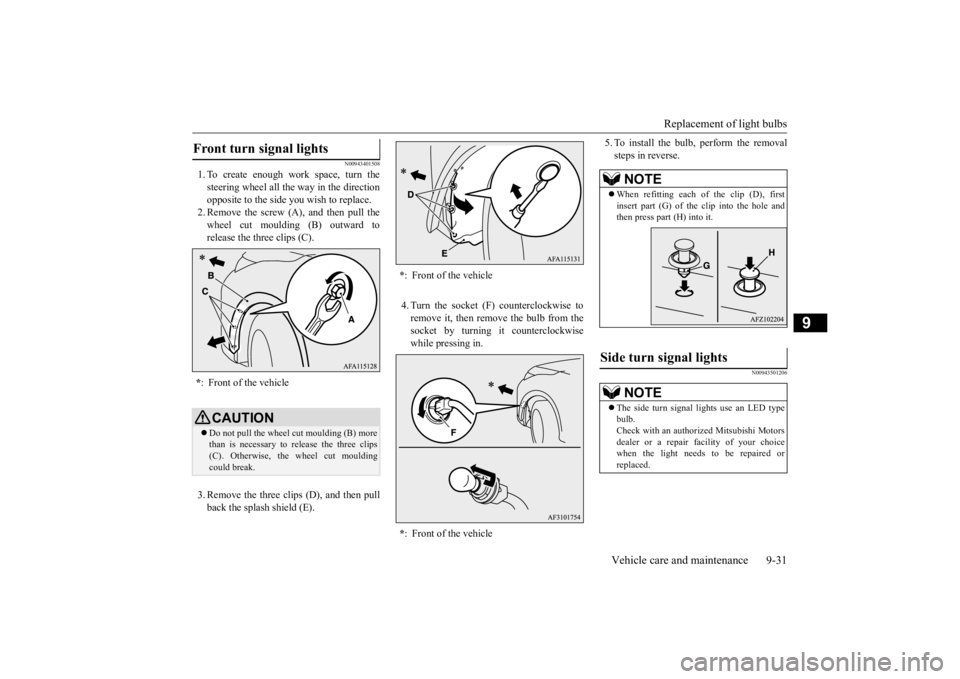
1. To create enough work space, turn the steering wheel all the way in the directionopposite to the side you wish to replace. 2. Remove the screw (A), and then pull the wheel cut moulding (B) outward torelease the three clips (C). 3. Remove the three clips (D), and then pull back the splash shield (E).
4. Turn the socket (F) counterclockwise to remove it, then remove the bulb from thesocket by turning it counterclockwise while pressing in.
5. To install the bulb, perform the removal steps in reverse.
N00943501206
Front turn signal lights * : Front of the vehicleCAUTIONDo not pull the wheel cut moulding (B) more than is necessary to release the three clips(C). Otherwise, the wheel cut moulding could break.
* : Front of the vehicle * : Front of the vehicle
NOTE
When refitting each of the clip (D), first insert part (G) of the clip into the hole andthen press part (H) into it.
Side turn signal lights
NOTE
The side turn signal lights use an LED type bulb. Check with an authorized Mitsubishi Motors dealer or a repair facility of your choice when the light needs to be repaired or replaced.
BK0277700US.bo
ok 31 ページ 2019年3月8日 金曜日 午前9時23分
Page 397 of 427
Replacement of light bulbs 9-32 Vehicle care and maintenance
9
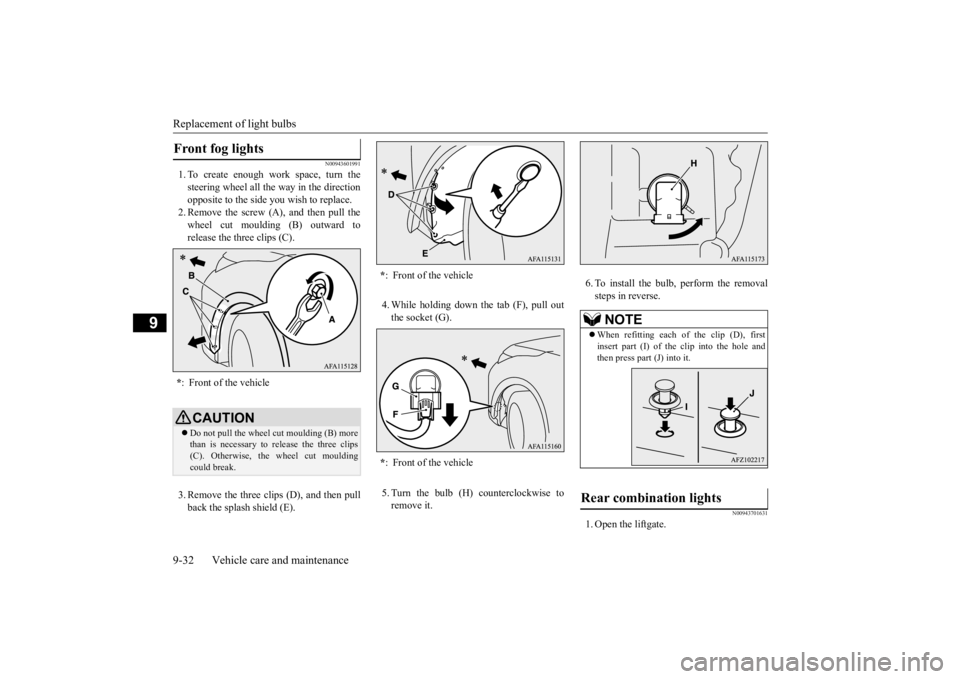
N00943601991
1. To create enough work space, turn the steering wheel all the way in the directionopposite to the side you wish to replace. 2. Remove the screw (A), and then pull the wheel cut moulding (B) outward torelease the three clips (C). 3. Remove the three clips (D), and then pull back the splash shield (E).
4. While holding down the tab (F), pull out the socket (G). 5. Turn the bulb (H) counterclockwise to remove it.
6. To install the bulb, perform the removal steps in reverse.
N00943701631
1. Open the liftgate.
Front fog lights * : Front of the vehicleCAUTIONDo not pull the wheel cut moulding (B) more than is necessary to release the three clips(C). Otherwise, the wheel cut moulding could break.
* : Front of the vehicle * : Front of the vehicle
NOTE
When refitting each of the clip (D), first insert part (I) of the clip into the hole and then press part (J) into it.
Rear combination lights
BK0277700US.bo
ok 32 ページ 2019年3月8日 金曜日 午前9時23分