roof MITSUBISHI ENDEAVOR 2004 Service Owner's Manual
[x] Cancel search | Manufacturer: MITSUBISHI, Model Year: 2004, Model line: ENDEAVOR, Model: MITSUBISHI ENDEAVOR 2004Pages: 3870, PDF Size: 98.47 MB
Page 3558 of 3870
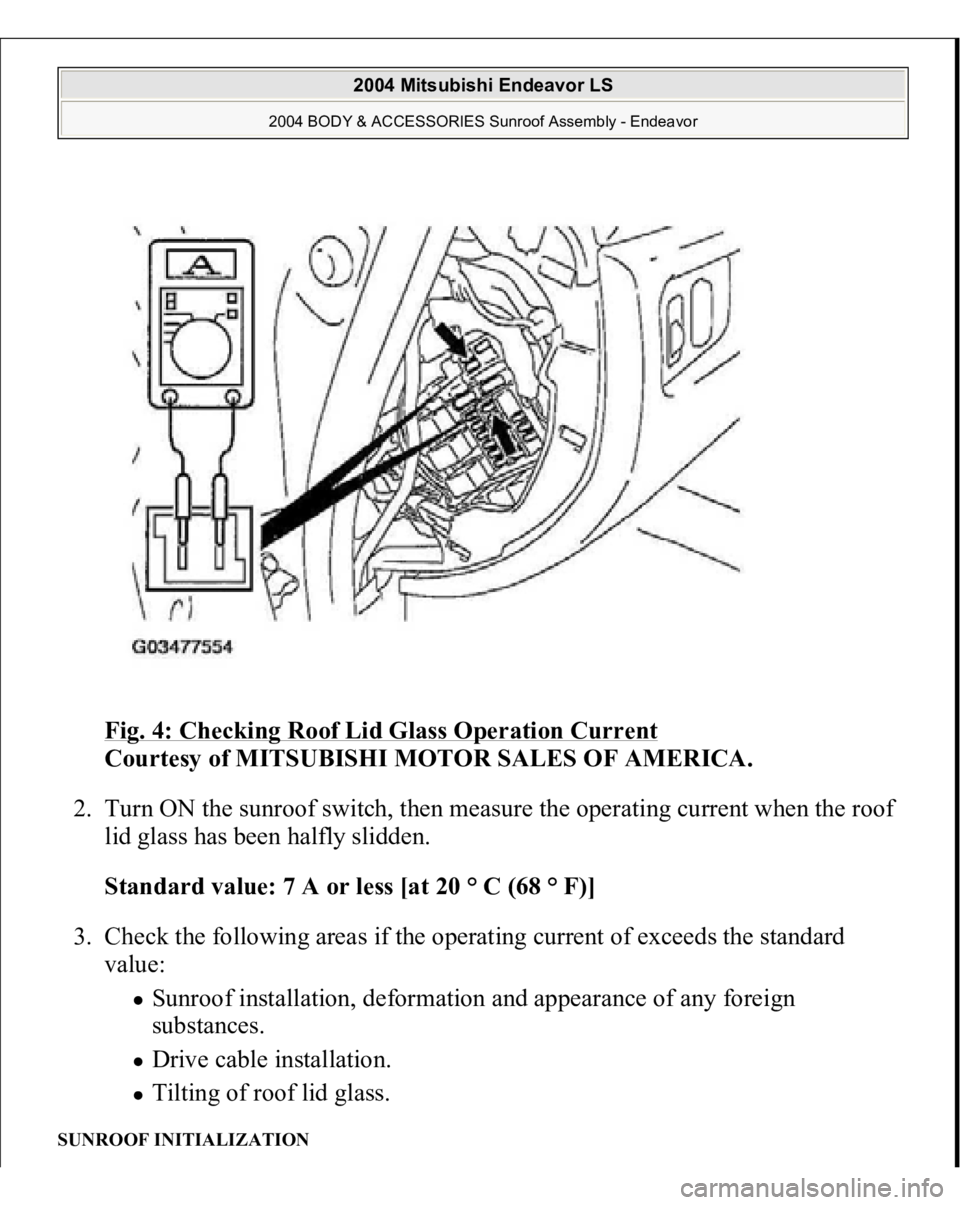
Fig. 4: Checking Roof Lid Glass Operation Current
Courtesy of MITSUBISHI MOTOR SALES OF AMERICA.
2. Turn ON the sunroof switch, then measure the operating current when the roof
lid glass has been halfly slidden.
Standard value: 7 A or less [at 20 ° C (68 ° F)]
3. Check the following areas if the operating current of exceeds the standard
value:
Sunroof installation, deformation and appearance of any foreign
substances. Drive cable installation. Tilting of roof lid glass.
SUNROOF INITIALIZATION
2004 Mitsubishi Endeavor LS
2004 BODY & ACCESSORIES Sunroof Assembly - Endeavor
Page 3559 of 3870
The sunroof should be initialized when any of the following components are
replaced, the sunroof position is miss timed, the sunroof is in learn mode.
Roof lid glass assembly Sunroof motor Sunroof-ECU
1. Ensure the components are correctly assembled. Ensure all the connectors are
connected securely.
2. If the sunroof is already in learn mode, go to step 3. If the sunroof is not in
learn mode, enter learn mode by i or ii.
i. Disconnect the sunroof-ECU connector while the sunroof is operating.
ii. Activate the jam preventing mechanism five times continuously.
3. Press the sunroof Close switch repeatedly until the sunroof is tilted up fully.
4. Press and hold the sunroof Close switch for at least three seconds.
5. Press the sunroof Close switch until the sunroof closes fully.
6. Press the sunroof Open switch until the sunroof opens fully. Then press the
sunroof Close switch until the sunroof closes fully. The sunroof should work
normally.
OPERATION CHECK Check that the following items. If faulty, replace the sunroof-ECU.
1.Installation condition of the sunroof assembly
2.Installation condition, deformation and contamination of the sunroof drive
cable NOTE: Do not stop the sunroof before it reaches the fully open or
fully closed position during operations in steps 5 and 6
above. If the sunroof has stopped accidentally, repeat the
procedure from step 1 .
CAUTION: Check that the following items are normal before
carrying out this operation check.
2004 Mitsubishi Endeavor LS
2004 BODY & ACCESSORIES Sunroof Assembly - Endeavor
Page 3560 of 3870
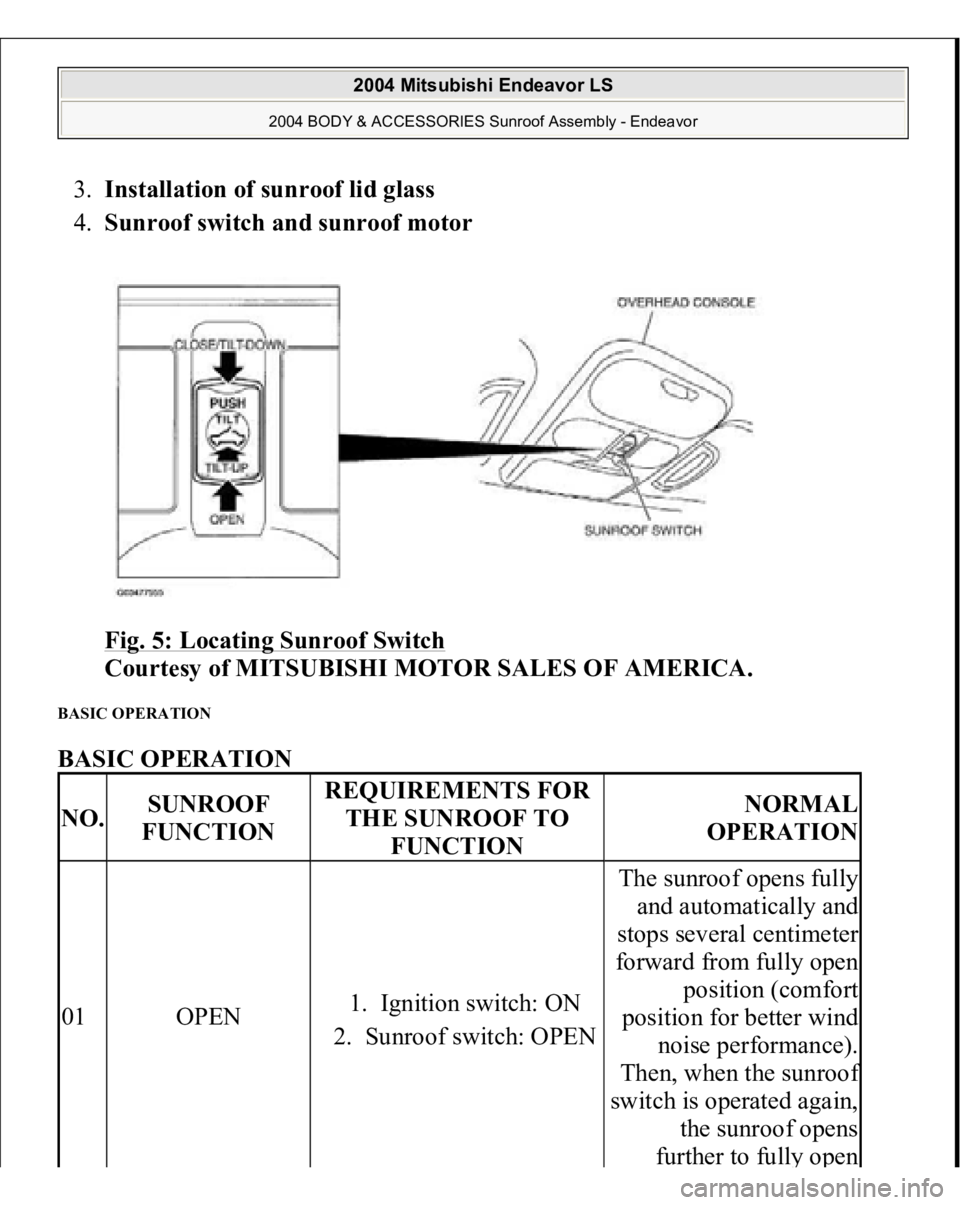
3.Installation of sunroof lid glass
4.Sunroof switch and sunroof motor
Fig. 5: Locating Sunroof Switch
Courtesy of MITSUBISHI MOTOR SALES OF AMERICA.
BASIC OPERATION BASIC OPERATION NO.
SUNROOF
FUNCTION
REQUIREMENTS FOR
THE SUNROOF TO
FUNCTION
NORMAL
OPERATION
01
OPEN
1. Ignition switch: ON
2. Sunroof switch: OPEN
The sunroof opens fully
and automatically and
stops several centimeter
forward from fully open
position (comfort
position for better wind
noise performance).
Then, when the sunroo
f
switch is operated again,
the sunroof opens
further to full
y open
2004 Mitsubishi Endeavor LS
2004 BODY & ACCESSORIES Sunroof Assembly - Endeavor
Page 3561 of 3870

position.
02
CLOSE
1. Ignition switch: ON
2. Sunroof switch:
CLOSE/TILT-DOWN
The sunroof closes while
the sunroof switch is
pushed to the
CLOSE/TILT-DOWN
position.
03
TILT-UP
1. Ignition switch: ON
2. Sunroof switch: TILT-
UP
The sunroof tilts up fully
and automatically.
04
TILT-DOWN
1. Ignition switch: ON
2. Sunroof switch:
CLOSE/TILT-DOWN
The sunroof closes while
the sunroof switch is
pushed to the
CLOSE/TILT-DOWN
position.
05
AUTOMATIC
OPERATION
INTERRUPTION
(OPEN)
A
1. Ignition switch: ON
2. Sunroof switch:
OPEN or TILT-UP
The sunroof stops the
automatic opening
operation.
B
1. Ignition switch: ON
2. Sunroof switch:
CLOSE/TILT
DOWN (Push the
sunroof switch to the
CLOSE/TILT-
DOWN position
while the sunroof is
automatically
opening and release
the switch within two
seconds)
The sunroof stops the
automatic opening
operation.
1. Ignition switch: ON
2. Sunroof switch:
CLOSE/TILT
DOWN
(Push the
The sunroof stops the
automatic o
penin
g
2004 Mitsubishi Endeavor LS
2004 BODY & ACCESSORIES Sunroof Assembly - Endeavor
Page 3562 of 3870

JAM PREVENTING MECHANISM JAM PREVENTING MECHANISM
C
sunroof switch to the
CLOSE/TILT-
DOWN position
more than two
seconds while the
sunroof is
automatically
opening)
operation, and the
sunroof closes while the
sunroof switch is pushed
to the CLOSE/TILT-
DOWN position.
06
AUTOMATIC
OPERATION
INTERRUPTION
(TILT-UP)
1. Ignition switch: ON
2. Sunroof switch: OPEN
or TILT-UP,
CLOSE/TILT DOWN
The sunroof stops the
automatic opening
operation.
NO.
SUNROOF
FUNCTION
REQUIREMENTS FOR
THE SUNROOF TO
FUNCTION
NORMAL
OPERATION
01
CLOSE
1. Ignition switch: ON
2. Sunroof switch:
CLOSE/TILT-DOWN
3. Sunroof initial position:
being closed or opened
4. If there is an object in the
sunroof opening, interrupt
the sunroof operation
before the sunroof is fully
closed.
After the sunroo
f
operation is interrupted, it
opens to the
predetermined distance
and then stops
automatically.
02
TILT-DOWN
1. Ignition switch: ON
2. Sunroof switch:
CLOSE/TILT-DOWN
3. Sunroof initial position:
bein
g tiltin
g down
The sunroof tilts up
automaticall
y after it is
2004 Mitsubishi Endeavor LS
2004 BODY & ACCESSORIES Sunroof Assembly - Endeavor
Page 3563 of 3870

SUNROOF TIMER MECHANISM In cases except the following, the basic operation and jam preventing mechanism
will be maintained for thirty seconds after the ignition switch is turned to the LOCK
(OFF) position. (Sunroof timer function)
If you open a door within that period (i.e. a door switch is on), the sunroof
timer function will be cancelled immediately. If you turn the ignition switch to the LOCK (OFF) position while the timer is
working, the sunroof will continue moving until it close fully, regardless of the
time-out period.
SUNROOF ASSEMBLY REMOVAL AND INSTALLATION
4. Interrupt the sunroof
operation before the
sunroof is fully close.
interrupted.
2004 Mitsubishi Endeavor LS
2004 BODY & ACCESSORIES Sunroof Assembly - Endeavor
Page 3564 of 3870

2004 Mitsubishi Endeavor LS
2004 BODY & ACCESSORIES Sunroof Assembly - Endeavor
Page 3565 of 3870

Fig. 6: Removing/Installing Sunroof Assembly
Courtesy of MITSUBISHI MOTOR SALES OF AMERICA.
Required Special Tool:
MB991223: Harness set
REMOVAL SERVICE POINT << A >> FRONT DRAIN PIPE/REAR DRAIN PIPE REMOVAL Tie a cord to the end of the drain pipe, and wind tape around it so that there is no
unevenness. Then pull the drain pipe out to the wheel house side.
Fig. 7: Removing Drain Pipe And Cord
Courtesy of MITSUBISHI MOTOR SALES OF AMERICA.
INSTALLATION SERVICE POINT
2004 Mitsubishi Endeavor LS
2004 BODY & ACCESSORIES Sunroof Assembly - Endeavor
Page 3566 of 3870

>>A<< FRONT DRAIN PIPE/REAR DRAIN PIPE INSTALLATION1. Tie the cord that was used during removal to the end of the drain pipe, and
wind tape around it so that there is no unevenness.
2. Pull the cord to pass through the drain pipe.
Fig. 8: Pulling Cord Through Drain Pipe
Courtesy of MITSUBISHI MOTOR SALES OF AMERICA.
3. Install the grommet, and then position the drain pipe so that it protrudes from
the grommet as shown in the illustration.
2004 Mitsubishi Endeavor LS
2004 BODY & ACCESSORIES Sunroof Assembly - Endeavor
Page 3567 of 3870

Fig. 9: Identifying Groomet
Courtesy of MITSUBISHI MOTOR SALES OF AMERICA.
INSPECTION SUNROOF SWITCH CONTINUITY CHECK SUNROOF SWITCH CONTINUITY CHECK SWITCH
POSITION
TESTER
CONNECTION
SPECIFIED
CONDITION
Open
4-5
Less than 2 ohms
Off
3-4,3-5,3-6, 4-5,4-6,5-6
Open circuit
Tilt-up
3-4
Less than 2 ohms
Close/Tilt-down
4-6
Less than 2 ohms
2004 Mitsubishi Endeavor LS
2004 BODY & ACCESSORIES Sunroof Assembly - Endeavor