sunroof MITSUBISHI ENDEAVOR 2004 Service Repair Manual
[x] Cancel search | Manufacturer: MITSUBISHI, Model Year: 2004, Model line: ENDEAVOR, Model: MITSUBISHI ENDEAVOR 2004Pages: 3870, PDF Size: 98.47 MB
Page 1095 of 3870

MOTORS MOTORS LOCATION SENDING UNITS & SENSORS SENDING UNITS & SENSORS LOCATION
4 .
Power Window Main Switch CPU
Integral to power window main switch.
See Fig. 15
.
SRS ECU
Under front of center console.Fig. 14
.
Sunroof ECU
At front of sunroof opening.Fig. 13
.
Component
Location
Door Lock Actuator (Left Front) (E-
20)
Rear of left front door.Fig. 77
.
Door Lock Actuator (Left Rear) (E-13)
Rear of left rear door.Fig. 77
.
Door Lock Actuator (Right Front) (E-
03)
Rear of right front door.Fig. 77
.
Door Lock Actuator (Right Rear) (E-
07)
Rear of right rear door.Fig. 77
.
Fuel Pump Module
In top of fuel tank.Fig. 64
.
Liftgate Actuator (F-11)
Lower center of liftgate. See Fig. 88
.
Power Steering Oil Pump
Lower right side of engine
compartment. See Fig. 36
.
Rear Blower Motor (C-20)
Rear of center console.Fig. 76
.
Rear Washer Motor (A-26)
In washer tank assembly.Fig. 79
.
Sunroof Motor Assembly
Right front of roof. See Fig. 62
.
Windshield Washer Motor (A-27)
In washer tank assembly.Fig. 79
.
Windshield Wiper Motor (A-03)
On left side of firewall.Fig. 79
.
Component
Location
ABS G Sensor Or G & Yaw Rate
Sensor
Under center console. See Fig. 67
.
Acceleration Pedal Position
Above accelerator pedal.Fig. 59
.
2004 Mitsubishi Endeavor LS
2004 MITSUBISHI Endeavor
Page 1992 of 3870
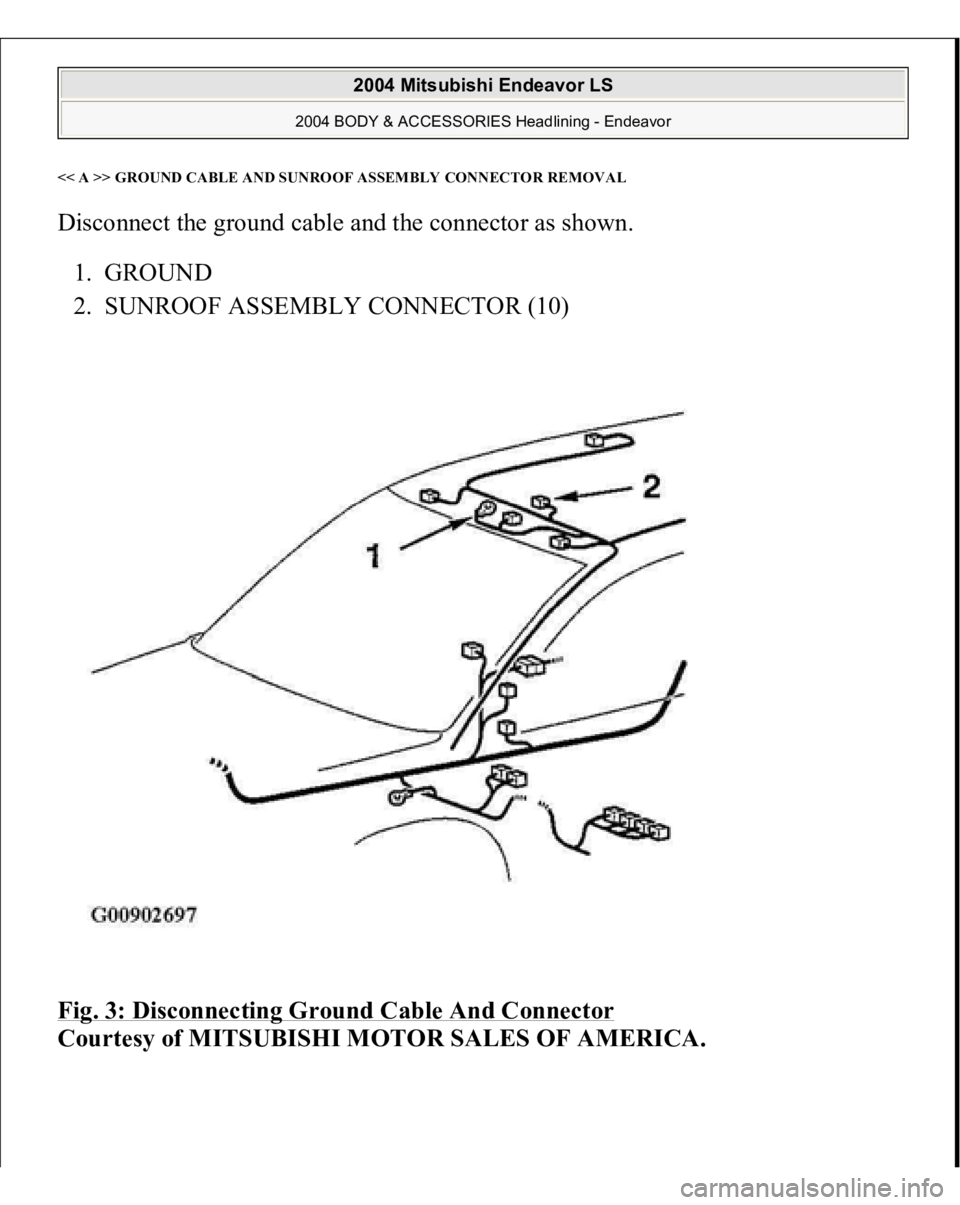
<< A >> GROUND CABLE AND SUNROOF ASSEMBLY CONNECTO
RREMOVA
L
Disconnect the ground cable and the connector as shown.
1. GROUND
2. SUNROOF ASSEMBLY CONNECTOR (10)
Fig. 3: Disconnecting Ground Cable And Connector
Courtes
y of MITSUBISHI MOTOR SALES OF AMERICA
.
2004 Mitsubishi Endeavor LS
2004 BODY & ACCESSORIES Headlining - Endeavor
Page 3553 of 3870
2004 BODY & ACCESSORIES
Sunroof Assembly - Endeavor
GENERAL DESCRIPTION A motor-driven inner slide-type glass sunroof with a tilt-up mechanism is adopted
in some models as a standard or optional equipment. Even when the sunroof is fully
closed, a sufficient amount of lighting and a feeling of openness can still be
obtained by opening the sunroof sunshade. SUNROOF ASSEMBLY The sunroof system is controlled by the Simplified Wiring System (SWS). Refer to
SYMPTOM CHART
.
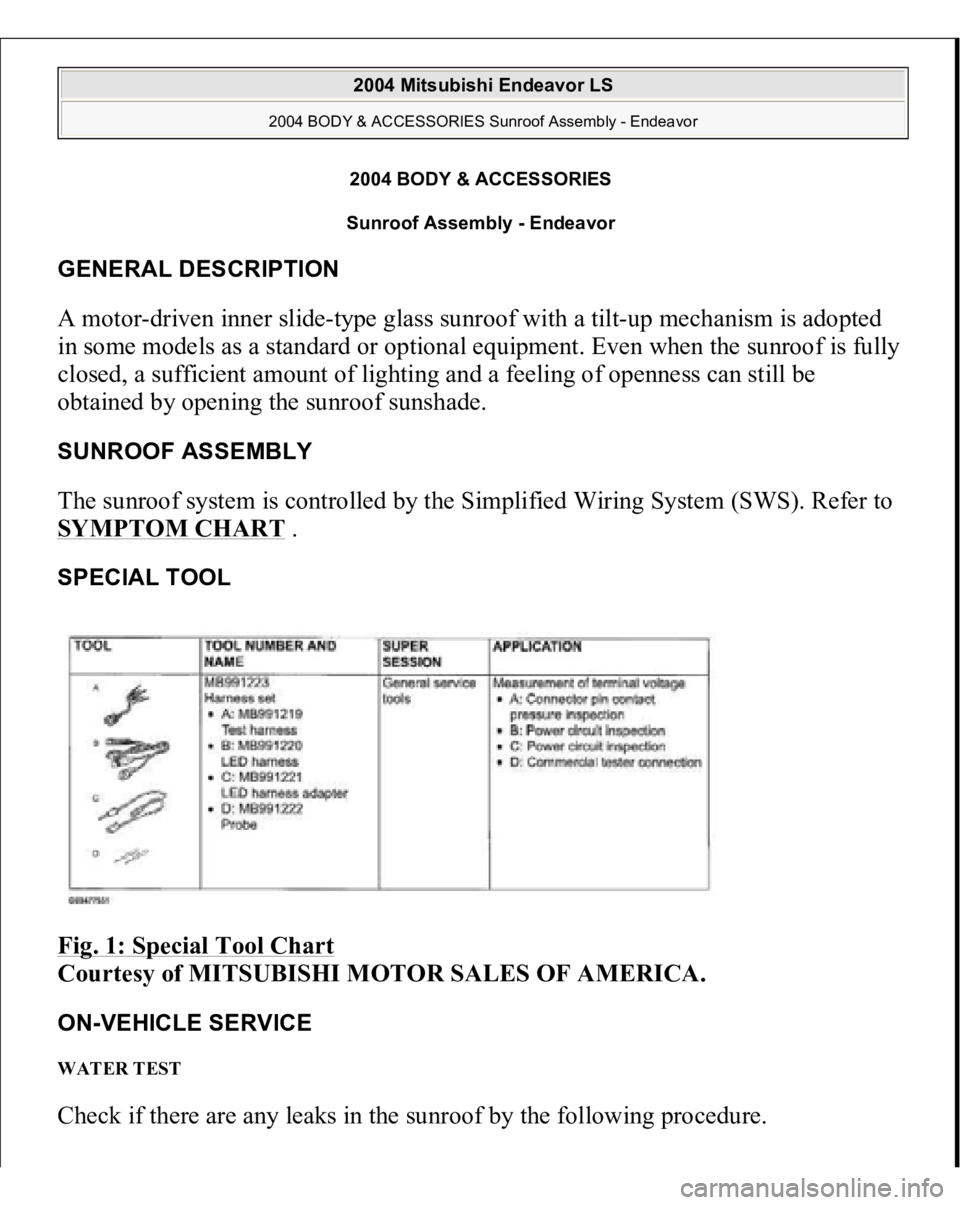
SPECIAL TOOL Fig. 1: Special Tool Chart
Courtesy of MITSUBISHI MOTOR SALES OF AMERICA.
ON-VEHICLE SERVICE WATER TEST Check if there are an
y leaks in the sunroof b
y the followin
g procedure.
2004 Mitsubishi Endeavor LS
2004 BODY & ACCESSORIES Sunroof Assembly - Endeavor
2004 Mitsubishi Endeavor LS
2004 BODY & ACCESSORIES Sunroof Assembly - Endeavor
Page 3554 of 3870
1. Fully close the roof lid glass.
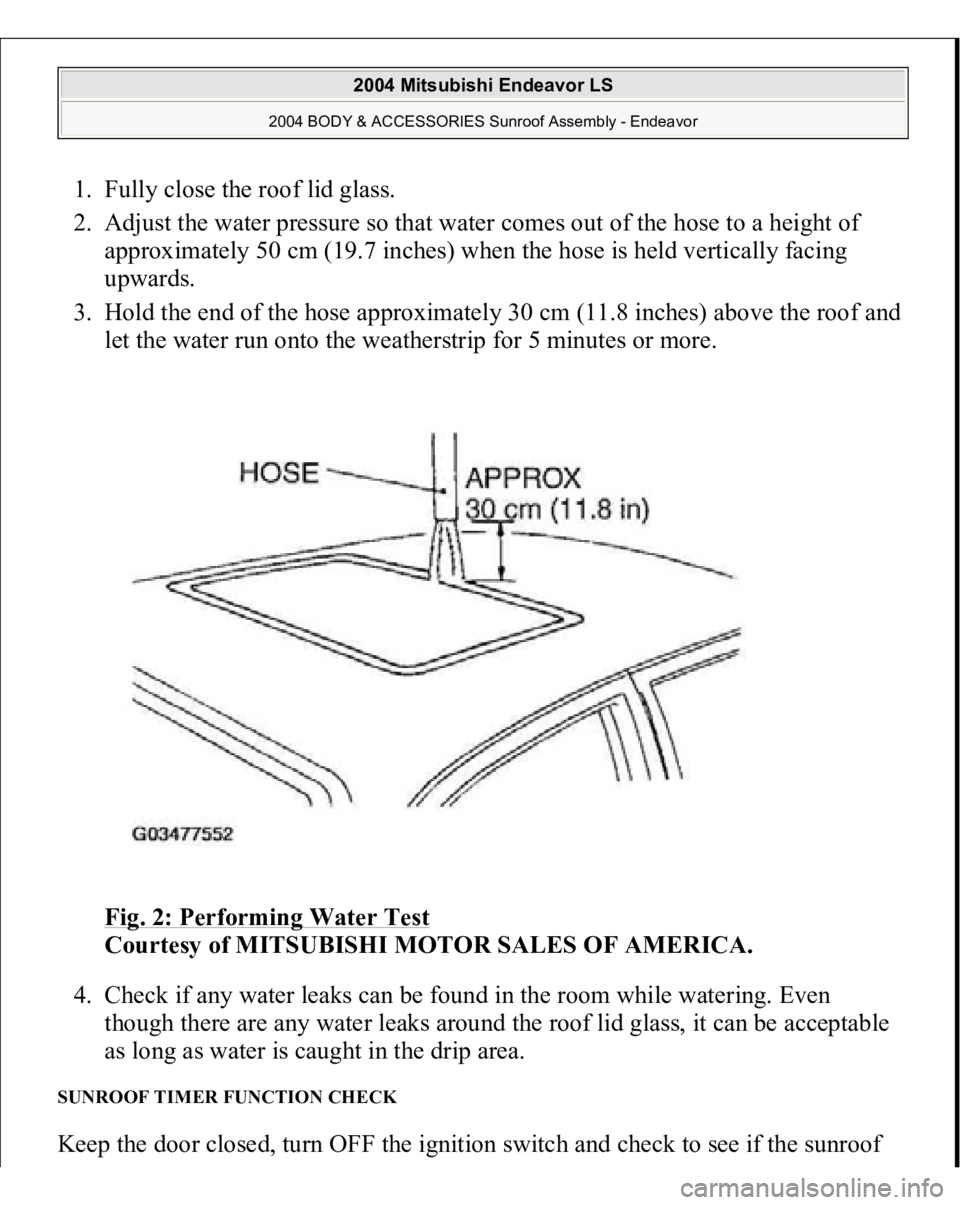
2. Adjust the water pressure so that water comes out of the hose to a height of
approximately 50 cm (19.7 inches) when the hose is held vertically facing
upwards.
3. Hold the end of the hose approximately 30 cm (11.8 inches) above the roof and
let the water run onto the weatherstrip for 5 minutes or more.
Fig. 2: Performing Water Test
Courtesy of MITSUBISHI MOTOR SALES OF AMERICA.
4. Check if any water leaks can be found in the room while watering. Even
though there are any water leaks around the roof lid glass, it can be acceptable
as long as water is caught in the drip area.
SUNROOF TIMER FUNCTION CHECK Keep the door closed, turn OFF the ignition switch and check to see if the sunroof
2004 Mitsubishi Endeavor LS
2004 BODY & ACCESSORIES Sunroof Assembly - Endeavor
Page 3555 of 3870
can be operated for 30 seconds after that. If not, perform troubleshooting (Refer to
SYMPTOM CHART
).
SUNROOF FIT ADJUSTMENT 1. Fully close the roof lid glass.
2. Fully open the sunshade.
3. Loosen the roof lid glass assembly mounting screws. Align the roof lid glass
by moving it backward, forward, up or down along the guide oblong hole so
that the clearance between the
glass and the vehicle bod
y is even.
2004 Mitsubishi Endeavor LS
2004 BODY & ACCESSORIES Sunroof Assembly - Endeavor
Page 3556 of 3870
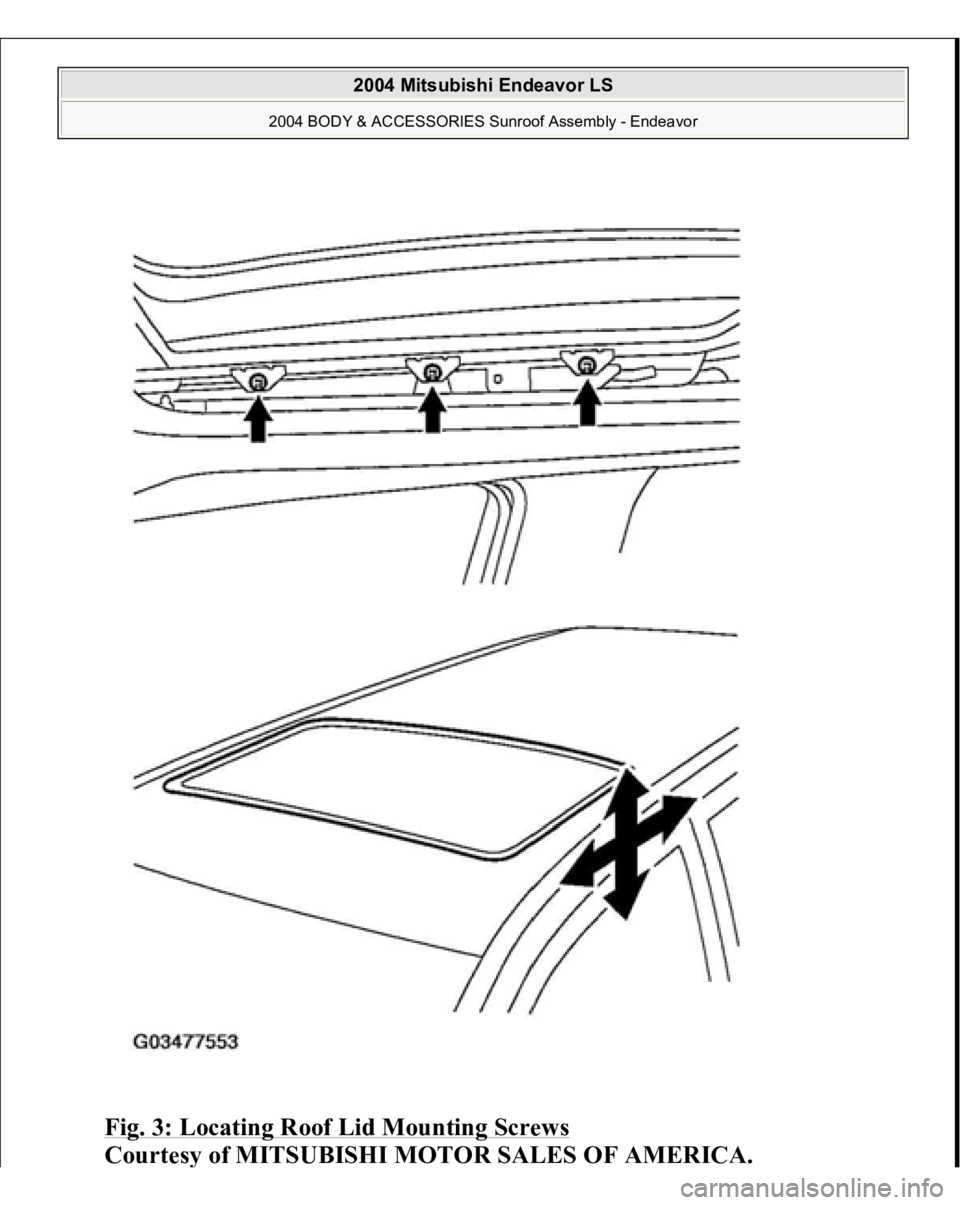
Fig. 3: Locating Roof Lid Mounting Screws
Courtes
y of MITSUBISHI MOTOR SALES OF AMERICA
.
2004 Mitsubishi Endeavor LS
2004 BODY & ACCESSORIES Sunroof Assembly - Endeavor
Page 3557 of 3870
4. Check to be sure that the roof lid glass is flush with the roof panel at corner
areas.
5. Check to be sure that the sunroof operates smoothly. SUNROOF SAFETY FUNCTION CHECK 1. Close the roof lid glass by applying an approximately 10mm (0.39 inch)
thickness solid object placed at a right angle to the roof lid glass.
2. Check to see if the roof lid glass opens after the motor turns when the roof lid
glass catches the object (Refer to SYMPTOM CHART
).
SUNROOF CHECK Check to see that the sunroof operates by pressing the sunroof switch. Perform
troubleshooting if operations malfunction (Refer to SYMPTOM CHART
).
ROOF LID GLASS OPERATION CURRENT CHECK 1. Remove the fuse of the sunroof, then connect the circuit tester as shown.
2004 Mitsubishi Endeavor LS
2004 BODY & ACCESSORIES Sunroof Assembly - Endeavor
Page 3558 of 3870
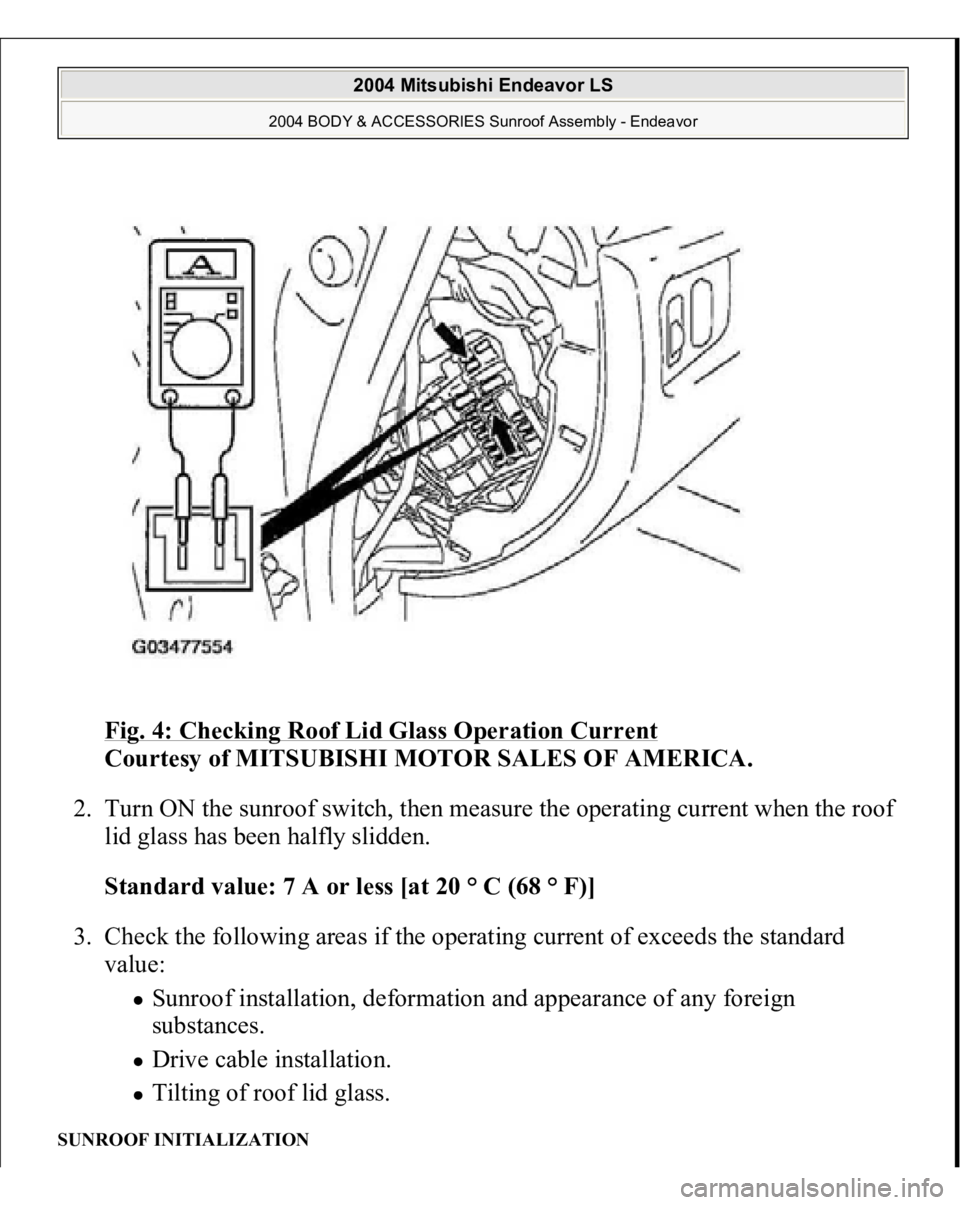
Fig. 4: Checking Roof Lid Glass Operation Current
Courtesy of MITSUBISHI MOTOR SALES OF AMERICA.
2. Turn ON the sunroof switch, then measure the operating current when the roof
lid glass has been halfly slidden.
Standard value: 7 A or less [at 20 ° C (68 ° F)]
3. Check the following areas if the operating current of exceeds the standard
value:
Sunroof installation, deformation and appearance of any foreign
substances. Drive cable installation. Tilting of roof lid glass.
SUNROOF INITIALIZATION
2004 Mitsubishi Endeavor LS
2004 BODY & ACCESSORIES Sunroof Assembly - Endeavor
Page 3559 of 3870
The sunroof should be initialized when any of the following components are
replaced, the sunroof position is miss timed, the sunroof is in learn mode.
Roof lid glass assembly Sunroof motor Sunroof-ECU
1. Ensure the components are correctly assembled. Ensure all the connectors are
connected securely.
2. If the sunroof is already in learn mode, go to step 3. If the sunroof is not in
learn mode, enter learn mode by i or ii.
i. Disconnect the sunroof-ECU connector while the sunroof is operating.
ii. Activate the jam preventing mechanism five times continuously.
3. Press the sunroof Close switch repeatedly until the sunroof is tilted up fully.
4. Press and hold the sunroof Close switch for at least three seconds.
5. Press the sunroof Close switch until the sunroof closes fully.
6. Press the sunroof Open switch until the sunroof opens fully. Then press the
sunroof Close switch until the sunroof closes fully. The sunroof should work
normally.
OPERATION CHECK Check that the following items. If faulty, replace the sunroof-ECU.
1.Installation condition of the sunroof assembly
2.Installation condition, deformation and contamination of the sunroof drive
cable NOTE: Do not stop the sunroof before it reaches the fully open or
fully closed position during operations in steps 5 and 6
above. If the sunroof has stopped accidentally, repeat the
procedure from step 1 .
CAUTION: Check that the following items are normal before
carrying out this operation check.
2004 Mitsubishi Endeavor LS
2004 BODY & ACCESSORIES Sunroof Assembly - Endeavor
Page 3560 of 3870
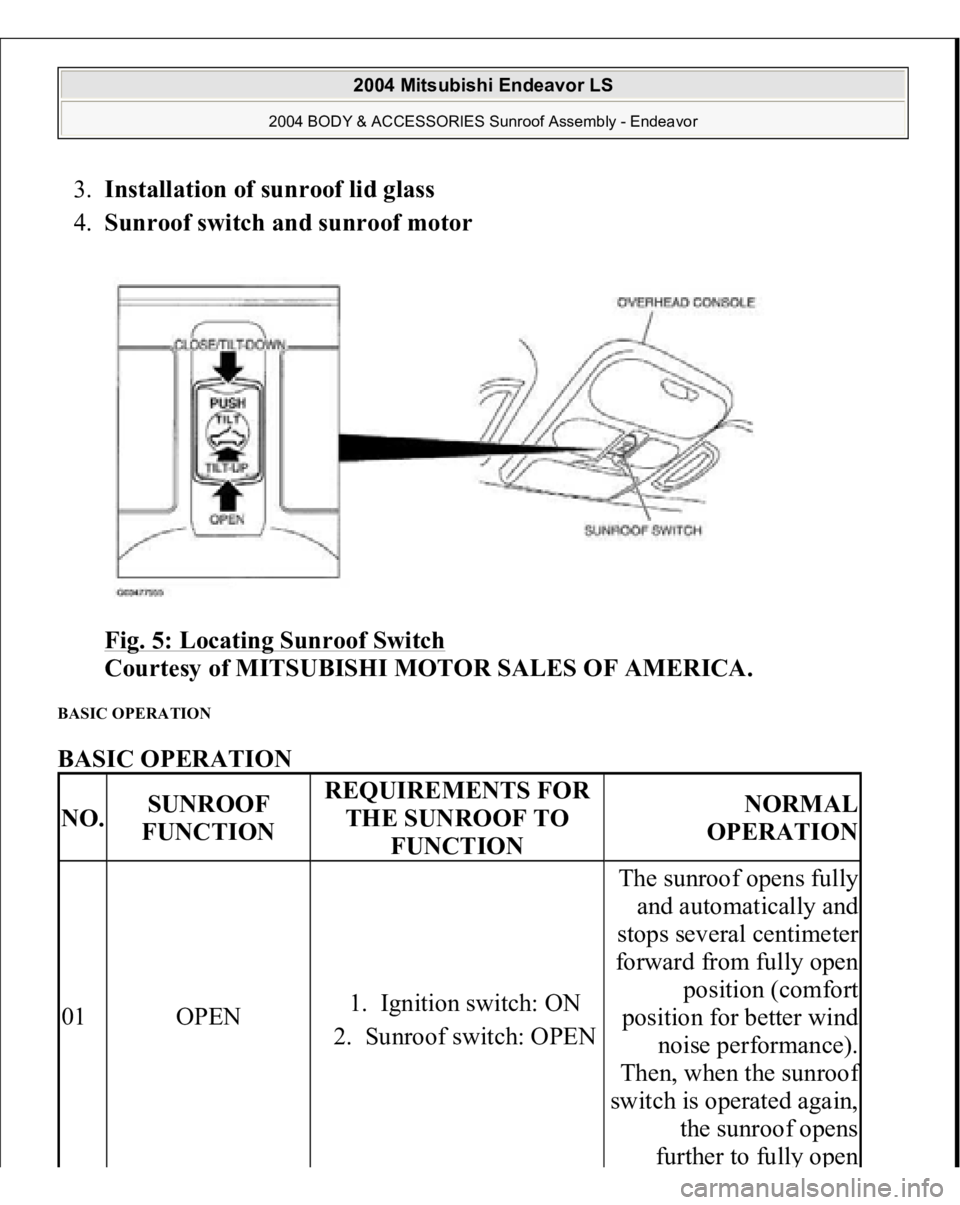
3.Installation of sunroof lid glass
4.Sunroof switch and sunroof motor
Fig. 5: Locating Sunroof Switch
Courtesy of MITSUBISHI MOTOR SALES OF AMERICA.
BASIC OPERATION BASIC OPERATION NO.
SUNROOF
FUNCTION
REQUIREMENTS FOR
THE SUNROOF TO
FUNCTION
NORMAL
OPERATION
01
OPEN
1. Ignition switch: ON
2. Sunroof switch: OPEN
The sunroof opens fully
and automatically and
stops several centimeter
forward from fully open
position (comfort
position for better wind
noise performance).
Then, when the sunroo
f
switch is operated again,
the sunroof opens
further to full
y open
2004 Mitsubishi Endeavor LS
2004 BODY & ACCESSORIES Sunroof Assembly - Endeavor