suspension MITSUBISHI ENDEAVOR 2004 Service Repair Manual
[x] Cancel search | Manufacturer: MITSUBISHI, Model Year: 2004, Model line: ENDEAVOR, Model: MITSUBISHI ENDEAVOR 2004Pages: 3870, PDF Size: 98.47 MB
Page 3 of 3870
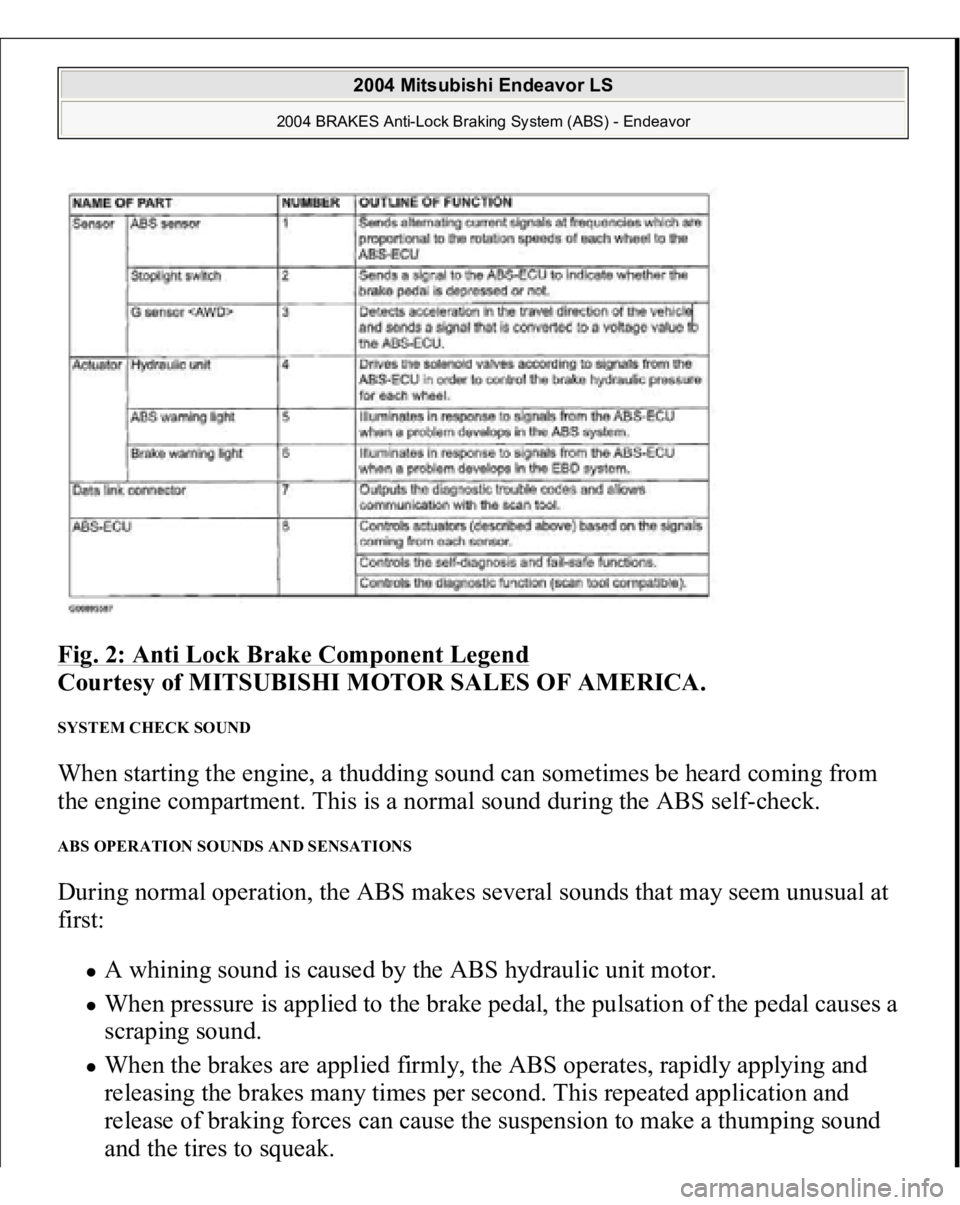
Fig. 2: Anti Lock Brake Component Legend
Courtesy of MITSUBISHI MOTOR SALES OF AMERICA.
SYSTEM CHECK SOUND When starting the engine, a thudding sound can sometimes be heard coming from
the engine compartment. This is a normal sound during the ABS self-check. ABS OPERATION SOUNDS AND SENSATIONS During normal operation, the ABS makes several sounds that may seem unusual at
first:
A whining sound is caused by the ABS hydraulic unit motor. When pressure is applied to the brake pedal, the pulsation of the pedal causes a
scraping sound. When the brakes are applied firmly, the ABS operates, rapidly applying and
releasing the brakes many times per second. This repeated application and
release of braking forces can cause the suspension to make a thumping sound
and the tires to s
queak.
2004 Mitsubishi Endeavor LS
2004 BRAKES Anti-Lock Braking System (ABS) - Endeavor
Page 252 of 3870
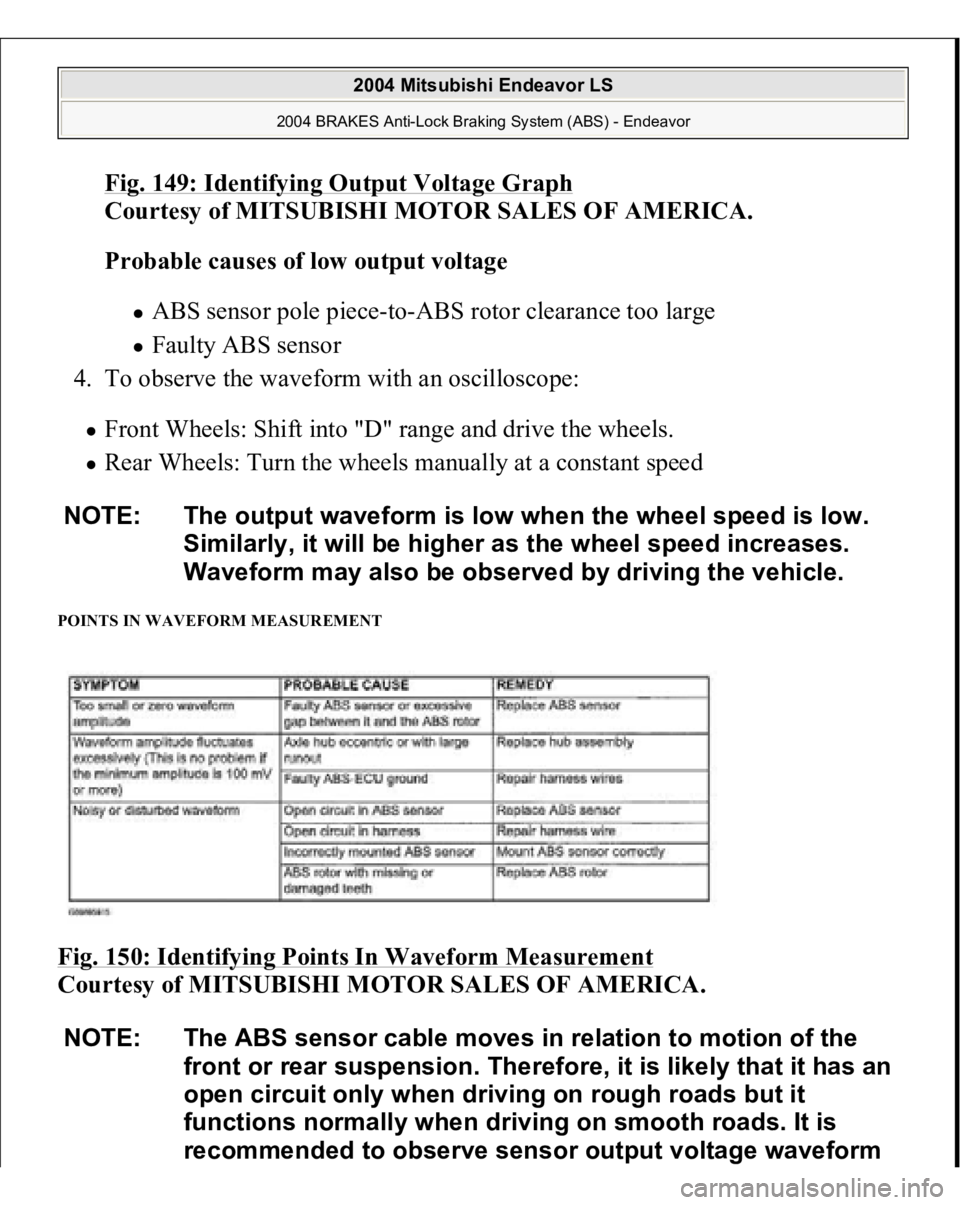
Fig. 149: Identifying Output Voltage Grap
h
Courtesy of MITSUBISHI MOTOR SALES OF AMERICA.
Probable causes of low output voltage
ABS sensor pole piece-to-ABS rotor clearance too large Faulty ABS sensor
4. To observe the waveform with an oscilloscope:
Front Wheels: Shift into "D" range and drive the wheels. Rear Wheels: Turn the wheels manually at a constant speed
POINTS IN WAVEFORM MEASUREMENT Fig. 150: Identifying Points In Waveform Measurement
Courtesy of MITSUBISHI MOTOR SALES OF AMERICA. NOTE: The output waveform is low when the wheel speed is low.
Similarly, it will be higher as the wheel speed increases.
Waveform may also be observed by driving the vehicle.
NOTE: The ABS sensor cable moves in relation to motion of the
front or rear suspension. Therefore, it is likely that it has an
open circuit only when driving on rough roads but it
functions normally when driving on smooth roads. It is
recommended to observe sensor output voltage waveform
2004 Mitsubishi Endeavor LS
2004 BRAKES Anti-Lock Braking System (ABS) - Endeavor
Page 1877 of 3870
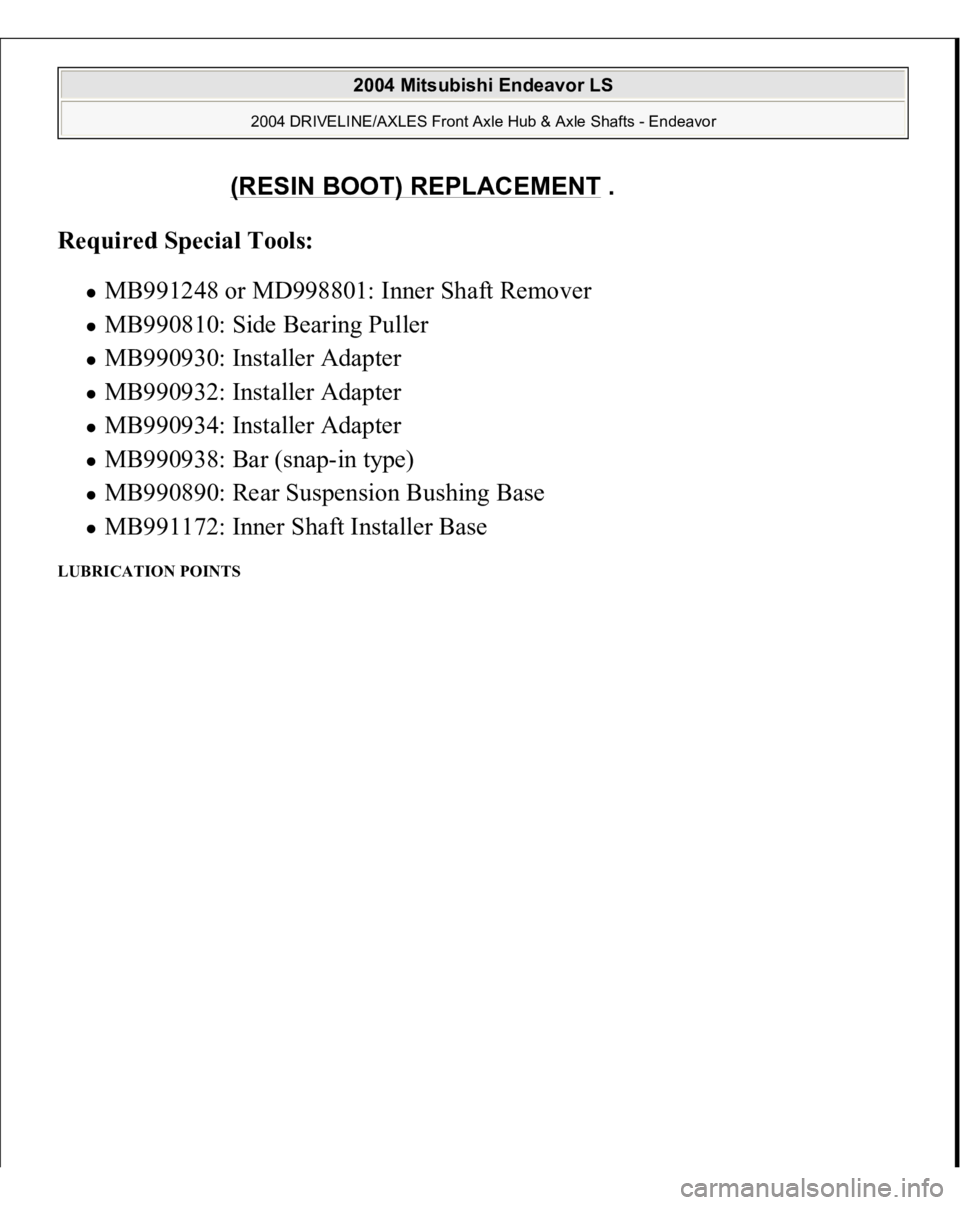
Required Special Tools:
MB991248 or MD998801: Inner Shaft Remover MB990810: Side Bearing Puller MB990930: Installer Adapter MB990932: Installer Adapter MB990934: Installer Adapter MB990938: Bar (snap-in type) MB990890: Rear Suspension Bushing Base MB991172: Inner Shaft Installer Base
LUBRICATION POINTS
(RESIN BOOT) REPLACEMENT
.
2004 Mitsubishi Endeavor LS
2004 DRIVELINE/AXLES Front Axle Hub & Axle Shafts - Endeavor
Page 1934 of 3870
the direction of the spline chamfered side. See Fig. 13
.
C. Using Bar (Snap-In Type) (MB990938) and Installer Adapter (MB990932),
press-fit the center bearing into the center bearing bracket. See Fig. 18
.
D. Apply the specified great (from the repair kit) to the rear surface of all dust
seals. Using Rear Suspension Bushing Base (MB990890), Bar (Snap-In type)
(MB990838), and Installer Adapter (MB990934), press the dust seals into the
center bearing bracket until they are flush with each other. See Fig. 19 . Apply
repair kit grease to the lip of each dust seal.
E. Using Inner Shaft Installer Base (MB991172), hold the center bearing inner
race, and then press-in the inner shaft. See Fig. 20
. Apply repair kit grease to
the inner shaft spline, then press-fit it into the PTJ case.
F. After applying the specified grease to the PTJ case, insert the axle shaft and
apply grease again.
G. Set the PTJ boot bands at the specified distance to adjust the amount of air
inside the PTJ joint, and then tighten the small and large PTJ boot bands. See
Fi
g. 12
. CAUTION: When applying grease, make sure that it does not
adhere to anything outside the lip.
NOTE: When press-fitting the inner shaft into the PTJ case,
apply a thin coat of repair kit grease to the dust seal
outer lip part and the outside edge of the PTJ axial part.
CAUTION: The axle shaft joint uses special grease. DO NOT
mix old, new, or different types of grease.
NOTE: The grease in the repair kit should be divided in half for
use, respectively, at the joint and inside the boot.
2004 Mitsubishi Endeavor LS
2004 DRIVE AXLES Axle Shafts - Front - Endeavor
Page 1938 of 3870
2004 SUSPENSION
Front - Endeavor
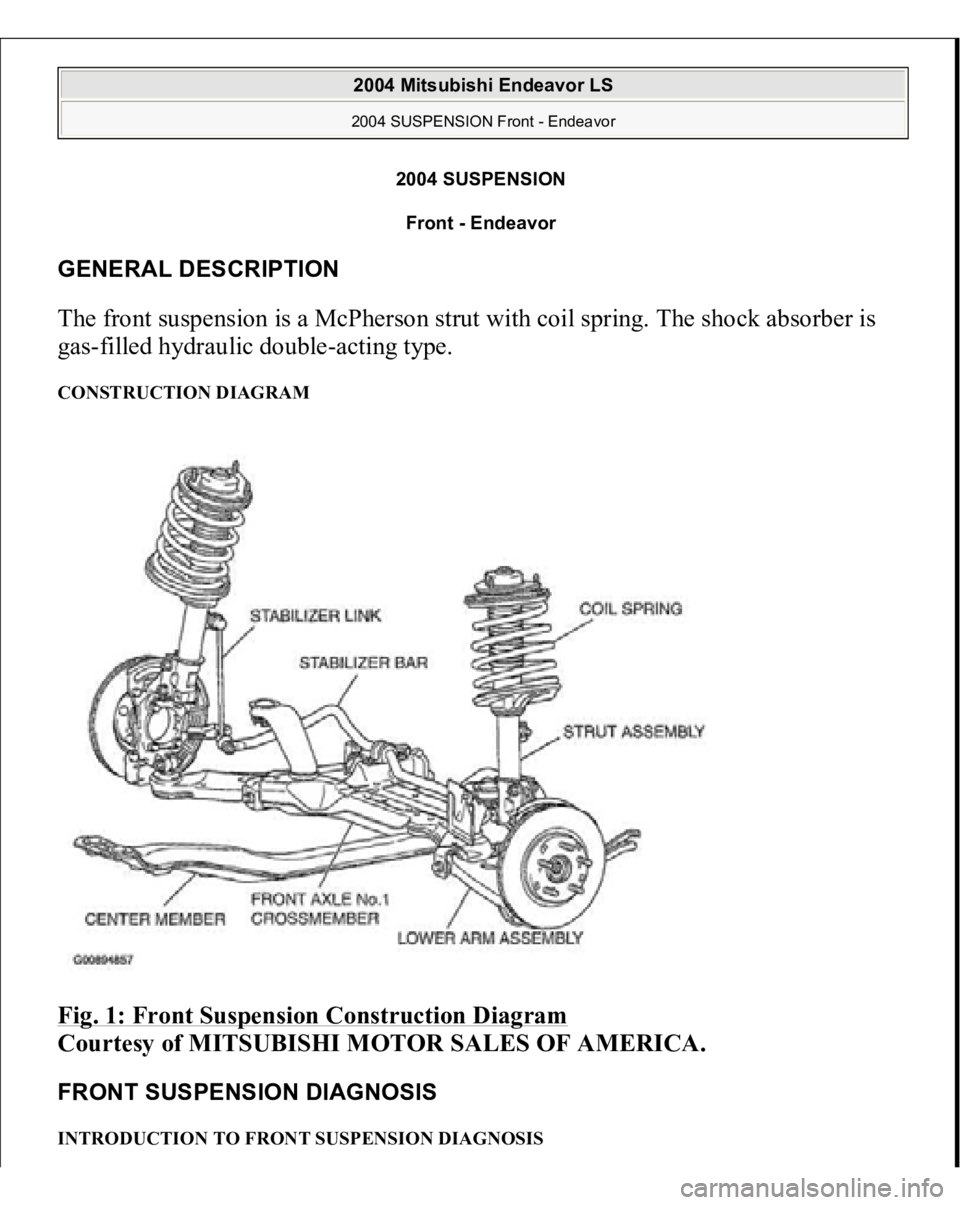
GENERAL DESCRIPTION The front suspension is a McPherson strut with coil spring. The shock absorber is
gas-filled hydraulic double-acting type. CONSTRUCTION DIAGRAM Fig. 1: Front Suspension Construction Diagram
Courtesy of MITSUBISHI MOTOR SALES OF AMERICA.
FRONT SUSPENSION DIAGNOSIS INTRODUCTION TO FRONT SUSPENSION DIAGNOSIS
2004 Mitsubishi Endeavor LS 2004 SUSPENSION Front - Endeavor
2004 Mitsubishi Endeavor LS 2004 SUSPENSION Front - Endeavor
Page 1939 of 3870
If the front suspension is faulty, the vehicle will not run straightforward or noise
will occur. Incorrect wheel alignment, malfunction of strut assembly, stabilizer bar,
coil spring, or worn or out-of-balance tires can cause these problems. FRONT SUSPENSION DIAGNOSIS TROUBLESHOOTING STRATEGY Use these steps to plan your diagnostic strategy. If you follow them carefully, you
will be sure that you have exhausted most of the possible ways to find a front
suspension fault.
1. Gather information from the customer.
2. Verify that the condition described by the customer exists.
3. Find and repair the malfunction by following the Symptom Chart and
Symptom Procedures.
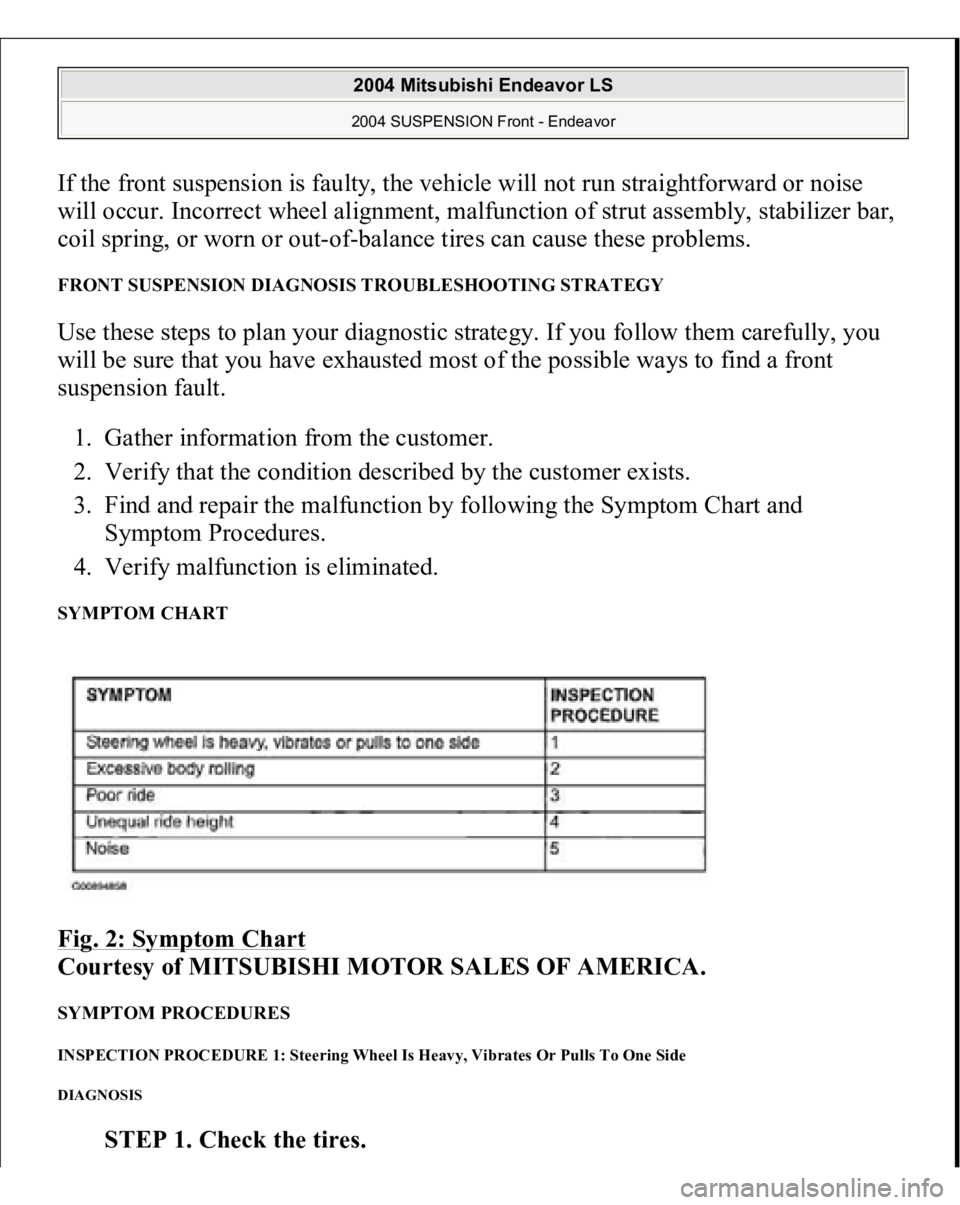
4. Verify malfunction is eliminated. SYMPTOM CHART Fig. 2: Symptom Chart
Courtesy of MITSUBISHI MOTOR SALES OF AMERICA.
SYMPTOM PROCEDURES INSPECTION PROCEDURE 1: Steering Wheel Is Heavy, Vibrates Or Pulls To One Side DIAGNOSIS
STEP 1. Check the tires.
2004 Mitsubishi Endeavor LS 2004 SUSPENSION Front - Endeavor
Page 1940 of 3870
Q: Are the tires in normal condition?
YES: Go to Step 2.
NO: If out of balance, balance the tires as necessary. If excessively worn,
replace the tires as necessary and go to Step 5 .
STEP 2. Check the wheel alignment.
Refer to ON
-VEHICLE SERVICE
.
Q: Is the wheel alignment correct?
YES: Go to Step 3.
NO: Adjust it, then go to Step 5 .
STEP 3. Check the lower arm ball joint.
Q: Is the ball joint in good condition?
YES: Go to Step 4.
NO: Replace the lower arm assembly, then go to Step 5 .
STEP 4. Check the coil spring.
Q: Is the coil spring in good condition?
YES: Go to Step 5.
NO: Replace it, then go to Step 5.
STEP 5. Retest the system.
Q: Is the malfunction eliminated?
YES: The procedure is complete.
NO: Return to Step 1 .
INSPECTION PROCEDURE 2: Excessive Body Rolling DIAGNOSIS
STEP 1. Check for broken or deteriorated stabilizer bar
.
2004 Mitsubishi Endeavor LS 2004 SUSPENSION Front - Endeavor
Page 1941 of 3870
Q: Is the stabilizer bar in good condition?
YES: Go to Step 2.
NO: Replace it, then go to Step 3 .
STEP 2. Check the strut assembly for damage.
Q: Is the strut assembly in good condition?
YES: Go to Step 3.
NO: Replace it, then go to Step 3.
STEP 3. Retest the system.
Q: Is the malfunction eliminated?
YES: The procedure is complete.
NO: Return to Step 1 .
INSPECTION PROCEDURE 3: Poor Ride DIAGNOSIS
STEP 1. Check for improper tire inflation pressure.
Q: Is the tire inflation correct?
YES: Go to Step 2.
NO: Adjust it, then go to Step 4 .
STEP 2. Check for broken or deteriorated coil spring(s).
Q: Are the coil spring(s) broken or deteriorated?
YES: Replace the coil spring(s), then go to Step 4 .
NO: Go to Step 3.
STEP 3. Check for strut assembly damage.
Q: Is the strut assembly damaged?
2004 Mitsubishi Endeavor LS 2004 SUSPENSION Front - Endeavor
Page 1942 of 3870
YES: Replace it, then go to Step 4.
NO: Go to Step 4.
STEP 4. Retest the system.
Q: Is the malfunction eliminated?
YES: The procedure is complete.
NO: Return to Step 1 .
INSPECTION PROCEDURE 4: Unequal Ride Height DIAGNOSIS
STEP 1. Check for broken or deteriorated coil spring(s).
Q: Is the coil spring(s) broken or deteriorated?
YES: Replace it, then go to Step 2.
NO: Go to Step 2.
STEP 2. Retest the system.
Q: Is the malfunction eliminated?
YES: The procedure is complete.
NO: Return to Step 1
INSPECTION PROCEDURE 5: Noise DIAGNOSIS
STEP 1. Check for lack of lubrication.
Q: Is lubrication inadequate?
YES: Lubricate it, then go to Step 5 .
NO: Go to Step 2.
STEP 2. Check the ti
ghtened
parts for looseness as well as the bushin
gs for
wear.
2004 Mitsubishi Endeavor LS 2004 SUSPENSION Front - Endeavor
Page 1943 of 3870
Q: Are the tightened parts and bushings in good condition?
YES: Go to Step 3.
NO: Replace it, then go to Step 5 .
STEP 3. Check for broken coil spring.
Q: Is the coil spring broken?
YES: Replace it, then go to Step 5 .
NO: Go to Step 4.
STEP 4. Check for strut assembly damage.
Q: Is the strut assembly damaged?
YES: Replace it, then go to Step 5.
NO: Go to Step 5.
STEP 5. Retest the system.
Q: Is the malfunction eliminated?
YES: The procedure is complete.
NO: Return to Step 1 .
SPECIAL TOOLS
2004 Mitsubishi Endeavor LS 2004 SUSPENSION Front - Endeavor