MITSUBISHI iMiEV 2013 Owner's Manual (in English)
Manufacturer: MITSUBISHI, Model Year: 2013, Model line: iMiEV, Model: MITSUBISHI iMiEV 2013Pages: 258, PDF Size: 13 MB
Page 141 of 258
CAUTION
l
Before driving and after travelling a
short distance, always check the load to
make sure it is securely fastened to the
roof carrier.
Check periodically during your travel
that the load remains secure.
NOTE l To
prevent wind noise, remove the roof carri-
er when not in use.
l Remove the roof carrier before using an auto-
matic car wash.
l Be sure that adequate clearance is main-
tained for raising the tailgate when installing
a roof carrier. Trailer towing
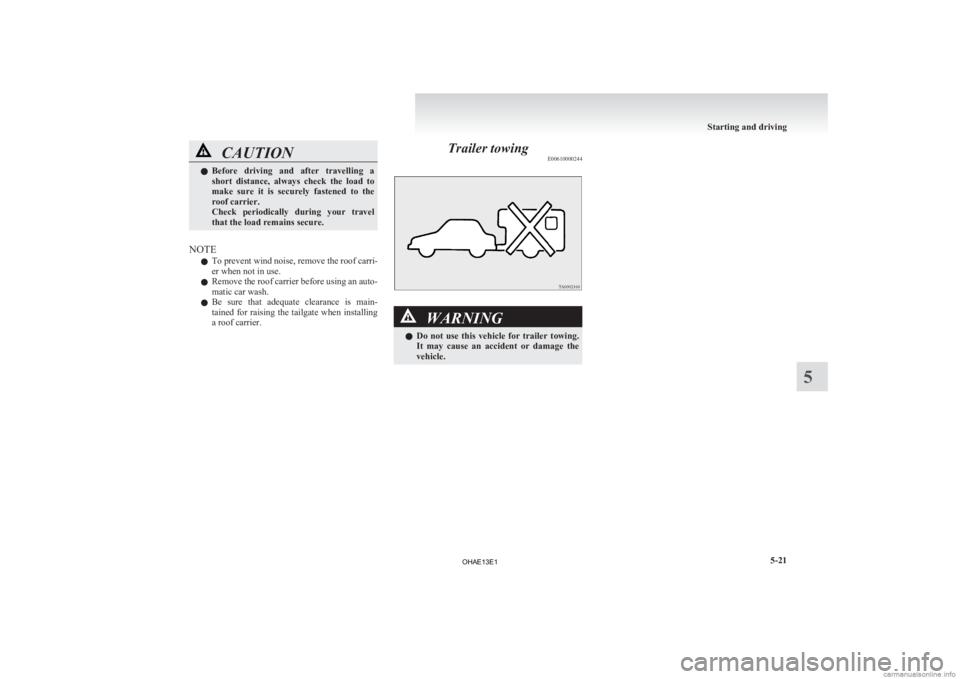
E00610000244 WARNING
l Do
not use this vehicle for trailer towing.
It may cause an accident or damage the
vehicle. Starting and driving
5-21 5
OHAE13E1
Page 142 of 258

OHAE13E1
Page 143 of 258
Ventilators
.................................................................................... 6-02
Air conditioning ............................................................................ 6-03
Important operation tips for the air conditioning
..........................6-09
Air purifier.................................................................................... 6-09
Remote Climate Control ............................................................... 6-10
LW/MW/FM electronic tuning radio with CD player* ................6-10
To play tracks from USB device* ................................................6-20
Error codes.................................................................................... 6-26
Error codes (iPod)......................................................................... 6-27
Error codes (USB memory device) ..............................................6-28
Handling of compact discs ........................................................... 6-29
Antenna......................................................................................... 6-30
Digital clock* ............................................................................... 6-31
Link System* ................................................................................ 6-33
USB input terminal* ..................................................................... 6-33
Sun visors..................................................................................... 6-35
Accessory socket.......................................................................... 6-36
Interior lamps ................................................................................ 6-37
Storage spaces...............................................................................6-39
Cup holder.................................................................................... 6-40
Assist grips................................................................................... 6-41For pleasant driving
6
OHAE13E1
Page 144 of 258
Ventilators
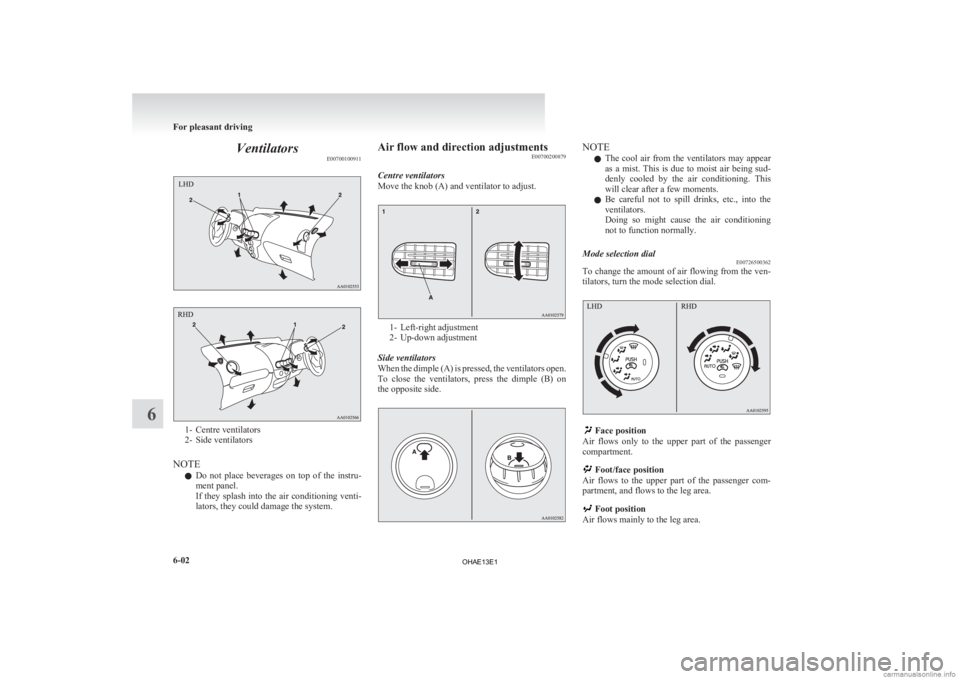
E007001009111- Centre ventilators
2-
Side ventilators
NOTE l Do not place beverages on top of the instru-
ment panel.
If they splash into the air conditioning venti-
lators, they could damage the system. Air flow and direction adjustments
E00700200879
Centre ventilators
Move the knob (A) and ventilator to adjust. 1- Left-right adjustment
2-
Up-down adjustment
Side ventilators
When the dimple (A) is pressed, the ventilators open.
To close the ventilators, press the dimple (B) on
the opposite side. NOTE
l The
cool air from the ventilators may appear
as a mist. This is due to moist air being sud-
denly cooled by the air conditioning. This
will clear after a few moments.
l Be careful not to spill drinks, etc., into the
ventilators.
Doing so might cause the air conditioning
not to function normally.
Mode selection dial E00726500362
To change the amount of air flowing from the ven-
tilators, turn the mode selection dial. Face position
Air
flows only to the upper part of the passenger
compartment. Foot/face position
Air
flows to the upper part of the passenger com-
partment, and flows to the leg area. Foot position
Air flows mainly to the leg area. For pleasant driving
6-02
6
OHAE13E1
Page 145 of 258
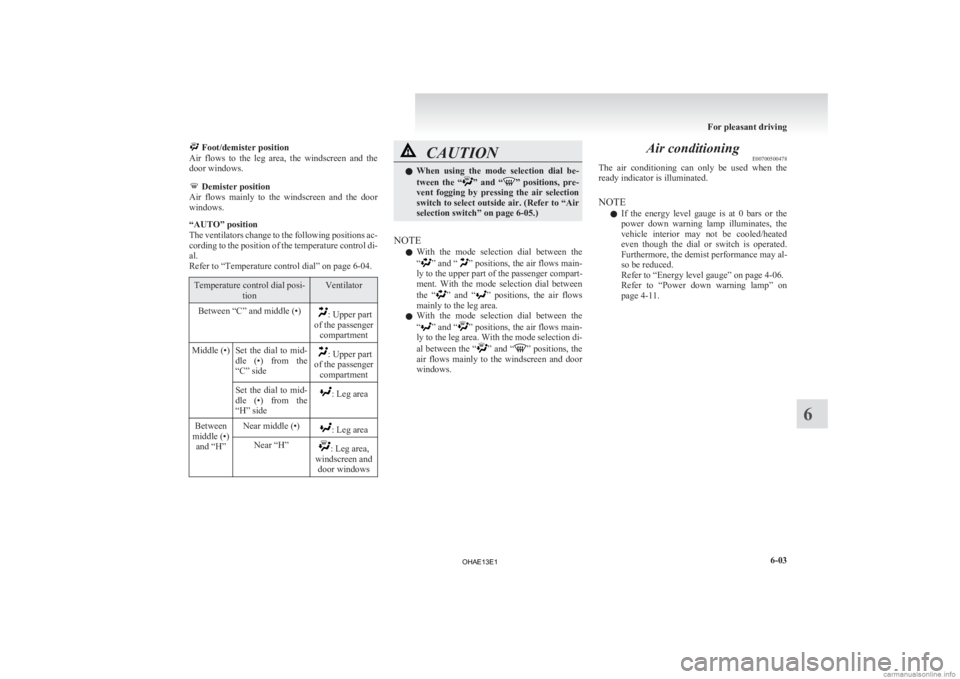
Foot/demister position
Air flows to the leg area, the windscreen and the
door windows. Demister position
Air
flows mainly to the windscreen and the door
windows.
“AUTO” position
The ventilators change to the following positions ac-
cording to the position of the temperature control di-
al.
Refer to “Temperature control dial” on page 6-04. Temperature control dial posi-
tion Ventilator
Between “C” and middle (•) : Upper part
of the passenger compartment
Middle (•) Set the dial to mid- dle
(•) from the
“C” side : Upper part
of the passenger compartment
Set the dial to mid-
dle
(•) from the
“H” side : Leg area
Between
middle (•) and “H” Near middle (•) : Leg area
Near “H” : Leg area,
windscreen and door windows CAUTION
l
When
using the mode selection dial be-
tween the “ ” and “ ” positions, pre-
vent fogging by pressing the air selection
switch to select outside air. (Refer to “Air
selection switch” on page 6-05.)
NOTE l With
the mode selection dial between the
“ ”
and “ ” positions, the air flows main-
ly to the upper part of the passenger compart-
ment. With the mode selection dial between
the “ ”
and “ ” positions, the air flows
mainly to the leg area.
l With the mode selection dial between the
“ ”
and “ ” positions, the air flows main-
ly to the leg area. With the mode selection di-
al between the “ ”
and “ ” positions, the
air flows mainly to the windscreen and door
windows. Air conditioning
E00700500478
The
air conditioning can only be used when the
ready indicator is illuminated.
NOTE
l If the energy level gauge is at 0 bars or the
power down warning lamp illuminates, the
vehicle interior may not be cooled/heated
even though the dial or switch is operated.
Furthermore, the demist performance may al-
so be reduced.
Refer to “Energy level gauge” on page 4-06.
Refer to “Power down warning lamp” on
page 4-11. For pleasant driving
6-03 6
OHAE13E1
Page 146 of 258
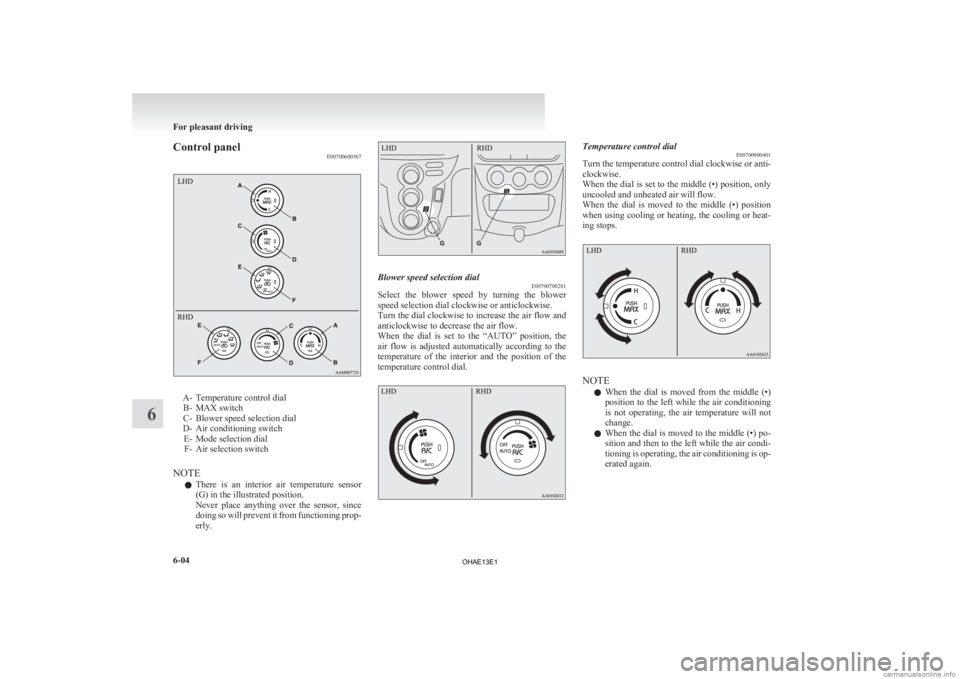
Control panel
E00700600567A- Temperature control dial
B- MAX switch
C- Blower speed selection dial
D- Air conditioning switch E- Mode selection dialF- Air selection switch
NOTE l There is an interior air temperature sensor
(G) in the illustrated position.
Never place anything over the sensor, since
doing so will prevent it from functioning prop-
erly. Blower speed selection dial
E00700700281
Select the blower speed by turning the blower
speed selection dial clockwise or anticlockwise.
Turn
the dial clockwise to increase the air flow and
anticlockwise to decrease the air flow.
When the dial is set to the “AUTO” position, the
air flow is adjusted automatically according to the
temperature of the interior and the position of the
temperature control dial. Temperature control dial
E00700900401
Turn the temperature control dial clockwise or anti-
clockwise.
When
the dial is set to the middle (•) position, only
uncooled and unheated air will flow.
When the dial is moved to the middle (•) position
when using cooling or heating, the cooling or heat-
ing stops. NOTE
l When
the dial is moved from the middle (•)
position to the left while the air conditioning
is not operating, the air temperature will not
change.
l When the dial is moved to the middle (•) po-
sition and then to the left while the air condi-
tioning is operating, the air conditioning is op-
erated again. For pleasant driving
6-04
6
OHAE13E1
Page 147 of 258
l
When the temperature control dial is set to
the “C” position, the air selection changes au-
tomatically to the recirculation position and
the air conditioning operates.
When the dial is moved thereafter, the air con-
ditioning continues to operate and the air se-
lection setting returns to the setting before
the dial was set to the “C” position.
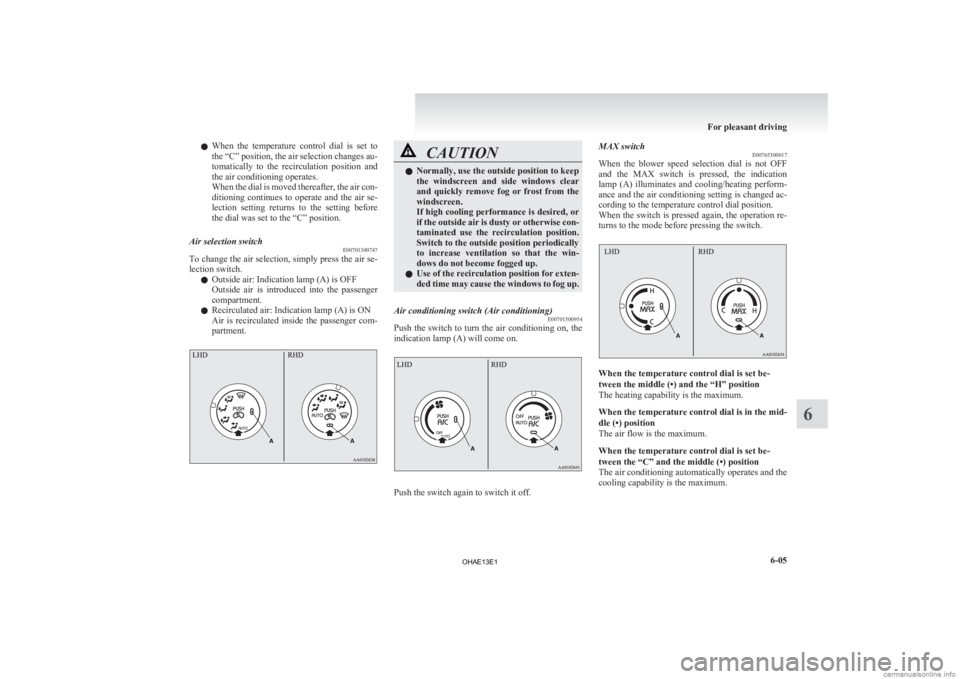
Air selection switch E00701300747
To change the air selection, simply press the air se-
lection switch.
l Outside air: Indication lamp (A) is OFF
Outside
air is introduced into the passenger
compartment.
l Recirculated air: Indication lamp (A) is ON
Air is recirculated inside the passenger com-
partment. CAUTION
l
Normally, use the outside position to keep
the
windscreen and side windows clear
and quickly remove fog or frost from the
windscreen.
If high cooling performance is desired, or
if the outside air is dusty or otherwise con-
taminated use the recirculation position.
Switch to the outside position periodically
to increase ventilation so that the win-
dows do not become fogged up.
l Use of the recirculation position for exten-
ded time may cause the windows to fog up.
Air conditioning switch (Air conditioning) E00701500954
Push the switch to turn the air conditioning on, the
indication lamp (A) will come on. Push the switch again to switch it off.MAX switch
E00765300017
When
the blower speed selection dial is not OFF
and the MAX switch is pressed, the indication
lamp (A) illuminates and cooling/heating perform-
ance and the air conditioning setting is changed ac-
cording to the temperature control dial position.
When the switch is pressed again, the operation re-
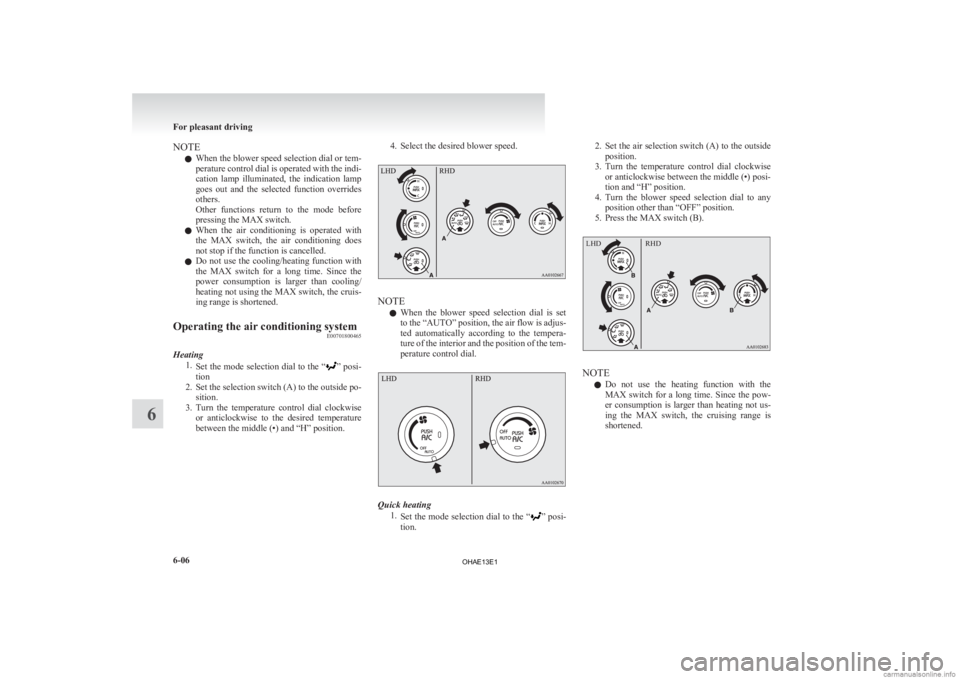
turns to the mode before pressing the switch. When the temperature control dial is set be-
tween the middle (•) and the “H” position
The heating capability is the maximum.
When
the temperature control dial is in the mid-
dle (•) position
The air flow is the maximum.
When the temperature control dial is set be-
tween the “C” and the middle (•) position
The air conditioning automatically operates and the
cooling capability is the maximum. For pleasant driving
6-05 6
OHAE13E1
Page 148 of 258
NOTE
l When
the blower speed selection dial or tem-
perature control dial is operated with the indi-
cation lamp illuminated, the indication lamp
goes out and the selected function overrides
others.
Other functions return to the mode before
pressing the MAX switch.
l When the air conditioning is operated with
the MAX switch, the air conditioning does
not stop if the function is cancelled.
l Do not use the cooling/heating function with
the MAX switch for a long time. Since the
power consumption is larger than cooling/
heating not using the MAX switch, the cruis-
ing range is shortened.
Operating the air conditioning system E00701800465
Heating 1.Set
the mode selection dial to the “ ”
posi-
tion
2. Set the selection switch (A) to the outside po- sition.
3. Turn the temperature control dial clockwise or anticlockwise to the desired temperature
between the middle (•) and “H” position. 4. Select the desired blower speed.
NOTE
l When
the blower speed selection dial is set
to the “AUTO” position, the air flow is adjus-
ted automatically according to the tempera-
ture of the interior and the position of the tem-
perature control dial. Quick heating
1.Set
the mode selection dial to the “ ”
posi-
tion. 2. Set
the air selection switch (A) to the outside
position.
3. Turn the temperature control dial clockwise or anticlockwise between the middle (•) posi-
tion and “H” position.
4. Turn the blower speed selection dial to any position other than “OFF” position.
5. Press the MAX switch (B). NOTE
l Do
not use the heating function with the
MAX switch for a long time. Since the pow-
er consumption is larger than heating not us-
ing the MAX switch, the cruising range is
shortened. For pleasant driving
6-06
6 LHDRHD
OHAE13E1
Page 149 of 258
Cooling
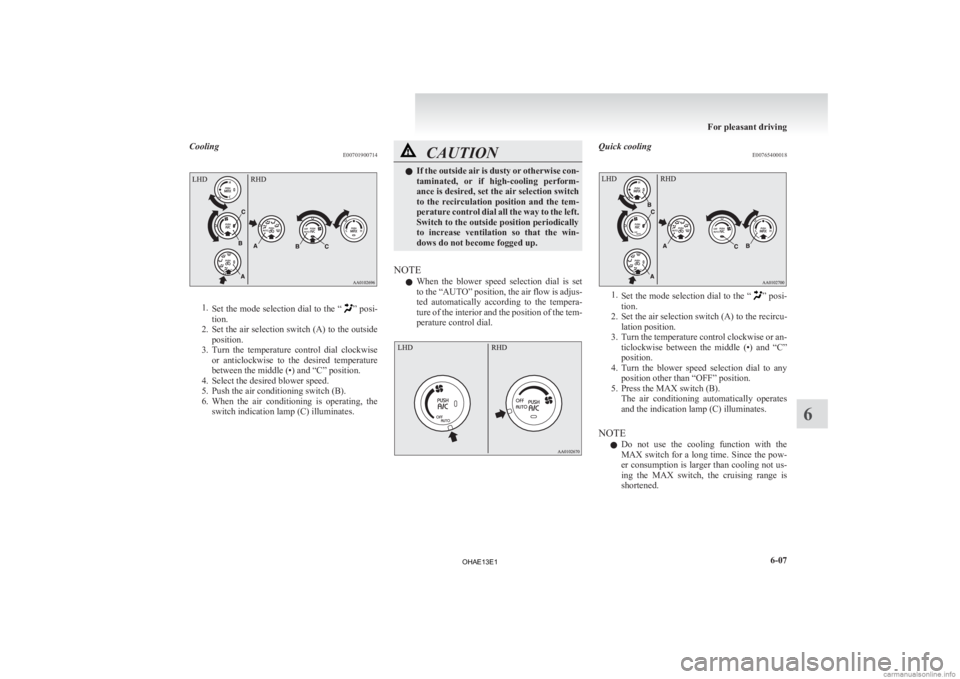
E007019007141.
Set the mode selection dial to the “ ” posi-
tion.
2. Set the air selection switch (A) to the outside position.
3. Turn the temperature control dial clockwise or anticlockwise to the desired temperature
between the middle (•) and “C” position.
4. Select the desired blower speed.
5. Push the air conditioning switch (B).
6. When the air conditioning is operating, the switch indication lamp (C) illuminates. CAUTION
l
If
the outside air is dusty or otherwise con-
taminated, or if high-cooling perform-
ance is desired, set the air selection switch
to the recirculation position and the tem-
perature control dial all the way to the left.
Switch to the outside position periodically
to increase ventilation so that the win-
dows do not become fogged up.
NOTE l When
the blower speed selection dial is set
to the “AUTO” position, the air flow is adjus-
ted automatically according to the tempera-
ture of the interior and the position of the tem-
perature control dial. Quick cooling
E00765400018 1.
Set
the mode selection dial to the “ ” posi-
tion.
2. Set the air selection switch (A) to the recircu- lation position.
3. Turn the temperature control clockwise or an- ticlockwise between the middle (•) and “C”
position.
4. Turn the blower speed selection dial to any position other than “OFF” position.
5. Press the MAX switch (B). The air conditioning automatically operates
and the indication lamp (C) illuminates.
NOTE l Do not use the cooling function with the
MAX switch for a long time. Since the pow-
er consumption is larger than cooling not us-
ing the MAX switch, the cruising range is
shortened. For pleasant driving
6-07 6
OHAE13E1
Page 150 of 258
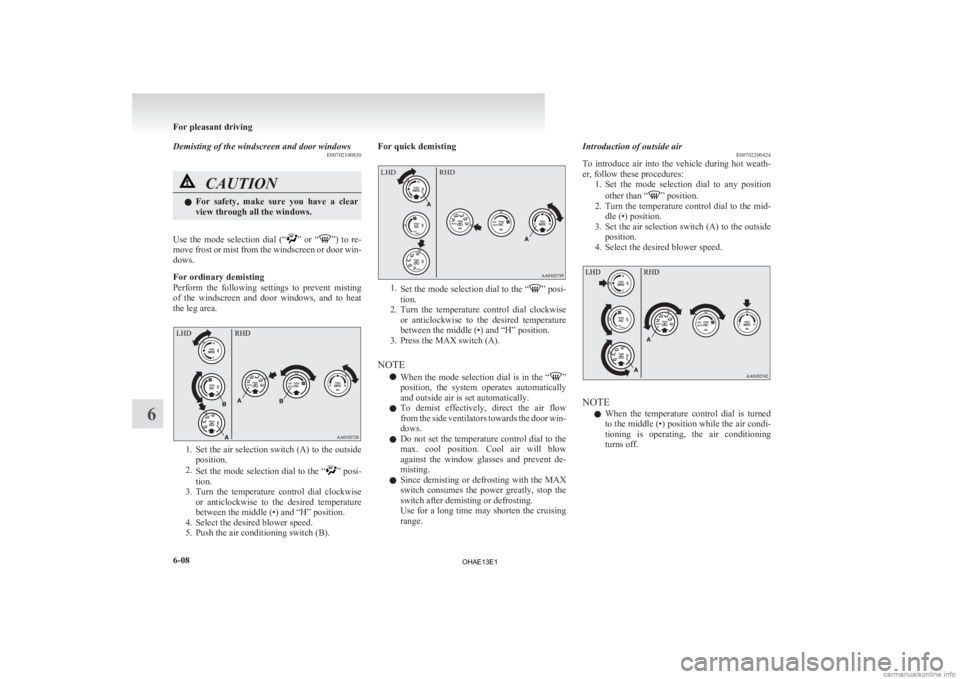
Demisting of the windscreen and door windows
E00702100830CAUTION
l
For safety, make sure you have a clear
view through all the windows.
Use the mode selection dial (“ ”
or “ ”) to re-
move frost or mist from the windscreen or door win-
dows.
For ordinary demisting
Perform the following settings to prevent misting
of the windscreen and door windows, and to heat
the leg area. 1. Set
the air selection switch (A) to the outside
position.
2. Set the mode selection dial to the “ ”
posi-
tion.
3. Turn the temperature control dial clockwise or anticlockwise to the desired temperature
between the middle (•) and “H” position.
4. Select the desired blower speed.
5. Push the air conditioning switch (B). For quick demisting
1.
Set
the mode selection dial to the “ ” posi-
tion.
2. Turn
the temperature control dial clockwise
or anticlockwise to the desired temperature
between the middle (•) and “H” position.
3. Press the MAX switch (A).
NOTE l When the mode selection dial is in the “ ”
position,
the system operates automatically
and outside air is set automatically.
l To demist effectively, direct the air flow
from the side ventilators towards the door win-
dows.
l Do not set the temperature control dial to the
max. cool position. Cool air will blow
against the window glasses and prevent de-
misting.
l Since demisting or defrosting with the MAX
switch consumes the power greatly, stop the
switch after demisting or defrosting.
Use for a long time may shorten the cruising
range. Introduction of outside air
E00702200424
To
introduce air into the vehicle during hot weath-
er, follow these procedures: 1. Set the mode selection dial to any position
other than “ ” position.
2. Turn
the temperature control dial to the mid-
dle (•) position.
3. Set the air selection switch (A) to the outside position.
4. Select the desired blower speed. NOTE
l When
the temperature control dial is turned
to the middle (•) position while the air condi-
tioning is operating, the air conditioning
turns off. For pleasant driving
6-08
6 LHD RHD
OHAE13E1