MITSUBISHI iMiEV 2013 Owner's Manual (in English)
Manufacturer: MITSUBISHI, Model Year: 2013, Model line: iMiEV, Model: MITSUBISHI iMiEV 2013Pages: 258, PDF Size: 13 MB
Page 201 of 258
NOTE
l If
genuine leather is wet with water or is wash-
ed in water, wipe off water as quickly as pos-
sible with a dry, soft cloth. If left damp, mil-
dew may grow.
l The genuine leather surface may be damaged
if a nylon brush or synthetic fibre is rubbed
hard against it.
l Organic solvents such as benzine, kerosene,
alcohol and petrol, acid or alkaline solvents
may discolour the genuine leather surface.
Be sure to use neutral detergents.
l Remove dirty patches or oil substances quick-
ly as they can stain genuine leather.
l The genuine leather surface may harden and
shrink if it is exposed to direct sun for long
hours. When your vehicle is parked, place it
in the shade as much as possible. Cleaning the exterior of your
vehicle E08400600010
If
the following is left on your vehicle, it may
cause corrosion, discolouration and stains, wash
the vehicle as soon as possible.
l Seawater, road deicing products.
l Soot and dust, iron powder from factories,
chemical substance (acids, alkalis, coal-tar,
etc.).
l Droppings from birds, carcasses of insects,
tree sap, etc.
Washing E08400700011
Chemicals contained in the dirt and dust picked up
from
the road surface can damage the paint coat
and body of your vehicle if left in prolonged contact.
Frequent washing and waxing is the best way to pro-
tect your vehicle from this damage. This will also
be effective in protecting it from environmental el-
ements such as rain, snow, salt air, etc.
Do not wash the vehicle in direct sunlight. Park the
vehicle in the shade and spray it with water to re-
move dust. Next, using an ample amount of clean
water and a car washing brush or sponge, wash the
vehicle from top to bottom.
Use a mild car washing soap if necessary. Rinse
thoroughly and wipe dry with a soft cloth. After
washing the vehicle, carefully clean the joints and
flanges of the doors, bonnet and other sections
where dirt is likely to remain. WARNING
l Do
not wash the vehicle while charging
the traction battery.
Doing so could cause fire or an electric
shock.
l Before washing the vehicle, make sure
that the charging lid and the inner lid are
completely closed.
If the lid is open, the charging unit is ex-
posed to water, resulting in fire or an elec-
tric shock.
l Do not pour water inside the electric mo-
tor unit room. Doing so could cause fire
or an electric shock.
l When washing the vehicle, turn the elec-
tric motor switch to the “LOCK” position.
l Do not use a high pressure washing ma-
chine to clean the underneath of the vehi-
cle.
Doing so might cause the electric motor
unit problem or malfunction.
l When washing the underside of your vehi-
cle or wheel, be careful not to injure your
hands.
l Refrain from excessively using a car wash
as its brushes may scratch the paint sur-
face, causing it to lose its gloss. Scratches
will be especially visible on darker col-
oured vehicles.
l Never spray or splash water on the electri-
cal components in the bonnet room.
Exercise caution also when washing the
underbody; be careful not to spray water
into the bonnet room.
l Some types of hot water washing equip-
ment apply high pressure and heat to the Vehicle care and Maintenance
8-03 8
OHAE13E1
Page 202 of 258
WARNING
vehicle. They may cause heat distortion
and damage to the vehicle resin parts and
may result in flooding of the vehicle inte-
rior.
Therefore; • Maintain a distance of approx. 70 cmor more between the vehicle body and
the washing nozzle.
• When washing around the door glass, hold the nozzle at a distance of more
than 70 cm and at right angles to the
glass surface.
l After washing the vehicle, drive the vehi-
cle slowly while lightly depressing the
brake pedal several times in order to dry
out the brakes.
Leaving the brakes wet could result in re-
duced braking performance. Also, there
is a possibility that they could freeze up
or become inoperative due to rust, render-
ing the vehicle unable to move.
l When using an automatic car wash, pay
attention to the following items, referring
to the operation manual or consulting a
car wash operator. If the following proce-
dure is not followed, it could result in dam-
age to your vehicle.
• The outside mirrors are retracted.
• The antenna is removed.
• The wiper arms are secured in placewith tape.
• If your vehicle is equipped with a rear spoiler, consult a car wash operator be-
fore using the car wash. During cold weather
Salt
and other chemicals spread on the roads in
some areas in winter can have a harmful effect on
the vehicle body. You should therefore wash the ve-
hicle as often as possible in accordance with our
care-instructions. It is recommended to have a pres-
ervative applied and the underfloor protection
checked before and after the cold weather season.
After washing your vehicle, wipe off all water-
drops from the rubber parts around the doors to pre-
vent the doors from freezing.
NOTE
l To prevent freezing of the weatherstripping
on the doors, bonnet, etc., they should be trea-
ted with silicone spray.
Waxing E08400800012
Waxing the vehicle will help prevent the adherence
of
dust and road chemicals to the paintwork. Apply
a wax solution after washing the vehicle, or at least
once every three months to assist displacing of water.
Do not wax your vehicle in direct sunlight. You
should wax after the surfaces have cooled. CAUTION
l
Waxes
containing high abrasive com-
pounds should not be used. Such waxes re-
move rust and stains effectively from the
paintwork but they are harmful to the lus-
tre on the painted surface and the plated
surface.
Further, they are harmful to glossy surfa-
ces such as grille, garnish, mouldings, etc. CAUTION
l
Do
not use petrol or paint thinners to re-
move road tar or other contamination to
the painted surface.
l Do not apply wax to sections that have a
black mat paint coating, as doing so
could cause uneven discolouration, spots
or stains. If wax gets on such areas, wipe
it off using lukewarm water and a soft
cloth.
Polishing E08400900013
The vehicle should only be polished if the paint-
work
has become stained or lost its lustre. Do not
polish parts with a mat coating and the plastic bump-
ers. Doing so could cause stains or damage the finish.
Damaged paint E08401000011
Small cracks and scratches in the paint coat should
be
touched up as soon as possible with
MITSUBISHI touch-up paint to prevent corrosion.
Check body areas facing the road or the tyres care-
fully for damage to the paint caused by gravels,
etc. The paint code number for your vehicle can be
found on the vehicle information code plate. (Refer
to “Vehicle information code plate” on page 9-02.)
Cleaning plastic parts E08401100012
Use a sponge or chamois leather.
If
a car wax adheres on a grey or black rough sur-
face of the bumper, moulding or lamps, the surface
becomes white. In such a case, wipe it off using
lukewarm water and soft cloth or chamois leather. Vehicle care and Maintenance
8-04
8
OHAE13E1
Page 203 of 258
CAUTION
l
Do not use a scrubbing brush or other
hard tools as they may damage the plastic
part surface.
l Do not use wax containing compound (pol-
ishing powder) which may damage the
plastic part surface.
l Do not bring the plastic parts into contact
with petrol, light oil, brake fluids,
greases, paint thinners, and sulphuric
acid (battery electrolyte) which may
crack, stain or discolour the plastic parts.
If they touch the plastic parts, wipe them
off with soft cloth, chamois or the like
and an aqueous solution of neutral deter-
gent then immediately rinse the affected
parts with water.
Chrome parts E08401200013
In order to prevent spots and corrosion of chrome
parts,
wash with water, dry thoroughly, and apply a
special protective coating. This should be done
more frequently in winter.
Aluminium wheels E08401300014
1. Remove
dirt using a sponge while sprinkling
water on the vehicle.
2. Use neutral detergent on any dirt that cannot be removed easily with water.
Rinse off the neutral detergent after washing
the vehicle.
3. Dry the vehicle thoroughly using a chamois leather or a soft cloth. CAUTION
l
Do
not use a brush or other hard imple-
ment on the wheels.
Doing so could scratch the wheels.
l Do not use any cleaner that contains an
abrasive substance or is acidic or alka-
line. Doing so could cause the coating on
the wheels to peel or become discoloured
or stained.
l Do not directly apply hot water using a
steam cleaner or by any other means.
l Contact with seawater and road deicer
can cause corrosion. Rinse off such sub-
stances as soon as possible.
Window glass E08401400015
The window glass can normally be cleaned using
only a sponge and water.
Glass
cleaner can be used to remove oil, grease, in-
sect carcasses, etc. After washing the glass, wipe it
dry with a clean, dry, soft cloth. Never use a cloth
that is used for cleaning a painted surface to clean a
window. Wax from the painted surface could get
on the glass and lower glass transparency and visi-
bility.
NOTE
l To clean the inside of the rear window, al-
ways use a soft cloth and wipe the window
glass along the demister heater element so as
not to cause damage. Wiper blades
E08401500016
Use a soft cloth and glass cleaner to remove grease,
dead
insects, etc., from the wiper blades. Replace
the wiper blades when they no longer wipe proper-
ly. (Refer to page 8-17.)
Bonnet room E08401600017
Clean the bonnet room at the beginning and end of
winter.
Pay particular attention to flanges, crevices
and peripheral parts where dust containing road
chemicals and other corrosive materials might col-
lect.
If salt and other chemicals are used on the roads in
your area, clean the engine compartment at least ev-
ery three months.
Never spray or splash water on the electrical com-
ponents in the bonnet room, as this may cause dam-
age.
Do not bring the nearby parts, the plastic parts and
so on into contact with sulphuric acid (battery elec-
trolyte) which may crack, stain or discolour them.
If they are in contact, wipe off with soft cloth, cha-
mois or the like and an aqueous solution of neutral
detergent then immediately rinse the affected parts
with plenty of water. Vehicle care and Maintenance
8-05 8
OHAE13E1
Page 204 of 258
Service precautions
E08401700050
Adequate
care of your vehicle at regular intervals
serves to preserve the value and appearance as long
as possible.
Maintenance items as described in this owner’s man-
ual can be performed by the owner.
We recommend you to have the periodic inspection
and maintenance performed by a MITSUBISHI
MOTORS Authorized Service Point or another spe-
cialist.
In the event a malfunction or a problem is discov-
ered, we recommend you to have it checked and re-
paired. Follow the instructions and cautions for
each of the various procedures. WARNING
l Do
not touch any components in the elec-
tric motor unit room other than the re-
serve tank. There are no components re-
quiring inspection other than the reserve
tank. Never remove or disassemble the
component which generates high voltage,
high voltage wire (orange), its connector,
EV charging cable, charge connector,
plug and an outlet. Doing so could result
in a serious injury that may risk your life.
These components are affixed with the la-
bel indicating precautions for handling.
Follow the instructions on the label. Take
your vehicle to a MITSUBISHI
MOTORS Authorized Service Point for
any necessary maintenance. High voltage components and wiring cables are lo-
cated as shown in the figure below.
1- Regular charge port
2-
Inverter
3- Traction battery
4- Heater
5- Air conditioner compressor
6- High voltage connector
7- Service plug
8- Electric motor (Electric motor unit)
9- On board charger/DC-DC converter
10- Quick charge port WARNING
l Never
touch the service plug (A) under
the front seat. Doing so could result in se-
rious injury that may risk your life, in-
cluding an electric shock. The service
plug (A) is used to shut off high voltage
from the traction battery for repair of the
vehicle at a MITSUBISHI MOTORS Au-
thorized Service Point or another special-
ist. WARNING
l When
the ready indicator is illuminated,
and the charging indicator is illuminated
or blinking, never perform maintenance
because the high voltage system is operat-
ing.
l When servicing the vehicle, make sure
that the electric motor switch is in the
“LOCK” position and the charging cable
is disconnected. Failure to do so could re-
sult in an electric shock.
l When checking or servicing the inside of
the bonnet room and coolant reserve
tank, make sure the electric motor unit is
switched off and has had a chance to cool
down. Vehicle care and Maintenance
8-06
8
OHAE13E1
Page 205 of 258
WARNING
l If it is necessary to do work in the bonnet
room with the electric motor running, be
especially careful that your clothing, hair,
etc., does not become caught by the fan,
or other moving parts.
l The fan can turn on automatically even if
the electric motor is not running. Turn
the electric motor switch to the “LOCK”
position to be safe while you work in the
bonnet room.
l Do not smoke, cause sparks or allow open
flames around the auxiliary battery.
l Be extremely cautious when working
around the auxiliary battery. It contains
poisonous and corrosive sulphuric acid.
l Improper handling of components and
materials used in the vehicle can endan-
ger your personal safety. We recommend
you to consult a specialist for necessary in-
formation. CAUTION
l
The
components inside the electric motor
unit room might be very hot to touch.
To avoid being burnt, make sure all com-
ponents have sufficiently cooled before be-
ginning an inspection.
These components are affixed with the la-
bel indicating precautions for handling.
Follow the instructions on the label. CAUTION
l
When
replacing the auxiliary battery, re-
move the connected positive (+) and nega-
tive (-) terminals after turning the electric
motor switch to the “LOCK” position
and waiting at least 2 minutes. If the aux-
iliary battery terminal is removed just af-
ter the electric motor switch is turned to
the “LOCK” position, this may cause dam-
age to components of the electric motor
unit. If the electric motor unit warning
lamp illuminates, do not replace the auxil-
iary battery. Contact a MITSUBISHI
MOTORS Authorized Service Point. Bonnet
E08402000018
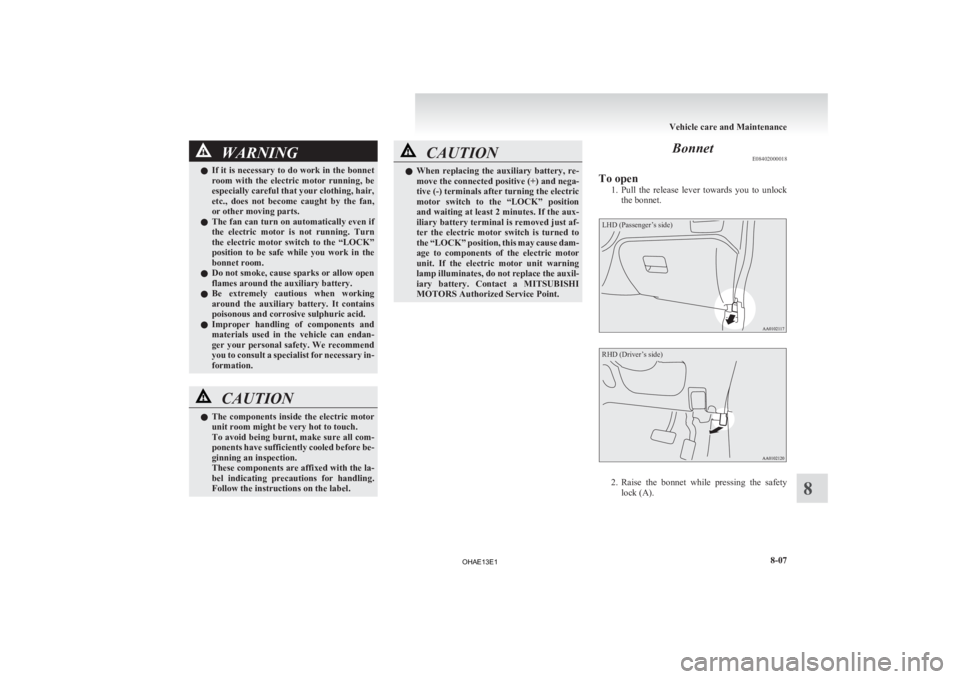
To open 1. Pull
the release lever towards you to unlock
the bonnet.
LHD (Passenger’s side)
RHD (Driver’s side) 2. Raise
the bonnet while pressing the safety
lock (A). Vehicle care and Maintenance
8-07 8
OHAE13E1
Page 206 of 258
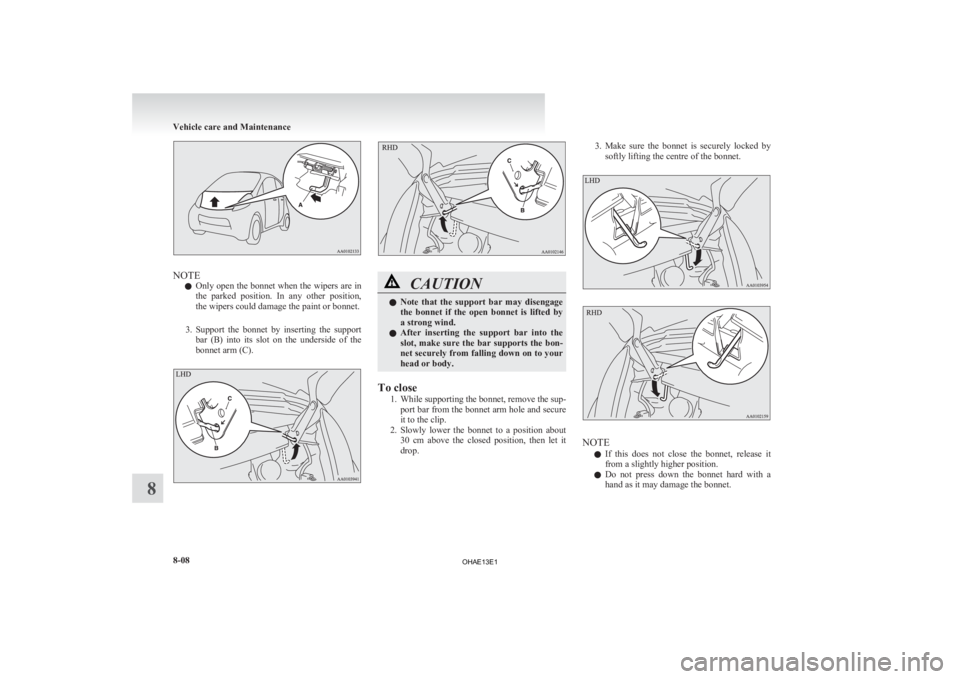
NOTE
l Only
open the bonnet when the wipers are in
the parked position. In any other position,
the wipers could damage the paint or bonnet.
3. Support the bonnet by inserting the support bar (B) into its slot on the underside of the
bonnet arm (C). CAUTION
l
Note
that the support bar may disengage
the bonnet if the open bonnet is lifted by
a strong wind.
l After inserting the support bar into the
slot, make sure the bar supports the bon-
net securely from falling down on to your
head or body.
To close 1. While
supporting the bonnet, remove the sup-
port bar from the bonnet arm hole and secure
it to the clip.
2. Slowly lower the bonnet to a position about 30 cm above the closed position, then let it
drop. 3. Make
sure the bonnet is securely locked by
softly lifting the centre of the bonnet. NOTE
l If
this does not close the bonnet, release it
from a slightly higher position.
l Do not press down the bonnet hard with a
hand as it may damage the bonnet. Vehicle care and Maintenance
8-08
8
OHAE13E1
Page 207 of 258
CAUTION
l
Be careful that hands or fingers are not
trapped when closing the bonnet.
l Before driving, make sure that the bon-
net is securely locked. An incompletely
locked bonnet can suddenly open while
driving. This can be extremely dangerous. Coolant/Hot water heater fluid
E08402100048
To check the coolant level
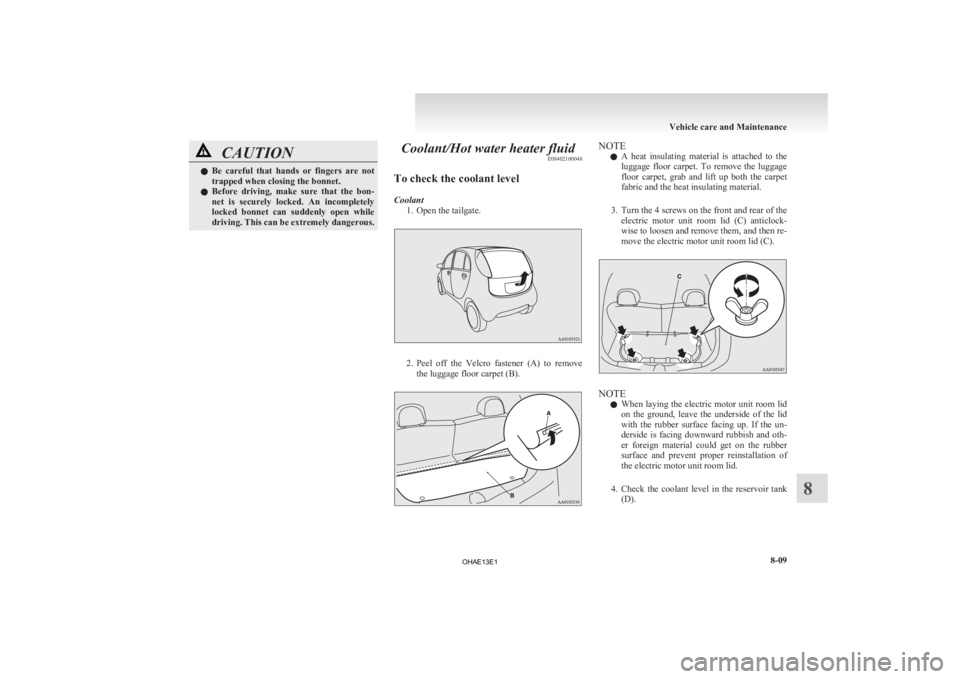
Coolant 1.
Open the tailgate. 2. Peel
off the Velcro fastener (A) to remove
the luggage floor carpet (B). NOTE
l A
heat insulating material is attached to the
luggage floor carpet. To remove the luggage
floor carpet, grab and lift up both the carpet
fabric and the heat insulating material.
3. Turn the 4 screws on the front and rear of the electric motor unit room lid (C) anticlock-
wise to loosen and remove them, and then re-
move the electric motor unit room lid (C). NOTE
l When
laying the electric motor unit room lid
on the ground, leave the underside of the lid
with the rubber surface facing up. If the un-
derside is facing downward rubbish and oth-
er foreign material could get on the rubber
surface and prevent proper reinstallation of
the electric motor unit room lid.
4. Check the coolant level in the reservoir tank (D). Vehicle care and Maintenance
8-09 8
OHAE13E1
Page 208 of 258
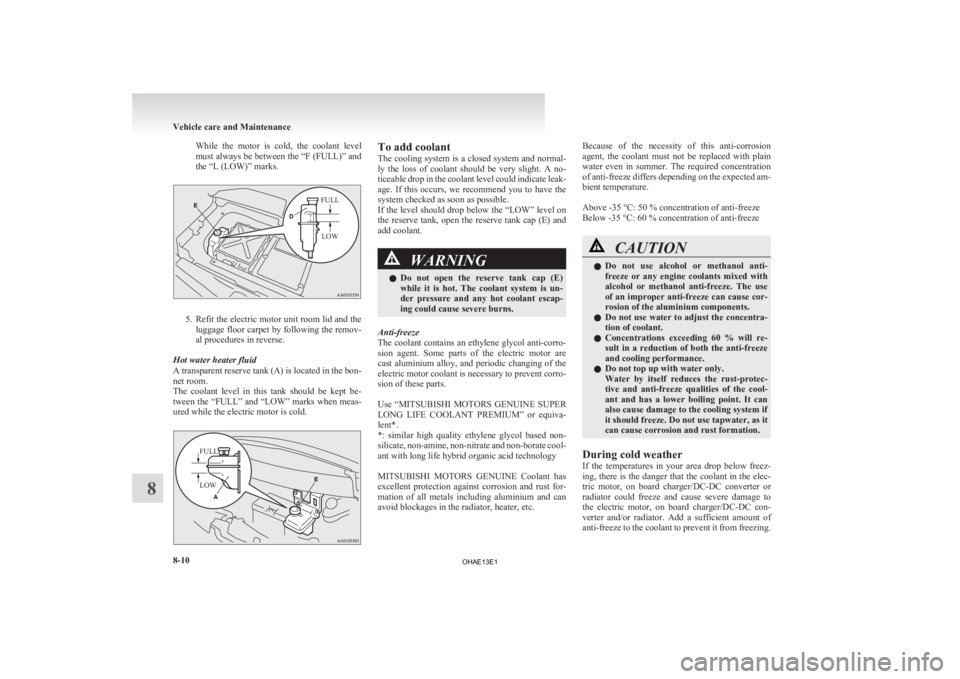
While the motor is cold, the coolant level
must
always be between the “F (FULL)” and
the “L (LOW)” marks.
FULL
LOW 5. Refit
the electric motor unit room lid and the
luggage floor carpet by following the remov-
al procedures in reverse.
Hot water heater fluid
A transparent reserve tank (A) is located in the bon-
net room.
The coolant level in this tank should be kept be-
tween the “FULL” and “LOW” marks when meas-
ured while the electric motor is cold.
FULL
LOW To add coolant
The
cooling system is a closed system and normal-
ly the loss of coolant should be very slight. A no-
ticeable drop in the coolant level could indicate leak-
age. If this occurs, we recommend you to have the
system checked as soon as possible.
If the level should drop below the “LOW” level on
the reserve tank, open the reserve tank cap (E) and
add coolant. WARNING
l Do
not open the reserve tank cap (E)
while it is hot. The coolant system is un-
der pressure and any hot coolant escap-
ing could cause severe burns.
Anti-freeze
The
coolant contains an ethylene glycol anti-corro-
sion agent. Some parts of the electric motor are
cast aluminium alloy, and periodic changing of the
electric motor coolant is necessary to prevent corro-
sion of these parts.
Use “MITSUBISHI MOTORS GENUINE SUPER
LONG LIFE COOLANT PREMIUM” or equiva-
lent*.
*: similar high quality ethylene glycol based non-
silicate, non-amine, non-nitrate and non-borate cool-
ant with long life hybrid organic acid technology
MITSUBISHI MOTORS GENUINE Coolant has
excellent protection against corrosion and rust for-
mation of all metals including aluminium and can
avoid blockages in the radiator, heater, etc. Because of the necessity of this anti-corrosion
agent,
the coolant must not be replaced with plain
water even in summer. The required concentration
of anti-freeze differs depending on the expected am-
bient temperature.
Above -35 °C: 50 % concentration of anti-freeze
Below -35 °C: 60 % concentration of anti-freeze CAUTION
l
Do
not use alcohol or methanol anti-
freeze or any engine coolants mixed with
alcohol or methanol anti-freeze. The use
of an improper anti-freeze can cause cor-
rosion of the aluminium components.
l Do not use water to adjust the concentra-
tion of coolant.
l Concentrations exceeding 60 % will re-
sult in a reduction of both the anti-freeze
and cooling performance.
l Do not top up with water only.
Water by itself reduces the rust-protec-
tive and anti-freeze qualities of the cool-
ant and has a lower boiling point. It can
also cause damage to the cooling system if
it should freeze. Do not use tapwater, as it
can cause corrosion and rust formation.
During cold weather
If
the temperatures in your area drop below freez-
ing, there is the danger that the coolant in the elec-
tric motor, on board charger/DC-DC converter or
radiator could freeze and cause severe damage to
the electric motor, on board charger/DC-DC con-
verter and/or radiator. Add a sufficient amount of
anti-freeze to the coolant to prevent it from freezing. Vehicle care and Maintenance
8-10
8
OHAE13E1
Page 209 of 258
The concentration should be checked before the
start
of cold weather and anti-freeze added to the
system if necessary. Washer fluid
E08402200010
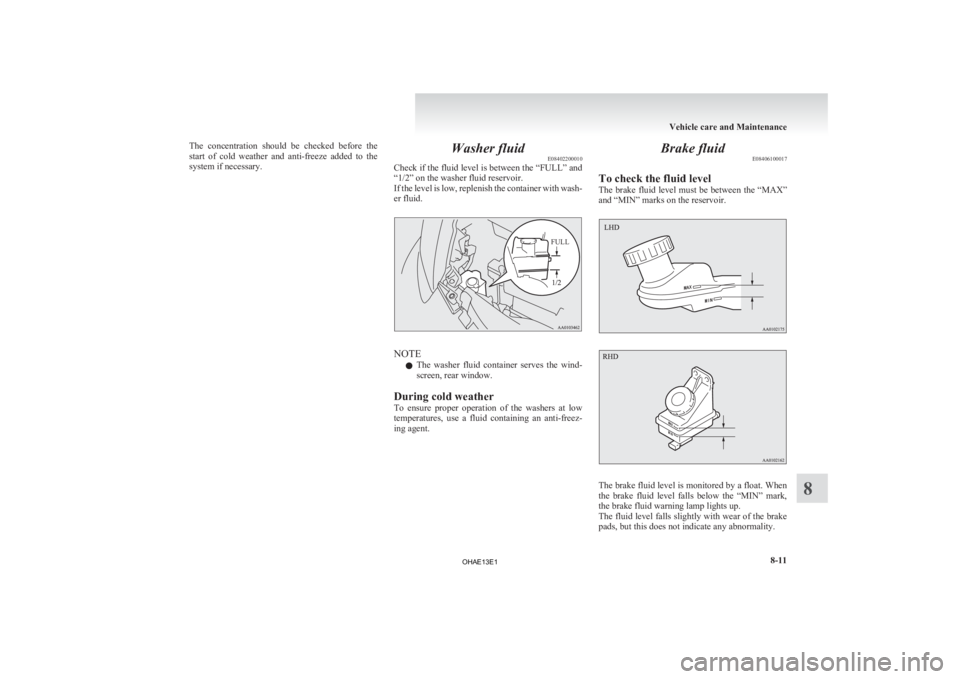
Check
if the fluid level is between the “FULL” and
“1/2” on the washer fluid reservoir.
If the level is low, replenish the container with wash-
er fluid.
FULL NOTE
l The
washer fluid container serves the wind-
screen, rear window.
During cold weather
To ensure proper operation of the washers at low
temperatures, use a fluid containing an anti-freez-
ing agent. Brake fluid
E08406100017
To check the fluid level
The
brake fluid level must be between the “MAX”
and “MIN” marks on the reservoir. The brake fluid level is monitored by a float. When
the
brake fluid level falls below the “MIN” mark,
the brake fluid warning lamp lights up.
The fluid level falls slightly with wear of the brake
pads, but this does not indicate any abnormality.
Vehicle care and Maintenance
8-11 8
OHAE13E1
Page 210 of 258
The brake fluid in the master cylinder should be
checked
when doing other work under the bonnet.
The brake system should also be checked for leak-
age at the same time.
If the brake fluid level falls markedly in a short
length of time, it indicates leaks from the brake sys-
tem.
If this occurs, we recommend you to have the vehi-
cle checked.
Fluid type
Use brake fluid conforming to DOT3 or DOT4
from a sealed container. The brake fluid is hygro-
scopic. Too much moisture in the brake fluid will
adversely affect the brake system, reducing the per-
formance. CAUTION
l
Take
care in handling brake fluid as it is
harmful to the eyes, may irritate your
skin and also damage painted surfaces.
l Use only the specified brake fluid.
Do not mix or add different brands of
brake fluid to prevent chemical reactions.
Do not let any petroleum-based fluid
touch, mix with, or get into the brake fluid.
This will damage the seals.
l Keep the reservoir tank cap closed to pre-
vent the brake fluid from deteriorating ex-
cept maintenance.
l Clean the filler cap before removing and
close the cap securely after maintenance. Auxiliary battery
E08402300011
The
condition of the auxiliary battery is very impor-
tant to keep the vehicle’s electrical system working
properly. Regular inspection and care are especial-
ly important in cold weather.
Removing and installing the auxiliary
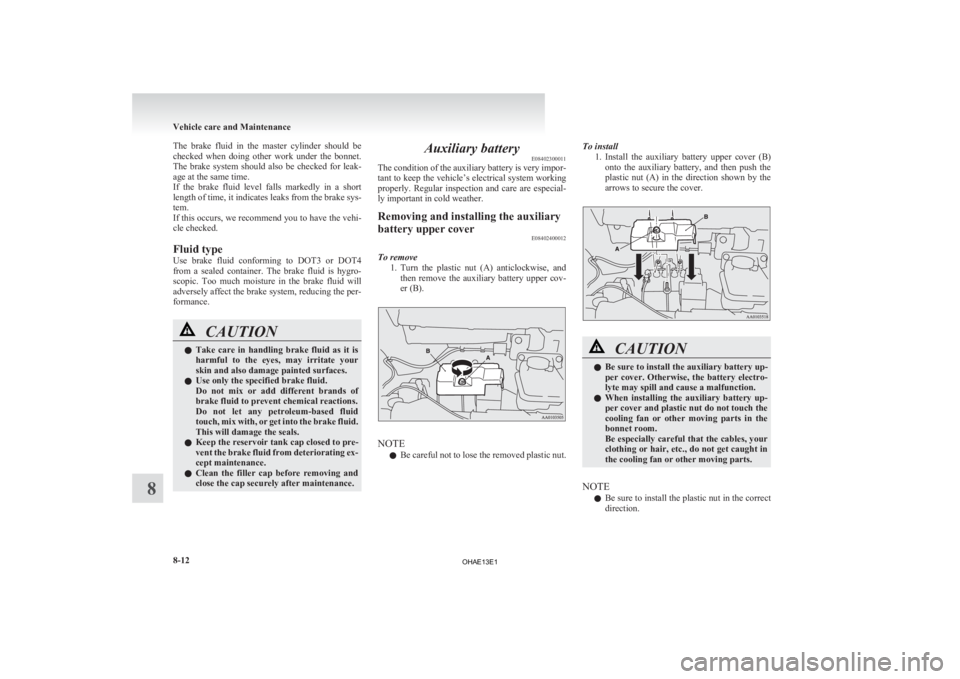
battery upper cover E08402400012
To remove 1. Turn
the plastic nut (A) anticlockwise, and
then remove the auxiliary battery upper cov-
er (B). NOTE
l Be
careful not to lose the removed plastic nut. To install
1. Install
the auxiliary battery upper cover (B)
onto the auxiliary battery, and then push the
plastic nut (A) in the direction shown by the
arrows to secure the cover. CAUTION
l
Be sure to install the auxiliary battery up-
per
cover. Otherwise, the battery electro-
lyte may spill and cause a malfunction.
l When installing the auxiliary battery up-
per cover and plastic nut do not touch the
cooling fan or other moving parts in the
bonnet room.
Be especially careful that the cables, your
clothing or hair, etc., do not get caught in
the cooling fan or other moving parts.
NOTE l Be
sure to install the plastic nut in the correct
direction. Vehicle care and Maintenance
8-12
8
OHAE13E1