engine MITSUBISHI L200 2004 (in English) Owner's Guide
[x] Cancel search | Manufacturer: MITSUBISHI, Model Year: 2004, Model line: L200, Model: MITSUBISHI L200 2004Pages: 264, PDF Size: 4.14 MB
Page 99 of 264
STARTING AND DRIVING
5-13 Starting (diesel-powered vehicles)
EI02BAH
1. Insert the ignition key and fasten the
seat belt.
2. Apply the parking brake.
3. Depress and hold the brake pedal.
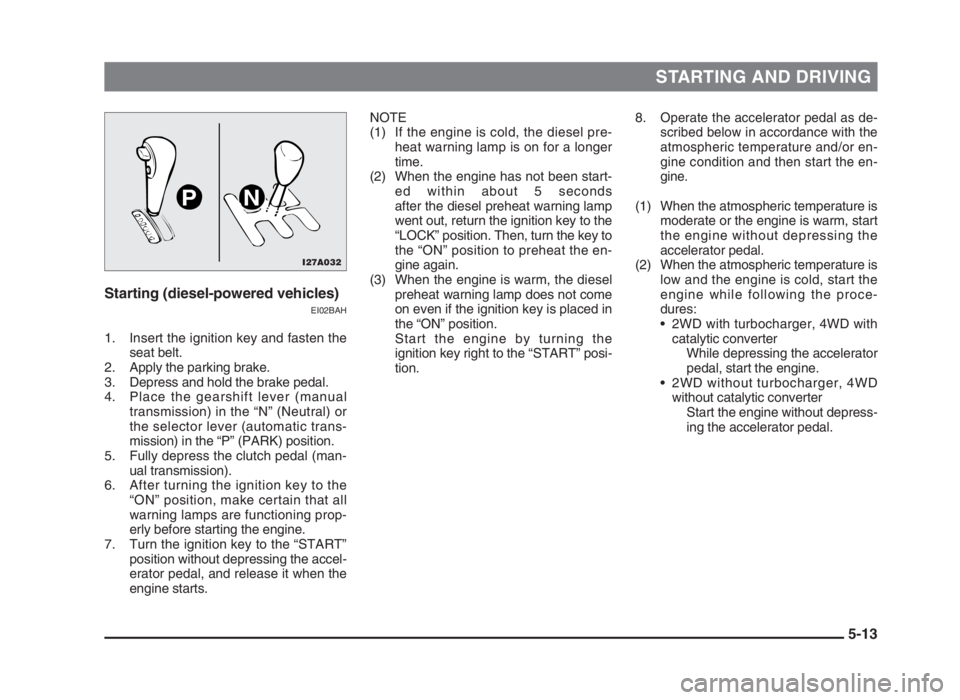
4. Place the gearshift lever (manual
transmission) in the “N” (Neutral) or
the selector lever (automatic trans-
mission) in the “P” (PARK) position.
5. Fully depress the clutch pedal (man-
ual transmission).
6. After turning the ignition key to the
“ON” position, make certain that all
warning lamps are functioning prop-
erly before starting the engine.
7. Turn the ignition key to the “START”
position without depressing the accel-
erator pedal, and release it when the
engine starts.8.
Operate the accelerator pedal as de-
scribed below in accordance with the
atmospheric temperature and/or en-
gine condition and then start the en-
gine.
(1) When the atmospheric temperature is
moderate or the engine is warm, start
the engine without depressing the
accelerator pedal.
(2) When the atmospheric temperature is
low and the engine is cold, start the
engine while following the proce-
dures:
• 2WD with turbocharger, 4WD with
catalytic converter
While depressing the accelerator
pedal, start the engine.
• 2WD without turbocharger, 4WD
without catalytic converter
Start the engine without depress-
ing the accelerator pedal. NOTE
(1) If the engine is cold, the diesel pre-
heat warning lamp is on for a longer
time.
(2) When the engine has not been start-
ed within about 5 seconds
after the diesel preheat warning lamp
went out, return the ignition key to the
“LOCK” position. Then, turn the key to
the “ON” position to preheat the en-
gine again.
(3) When the engine is warm, the diesel
preheat warning lamp does not come
on even if the ignition key is placed in
the “ON” position.
Start the engine by turning the
ignition key right to the “START” posi-
tion.
I27A032
PN
05engL2_240082_4 22-01-2004 13:04 Page 5-13
Page 100 of 264
STARTING AND DRIVING
5-14
Shift pointSpeed limit km/h (mph)
With
TurbochargerWithout
Turbocharger
1st to 2nd 10 (6) 15 (9)
2nd to 3rd25 (15) 25 (15)
3rd to 4th40 (24) 45 (27)
4th to 5th55 (34) 65 (40)
Manual transmissionEI29A-Af
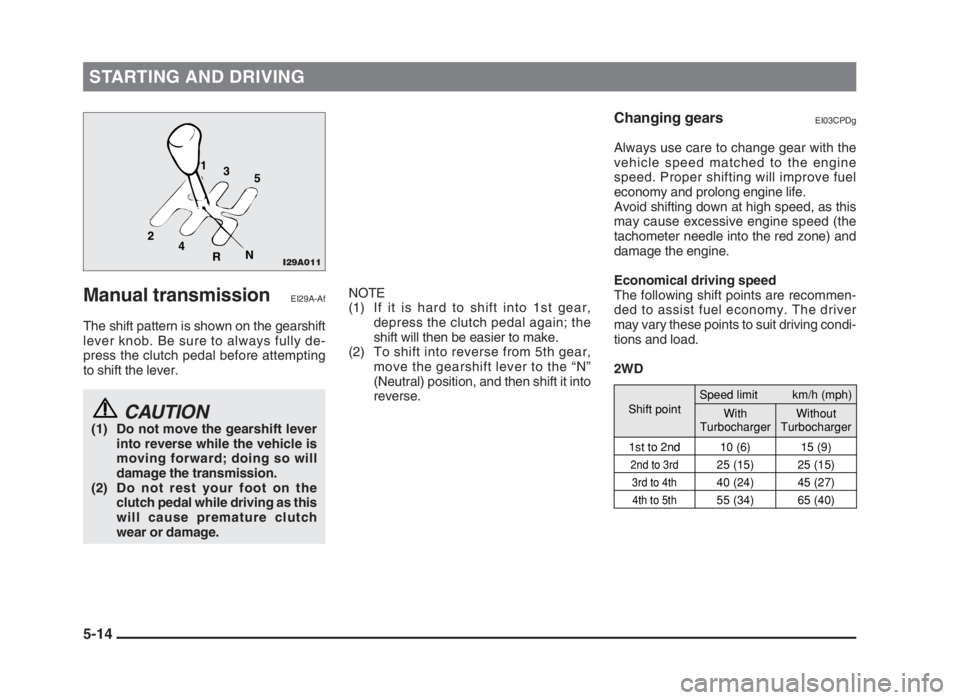
The shift pattern is shown on the gearshift
lever knob. Be sure to always fully de-
press the clutch pedal before attempting
to shift the lever.
CAUTION(1) Do not move the gearshift lever
into reverse while the vehicle is
moving forward; doing so will
damage the transmission.
(2) Do not rest your foot on the
clutch pedal while driving as this
will cause premature clutch
wear or damage.
NOTE
(1) If it is hard to shift into 1st gear,
depress the clutch pedal again; the
shift will then be easier to make.
(2) To shift into reverse from 5th gear,
move the gearshift lever to the “N”
(Neutral) position, and then shift it into
reverse.
Changing gearsEI03CPDg
Always use care to change gear with the
vehicle speed matched to the engine
speed. Proper shifting will improve fuel
economy and prolong engine life.
Avoid shifting down at high speed, as this
may cause excessive engine speed (the
tachometer needle into the red zone) and
damage the engine.
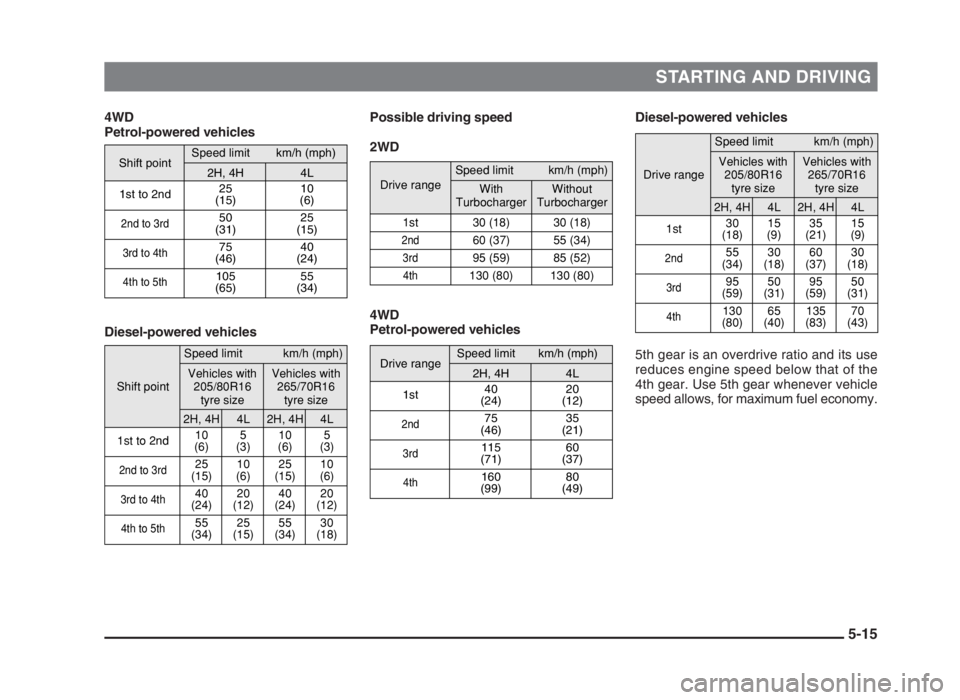
Economical driving speed
The following shift points are recommen-
ded to assist fuel economy. The driver
may vary these points to suit driving condi-
tions and load.
2WD
I29A011
2
4
RN5 3 1
05engL2_240082_4 22-01-2004 13:04 Page 5-14
Page 101 of 264
STARTING AND DRIVING
5-15
Diesel-powered vehicles
5th gear is an overdrive ratio and its use
reduces engine speed below that of the
4th gear. Use 5th gear whenever vehicle
speed allows, for maximum fuel economy. 4WD
Petrol-powered vehicles
Diesel-powered vehiclesPossible driving speed
2WD
4WD
Petrol-powered vehicles
Shift point
Speed limit km/h (mph)
2H, 4H4L
1st to 2nd25
(15)10
(6)
2nd to 3rd
50
(31)25
(15)
3rd to 4th
75
(46)40
(24)
4th to 5th
105
(65)55
(34)
Shift point
Speed limit km/h (mph)
Vehicles with
205/80R16
tyre sizeVehicles with
265/70R16
tyre size
2H, 4H4L2H, 4H4L
1st to 2nd10
(6)5
(3)10
(6)5
(3)
2nd to 3rd25
(15)10
(6)25
(15)10
(6)
3rd to 4th40
(24)20
(12)40
(24)20
(12)
4th to 5th55
(34)25
(15)55
(34)30
(18)
Drive range
Speed limit km/h (mph)
With
TurbochargerWithout
Turbocharger
1st 30 (18) 30 (18)
2nd
60 (37) 55 (34)
3rd
95 (59) 85 (52)
4th
130 (80) 130 (80)
Drive range
Speed limit km/h (mph)
2H, 4H4L
1st40
(24)20
(12)
2nd
75
(46)35
(21)
3rd
115
(71)60
(37)
4th
160
(99)80
(49)
Drive range
Speed limit km/h (mph)
Vehicles with
205/80R16
tyre sizeVehicles with
265/70R16
tyre size
2H, 4H4L2H, 4H4L
1st30
(18)15
(9)35
(21)15
(9)
2nd
55
(34)30
(18)60
(37)30
(18)
3rd
95
(59)50
(31)95
(59)50
(31)
4th
130
(80)65
(40)135
(83)70
(43)
05engL2_240082_4 22-01-2004 13:05 Page 5-15
Page 103 of 264
STARTING AND DRIVING
5-17 Selector positions
EI04B-Cp
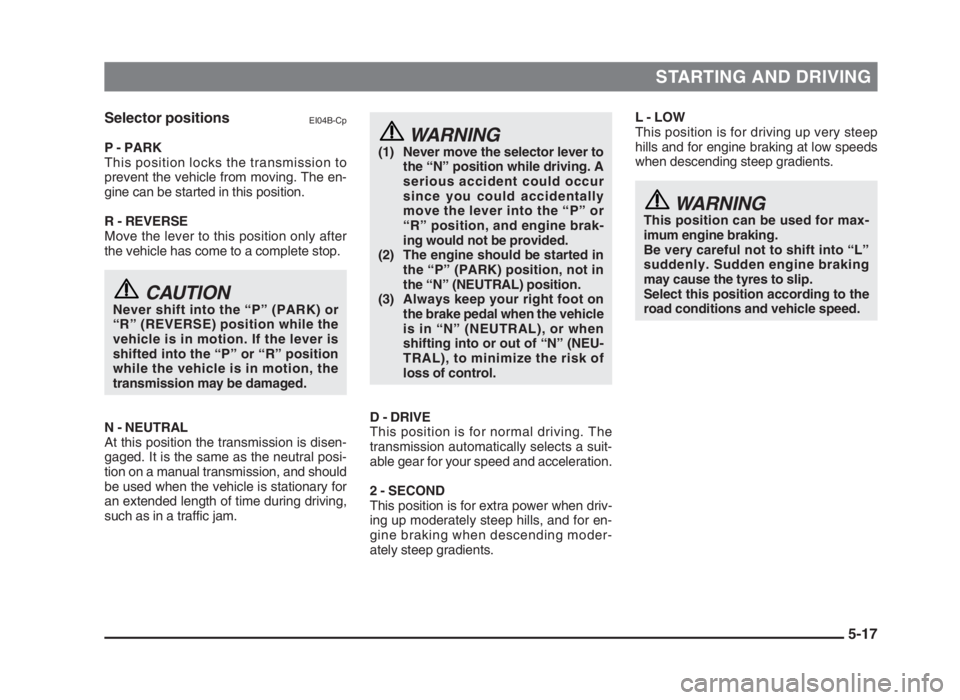
P - PARK
This position locks the transmission to
prevent the vehicle from moving. The en-
gine can be started in this position.
R - REVERSE
Move the lever to this position only after
the vehicle has come to a complete stop.
CAUTIONNever shift into the “P” (PARK) or
“R” (REVERSE) position while the
vehicle is in motion. If the lever is
shifted into the “P” or “R” position
while the vehicle is in motion, the
transmission may be damaged.
N - NEUTRAL
At this position the transmission is disen-
gaged. It is the same as the neutral posi-
tion on a manual transmission, and should
be used when the vehicle is stationary for
an extended length of time during driving,
such as in a traffic jam.
L - LOW
This position is for driving up very steep
hills and for engine braking at low speeds
when descending steep gradients.
WARNINGThis position can be used for max-
imum engine braking.
Be very careful not to shift into “L”
suddenly. Sudden engine braking
may cause the tyres to slip.
Select this position according to the
road conditions and vehicle speed.
WARNING(1) Never move the selector lever to
the “N” position while driving. A
serious accident could occur
since you could accidentally
move the lever into the “P” or
“R” position, and engine brak-
ing would not be provided.
(2) The engine should be started in
the “P” (PARK) position, not in
the “N” (NEUTRAL) position.
(3) Always keep your right foot on
the brake pedal when the vehicle
is in “N” (NEUTRAL), or when
shifting into or out of “N” (NEU-
TRAL), to minimize the risk of
loss of control.
D - DRIVE
This position is for normal driving. The
transmission automatically selects a suit-
able gear for your speed and acceleration.
2 - SECOND
This position is for extra power when driv-
ing up moderately steep hills, and for en-
gine braking when descending moder-
ately steep gradients.
05engL2_240082_4 22-01-2004 13:05 Page 5-17
Page 104 of 264
STARTING AND DRIVING
5-18
Operation of the automatic
transmission
EI04D-Cg
CAUTION(1) Before selecting a gear with the
engine running and the vehicle
stationary, fully depress the
brake pedal to prevent the vehi-
cle from creeping.
The vehicle will begin to move as
soon as the gear is engaged, es-
pecially when the engine speed
is high, at fast idle or the air con-
ditioning operating, the brakes
should only be released when
you are ready to drive away.
(2) Depress the brake pedal with the
right foot at all times.
Using the left foot could cause
driver movement delay in case
of an emergency.
(3) To prevent sudden acceleration,
never race the engine when
shifting from the “P” (PARK) or
“N” (NEUTRAL).
(4) Operating the accelerator pedal
while the other foot is resting on
the brake pedal will affect brak-
ing efficiency and may cause
premature wear of brake pads.
Do not race the engine with
brake pedal pressed.
This can damage the transmis-
sion.
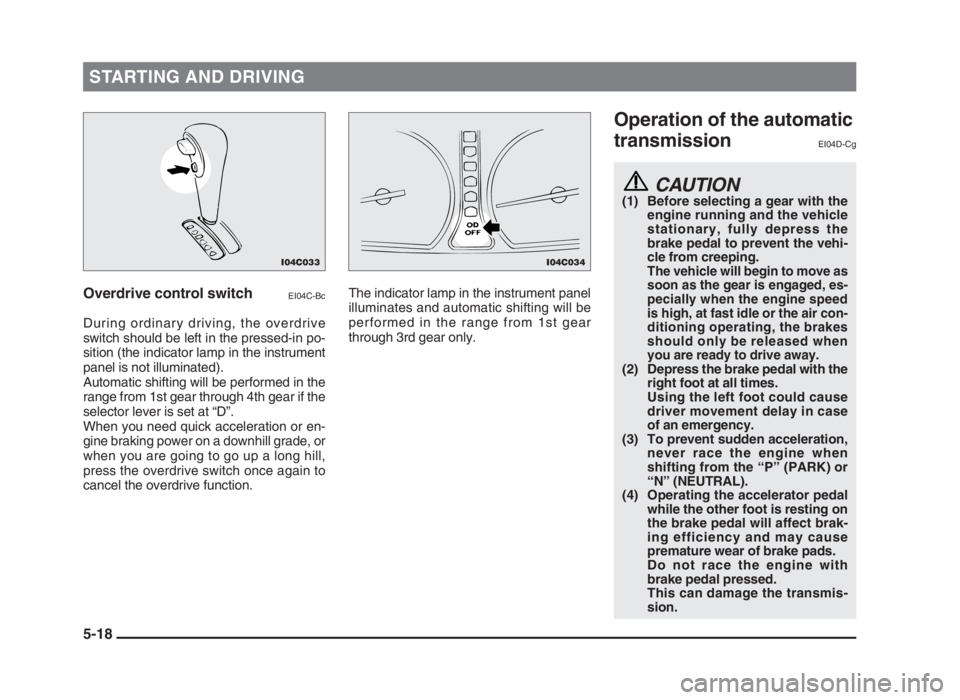
Overdrive control switchEI04C-Bc
During ordinary driving, the overdrive
switch should be left in the pressed-in po-
sition (the indicator lamp in the instrument
panel is not illuminated).
Automatic shifting will be performed in the
range from 1st gear through 4th gear if the
selector lever is set at “D”.
When you need quick acceleration or en-
gine braking power on a downhill grade, or
when you are going to go up a long hill,
press the overdrive switch once again to
cancel the overdrive function.The indicator lamp in the instrument panel
illuminates and automatic shifting will be
performed in the range from 1st gear
through 3rd gear only.
I04C033I04C034
05engL2_240082_4 22-01-2004 13:05 Page 5-18
Page 105 of 264
STARTING AND DRIVING
5-19 Passing acceleration
EI04F-Bb
For quick acceleration when passing, de-
pressing the accelerator pedal all the way
to the floor will cause the transmission to
automatically shift from 4th gear to 3rd
gear, from 3rd gear to 2nd gear or from
2nd gear to 1st gear, in accordance with
the driving speed, without having to move
the selector lever from either the “D” or “2”
positions.
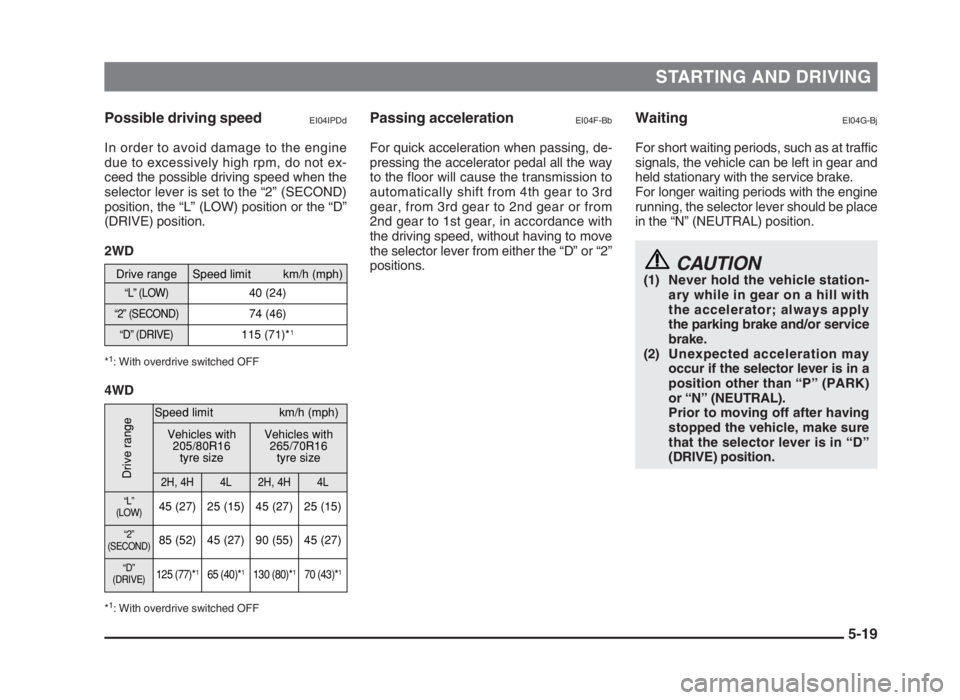
Possible driving speedEI04IPDd
In order to avoid damage to the engine
due to excessively high rpm, do not ex-
ceed the possible driving speed when the
selector lever is set to the “2” (SECOND)
position, the “L” (LOW) position or the “D”
(DRIVE) position.
2WD
*1: With overdrive switched OFF
4WD
*1: With overdrive switched OFF
WaitingEI04G-Bj
For short waiting periods, such as at traffic
signals, the vehicle can be left in gear and
held stationary with the service brake.
For longer waiting periods with the engine
running, the selector lever should be place
in the “N” (NEUTRAL) position.
CAUTION(1) Never hold the vehicle station-
ary while in gear on a hill with
the accelerator; always apply
the parking brake and/or service
brake.
(2) Unexpected acceleration may
occur if the selector lever is in a
position other than “P” (PARK)
or “N” (NEUTRAL).
Prior to moving off after having
stopped the vehicle, make sure
that the selector lever is in “D”
(DRIVE) position.
Drive range
Speed limit km/h (mph)
“L” (LOW)
40 (24)
“2” (SECOND)
74 (46)
“D” (DRIVE)
115 (71)*
1
Drive range
Speed limit km/h (mph)
Vehicles with
205/80R16
tyre sizeVehicles with
265/70R16
tyre size
2H, 4H4L2H, 4H4L
“L”
(LOW)45 (27) 25 (15) 45 (27) 25 (15)
“2”
(SECOND)85 (52) 45 (27) 90 (55) 45 (27)
“D”
(DRIVE)125 (77)*165 (40)*1130 (80)*170 (43)*1
05engL2_240082_4 22-01-2004 13:05 Page 5-19
Page 106 of 264
STARTING AND DRIVING
5-20 Parking
EI04H-Be
To park the vehicle, first bring it to a com-
plete stop, fully engage the parking brake,
and then move the selector lever to the “P”
(PARK) position.
If you are going to leave the vehicle unat-
tended, always switch off the engine and
remove the ignition key.
NOTE
On a slope, be sure to apply the parking
brake before moving the selector lever to
the “P” (PARK) position. If you move the
selector lever to the “P” (PARK) position
without first applying the parking brake, a
stronger than normal resistance force may
be encountered. In this situation, move
the selector lever strongly when you next
wish to drive.
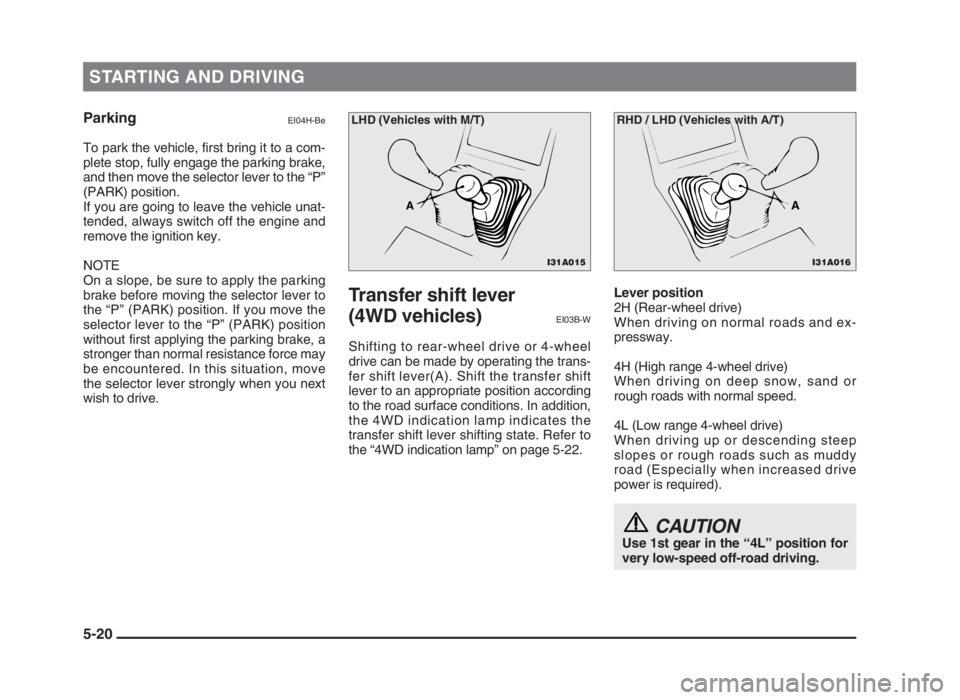
Transfer shift lever
(4WD vehicles)
EI03B-W
Shifting to rear-wheel drive or 4-wheel
drive can be made by operating the trans-
fer shift lever(A). Shift the transfer shift
lever to an appropriate position according
to the road surface conditions. In addition,
the 4WD indication lamp indicates the
transfer shift lever shifting state. Refer to
the “4WD indication lamp” on page 5-22.Lever position
2H (Rear-wheel drive)
When driving on normal roads and ex-
pressway.
4H (High range 4-wheel drive)
When driving on deep snow, sand or
rough roads with normal speed.
4L (Low range 4-wheel drive)
When driving up or descending steep
slopes or rough roads such as muddy
road (Especially when increased drive
power is required).
CAUTIONUse 1st gear in the “4L” position for
very low-speed off-road driving.
I31A015
A
LHD (Vehicles with M/T)
I31A016
A
RHD / LHD (Vehicles with A/T)
05engL2_240082_4 22-01-2004 13:05 Page 5-20
Page 111 of 264
STARTING AND DRIVING
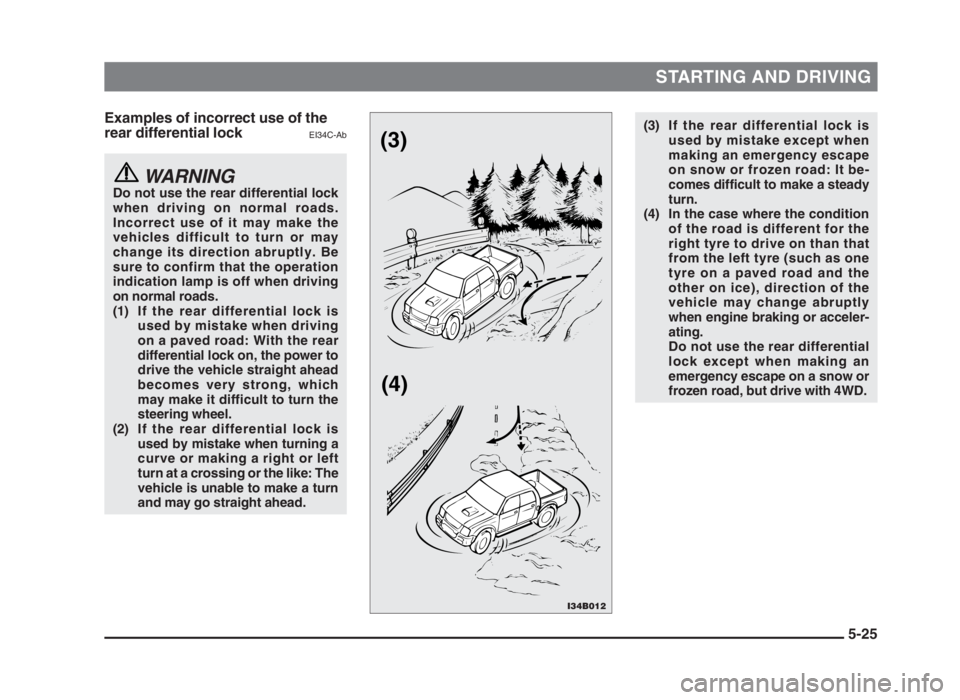
5-25 Examples of incorrect use of the
rear differential lock
EI34C-Ab
WARNINGDo not use the rear differential lock
when driving on normal roads.
Incorrect use of it may make the
vehicles difficult to turn or may
change its direction abruptly. Be
sure to confirm that the operation
indication lamp is off when driving
on normal roads.
(1) If the rear differential lock is
used by mistake when driving
on a paved road: With the rear
differential lock on, the power to
drive the vehicle straight ahead
becomes very strong, which
may make it difficult to turn the
steering wheel.
(2) If the rear differential lock is
used by mistake when turning a
curve or making a right or left
turn at a crossing or the like: The
vehicle is unable to make a turn
and may go straight ahead.
(3) If the rear differential lock is
used by mistake except when
making an emergency escape
on snow or frozen road: It be-
comes difficult to make a steady
turn.
(4) In the case where the condition
of the road is different for the
right tyre to drive on than that
from the left tyre (such as one
tyre on a paved road and the
other on ice), direction of the
vehicle may change abruptly
when engine braking or acceler-
ating.
Do not use the rear differential
lock except when making an
emergency escape on a snow or
frozen road, but drive with 4WD.
I34B012
(3)
(4)
05engL2_240082_4 22-01-2004 13:05 Page 5-25
Page 112 of 264
STARTING AND DRIVING
5-26
Correct 4-wheel drive
operation
EI32ABDa
By shifting lock to 4-wheel drive (4H, 4L),
both axles of the vehicle are rigidly con-
nected with each other. This improves the
traction characteristics. When turning
sharp corners or moving forward and
backward repeatedly, however, the drive
line is stressed, which is felt as a braking
effect. A 4-wheel drive vehicle can accele-
rate more quickly and smoothly.
However, note that the braking distance is
not shorter than that of a rear-wheel drive
vehicle.
When using 4-wheel drive on rough roads
(snow, mud, sand, etc.), it is important to
operate the vehicle correctly.
NOTE
(1) The driving posture should be more
upright and closer to the wheel than
usual; adjust the seat to a good posi-
tion for easy steering and pedal oper-
ation. Be sure to wear the seat belt.
(2) After driving on rough roads, check
each part of the vehicle and wash it
thoroughly with water. Refer to the
“Vehicle care” section and “Inspection
and maintenance following rough
road operation” sections.Driving on dry paved road and highway
Select 2WD (2H) to drive on dry paved
roads. Especially on dry highway, never
select the 4WD (4H or 4L).
CAUTIONSelecting 4-wheel drive to drive on
dry paved road will increase the fuel
consumption with possible noise
generation and early tyre wear.
It may also increase the differential
oil temperature, resulting in possible
damage to the driving system. Fur-
ther, the drive train will be subjected
to excessive loading, possibly lead-
ing to oil leakage, component
seizure, or other serious faults.
Driving on snowy or icy roads
Set the transfer shift lever to “4H” or “4L” in
accordance with the road conditions, and
then gradually depress the accelerator
pedal for a smooth start.
NOTE
(1) The use of snow tyres and/or tyre
chains is recommended.
(2) Maintain a safe distance between
vehicles, avoid sudden braking, and
use engine braking (downshifting).
CAUTIONAvoid sudden braking, sudden ac-
celeration, and sharp turning; such
operations could cause skidding
and spinouts.
Driving on sandy or muddy roads
Set the transfer shift lever to “4H” or “4L”,
and then gradually depress the accelera-
tor pedal for a smooth start. Keep the
pressure on the accelerator pedal as con-
stant as possible, and drive at low speed.
05engL2_240082_4 22-01-2004 13:05 Page 5-26
Page 113 of 264
STARTING AND DRIVING
5-27
CAUTIONS(1) Do not force the vehicle to driver
recklessly on sandy surfaces. In
comparison with normal road
surfaces, the engine and other
drive-system components are
put under excessive strain when
driving on such a surface, and
this could lead to accidents.
(2) If any of following conditions
occur while the vehicle is being
driven, immediately park your
vehicle in a safe place and follow
this procedure:
• The needle in the temperature
gauge approaches the over-
heating zone.
Refer to the “Engine overheat-
ing” on page 8-23.
• A/T fluid temperature warning
lamp illuminates.
Refer to the “A/T warning
lamp” on page 4-8.
(4) If it is necessary to drive in extremely
muddy conditions, the use of tyre
chains is recommended. Because the
extent of muddy conditions is difficult
to judge and the vehicle could be-
come bogged down very deeply, op-
eration should be at a low speed. If
possible, get out of the vehicle and
check the conditions ahead before
proceeding.
(5) Driving over roads in coastal areas or
roads on which anti-skid preparations
have been spread can cause rust
on the vehicle; wash the vehicle
thoroughly as soon as possible after
such use.
WARNINGWhen attempting to rock your vehi-
cle out of a stuck position, be sure
that the area around the vehicle is
clear of people and physical objects.
The rocking motion may cause the
vehicle to suddenly launch forward
or backward, causing injury or dam-
age to nearby people or objects.
NOTE
(1) Avoid sudden braking, acceleration,
and turning; such operations could
result in the vehicle becoming stuck.
(2) If the vehicle becomes stuck in sandy
or muddy roads, it can often be
moved by a rocking motion. Move the
selector lever alternately between the
“D” (DRIVE) and “R” (REVERSE)
position, (with manual transmission,
between 1st and Reverse), while
applying slight pressure to the accel-
erator pedal.
(3) It is recommended to start the vehicle
with parking brake partially, but not
completely, applied by slightly pulling
the parking brake lever.
After the vehicle has become free, do
not forget to release the parking
brake.
05engL2_240082_4 22-01-2004 13:05 Page 5-27