battery MITSUBISHI L200 2015 (in English) User Guide
[x] Cancel search | Manufacturer: MITSUBISHI, Model Year: 2015, Model line: L200, Model: MITSUBISHI L200 2015Pages: 418, PDF Size: 25.8 MB
Page 118 of 418
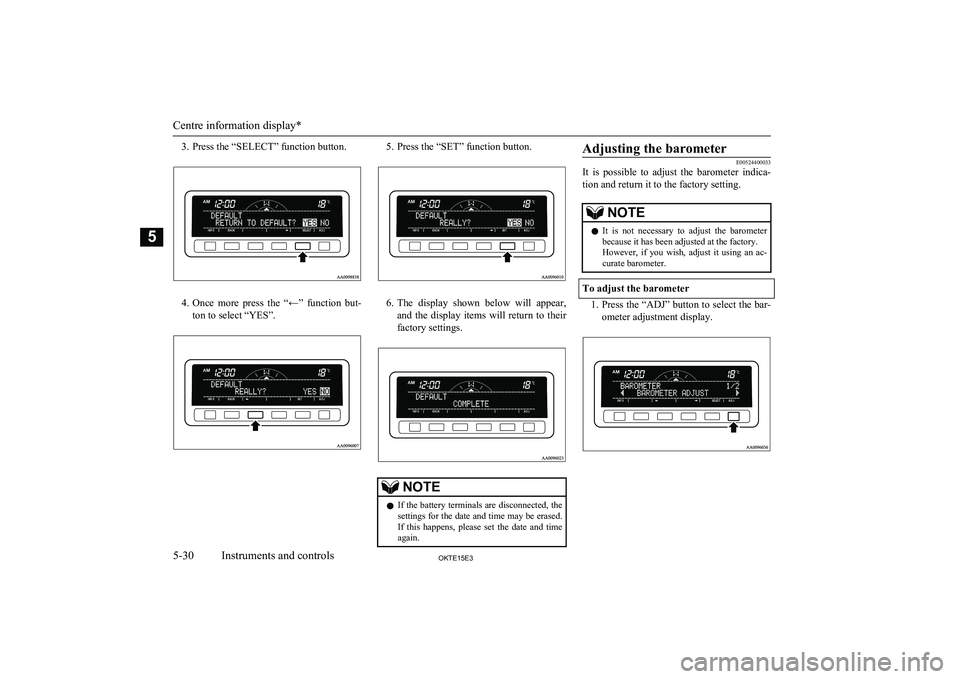
3. Press the “SELECT” function button.
4.Once more press the “←” function but-
ton to select “YES”.
5. Press the “SET” function button.
6. The display shown below will appear,
and the display items will return to their
factory settings.
NOTEl If the battery terminals are disconnected, the
settings for the date and time may be erased. If this happens, please set the date and time
again.Adjusting the barometer
E00524400033
It is possible to adjust the barometer indica-
tion and return it to the factory setting.NOTEl It is not necessary to adjust the barometer
because it has been adjusted at the factory.
However, if you wish, adjust it using an ac- curate barometer.
To adjust the barometer
1. Press the “ADJ” button to select the bar-
ometer adjustment display.
Centre information display*
5-30OKTE15E3Instruments and controls5
Page 120 of 418
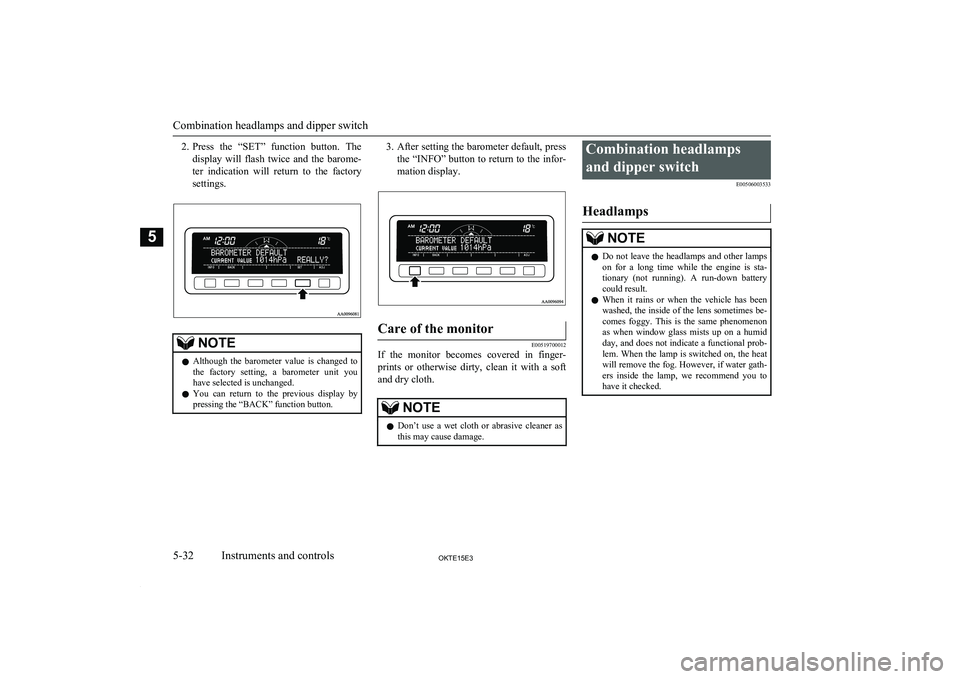
2.Press the “SET” function button. The
display will flash twice and the barome- ter indication will return to the factory
settings.NOTEl Although the barometer value is changed to
the factory setting, a barometer unit you have selected is unchanged.
l You can return to the previous display by
pressing the “BACK” function button.3. After setting the barometer default, press
the “INFO” button to return to the infor-
mation display.Care of the monitor
E00519700012
If the monitor becomes covered in finger-
prints or otherwise dirty, clean it with a soft and dry cloth.
NOTEl Don’t use a wet cloth or abrasive cleaner as
this may cause damage.Combination headlamps
and dipper switch E00506003533
HeadlampsNOTEl Do not leave the headlamps and other lamps
on for a long time while the engine is sta-tionary (not running). A run-down batterycould result.
l When it rains or when the vehicle has been
washed, the inside of the lens sometimes be-
comes foggy. This is the same phenomenon as when window glass mists up on a humid
day, and does not indicate a functional prob- lem. When the lamp is switched on, the heat
will remove the fog. However, if water gath-
ers inside the lamp, we recommend you to have it checked.
Combination headlamps and dipper switch
5-32OKTE15E3Instruments and controls5
Page 125 of 418
NOTElIf the lamp flashes unusually quickly, the
bulb in a turn-signal lamp may have burned out. We recommend you to have the vehicle
inspected.
l It is possible to activate the following func-
tions. For further information, we recom-
mend you to consult a MITSUBISHI
MOTORS Authorized Service Point.
• Flashing of the turn-signal lamps and the
indication lamp in the instrument clusterwhen the lever is operated with the igni-
tion switch in the “ACC” position
• Flashing of the turn-signal lamps and the
indication lamp in the instrument cluster three times when you move the lever to (2) slightly then release it
• The time required to operate the lever for
the 3-flash function can be adjusted.Hazard warning flasher
switch E00506602066
Use the hazard warning flasher switch when
the vehicle has to be parked on the road for
any emergency.
The hazard warning flashers can always be operated, regardless of the position of the ig-
nition key.
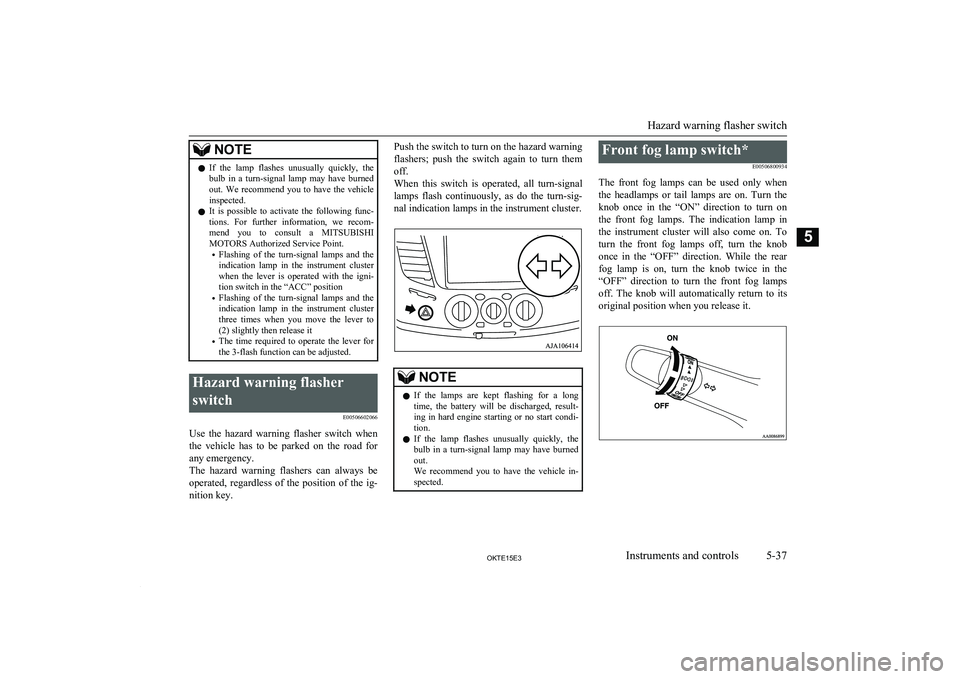
Push the switch to turn on the hazard warning
flashers; push the switch again to turn them off.
When this switch is operated, all turn-signal
lamps flash continuously, as do the turn-sig- nal indication lamps in the instrument cluster.NOTEl If the lamps are kept flashing for a long
time, the battery will be discharged, result-
ing in hard engine starting or no start condi- tion.
l If the lamp flashes unusually quickly, the
bulb in a turn-signal lamp may have burned
out.
We recommend you to have the vehicle in- spected.Front fog lamp switch*
E00506800934
The front fog lamps can be used only when the headlamps or tail lamps are on. Turn the knob once in the “ON” direction to turn on
the front fog lamps. The indication lamp in
the instrument cluster will also come on. To turn the front fog lamps off, turn the knobonce in the “OFF” direction. While the rear fog lamp is on, turn the knob twice in the
“OFF” direction to turn the front fog lamps off. The knob will automatically return to its
original position when you release it.
Hazard warning flasher switch
5-37OKTE15E3Instruments and controls5
Page 145 of 418
CAUTIONlDo not remove the ignition key from the ig-
nition switch while driving. The steeringwheel will lock, causing loss of control.
l If the engine is stopped while driving, the
brake servomechanism will cease to function and braking efficiency will deteriorate. Also,
the power steering system will not function
and it will require greater manual effort to
operate the steering.
l Do not leave the key in the “ON” position
for a long time when the engine is not run- ning, doing so will cause the battery to be
discharged.
l Do not turn the key to the “START” position
when the engine is running, doing so could damage the starter motor.NOTEl For vehicles with an
A/T, when the selector
lever is in the “P” (PARK) position, do not operate the lock button of selector lever re-
peatedly for more than 30 seconds. You may
not be able to remove the key from the igni-
tion switch, because the protection circuit is
activated. If this occurs, wait a few moments before removing the key.
Refer to “Selector lever operation” on page
6-19.Steering wheel lock
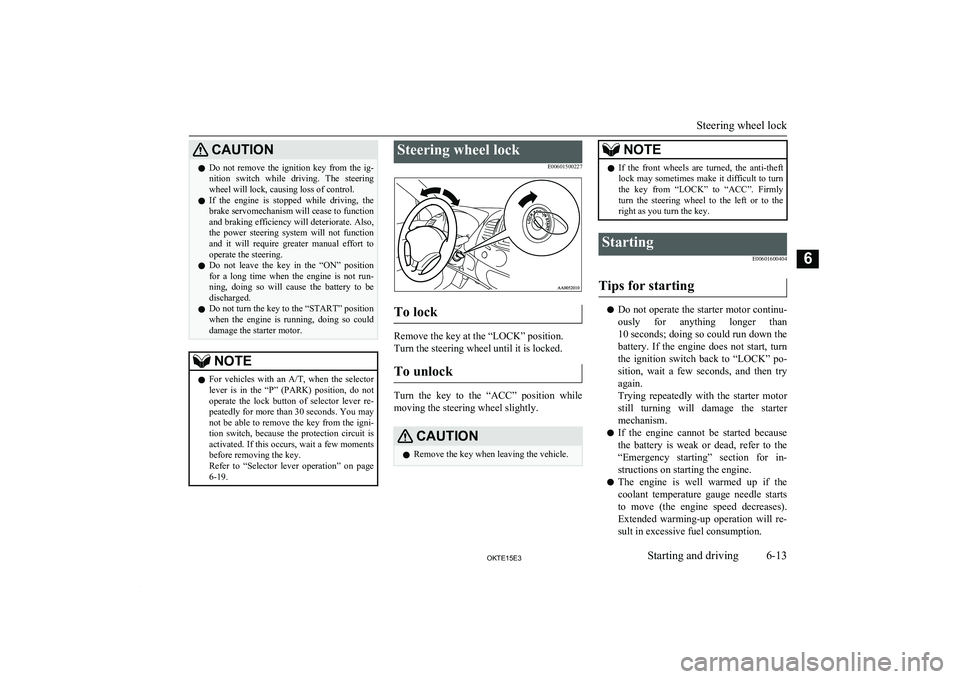
E00601500227
To lock
Remove the key at the “LOCK” position.
Turn the steering wheel until it is locked.
To unlock
Turn the key to the “ACC” position while
moving the steering wheel slightly.
CAUTIONl Remove the key when leaving the vehicle.NOTElIf the front wheels are turned, the anti-theft
lock may sometimes make it difficult to turnthe key from “LOCK” to “ACC”. Firmly
turn the steering wheel to the left or to the right as you turn the key.Starting
E00601600404
Tips for starting
lDo not operate the starter motor continu-
ously for anything longer than10 seconds ; doing so could run down the
battery. If the engine does not start, turn
the ignition switch back to “LOCK” po-
sition, wait a few seconds, and then try again.
Trying repeatedly with the starter motor still turning will damage the starter
mechanism.
l If the engine cannot be started because
the battery is weak or dead, refer to the“Emergency starting” section for in- structions on starting the engine.
l The engine is well warmed up if the
coolant temperature gauge needle starts
to move (the engine speed decreases).
Extended warming-up operation will re-
sult in excessive fuel consumption.
Steering wheel lock
6-13OKTE15E3Starting and driving6
Page 151 of 418
Automatic transmissionSports Mode 4A/T, 5A/T E00603200710NOTElDuring running-in period or immediately af-
ter reconnection of the battery cable, there may be a case where gear shifts are not
made smoothly. This does not indicate a faulty transmission.
Gear shifts will become smooth after the transmission has been shifted several times
by the electronic control system.Selector lever operation
E00603301082
The transmission has 4 forward gears (4A/T),
5 forward gears (5A/T) and 1 reverse gear.
The individual gears are selected automati- cally, depending on the position of the gear selector lever, the speed of the vehicle and
the position of the accelerator pedal.
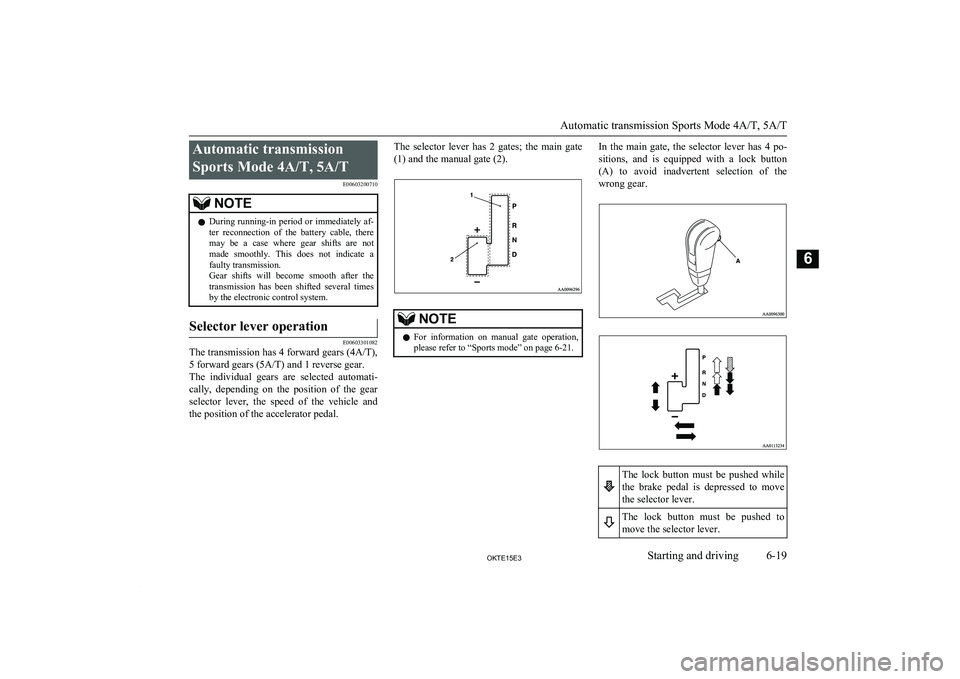
The selector lever has 2 gates; the main gate
(1) and the manual gate (2).NOTEl For information on manual gate operation,
please refer to “Sports mode” on page 6-21.In the main gate, the selector lever has 4 po-
sitions, and is equipped with a lock button
(A) to avoid inadvertent selection of the wrong gear.The lock button must be pushed while the brake pedal is depressed to move
the selector lever.The lock button must be pushed to move the selector lever.
Automatic transmission Sports Mode 4A/T, 5A/T
6-19OKTE15E3Starting and driving6
Page 152 of 418
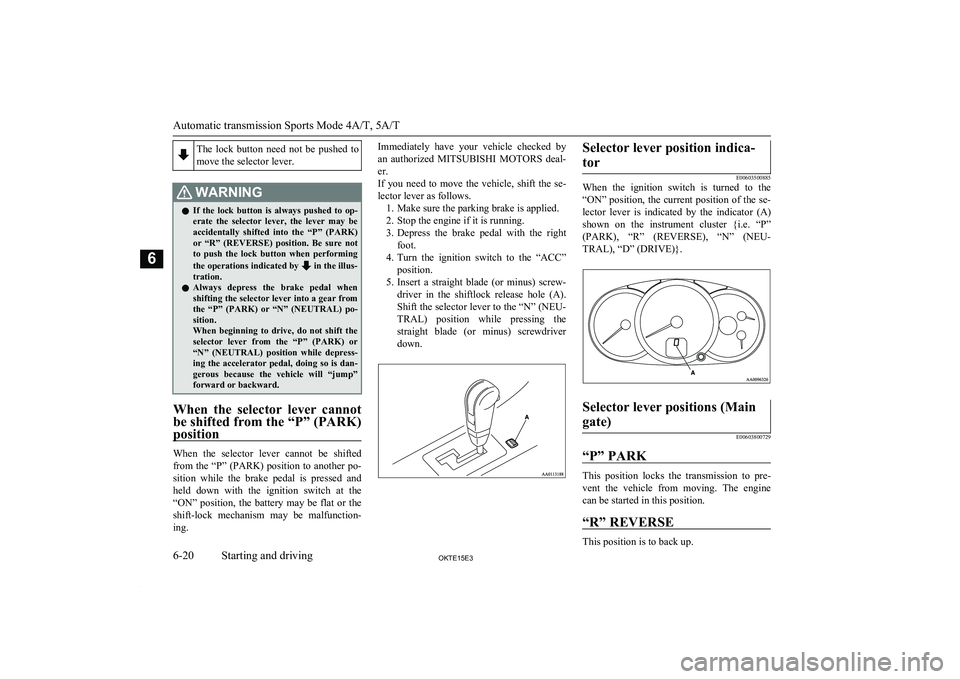
The lock button need not be pushed to
move the selector lever.WARNINGl If the lock button is always pushed to op-
erate the selector lever, the lever may beaccidentally shifted into the “P” (PARK)
or “R” (REVERSE) position. Be sure not to push the lock button when performing
the operations indicated by
in the illus-
tration.
l Always depress the brake pedal when
shifting the selector lever into a gear from the “P” (PARK) or “N” (NEUTRAL) po-sition.
When beginning to drive, do not shift the
selector lever from the “P” (PARK) or
“N” (NEUTRAL) position while depress-
ing the accelerator pedal, doing so is dan- gerous because the vehicle will “jump”
forward or backward.
When the selector lever cannot
be shifted from the “P” (PARK)
position
When the selector lever cannot be shifted from the “P” (PARK) position to another po-
sition while the brake pedal is pressed and
held down with the ignition switch at the
“ON” position, the battery may be flat or the shift-lock mechanism may be malfunction- ing.
Immediately have your vehicle checked by
an authorized MITSUBISHI MOTORS deal-
er.
If you need to move the vehicle, shift the se- lector lever as follows. 1. Make sure the parking brake is applied.
2. Stop the engine if it is running.
3. Depress the brake pedal with the right
foot.
4. Turn the ignition switch to the “ACC”
position.
5. Insert a straight blade (or minus) screw-
driver in the shiftlock release hole (A).
Shift the selector lever to the “N” (NEU-
TRAL) position while pressing the straight blade (or minus) screwdriver down.Selector lever position indica-
tor
E00603500885
When the ignition switch is turned to the
“ON” position, the current position of the se- lector lever is indicated by the indicator (A)
shown on the instrument cluster {i.e. “P” (PARK), “R” (REVERSE), “N” (NEU-
TRAL), “D” (DRIVE)}.
Selector lever positions (Main
gate)
E00603800729
“P” PARK
This position locks the transmission to pre- vent the vehicle from moving. The engine
can be started in this position.
“R” REVERSE
This position is to back up.
Automatic transmission Sports Mode 4A/T, 5A/T
6-20OKTE15E3Starting and driving6
Page 179 of 418
If the warning lamp illuminateswhile driving
E00607302436
If only the ABS warning lamp illuminates
l Avoid hard braking and high-speed driv-
ing. Stop the vehicle in a safe place.
Restart the engine and check to see whether the lamp goes out after a few
minutes driving; if it then remains off during driving, there is no problem.
However, if the lamp does not go out, or if it lights up again when the vehicle is
driven, we recommend you to have the
vehicle checked as soon as possible.
l The ABS warning lamp can illuminate if
the battery voltage is insufficient when the engine is started. In this case, it doesnot indicate an ABS fault.
Charge the battery by allowing the en- gine to idle for a while.
If the battery has been charged but the
ABS warning lamp continues to illumi-
nate or illuminates intermittently, have
the vehicle inspected.
If the ABS warning lamp and
brake warning lamp illuminate
at the same time
The ABS and brake force distribution func- tion will not work, so hard braking could
make the vehicle unstable.
Avoid hard braking and high-speed driving.
Stop the vehicle in a safe place and contact a MITSUBISHI MOTORS Authorized Service
Point.
NOTEl Immediately after the vehicle starts moving
after engine start up, a whining sound of a motor will be heard from the engine com-
partment. If the brake pedal is depressed at that moment, you can feel the brake pedal
pulsating.
This pulsation is due to the self-diagnosis
operation of the ABS and does not indicate a malfunction.
l After driving on snowy roads, remove any
snow and ice which may have become ad-
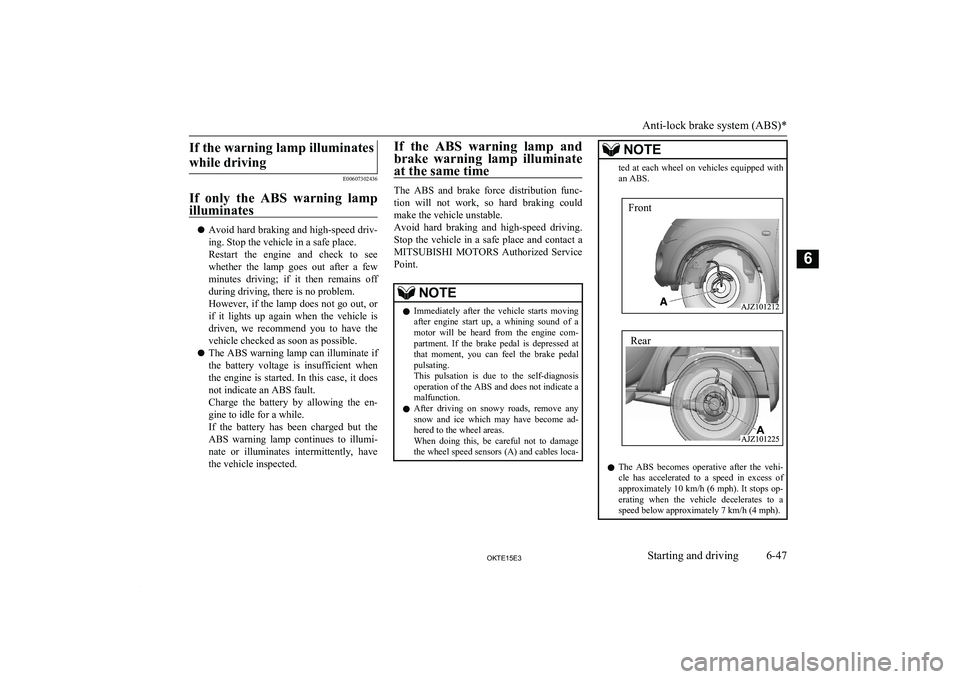
hered to the wheel areas.
When doing this, be careful not to damage the wheel speed sensors (A) and cables loca-NOTEted at each wheel on vehicles equipped with
an ABS.
l The ABS becomes operative after the vehi-
cle has accelerated to a speed in excess of approximately 10 km/h (6 mph). It stops op-
erating when the vehicle decelerates to a speed below approximately 7 km/h (4 mph).
Anti-lock brake system (ABS)*
6-47OKTE15E3Starting and driving6 Front Rear
Page 184 of 418

NOTElIf the cruise control is on when the ignition
switch is turned to the “LOCK” or “ACC” position, cruise control will be on automati- cally the next time you start the engine.
The “CRUISE” indication lamp will also be
on.
l If the battery voltage is insufficient, the
memory data for the cruise control may be erased.
As a result, the “CRUISE” indication lamp may not come on when you restart the en-
gine.
If this happens, press the “ON OFF” switch once again to turn on the cruise control.
2. Accelerate or decelerate to your desired
speed, then press and release the “COAST SET” switch (B) when the
“CRUISE” indication lamp is illumina- ted. The vehicle will then maintain the
desired speed.
NOTEl When you release the “COAST SET”
switch, the vehicle speed will be set.To increase the set speed
E00609400570
There are 2 ways to increase the set speed.
“ACC RES” switch
Press and hold the “ACC RES” switch (C)while driving at the set speed, and your speed
will then gradually increase.
When you reach your desired speed, release
the switch. Your new cruising speed is now set.
To increase your speed in small amounts,
press the “ACC RES” switch for less than about 1 second and release it. Each time youpress the “ACC RES” switch, your vehicle
will go about 1.6 km/h (1 mph) faster.
Accelerator pedal
While driving at the set speed, use the accel-
erator pedal to reach your desired speed and
then press the “COAST SET” switch (B) and release the switch momentarily to set a new
desired cruising speed.
To decrease the set speed
E00609500500
There are 2 ways to decrease the set speed.
“COAST SET” switch
Press and hold the “COAST SET” switch (B)
while driving at the set speed, and your speed will slow down gradually.
Cruise control*
6-52OKTE15E3Starting and driving6
Page 234 of 418
To activate the external audioinput mode
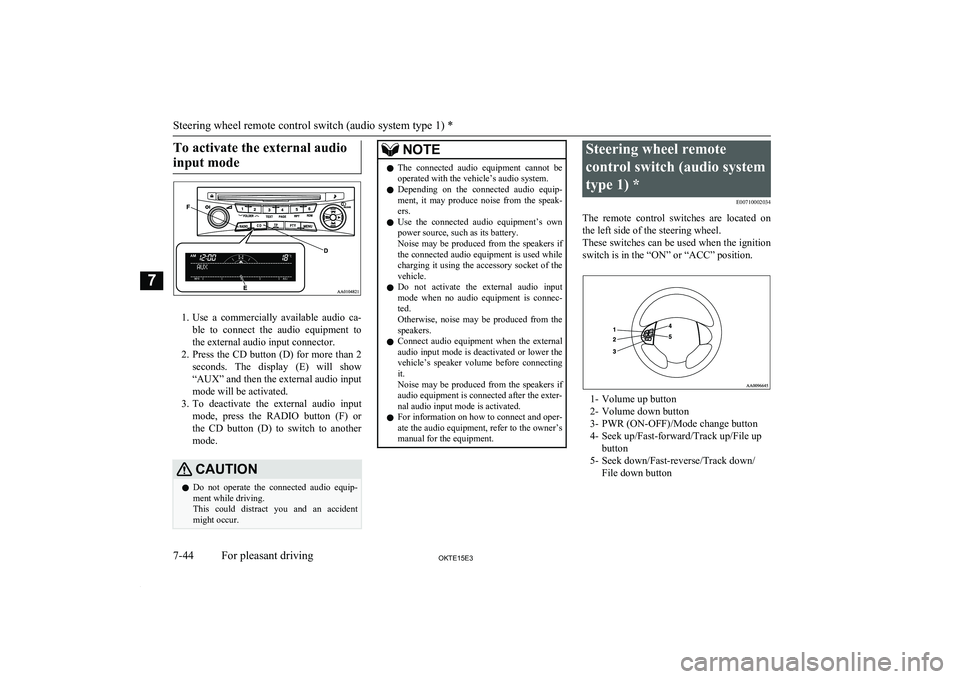
1. Use a commercially available audio ca-
ble to connect the audio equipment to
the external audio input connector.
2. Press the CD button (D) for more than 2
seconds. The display (E) will show
“AUX” and then the external audio input
mode will be activated.
3. To deactivate the external audio input
mode, press the RADIO button (F) orthe CD button (D) to switch to another
mode.
CAUTIONl Do not operate the connected audio equip-
ment while driving.
This could distract you and an accident might occur.NOTEl The connected audio equipment cannot be
operated with the vehicle’s audio system.
l Depending on the connected audio equip-
ment, it may produce noise from the speak- ers.
l Use the connected audio equipment’s own
power source, such as its battery.
Noise may be produced from the speakers if the connected audio equipment is used while
charging it using the accessory socket of the vehicle.
l Do not activate the external audio input
mode when no audio equipment is connec-
ted.
Otherwise, noise may be produced from the
speakers.
l Connect audio equipment when the external
audio input mode is deactivated or lower the
vehicle’s speaker volume before connecting it.
Noise may be produced from the speakers if
audio equipment is connected after the exter-
nal audio input mode is activated.
l For information on how to connect and oper-
ate the audio equipment, refer to the owner’s manual for the equipment.Steering wheel remote
control switch (audio system type 1) * E00710002034
The remote control switches are located on the left side of the steering wheel.
These switches can be used when the ignition
switch is in the “ON” or “ACC” position.
1- Volume up button
2- Volume down button
3- PWR (ON-OFF)/Mode change button
4- Seek up/Fast-forward/Track up/File up button
5- Seek down/Fast-reverse/Track down/ File down button
Steering wheel remote control switch (audio system type 1) *
7-44OKTE15E3For pleasant driving7
Page 264 of 418
NOTElEach time the 1RPT key is pressed, this
switches in the order Repeat OFF, 1 track re-
peat, All track repeat, and Repeat OFF.
Random Playback (RDM)
Press the 2RDM key.
Play the tracks in the Bluetooth Audio device in a random order.
NOTEl Pressing again will cancel.
Scan Playback (SCAN)
Press the PTY/SCAN key.
Play the first 10 seconds of each of the tracks on the whole Bluetooth Audio device in or-
der.
NOTEl Press this button again during playback if
you wish to hear that track, and that trackwill play normally.Use AUX (audio system type
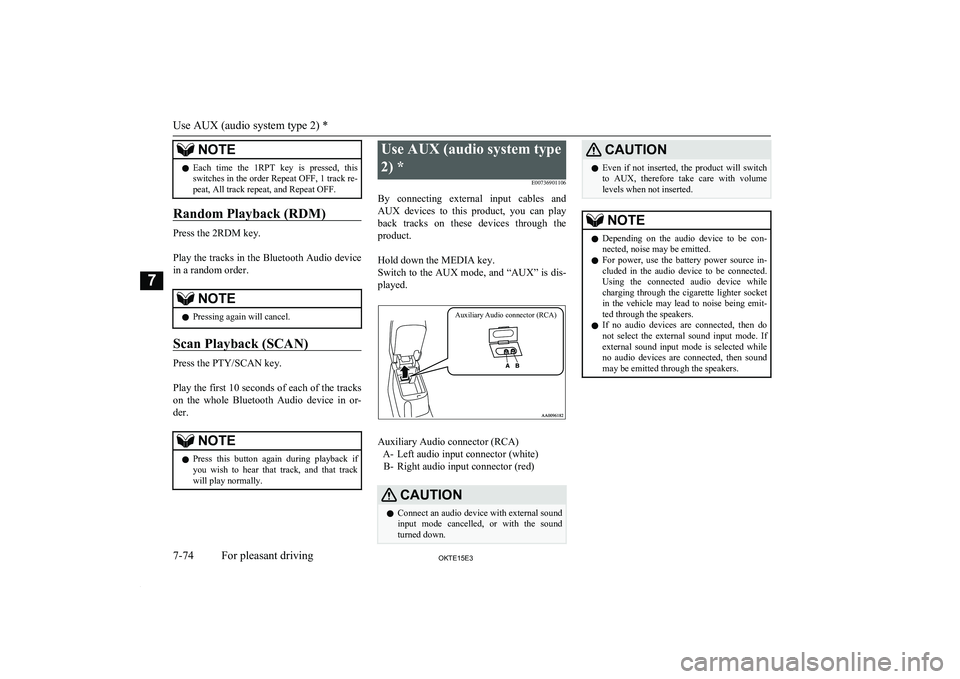
2) * E00736901106
By connecting external input cables and AUX devices to this product, you can play
back tracks on these devices through the product.
Hold down the MEDIA key.
Switch to the AUX mode, and “AUX” is dis- played.
Auxiliary Audio connector (RCA)
Auxiliary Audio connector (RCA) A- Left audio input connector (white)B- Right audio input connector (red)
CAUTIONl Connect an audio device with external sound
input mode cancelled, or with the soundturned down.CAUTIONl Even if not inserted, the product will switch
to AUX, therefore take care with volume
levels when not inserted.NOTEl Depending on the audio device to be con-
nected, noise may be emitted.
l For power, use the battery power source in-
cluded in the audio device to be connected.
Using the connected audio device while charging through the cigarette lighter socket
in the vehicle may lead to noise being emit- ted through the speakers.
l If no audio devices are connected, then do
not select the external sound input mode. If external sound input mode is selected while
no audio devices are connected, then sound
may be emitted through the speakers.
Use AUX (audio system type 2) *
7-74OKTE15E3For pleasant driving7