seats MITSUBISHI L200 2015 (in English) User Guide
[x] Cancel search | Manufacturer: MITSUBISHI, Model Year: 2015, Model line: L200, Model: MITSUBISHI L200 2015Pages: 418, PDF Size: 25.8 MB
Page 53 of 418
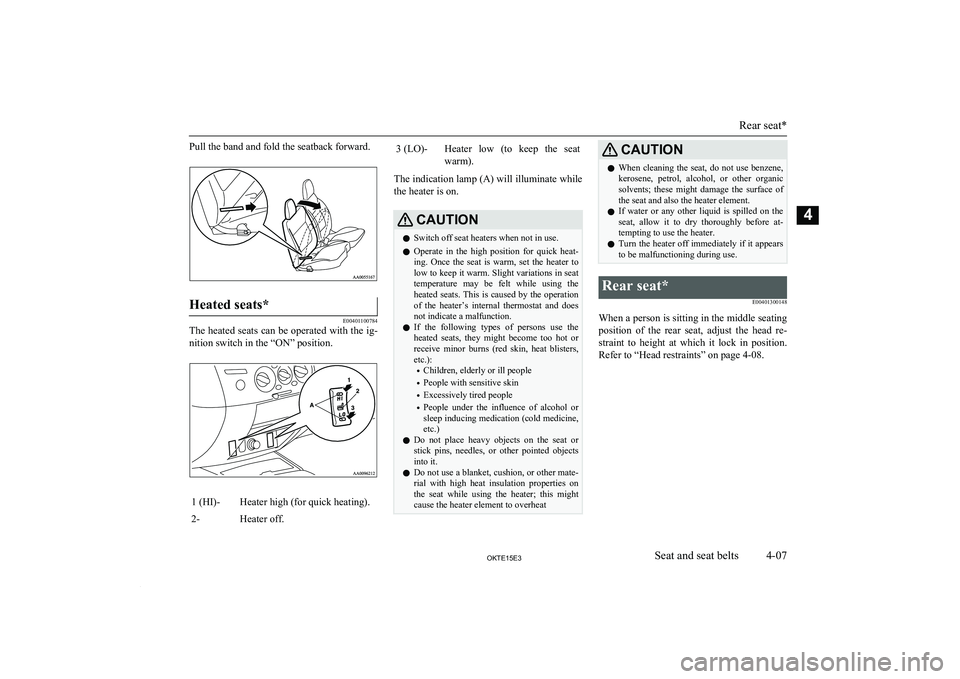
Pull the band and fold the seatback forward.Heated seats*
E00401100784
The heated seats can be operated with the ig-nition switch in the “ON” position.
1 (HI)-Heater high (for quick heating).2-Heater off.3 (LO)-Heater low (to keep the seat
warm).
The indication lamp (A) will illuminate while
the heater is on.
CAUTIONl Switch off seat heaters when not in use.
l Operate in the high position for quick heat-
ing. Once the seat is warm, set the heater to low to keep it warm. Slight variations in seat
temperature may be felt while using the heated seats. This is caused by the operationof the heater’s internal thermostat and does
not indicate a malfunction.
l If the following types of persons use the
heated seats, they might become too hot or receive minor burns (red skin, heat blisters,
etc.):
• Children, elderly or ill people
• People with sensitive skin
• Excessively tired people
• People under the influence of alcohol or
sleep inducing medication (cold medicine,
etc.)
l Do not place heavy objects on the seat or
stick pins, needles, or other pointed objects into it.
l Do not use a blanket, cushion, or other mate-
rial with high heat insulation properties on the seat while using the heater; this might
cause the heater element to overheatCAUTIONl When cleaning the seat, do not use benzene,
kerosene, petrol, alcohol, or other organicsolvents; these might damage the surface of
the seat and also the heater element.
l If water or any other liquid is spilled on the
seat, allow it to dry thoroughly before at-tempting to use the heater.
l Turn the heater off immediately if it appears
to be malfunctioning during use.Rear seat*
E00401300148
When a person is sitting in the middle seatingposition of the rear seat, adjust the head re-straint to height at which it lock in position.
Refer to “Head restraints” on page 4-08.
Rear seat*
4-07OKTE15E3Seat and seat belts4
Page 55 of 418
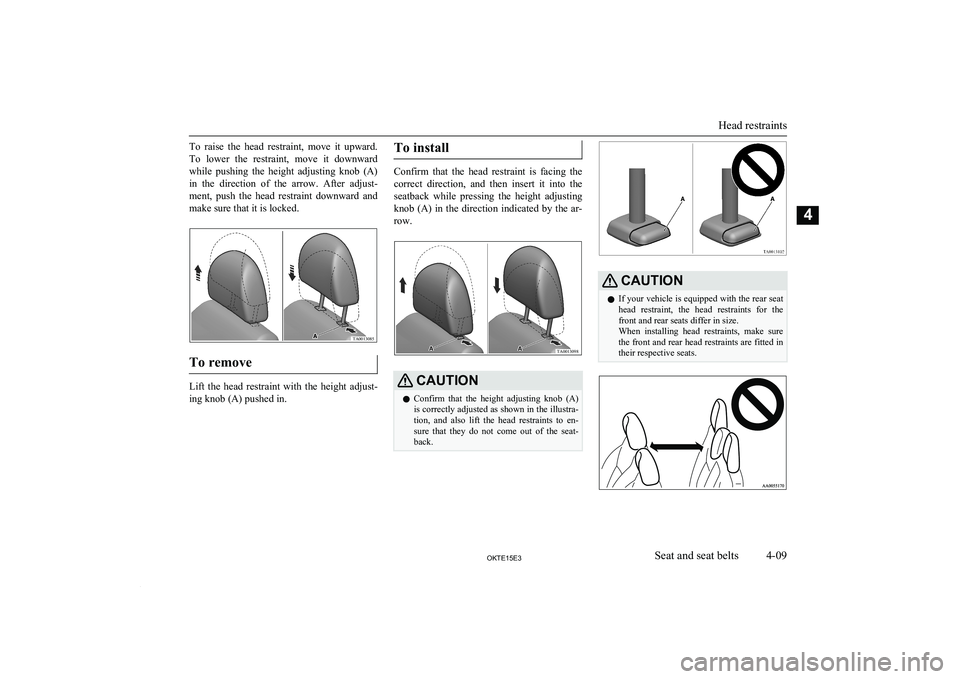
To raise the head restraint, move it upward.To lower the restraint, move it downward while pushing the height adjusting knob (A)
in the direction of the arrow. After adjust- ment, push the head restraint downward and
make sure that it is locked.
To remove
Lift the head restraint with the height adjust-
ing knob (A) pushed in.
To install
Confirm that the head restraint is facing the
correct direction, and then insert it into the seatback while pressing the height adjusting
knob (A) in the direction indicated by the ar-
row.
CAUTIONl Confirm that the height adjusting knob (A)
is correctly adjusted as shown in the illustra- tion, and also lift the head restraints to en- sure that they do not come out of the seat-back.CAUTIONl If your vehicle is equipped with the rear seat
head restraint, the head restraints for thefront and rear seats differ in size.
When installing head restraints, make sure
the front and rear head restraints are fitted in
their respective seats.
Head restraints
4-09OKTE15E3Seat and seat belts4TA0013085 TA0013098
Page 58 of 418
WARNINGlIn order to reduce the risk of serious or
fatal injury in an accident, always wearyour own seat belt. Do not allow anyone
to ride in your vehicle unless he or she is also seated and wearing a seat belt. Chil-
dren should additionally be restrained in a secure child restraint system.NOTEl When luggage is placed on the front passen-
ger seat, a sensor in the seat cushion may,
depending on the weight and position of the
luggage, cause the warning tone to sound and the warning lamp to come on (Double
cab).Adjustable seat belt anchor
(front seats)*
E00405000299
The seat belt anchor height can be adjusted.
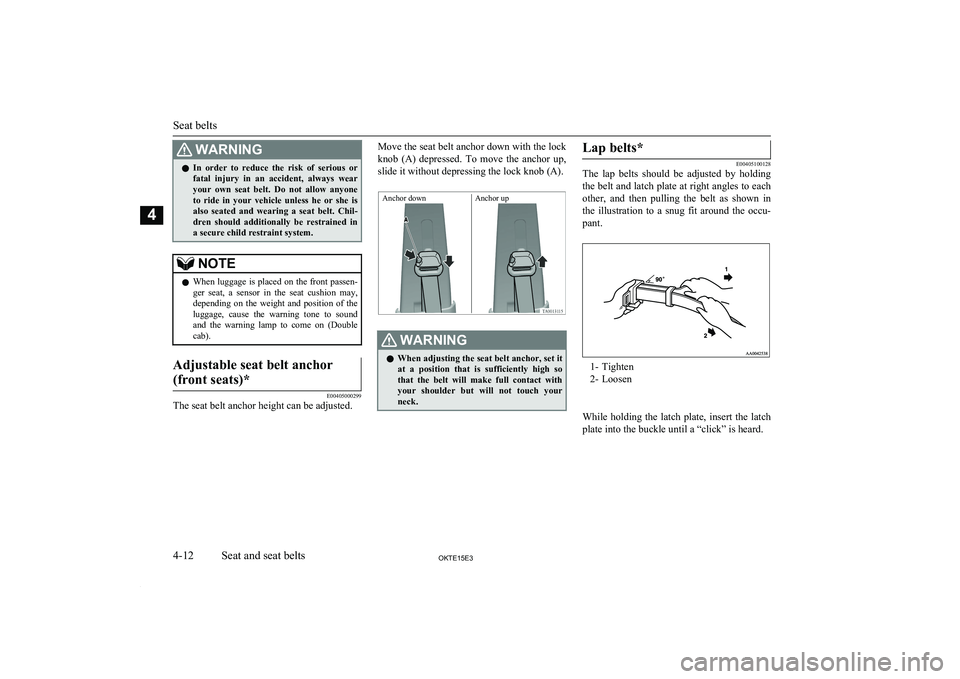
Move the seat belt anchor down with the lock knob (A) depressed. To move the anchor up,
slide it without depressing the lock knob (A).WARNINGl When adjusting the seat belt anchor, set it
at a position that is sufficiently high so
that the belt will make full contact with your shoulder but will not touch your
neck.Lap belts*
E00405100128
The lap belts should be adjusted by holding
the belt and latch plate at right angles to each
other, and then pulling the belt as shown in
the illustration to a snug fit around the occu- pant.
1- Tighten
2- Loosen
While holding the latch plate, insert the latch
plate into the buckle until a “click” is heard.
Seat belts
4-12OKTE15E3Seat and seat belts4 Anchor down Anchor up
Page 71 of 418
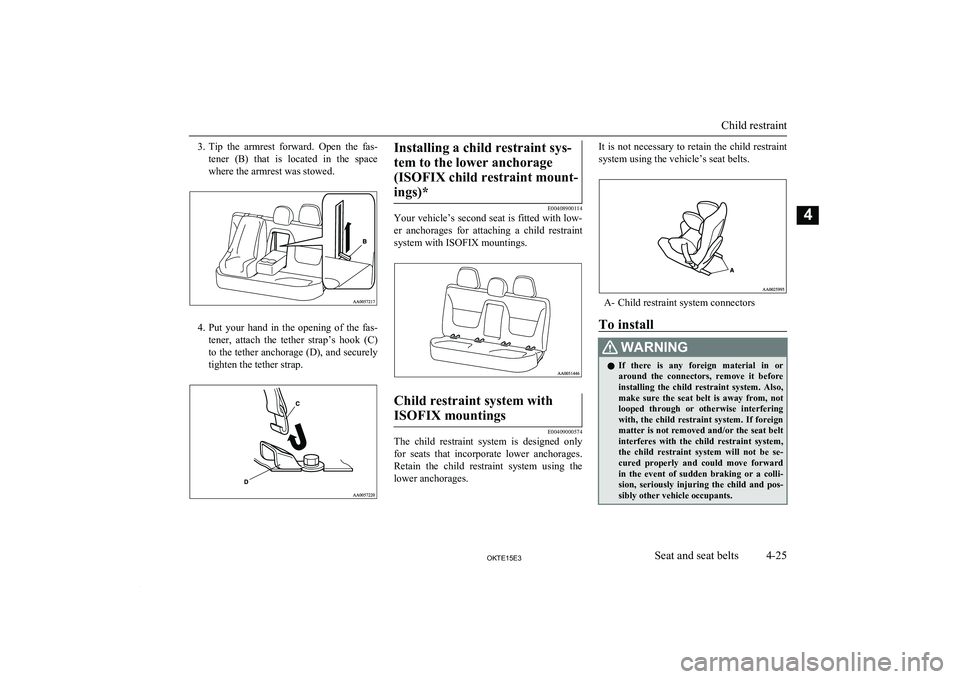
3.Tip the armrest forward. Open the fas-
tener (B) that is located in the space where the armrest was stowed.
4. Put your hand in the opening of the fas-
tener, attach the tether strap’s hook (C)
to the tether anchorage (D), and securely tighten the tether strap.
Installing a child restraint sys-
tem to the lower anchorage (ISOFIX child restraint mount-ings)*
E00408900114
Your vehicle’s second seat is fitted with low-
er anchorages for attaching a child restraint
system with ISOFIX mountings.
Child restraint system with
ISOFIX mountings
E00409000574
The child restraint system is designed only
for seats that incorporate lower anchorages. Retain the child restraint system using the
lower anchorages.
It is not necessary to retain the child restraint
system using the vehicle’s seat belts.
A- Child restraint system connectors
To install
WARNINGl If there is any foreign material in or
around the connectors, remove it before
installing the child restraint system. Also, make sure the seat belt is away from, not
looped through or otherwise interfering
with, the child restraint system. If foreign matter is not removed and/or the seat belt interferes with the child restraint system,
the child restraint system will not be se-
cured properly and could move forward in the event of sudden braking or a colli-sion, seriously injuring the child and pos-
sibly other vehicle occupants.
Child restraint
4-25OKTE15E3Seat and seat belts4
Page 86 of 418
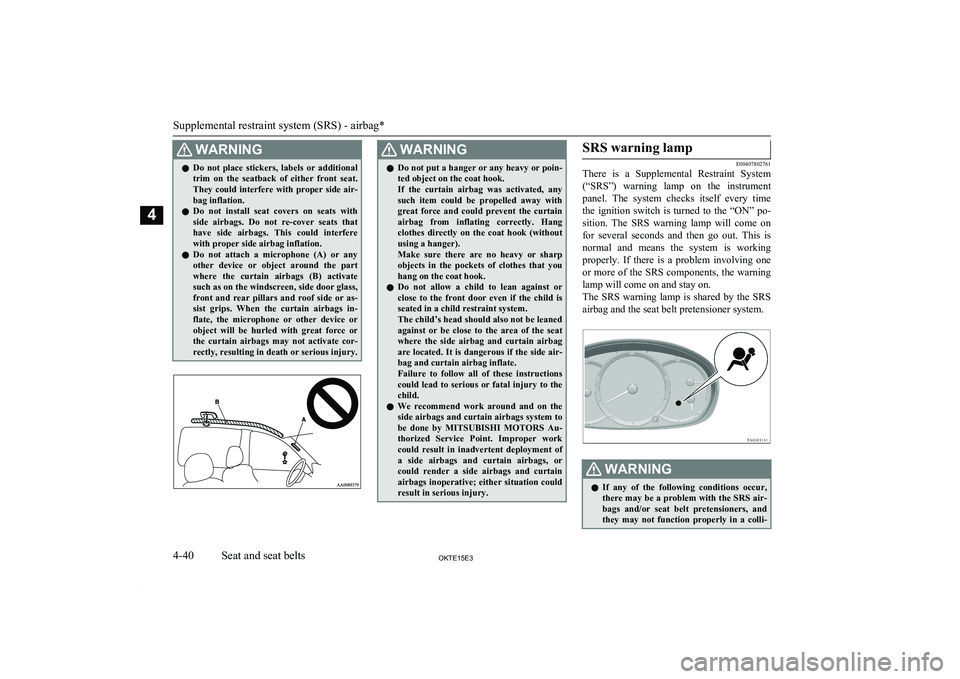
WARNINGlDo not place stickers, labels or additional
trim on the seatback of either front seat.They could interfere with proper side air-bag inflation.
l Do not install seat covers on seats with
side airbags. Do not re-cover seats that have side airbags. This could interfere with proper side airbag inflation.
l Do not attach a microphone (A) or any
other device or object around the part
where the curtain airbags (B) activate such as on the windscreen, side door glass,
front and rear pillars and roof side or as- sist grips. When the curtain airbags in-
flate, the microphone or other device or object will be hurled with great force orthe curtain airbags may not activate cor-
rectly, resulting in death or serious injury.WARNINGl Do not put a hanger or any heavy or poin-
ted object on the coat hook.
If the curtain airbag was activated, any
such item could be propelled away with
great force and could prevent the curtain
airbag from inflating correctly. Hang clothes directly on the coat hook (withoutusing a hanger).
Make sure there are no heavy or sharp objects in the pockets of clothes that you
hang on the coat hook.
l Do not allow a child to lean against or
close to the front door even if the child is seated in a child restraint system.
The child’s head should also not be leaned
against or be close to the area of the seat where the side airbag and curtain airbag
are located. It is dangerous if the side air- bag and curtain airbag inflate.
Failure to follow all of these instructions
could lead to serious or fatal injury to the
child.
l We recommend work around and on the
side airbags and curtain airbags system to
be done by MITSUBISHI MOTORS Au-
thorized Service Point. Improper work could result in inadvertent deployment of
a side airbags and curtain airbags, or could render a side airbags and curtain airbags inoperative; either situation could
result in serious injury.SRS warning lamp
E00407802761
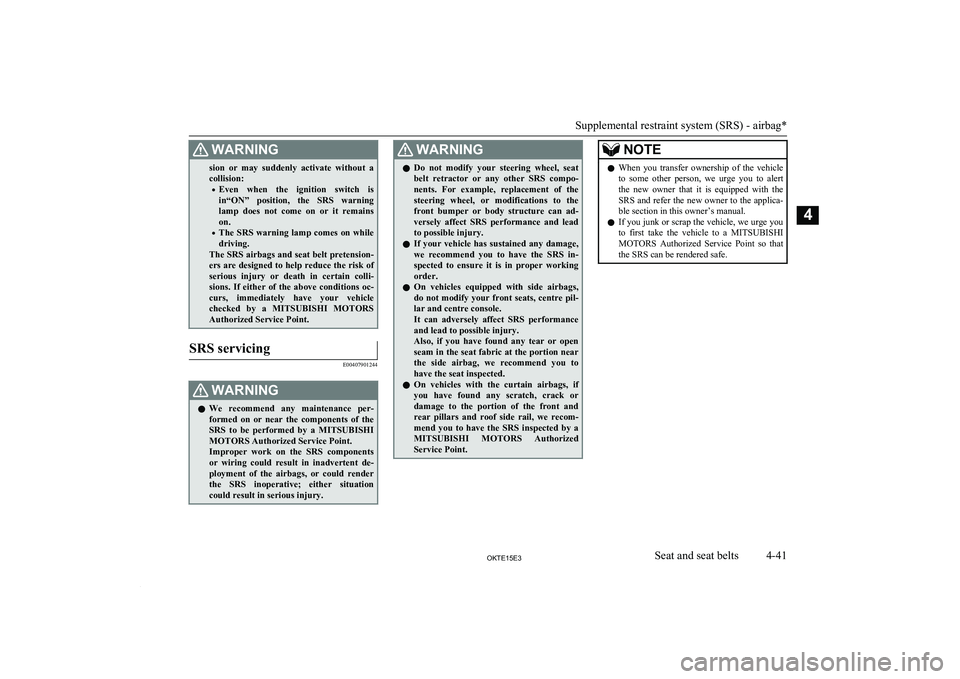
There is a Supplemental Restraint System
(“SRS”) warning lamp on the instrument panel. The system checks itself every time
the ignition switch is turned to the “ON” po- sition. The SRS warning lamp will come on
for several seconds and then go out. This is
normal and means the system is working properly. If there is a problem involving one
or more of the SRS components, the warning
lamp will come on and stay on.
The SRS warning lamp is shared by the SRS airbag and the seat belt pretensioner system.
WARNINGl If any of the following conditions occur,
there may be a problem with the SRS air- bags and/or seat belt pretensioners, and they may not function properly in a colli-
Supplemental restraint system (SRS) - airbag*
4-40OKTE15E3Seat and seat belts4
Page 87 of 418
WARNINGsion or may suddenly activate without a
collision:
• Even when the ignition switch is
in“ON” position, the SRS warning lamp does not come on or it remains
on.
• The SRS warning lamp comes on while
driving.
The SRS airbags and seat belt pretension- ers are designed to help reduce the risk of
serious injury or death in certain colli- sions. If either of the above conditions oc-
curs, immediately have your vehicle checked by a MITSUBISHI MOTORS
Authorized Service Point.SRS servicing
E00407901244
WARNINGl We recommend any maintenance per-
formed on or near the components of the
SRS to be performed by a MITSUBISHI
MOTORS Authorized Service Point.
Improper work on the SRS components
or wiring could result in inadvertent de- ployment of the airbags, or could render
the SRS inoperative; either situation could result in serious injury.WARNINGl Do not modify your steering wheel, seat
belt retractor or any other SRS compo- nents. For example, replacement of the
steering wheel, or modifications to the
front bumper or body structure can ad- versely affect SRS performance and lead
to possible injury.
l If your vehicle has sustained any damage,
we recommend you to have the SRS in- spected to ensure it is in proper workingorder.
l On vehicles equipped with side airbags,
do not modify your front seats, centre pil- lar and centre console.
It can adversely affect SRS performance and lead to possible injury.
Also, if you have found any tear or open
seam in the seat fabric at the portion near the side airbag, we recommend you to
have the seat inspected.
l On vehicles with the curtain airbags, if
you have found any scratch, crack or
damage to the portion of the front and rear pillars and roof side rail, we recom-
mend you to have the SRS inspected by a MITSUBISHI MOTORS Authorized
Service Point.NOTEl When you transfer ownership of the vehicle
to some other person, we urge you to alert
the new owner that it is equipped with the SRS and refer the new owner to the applica- ble section in this owner’s manual.
l If you junk or scrap the vehicle, we urge you
to first take the vehicle to a MITSUBISHI
MOTORS Authorized Service Point so that
the SRS can be rendered safe.
Supplemental restraint system (SRS) - airbag*
4-41OKTE15E3Seat and seat belts4
Page 305 of 418
Cup holder*E00714500802CAUTIONlDo not drink beverages while driving the ve-
hicle; doing so could distract you and result
in an accident.
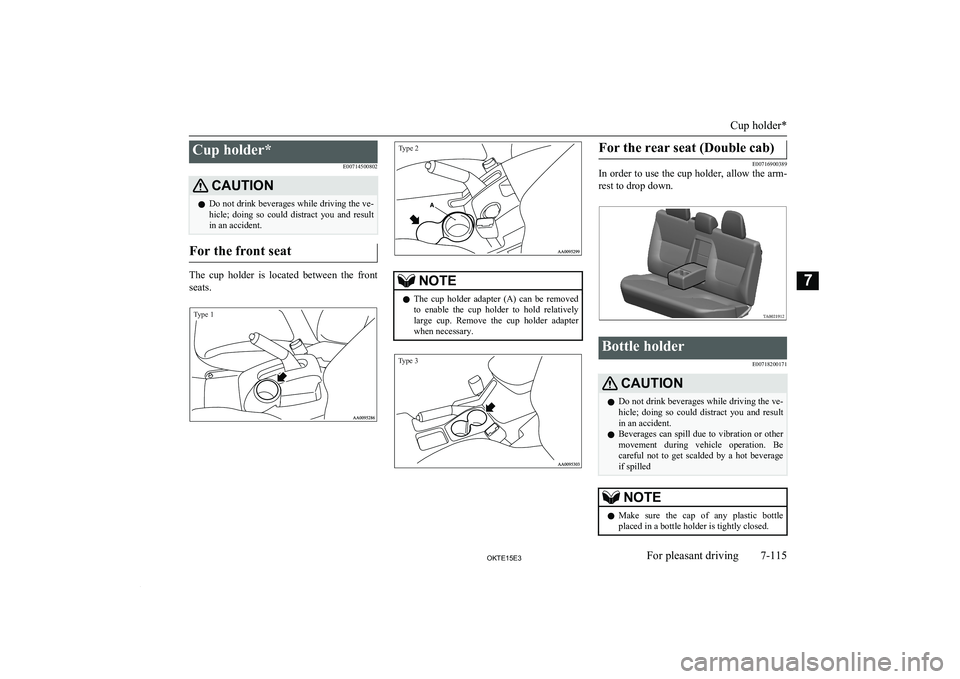
For the front seat
The cup holder is located between the front
seats.
Type 1Type 2
NOTEl The cup holder adapter (A) can be removed
to enable the cup holder to hold relativelylarge cup. Remove the cup holder adapter when necessary.Type 3For the rear seat (Double cab)
E00716900389
In order to use the cup holder, allow the arm-
rest to drop down.Bottle holder
E00718200171CAUTIONlDo not drink beverages while driving the ve-
hicle; doing so could distract you and result
in an accident.
l Beverages can spill due to vibration or other
movement during vehicle operation. Be careful not to get scalded by a hot beverage
if spilledNOTEl Make sure the cap of any plastic bottle
placed in a bottle holder is tightly closed.
Cup holder*
7-115OKTE15E3For pleasant driving7
Page 328 of 418
8.Find the closest jacking point to the flat
tyre (refer to “Jacking up the vehicle” on page 8-13). Then position the jack and
raise the vehicle until the tyre is slightly off the ground.
9. Remove the wheel nuts with the wheel
nut wrench, then take the wheel off.CAUTIONl Handle the wheel carefully when changing
the tyre, to avoid scratching the wheel sur- face.
10. Clean out any mud, etc. on the hub sur-
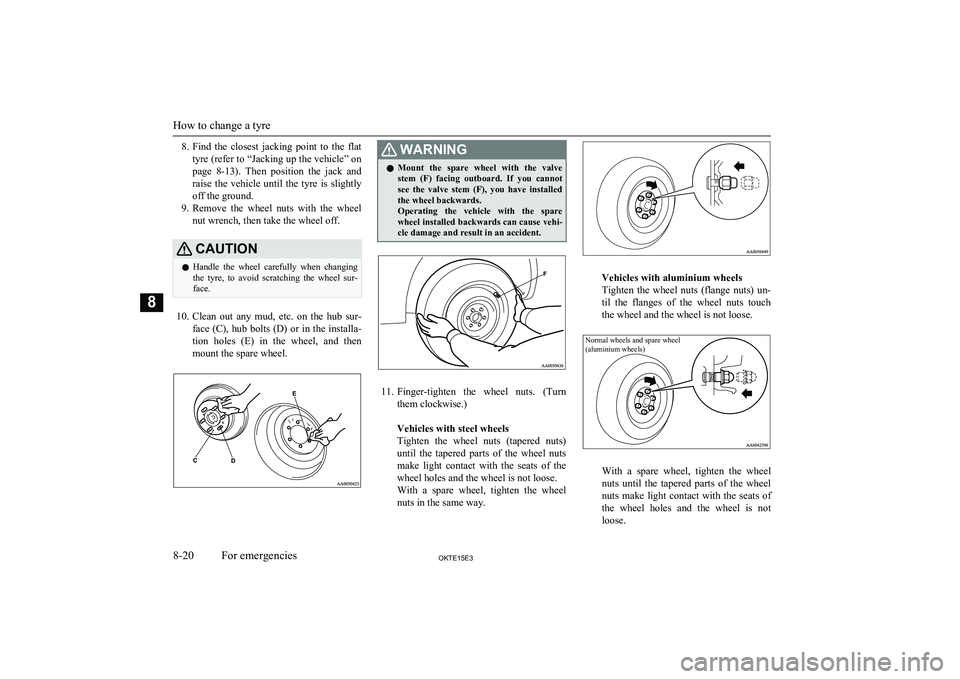
face (C), hub bolts (D) or in the installa- tion holes (E) in the wheel, and then
mount the spare wheel.
WARNINGl Mount the spare wheel with the valve
stem (F) facing outboard. If you cannot see the valve stem (F), you have installed
the wheel backwards.
Operating the vehicle with the spare wheel installed backwards can cause vehi-
cle damage and result in an accident.
11. Finger-tighten the wheel nuts. (Turn
them clockwise.)
Vehicles with steel wheels
Tighten the wheel nuts (tapered nuts)
until the tapered parts of the wheel nuts make light contact with the seats of the wheel holes and the wheel is not loose.
With a spare wheel, tighten the wheel
nuts in the same way.
Vehicles with aluminium wheels
Tighten the wheel nuts (flange nuts) un-
til the flanges of the wheel nuts touch the wheel and the wheel is not loose.
Normal wheels and spare wheel
(aluminium wheels)
With a spare wheel, tighten the wheel
nuts until the tapered parts of the wheel nuts make light contact with the seats of the wheel holes and the wheel is not
loose.
How to change a tyre
8-20OKTE15E3For emergencies8
Page 338 of 418
Vehicle care precautionsE00900100870
In order to maintain the value of your vehi- cle, it is necessary to perform regular mainte- nance using the proper procedures. Always
maintain your vehicle in compliance with en- vironmental pollution control regulations. Carefully select the materials used for wash-ing, etc., to be sure that they do not contain
corrosives. If in doubt, we recommend you to consult a specialist for selection of these ma- terials.CAUTIONl Cleaning products can be dangerous. Some
are poisonous. Others can burst into flame if
you strike a match or drop them on a hot part
of the vehicle. Some are dangerous if you
breathe their fumes in a closed space. When you use anything in a container to clean your
vehicle, always follow the instructions and always open your vehicle doors or windows when you’re cleaning the inside. Never use
the following to clean your vehicle:
• Petrol
• Paint Thinner
• Benzine
• Kerosene
• Turpentine
• Naphtha
• Lacquer ThinnerCAUTION•Carbon Tetrachloride
• Nail Polish Remover
• Acetone
l These are all dangerous, and can damage
your vehicle.Cleaning the interior of your
vehicle E00900200288
After cleaning the interior of your vehiclewith water, cleaner or similar, wipe and dry
in a shady, well-ventilated area.
CAUTIONl Do not use organic substances (solvents,
benzine, kerosene, alcohol, petrol, etc.) or
alkaline or acidic solutions.
These chemicals can cause discolouring, staining or cracking of the surface.
If you use cleaners or polishing agents, make
sure their ingredients do not include the sub- stances mentioned above.NOTEl Always read the instructions on the cleaner
label.Plastic, vinyl leather, fabric
and flocked parts
E00900300377
1. Gently wipe off with gauze or other soft
cloth soaked with a 3 % aqueous solu-tion of neutral detergent.
2. Dip cloth in fresh water and wring out
well. Using this cloth, wipe off the deter-
gent thoroughly.
NOTEl Do not use cleaners, conditioners, and pro-
tectants containing silicons or wax.
Such products, when applied to the instru- ment panels or other parts, may cause reflec-
tions on the windscreen and obscure vision.
Also, if such products get on the switches of
the electrical accessories, it may lead to fail-
ure of these accessories.Upholstery
E00900500018
1. To maintain the value of your new vehi-
cle, handle the upholstery carefully and
keep the interior clean.
Use a vacuum cleaner and brush to clean
the seats. If stained, vinyl and synthetic leather should be cleaned with an appro- priate cleaner, and cloth fabrics can be cleaned with either upholstery cleaner or
a 3 % solution of neutral detergent in lukewarm water.
Vehicle care precautions
9-02OKTE15E3Vehicle care9
Page 406 of 418
Diesel particulate filter (DPF)........................... 6-15
Differential oil................................................. 11-22
Digital clock............................................ 5-20,7-109 Time Setting.................................................. 7-78
Dimensions...................................................... 11-04
Dipper (High/Low beam change)......................5-34
Door courtesy lamps........................................7-111
Replacement................................................ 10-37
Doors
Central door locks......................................... 3-07
Child-protection............................................ 3-08
Lock and unlock............................................ 3-06
Driving, alcohol and drugs................................ 6-02
E
Easy select 4WD............................................... 6-25
Economical driving........................................... 6-02
Electric window control.................................... 3-08 Switch........................................................... 3-08
Electrical system............................................. 11-18
Electronic immobilizer (Anti-theft starting system)................................................ 3-02
Emergency starting............................................8-02
Engine specifications.......................................11-16
Engine Coolant..............................................10-06,11-22Number....................................................... 11-03 Oil..................................................... 10-04,11-22
Overheating................................................... 8-04
Specifications.............................................. 11-16
Used engine oils safety instructions and disposal information............................. 2-05
Water temperature gauge.............................. 5-05
Error codes........................................................ 7-47
Exterior and interior lamp operation............... 10-20
F
First-aid kit and warning triangleband for securing........................................... 7-117
Floor console box............................................ 7-113
Fluid Automatic transmission fluid............10-07,11-22
Brake fluid........................................ 10-08,11-22 Clutch fluid....................................... 10-09,11-22
Engine coolant.................................. 10-06,11-22
Power steering fluid.......................... 10-10,11-22
Washer fluid..................................... 10-08,11-22
For cold and snowy weather............................10-20
Front console box............................................ 7-113
Front fog lamps Bulb capacity.............................................. 10-25
Indication lamp............................................. 5-07
Replacement................................................ 10-30
Switch........................................................... 5-37
Front room lamp
Bulb capacity.............................................. 10-26
Replacement................................................ 10-36
Front seat........................................................... 4-04
Front turn-signal lamps Bulb capacity.............................................. 10-25
Replacement................................................ 10-29
Frozen road warning..........................................5-16
Fuel consumption............................................ 11-20
Fuel Filling the fuel tank....................................... 2-02Fuel filter indication lamp............................. 5-08
Fuel gauge..................................................... 5-04
Fuel selection................................................ 2-02
Low fuel warning lamp................................. 5-05
Modification/alterations to the electrical or fuel systems............................. 2-04
Tank capacity................................................ 2-02
Fuses................................................................ 10-20
Fusible links.................................................... 10-20
G
Gauges............................................................... 5-02
General maintenance....................................... 10-19
General vehicle data........................................ 11-04
Genuine parts.....................................................2-04
Glove box........................................................ 7-112
Glove box lamp Bulb capacity.............................................. 10-26
Replacement................................................ 10-38
H
Handling of compact discs................................ 7-49
Hazard warning flasher switch.......................... 5-37
Hazard warning indication lamps......................5-07
Head restraints................................................... 4-08
Headlamp levelling switch................................ 5-35
Headlamps Bulb capacity.............................................. 10-25
Headlamp flasher.......................................... 5-35 Replacement................................................ 10-27
Switch........................................................... 5-32 Washer switch............................................... 5-42
Heated mirror.................................................... 6-11
Heated seats....................................................... 4-07
Alphabetical index
12- 2 OKTE15E3Alphabetical index