ECU MITSUBISHI L200 2015 Owner's Manual (in English)
[x] Cancel search | Manufacturer: MITSUBISHI, Model Year: 2015, Model line: L200, Model: MITSUBISHI L200 2015Pages: 418, PDF Size: 25.8 MB
Page 28 of 418

lImproper installation of electrical com-
ponents may cause an electrical fire if
incorrectly fitted. Please refer to the Modification/alteration to the electrical
or fuel systems section within this own- er’s manual.
l Using a cellular phone or radio set inside
the vehicle without an external antenna
may cause electrical system interference,
which could lead to unsafe vehicle oper- ation.
l Tyres and wheels which do not meet
specifications must not be used.
Refer to the “Specifications” section for information regarding wheel and tyre
sizes.
l When fitting accessories, ensure that
maximum gross vehicle weight and
maximum axle weight are not exceeded.
Important points!
Due to large number of accessory and re- placement parts of different manufactures available in the market, it is not possible, not
only for MITSUBISHI MOTORS , but also
for a MITSUBISHI MOTORS Authorized
Service Point, to check whether the attach-
ment or installation of such parts affects the overall safety of your MITSUBISHI-vehicle.
Even when such parts are officially author-
ized, for example by a “general operators permit” (an appraisal for the part) or throughthe execution of the part in an officially ap-
proved manner of construction, or when a single operation permit following the attach-
ment or installation of such parts, it cannot be deduced from that alone, that the driving
safety of your vehicle has not been affected.
Consider also that there basically exists no li- ability on the part of the appraiser or the offi- cial. Only in the case of parts ( MITSUBISHI
MOTORS original replacement or exchange
parts as well as MITSUBISHI MOTORS
genuine accessories) that are recommended and released by a MITSUBISHI MOTORS
Authorized Service Point and that are attach-
ed or installed by a MITSUBISHI MOTORS
Authorized Service Point can you assume, that optimal safety has been provided. Thesame also pertains to modifications of
MITSUBISHI vehicle with respect to the
production specifications. For your own safe-
ty, in such cases, you should only undertake
modifications according to the recommenda- tions of a MITSUBISHI MOTORS Author-
ized Service Point.Modification/alterations to
the electrical or fuel systems E00200400238
MITSUBISHI MOTORS CORPORATION
has always manufactured safe, high quality vehicles. In order to maintain this safety and
quality, it is important that any accessory that is to be fitted, or any modifications carried
out which involve the electrical or fuel sys- tems, should be carried out in accordancewith MITSUBISHI guidelines.CAUTIONl If the wiring interferes with any part of the
vehicle bodywork or improper installation methods are used, i.e. protective fuses not
installed, etc.), electronic devices may be ad- versely affected, possibly resulting in an
electrical fire or other failures that may cause an accident.Genuine parts
E00200500545
MITSUBISHI MOTORS has gone to great
lengths to bring you a superbly crafted auto-
mobile offering the highest quality and de- pendability.
Modification/alterations to the electrical or fuel systems
2-04OKTE15E3General information2
Page 43 of 418
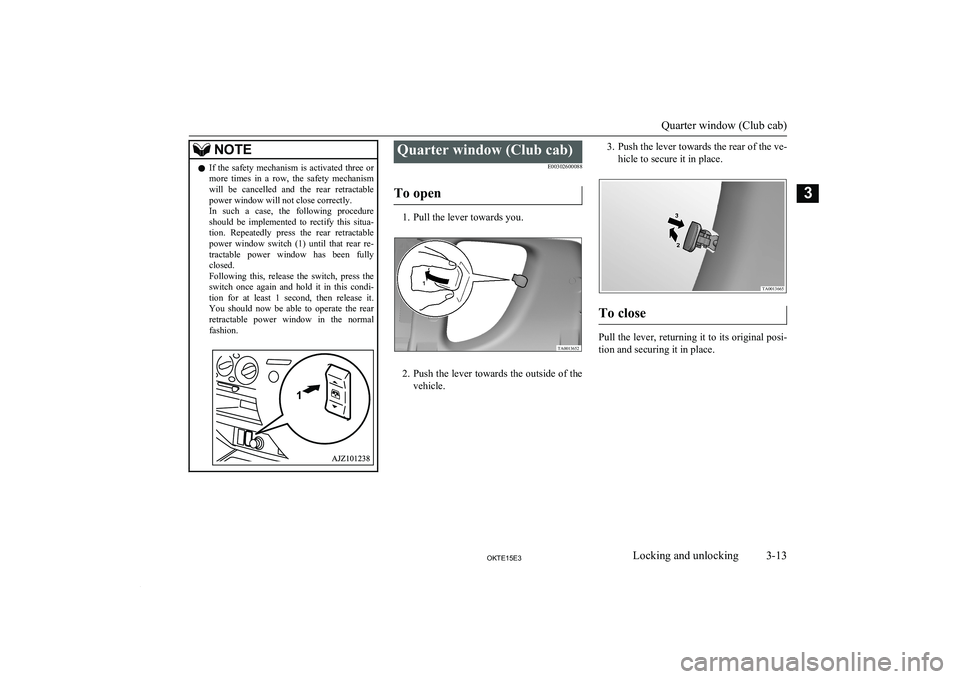
NOTElIf the safety mechanism is activated three or
more times in a row, the safety mechanism
will be cancelled and the rear retractable power window will not close correctly.
In such a case, the following procedure
should be implemented to rectify this situa-
tion. Repeatedly press the rear retractable
power window switch (1) until that rear re- tractable power window has been fully closed.
Following this, release the switch, press the
switch once again and hold it in this condi- tion for at least 1 second, then release it.
You should now be able to operate the rear retractable power window in the normalfashion.Quarter window (Club cab)
E00302600088
To open
1. Pull the lever towards you.
2. Push the lever towards the outside of the
vehicle.
3. Push the lever towards the rear of the ve-
hicle to secure it in place.
To close
Pull the lever, returning it to its original posi- tion and securing it in place.
Quarter window (Club cab)
3-13OKTE15E3Locking and unlocking3 TA0013652 TA0013665
Page 44 of 418
Rear gateE00303000050
To open
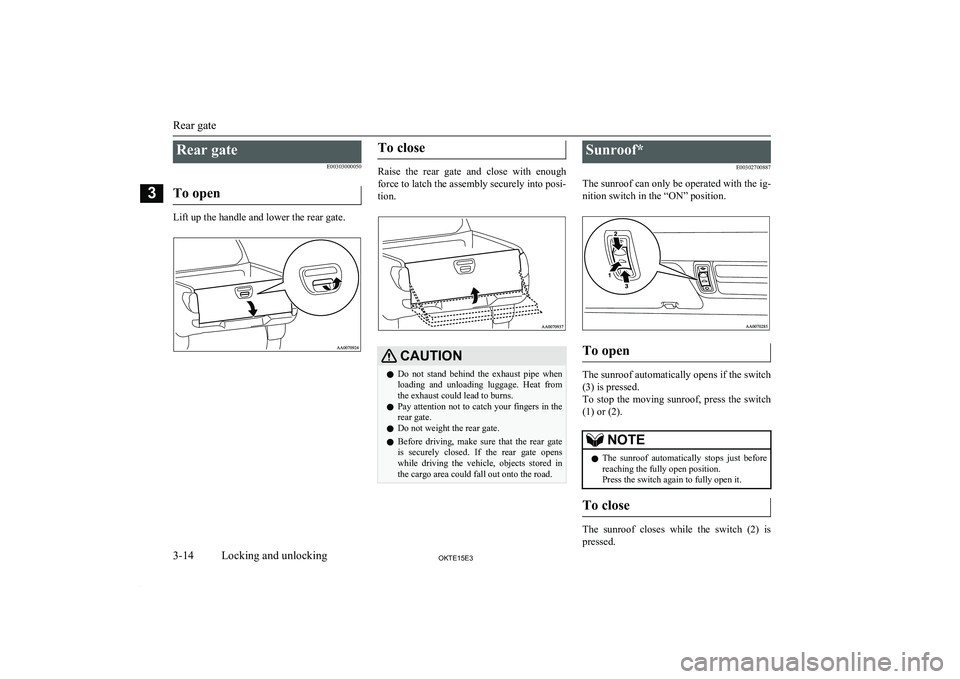
Lift up the handle and lower the rear gate.
To close
Raise the rear gate and close with enough
force to latch the assembly securely into posi- tion.
CAUTIONl Do not stand behind the exhaust pipe when
loading and unloading luggage. Heat fromthe exhaust could lead to burns.
l Pay attention not to catch your fingers in the
rear gate.
l Do not weight the rear gate.
l Before driving, make sure that the rear gate
is securely closed. If the rear gate opens
while driving the vehicle, objects stored in
the cargo area could fall out onto the road.Sunroof*
E00302700887
The sunroof can only be operated with the ig- nition switch in the “ON” position.
To open
The sunroof automatically opens if the switch(3) is pressed.
To stop the moving sunroof, press the switch
(1) or (2).
NOTEl The sunroof automatically stops just before
reaching the fully open position.
Press the switch again to fully open it.
To close
The sunroof closes while the switch (2) is
pressed.
Rear gate
3-14OKTE15E3Locking and unlocking3
Page 45 of 418
To tilt up
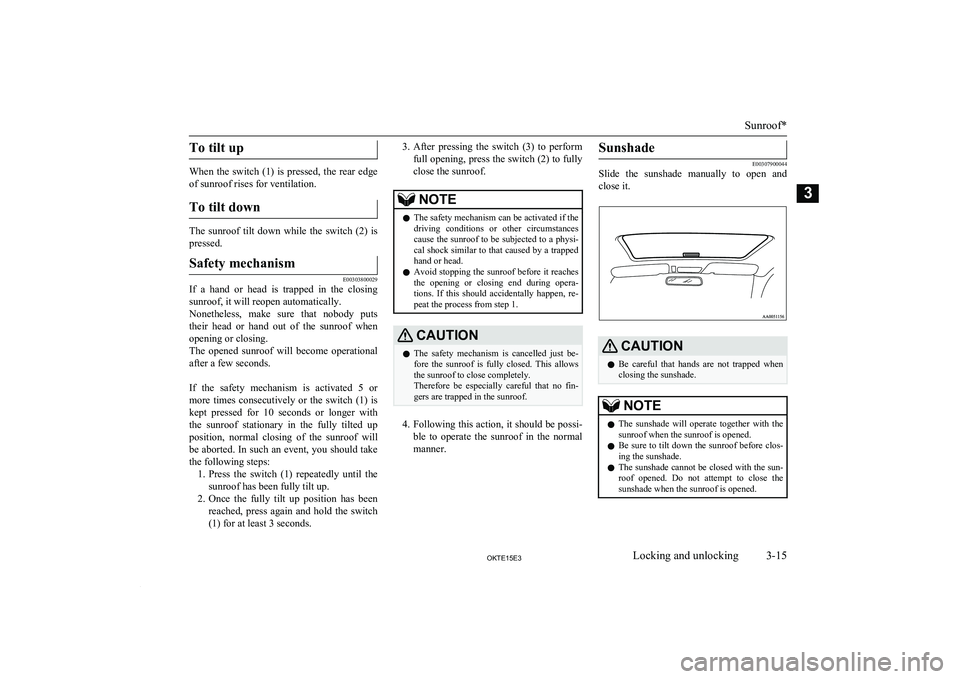
When the switch (1) is pressed, the rear edgeof sunroof rises for ventilation.
To tilt down
The sunroof tilt down while the switch (2) is
pressed.
Safety mechanism
E00303800029
If a hand or head is trapped in the closing sunroof, it will reopen automatically.Nonetheless, make sure that nobody puts
their head or hand out of the sunroof when
opening or closing.
The opened sunroof will become operational after a few seconds.
If the safety mechanism is activated 5 or
more times consecutively or the switch (1) is kept pressed for 10 seconds or longer with
the sunroof stationary in the fully tilted up position, normal closing of the sunroof will be aborted. In such an event, you should take
the following steps: 1. Press the switch (1) repeatedly until the
sunroof has been fully tilt up.
2. Once the fully tilt up position has been
reached, press again and hold the switch
(1) for at least 3 seconds.
3. After pressing the switch (3) to perform
full opening, press the switch (2) to fully close the sunroof.NOTEl The safety mechanism can be activated if the
driving conditions or other circumstancescause the sunroof to be subjected to a physi-
cal shock similar to that caused by a trapped hand or head.
l Avoid stopping the sunroof before it reaches
the opening or closing end during opera-
tions. If this should accidentally happen, re- peat the process from step 1.CAUTIONl The safety mechanism is cancelled just be-
fore the sunroof is fully closed. This allows the sunroof to close completely.
Therefore be especially careful that no fin-
gers are trapped in the sunroof.
4. Following this action, it should be possi-
ble to operate the sunroof in the normal manner.
Sunshade
E00307900044
Slide the sunshade manually to open and
close it.
CAUTIONl Be careful that hands are not trapped when
closing the sunshade.NOTEl The sunshade will operate together with the
sunroof when the sunroof is opened.
l Be sure to tilt down the sunroof before clos-
ing the sunshade.
l The sunshade cannot be closed with the sun-
roof opened. Do not attempt to close the sunshade when the sunroof is opened.
Sunroof*
3-15OKTE15E3Locking and unlocking3
Page 50 of 418
Front seatE0400400012To adjust forward or back-
ward
E00400500824
Manual type
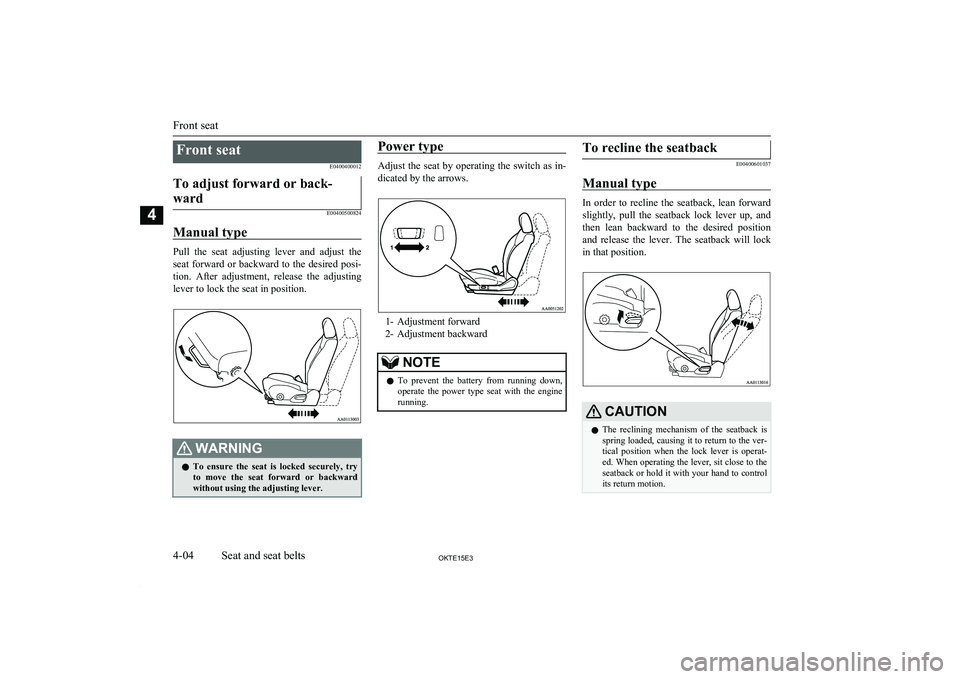
Pull the seat adjusting lever and adjust the seat forward or backward to the desired posi-tion. After adjustment, release the adjusting
lever to lock the seat in position.
WARNINGl To ensure the seat is locked securely, try
to move the seat forward or backward
without using the adjusting lever.Power type
Adjust the seat by operating the switch as in-
dicated by the arrows.
1- Adjustment forward
2- Adjustment backward
NOTEl To prevent the battery from running down,
operate the power type seat with the engine
running.To recline the seatback
E00400601037
Manual type
In order to recline the seatback, lean forward slightly, pull the seatback lock lever up, and
then lean backward to the desired position
and release the lever. The seatback will lock in that position.
CAUTIONl The reclining mechanism of the seatback is
spring loaded, causing it to return to the ver- tical position when the lock lever is operat- ed. When operating the lever, sit close to the
seatback or hold it with your hand to control its return motion.
Front seat
4-04OKTE15E3Seat and seat belts4
Page 54 of 418

Folding the seatback forward(Double cab)
E00401600242
Pull up the band on the top of the seatback
and fold it forward.
Confirm that the seatback locks securelywhen it is returned.
Folding up the seat cushion
(Club cab)*
E00411300024
The right and left seat cushions can be folded up separately.
To fold the seat cushions up, raise the seat cushions.
Securely retain the seat cushion by hooking
the retaining band (A) onto the head restraint (B) of the rear seat.Armrest (Double cab)
E00401700605
To use the armrest, fold it down.
To return to the original position, push it
backward (into the seatback) until it is level with the seat.
NOTEl Do not stand or sit on the armrest. It could
break.
l The top surface of the armrest contains a cup
holder for rear seat occupants.
Refer to “Cup holder” on page 7-115.Head restraints
E00403300995WARNINGlDriving without the head restraints in
place can cause you and your passengers
serious injury or death in an accident. To reduce the risk of injury in an accident, always make sure the head restraints are
installed and properly positioned when the seat is occupied.
l Never place a cushion or similar device on
the seatback. This can adversely affect head restraint performance by increasing
the distance between your head and the restraint.
To adjust height
Adjust the head restraint height so that the
centre of the restraint is as close as possible
to eye level to reduce the chances of injury in
the event of collision. Any person too tall for the restraint to reach their seated eye level,should adjust the restraint as high as possible.
Head restraints
4-08OKTE15E3Seat and seat belts4
Page 58 of 418
WARNINGlIn order to reduce the risk of serious or
fatal injury in an accident, always wearyour own seat belt. Do not allow anyone
to ride in your vehicle unless he or she is also seated and wearing a seat belt. Chil-
dren should additionally be restrained in a secure child restraint system.NOTEl When luggage is placed on the front passen-
ger seat, a sensor in the seat cushion may,
depending on the weight and position of the
luggage, cause the warning tone to sound and the warning lamp to come on (Double
cab).Adjustable seat belt anchor
(front seats)*
E00405000299
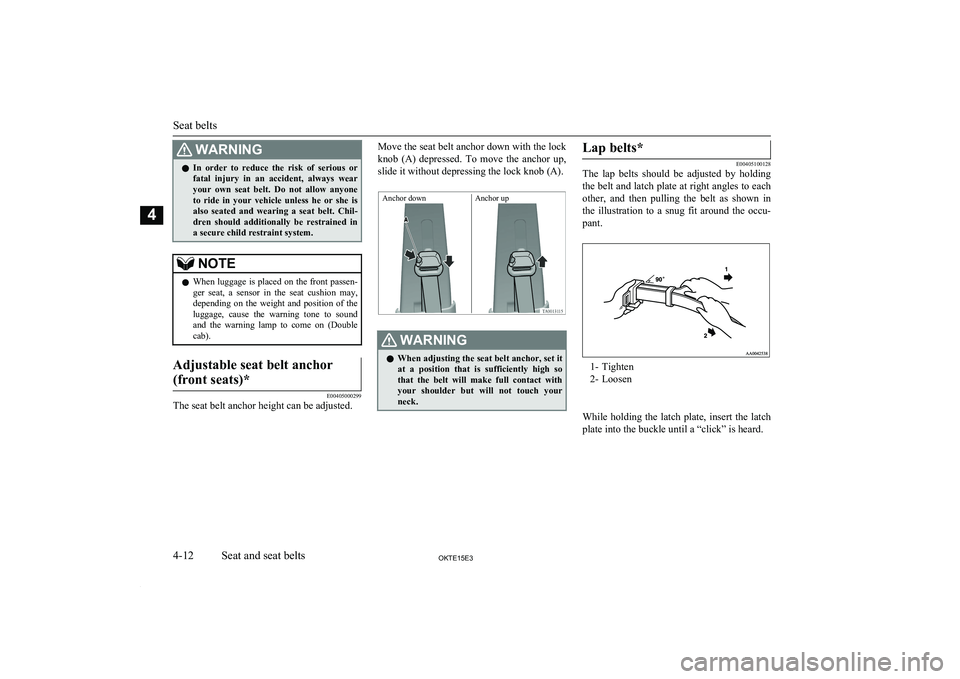
The seat belt anchor height can be adjusted.
Move the seat belt anchor down with the lock knob (A) depressed. To move the anchor up,
slide it without depressing the lock knob (A).WARNINGl When adjusting the seat belt anchor, set it
at a position that is sufficiently high so
that the belt will make full contact with your shoulder but will not touch your
neck.Lap belts*
E00405100128
The lap belts should be adjusted by holding
the belt and latch plate at right angles to each
other, and then pulling the belt as shown in
the illustration to a snug fit around the occu- pant.
1- Tighten
2- Loosen
While holding the latch plate, insert the latch
plate into the buckle until a “click” is heard.
Seat belts
4-12OKTE15E3Seat and seat belts4 Anchor down Anchor up
Page 61 of 418

WARNINGlA FORWARD FACING CHILD RE-
STRAINT should not be used in the frontpassenger seat whenever possible; if used
in the front passenger seat, adjust the seat to the most rearward position.Infants and small children
E00406602124
When transporting infants and small children
in your vehicle, follow the instruction given below.
Instruction:
l For small infants, an infant carrier
should be used. For small children whose height when seated allows the shoulder belt to lie in contact with the
face or the throat, a child seat should be
used.
l The child restraint system should be ap-
propriate for the child’s weight and
height and properly fit in the vehicle.
l Before purchasing a child restraint sys-
tem, try installing it in the seat to make sure there is a good fit. Because of the
location of the seat belt buckles and the shape of the seat cushion, it may be dif-
ficult to securely install some manufac-
turer’s child restraint systems.
If the child restraint system can be
pulled forward or to either side easily on
the seat cushion after the seat belt has been tightened, choose another manufac-turer’s child restraint system.WARNINGl When installing a child restraint system,
refer to the instructions provided by themanufacturer of the restraint system.
Failure to do so can result in severe or fa- tal injury to the child.
l After installation, push and pull the child
restraint system back and forth, and side
to side, to see that it is properly secured. If the child restraint system is not instal-
led securely, it may cause injury to the
child or other occupants in the case of ac- cident or sudden stops.
l When the child restraint system is not in
use, keep your child restraint system se- cured with the seat belt or remove it fromthe vehicle in order to prevent it from be- ing thrown around inside the vehicle dur-
ing an accident.
Child restraint
4-15OKTE15E3Seat and seat belts4Front passenger’s air bag OFF
Page 70 of 418

NOTElThere is no applicable MITSUBISHI MOTORS GENUINE Parts to the Mass Group “0-Up to 10 kg”.
MITSUBISHI MOTORS Europe B.V. reserves the right to changes without any prior announcement.
For further information, please contact a MITSUBISHI MOTORS Authorized Service Point.
Child restraint anchorage
points (Double cab)*
E00406900354
Anchorage locations
There are 2 child restraint anchorage points on the floor, located behind the rear seat.These are for securing a child restraint sys-
tem tether strap to each of the 2 rear seating positions in your vehicle.
*: Rear of the vehicle
CAUTIONl The anchorages are only applicable for child
restraints fitted in the rear seat.
Tether anchorage strap installa-
tion
WARNINGl Child restraint anchorages are designed
to withstand only those loads imposed by
correctly fitted child restraints. Under no circumstances are they to be used for adult seat belts, harnesses, or for attach-
ing other items or equipment to the vehi- cle.
1. Remove the head restraint from the loca-
tion in which you wish to install a child
restraint.
2. Drop the child restraint’s tether strap (A)
down the back of the rear seatback.
Child restraint
4-24OKTE15E3Seat and seat belts4
Page 71 of 418
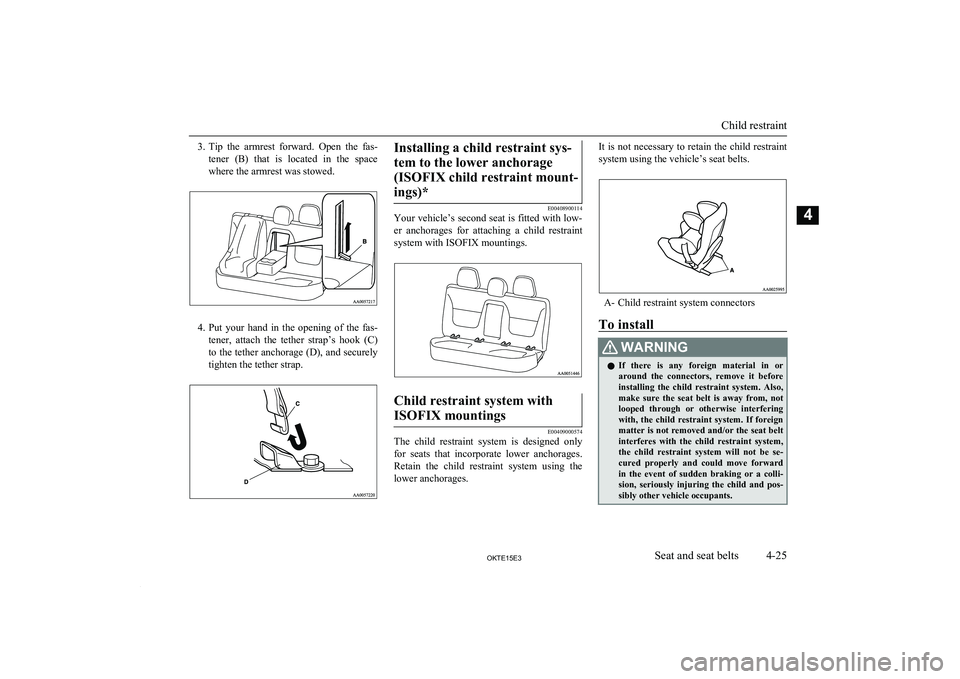
3.Tip the armrest forward. Open the fas-
tener (B) that is located in the space where the armrest was stowed.
4. Put your hand in the opening of the fas-
tener, attach the tether strap’s hook (C)
to the tether anchorage (D), and securely tighten the tether strap.
Installing a child restraint sys-
tem to the lower anchorage (ISOFIX child restraint mount-ings)*
E00408900114
Your vehicle’s second seat is fitted with low-
er anchorages for attaching a child restraint
system with ISOFIX mountings.
Child restraint system with
ISOFIX mountings
E00409000574
The child restraint system is designed only
for seats that incorporate lower anchorages. Retain the child restraint system using the
lower anchorages.
It is not necessary to retain the child restraint
system using the vehicle’s seat belts.
A- Child restraint system connectors
To install
WARNINGl If there is any foreign material in or
around the connectors, remove it before
installing the child restraint system. Also, make sure the seat belt is away from, not
looped through or otherwise interfering
with, the child restraint system. If foreign matter is not removed and/or the seat belt interferes with the child restraint system,
the child restraint system will not be se-
cured properly and could move forward in the event of sudden braking or a colli-sion, seriously injuring the child and pos-
sibly other vehicle occupants.
Child restraint
4-25OKTE15E3Seat and seat belts4