MITSUBISHI L200 2017 Owner's Manual (in English)
Manufacturer: MITSUBISHI, Model Year: 2017, Model line: L200, Model: MITSUBISHI L200 2017Pages: 426, PDF Size: 14.12 MB
Page 311 of 426
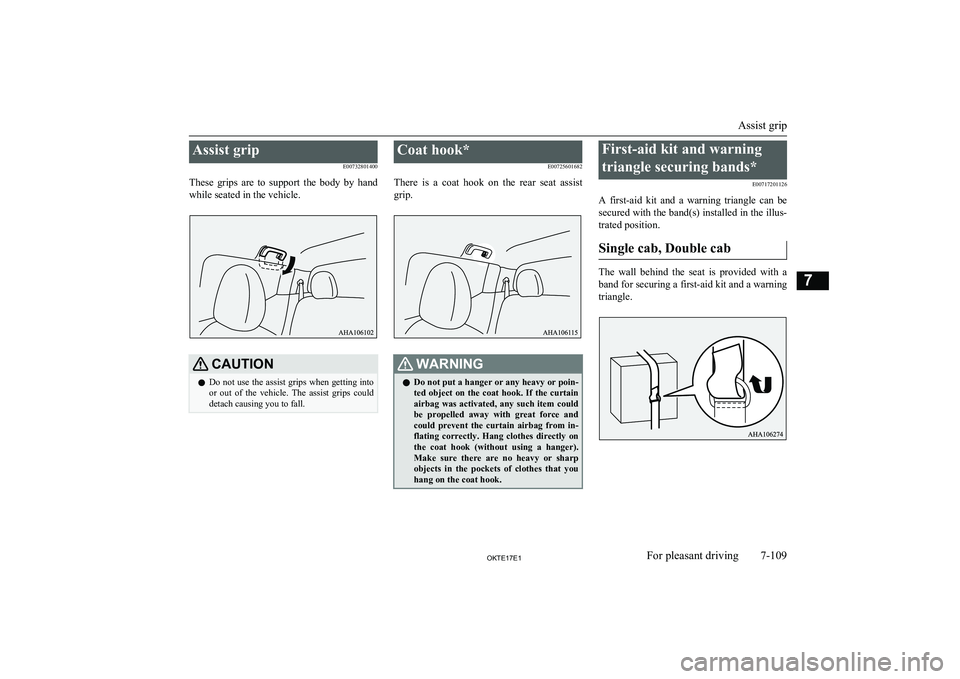
Assist gripE00732801400
These grips are to support the body by hand
while seated in the vehicle.CAUTIONl Do not use the assist grips when getting into
or out of the vehicle. The assist grips could
detach causing you to fall.Coat hook*
E00725601682
There is a coat hook on the rear seat assist
grip.WARNINGl Do not put a hanger or any heavy or poin-
ted object on the coat hook. If the curtain
airbag was activated, any such item could
be propelled away with great force and could prevent the curtain airbag from in-
flating correctly. Hang clothes directly on the coat hook (without using a hanger).
Make sure there are no heavy or sharp objects in the pockets of clothes that you
hang on the coat hook.First-aid kit and warning
triangle securing bands* E00717201126
A first-aid kit and a warning triangle can be secured with the band(s) installed in the illus- trated position.
Single cab, Double cab
The wall behind the seat is provided with a
band for securing a first-aid kit and a warning triangle.
Assist grip
7-109OKTE17E1For pleasant driving7
Page 312 of 426
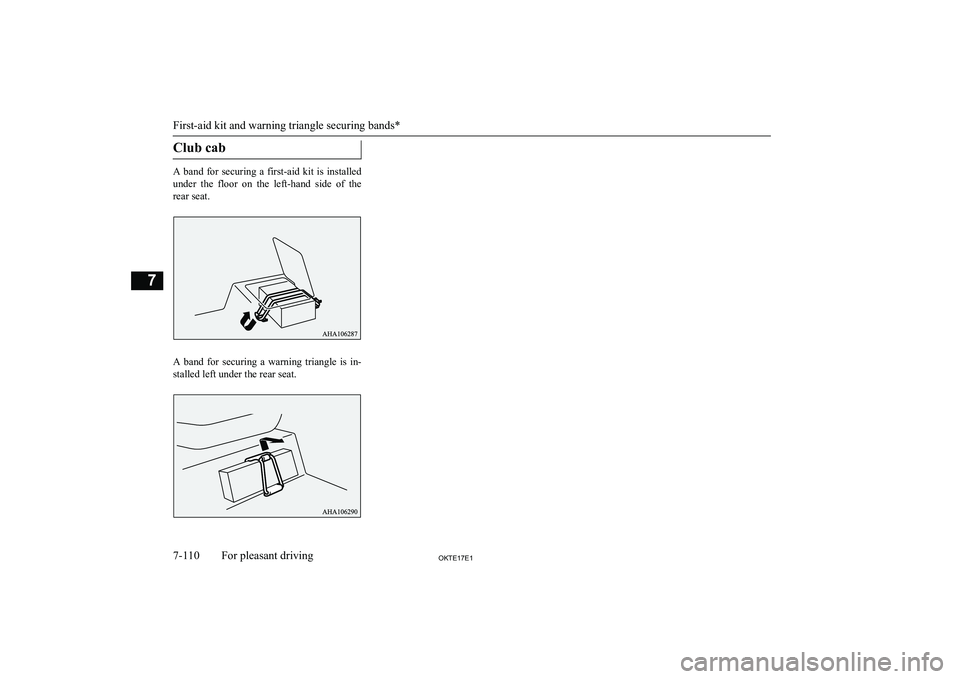
Club cab
A band for securing a first-aid kit is installed
under the floor on the left-hand side of the
rear seat.
A band for securing a warning triangle is in- stalled left under the rear seat.
First-aid kit and warning triangle securing bands*
7-110OKTE17E1For pleasant driving7
Page 313 of 426
ERA-GLONASS*............................................................................... 8-02
If the vehicle breaks down.................................................................. 8-07 Emergency starting............................................................................. 8-08
Engine overheating............................................................................. 8-09
Bleeding the fuel system..................................................................... 8-11 Removal of water from the fuel filter................................................. 8-11
Tools, jack and jack handle................................................................. 8-12
How to change a tyre.......................................................................... 8-17
Towing................................................................................................ 8-24
Operation under adverse driving conditions....................................... 8-28For emergencies
OKTE17E18
Page 314 of 426
ERA-GLONASS*E00804800050
ERA-GLONASS is a system designed to re- duce the severity of accidents. The location
and vehicle information is transmitted from
the system to the emergency call centre in
case of an accident or sudden illness, and the emergency call centre arranges for despatch
of emergency vehicles as required.WARNINGl In the country or area where there is no
available emergency call centre of theERA-GLONASS, or where the radio waveof the emergency call cannot be transmit-
ted or received normally, the system does
not operate. In this case, directly arrange
an emergency vehicle or road service with a cellular phone, etc.
l If an emergency occurs and you notice a
fuel smell or bad smell, do not stay inside the vehicle and escape to a safe place im-
mediately.
l While waiting for the rescue after the
emergency call, take action to prevent sec- ondary accidents such as a rear end colli-
sion with the following vehicle, and escape to a safe place.
l In the following cases, directly arrange an
emergency vehicle or road service with a
cellular phone, etc.
• When the system does not operate by
failing because of collision, etc.WARNING• When the vehicle is in a place where ra-
dio waves cannot be transmitted and
received. (for example, indoor, a base- ment parking area, mountainous area,
inside a tunnel, etc.)
• When the line to the emergency call
centre is occupied and the call cannot
be connected to the emergency call cen- tre.NOTEl This system reports to the emergency call
centre, but does not directly arrange anemergency vehicle or pass to the road serv-
ice.
l This system helps to maken an emergency
call for a traffic accident or sudden illness,
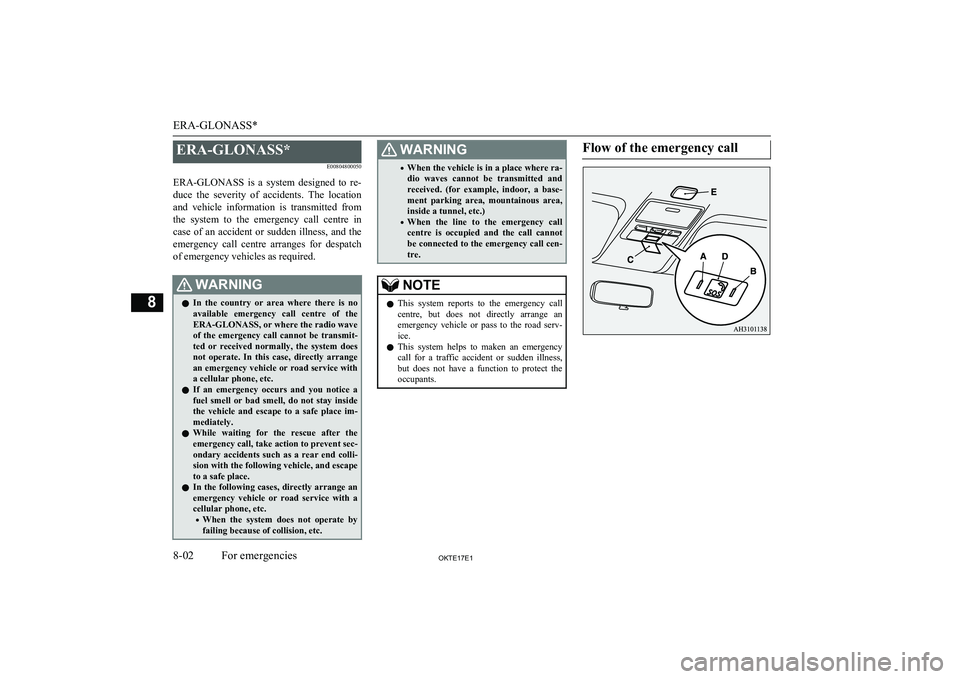
but does not have a function to protect the occupants.Flow of the emergency call
ERA-GLONASS*
8-02OKTE17E1For emergencies8
Page 315 of 426
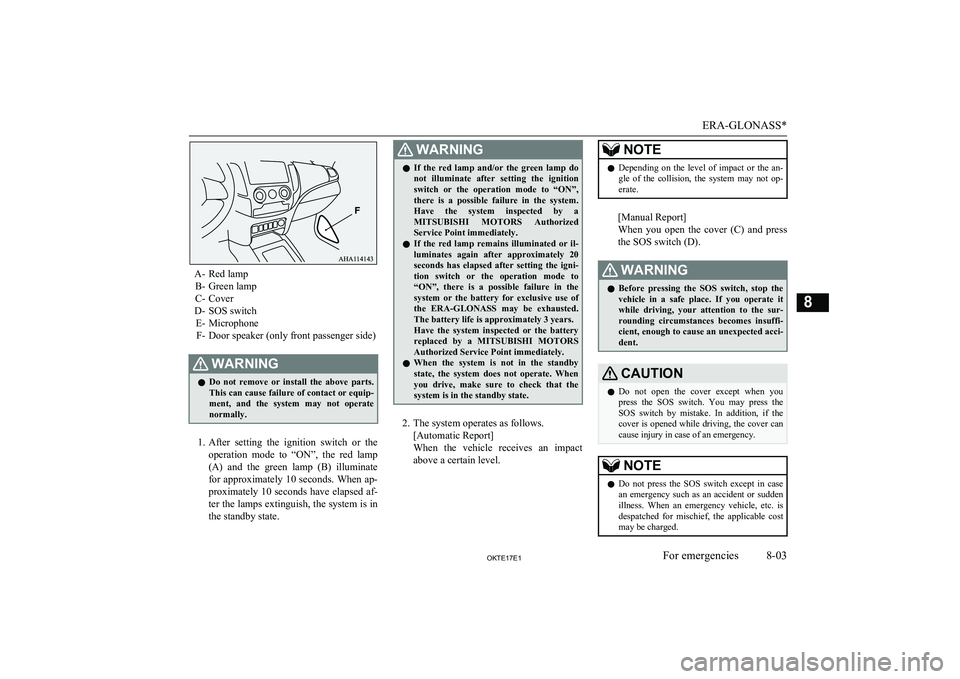
A- Red lampB- Green lamp
C- Cover
D- SOS switch E- MicrophoneF- Door speaker (only front passenger side)
WARNINGl Do not remove or install the above parts.
This can cause failure of contact or equip- ment, and the system may not operate
normally.
1. After setting the ignition switch or the
operation mode to “ON”, the red lamp
(A) and the green lamp (B) illuminate
for approximately 10 seconds. When ap- proximately 10 seconds have elapsed af-
ter the lamps extinguish, the system is in the standby state.
WARNINGl If the red lamp and/or the green lamp do
not illuminate after setting the ignition switch or the operation mode to “ON”,
there is a possible failure in the system. Have the system inspected by a
MITSUBISHI MOTORS Authorized
Service Point immediately.
l If the red lamp remains illuminated or il-
luminates again after approximately 20 seconds has elapsed after setting the igni-
tion switch or the operation mode to “ON”, there is a possible failure in the
system or the battery for exclusive use of the ERA-GLONASS may be exhausted.The battery life is approximately 3 years.
Have the system inspected or the battery
replaced by a MITSUBISHI MOTORS
Authorized Service Point immediately.
l When the system is not in the standby
state, the system does not operate. When
you drive, make sure to check that the system is in the standby state.
2. The system operates as follows.
[Automatic Report]
When the vehicle receives an impact
above a certain level.
NOTEl Depending on the level of impact or the an-
gle of the collision, the system may not op-erate.
[Manual Report]
When you open the cover (C) and press
the SOS switch (D).
WARNINGl Before pressing the SOS switch, stop the
vehicle in a safe place. If you operate it while driving, your attention to the sur- rounding circumstances becomes insuffi-
cient, enough to cause an unexpected acci- dent.CAUTIONl Do not open the cover except when you
press the SOS switch. You may press theSOS switch by mistake. In addition, if the
cover is opened while driving, the cover can cause injury in case of an emergency.NOTEl Do not press the SOS switch except in case
an emergency such as an accident or sudden
illness. When an emergency vehicle, etc. is
despatched for mischief, the applicable cost
may be charged.
ERA-GLONASS*
8-03OKTE17E1For emergencies8
Page 316 of 426
3.The green lamp blinks and the system
calls the emergency call centre.WARNINGl If the red lamp illuminates as follows, di-
rectly arrange an emergency vehicle or
road service with a cellular phone, etc.
• When the red lamp remains illumina-
ted. (There is a possible failure in the
system.)
• When the red lamp illuminates for 60
seconds. (The vehicle may be in a place
where radio waves cannot be transmit-
ted and received.)
4. The green lamp blinks slowly, and the
location and vehicle information is trans-
mitted to the emergency call centre.
5. When the green lamp changes from a
blinking state to an illumination state and the buzzer sounds once, a conversa- tion with an operator of the emergencycall centre is available.WARNINGl Do not replace the speakers. If they are
replaced, the buzzer sound or the voice of
the operator at the emergency call centre
may not be audible. If the speakers need to be replaced due to a failure etc., we rec-
ommend you to consult a MITSUBISHI
MOTORS Authorized Service Point.
l An error may occur between the actual
report point and the point reported to the
emergency call centre. Mutually confirm
the report point and the object through
the phone call with the operator of the emergency call centre.NOTEl If the vehicle side microphone (E) and/or the
speakers fail, you cannot talk with the opera-tor of the emergency call centre.
l A call cannot be disconnected from the vehi-
cle side.
6. The emergency call centre arranges for
despatch of the emergency vehicle as re- quired.
Indicator list
ERA-GLONASS*
8-04OKTE17E1For emergencies8
Page 317 of 426
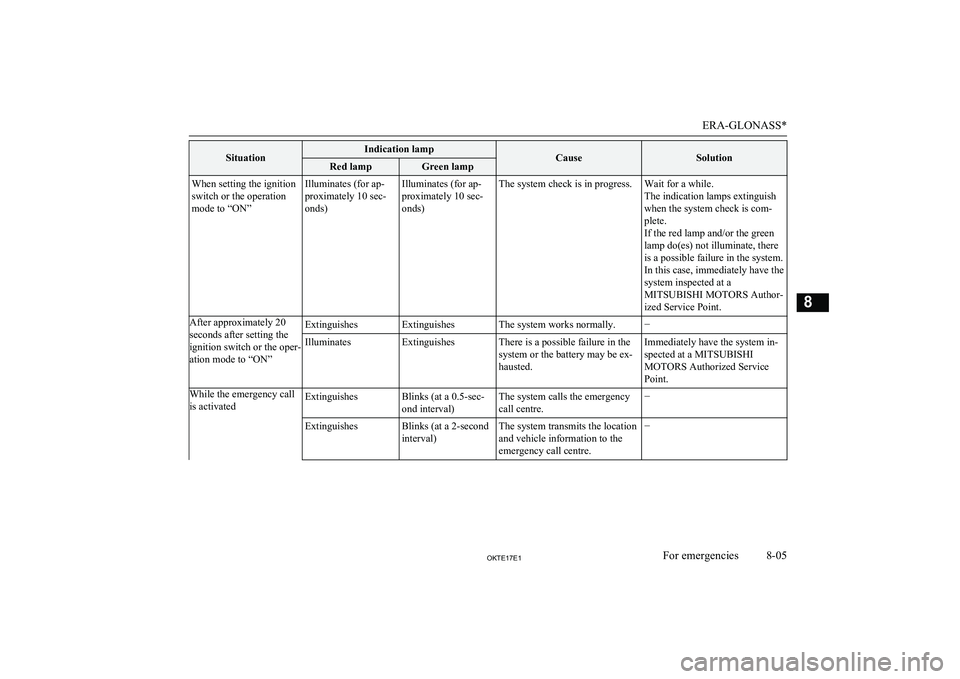
SituationIndication lampCauseSolutionRed lampGreen lampWhen setting the ignition
switch or the operation
mode to “ON”Illuminates (for ap-
proximately 10 sec-
onds)Illuminates (for ap-
proximately 10 sec-
onds)The system check is in progress.Wait for a while.
The indication lamps extinguish
when the system check is com-
plete.
If the red lamp and/or the green
lamp do(es) not illuminate, there
is a possible failure in the system.
In this case, immediately have the
system inspected at a
MITSUBISHI MOTORS Author-
ized Service Point.After approximately 20
seconds after setting the
ignition switch or the oper-
ation mode to “ON”ExtinguishesExtinguishesThe system works normally.−IlluminatesExtinguishesThere is a possible failure in the
system or the battery may be ex-
hausted.Immediately have the system in-
spected at a MITSUBISHI
MOTORS Authorized Service
Point.While the emergency call
is activatedExtinguishesBlinks (at a 0.5-sec-
ond interval)The system calls the emergency
call centre.−ExtinguishesBlinks (at a 2-second
interval)The system transmits the location
and vehicle information to the
emergency call centre.−
ERA-GLONASS*
8-05OKTE17E1For emergencies8
Page 318 of 426
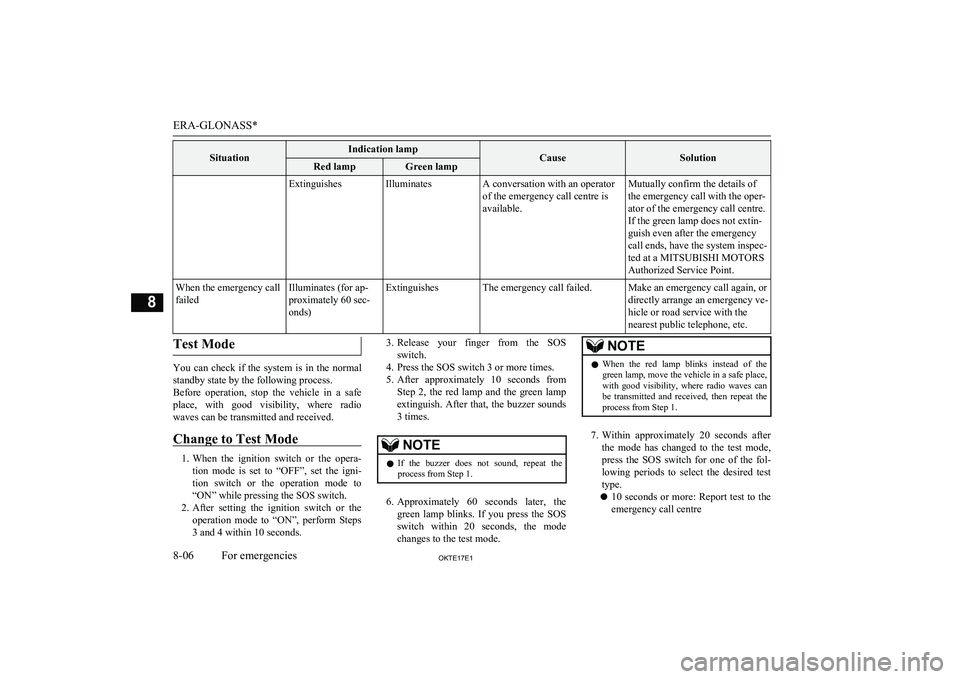
SituationIndication lampCauseSolutionRed lampGreen lampExtinguishesIlluminatesA conversation with an operator
of the emergency call centre is
available.Mutually confirm the details of
the emergency call with the oper-
ator of the emergency call centre.
If the green lamp does not extin-
guish even after the emergency
call ends, have the system inspec-
ted at a MITSUBISHI MOTORS
Authorized Service Point.When the emergency call
failedIlluminates (for ap-
proximately 60 sec-
onds)ExtinguishesThe emergency call failed.Make an emergency call again, or
directly arrange an emergency ve-
hicle or road service with the
nearest public telephone, etc.Test Mode
You can check if the system is in the normal
standby state by the following process.
Before operation, stop the vehicle in a safe place, with good visibility, where radio
waves can be transmitted and received.
Change to Test Mode
1. When the ignition switch or the opera-
tion mode is set to “OFF”, set the igni- tion switch or the operation mode to
“ON” while pressing the SOS switch.
2. After setting the ignition switch or the
operation mode to “ON”, perform Steps
3 and 4 within 10 seconds.
3. Release your finger from the SOS
switch.
4. Press the SOS switch 3 or more times.
5. After approximately 10 seconds from
Step 2, the red lamp and the green lampextinguish. After that, the buzzer sounds
3 times.NOTEl If the buzzer does not sound, repeat the
process from Step 1.
6. Approximately 60 seconds later, the
green lamp blinks. If you press the SOS switch within 20 seconds, the mode
changes to the test mode.
NOTEl When the red lamp blinks instead of the
green lamp, move the vehicle in a safe place, with good visibility, where radio waves can
be transmitted and received, then repeat the process from Step 1.
7. Within approximately 20 seconds after
the mode has changed to the test mode,
press the SOS switch for one of the fol- lowing periods to select the desired test
type.
l 10 seconds or more: Report test to the
emergency call centre
ERA-GLONASS*
8-06OKTE17E1For emergencies8
Page 319 of 426
lLess than 10 seconds: Test of the
ERA-GLONASS system equipment of
the vehicleNOTEl If you do not press the SOS switch within
approximately 20 seconds, the test modeends.
l If you drive a certain distance in the test
mode, the test mode ends.
Report test to the emergency
call centre
1. The green lamp illuminates, and the re-
port test to the emergency call centre is
started.
NOTEl If the red lamp illuminates for approximately
60 seconds, the vehicle is in a place where radio waves cannot be transmitted and re-ceived. Therefore you cannot report to the emergency call centre.
2. When the green lamp extinguishes, the
test mode is completed.
Test of the ERA-GLONASS
system equipment of the vehicle
1. After the buzzer sounds once, press the
SOS switch.
[Lamp Check]
When the buzzer sounds once and both the red and green lamp illuminate alter-nately, they are working normally.
2. When the lamps are normal, press the
SOS switch. When the lamps do not illu-
minate normally, wait for approximately
20 seconds.
[Speaker Check]
When the buzzer sounds twice and con-
tinues sounding, they are working nor-
mally.
3. When the speakers are normal, press the
SOS switch. When the buzzer does not
sound normally, wait for approximately
20 seconds.
[Microphone Check]
After the buzzer sounds 3 times, say something towards the microphone.If your voice sounds from the speakers,
they are working normally.
4. When the microphone is normal, press
the SOS switch. When it does not oper-
ate normally, wait for approximately 20
seconds.
5. If all check results are normal, the green
lamp illuminates (for approximately 5
seconds) and the buzzer sounds once.
WARNINGl If any of the check results are not normal,
the red lamp illuminates (for approxi- mately 5 seconds) and the buzzer sounds 3times. In this case, there is a possible fail-
ure in the system. Have the system inspec- ted by a MITSUBISHI MOTORS Au-
thorized Service Point immediately.
6. When the green lamp extinguishes, the
test mode is completed.
If the vehicle breaks down
E00800101137
If the vehicle breaks down on the road, moveit to the shoulder and use the hazard warning
flashers and/or the warning triangle etc.
Refer to “Hazard warning flasher switch” on page 5-21.
If the engine stops/fails
Vehicle operation and control are affected if
the engine stops. Before moving the vehicle to a safe area, be aware of the following:
l The brake booster becomes inoperative
and the pedal effort will increase. Press
down the brake pedal harder than usual.
l Since the power steering system is no
longer operative, the steering wheel feels heavy when turning it.
If the vehicle breaks down
8-07OKTE17E1For emergencies8
Page 320 of 426
Emergency startingE00800504132
If the engine cannot be started because the battery is weak or dead, the battery from an-other vehicle can be used with jumper cables to start the engine.WARNINGl To start the engine using jumper cables
connected from another vehicle, perform the correct procedures according to theinstruction below. Incorrect procedures
could result in a fire or explosion or dam- age to the vehicles.
l Keep sparks, cigarettes and flames away
from the battery because the battery may produce an explosion.CAUTIONl Do not attempt to start the engine by pulling
or pushing the vehicle.
It could damage your vehicle.
l Check the other vehicle. It must have a 12-
volt battery.
If the other system isn’t 12-volt, shorting can
damage both vehicles.
l Use the proper cables suitable for the battery
size to prevent overheating of the cables.
l Check the jumper cables for damage and
corrosion before use.CAUTIONl Always wear protective eye goggles when
working near the battery.
l Keep the battery out of the reach of children.
1.
Get the vehicles close enough so the
jumper cables can reach, but be sure the vehicles aren’t touching each other.
2. Turn off all lamps, heater and other elec-
trical loads.
3. Set the parking brake firmly on each ve-
hicle. Put an automatic transmission in “P” (PARK) or a manual transmission in
“N” (Neutral). Stop the engine.
WARNINGl Turn off the ignition on both vehicles be-
forehand. Make sure that the cables or your clothes cannot be caught by the fan or drive belt. Personal injury could result.
4. Make sure battery electrolyte is at the
proper level.
Refer to “Battery” on page 10-10.
WARNINGl If electrolyte fluid is not visible, or ap-
pears to be frozen, Do Not Attempt Jump Starting!
A battery might rupture or explode if the temperature is below the freezing point orif it is not filled to the proper level.
l Electrolyte is corrosive diluted sulphuric
acid.
If electrolyte (battery acid) comes into contact with your hands, eyes, clothes and
the painted surface of your vehicle, it
should be thoroughly flushed with water. If electrolyte gets in your eyes, flush them with water immediately and thoroughly,and get prompt medical attention.
5. Connect one end of one jumper cable
to the positive (+) terminal of the dis-
charged battery (A), and the other end
to the positive (+) terminal of the
booster battery (B).
Connect one end of the other jumper ca-
ble
to the negative ( −) terminal of the
booster battery (B), and the other end
to the engine block of the vehicle with
the discharged battery at the point far- thest from the battery.
Emergency starting
8-08OKTE17E1For emergencies8