MITSUBISHI L200 2017 Owner's Manual (in English)
Manufacturer: MITSUBISHI, Model Year: 2017, Model line: L200, Model: MITSUBISHI L200 2017Pages: 426, PDF Size: 14.12 MB
Page 351 of 426
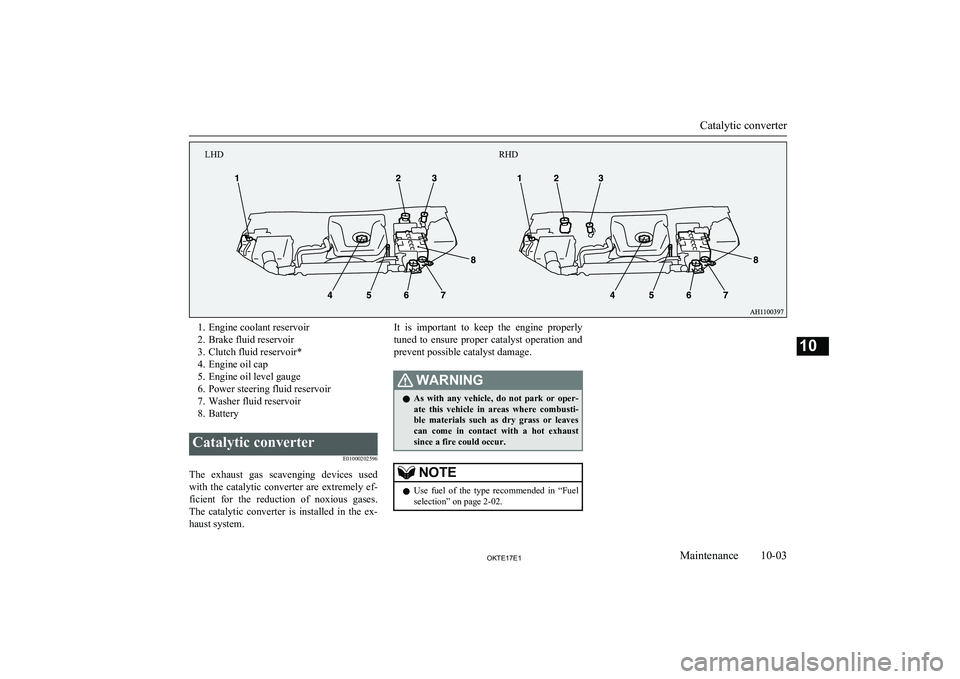
1. Engine coolant reservoir
2. Brake fluid reservoir
3. Clutch fluid reservoir*
4. Engine oil cap
5. Engine oil level gauge
6. Power steering fluid reservoir
7. Washer fluid reservoir
8. BatteryCatalytic converter
E01000202596
The exhaust gas scavenging devices usedwith the catalytic converter are extremely ef- ficient for the reduction of noxious gases.
The catalytic converter is installed in the ex- haust system.
It is important to keep the engine properly
tuned to ensure proper catalyst operation and prevent possible catalyst damage.WARNINGl As with any vehicle, do not park or oper-
ate this vehicle in areas where combusti- ble materials such as dry grass or leaves
can come in contact with a hot exhaust
since a fire could occur.NOTEl Use fuel of the type recommended in
“Fuel
selection” on page 2-02.
Catalytic converter
10-03OKTE17E1Maintenance10RHD
LHD
Page 352 of 426
BonnetE01000304126
To open
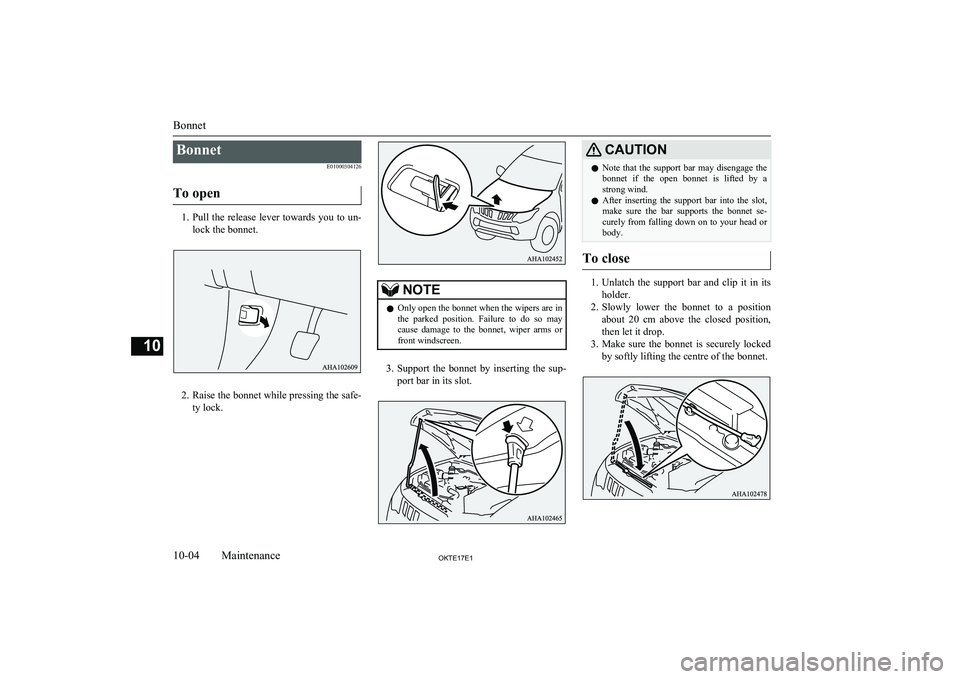
1. Pull the release lever towards you to un-
lock the bonnet.
2. Raise the bonnet while pressing the safe-
ty lock.
NOTEl Only open the bonnet when the wipers are in
the parked position. Failure to do so may
cause damage to the bonnet, wiper arms or
front windscreen.
3. Support the bonnet by inserting the sup-
port bar in its slot.
CAUTIONl Note that the support bar may disengage the
bonnet if the open bonnet is lifted by astrong wind.
l After inserting the support bar into the slot,
make sure the bar supports the bonnet se-
curely from falling down on to your head or body.
To close
1. Unlatch the support bar and clip it in its
holder.
2. Slowly lower the bonnet to a position
about 20 cm above the closed position,
then let it drop.
3. Make sure the bonnet is securely locked
by softly lifting the centre of the bonnet.
Bonnet
10-04OKTE17E1Maintenance10
Page 353 of 426
CAUTIONlBe careful that hands or fingers are not trap-
ped when closing the bonnet.
l Before driving, make sure that the bonnet is
securely locked. An incompletely locked bonnet can suddenly open while driving.
This can be extremely dangerous.NOTEl If this does not close the bonnet, release it
from a slightly higher position.
l Do not press down firmly on the bonnet as
doing so could damage it.Engine oil
E01000404693
To check and refill engine oil
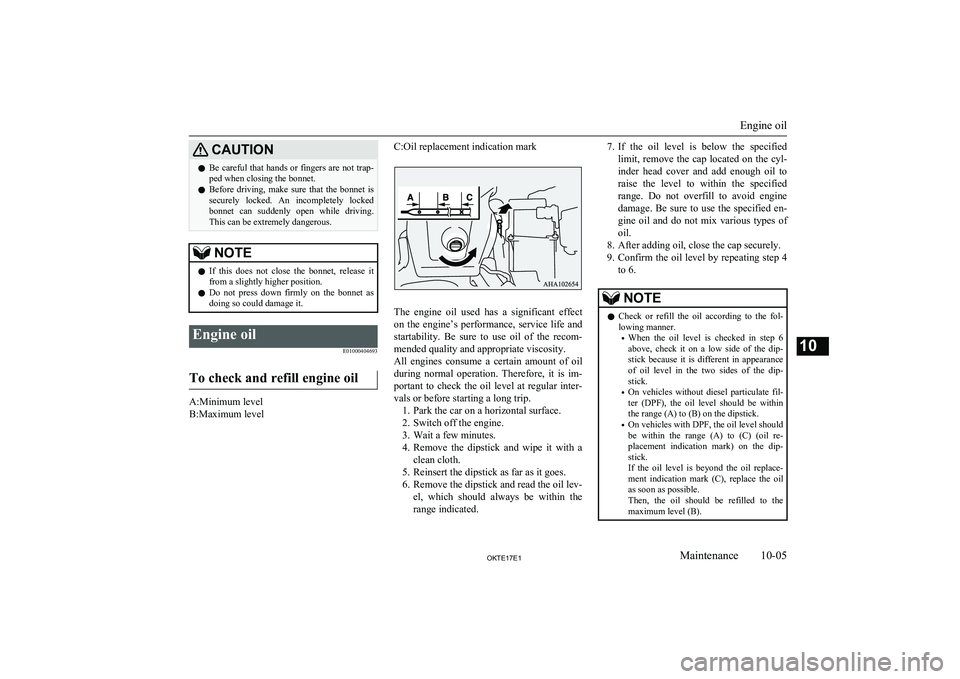
A:Minimum level
B:Maximum level
C:Oil replacement indication mark
The engine oil used has a significant effect on the engine’s performance, service life and
startability. Be sure to use oil of the recom- mended quality and appropriate viscosity.
All engines consume a certain amount of oil during normal operation. Therefore, it is im-portant to check the oil level at regular inter-
vals or before starting a long trip. 1. Park the car on a horizontal surface.
2. Switch off the engine.
3. Wait a few minutes.
4. Remove the dipstick and wipe it with a
clean cloth.
5. Reinsert the dipstick as far as it goes.
6. Remove the dipstick and read the oil lev- el, which should always be within therange indicated.
7. If the oil level is below the specified
limit, remove the cap located on the cyl- inder head cover and add enough oil to
raise the level to within the specified
range. Do not overfill to avoid engine damage. Be sure to use the specified en-
gine oil and do not mix various types of
oil.
8. After adding oil, close the cap securely.
9. Confirm the oil level by repeating step 4
to 6.NOTEl Check or refill the oil according to the fol-
lowing manner.
• When the oil level is checked in step 6
above, check it on a low side of the dip-
stick because it is different in appearance
of oil level in the two sides of the dip-
stick.
• On vehicles without diesel particulate fil-
ter (DPF), the oil level should be within the range (A) to (B) on the dipstick.
• On vehicles with DPF, the oil level should
be within the range (A) to (C) (oil re-
placement indication mark) on the dip-
stick.
If the oil level is beyond the oil replace-
ment indication mark (C), replace the oil as soon as possible.
Then, the oil should be refilled to the maximum level (B).
Engine oil
10-05OKTE17E1Maintenance10
Page 354 of 426
NOTE•On vehicles with DPF, the engine oil will
increase due to a little fuel getting mixed
in the engine oil when the DPF regener- ates to burn away the PM (particulate
matter). However, it does not indicate a
malfunction.
• The engine oil level will be increased due
to an amount of the fuel being mixed in
the engine oil when the DPF regenerates
to burn away the PM (particulate matter). It does not indicate a malfunction.
In the following conditions, the engine oil level may increase easily. We recommendyou to have it checked frequently.
•frequent driving at uphill and down-
hill
• frequent driving at high altitudes
• frequent and extended idling
• frequent driving through a traffic
jam
l The engine oil will deteriorate rapidly if the
vehicle is subjected to severe conditions, re- quiring earlier oil replacement. Please refer
to the maintenance schedule.
l For handling of used engine oils, refer to
page 2-06.Selection of engine oil
l Select engine oil of the proper SAE vis-
cosity number according to the atmos-pheric temperature.
l Use engine oil conforming to the follow-
ing classification: • ACEA classification: “For service C1, C2, C3 or C4”
• JASO classification: “For service DL-1”
If those classifications are not available, con- tact a MITSUBISHI MOTORS Authorized
Service Point.
NOTEl Use of additives is not recommended since
they may reduce the effectiveness of addi-
tives already included in the engine oil. It may result in failure of the mechanical as-
sembly.Engine coolant
E01000503509
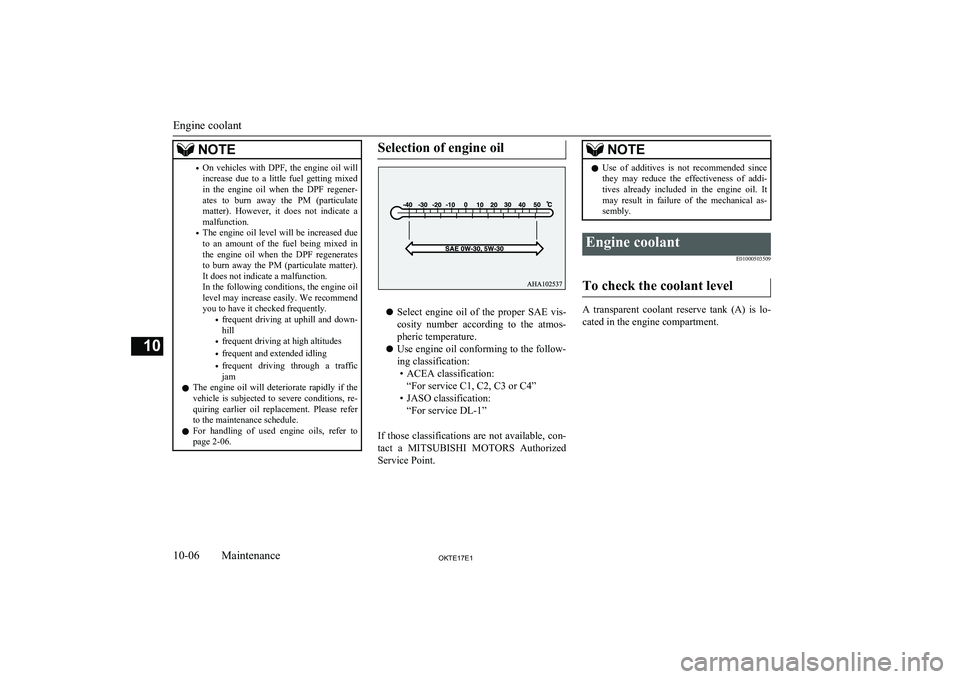
To check the coolant level
A transparent coolant reserve tank (A) is lo-cated in the engine compartment.
Engine coolant
10-06OKTE17E1Maintenance10
Page 355 of 426
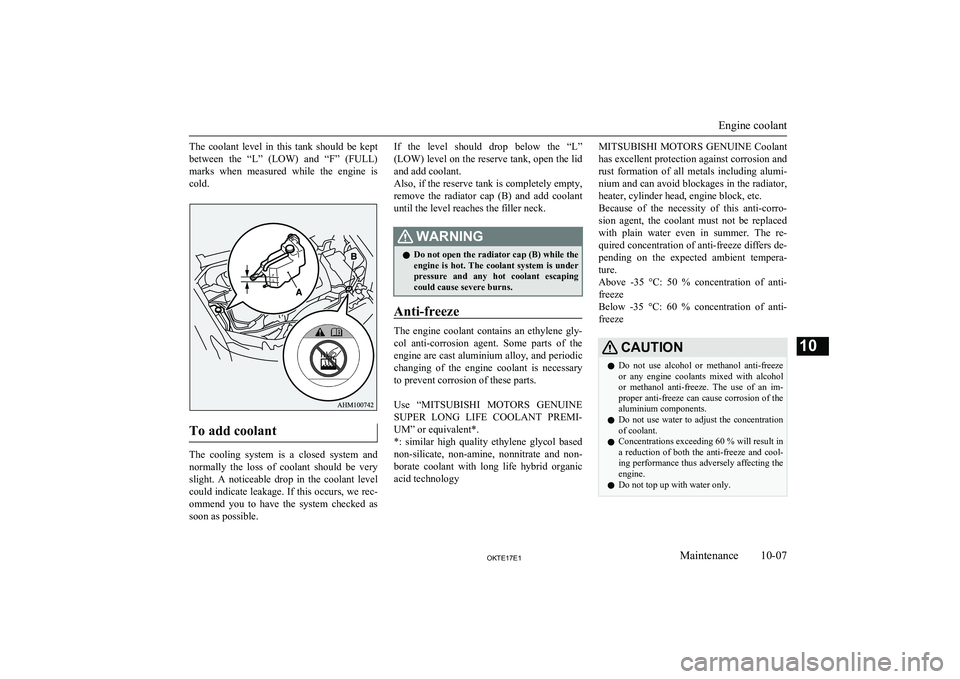
The coolant level in this tank should be keptbetween the “L” (LOW) and “F” (FULL)
marks when measured while the engine is cold.
To add coolant
The cooling system is a closed system and normally the loss of coolant should be very
slight. A noticeable drop in the coolant level
could indicate leakage. If this occurs, we rec- ommend you to have the system checked as
soon as possible.
If the level should drop below the “L”
(LOW) level on the reserve tank, open the lid
and add coolant.
Also, if the reserve tank is completely empty, remove the radiator cap (B) and add coolant until the level reaches the filler neck.WARNINGl Do not open the radiator cap (B) while the
engine is hot. The coolant system is under
pressure and any hot coolant escaping
could cause severe burns.
Anti-freeze
The engine coolant contains an ethylene gly-
col anti-corrosion agent. Some parts of the engine are cast aluminium alloy, and periodic
changing of the engine coolant is necessary to prevent corrosion of these parts.
Use “ MITSUBISHI MOTORS GENUINE
SUPER LONG LIFE COOLANT PREMI- UM” or equivalent*.
*: similar high quality ethylene glycol based
non-silicate, non-amine, nonnitrate and non- borate coolant with long life hybrid organic
acid technology
MITSUBISHI MOTORS GENUINE Coolant
has excellent protection against corrosion and
rust formation of all metals including alumi- nium and can avoid blockages in the radiator,
heater, cylinder head, engine block, etc.
Because of the necessity of this anti-corro-
sion agent, the coolant must not be replaced with plain water even in summer. The re-
quired concentration of anti-freeze differs de- pending on the expected ambient tempera-
ture.
Above -35 °C: 50 % concentration of anti-
freeze
Below -35 °C: 60 % concentration of anti- freezeCAUTIONl Do not use alcohol or methanol anti-freeze
or any engine coolants mixed with alcoholor methanol anti-freeze. The use of an im-
proper anti-freeze can cause corrosion of the aluminium components.
l Do not use water to adjust the concentration
of coolant.
l Concentrations exceeding 60 % will result in
a reduction of both the anti-freeze and cool-
ing performance thus adversely affecting the
engine.
l Do not top up with water only.
Engine coolant
10-07OKTE17E1Maintenance10
Page 356 of 426
During cold weather
If the temperatures in your area drop belowfreezing, there is the danger that the coolant
in the engine or radiator could freeze and
cause severe damage to the engine and/or ra- diator. Add a sufficient amount of anti-freeze to the coolant to prevent it from freezing.The concentration should be checked before the start of cold weather and anti-freeze add-
ed to the system if necessary.
Washer fluid
E01000702113
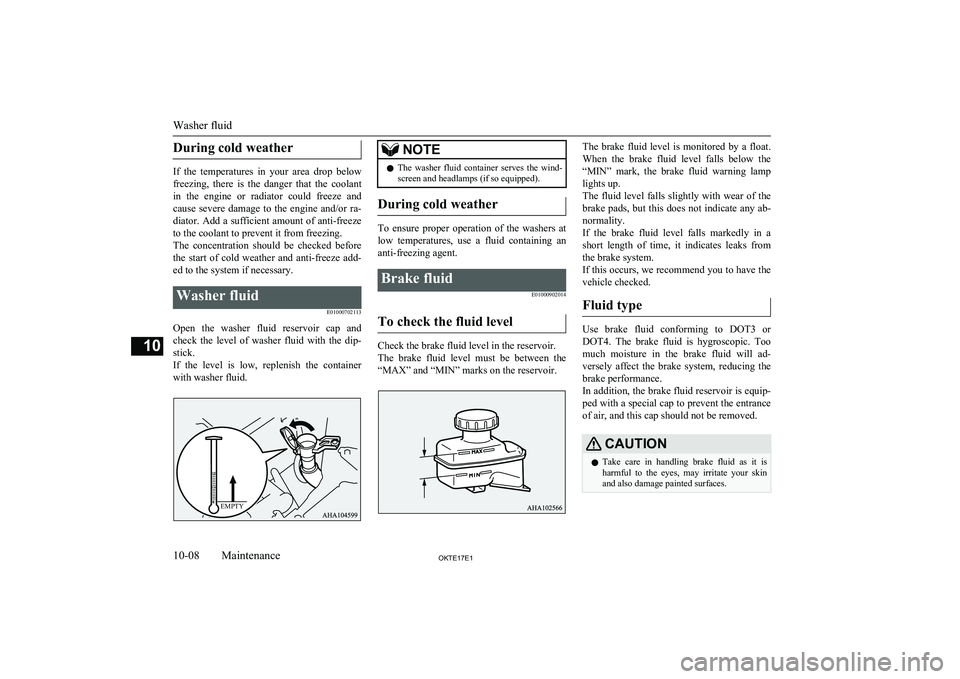
Open the washer fluid reservoir cap andcheck the level of washer fluid with the dip- stick.
If the level is low, replenish the container with washer fluid.
NOTEl The washer fluid container serves the wind-
screen and headlamps (if so equipped).
During cold weather
To ensure proper operation of the washers at
low temperatures, use a fluid containing ananti-freezing agent.
Brake fluid
E01000902014
To check the fluid level
Check the brake fluid level in the reservoir.
The brake fluid level must be between the “MAX” and “MIN” marks on the reservoir.
The brake fluid level is monitored by a float.
When the brake fluid level falls below the “MIN” mark, the brake fluid warning lamp
lights up.
The fluid level falls slightly with wear of the brake pads, but this does not indicate any ab-
normality.
If the brake fluid level falls markedly in a short length of time, it indicates leaks from
the brake system.
If this occurs, we recommend you to have the vehicle checked.
Fluid type
Use brake fluid conforming to DOT3 or
DOT4. The brake fluid is hygroscopic. Too
much moisture in the brake fluid will ad- versely affect the brake system, reducing the brake performance.
In addition, the brake fluid reservoir is equip-
ped with a special cap to prevent the entrance
of air, and this cap should not be removed.
CAUTIONl Take care in handling brake fluid as it is
harmful to the eyes, may irritate your skin
and also damage painted surfaces.
Washer fluid
10-08OKTE17E1Maintenance10EMPTY
Page 357 of 426
CAUTIONlUse only the specified brake fluid.
Do not mix or add different brands of brake fluid to prevent chemical reactions.
Do not let any petroleum-based fluid touch, mix with, or get into the brake fluid.
This will damage the seals.
l Keep the reservoir tank cap closed to pre-
vent the brake fluid from deteriorating ex- cept maintenance.
l Clean the filler cap before removing and
close the cap securely after maintenance.Clutch fluid*
E01001001477
To check the fluid level
The clutch fluid in the master cylinder should
be checked when performing other under- hood service. In addition, the system shouldbe checked for leakage at the same time.
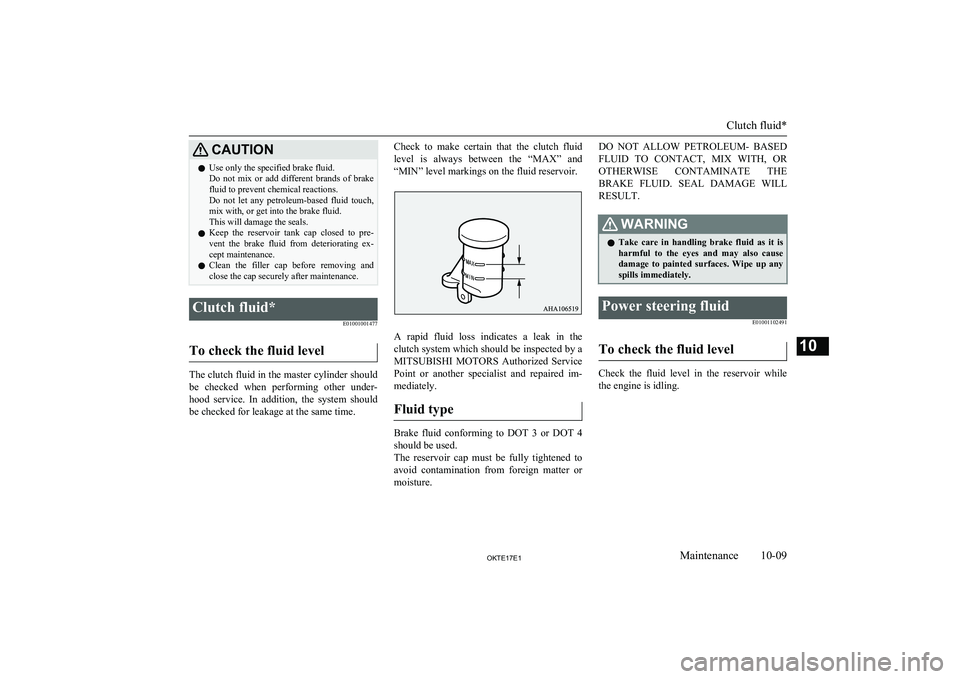
Check to make certain that the clutch fluid
level is always between the “MAX” and
“MIN” level markings on the fluid reservoir.
A rapid fluid loss indicates a leak in the
clutch system which should be inspected by a
MITSUBISHI MOTORS Authorized Service
Point or another specialist and repaired im- mediately.
Fluid type
Brake fluid conforming to DOT 3 or DOT 4 should be used.
The reservoir cap must be fully tightened to avoid contamination from foreign matter or
moisture.
DO NOT ALLOW PETROLEUM- BASED
FLUID TO CONTACT, MIX WITH, OR
OTHERWISE CONTAMINATE THE BRAKE FLUID. SEAL DAMAGE WILLRESULT.WARNINGl Take care in handling brake fluid as it is
harmful to the eyes and may also cause
damage to painted surfaces. Wipe up any spills immediately.Power steering fluid
E01001102491
To check the fluid level
Check the fluid level in the reservoir whilethe engine is idling.
Clutch fluid*
10-09OKTE17E1Maintenance10
Page 358 of 426
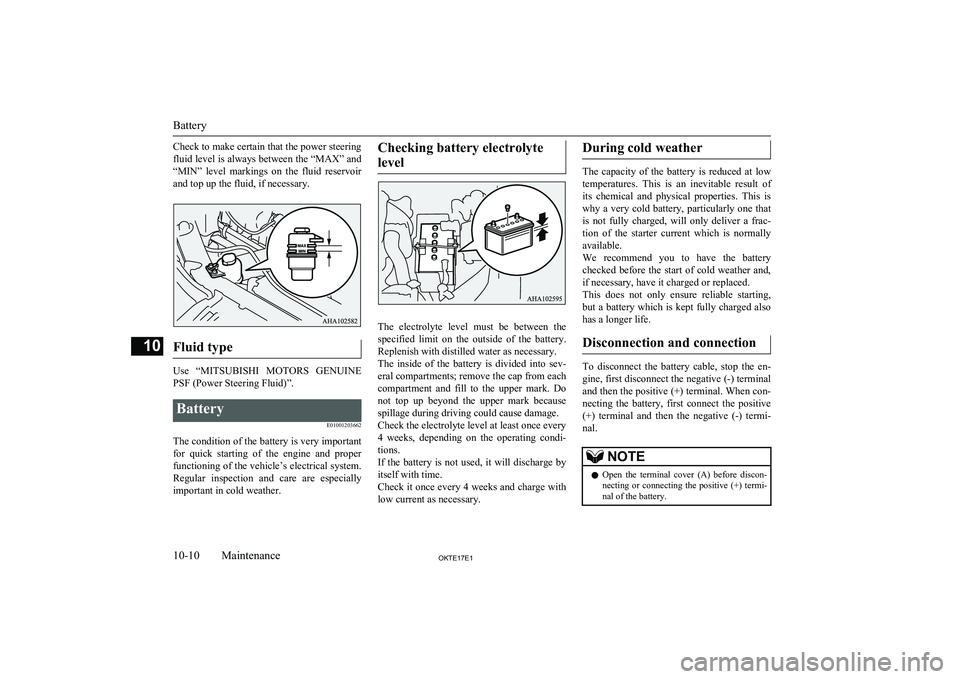
Check to make certain that the power steering
fluid level is always between the “MAX” and
“MIN” level markings on the fluid reservoir and top up the fluid, if necessary.
Fluid type
Use “ MITSUBISHI MOTORS GENUINE
PSF (Power Steering Fluid)”.
Battery
E01001203662
The condition of the battery is very important
for quick starting of the engine and proper functioning of the vehicle’s electrical system.
Regular inspection and care are especially
important in cold weather.
Checking battery electrolyte
level
The electrolyte level must be between the specified limit on the outside of the battery.
Replenish with distilled water as necessary.
The inside of the battery is divided into sev- eral compartments; remove the cap from each
compartment and fill to the upper mark. Do
not top up beyond the upper mark because spillage during driving could cause damage.
Check the electrolyte level at least once every
4 weeks, depending on the operating condi- tions.
If the battery is not used, it will discharge by
itself with time.
Check it once every 4 weeks and charge with
low current as necessary.
During cold weather
The capacity of the battery is reduced at low
temperatures. This is an inevitable result of its chemical and physical properties. This iswhy a very cold battery, particularly one that
is not fully charged, will only deliver a frac- tion of the starter current which is normallyavailable.
We recommend you to have the battery checked before the start of cold weather and,
if necessary, have it charged or replaced.
This does not only ensure reliable starting, but a battery which is kept fully charged alsohas a longer life.
Disconnection and connection
To disconnect the battery cable, stop the en-
gine, first disconnect the negative (-) terminal
and then the positive (+) terminal. When con- necting the battery, first connect the positive
(+) terminal and then the negative (-) termi-
nal.
NOTEl Open the terminal cover (A) before discon-
necting or connecting the positive (+) termi-
nal of the battery.
Battery
10-10OKTE17E1Maintenance10
Page 359 of 426
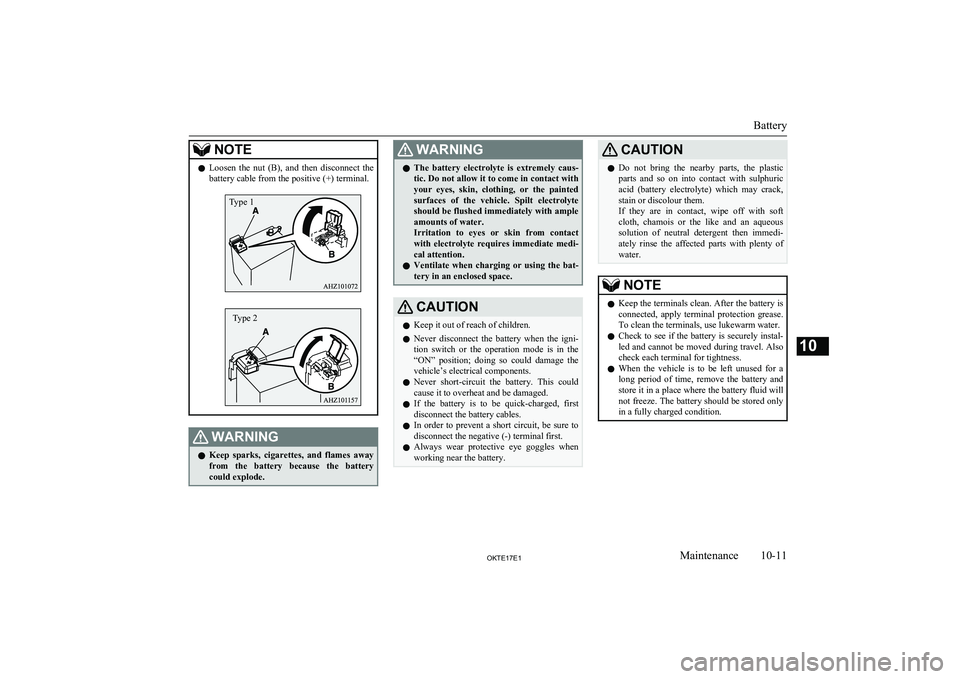
NOTElLoosen the nut (B), and then disconnect the
battery cable from the positive (+) terminal.WARNINGl Keep sparks, cigarettes, and flames away
from the battery because the battery could explode.WARNINGl The battery electrolyte is extremely caus-
tic. Do not allow it to come in contact with
your eyes, skin, clothing, or the painted surfaces of the vehicle. Spilt electrolyte
should be flushed immediately with ample amounts of water.
Irritation to eyes or skin from contact
with electrolyte requires immediate medi-
cal attention.
l Ventilate when charging or using the bat-
tery in an enclosed space.CAUTIONl Keep it out of reach of children.
l Never disconnect the battery when the igni-
tion switch or the operation mode is in the“ON” position; doing so could damage the
vehicle’s electrical components.
l Never short-circuit the battery. This could
cause it to overheat and be damaged.
l If the battery is to be quick-charged, first
disconnect the battery cables.
l In order to prevent a short circuit, be sure to
disconnect the negative (-) terminal first.
l Always wear protective eye goggles when
working near the battery.CAUTIONl Do not bring the nearby parts, the plastic
parts and so on into contact with sulphuric acid (battery electrolyte) which may crack,
stain or discolour them.
If they are in contact, wipe off with soft cloth, chamois or the like and an aqueous
solution of neutral detergent then immedi-
ately rinse the affected parts with plenty of water.NOTEl Keep the terminals clean. After the battery is
connected, apply terminal protection grease.
To clean the terminals, use lukewarm water.
l Check to see if the battery is securely instal-
led and cannot be moved during travel. Also check each terminal for tightness.
l When the vehicle is to be left unused for a
long period of time, remove the battery and
store it in a place where the battery fluid will not freeze. The battery should be stored only in a fully charged condition.
Battery
10-11OKTE17E1Maintenance10 Type 1 Type 2
Page 360 of 426
TyresE01001300239WARNINGlDriving with tyres that are worn, dam-
aged or improperly inflated can lead to a
loss of control or blow out of the tyres which can result in a collision with serious
or fatal injury.Tyre inflation pressures
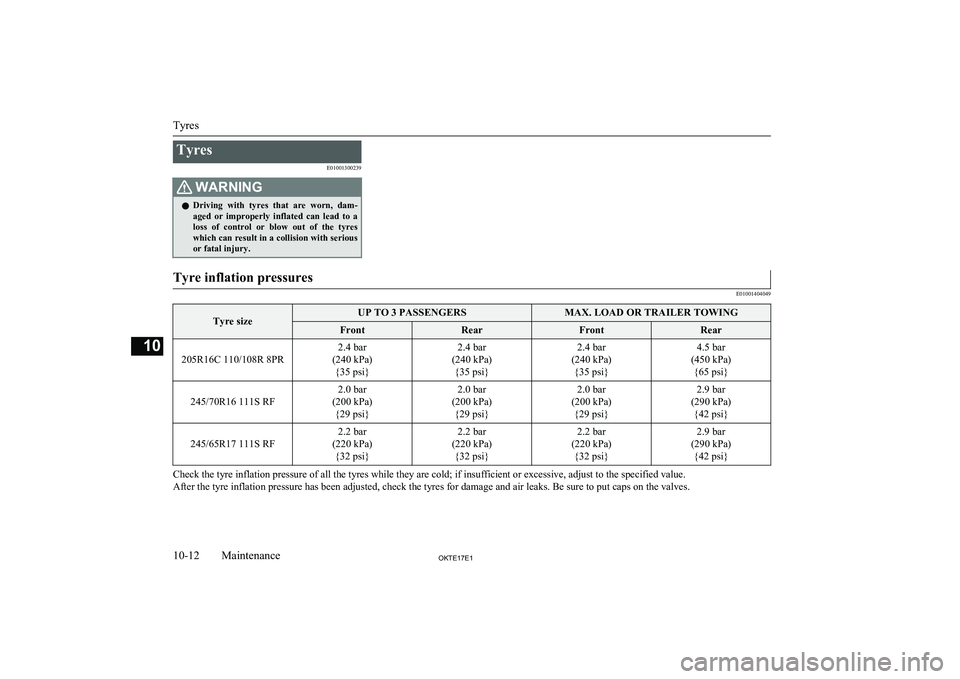
E01001404049Tyre sizeUP TO 3 PASSENGERSMAX. LOAD OR TRAILER TOWINGFrontRearFrontRear
205R16C 110/108R 8PR
2.4 bar
(240 kPa) {35 psi}2.4 bar
(240 kPa) {35 psi}2.4 bar
(240 kPa) {35 psi}4.5 bar
(450 kPa) {65 psi}
245/70R16 111S RF
2.0 bar
(200 kPa) {29 psi}2.0 bar
(200 kPa) {29 psi}2.0 bar
(200 kPa) {29 psi}2.9 bar
(290 kPa) {42 psi}
245/65R17 111S RF
2.2 bar
(220 kPa) {32 psi}2.2 bar
(220 kPa) {32 psi}2.2 bar
(220 kPa) {32 psi}2.9 bar
(290 kPa) {42 psi}
Check the tyre inflation pressure of all the tyres while they are cold; if insufficient or excessive, adjust to the specified value.
After the tyre inflation pressure has been adjusted, check the tyres for damage and air leaks. Be sure to put caps on the valves.
Tyres
10-12OKTE17E1Maintenance10