stop start MITSUBISHI L200 2017 (in English) Owner's Guide
[x] Cancel search | Manufacturer: MITSUBISHI, Model Year: 2017, Model line: L200, Model: MITSUBISHI L200 2017Pages: 426, PDF Size: 14.12 MB
Page 157 of 426
CAUTIONlDo not drive your vehicle in the “4HLc” or
“4LLc” position on dry paved roads and highways. Doing so may result in excessivetyre wear, increased fuel consumption, and
possible noise generation. It may also in-
crease the differential oil temperature, which
may damage the drive system. Further, the drive train will be subjected to excessive loading, resulting in oil leakage, component
seizure, or other serious problems. On dry
paved roads and highways, drive the vehicle
in “2H” or “4H” only.Drive mode-selector operation
E00605901402
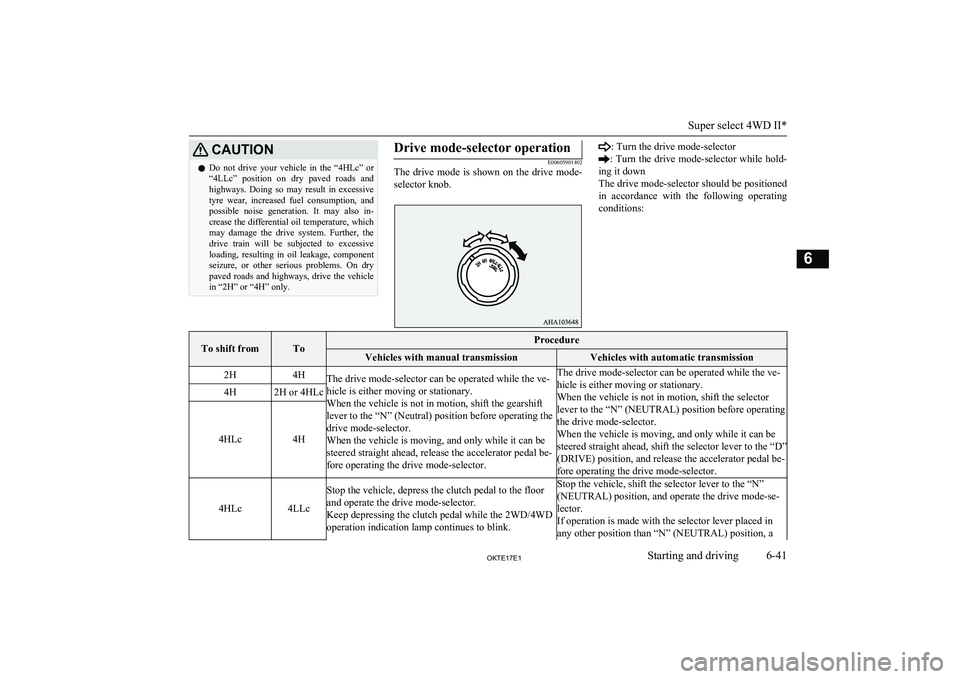
The drive mode is shown on the drive mode-
selector knob.
: Turn the drive mode-selector
: Turn the drive mode-selector while hold-
ing it down
The drive mode-selector should be positioned
in accordance with the following operating conditions:To shift fromToProcedureVehicles with manual transmissionVehicles with automatic transmission2H4HThe drive mode-selector can be operated while the ve-
hicle is either moving or stationary.
When the vehicle is not in motion, shift the gearshift
lever to the “N” (Neutral) position before operating the
drive mode-selector.
When the vehicle is moving, and only while it can be
steered straight ahead, release the accelerator pedal be- fore operating the drive mode-selector.The drive mode-selector can be operated while the ve-
hicle is either moving or stationary.
When the vehicle is not in motion, shift the selector
lever to the “N” (NEUTRAL) position before operating
the drive mode-selector.
When the vehicle is moving, and only while it can be
steered straight ahead, shift the selector lever to the “D”
(DRIVE) position, and release the accelerator pedal be-
fore operating the drive mode-selector.4H2H or 4HLc
4HLc4H4HLc4LLc
Stop the vehicle, depress the clutch pedal to the floor
and operate the drive mode-selector.
Keep depressing the clutch pedal while the 2WD/4WD
operation indication lamp continues to blink.Stop the vehicle, shift the selector lever to the “N”
(NEUTRAL) position, and operate the drive mode-se-
lector.
If operation is made with the selector lever placed in any other position than “N” (NEUTRAL) position, a
Super select 4WD II*
6-41OKTE17E1Starting and driving6
Page 158 of 426
To shift fromToProcedureVehicles with manual transmissionVehicles with automatic transmission4LLc4HLcgear noise may be generated, with a possible failure to
shift into a proper gear.NOTEl Setting of the drive mode-selector between
“2H”, “4H” and “4HLc” should only bedone at speeds below 100 km/h (62 mph).
l During driving, never attempt to shift from
“4HLc” to “4LLc”.
l When shifting between “2H”, “4H” and
“4HLc” in cold weather while the vehicle is
in motion, the transfer gear may make some noise. In cold weather, try to shift the gearwhile the vehicle is stopped.
l When shifting between “4LLc” and “4HLc”,
the transfer gear may make some noise.
l When the drive mode-selector is set between
“2H”, “4H” and “4HLc” while the vehicle is
stopped, the 2WD/4WD operation indication lamp blinks while the selection is in process. Drive slowly and normally after confirmingthat the lamp is illuminated. (Refer to “2WD/4WD operation indication lamp and
low-range indication lamp” on page 6-42.)
l When the drive mode-selector is set between
“2H”, “4H” and “4HLc” while the cruise
control is activated, the transfer gear may
make some noise.NOTEl When the drive mode-selector is set be-
tween“4HLc” ↔ “4LLc” in cold weather, its selection may not complete. Return the drivemode-selector to its previous position. After
the engine is warmed up, make the range se-
lection again.CAUTIONl Do not operate the drive mode-selector
while the rear wheels of the vehicle are slip-
ping on snow or ice.2WD/4WD operation indica-
tion lamp and low-range indi- cation lamp
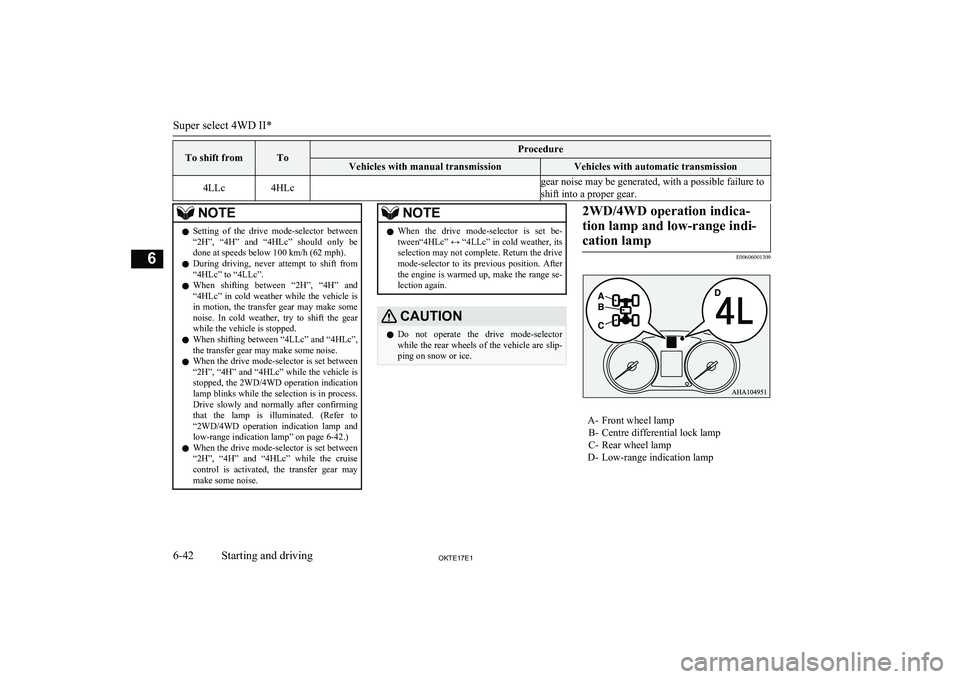
E00606001309
A- Front wheel lamp B- Centre differential lock lamp
C- Rear wheel lamp
D- Low-range indication lamp
Super select 4WD II*
6-42OKTE17E1Starting and driving6
Page 160 of 426
NOTElWhen the drive mode-selector is set between
“2H”, “4H” and “4HLc”, the front wheel
and/or centre differential lock lamps blink
while the selection is in process. Take the following precautions when the indicationlamp is blinking.
• Keep the steering wheel in the straight
ahead position while making range selec- tions. If you attempt to drive forward with
the steering wheel turned, gear rattling or
shock may occur and the desired range may not actually be selected.
• When the drive mode-selector is set be-
tween “2H”, “4H” and “4HLc”, while the
vehicle is stopped, the front wheel and/or centre differential lock lamps blink whilethe selection is in process. Drive slowly and normally after confirming that the
lamp is switched.
• If the front wheel and/or centre differen-
tial lock lamps blinking after a “2H” ↔
“4H” ↔ “4HLc” selection has been made with the vehicle moving, hold the steering wheel in the straight ahead position and
slowly depress the accelerator pedal sev-
eral times.
l The front and the rear wheel lamps will
blink during shifting process from “4HLc”
to “4LLc” or vice versa, as the transfer pass-
es through the neutral position. Be sure to operate the drive mode-selector until the
front and the rear wheel lamps illuminate
again.NOTEl When parking, apply the parking brake be-
fore stopping the engine and make sure that the front and the rear wheel lamps and the low range lamp are not blinking during shift-ing process between “4HLc” ↔ “4LLc”.
Otherwise, the vehicle could unexpectedly move even if the automatic transmission is
in the “P” (PARK) position.
l If, after a “4HLc” ↔ “4LLc” selection has
been made, front and the rear wheel lamps continue blinking and the desired range isnot actually selected, return the drive mode-selector to its previous position. Place the
steering wheel in the straight ahead position, drive the vehicle forward, and release the ac-
celerator pedal. Next, hold down the clutch pedal (with manual transmission) or place
the selector lever in the “N” (NEUTRAL)
position (with automatic transmission) and make the range selection again.
l If the low range lamp blinks when you at-
tempt to make a “4HLc” ↔ “4LLc” selec-
tion, a “4HLc” ↔ “4LLc” selection cannot
be made. Stop the vehicle and release the ac- celerator pedal. Next, hold down the clutch pedal (with manual transmission) or placethe selector lever in the “N” (NEUTRAL)
position (with automatic transmission) and make the range selection again.NOTEl The Active Stability Control function is sus-
pended while “4LLc” is selected. indica-
tion lamp is illuminated while these func-
tions are suspended. It does not indicate a
problem. When “2H” or “4H” or “4HLc” is selected, this lamp goes out and function
again. Refer to “ASTC indication lamp, ASTC OFF indication lamp” on page 6-62.
Super select 4WD II*
6-44OKTE17E1Starting and driving6
Page 161 of 426
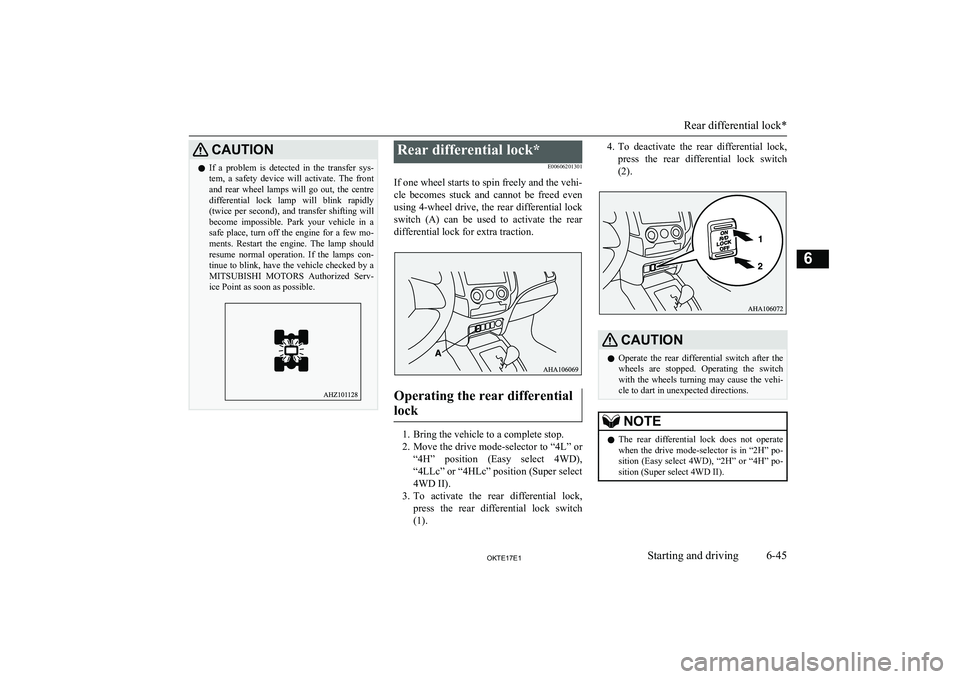
CAUTIONlIf a problem is detected in the transfer sys-
tem, a safety device will activate. The front and rear wheel lamps will go out, the centre
differential lock lamp will blink rapidly (twice per second), and transfer shifting will
become impossible. Park your vehicle in a safe place, turn off the engine for a few mo-
ments. Restart the engine. The lamp should resume normal operation. If the lamps con-tinue to blink, have the vehicle checked by aMITSUBISHI MOTORS Authorized Serv-
ice Point as soon as possible.Rear differential lock*
E00606201301
If one wheel starts to spin freely and the vehi-
cle becomes stuck and cannot be freed even using 4-wheel drive, the rear differential lock switch (A) can be used to activate the reardifferential lock for extra traction.
Operating the rear differential
lock
1. Bring the vehicle to a complete stop.
2. Move the drive mode-selector to “4L” or
“4H” position (Easy select 4WD), “4LLc” or “4HLc” position (Super select
4WD II).
3. To activate the rear differential lock,
press the rear differential lock switch
(1).
4. To deactivate the rear differential lock,
press the rear differential lock switch
(2).CAUTIONl Operate the rear differential switch after the
wheels are stopped. Operating the switch with the wheels turning may cause the vehi-
cle to dart in unexpected directions.NOTEl The rear differential lock does not operate
when the drive mode-selector is in “2H” po-
sition (Easy select 4WD), “2H” or “4H” po- sition (Super select 4WD II).
Rear differential lock*
6-45OKTE17E1Starting and driving6
Page 170 of 426
CAUTIONlAvoid driving habits that cause heavy brak-
ing and never “ride” the brakes by resting
your foot on the brake pedal while driving.
It causes brake overheating and fade.
Brake system
The service brake is divided into two brake
circuits. And your vehicle is equipped with
power brakes. If one brake circuit fails, the other is available to stop the vehicle. If you
should lose the power assist for some reason, the brakes will still work. In these situations,
even if the brake pedal moves down to the very end of its possible stroke or resists being
depressed, keep depressing the brake pedal
down harder and further than usual; stop
driving as soon as possible and have the brake system repaired.
WARNINGl Do not turn off the engine while your ve-
hicle is in motion. If you turn off the engine while driving,
the power assistance for the braking sys-
tem will stop working and your brakes will not work effectively.
l If the power assist is lost or if either brake
hydraulic system stops working properly,
have your vehicle checked immediately.Warning lamp
The brake warning lamp illuminates to indi-
cate a fault in the braking system. Refer to “Brake warning lamp” on page 5-15.
When brakes are wet
Check the brake system while driving at a
low speed immediately after starting, espe-
cially when the brakes are wet, to confirm they work normally.
A film of water can be formed on the brake discs or brake drums and prevent normalbraking after driving in heavy rain or through
large puddles, or after the vehicle is washed.
If this occurs, dry the brakes out by driving
slowly while lightly depressing the brake
pedal.
When driving downhill
It is important to take advantage of the en- gine braking by shifting to a lower shift posi-
tion while driving on steep downhill roads in order to prevent the brakes from overheating.
WARNINGl Do not leave any objects near the brake
pedal or let a floor mat slide under it; do- ing so could prevent the full pedal stroke
that would be necessary in an emergency. Make sure that the pedal can be operated freely at all times. Make sure the floor mat is securely held in place.
Brake pads and linings
l Avoid hard braking situations.
New brakes need to be broken-in by
moderate use for the first 200 km (124 mph).
l The disc brakes are provided with a
warning device which emits a shrieking metallic sound while braking if the brake
pads have reached their wear limit. If you hear this sound, have the brake padsreplaced.
WARNINGl Driving with worn brake pads will make
it harder to stop, and can cause an acci-
dent.
Braking
6-54OKTE17E1Starting and driving6
Page 171 of 426
Hill start assistE00628001396
The hill start assist makes it easy to start off on a steep uphill slope by preventing the ve-
hicle from moving backwards. It keeps the
braking force for approximately 2 seconds when you move your foot from the brake
pedal to the accelerator pedal.CAUTIONl Do not overly rely on the hill start assist to
prevent backwards movement of the vehicle. Under certain circumstances, even when hill
start assist is activated, the vehicle may
move backwards if the brake pedal is not sufficiently depressed, if the vehicle is heav-
ily loaded, if the road is very steep or slip- pery or if the vehicle tows a trailer, etc.
l The hill start assist is not designed to keep
the vehicle stopped in place on uphill slopes for more than 2 seconds.
l When facing uphill, do not rely on using the
hill start assist to maintain a stopped position as an alternative to depressing the brake ped-
al.
Doing so could result in an accident.
l Do not turn the ignition switch to the
“LOCK” or “ACC” position or the operation
mode in ACC or OFF while the hill start as- sist is operating. The hill start assist couldstop operating, which could result in an acci-
dent.To operate
E00628101371
1. Stop the vehicle completely using the
brake pedal.
2. On vehicles equipped with M/T, place
the gearshift lever into the 1 st
position.
On vehicles equipped with A/T, place
the selector lever into the “D” position.
NOTEl When reversing on an uphill slope, place the
selector lever or gearshift lever into the “R”
position.
3. Release the brake pedal and the hill start
assist will maintain the braking force ap-
plied while stopping for approximately 2 seconds.
4. Depress the accelerator pedal and the
hill start assist gradually will decrease the braking force as the vehicle startsmoving.
NOTEl The hill start assist is activated when all of
the following conditions are met.
• The engine is running.
(The hill start assist will not be activated
while the engine is starting or immediate-
ly after the engine is started.)NOTE• On vehicles equipped with
M/T, the gear-
shift lever is in the following position.
[When starting an uphill slope forwards.]
The gearshift lever is in any position other
than “R”.
(The hill start assist will operate, even if the gearshift lever is in the “N” position.)
[When starting an uphill slope back-
wards.]
The gearshift lever is in the “R” position.
(The hill start assist will not operate when
the gearshift lever is in the “N” position.)
• On vehicles equipped with
A/T, the selec-
tor lever is in any position other than “P” or “N”.
• The vehicle is completely stationary, with
the brake pedal depressed.
• The parking brake is released.
l The hill start assist will not operate if the ac-
celerator pedal is depressed before the brake pedal is released.
l The hill start assist also operates when re-
versing on an uphill slope.
l When the hill start assist is activated, you
may feel the operating sound.
This is a normal result of the hill start assist operation, and does not indicate a problem.Warning indicator
E00628201545
If an abnormal condition occurs in the sys-
tem, the indication lamp will turn on.
- ASTC indicator
Hill start assist
6-55OKTE17E1Starting and driving6
Page 172 of 426
CAUTIONlIf the warning is turn on, the hill start assist
will not operate. Start off carefully.
l Park your vehicle in a safe place and stop
the engine.
Restart the engine and check whether the warning indicator went out, in which case
the hill start assist is again working normal- ly. If the warning remains displayed or reap-
pears frequently, it is not necessary to stop
the vehicle immediately, but the vehicle
should be inspected by a MITSUBISHI
MOTORS Authorized Service Point.Brake assist system
E00627001780
The brake assist system is a device assistingdrivers who cannot depress the brake pedalfirmly when it is necessary to do so (such as
in emergency stop situations) and provides
greater braking force.
If the brake pedal is depressed suddenly, the brakes will be applied with more force thanusual.
CAUTIONl The brake assist system is not a device de-
signed to exercise braking force greater than its capacity. Make sure to always keep a suf-
ficient distance between your vehicle and a
vehicle in front of you without relying too much on the brake assist system.NOTEl Once the brake assist system is operational,
it maintains great braking force even if the
brake pedal is lightly released.
To stop its operation, completely remove
your foot from the brake pedal.
l When the brake assist system is in use while
driving, you may feel the brake pedal at-
tempt to resist, the pedal moves in small mo- tions in conjunction with the operation
noise, or the vehicle body and the steering wheel vibrate. This occurs when the brake
assist system is operating normally and does not indicate faulty operation. Continue to
firmly depress the brake pedal.
l When the active stability & traction control
(ASTC) indication lamp is illuminated, the
brake assist system may not function.Emergency stop signal
system* E00626001129
This is a device that reduces the possibility of rear end collisions by the rapid and automatic blinking of the hazard warning lamps to alert
vehicles approaching from behind during sudden braking. When the emergency stop
signal system operates, the hazard warning indication lamp in the instrument cluster
blinks rapidly at the same time.CAUTIONl If the ABS warning lamp or ASTC indica-
tion lamp illuminates, the emergency stopsignal system may not operate. Refer to“ABS warning lamp” on page 6-57.
Refer to “ASTC indication lamp” on page
6-62.NOTEl [Activating condition for the emergency stop
signal system]
It activates when all of the following condi-
tions are met.
• The vehicle speed is approximately
55 km/h (34 mph) or higher.
Brake assist system
6-56OKTE17E1Starting and driving6
Page 173 of 426
NOTE•The brake pedal has been depressed, and
the system judges that it was sudden brak-
ing from the vehicle deceleration and the operating condition of the anti-lock brake
system (ABS).
[Deactivating condition for the emergency stop signal system]
It deactivates when one of the following conditions is met.
• The brake pedal is released.
• The hazard warning flasher switch is
pressed.
• The system judges that it was not sudden
braking from the vehicle deceleration and
the operating condition of the anti-lock brake system (ABS).Anti-lock brake system
(ABS) E00607102577
The anti-lock brake system (ABS) helps pre-vent the wheels from locking during braking.
This helps maintain vehicle drivability and
steering wheel handling.
Driving hints
l Always keep a safe distance from the ve-
hicle in front of you. Even if your vehi- cle is equipped with ABS, leave a great-
er braking distance when:
• Driving on gravel or snow-covered
roads.
• Driving with tyre chains installed.
• Driving on roads where the road sur-
face is pitted or has other differences in surface height.
• Driving on uneven road surfaces.
l Operation of ABS is not restricted to sit-
uations where brakes are applied sud-denly. This system may also prevent the
wheels from locking when you drive over manholes, steel roadwork plates,
road markings, or any uneven road sur-
face.
l When the ABS is activated, you may
feel the brake pedal pulsation and the vi-
brations of the vehicle body and steering
wheel. It may also feel as if the pedal re- sists being pressed.
In this situation, simply hold the brake
pedal down firmly. Do not pump the
brake, which will result in reduced brak- ing performance.
l An operation noise is emitted from the
engine compartment or you can feel a shock from the brake pedal when start-
ing to drive immediately after starting
the engine. These are normal sounds or operations that the ABS makes whenperforming a self-check. It does not indi-
cate a malfunction.l The ABS can be used after the vehicle
has reached a speed over approximately 10 km/h (6 mph). It stops working when the vehicle slows below 7 km/h.CAUTIONl The ABS cannot prevent accidents. It is your
responsibility to take safety precautions and to drive carefully.
l To prevent failure of the ABS, be sure all 4
wheels and tyres are the same size and the same type.
l Do not install any aftermarket limited-slip
differential (LSD) on your vehicle. The ABS may stop functioning properly.ABS warning lamp
E00607202477
If there is a malfunction in the system, the
ABS warning lamp will come on.
Anti-lock brake system (ABS)
6-57OKTE17E1Starting and driving6
Page 174 of 426
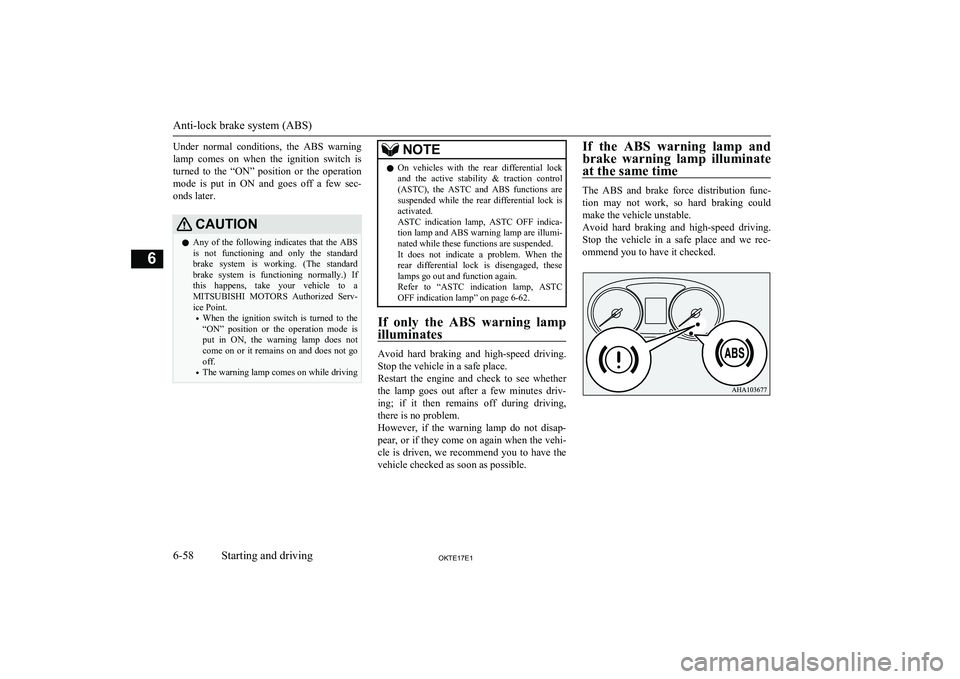
Under normal conditions, the ABS warning
lamp comes on when the ignition switch is turned to the “ON” position or the operation
mode is put in ON and goes off a few sec-
onds later.CAUTIONl Any of the following indicates that the ABS
is not functioning and only the standard
brake system is working. (The standard brake system is functioning normally.) If this happens, take your vehicle to a
MITSUBISHI MOTORS Authorized Serv-
ice Point.
• When the ignition switch is turned to the
“ON” position or the operation mode is put in ON, the warning lamp does notcome on or it remains on and does not go
off.
• The warning lamp comes on while drivingNOTEl On vehicles with the rear differential lock
and the active stability & traction control
(ASTC), the ASTC and ABS functions are suspended while the rear differential lock isactivated.
ASTC indication lamp, ASTC OFF indica-
tion lamp and ABS warning lamp are illumi- nated while these functions are suspended.
It does not indicate a problem. When the
rear differential lock is disengaged, these lamps go out and function again.
Refer to “ASTC indication lamp, ASTC
OFF indication lamp” on page 6-62.
If only the ABS warning lamp
illuminates
Avoid hard braking and high-speed driving.
Stop the vehicle in a safe place.
Restart the engine and check to see whether the lamp goes out after a few minutes driv-
ing; if it then remains off during driving,
there is no problem.
However, if the warning lamp do not disap- pear, or if they come on again when the vehi-cle is driven, we recommend you to have the vehicle checked as soon as possible.
If the ABS warning lamp and
brake warning lamp illuminate at the same time
The ABS and brake force distribution func-tion may not work, so hard braking could
make the vehicle unstable.
Avoid hard braking and high-speed driving.
Stop the vehicle in a safe place and we rec- ommend you to have it checked.
Anti-lock brake system (ABS)
6-58OKTE17E1Starting and driving6
Page 175 of 426
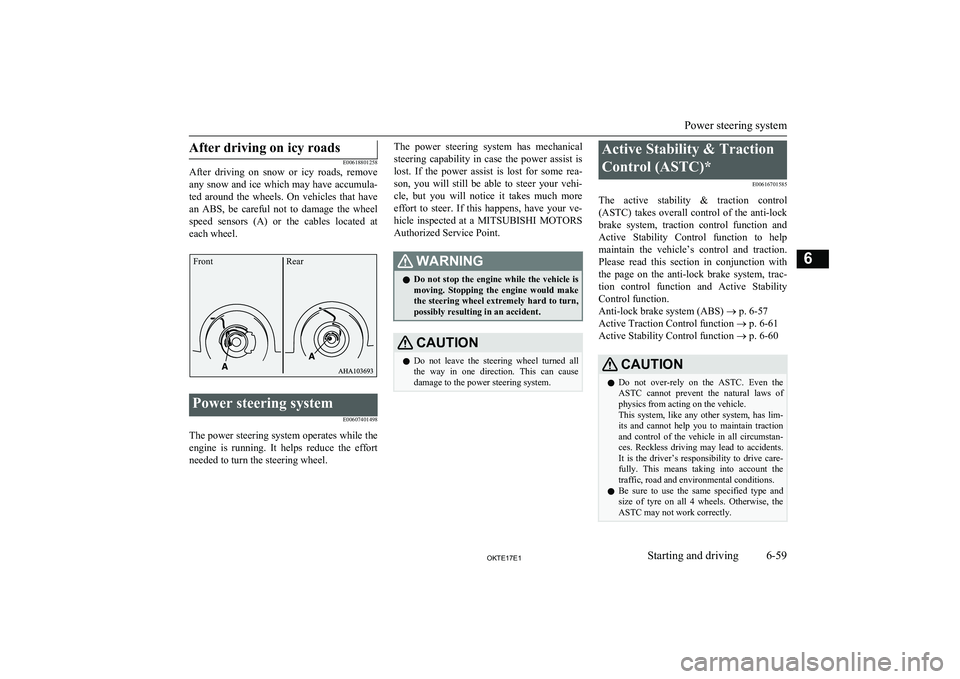
After driving on icy roads
E00618801258
After driving on snow or icy roads, remove
any snow and ice which may have accumula-
ted around the wheels. On vehicles that have
an ABS, be careful not to damage the wheel
speed sensors (A) or the cables located at each wheel.Power steering system
E00607401498
The power steering system operates while the
engine is running. It helps reduce the effort needed to turn the steering wheel.
The power steering system has mechanical
steering capability in case the power assist is lost. If the power assist is lost for some rea-
son, you will still be able to steer your vehi-
cle, but you will notice it takes much more effort to steer. If this happens, have your ve-
hicle inspected at a MITSUBISHI MOTORS
Authorized Service Point.WARNINGl Do not stop the engine while the vehicle is
moving. Stopping the engine would make the steering wheel extremely hard to turn,
possibly resulting in an accident.CAUTIONl Do not leave the steering wheel turned all
the way in one direction. This can causedamage to the power steering system.Active Stability & Traction
Control (ASTC)* E00616701585
The active stability & traction control (ASTC) takes overall control of the anti-lockbrake system, traction control function and Active Stability Control function to help
maintain the vehicle’s control and traction. Please read this section in conjunction with the page on the anti-lock brake system, trac- tion control function and Active Stability
Control function.
Anti-lock brake system (ABS) ® p. 6-57
Active Traction Control function ® p. 6-61
Active Stability Control function ® p. 6-60CAUTIONl Do not over-rely on the ASTC. Even the
ASTC cannot prevent the natural laws of physics from acting on the vehicle.
This system, like any other system, has lim-
its and cannot help you to maintain traction and control of the vehicle in all circumstan- ces. Reckless driving may lead to accidents.
It is the driver’s responsibility to drive care- fully. This means taking into account the
traffic, road and environmental conditions.
l Be sure to use the same specified type and
size of tyre on all 4 wheels. Otherwise, the ASTC may not work correctly.
Power steering system
6-59OKTE17E1Starting and driving6Front Rear