ECU MITSUBISHI L200 2018 Owner's Manual (in English)
[x] Cancel search | Manufacturer: MITSUBISHI, Model Year: 2018, Model line: L200, Model: MITSUBISHI L200 2018Pages: 466, PDF Size: 28.42 MB
Page 8 of 466
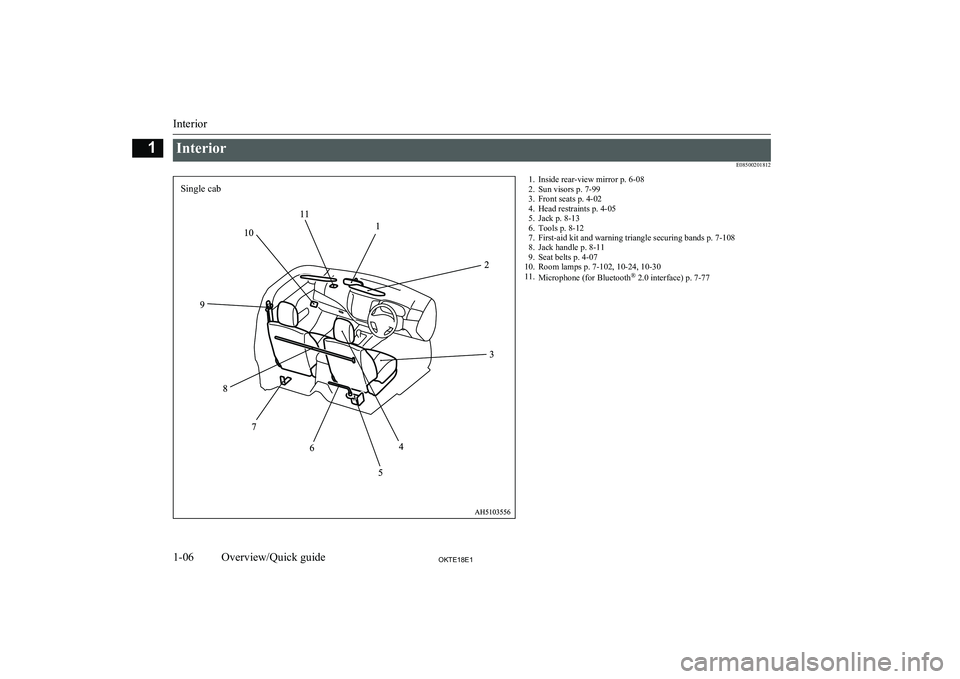
Interior E085002018121. Inside rear-view mirror p. 6-082. Sun visors p. 7-99
3. Front seats p. 4-02
4. Head restraints p. 4-05
5. Jack p. 8-13
6. Tools p. 8-12
7. First-aid kit and warning triangle securing bands p. 7-108
8. Jack handle p. 8-11
9. Seat belts p. 4-07
10. Room lamps p. 7-102, 10-24, 10-30
11. Microphone (for Bluetooth ®
2.0 interface) p. 7-77
Interior
1-06OKTE18E1Overview/Quick guide1Single cab
Page 9 of 466
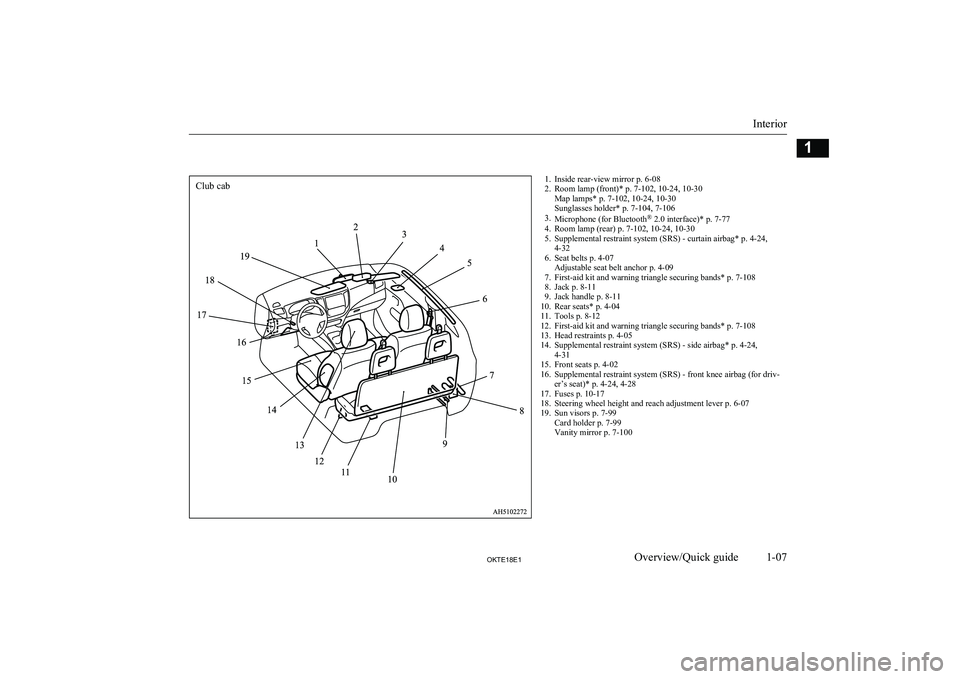
1. Inside rear-view mirror p. 6-08
2. Room lamp (front)* p. 7-102, 10-24, 10-30 Map lamps* p. 7-102, 10-24, 10-30
Sunglasses holder* p. 7-104, 7-106
3. Microphone (for Bluetooth ®
2.0 interface)* p. 7-77
4. Room lamp (rear) p. 7-102, 10-24, 10-30
5. Supplemental restraint system (SRS) - curtain airbag* p. 4-24, 4-32
6. Seat belts p. 4-07 Adjustable seat belt anchor p. 4-09
7. First-aid kit and warning triangle securing bands* p. 7-108
8. Jack p. 8-11
9. Jack handle p. 8-11
10. Rear seats* p. 4-04
11. Tools p. 8-12
12. First-aid kit and warning triangle securing bands* p. 7-108
13. Head restraints p. 4-05
14. Supplemental restraint system (SRS) - side airbag* p. 4-24, 4-31
15. Front seats p. 4-02
16. Supplemental restraint system (SRS) - front knee airbag (for driv- er’s seat)* p. 4-24, 4-28
17. Fuses p. 10-17
18. Steering wheel height and reach adjustment lever p. 6-07
19. Sun visors p. 7-99 Card holder p. 7-99
Vanity mirror p. 7-100
Interior
1-07OKTE18E1Overview/Quick guide1Club cab
Page 10 of 466
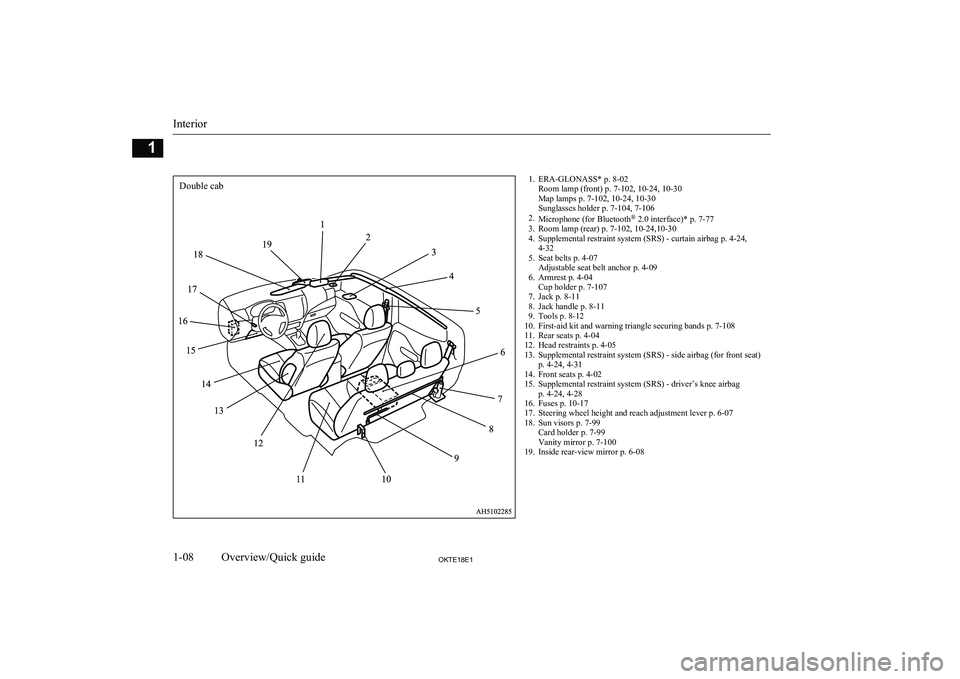
1. ERA-GLONASS* p. 8-02Room lamp (front) p. 7-102, 10-24, 10-30
Map lamps p. 7-102, 10-24, 10-30
Sunglasses holder p. 7-104, 7-106
2. Microphone (for Bluetooth ®
2.0 interface)* p. 7-77
3. Room lamp (rear) p. 7-102, 10-24,10-30
4. Supplemental restraint system (SRS) - curtain airbag p. 4-24, 4-32
5. Seat belts p. 4-07 Adjustable seat belt anchor p. 4-09
6. Armrest p. 4-04 Cup holder p. 7-107
7. Jack p. 8-11
8. Jack handle p. 8-11
9. Tools p. 8-12
10. First-aid kit and warning triangle securing bands p. 7-108
11. Rear seats p. 4-04
12. Head restraints p. 4-05
13. Supplemental restraint system (SRS) - side airbag (for front seat) p. 4-24, 4-31
14. Front seats p. 4-02
15. Supplemental restraint system (SRS) - driver’s knee airbag p. 4-24, 4-28
16. Fuses p. 10-17
17. Steering wheel height and reach adjustment lever p. 6-07
18. Sun visors p. 7-99 Card holder p. 7-99
Vanity mirror p. 7-100
19. Inside rear-view mirror p. 6-08
Interior
1-08OKTE18E1Overview/Quick guide1Double cab
Page 19 of 466
Type 2OFFAll lamps off
AUTO
With the ignition switch or theoperation mode is in ON, head-
lamps, position, tail, licence plate and instrument panellamps turn on and off automati-
cally in accordance with outside
light level. All lamps turn off automatically when the ignition
switch is turned to “OFF” posi-
tion or the operation mode is put in OFF.Position, tail, licence plate and
instrument panel lamps onHeadlamps and other lamps go
on
Refer to “Combination headlamps and dipper switch” on page 5-17.
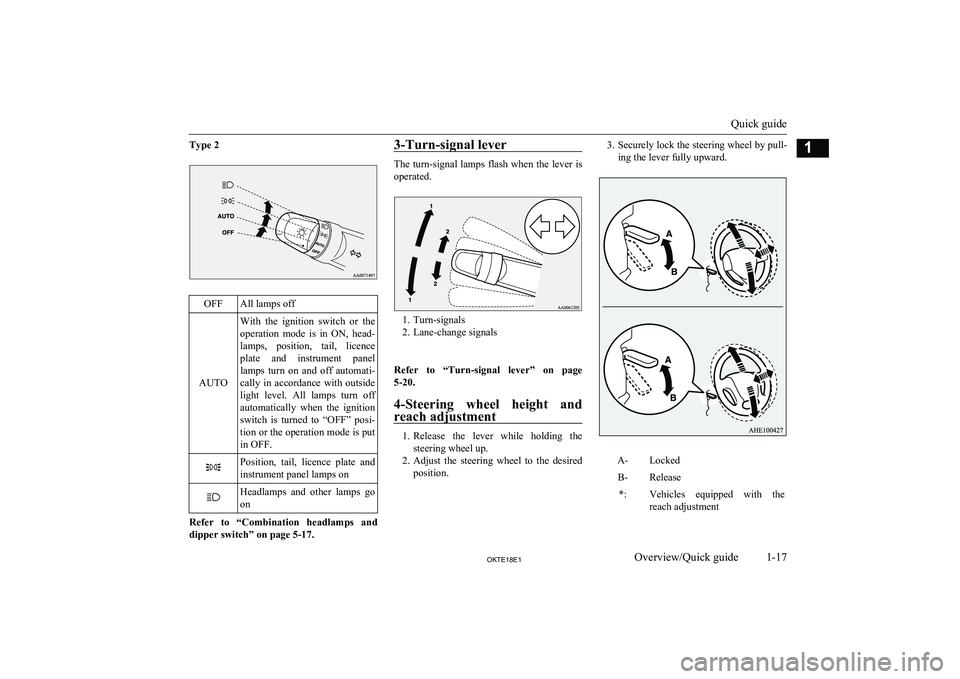
3-Turn-signal lever
The turn-signal lamps flash when the lever is
operated.
1. Turn-signals
2. Lane-change signals
Refer to “Turn-signal lever” on page 5-20.
4-Steering wheel height and
reach adjustment
1. Release the lever while holding the
steering wheel up.
2. Adjust the steering wheel to the desired
position.
3. Securely lock the steering wheel by pull-
ing the lever fully upward.A-LockedB-Release*:Vehicles equipped with the reach adjustment
Quick guide
1-17OKTE18E1Overview/Quick guide1
Page 28 of 466
Even when such parts are officially Author-ized, for example by a “general operators
permit” (an appraisal for the part) or through the execution of the part in an officially ap- proved manner of construction, or when a
single operation permit following the attach- ment or installation of such parts, it cannot be
deduced from that alone, that the driving safety of your vehicles has not been affected.
Consider also that there basically exists no li- ability on the part of the appraiser or the offi-
cial. Maximum safety can only be ensured
with parts recommended, sold and fitted or installed by a MITSUBISHI MOTORS Au-
thorized Service Point ( MITSUBISHI
MOTORS GENUINE replacement parts and
MITSUBISHI MOTORS accessories). The
same also pertains to modifications of vehi- cles with respect to the production specifica- tions. For safety reasons, do not attempt any
modifications other than those that follow the recommendations of a MITSUBISHI
MOTORS Authorized Service Point.Modification/alterations to
the electrical or fuel systems E00200401525
MITSUBISHI MOTORS has always manu-
factured safe, high quality vehicles. In order to maintain this safety and quality, it is im-
portant that any accessory that is to be fitted, or any modifications carried out which in-
volve the electrical or fuel systems, should be carried out in accordance with MITSUBISHI
MOTORS guidelines.CAUTIONl If the wires interferes with the vehicle body
or improper installation methods are used (protective fuses not included, etc.), elec-
tronic devices may be adversely affected, re-
sulting in a fire or other accident.Genuine parts
E00200501715
MITSUBISHI MOTORS has gone to great
lengths to bring you a superbly crafted vehi-
cle offering the highest quality and dependa- bility.
Use MITSUBISHI MOTORS GENUINE
Parts, designed and manufactured to maintain your MITSUBISHI MOTORS vehicle at top
performance. MITSUBISHI MOTORS GEN- UINE Parts are identified by this mark and
are available at all MITSUBISHI MOTORS
Authorized Service Points.Safety and disposal
information for used engine
oil E00200601426WARNINGlProlonged and repeated contact may
cause serious skin disorders, including
dermatitis and cancer.
l Avoid contact with the skin as far as pos-
sible and wash thoroughly after any con- tact.
l Keep used engine oils out of reach of chil-
dren.
Modification/alterations to the electrical or fuel systems
2-06OKTE18E1General information2
Page 47 of 466
WARNINGlWhen opening the rear door, confirm that
the occupant of the front seat has taken off the seat belt before opening the rear
door.
If you open the rear door with the front
seat belt being worn, the occupant of the front seat may be tightened with the
locked seat belt and could result in serious injury.
l When closing the rear door, make sure
not being trapped your hands or your fin-
gers in the doors.
l Before driving, make sure that the rear
door is securely closed.
If a door is ajar, the door ajar warning
lamp will illuminates. If a door is not
completely closed, the rear door could open while driving and this could cause
an accident such as occupants being thrown from the vehicle.CAUTIONl When opening or closing the rear door,
please observe the followings. If you do not
follow them, it could result in damage to your vehicle.
• Do not open or close the rear door when
the front door is not completely opened.
• Do not open or close the rear door and the
front door at the same time.
• Do not close the rear door after closing
the front door.Central door locks
E00300803306NOTElRepeated continuous operation between lock
and unlock could activate the central door
locking systems built-in protection circuit
and prevent the system from operating. If
this occurs, wait approximately 1 minute be- fore operating the central door lock system.
All of the doors can be locked and unlocked
as described hereafter.
Driver’s door with key
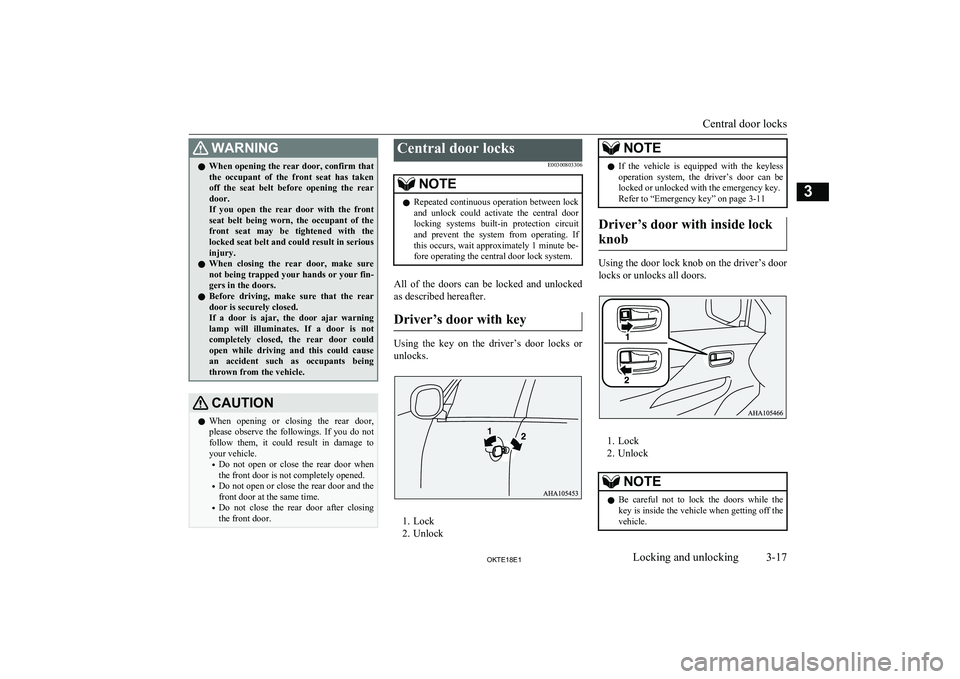
Using the key on the driver’s door locks or unlocks.
1. Lock
2. Unlock
NOTEl If the vehicle is equipped with the keyless
operation system, the driver’s door can be locked or unlocked with the emergency key.
Refer to “Emergency key” on page 3-11
Driver’s door with inside lock
knob
Using the door lock knob on the driver’s door locks or unlocks all doors.
1. Lock
2. Unlock
NOTEl Be careful not to lock the doors while the
key is inside the vehicle when getting off the vehicle.
Central door locks
3-17OKTE18E1Locking and unlocking3
Page 50 of 466
After setting the Dead Lock System, reach
into the vehicle through a window and con- firm that you cannot unlock the doors using
the lock knobs.NOTEl If you need advice on how to set the Dead
Lock System, please contact a MITSUBISHIMOTORS Authorized Service Point.“Child-protection” rear
doors (Double cab) E00300902209
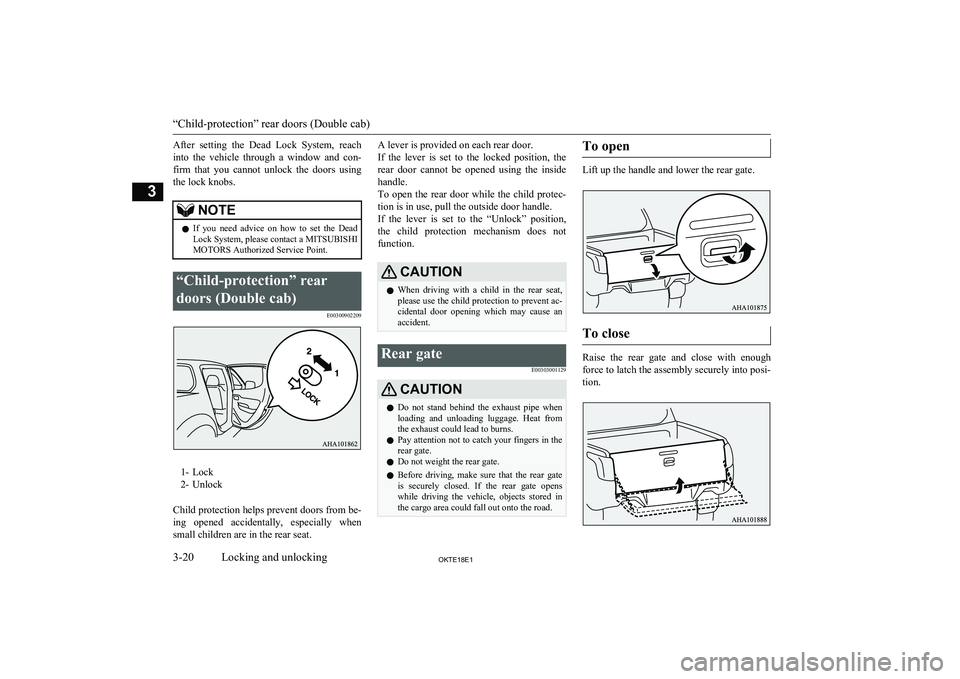
1- Lock
2- Unlock
Child protection helps prevent doors from be-
ing opened accidentally, especially when small children are in the rear seat.
A lever is provided on each rear door.
If the lever is set to the locked position, the rear door cannot be opened using the inside
handle.
To open the rear door while the child protec- tion is in use, pull the outside door handle.
If the lever is set to the “Unlock” position,
the child protection mechanism does not function.CAUTIONl When driving with a child in the rear seat,
please use the child protection to prevent ac-
cidental door opening which may cause an accident.Rear gate
E00303001129CAUTIONlDo not stand behind the exhaust pipe when
loading and unloading luggage. Heat fromthe exhaust could lead to burns.
l Pay attention not to catch your fingers in the
rear gate.
l Do not weight the rear gate.
l Before driving, make sure that the rear gate
is securely closed. If the rear gate opens
while driving the vehicle, objects stored in
the cargo area could fall out onto the road.To open
Lift up the handle and lower the rear gate.
To close
Raise the rear gate and close with enough
force to latch the assembly securely into posi- tion.
“Child-protection” rear doors (Double cab)
3-20OKTE18E1Locking and unlocking3
Page 58 of 466
CAUTIONlIf water or any other liquid is spilled on the
seat, allow it to dry thoroughly before at-tempting to use the heater.
l Turn the heater off immediately if it appears
to be malfunctioning during use.Rear seat (Club cab and
Double cab)* E00401301536
When a person is sitting in the middle seatingposition of the rear seat, adjust the head re-straint to height at which it lock in position.
Refer to “Head restraints*” on page 4-05.
(Double cab)
Folding the seatback forward
(Double cab)
E00401601467
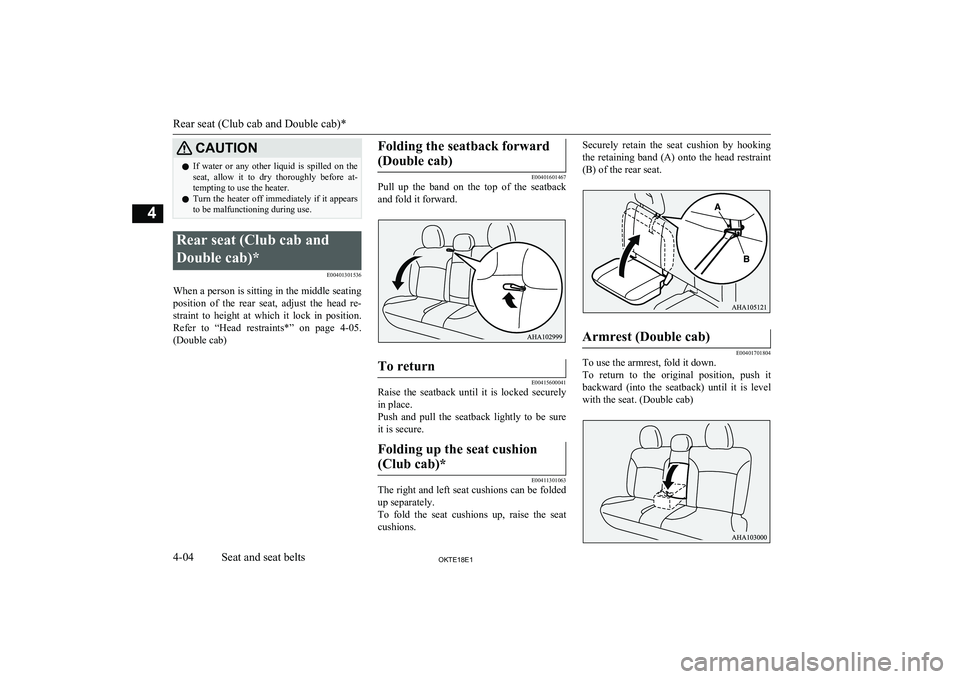
Pull up the band on the top of the seatback
and fold it forward.
To return
E00415600041
Raise the seatback until it is locked securely
in place.
Push and pull the seatback lightly to be sure
it is secure.
Folding up the seat cushion
(Club cab)*
E00411301063
The right and left seat cushions can be folded up separately.
To fold the seat cushions up, raise the seat
cushions.
Securely retain the seat cushion by hooking
the retaining band (A) onto the head restraint
(B) of the rear seat.Armrest (Double cab)
E00401701804
To use the armrest, fold it down.
To return to the original position, push it
backward (into the seatback) until it is level with the seat. (Double cab)
Rear seat (Club cab and Double cab)*
4-04OKTE18E1Seat and seat belts4
Page 66 of 466
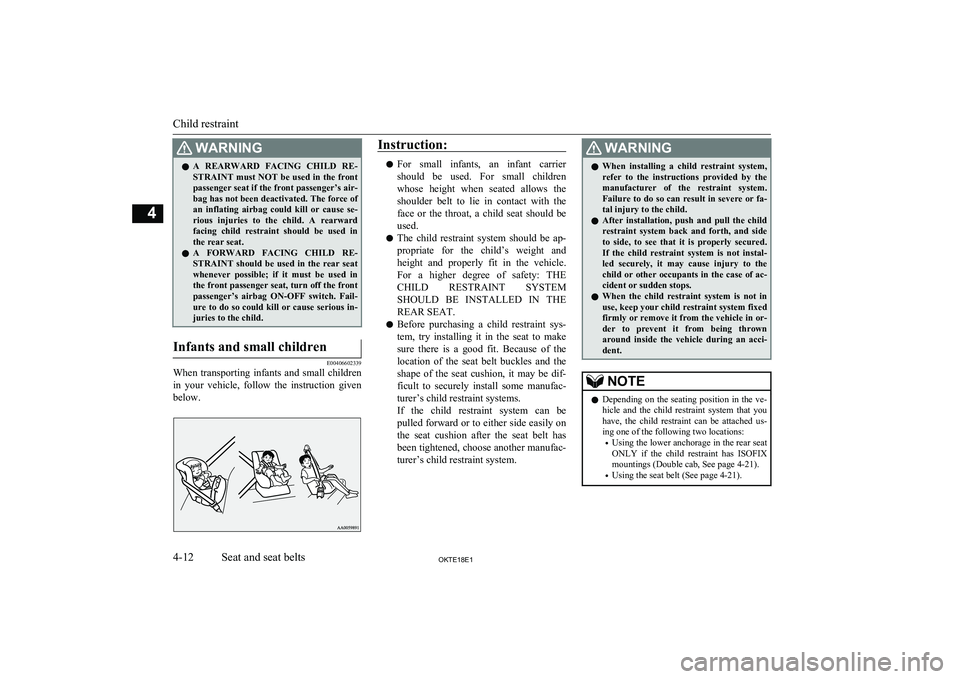
WARNINGlA REARWARD FACING CHILD RE-
STRAINT must NOT be used in the front passenger seat if the front passenger’s air-
bag has not been deactivated. The force of an inflating airbag could kill or cause se-
rious injuries to the child. A rearward facing child restraint should be used in
the rear seat.
l A FORWARD FACING CHILD RE-
STRAINT should be used in the rear seat
whenever possible; if it must be used in the front passenger seat, turn off the front
passenger’s airbag ON-OFF switch. Fail- ure to do so could kill or cause serious in-
juries to the child.Infants and small children
E00406602339
When transporting infants and small children
in your vehicle, follow the instruction given below.
Instruction:
l For small infants, an infant carrier
should be used. For small children whose height when seated allows the shoulder belt to lie in contact with the
face or the throat, a child seat should be used.
l The child restraint system should be ap-
propriate for the child’s weight and
height and properly fit in the vehicle. For a higher degree of safety: THE
CHILD RESTRAINT SYSTEM
SHOULD BE INSTALLED IN THE REAR SEAT.
l Before purchasing a child restraint sys-
tem, try installing it in the seat to make sure there is a good fit. Because of the location of the seat belt buckles and the
shape of the seat cushion, it may be dif-
ficult to securely install some manufac- turer’s child restraint systems.
If the child restraint system can be
pulled forward or to either side easily on
the seat cushion after the seat belt has
been tightened, choose another manufac- turer’s child restraint system.
WARNINGl When installing a child restraint system,
refer to the instructions provided by themanufacturer of the restraint system.Failure to do so can result in severe or fa-tal injury to the child.
l After installation, push and pull the child
restraint system back and forth, and side to side, to see that it is properly secured.
If the child restraint system is not instal-
led securely, it may cause injury to the
child or other occupants in the case of ac- cident or sudden stops.
l When the child restraint system is not in
use, keep your child restraint system fixed
firmly or remove it from the vehicle in or- der to prevent it from being thrown around inside the vehicle during an acci-
dent.NOTEl Depending on the seating position in the ve-
hicle and the child restraint system that you have, the child restraint can be attached us-
ing one of the following two locations:
• Using the lower anchorage in the rear seat
ONLY if the child restraint has ISOFIX mountings (Double cab, See page 4-21).
• Using the seat belt (See page 4-21).
Child restraint
4-12OKTE18E1Seat and seat belts4
Page 75 of 466
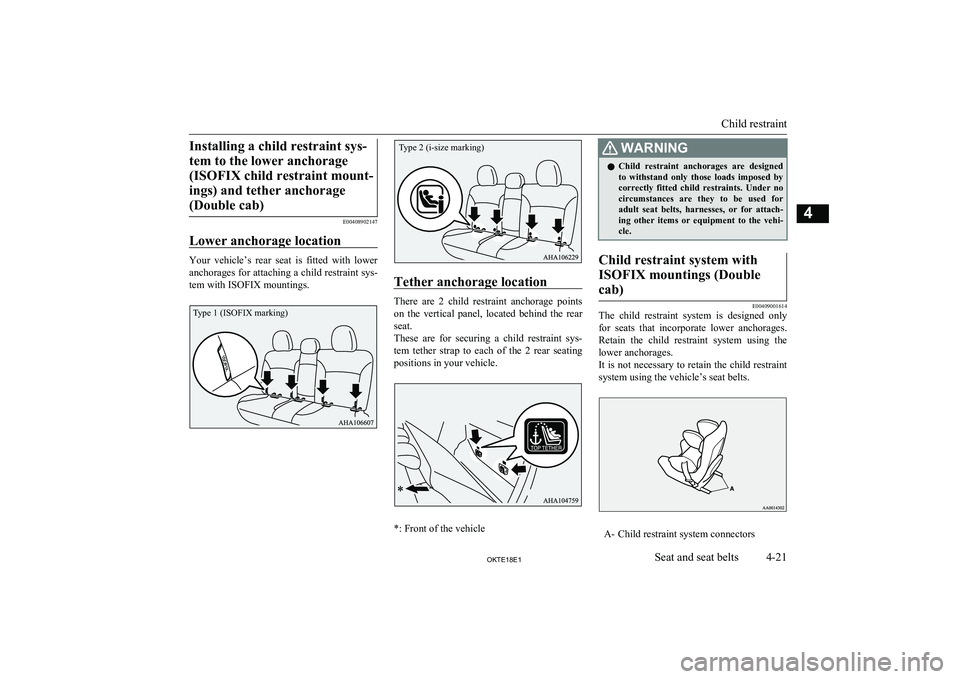
Installing a child restraint sys-tem to the lower anchorage (ISOFIX child restraint mount-ings) and tether anchorage (Double cab)
E00408902147
Lower anchorage location
Your vehicle’s rear seat is fitted with lower anchorages for attaching a child restraint sys-tem with ISOFIX mountings.
Tether anchorage location
There are 2 child restraint anchorage points on the vertical panel, located behind the rear
seat.
These are for securing a child restraint sys- tem tether strap to each of the 2 rear seating
positions in your vehicle.
*: Front of the vehicle
WARNINGl Child restraint anchorages are designed
to withstand only those loads imposed by
correctly fitted child restraints. Under no circumstances are they to be used for adult seat belts, harnesses, or for attach-
ing other items or equipment to the vehi- cle.Child restraint system with
ISOFIX mountings (Doublecab)
E00409001614
The child restraint system is designed only
for seats that incorporate lower anchorages. Retain the child restraint system using the
lower anchorages.
It is not necessary to retain the child restraint system using the vehicle’s seat belts.
A- Child restraint system connectors
Child restraint
4-21OKTE18E1Seat and seat belts4Type 1 (ISOFIX marking) Type 2 (i-size marking)