ESP MITSUBISHI LANCER 2005 Owner's Manual
[x] Cancel search | Manufacturer: MITSUBISHI, Model Year: 2005, Model line: LANCER, Model: MITSUBISHI LANCER 2005Pages: 788, PDF Size: 45.98 MB
Page 466 of 788
ROOM LAMP
CHASSIS ELECTRICAL54A-78
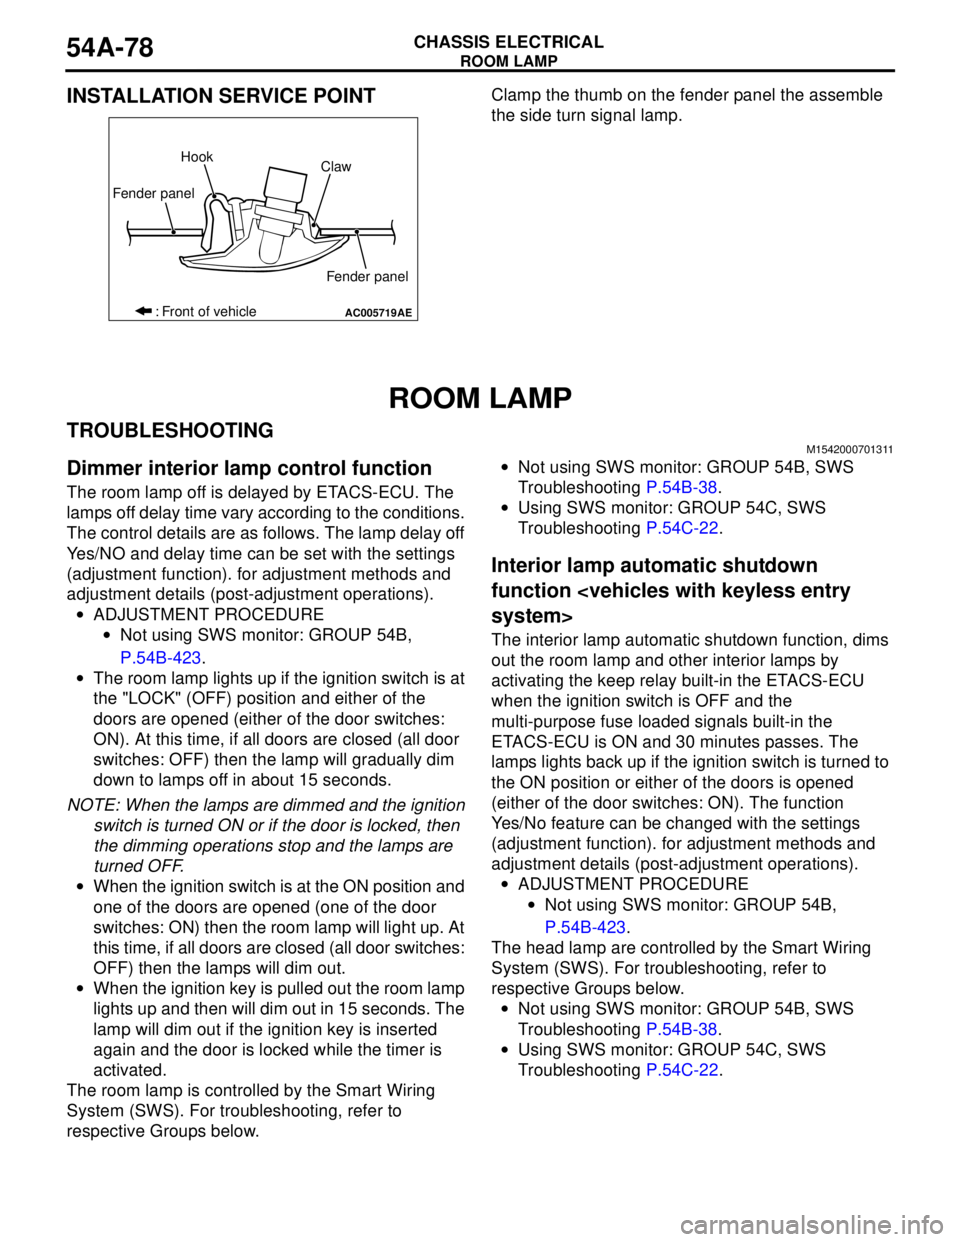
INSTALLATION SERVICE POINTClamp the thumb on the fender panel the assemble
the side turn signal lamp.
ROOM LAMP
TROUBLESHOOTINGM1542000701311
Dimmer interior lamp control function
The room lamp off is delayed by ETACS-ECU. The
lamps off delay time vary according to the conditions.
The control details are as follows. The lamp delay off
Yes/NO and delay time can be set with the settings
(adjustment function). for adjustment methods and
adjustment details (post-adjustment operations).
•ADJUSTMENT PROCEDURE
•Not using SWS monitor: GROUP 54B,
P.54B-423.
•The room lamp lights up if the ignition switch is at
the "LOCK" (OFF) position and either of the
doors are opened (either of the door switches:
ON). At this time, if all doors are closed (all door
switches: OFF) then the lamp will gradually dim
down to lamps off in about 15 seconds.
NOTE: When the lamps are dimmed and the ignition
switch is turned ON or if the door is locked, then
the dimming operations stop and the lamps are
turned OFF.
•When the ignition switch is at the ON position and
one of the doors are opened (one of the door
switches: ON) then the room lamp will light up. At
this time, if all doors are closed (all door switches:
OFF) then the lamps will dim out.
•When the ignition key is pulled out the room lamp
lights up and then will dim out in 15 seconds. The
lamp will dim out if the ignition key is inserted
again and the door is locked while the timer is
activated.
The room lamp is controlled by the Smart Wiring
System (SWS). For troubleshooting, refer to
respective Groups below.•Not using SWS monitor: GROUP 54B, SWS
Troubleshooting P.54B-38.
•Using SWS monitor: GROUP 54C, SWS
Troubleshooting P.54C-22.
Interior lamp automatic shutdown
function
The interior lamp automatic shutdown function, dims
out the room lamp and other interior lamps by
activating the keep relay built-in the ETACS-ECU
when the ignition switch is OFF and the
multi-purpose fuse loaded signals built-in the
ETACS-ECU is ON and 30 minutes passes. The
lamps lights back up if the ignition switch is turned to
the ON position or either of the doors is opened
(either of the door switches: ON). The function
Yes/No feature can be changed with the settings
(adjustment function). for adjustment methods and
adjustment details (post-adjustment operations).
•ADJUSTMENT PROCEDURE
•Not using SWS monitor: GROUP 54B,
P.54B-423.
The head lamp are controlled by the Smart Wiring
System (SWS). For troubleshooting, refer to
respective Groups below.
•Not using SWS monitor: GROUP 54B, SWS
Troubleshooting P.54B-38.
•Using SWS monitor: GROUP 54C, SWS
Troubleshooting P.54C-22.
AC005719
Fender panelHook
Claw
Fender panel
: Front of vehicle
AE
Page 467 of 788
REAR COMBINATION LAMP
CHASSIS ELECTRICAL54A-79
REAR COMBINATION LAMP
TROUBLESHOOTINGM1542000701322
The lamps setup on the rear combination lamp is
controlled in the same manner as the lamps of the
headlamp assembly. For details go to the reference.
For troubleshooting, refer to respective Groups
below.•Not using SWS monitor: GROUP 54B, SWS
Troubleshooting P.54B-38.
•Using SWS monitor: GROUP 54C, SWS
Troubleshooting P.54C-22.
SPECIAL TOOLM1542000600924
REAR COMBINATION LAMP
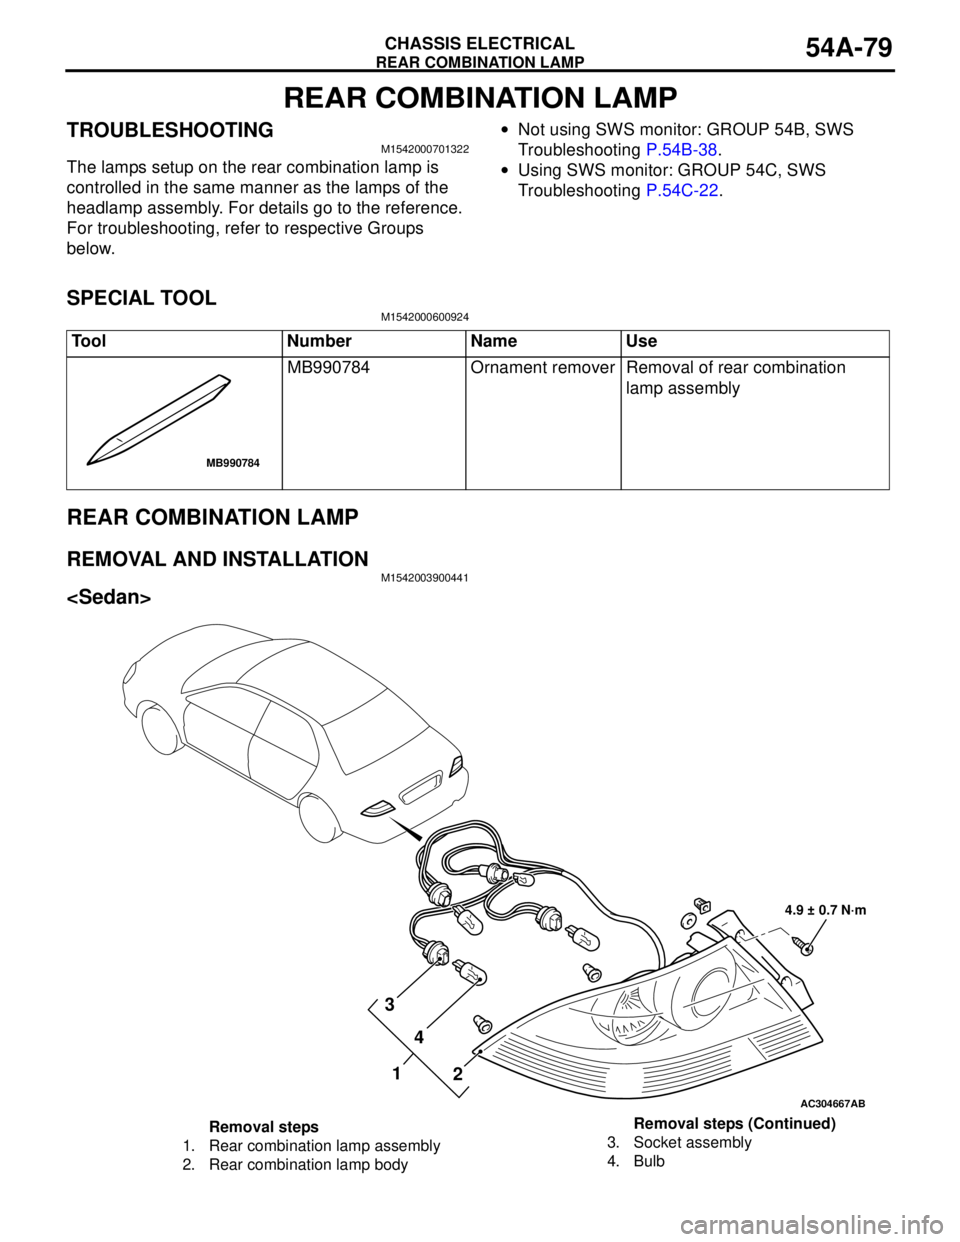
REMOVAL AND INSTALLATIONM1542003900441
Tool Number Name Use
MB990784 Ornament remover Removal of rear combination
lamp assembly
MB990784
AC304667
4.9 ± 0.7 N·m
AB
3
4
2
1
Removal steps
1. Rear combination lamp assembly
2. Rear combination lamp body3. Socket assembly
4. BulbRemoval steps (Continued)
Page 473 of 788
HAZARD WARNING LAMP SWITCH
CHASSIS ELECTRICAL54A-85
HAZARD WARNING LAMP SWITCH
TROUBLESHOOTING
M1542000701333
FLASHER TIMER FUNCTION
The hazard warning lamps (flasher timer function)
are controlled by the Smart Wiring System (SWS).
For troubleshooting, refer to respective Groups
below.•Not using SWS monitor: GROUP 54B, SWS
Troubleshooting P.54B-38.
•Using SWS monitor: GROUP 54C, SWS
Troubleshooting P.54C-22.
SPECIAL TOOL
M1542000600935
AC304717AB
2
1 3 4
56
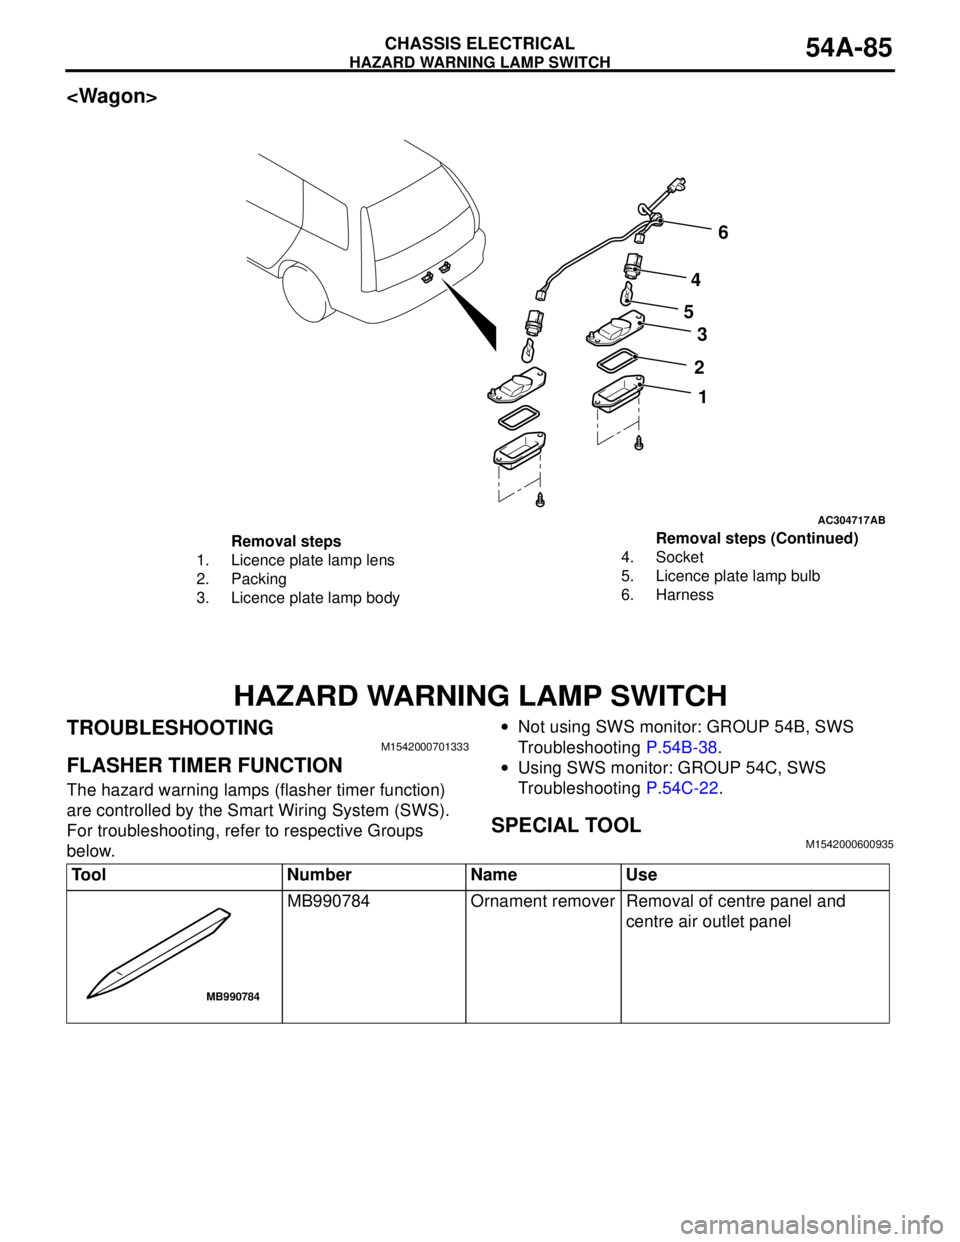
Removal steps
1. Licence plate lamp lens
2. Packing
3. Licence plate lamp body4. Socket
5. Licence plate lamp bulb
6. HarnessRemoval steps (Continued)
Tool Number Name Use
MB990784 Ornament remover Removal of centre panel and
centre air outlet panel
MB990784
Page 476 of 788
COLUMN SWITCH
CHASSIS ELECTRICAL54A-88
INSPECTIONM1542011200931
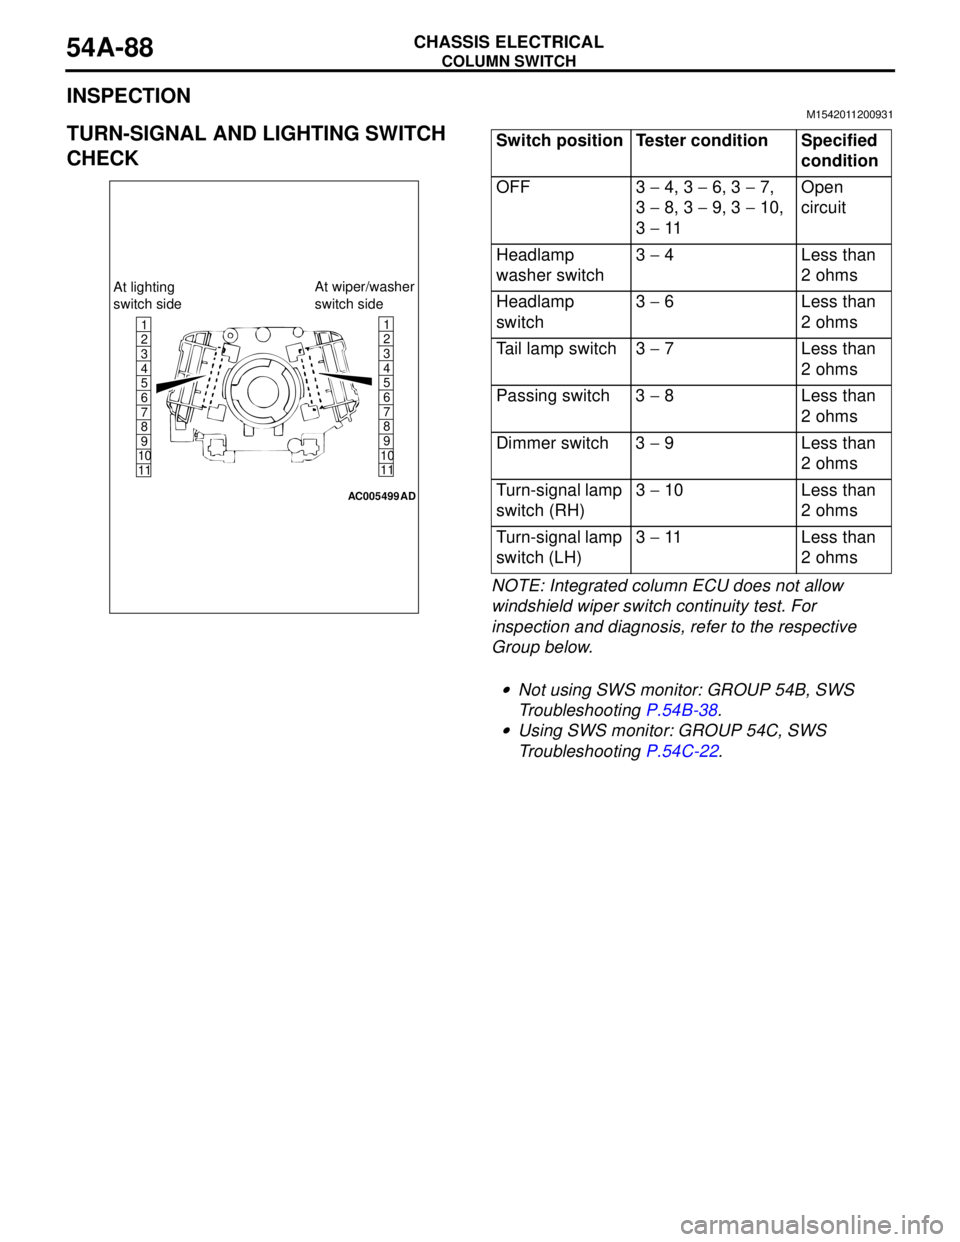
TURN-SIGNAL AND LIGHTING SWITCH
CHECK
NOTE: Integrated column ECU does not allow
windshield wiper switch continuity test. For
inspection and diagnosis, refer to the respective
Group below.
.
•Not using SWS monitor: GROUP 54B, SWS
Troubleshooting P.54B-38.
•Using SWS monitor: GROUP 54C, SWS
Troubleshooting P.54C-22.
1
6
8
11 109 7 5 4 3 21
6
8
11 109 7 5 4
3
2
AC005499
At lighting
switch sideAt wiper/washer
switch side
AD
Switch position Tester condition Specified
condition
OFF 3 − 4, 3 − 6, 3 − 7,
3 − 8, 3 − 9, 3 − 10,
3 − 11Open
circuit
Headlamp
washer switch3 − 4 Less than
2 ohms
Headlamp
switch3 − 6 Less than
2 ohms
Tail lamp switch 3 − 7 Less than
2 ohms
Passing switch 3 − 8 Less than
2 ohms
Dimmer switch 3 − 9 Less than
2 ohms
Turn-signal lamp
switch (RH)3 − 10 Less than
2 ohms
Turn-signal lamp
switch (LH)3 − 11 Less than
2 ohms
Page 485 of 788
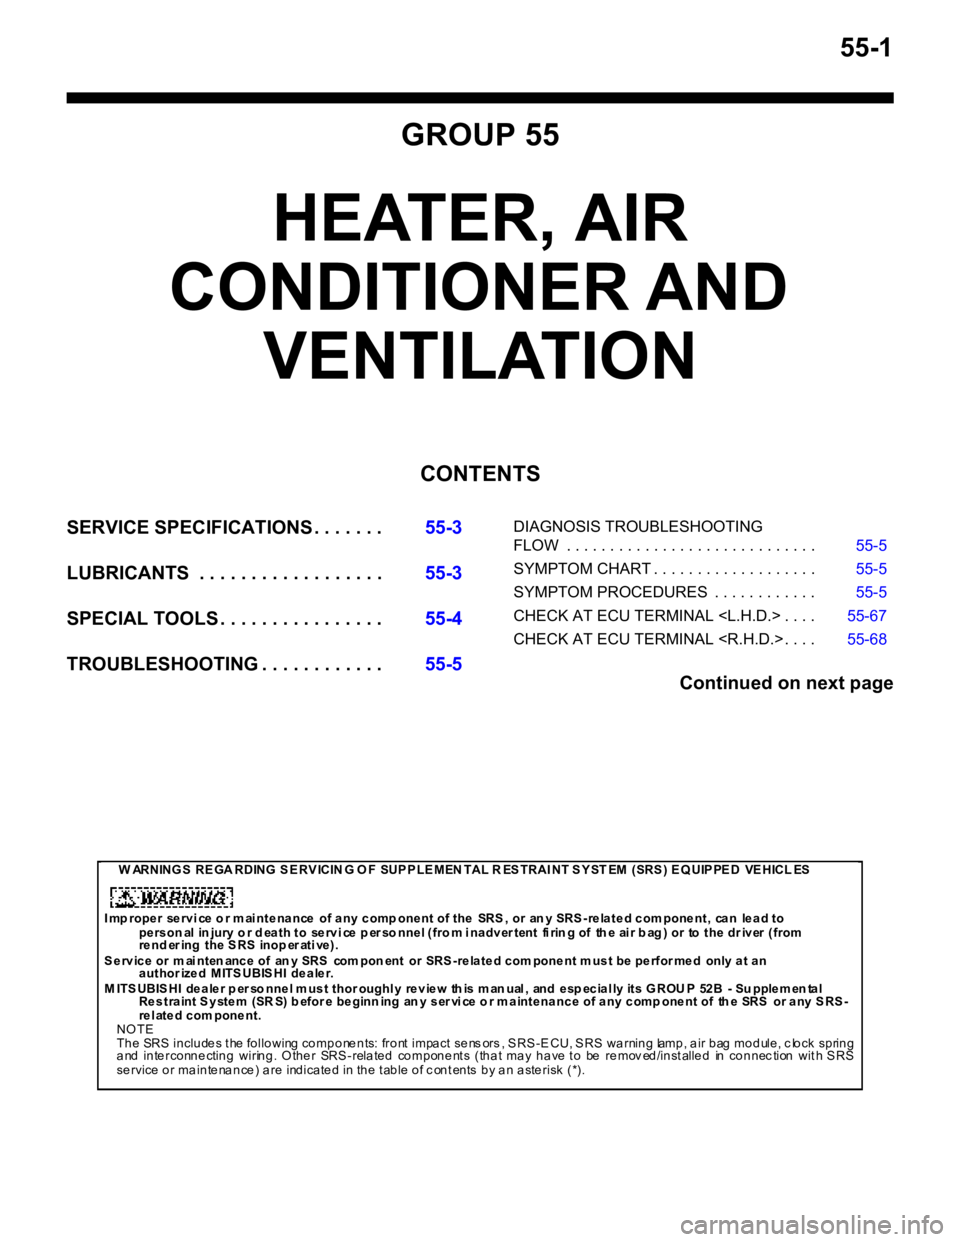
55-1
GROUP 55
HEATER, AIR
CONDITIONER AND
VENTILATION
CONTENTS
SERVICE SPECIFICATIONS . . . . . . .55-3
LUBRICANTS . . . . . . . . . . . . . . . . . .55-3
SPECIAL TOOLS . . . . . . . . . . . . . . . .55-4
TROUBLESHOOTING . . . . . . . . . . . .55-5DIAGNOSIS TROUBLESHOOTING
FLOW . . . . . . . . . . . . . . . . . . . . . . . . . . . . . 55-5
SYMPTOM CHART . . . . . . . . . . . . . . . . . . . 55-5
SYMPTOM PROCEDURES . . . . . . . . . . . . 55-5
CHECK AT ECU TERMINAL
CHECK AT ECU TERMINAL
Continued on next page
W ARNING S RE GA RDING S E RV ICIN G O F SUP P LE MEN TAL R ES TRAI NT S Y ST EM (SRS ) E Q UIP PE D VE HICL ES
I mp roper se rvi ce o r m ai nte na nce of a ny c omp onent of the SRS , or an y SRS -re la te d c om pone nt, ca n le a d to
personal injury or death to service personnel (from inadvertent firing of the air bag) or to the driver (from
re nd er ing the S RS inop er ati ve).
S e rvic e or m ai nten anc e of an y SRS com pon ent or SRS -re late d com pone nt m ust be pe rfor me d only a t an
authorized MITSUBISHI dealer.
M ITSUBISHI dealer p erso nnel must thoroughly review th is man ual, and esp ecially its GROU P 52B - Su pplemen tal
Restraint System (SR S) b efore beginn ing an y service o r maintenance of any comp onent of th e SRS or any SRS-
rel ated com ponent.
NOTE
The SRS includes the following components: front impact sens ors , SRS-ECU, SRS warning lamp, air bag module, c lock spring
and interconnecting wiring. Other SRS-related components (that may have to be remov ed/installed in connection with SRS
service or maintenance) are indicated in the table of c ontents by an asterisk (*).
Page 558 of 788
ON-VEHICLE SERVICE
HEATER, AIR CONDITIONER AND VENTILATION55-74
REFRIGERANT LEAK REPAIR
PROCEDURE
M1552001500277
LOST CHARGE
If the system has lost all charge due to a leak:
1. Evacuate the system (Refer to P.55-72).
2. Charge the system with approximately 480 − 520
g of refrigerant.
3. Check for leaks.
4. Discharge the system.
5. Repair leaks.
CAUTION
Replacement filter-drier units must be sealed
while in storage. The drier used in these units will
saturate water quickly upon exposure to the
atmosphere. When installing a drier, have all
tools and supplies ready for quick assembly to
avoid keeping the system open any longer than
necessary.
6. Replace receiver drier.
7. Evacuate and charge system.
LOW CHARGE
If the system has not lost all of its refrigerant charge;
locate and repair all leaks. If it is necessary to
increase the system pressure to find the leak
(because of an especially low charge) add
refrigerant. If it is possible to repair the leak without
discharging the refrigerant system, use the
procedure for correcting low refrigerant level.
HANDLING TUBING AND FITTINGS
Kinks in the refrigerant tubing or sharp bends in the
refrigerant hose lines will greatly reduce the capacity
of the entire system. High pressures are produced in
the system when it is operating. Extreme care must
be exercised to make sure that all connections are
pressure tight. Dirt and moisture can enter the
system when it is opened for repair or replacement of
lines or components. The following precautions must
be observed. The system must be completely
discharged before opening any fitting of connection
in the refrigeration system. Open fittings with caution
even after the system has been discharged. If any
pressure is noticed as a fitting is loosened, allow
trapped pressure to bleed off very slowly.
Never attempt to rebend formed lines to fit. Use the
correct line for the installation you are servicing. A
good rule for the flexible hose lines is keep the radius
of all bends at least 10 times the diameter of the
hose.Sharper bends will reduce the flow of refrigerant. The
flexible hose lines should be routed so that they are
at least 80 mm from the exhaust manifold. It is good
practice to inspect all flexible hose lines at least once
a year to make sure they are in good condition and
properly routed.
On standard plumbing fittings with O-rings, these
O-rings are not reusable.
COMPRESSOR NOISE CHECKM1552008700272
You must first know the conditions when the noise
occurs. These conditions are: weather, vehicle
speed, in gear or neutral, engine temperature or any
other special conditions.
Noises that develop during A/C operation can often
be misleading. For example: what sounds like a
failed front bearing or connecting rod, may be
caused by loose bolts, nuts, mounting brackets, or a
loose clutch assembly. Verify accessory drive belt
tension (power steering or alternator).
Improper accessory drive belt tension can cause a
misleading noise when the compressor is engaged
and little or no noise when the compressor is
disengaged.
Drive belts are speed-sensitive. That is, at different
engine speeds, and depending upon belt tension,
belts can develop unusual noises that are often
mistaken for mechanical problems within the
compressor.
ADJUSTMENT
1. Select a quiet area for testing. Duplicate
conditions as much as possible. Switch the
compressor on and off several times to clearly
identify compressor noise. To duplicate high
ambient conditions (high head pressure), restrict
air flow through the condenser. Install a manifold
gauge set to make sure discharge pressure
doesn't exceed 2,070 kPa.
2. Tighten all compressor mounting bolts, clutch
mounting bolt, and compressor drive belt. Check
to assure clutch coil is tight (no rotation or
wobble).
3. Check refrigerant hoses for rubbing or
interference that can cause unusual noises.
4. Check refrigerant charge (Refer to P.55-69).
5. Recheck compressor noise as in Step 1.
6. If noise still exists, loosen compressor mounting
bolts and retighten. Repeat Step 1.
7. If noise continues, replace compressor and repeat
Step 1.
Page 645 of 788
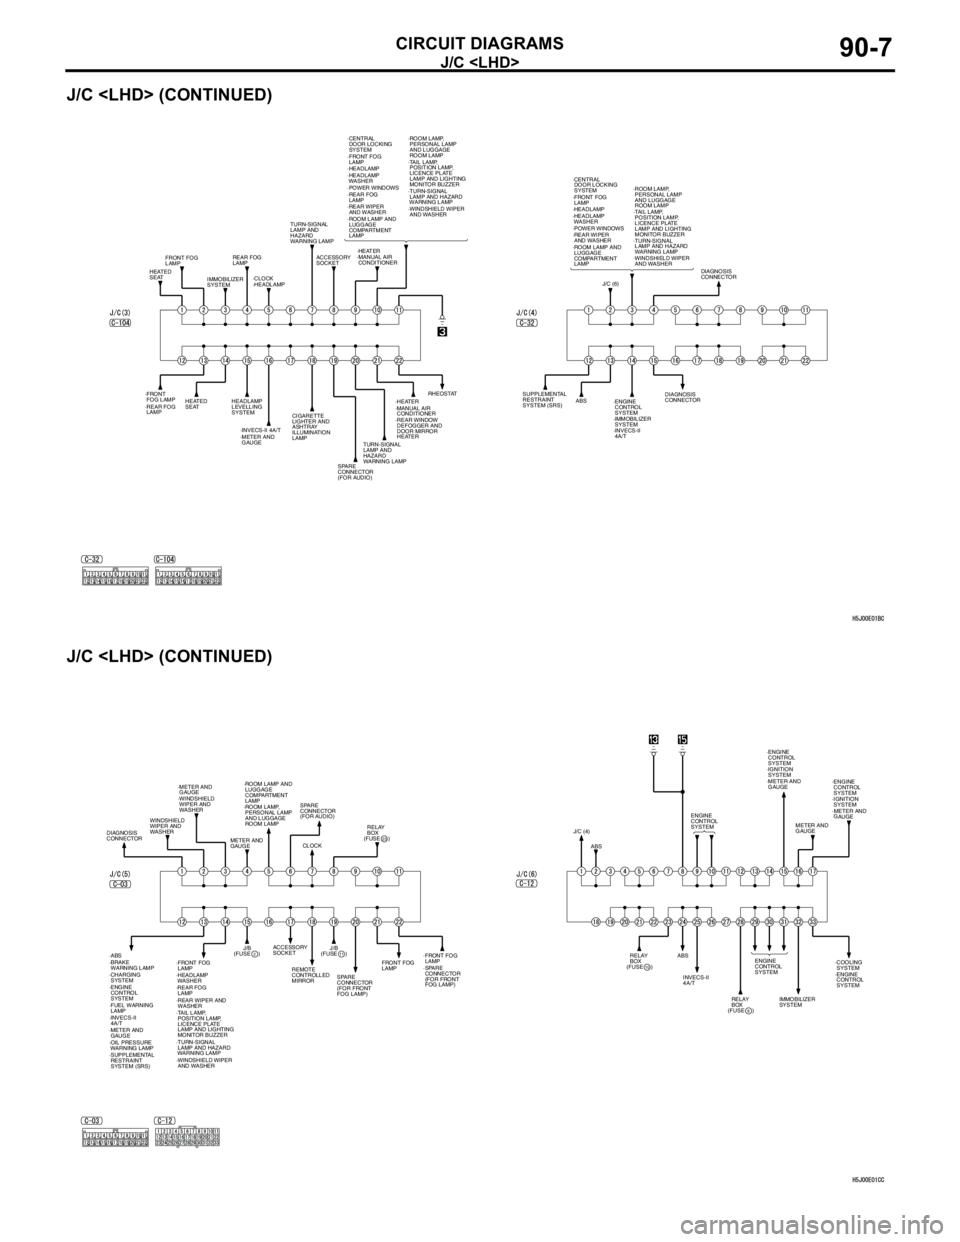
J/C
CIRCUIT DIAGRAMS90-7
J/C
J/C
FRONT FOG
LAMP
·FRONT
FOG LAMP·FRONT FOG
LAMP
REAR FOG
LAMP
·REAR FOG
LAMP·REAR FOG
LAMP
HEATED
SEAT
HEATED
SEATIMMOBILIZER
SYSTEM·CLOCK·HEATER TURN-SIGNAL
LAMP AND
HAZARD
WARNING LAMP·TURN-SIGNAL
LAMP AND HAZARD
WARNING LAMP
TURN-SIGNAL
LAMP AND
HAZARD
WARNING LAMP ·MANUAL AIR
CONDITIONER
·HEATER
·MANUAL AIR
CONDITIONER ·HEADLAMP·HEADLAMP
·HEADLAMP
WASHER
ACCESSORY
SOCKET·CENTRAL
DOOR LOCKING
SYSTEM
·POWER WINDOWS
·REAR WIPER
AND WASHER
·ROOM LAMP AND
LUGGAGE
COMPARTMENT
LAMP·ROOM LAMP,
PERSONAL LAMP
AND LUGGAGE
ROOM LAMP
·TAIL LAMP,
POSITION LAMP,
LICENCE PLATE
LAMP AND LIGHTING
MONITOR BUZZER
·WINDSHIELD WIPER
AND WASHER
HEADLAMP
LEVELLING
SYSTEM
·INVECS-II 4A/T
·METER AND
GAUGECIGARETTE
LIGHTER AND
ASHTRAY
ILLUMINATION
LAMP
SPARE
CONNECTOR
(FOR AUDIO)·REAR WINDOW
DEFOGGER AND
DOOR MIRROR
HEATERRHEOSTAT
·FRONT FOG
LAMP
·TURN-SIGNAL
LAMP AND HAZARD
WARNING LAMP ·HEADLAMP
·HEADLAMP
WASHER ·CENTRAL
DOOR LOCKING
SYSTEM
·POWER WINDOWS
·REAR WIPER
AND WASHER
·ROOM LAMP AND
LUGGAGE
COMPARTMENT
LAMP·ROOM LAMP,
PERSONAL LAMP
AND LUGGAGE
ROOM LAMP
·TAIL LAMP,
POSITION LAMP,
LICENCE PLATE
LAMP AND LIGHTING
MONITOR BUZZER
·WINDSHIELD WIPER
AND WASHER
J/C (6)DIAGNOSIS
CONNECTOR
DIAGNOSIS
CONNECTOR SUPPLEMENTAL
RESTRAINT
SYSTEM (SRS)ABS
·ENGINE
CONTROL
SYSTEM
·IMMOBILIZER
SYSTEM
·INVECS-II
4A/T
·FRONT FOG
LAMP·FRONT FOG
LAMP
FRONT FOG
LAMP
·TURN-SIGNAL
LAMP AND HAZARD
WARNING LAMP ·HEADLAMP
WASHER·ROOM LAMP AND
LUGGAGE
COMPARTMENT
LAMP
·ROOM LAMP,
PERSONAL LAMP
AND LUGGAGE
ROOM LAMP
·TAIL LAMP,
POSITION LAMP,
LICENCE PLATE
LAMP AND LIGHTING
MONITOR BUZZER
·WINDSHIELD WIPER
AND WASHER·WINDSHIELD
WIPER AND
WASHER
WINDSHIELD
WIPER AND
WASHER
DIAGNOSIS
CONNECTOR·METER AND
GAUGE
·METER AND
GAUGEMETER AND
GAUGESPARE
CONNECTOR
(FOR AUDIO)
SPARE
CONNECTOR
(FOR FRONT
FOG LAMP)·SPARE
CONNECTOR
(FOR FRONT
FOG LAMP) CLOCK(FUSE )
23
(FUSE )2
RELAY
BOX
·REAR FOG
LAMP
·REAR WIPER AND
WASHER ·ABS
·BRAKE
WARNING LAMP
·CHARGING
SYSTEM
·ENGINE
CONTROL
SYSTEM
·FUEL WARNING
LAMP
·INVECS-II
4A/T
·SUPPLEMENTAL
RESTRAINT
SYSTEM (SRS) ·OIL PRESSURE
WARNING LAMPJ/B
(FUSE )
11J/B ACCESSORY
SOCKET
REMOTE
CONTROLLED
MIRROR
J/C (4)
ABS
ABSENGINE
CONTROL
SYSTEM
ENGINE
CONTROL
SYSTEM·ENGINE
CONTROL
SYSTEM
·ENGINE
CONTROL
SYSTEMMETER AND
GAUGE
(FUSE )10RELAY
BOX
(FUSE )
8RELAY
BOX INVECS-II
4A/T
IMMOBILIZER
SYSTEM·COOLING
SYSTEM
·METER AND
GAUGE·IGNITION
SYSTEM ·ENGINE
CONTROL
SYSTEM
·METER AND
GAUGE·IGNITION
SYSTEM
Page 647 of 788
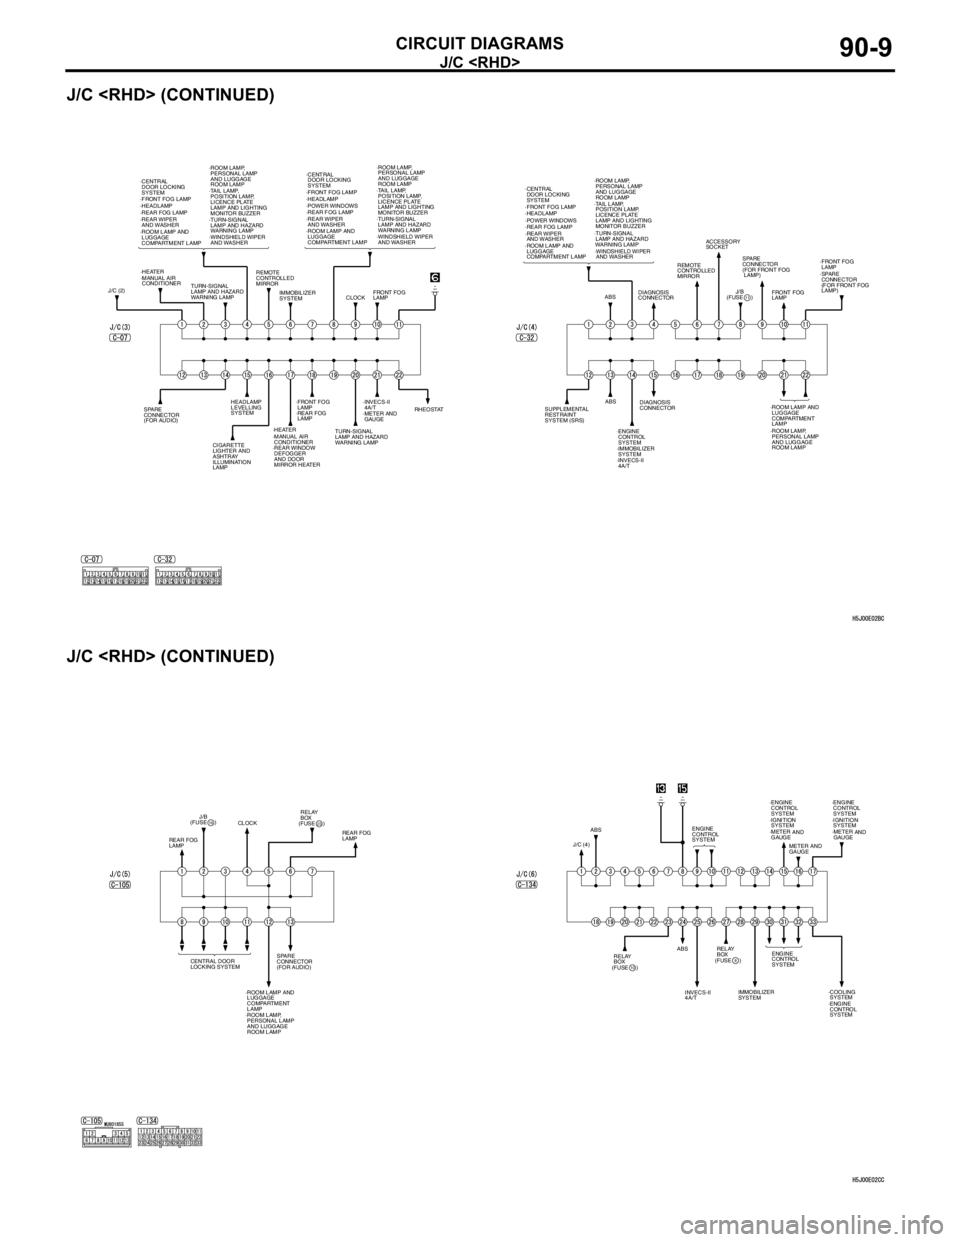
J/C
CIRCUIT DIAGRAMS90-9
J/C
J/C
·METER AND
GAUGESPARE
CONNECTOR
(FOR AUDIO)·REAR FOG
LAMP·INVECS-II
4A/T IMMOBILIZER
SYSTEMFRONT FOG
LAMP CLOCK REMOTE
CONTROLLED
MIRROR
TURN-SIGNAL
LAMP AND HAZARD
WARNING LAMP
TURN-SIGNAL
LAMP AND HAZARD
WARNING LAMP J/C (2)·FRONT FOG LAMP
·TURN-SIGNAL
LAMP AND HAZARD
WARNING LAMP ·HEADLAMP ·CENTRAL
DOOR LOCKING
SYSTEM
·POWER WINDOWS
·REAR WIPER
AND WASHER
·ROOM LAMP AND
LUGGAGE
COMPARTMENT LAMP·ROOM LAMP,
PERSONAL LAMP
AND LUGGAGE
ROOM LAMP
·TAIL LAMP,
POSITION LAMP,
LICENCE PLATE
LAMP AND LIGHTING
MONITOR BUZZER
·HEATER
·MANUAL AIR
CONDITIONER
·MANUAL AIR
CONDITIONER HEADLAMP
LEVELLING
SYSTEM
CIGARETTE
LIGHTER AND
ASHTRAY
ILLUMINATION
LAMP·REAR WINDOW
DEFOGGER
AND DOOR
MIRROR HEATERRHEOSTAT ·FRONT FOG LAMP
·REAR FOG LAMP
·TURN-SIGNAL
LAMP AND HAZARD
WARNING LAMP ·HEADLAMP ·CENTRAL
DOOR LOCKING
SYSTEM
·REAR WIPER
AND WASHER
·ROOM LAMP AND
LUGGAGE
COMPARTMENT LAMP·ROOM LAMP,
PERSONAL LAMP
AND LUGGAGE
ROOM LAMP
·TAIL LAMP,
POSITION LAMP,
LICENCE PLATE
LAMP AND LIGHTING
MONITOR BUZZER
·WINDSHIELD WIPER
AND WASHER·REAR FOG LAMP
·HEATER·WINDSHIELD WIPER
AND WASHERACCESSORY
SOCKET
·SPARE
CONNECTOR
(FOR FRONT FOG
LAMP)
(FUSE )
11J/B ·WINDSHIELD WIPER
AND WASHER
DIAGNOSIS
CONNECTOR
DIAGNOSIS
CONNECTOR
SUPPLEMENTAL
RESTRAINT
SYSTEM (SRS)ABS
·ENGINE
CONTROL
SYSTEM
·IMMOBILIZER
SYSTEM
·INVECS-II
4A/TFRONT FOG
LAMP REMOTE
CONTROLLED
MIRROR
·ROOM LAMP AND
LUGGAGE
COMPARTMENT
LAMP
·ROOM LAMP,
PERSONAL LAMP
AND LUGGAGE
ROOM LAMP·FRONT FOG
LAMP SPARE
CONNECTOR
(FOR FRONT FOG
LAMP)
ABS ·FRONT FOG LAMP
·TURN-SIGNAL
LAMP AND HAZARD
WARNING LAMP ·HEADLAMP ·CENTRAL
DOOR LOCKING
SYSTEM
·POWER WINDOWS
·REAR WIPER
AND WASHER
·ROOM LAMP AND
LUGGAGE
COMPARTMENT LAMP·ROOM LAMP,
PERSONAL LAMP
AND LUGGAGE
ROOM LAMP
·TAIL LAMP,
POSITION LAMP,
LICENCE PLATE
LAMP AND LIGHTING
MONITOR BUZZER
·REAR FOG LAMP
·FRONT FOG
LAMP
REAR FOG
LAMP
·ROOM LAMP AND
LUGGAGE
COMPARTMENT
LAMP
·ROOM LAMP,
PERSONAL LAMP
AND LUGGAGE
ROOM LAMPSPARE
CONNECTOR
(FOR AUDIO) CLOCK
(FUSE )23RELAY
BOX
(FUSE )16J/B
REAR FOG
LAMP
CENTRAL DOOR
LOCKING SYSTEM
J/C (4)ABS
ABSENGINE
CONTROL
SYSTEM
ENGINE
CONTROL
SYSTEM·ENGINE
CONTROL
SYSTEM
·ENGINE
CONTROL
SYSTEMMETER AND
GAUGE·METER AND
GAU GE
·IGNITION
SYSTEM
(FUSE )
10RELAY
BOX(FUSE )8RELAY
BOX
INVECS-II
4A/TIMMOBILIZER
SYSTEM·COOLING
SYSTEM
·ENGINE
CONTROL
SYSTEM
·METER AND
GAUGE·IGNITION
SYSTEM