service MITSUBISHI LANCER 2005 Owner's Guide
[x] Cancel search | Manufacturer: MITSUBISHI, Model Year: 2005, Model line: LANCER, Model: MITSUBISHI LANCER 2005Pages: 788, PDF Size: 45.98 MB
Page 70 of 788

CHARGING SYSTEM
ENGINE ELECTRICAL16-6
7. Connect a tachometer or the MUT-II/III (Refer to
GROUP 11A − On-vehicle Service − Idle speed
check <4G1> P.11A-11 or GROUP 11C −
On-vehicle Service − Idle speed check <4G6>
P.11C-11).
8. Leave the hood open.
9. Check that the reading on the voltmeter is equal
to the battery voltage.
NOTE: If the voltage is 0 V, the cause is probably
an open circuit in the wire or fusible link between
the alternator "B" terminal and the battery (+)
terminal.
10.Turn the light switch on to turn on headlamps and
then start the engine.
11.Immediately after setting the headlamps to high
beam and turning the heater blower switch to the
high revolution position, increase the engine
speed to 2,500 r/min and read the maximum
current output value displayed on the ammeter.
Limit: 70 % of normal current outputNOTE: .
•For the nominal current output, refer to the
Alternator Specifications.
•Because the current from the battery will soon
drop after the engine is started, the above step
should be carried out as quickly as possible in
order to obtain the maximum current output
value.
•The current output value will depend on the
electrical load and the temperature of the
alternator body.
•If the electrical load is small while testing, the
specified level of current may not be output
even though the alternator is normal. In such
cases, increase the electrical load by leaving
the headlamps turned on for some time to
discharge the battery or by using the lighting
system in another vehicle, and then test again.
•The specified level of current also may not be
output if the temperature of the alternator body
or the ambient temperature is too high. In such
cases, cool the alternator and then test again.
12.The reading on the ammeter should be above the
limit value. If the reading is below the limit value
and the alternator output wire is normal, remove
the alternator from the engine and check the
alternator.
13.Run the engine at idle after the test.
14.Turn the ignition switch to the "LOCK" (OFF)
position.
15.Remove the tachometer or the MUT-II/III.
16.Disconnect the negative battery cable.
17.Disconnect the ammeter and voltmeter.
18.Connect the negative battery cable.
Page 71 of 788
CHARGING SYSTEM
ENGINE ELECTRICAL16-7
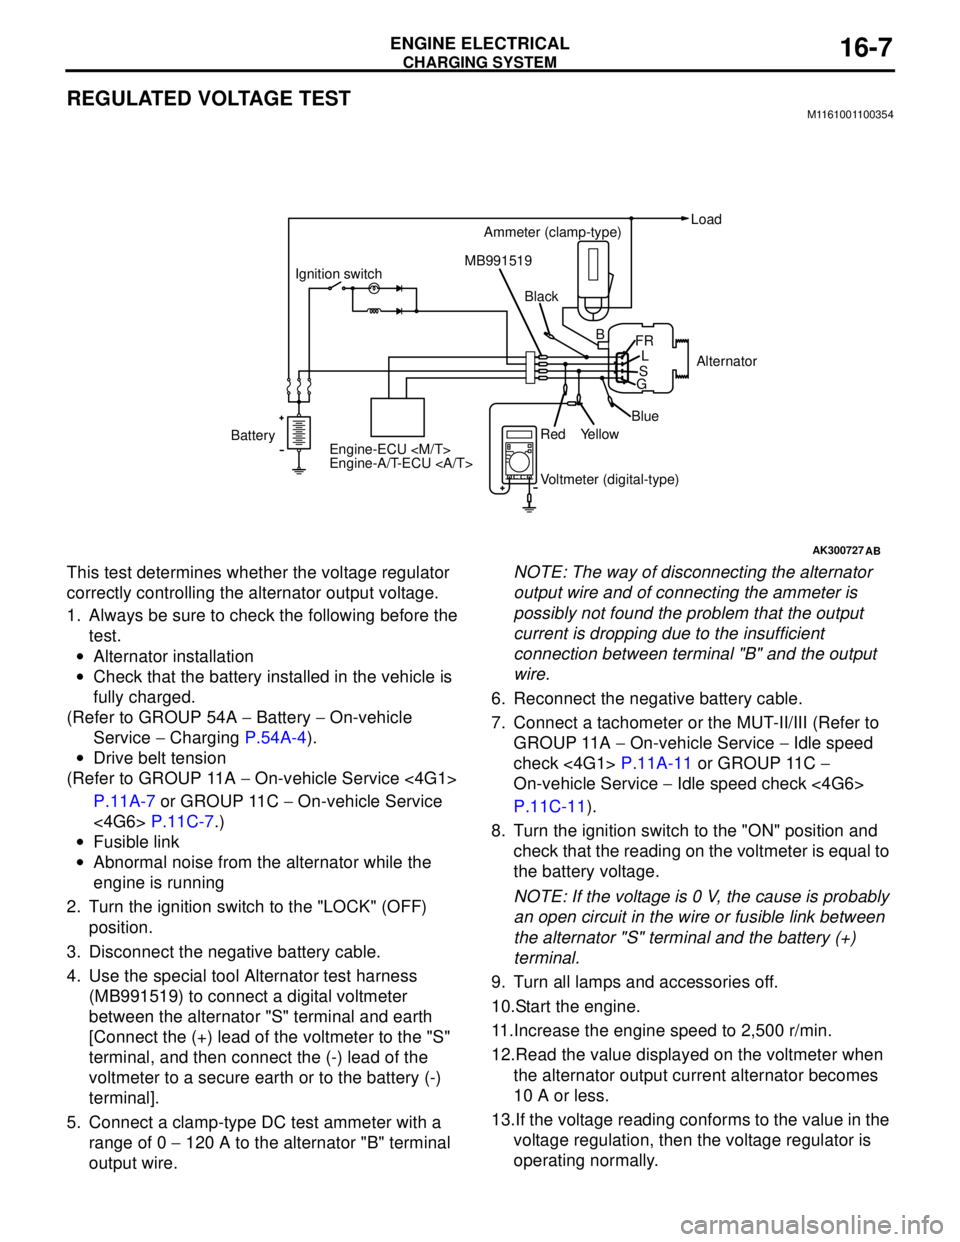
REGULATED VOLTAGE TESTM1161001100354
This test determines whether the voltage regulator
correctly controlling the alternator output voltage.
1. Always be sure to check the following before the
test.
•Alternator installation
•Check that the battery installed in the vehicle is
fully charged.
(Refer to GROUP 54A − Battery − On-vehicle
Service − Charging P.54A-4).
•Drive belt tension
(Refer to GROUP 11A − On-vehicle Service <4G1>
P.11A-7 or GROUP 11C − On-vehicle Service
<4G6> P.11C-7.)
•Fusible link
•Abnormal noise from the alternator while the
engine is running
2. Turn the ignition switch to the "LOCK" (OFF)
position.
3. Disconnect the negative battery cable.
4. Use the special tool Alternator test harness
(MB991519) to connect a digital voltmeter
between the alternator "S" terminal and earth
[Connect the (+) lead of the voltmeter to the "S"
terminal, and then connect the (-) lead of the
voltmeter to a secure earth or to the battery (-)
terminal].
5. Connect a clamp-type DC test ammeter with a
range of 0 − 120 A to the alternator "B" terminal
output wire.NOTE: The way of disconnecting the alternator
output wire and of connecting the ammeter is
possibly not found the problem that the output
current is dropping due to the insufficient
connection between terminal "B" and the output
wire.
6. Reconnect the negative battery cable.
7. Connect a tachometer or the MUT-II/III (Refer to
GROUP 11A − On-vehicle Service − Idle speed
check <4G1> P.11A-11 or GROUP 11C −
On-vehicle Service − Idle speed check <4G6>
P.11C-11).
8. Turn the ignition switch to the "ON" position and
check that the reading on the voltmeter is equal to
the battery voltage.
NOTE: If the voltage is 0 V, the cause is probably
an open circuit in the wire or fusible link between
the alternator "S" terminal and the battery (+)
terminal.
9. Turn all lamps and accessories off.
10.Start the engine.
11.Increase the engine speed to 2,500 r/min.
12.Read the value displayed on the voltmeter when
the alternator output current alternator becomes
10 A or less.
13.If the voltage reading conforms to the value in the
voltage regulation, then the voltage regulator is
operating normally.
AK300727AB
BatteryIgnition switch
Engine-ECU
Engine-A/T-ECU Ammeter (clamp-type)Load
Black MB991519
Voltmeter (digital-type) Red
YellowBlueAlternator B
FR
L
S
G
Page 76 of 788
CHARGING SYSTEM
ENGINE ELECTRICAL16-12
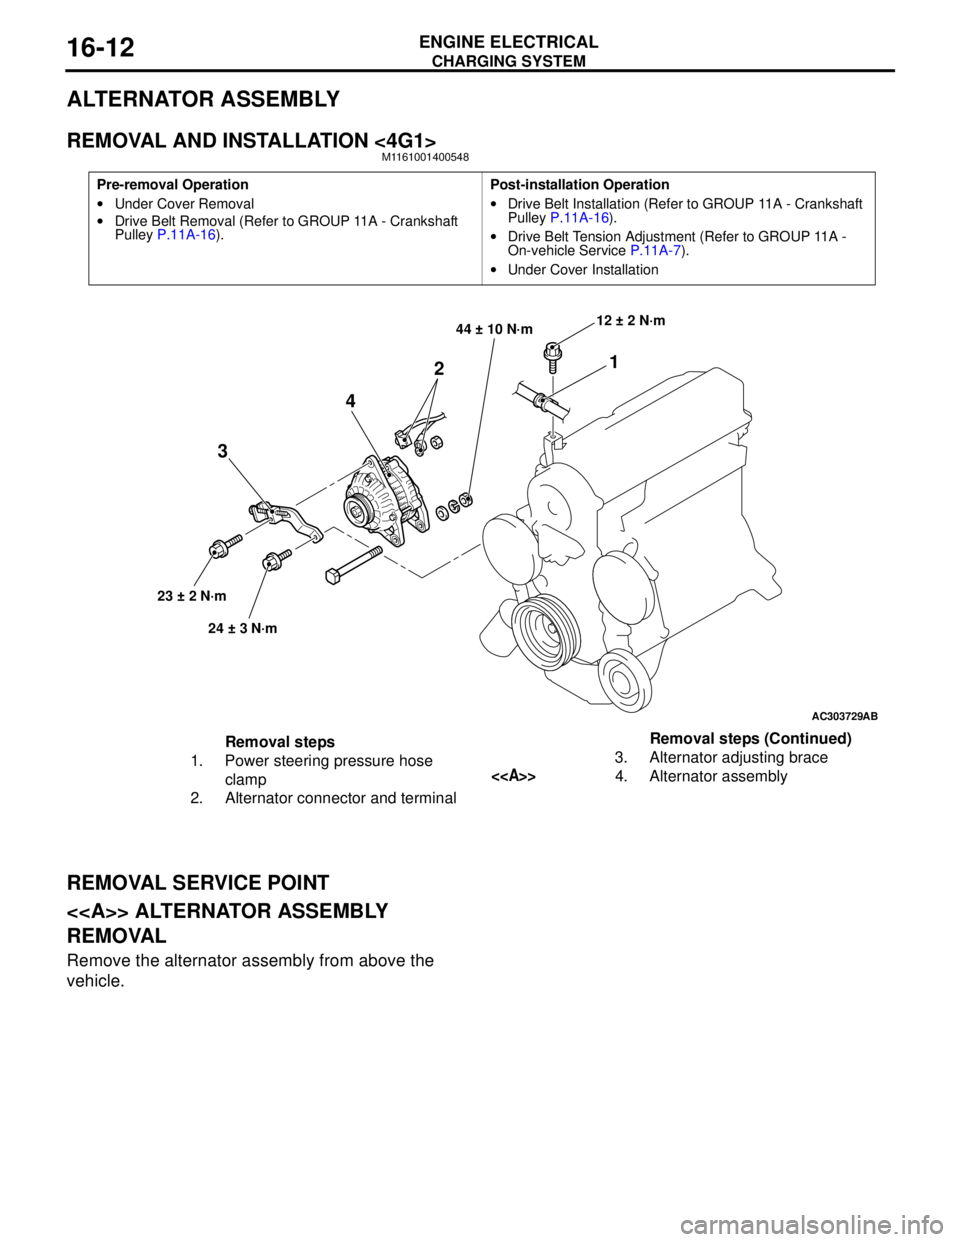
ALTERNATOR ASSEMBLY
REMOVAL AND INSTALLATION <4G1>M1161001400548
REMOVAL SERVICE POINT
<> ALTERNATOR ASSEMBLY
REMOVAL
Remove the alternator assembly from above the
vehicle.
Pre-removal Operation
•Under Cover Removal
•Drive Belt Removal (Refer to GROUP 11A - Crankshaft
Pulley P.11A-16).Post-installation Operation
•Drive Belt Installation (Refer to GROUP 11A - Crankshaft
Pulley P.11A-16).
•Drive Belt Tension Adjustment (Refer to GROUP 11A -
On-vehicle Service P.11A-7).
•Under Cover Installation
AC303729
1
2
4
3
44 ± 10 N·m
23 ± 2 N·m
24 ± 3 N·m12 ± 2 N·m
AB
Removal steps
1. Power steering pressure hose
clamp
2. Alternator connector and terminal3. Alternator adjusting brace
<>4. Alternator assemblyRemoval steps (Continued)
Page 77 of 788
CHARGING SYSTEM
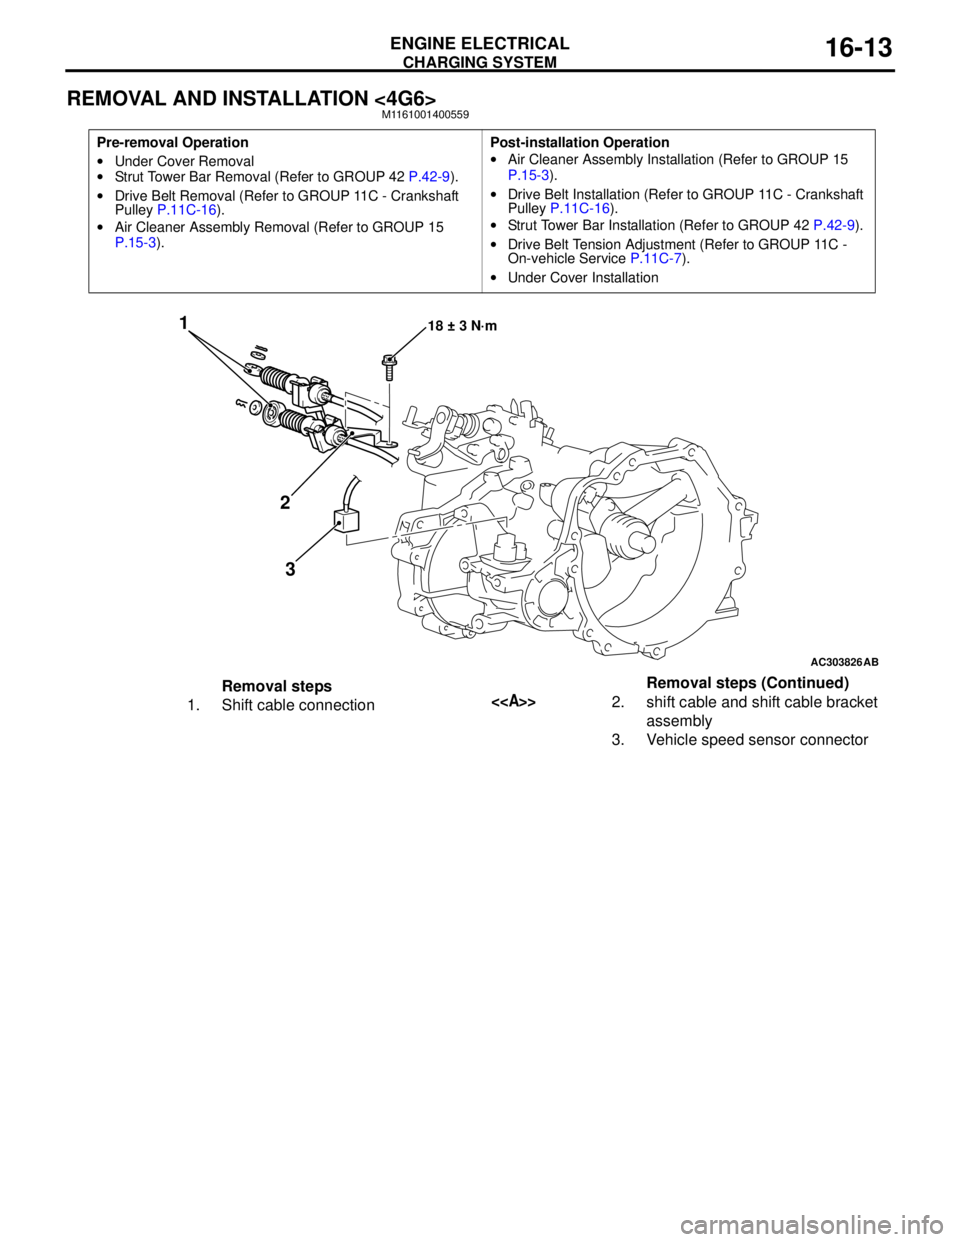
ENGINE ELECTRICAL16-13
REMOVAL AND INSTALLATION <4G6>M1161001400559
Pre-removal Operation
•Under Cover Removal
•Strut Tower Bar Removal (Refer to GROUP 42 P.42-9).
•Drive Belt Removal (Refer to GROUP 11C - Crankshaft
Pulley P.11C-16).
•Air Cleaner Assembly Removal (Refer to GROUP 15
P.15-3).Post-installation Operation
•Air Cleaner Assembly Installation (Refer to GROUP 15
P.15-3).
•Drive Belt Installation (Refer to GROUP 11C - Crankshaft
Pulley P.11C-16).
•Strut Tower Bar Installation (Refer to GROUP 42 P.42-9).
•Drive Belt Tension Adjustment (Refer to GROUP 11C -
On-vehicle Service P.11C-7).
•Under Cover Installation
AC303826
1
2
318 ± 3 N·m
AB
Removal steps
1. Shift cable connection<>2. shift cable and shift cable bracket
assembly
3. Vehicle speed sensor connectorRemoval steps (Continued)
Page 78 of 788
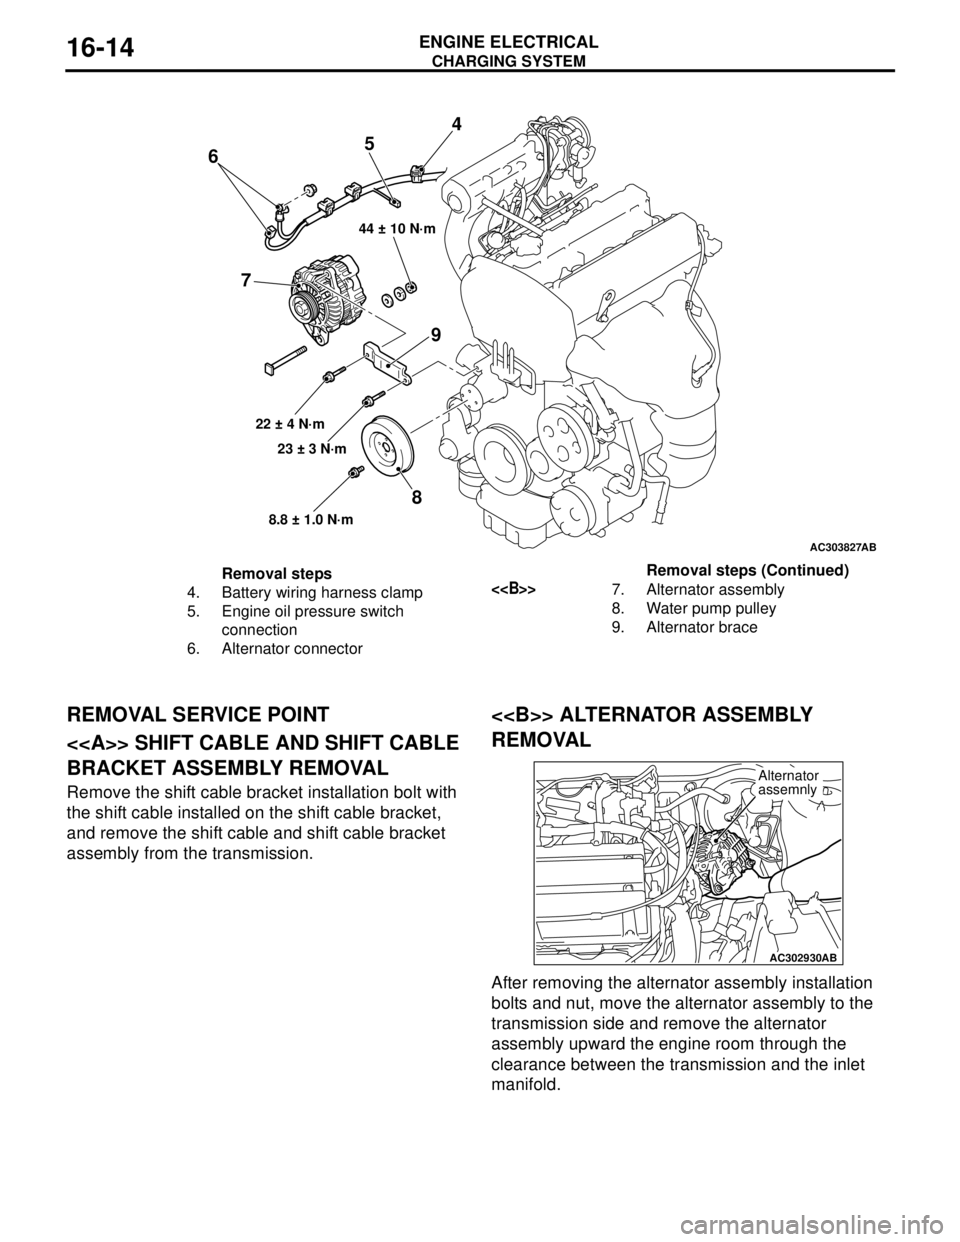
Page 80 of 788
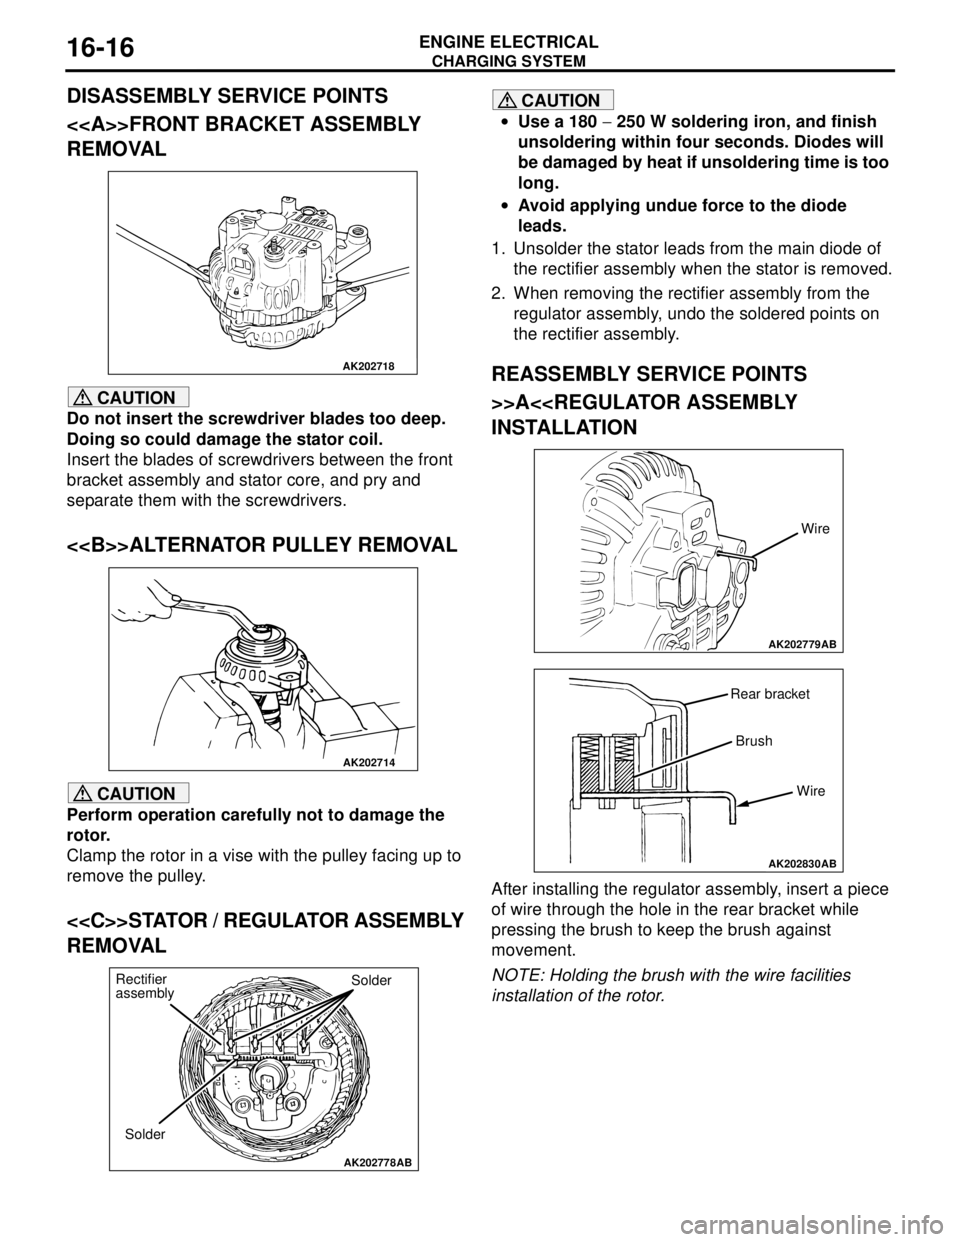
Page 84 of 788

STARTING SYSTEM
ENGINE ELECTRICAL16-20
STARTER MOTOR SPECIFICATIONS
SERVICE SPECIFICATIONS
M1162000300068
Item 4G1 4G6
Type Reduction drive with planetary
gearReduction drive with planetary gear
Rated output kW/V 1.2/12 1.4/12
Number of pinion teeth 8 8
Item Standard value Limit
Pinion gap mm 0.5 − 2.0
−
Commutator run-out mm
−0.05
Commutator diameter mm 29.4 28.8
Undercut depth mm 0.5 0.2
Page 85 of 788

STARTING SYSTEM
ENGINE ELECTRICAL16-21
STARTER MOTOR ASSEMBLY
REMOVAL AND INSTALLATION <4G1>M1162001000628
REMOVAL SERVICE POINT
<> SHIFT CABLE AND SHIFT CABLE
BRACKET ASSEMBLY
Remove the shift cable bracket installation bolt with
the shift cable installed on the shift cable bracket,
and remove the shift cable and shift cable bracket
assembly from the transmission.
<> SHIFT CABLE CONNECTION
REMOVAL
Disengage the transmission, and remove the shift
cable assembly from the transmission.
<
Remove the starter assembly from above the
vehicle.
Pre-removal and Post-installation Operation
•Air Cleaner Assembly Removal and Installation (Refer to
GROUP 15 P.15-3).
•Battery and Battery Tray Removal and Installation
AC303962AB
1
1 2
3
56
7
4
30 ± 3 N·m18 ± 3 N·m
12 ± 2 N·m
Removal steps
1. Shift cable connection
<>2. shift cable and shift cable bracket
assembly
<>3. Shift cable connection 4. Starter connector and terminal
5. Harness bracket
6. Harness bracket <
Page 86 of 788
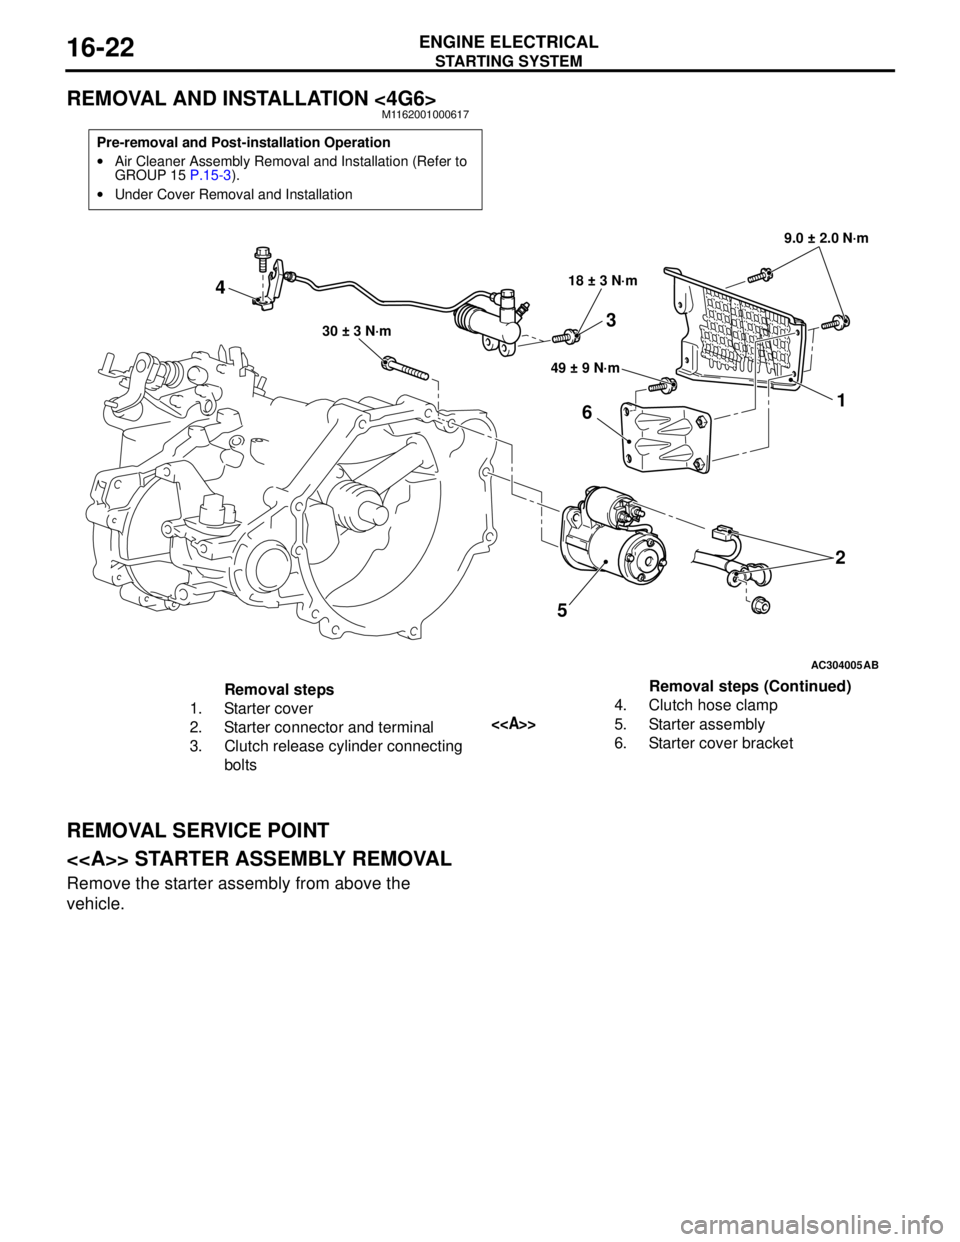
STARTING SYSTEM
ENGINE ELECTRICAL16-22
REMOVAL AND INSTALLATION <4G6>M1162001000617
REMOVAL SERVICE POINT
<> STARTER ASSEMBLY REMOVAL
Remove the starter assembly from above the
vehicle.
Pre-removal and Post-installation Operation
•Air Cleaner Assembly Removal and Installation (Refer to
GROUP 15 P.15-3).
•Under Cover Removal and Installation
AC304005
521
6
49 ± 9 N·m 18 ± 3 N·m9.0 ± 2.0 N·m
30 ± 3 N·m
AB
4
3
Removal steps
1. Starter cover
2. Starter connector and terminal
3. Clutch release cylinder connecting
bolts4. Clutch hose clamp
<>5. Starter assembly
6. Starter cover bracketRemoval steps (Continued)
Page 91 of 788
