service MITSUBISHI LANCER 2005 Repair Manual
[x] Cancel search | Manufacturer: MITSUBISHI, Model Year: 2005, Model line: LANCER, Model: MITSUBISHI LANCER 2005Pages: 788, PDF Size: 45.98 MB
Page 157 of 788
27-1
GROUP 27
REAR AXLE
CONTENTS
GENERAL INFORMATION . . . . . . . .27-2
SERVICE SPECIFICATIONS . . . . . . .27-2
SEALANT . . . . . . . . . . . . . . . . . . . . . .27-2
SPECIAL TOOLS . . . . . . . . . . . . . . . .27-3ON-VEHICLE SERVICE . . . . . . . . . . .27-4
WHEEL BEARING AXIAL PLAY CHECK . . 27-4
REAR HUB ROTARY-SLIDING
RESISTANCE CHECK . . . . . . . . . . . . . . . . 27-4
HUB BOLT REPLACEMENT . . . . . . . . . . . . 27-4
REAR AXLE HUB ASSEMBLY . . . . .27-5
REMOVAL AND INSTALLATION . . . . . . . . 27-5
INSPECTION . . . . . . . . . . . . . . . . . . . . . . . . 27-6
Page 158 of 788
GENERAL INFORMATION
REAR AXLE27-2
GENERAL INFORMATION
M1271000100304
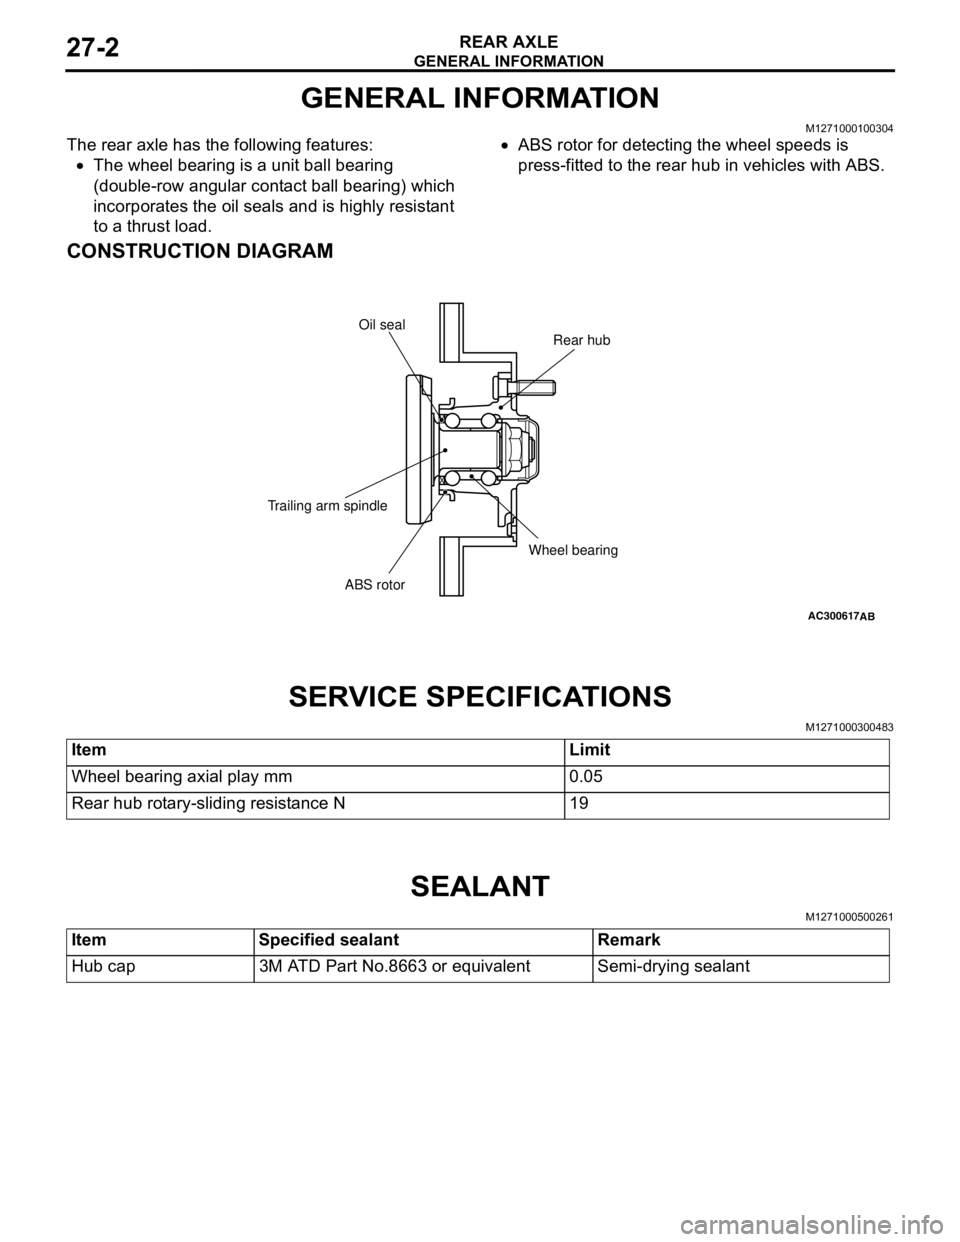
The rear axle has the following features:
•The wheel bearing is a unit ball bearing
(double-row angular contact ball bearing) which
incorporates the oil seals and is highly resistant
to a thrust load.•ABS rotor for detecting the wheel speeds is
press-fitted to the rear hub in vehicles with ABS.
CONSTRUCTION DIAGRAM
SERVICE SPECIFICATIONS
M1271000300483
SEALANT
M1271000500261
AC300617AB
Rear hub Oil seal
Wheel bearing
ABS rotor Trailing arm spindle
Item Limit
Wheel bearing axial play mm 0.05
Rear hub rotary-sliding resistance N 19
Item Specified sealant Remark
Hub cap 3M ATD Part No.8663 or equivalent Semi-drying sealant
Page 160 of 788
ON-VEHICLE SERVICE
REAR AXLE27-4
ON-VEHICLE SERVICE
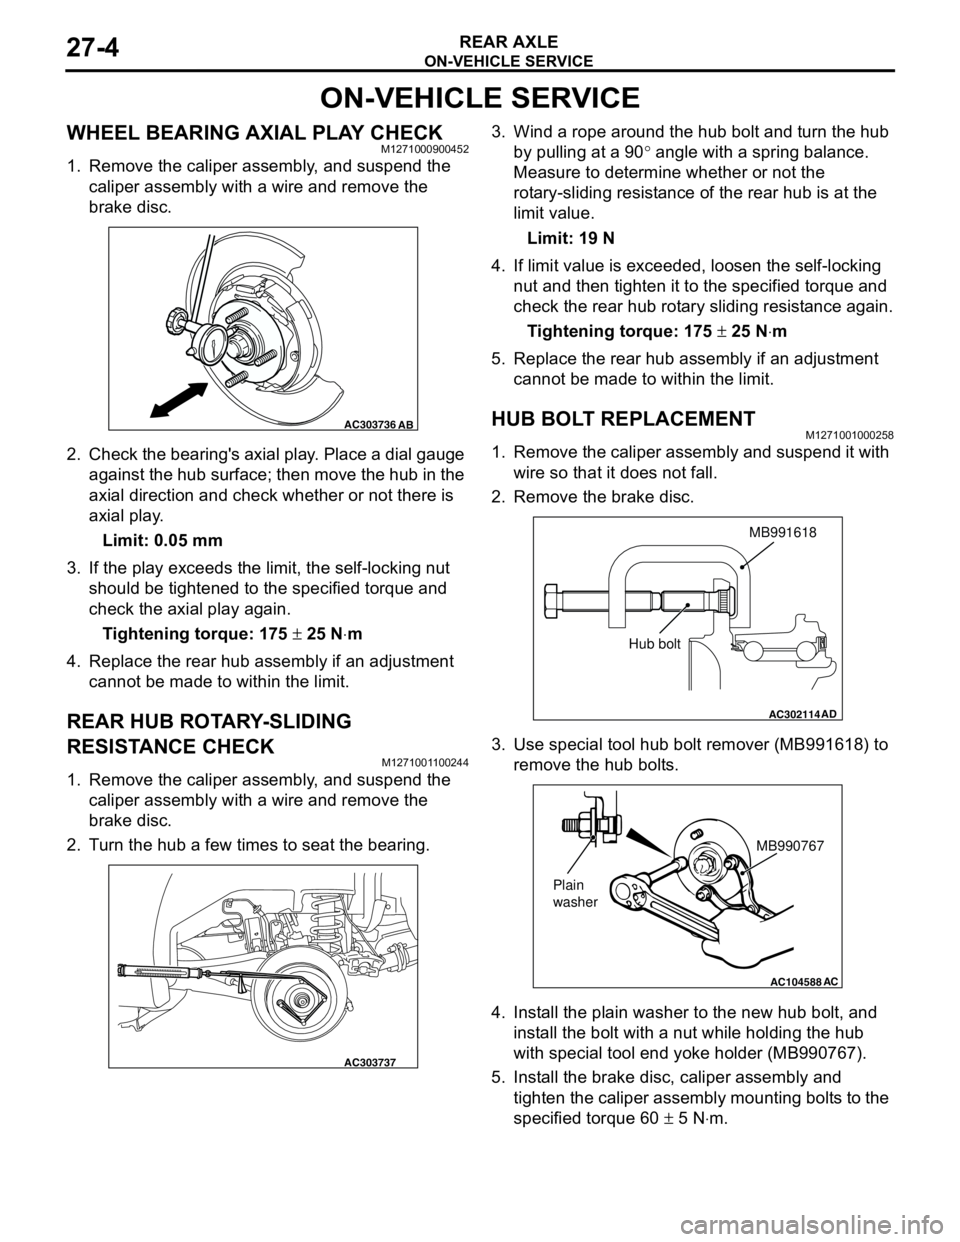
WHEEL BEARING AXIAL PLAY CHECKM1271000900452
1. Remove the caliper assembly, and suspend the
caliper assembly with a wire and remove the
brake disc.
2. Check the bearing's axial play. Place a dial gauge
against the hub surface; then move the hub in the
axial direction and check whether or not there is
axial play.
Limit: 0.05 mm
3. If the play exceeds the limit, the self-locking nut
should be tightened to the specified torque and
check the axial play again.
Tightening torque: 175 ± 25 N⋅m
4. Replace the rear hub assembly if an adjustment
cannot be made to within the limit.
REAR HUB ROTARY-SLIDING
RESISTANCE CHECK
M1271001100244
1. Remove the caliper assembly, and suspend the
caliper assembly with a wire and remove the
brake disc.
2. Turn the hub a few times to seat the bearing.3. Wind a rope around the hub bolt and turn the hub
by pulling at a 90° angle with a spring balance.
Measure to determine whether or not the
rotary-sliding resistance of the rear hub is at the
limit value.
Limit: 19 N
4. If limit value is exceeded, loosen the self-locking
nut and then tighten it to the specified torque and
check the rear hub rotary sliding resistance again.
Tightening torque: 175 ± 25 N⋅m
5. Replace the rear hub assembly if an adjustment
cannot be made to within the limit.
HUB BOLT REPLACEMENTM1271001000258
1. Remove the caliper assembly and suspend it with
wire so that it does not fall.
2. Remove the brake disc.
3. Use special tool hub bolt remover (MB991618) to
remove the hub bolts.
4. Install the plain washer to the new hub bolt, and
install the bolt with a nut while holding the hub
with special tool end yoke holder (MB990767).
5. Install the brake disc, caliper assembly and
tighten the caliper assembly mounting bolts to the
specified torque 60 ± 5 N⋅m.
AC303736AB
AC303737
AC302114
MB991618
AD
Hub bolt
AC104588
MB990767
Plain
washer
AC
Page 162 of 788
Page 163 of 788
31-1
GROUP 31
WHEEL AND TYRE
CONTENTS
GENERAL INFORMATION . . . . . . . .31-2
SERVICE SPECIFICATIONS . . . . . . .31-2
TROUBLESHOOTING . . . . . . . . . . . .31-3
DIAGNOSIS . . . . . . . . . . . . . . . . . . . . . . . . 31-3
WHEEL BALANCE ACCURACY . . . . . . . . 31-4
ON-VEHICLE SERVICE . . . . . . . . . . .31-7
TYRE INFLATION PRESSURE CHECK . . . 31-7
TYRE WEAR CHECK . . . . . . . . . . . . . . . . . 31-7
WHEEL RUNOUT CHECK . . . . . . . . . . . . . 31-7
WHEEL AND TYRE . . . . . . . . . . . . . .31-7
INSTALLATION SERVICE POINT . . . . . . . 31-7
Page 164 of 788
GENERAL INFORMATION
WHEEL AND TYRE31-2
GENERAL INFORMATION
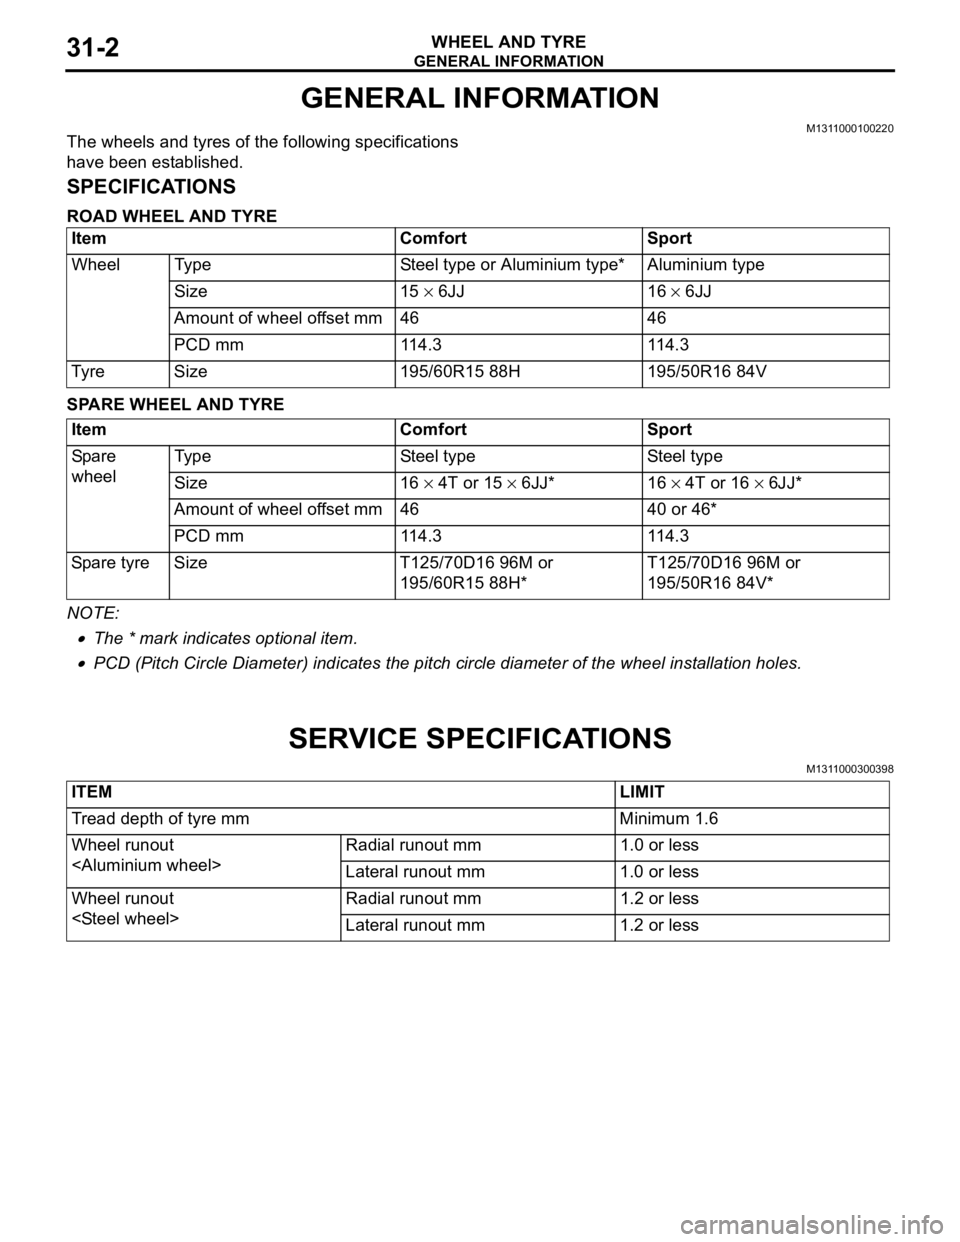
M1311000100220The wheels and tyres of the following specifications
have been established.
SPECIFICATIONS
ROAD WHEEL AND TYRE
SPARE WHEEL AND TYRE
NOTE: .
•The * mark indicates optional item.
•PCD (Pitch Circle Diameter) indicates the pitch circle diameter of the wheel installation holes.
SERVICE SPECIFICATIONS
M1311000300398
Item Comfort Sport
Wheel Type Steel type or Aluminium type* Aluminium type
Size 15 × 6JJ 16 × 6JJ
Amount of wheel offset mm 46 46
PCD mm 114.3 114.3
Tyre Size 195/60R15 88H 195/50R16 84V
Item Comfort Sport
Spare
wheelType Steel type Steel type
Size 16 × 4T or 15 × 6JJ* 16 × 4T or 16 × 6JJ*
Amount of wheel offset mm 46 40 or 46*
PCD mm 114.3 114.3
Spare tyre Size T125/70D16 96M or
195/60R15 88H*T125/70D16 96M or
195/50R16 84V*
ITEM LIMIT
Tread depth of tyre mm Minimum 1.6
Wheel runout
Lateral runout mm 1.0 or less
Wheel runout
Lateral runout mm 1.2 or less
Page 165 of 788
TROUBLESHOOTING
WHEEL AND TYRE31-3
TROUBLESHOOTING
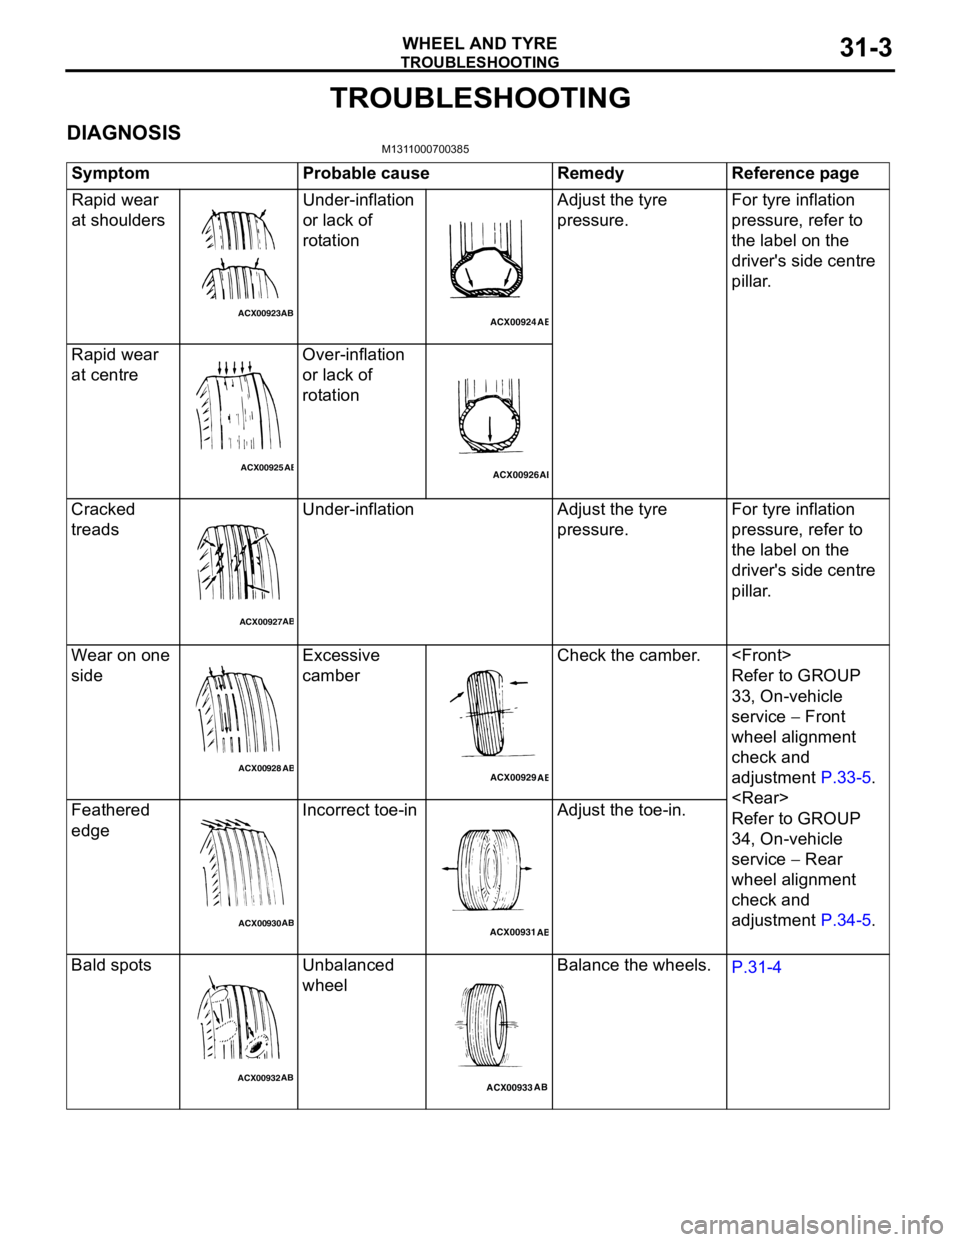
DIAGNOSISM1311000700385
Symptom Probable cause Remedy Reference page
Rapid wear
at shouldersUnder-inflation
or lack of
rotationAdjust the tyre
pressure.For tyre inflation
pressure, refer to
the label on the
driver's side centre
pillar.
Rapid wear
at centreOver-inflation
or lack of
rotation
Cracked
treadsUnder-inflation Adjust the tyre
pressure.For tyre inflation
pressure, refer to
the label on the
driver's side centre
pillar.
Wear on one
sideExcessive
camberCheck the camber.
Refer to GROUP
33, On-vehicle
service − Front
wheel alignment
check and
adjustment P.33-5.
Refer to GROUP
34, On-vehicle
service − Rear
wheel alignment
check and
adjustment P.34-5. Feathered
edgeIncorrect toe-in Adjust the toe-in.
Bald spots Unbalanced
wheelBalance the wheels.
P.31-4
ACX00923ABACX00924
AB
ACX00925ABACX00926AB
ACX00927AB
ACX00928
ABACX00929
AB
ACX00930ABACX00931
AB
ACX00932ABACX00933AB
Page 166 of 788
TROUBLESHOOTING
WHEEL AND TYRE31-4
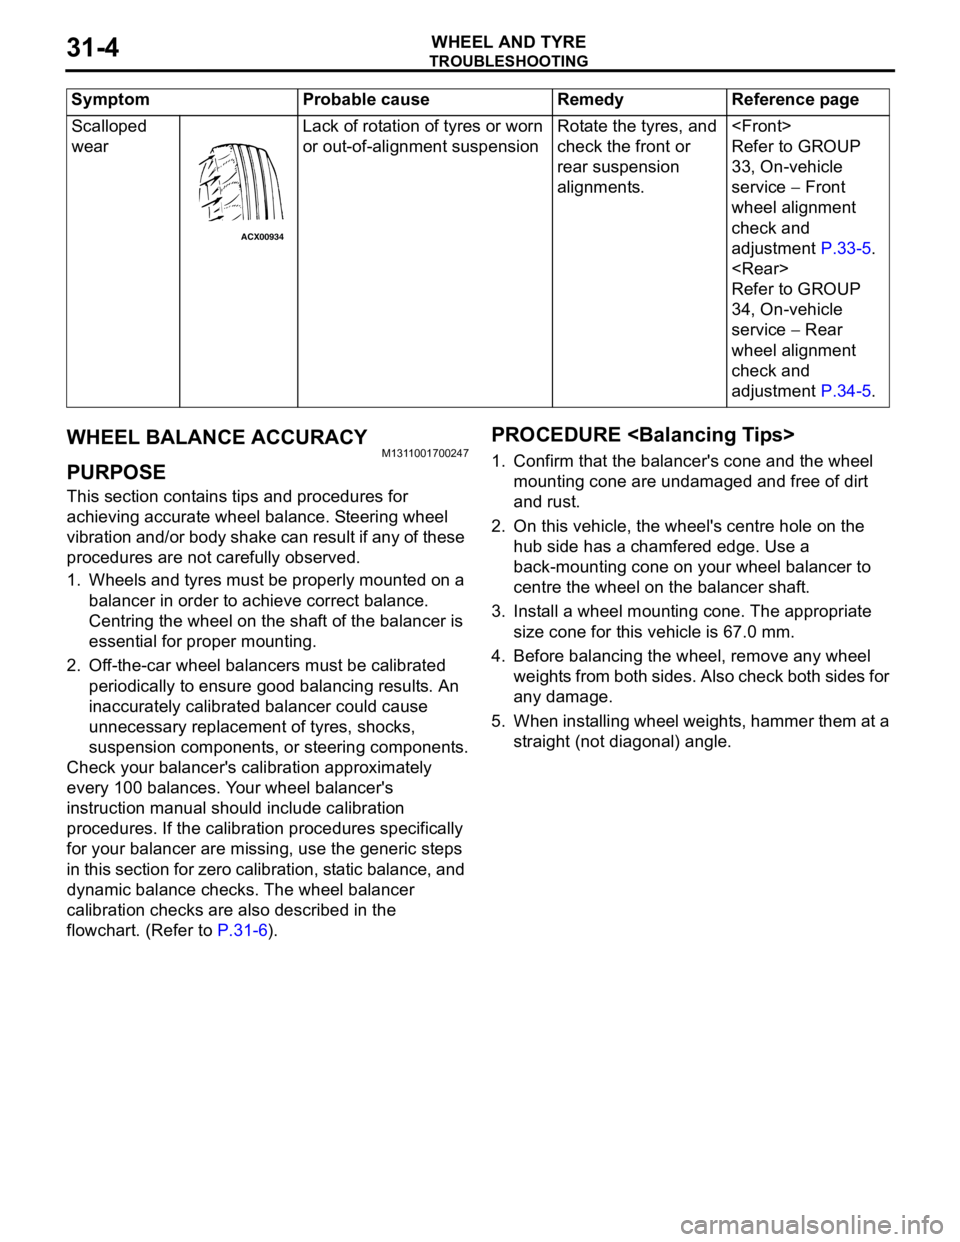
WHEEL BALANCE ACCURACYM1311001700247
PURPOSE
This section contains tips and procedures for
achieving accurate wheel balance. Steering wheel
vibration and/or body shake can result if any of these
procedures are not carefully observed.
1. Wheels and tyres must be properly mounted on a
balancer in order to achieve correct balance.
Centring the wheel on the shaft of the balancer is
essential for proper mounting.
2. Off-the-car wheel balancers must be calibrated
periodically to ensure good balancing results. An
inaccurately calibrated balancer could cause
unnecessary replacement of tyres, shocks,
suspension components, or steering components.
Check your balancer's calibration approximately
every 100 balances. Your wheel balancer's
instruction manual should include calibration
procedures. If the calibration procedures specifically
for your balancer are missing, use the generic steps
in this section for zero calibration, static balance, and
dynamic balance checks. The wheel balancer
calibration checks are also described in the
flowchart. (Refer to P.31-6).
PROCEDURE
1. Confirm that the balancer's cone and the wheel
mounting cone are undamaged and free of dirt
and rust.
2. On this vehicle, the wheel's centre hole on the
hub side has a chamfered edge. Use a
back-mounting cone on your wheel balancer to
centre the wheel on the balancer shaft.
3. Install a wheel mounting cone. The appropriate
size cone for this vehicle is 67.0 mm.
4. Before balancing the wheel, remove any wheel
weights from both sides. Also check both sides for
any damage.
5. When installing wheel weights, hammer them at a
straight (not diagonal) angle. Scalloped
wearLack of rotation of tyres or worn
or out-of-alignment suspensionRotate the tyres, and
check the front or
rear suspension
alignments.
Refer to GROUP
33, On-vehicle
service − Front
wheel alignment
check and
adjustment P.33-5.
Refer to GROUP
34, On-vehicle
service − Rear
wheel alignment
check and
adjustment P.34-5. Symptom Probable cause Remedy Reference page
ACX00934
Page 169 of 788
ON-VEHICLE SERVICE
WHEEL AND TYRE31-7
ON-VEHICLE SERVICE
TYRE INFLATION PRESSURE CHECKM1311000900312
NOTE: For information on tyre inflation pressure,
refer to the label attached to the centre pillar on the
driver's side.
TYRE WEAR CHECKM1311001000334
Measure the tread depth of the tyres.
Minimum limit: 1.6 mm
If the remaining tread depth is less than the minimum
limit, replace the tyre.
NOTE: When the tread depth of the tyres is reduced
to 1.6 mm or less, wear indicators will appear.
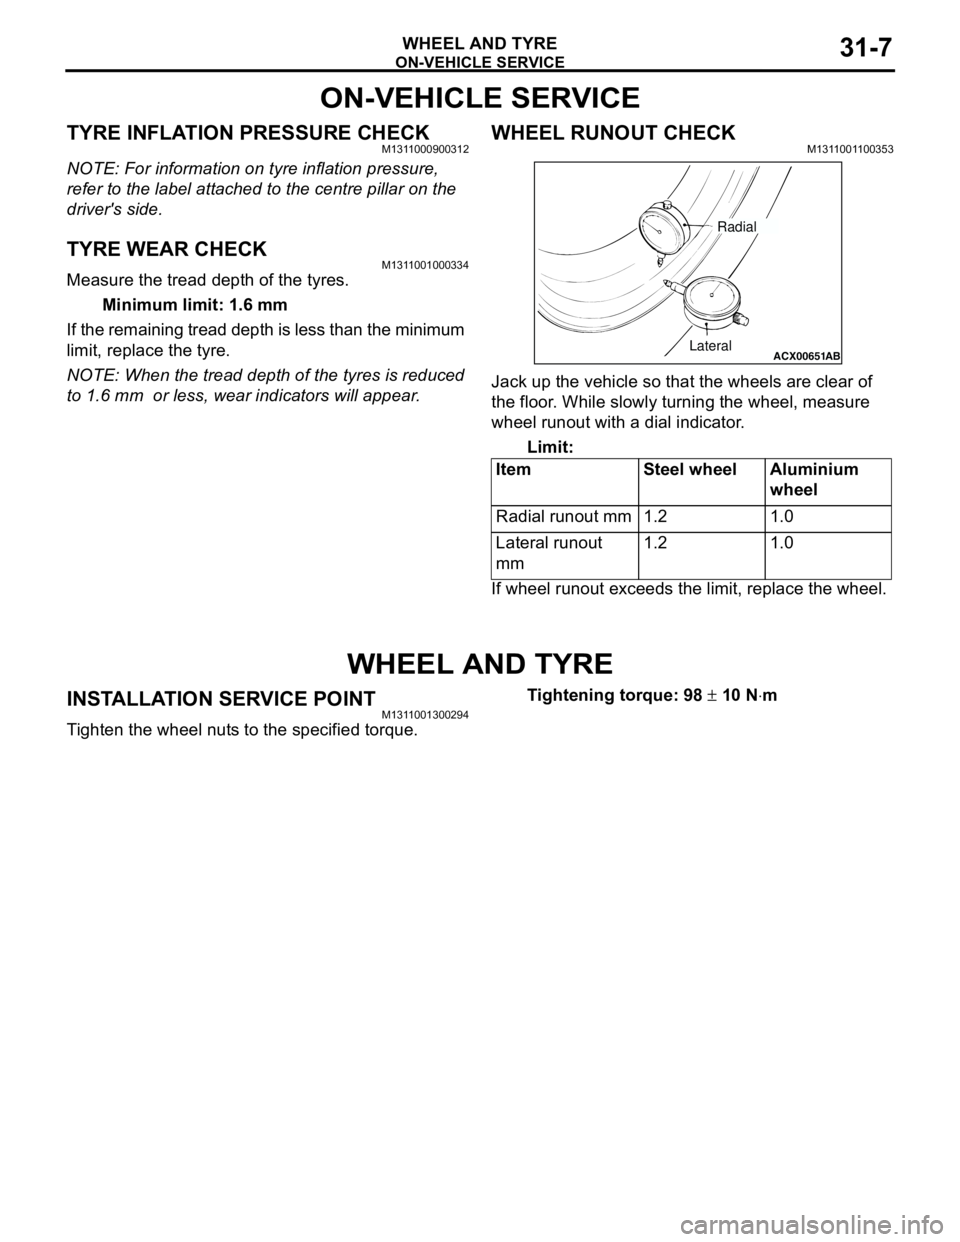
WHEEL RUNOUT CHECKM1311001100353
Jack up the vehicle so that the wheels are clear of
the floor. While slowly turning the wheel, measure
wheel runout with a dial indicator.
Limit:
If wheel runout exceeds the limit, replace the wheel.
WHEEL AND TYRE
INSTALLATION SERVICE POINTM1311001300294
Tighten the wheel nuts to the specified torque.Tightening torque: 98 ± 10 N⋅m Item Steel wheel Aluminium
wheel
Radial runout mm 1.2 1.0
Lateral runout
mm1.2 1.0
ACX00651
ABLateralRadial
Page 171 of 788
32-1
GROUP 32
POWER PLANT
MOUNT
CONTENTS
GENERAL INFORMATION . . . . . . . .32-2
SERVICE SPECIFICATION . . . . . . . .32-3
SPECIAL TOOL . . . . . . . . . . . . . . . . .32-3
ENGINE MOUNTING . . . . . . . . . . . . .32-4
REMOVAL AND INSTALLATION . . . . . . . . 32-4
TRANSMISSION MOUNTING . . . . . .32-5
REMOVAL AND INSTALLATION . . . . . . . . 32-5
ENGINE ROLL STOPPER,
CENTERMEMBER . . . . . . . . . . . . . . .32-7
REMOVAL AND INSTALLATION . . . . . . . . 32-7
CROSSMEMBER . . . . . . . . . . . . . . . .32-8
REMOVAL AND INSTALLATION . . . . . . . . 32-8