tow MITSUBISHI LANCER 2006 Owner's Manual
[x] Cancel search | Manufacturer: MITSUBISHI, Model Year: 2006, Model line: LANCER, Model: MITSUBISHI LANCER 2006Pages: 800, PDF Size: 45.03 MB
Page 356 of 800

DOOR SASH TAPE
EXTERIOR51-24
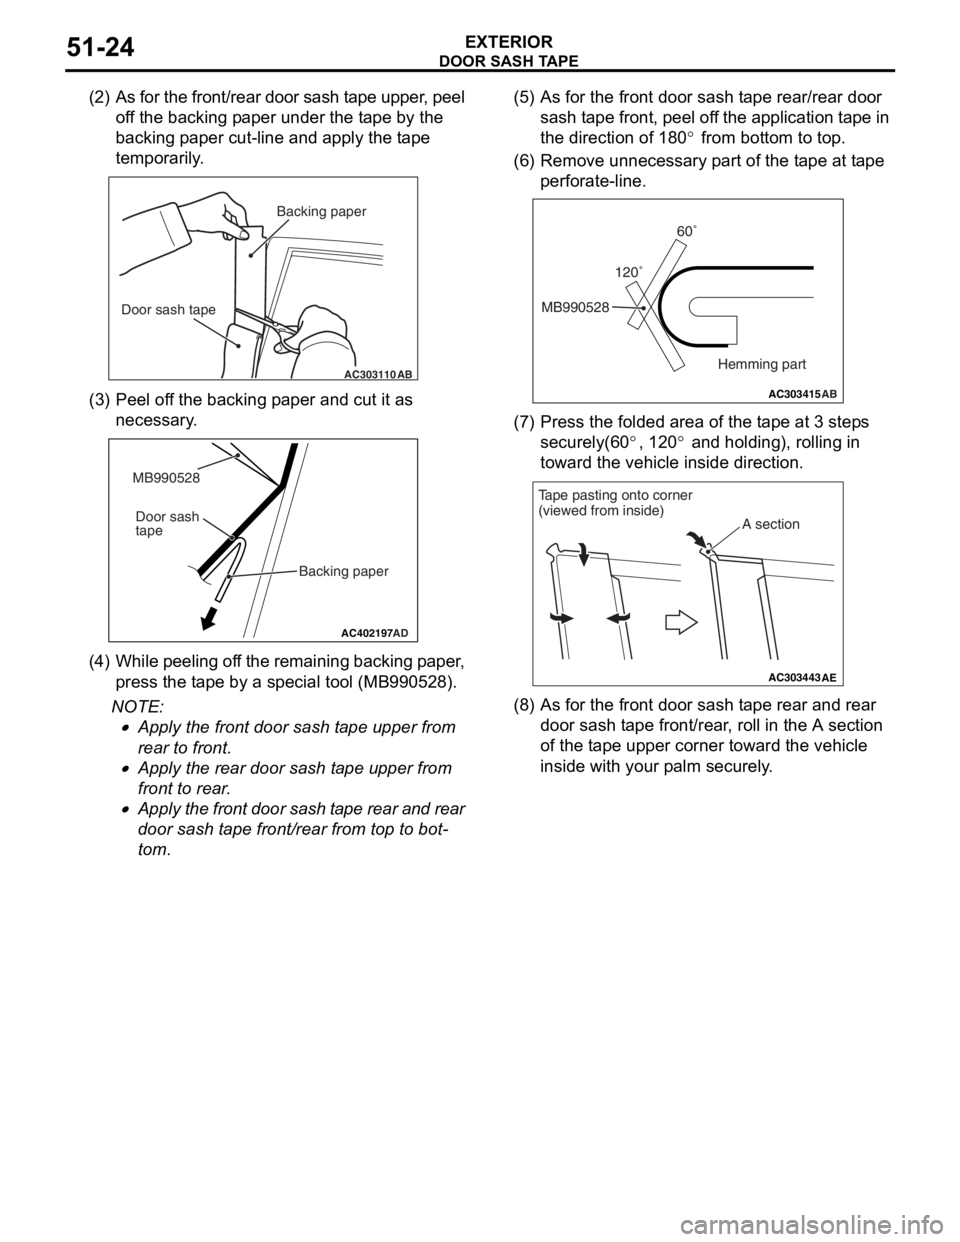
(2) As for the front/rear door sash tape upper, peel off the backing paper under the tape by the
backing paper cut-line and apply the tape
temporarily.
AC303110AB
Backing paper
Door sash tape
(3) P eel o f f th e backin g p aper a nd cu t it a s
necessary .
AC402197AD
MB990528
Backing paper
Door sash
tape
(4
) W hi le pe el in g o f f th e re mai n in g ba ck in g p a pe r ,
press the t a pe by a special to ol (MB99052 8).
NOTE: .
•Apply the fro n t doo r sash t ape u pper fro m
rear to f
r ont.
•Apply the rea r door sash t ape up per from
front to
rear .
•Apply the front door sash t ape rear and rear
door sash
t a p e front /rear from top to bot
-
tom.
(5) A s fo r the fro n t door sash t ape rea r /rear do or
sash t a pe front, pee l of f the ap plication t a pe in
the d i rection of 180
° from bottom to top.
(6) R emove un nece ssa ry p a rt o f the t ape at t ape
perfo rate-line.
AC303415 AB
MB990528 120˚60˚
Hemming part
(7) P ress the f o lded area o f the t ape at 3 step s
securely(60
°, 12 0° and holding ), rolling in
toward t
he ve
hicle inside direction.
AC303443 AE
A section
Tape pasting onto corner
(viewed from inside)
(8) A s fo r the fro n t door sash t ape rea r and re ar
door sash t ape fro n t/rear , roll in th e A section
of th e t a pe upp er co rner toward the vehicle
inside with your p a lm se curely .
Page 364 of 800

Wiper blade assembly removal steps
>>B<<1.Wiper blade assembly
>>A<<2.Wiper blade
Windshield wiper motor and link
assembly removal steps
3.Cover
4.Wiper arm
5.Hood weather strip
6.Front deck garnish (passenger's side)
7.Front deck garnish (driver's side)
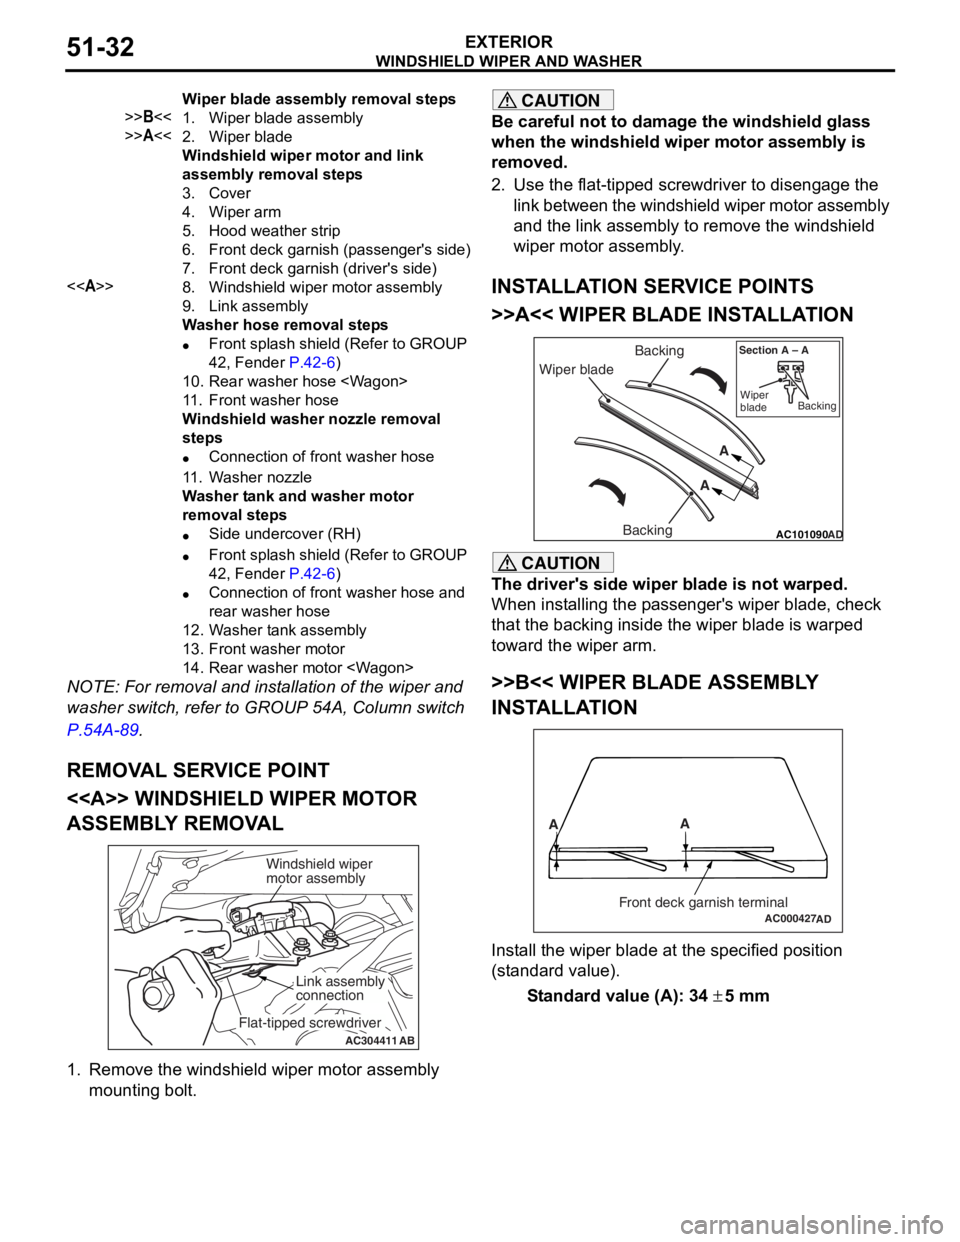
<>8.Windshield wiper motor assembly
9.Link assembly
Washer hose removal steps
•Front splash shield (Refer to GROUP
42, Fender
P.42-6)
10.Rear washer hose
11 .Front washer hose
Windshield washer nozzle removal
steps
•Connection of front washer hose
11 .Washer nozzle
Washer tank and washer motor
removal steps
•Side undercover (RH)
•Front splash shield (Refer to GROUP
42, Fender
P.42-6)
•Connection of front washer hose and
rear washer hose
12.Washer tank assembly
13.Front washer motor
14.Rear washer motor
WINDSHIELD W I PER AND W A SHER
EXTERIOR51-32
NOTE: For re moval a nd in st allation of the wiper an d
washer switch, refer to GROUP 54A, Colu mn switch
P.5 4 A - 89.
REMOV A L SER V ICE POINT
<> WI NDSHIELD W I PER MOT O R
ASSEMBL
Y REMOV A L
AC304411AB
Windshield wiper
motor assembly
Link assembly
connection
Flat-tipped screwdriver
1.
Remove the win d shield wiper motor asse mbly
mounting bo lt.
CAUTION
Be careful not to damage the windshield glass
when the windshield wiper motor assembly is
removed.
2. Use the flat-tipped screwdriver to disengage the link between the windshield wiper motor assembly
and the link assembly to remove the windshield
wiper motor assembly.
INSTALLATION SERVICE POINTS
>>A<< WIPER BLADE INSTALLATION
AC101090 AD
Wiper blade Backing
Backing A
A
Section A – A
Wiper
blade Backing
CAUTION
The driver's side wiper blade is not warped.
When installing the passenger's wiper blade, check
that the backing inside the wiper blade is warped
toward the wiper arm.
>>B<< WIPER BLADE ASSEMBLY
INSTALLATION
AC000427
A
A
Front deck garnish terminalAD
Install the wiper blade at the specified position
(standard value).
Standard value (A): 34 ± 5 mm