service MITSUBISHI LANCER EVOLUTION 2007 Service Repair Manual
[x] Cancel search | Manufacturer: MITSUBISHI, Model Year: 2007, Model line: LANCER EVOLUTION, Model: MITSUBISHI LANCER EVOLUTION 2007Pages: 1449, PDF Size: 56.82 MB
Page 1 of 1449

00
11
12
13
14
15
16
17
21
22
25
26
27
31
32
33
34
35
36
37
42
51
52
54
55
General........................
Engine .........................
Engine Lubrication .............
Fuel ...........................
Engine Cooling .................
Intake and Exhaust ............
Engine Electrical ...............
Engine and Emission Control ....
Clutch .........................
Manual Transmission ...........
Propeller Shaft .................
Front Axle ......................
Rear Axle ......................
Wheel and Tyre .................
Power Plant Mount ..............
Front Suspension ...............
Rear Suspension ...............
Service Brakes .................
Parking Brakes .................
Steering ........................
Body ...........................
Exterior ........................
Chassis Electrical ..............
Electrical Wiring ................
Body Repair ....................
WORKSHOP
MANUAL
FOREWORD
This Workshop Manual contains procedures for
service mechanics, including removal, disassembly,
inspection, adjustment, reassembly and
installation. Use the following manuals in
combination with this manual as required.
TECHNICAL INFORMATION MANUAL N0104CT9A
All information, illustrations and product
descriptions contained in this manual are current
as at the time of publication. We, however, reserve
the right to make changes at any time without prior
notice or obligation.
The EVOLUTION-VII is sold exclusively through
RALLIART Inc. Since the EVOLUTION-VII is a
rally-based model, it will not be warranted and will
not be homologated for general production.
Therefore, any service matters on the
EVOLUTION-VII should be inquired to RALLIART
Inc. as usual.
EMitsubishi Motors Corporation May 2001
Interior and Supplemental
Restraint System (SRS) ........
Heater, Air Conditioner and
Ventilation .....................
Page 2 of 1449

WARNING REGARDING SERVICING OF SUPPLEMENTAL
RESTRAINT SYSTEM (SRS) EQUIPPED VEHICLE
WARNING!
(1) Improper service or maintenance of any component of the SRS, or any SRS-related component,
can lead to personal injury or death to service personnel (from inadvertent firing of the air
bag) or to the driver and passenger (from rendering the SRS inoperative).
(2) The SRS components should not be subjected to temperature of 93_C or more. So, remove
the SRS-ECU, driver’s and front passenger’s air bag modules and clock spring before drying
or baking the vehicle after painting.
(3) Service or maintenance of any SRS component or SRS-related component must be performed
only at an authorized MITSUBISHI dealer.
(4) MITSUBISHI dealer personnel must thoroughly review this manual, and especially its GROUP
52B - Supplemental Restraint System (SRS), before beginning any service or maintenance
of any SRS component or any SRS-related component.
NOTE
Section titles with asterisks (*) in the table of contents in each group indicate operations requiring warnings.
Page 3 of 1449

A-1
BODY
CONSTRUCTION
CONTENTS
BODY COMPONENTS 2...................
BODY MAIN CROSS-SECTIONAL VIEWS 4.
MAINTENANCE, SERVICEABILITY 6........
BODY CONSTRUCTION
CHARACTERISTICS 8.....................
FRONT BODY 8...........................
SIDE BODY 13.............................
REAR BODY 15............................
ROOF 16...................................UNDER BODY 17...........................
DOOR 20..................................
SILENCER APPLICATION LOCATIONS 21..
LOCATIONS USING URETHANE FOAM
AND FOAM
MATERIAL 22.............................
STIFFENER AND DUMP SHEET
APPLICATION
LOCATIONS 24............................
Page 8 of 1449

BODY CONSTRUCTION -Maintenance, ServiceabilityA-6
MAINTENANCE, SERVICEABILITY
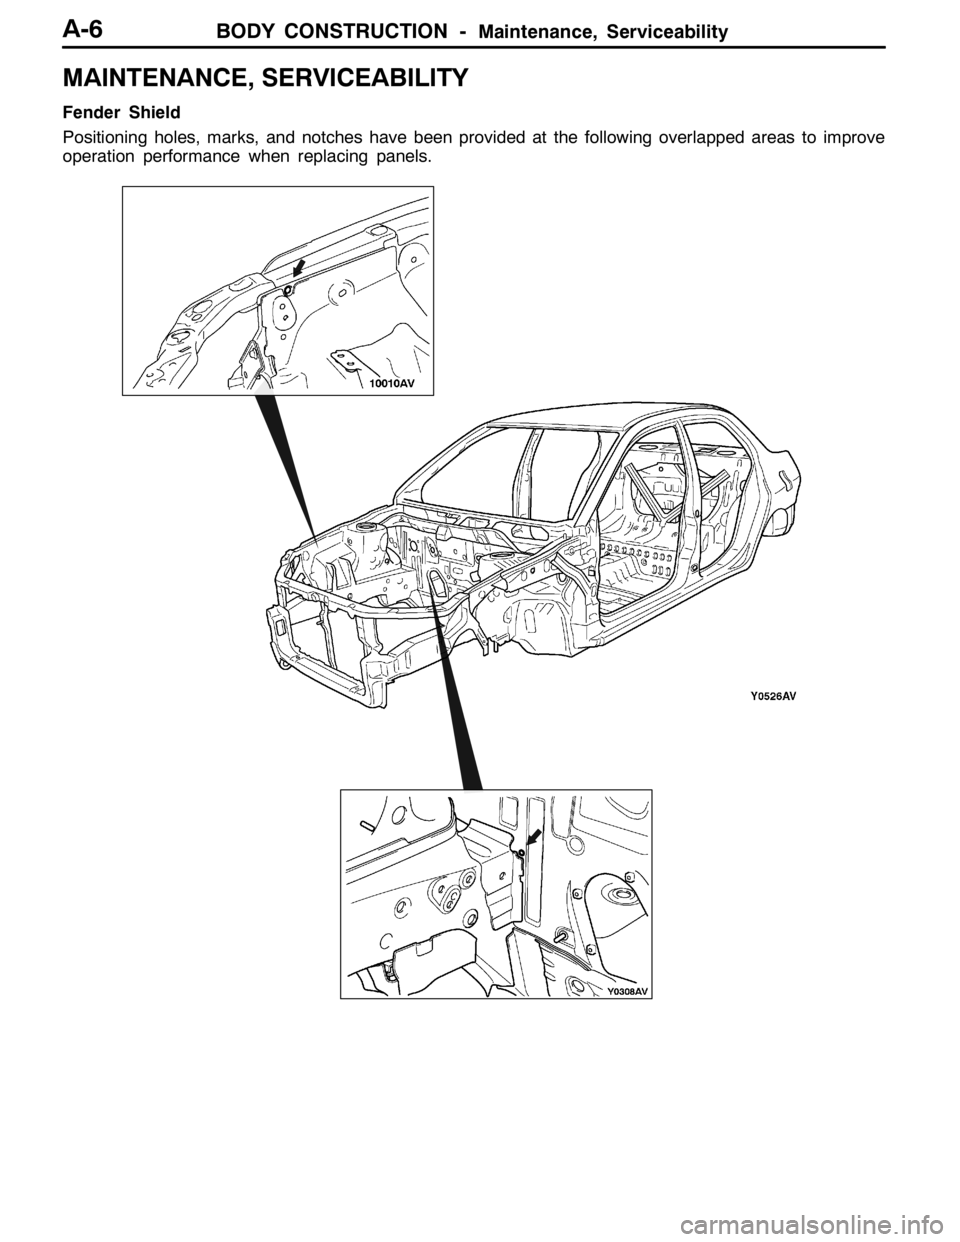
Fender Shield
Positioning holes, marks, and notches have been provided at the following overlapped areas to improve
operation performance when replacing panels.
Page 9 of 1449

BODY CONSTRUCTION -Maintenance, ServiceabilityA-7
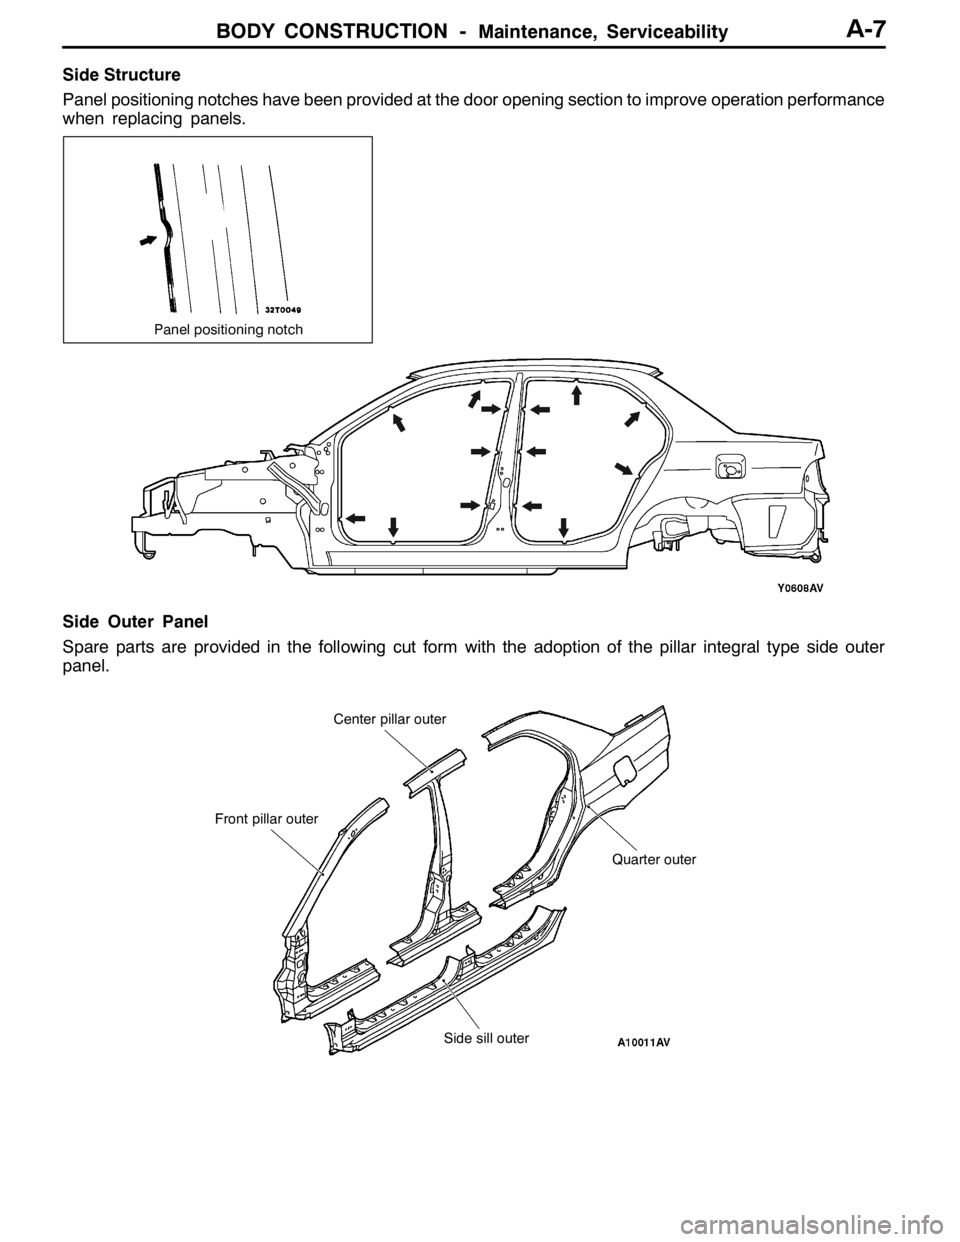
Side Structure
Panel positioning notches have been provided at the door opening section to improve operation performance
when replacing panels.
Panel positioning notch
Side Outer Panel
Spare parts are provided in the following cut form with the adoption of the pillar integral type side outer
panel.
Front pillar outerCenter pillar outer
Quarter outer
Side sill outer
Page 52 of 1449

WELDED PANEL REPLACEMENT -Front PillarC-8
NOTE ON REPAIR WORK
REMOVAL
As the front pillar reinforcement lower and side sill outer
reinforcement front are welded at the side sill, cut the side
outer panel at the position shown in the illustration where
the weld points of the reinforcement can be seen, remove,
and then remove the weld points of the front pillar
reinforcement lower.
INSTALLATION
1. To ensure the strength of the cut area of the front pillar,
cut the front pillar inner 100 mm above the cut area,
and the side outer panel 50 mm above the cut area as
shown in the illustration.
Cut the new center pillar at the same positions.
2. Attach the front pillar inner upper assembly of the new
front pillar to the body.
3.When installing a new front pillar outer, install a front
pillar silencer protector filling up the gap with butyl
tape
structural adhesive on the area shown in the illustration.
: Body sealant
: Adhesive
AdhesiveTypeBRAND
Epoxyayresin
adhesive3M DP-460, 3M DP-420 or
equivalent
4.After attaching the front pillar outer, seal the holes
and flanges with bolts and plate tape, fill the foam
material through the holes as shown in the illustration.
Foam materialTypeBrand Used
Foam acoustic
materialTwo - part ex-
panded urethane3M ULTRAPRO
Panel foam - Yellow
5. About two hours after filling the foam material, remove the
bolts and plate tape, and solder the sealed holes until a
clip, etc. can be inserted completely.
Weld points
Side sill outer reinforcement
front Front pillar
reinforce-
ment lower
50 mm
100 mm
Side outer panel
Front pillar
inner upper
Front pillar
silencer protector
Page 55 of 1449

WELDED PANEL REPLACEMENT -Center PillarC-11
5. When attaching the center pillar inner, attach the center
pillar silencer protector to the center pillar inner, and seal
the holes of the center pillar silencer protector with butyl
tape.
6. After attaching the center pillar outer, seal the holes and
flanges with bolts and plate tape,fill the foam material
through the holes as shown in the illustration.
Foam materialTypeBrand Used
Foam acoustic
materialTwo - part ex-
panded urethane3M ULTRAPRO
Panel foam - Yellow
7. About two hours after filling the foam material, remove
the bolts and plate tape, and solder the sealed holes
until a clip, etc. can be inserted completely.
Center pillar
silencer
protector
Page 60 of 1449

WELDED PANEL REPLACEMENT -Quarter, OuterC-16
2. After attaching the quarter outer, seal the holes and
flanges with bolts and plate tape, and fill foam material from
hole shown in the illustration.
Foam materialTypeBrand Used
Foam acoustic
materialTwo-part expanded
wretane3M ULTRAPRO
Panel foam - Yellow
3. After two hours after filling the foam material, remove
the bolts and plate tape, and solder the sealed holes
until a clip, etc. can be inserted completely.
Reference
Parts replacement is advised. depending on the damaged
range.
: Cuttable range
Caution
Avoid the fuel filler bracket (left side).
Page 379 of 1449

00-1
GENERAL
CONTENTS
HOW TO USE THIS MANUAL 2..............
Scope of Maintenance, Repair and Servicing
Explanations 2.................................
Indication of Destination 2......................
Definition of Terms 2...........................
Indication of Tightening Torque 2................
Model Indications 3............................
Explanation of Manual Contents 4...............
HOW TO USE
TROUBLESHOOTING/INSPECTION SERVICE
POINTS 6....................................
Troubleshooting Contents 6.....................
Diagnosis Function 7...........................
How to Use the Inspection Procedures 10........
Connector Measurement Service Points 11.......
Connector Inspection 12........................
Inspection Service Points for a Blown Fuse 13...
Points to Note for Intermittent Malfunctions 13....
VEHICLE IDENTIFICATION 14.................
Vehicle Information Code Plate 14...............Models 14.....................................
Model Code 15................................
Chassis Number 16............................
Engine Model Number 16.......................
MAJOR SPECIFICATIONS 17.................
PRECAUTIONS BEFORE SERVICE 18.........
SUPPLEMENTAL RESTRAINT SYSTEM
(SRS) 21...................................
SRS SERVICE PRECAUTIONS 22.............
SUPPORT LOCATIONS FOR LIFTING AND
JACKING 24.................................
Support Positions for a Garage Jack and Axle
Stands 24.....................................
Support Positions for a Single-Post Lift or
Double-Post Lift 25.............................
Support Positions and Support Method for an
H-Bar Lift 26..................................
STANDARD PART/TIGHTENING-TORQUE
TABLE 28....................................
Page 380 of 1449

GENERAL -How to Use This Manual00-2
HOW TO USE THIS MANUAL
SCOPE OF MAINTENANCE, REPAIR
AND SERVICING EXPLANATIONS
This manual provides explanations, etc. concerning
procedures for the inspection, maintenance, repair
and servicing of the subject model. Note, however,
that for engine and transmission-related component
parts, this manual covers only on-vehicle
inspections, adjustments, and the removal and
installation procedures for major components.
For detailed information concerning the inspection,
checking, adjustment, disassembly and reassembly
of the engine, transmission and major components
after they have been removed from the vehicle,
please refer to separate manuals covering the
engine and the transmission.
ON-VEHICLE SERVICE
“On-vehicle Service” is procedures for performing
inspections and adjustments of particularly
important locations with regard to the construction
and for maintenance and servicing, but other
inspection (for looseness, play, cracking, damage,
etc.) must also be performed.
INSPECTION
Under this title are presented inspection and
checking procedures to be performed by using
special tools and measuring instruments and by
feeling, but, for actual maintenance and servicing
procedures, visual inspections should always be
performed as well.
INDICATION OF DESTINATION
General Export and GCC are used for convenience
to indicate destination.
NOTE
(1) “General Export” means territories other than
Europe, GCC, Australia, New Zealand, the
U.S.A. and Canada.
(2) “GCC” indicates countries that are members
of the (Persian) Gulf Cooperation Council of
nations.
(3) In some instances, vehicles with other
specifications may be shipped to some
countries.
DEFINITION OF TERMS
STANDARD VALUE
Indicates the value used as the standard for judging
the quality of a part or assembly on inspection
or the value to which the part or assembly is
corrected and adjusted. It is given by tolerance.
LIMIT
Shows the standard for judging the quality of a
part or assembly on inspection and means the
maximum or minimum value within which the part
or assembly must be kept functionally or in strength.
It is a value established outside the range of
standard value.
REFERENCE VALUE
Indicates the adjustment value prior to starting the
work (presented in order to facilitate assembly and
adjustment procedures, and so they can be
completed in a shorter time).
CAUTION
Indicates the presentation of information particularly
vital to the worker during the performance of
maintenance and servicing procedures in order to
avoid the possibility of injury to the worker, or
damage to component parts, or a reduction of
component or vehicle function or performance, etc.
INDICATION OF TIGHTENING TORQUE
Tightening torques (units: N·m) are set to take into
account the central value and the allowable
tolerance. The central value is the target value,
and the allowable tolerance provides the checking
range for tightening torques. If bolts and nuts are
not provided with tightening torques, refer to
P.00-28.