length MITSUBISHI LANCER EVOLUTION 2007 Service Repair Manual
[x] Cancel search | Manufacturer: MITSUBISHI, Model Year: 2007, Model line: LANCER EVOLUTION, Model: MITSUBISHI LANCER EVOLUTION 2007Pages: 1449, PDF Size: 56.82 MB
Page 28 of 1449

BODY DIMENSIONS -Body Dimensions and Measurement MethodsB-2
BODY DIMENSIONS AND
MEASUREMENT METHODS
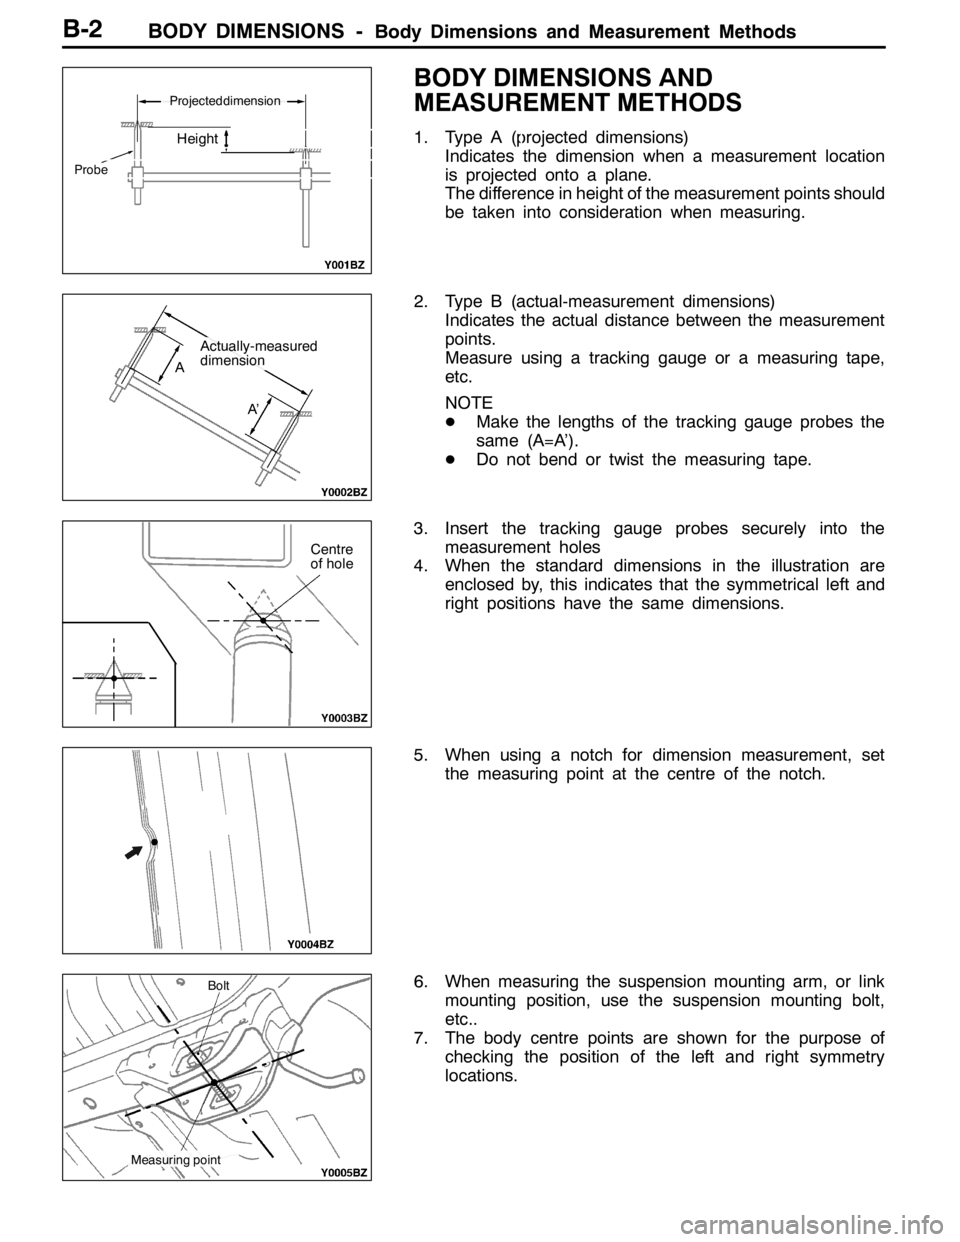
1. Type A (projected dimensions)
Indicates the dimension when a measurement location
is projected onto a plane.
The difference in height of the measurement points should
be taken into consideration when measuring.
2. Type B (actual-measurement dimensions)
Indicates the actual distance between the measurement
points.
Measure using a tracking gauge or a measuring tape,
etc.
NOTE
DMake the lengths of the tracking gauge probes the
same (A=A’).
DDo not bend or twist the measuring tape.
3. Insert the tracking gauge probes securely into the
measurement holes
4. When the standard dimensions in the illustration are
enclosed by, this indicates that the symmetrical left and
right positions have the same dimensions.
5. When using a notch for dimension measurement, set
the measuring point at the centre of the notch.
6. When measuring the suspension mounting arm, or link
mounting position, use the suspension mounting bolt,
etc..
7. The body centre points are shown for the purpose of
checking the position of the left and right symmetry
locations.Height
Probe
Projecteddimension
A’
Actually-measured
dimension
A
Centre
of hole
Bolt
Measuring point
Page 395 of 1449

GENERAL -Major Specifications00-17
MAJOR SPECIFICATIONS
1
234
5
6 78
9
ItemsCT9A
SNDFZL/RSNGFZL/R
Vehicle
di i
Front track11,500, 1,515*1
dimensions
mmOverall width21,770mm
Front overhang3895
Wheel base42,625
Rear overhang5935
Overall length64,455
Ground clearance
(unladen)7140
Overall height (unladen)81,450
Rear track91,500, 1,515*1
Vehicle
ihtk
Kerb weight1,3201,380
weight kgMax. gross vehicle weight1,6551,695
Max. axle weight
rating-front950970
Max. axle weight
rating-rear705725
Seating capacity5
EngineModel No.4G63g
Total displacement mL1,997
Transmis-
i
Model No.W5M51
sionType5-speed manual
Fuel systemFuel supply systemMPI
NOTE
*1: Vehicles with 17 inch wheels.
Page 410 of 1449

ENGINE -Service Specifications/Sealants11A-4
SERVICE SPECIFICATIONS
ItemsStandard valueLimit
Drive belt tensionVibration frequency Hz (Reference)110 - 144-
Tension N (Reference)245 - 412-
Basic ignition timing5_BTDC±3_-
Ignition timingApproximetely
5_BTDC-
Idle speed r/min850±100-
CO contents %0.1 or less-
HC contents ppm100 or less-
Compression pressure (250 - 400 r/min) kPa1,128951
Compression pressure difference of all cylinder kPa-Max. 98
Intake manifold vacuum kPa-Min. 60
Cylinder head bolt shank length mm-99.4
Timing belt B tension
(Whenchecked)
Vibration frequency Hz52 - 92-
(When checked)Deflection mm (Reference)5-10-
Timing belt B tension
(Whenadjusted)
Vibration frequency Hz76 - 92-
(When adjusted)Deflection mm (Reference)5-7-
Timing belt B tension
(Whenreplaced)
Vibration frequency Hz76 - 92-
(When replaced)Deflection mm (Reference)5-7-
Auto-tensioner rod protrusion amount mm3.8 - 4.5-
Auto-tensioner rod sink in amount mmWithin 1-
SEALANTS
ItemsSpecified SealantsRemarks
Rocker coverMITSUBISHI GENUINE PART MD970389 or
equivalent
Semi-drying
sealant
Rocker cover gasket
equivalentsealant
Cylinder head
Camshaft position sensor support
Oil pan
Camshaft end seal3M ATD Part No. 8660 or equivalent
Page 437 of 1449

ENGINE -Cylinder Head Gasket11A-31
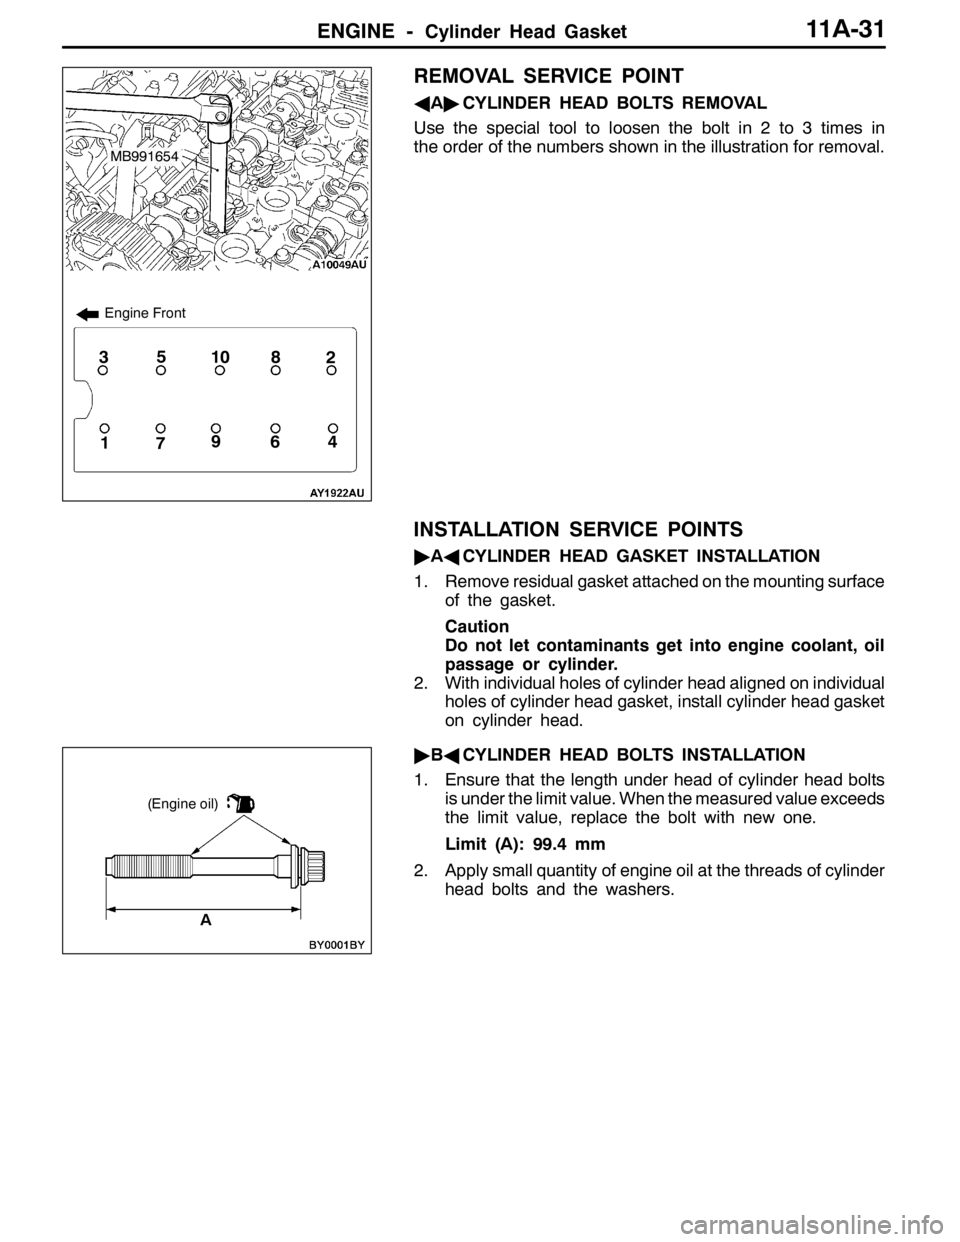
REMOVAL SERVICE POINT
AA"CYLINDER HEAD BOLTS REMOVAL
Use the special tool to loosen the bolt in 2 to 3 times in
the order of the numbers shown in the illustration for removal.
INSTALLATION SERVICE POINTS
"AACYLINDER HEAD GASKET INSTALLATION
1. Remove residual gasket attached on the mounting surface
of the gasket.
Caution
Do not let contaminants get into engine coolant, oil
passage or cylinder.
2. With individual holes of cylinder head aligned on individual
holes of cylinder head gasket, install cylinder head gasket
on cylinder head.
"BACYLINDER HEAD BOLTS INSTALLATION
1. Ensure that the length under head of cylinder head bolts
is under the limit value. When the measured value exceeds
the limit value, replace the bolt with new one.
Limit (A): 99.4 mm
2. Apply small quantity of engine oil at the threads of cylinder
head bolts and the washers.
1
5
4
2
7
38
69
10
Engine Front
MB991654
A
(Engine oil)
Page 448 of 1449

ENGINE -Timing belt and timing belt B11A-42
INSPECTION
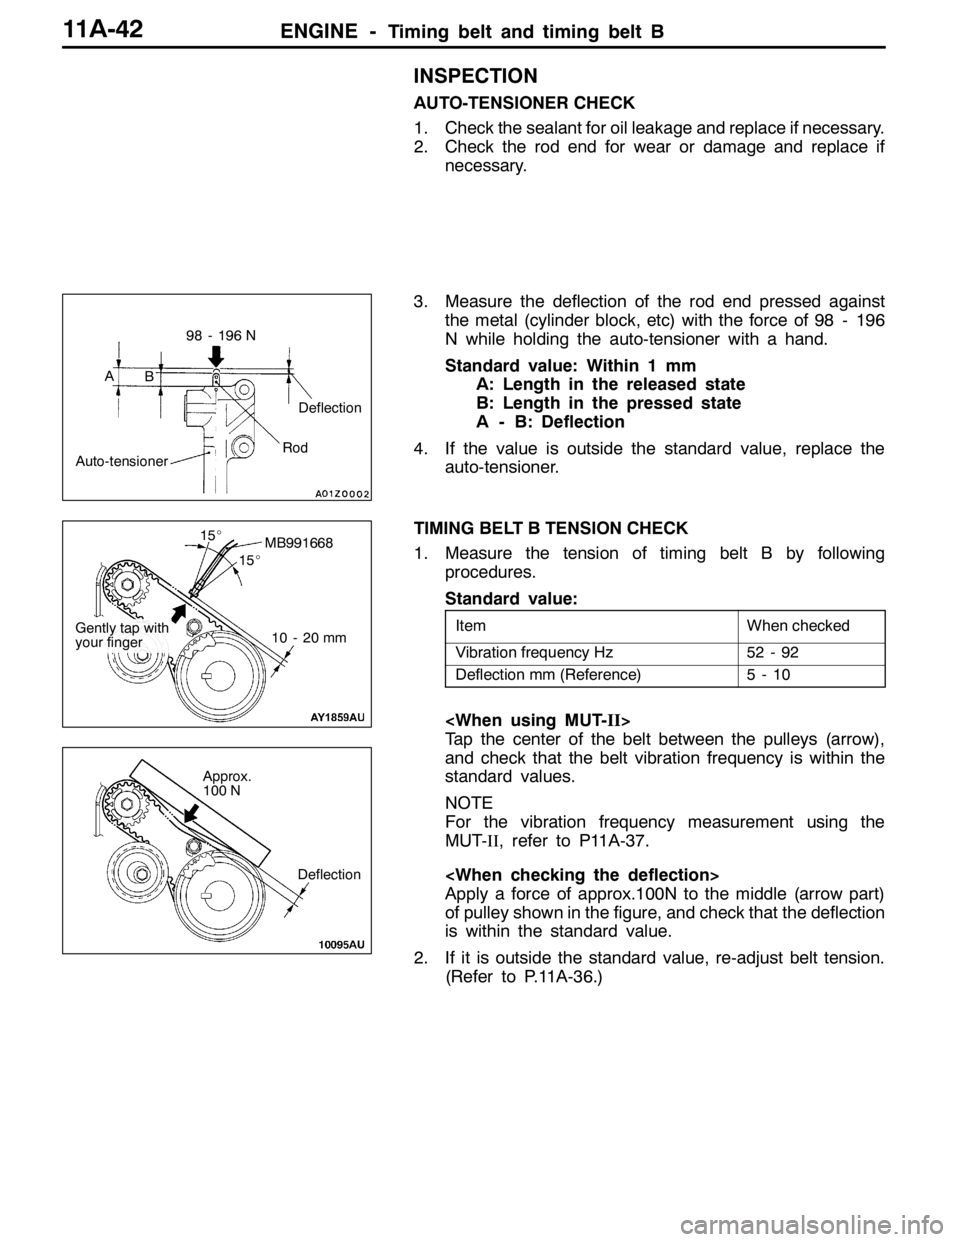
AUTO-TENSIONER CHECK
1. Check the sealant for oil leakage and replace if necessary.
2. Check the rod end for wear or damage and replace if
necessary.
3. Measure the deflection of the rod end pressed against
the metal (cylinder block, etc) with the force of 98 - 196
N while holding the auto-tensioner with a hand.
Standard value: Within 1 mm
A: Length in the released state
B: Length in the pressed state
A - B: Deflection
4. If the value is outside the standard value, replace the
auto-tensioner.
TIMING BELT B TENSION CHECK
1. Measure the tension of timing belt B by following
procedures.
Standard value:
ItemWhen checked
Vibration frequency Hz52 - 92
Deflection mm (Reference)5-10
Tap the center of the belt between the pulleys (arrow),
and check that the belt vibration frequency is within the
standard values.
NOTE
For the vibration frequency measurement using the
MUT-II, refer to P11A-37.
Apply a force of approx.100N to the middle (arrow part)
of pulley shown in the figure, and check that the deflection
is within the standard value.
2. If it is outside the standard value, re-adjust belt tension.
(Refer to P.11A-36.)
AB
Auto-tensioner
98 - 196 N
Deflection
Rod
MB991668
10 - 20 mm
15_
15_
Gently tap with
your finger
Deflection
Approx.
100 N
Page 457 of 1449

ENGINE OVERHAUL -Specifications11B-3
SPECIFICATIONS
SERVICE SPECIFICATIONS
Unit: mm
Items
Standard valueLimited value
Timing belt
Timing belt B
Vibration frequency Hz (during inspection)
Vibration frequency Hz (when re-tensing working belt)
Vibration frequency Hz (when mounting new belt)
Deflection amount
Deflection amount
Deflection amount
Auto-tensioner
Rod protrusion length (free length)
Rod protrusion length (when mounting timing belt)
Rod recess amount (when pressed at 98 to 196 N•m)
56 - 92
76 - 92
76 - 92
5-10
5-7
5-7
12.0
3.8 - 4.5
Within 1
-
-
-
Rocker arm, camshaft
Camshaft
Cam height
Intake
Exhaust
35.79
35.4935.29
34.99
Cylinder head, valve
Cylinder head
Lower surface strain
Lower surface grinding limit (in combination with combined cylinder block)
Total height
Valve
Margin
Intake
Exhaust
Total length
Intake
Exhaust
Valve spring
Free height
Squareness
Valve guide
Clearance between valve guide and valve stem
Intake
Exhaust
Total length
Intake
Exhaust
Protrusion amount
Valve seat
Contact width
Valve protrusion amount from spring seat surface
Intake
Exhaust
0.05
-
131.9 - 132.1
1.0
1.5
109.50
109.70
48.3
1.5_or less
0.02 - 0.05
0.05 - 0.09
45.5
50.5
19.2 - 19.8
0.9 - 1.3
49.20
48.400.2
0.2
-
0.5
1.0
109.00
109.20
47.3
4_
0.10
0.15
-
-
-
-
49.70
48.90
Page 458 of 1449

ENGINE OVERHAUL -Specifications11B-4
Unit: mm
Items
Standard valueLimited value
Oil pump, oil pan
Oil pump
Side clearance
Drive gear
Driven gear
0.08 - 0.14
0.06 - 0.12-
-
Piston, connecting rod
Piston
Press-in load N
Piston ring
Clearance between ring and ring groove
No. 1 ring
No. 2 ring
Closed gap
No. 1 ring
No. 2 ring
Oil
Connecting rod
Large end thrust clearance
Crankshaft
Pin section oil clearance
7,355 - 17,162
0.03 - 0.07
0.02 - 0.06
0.20 - 0.30
0.35 - 0.50
0.10 - 0.40
0.10 - 0.25
0.03 - 0.05-
0.1
0.1
0.8
0.8
1.0
0.4
0.1
Crankshaft, cylinder block
Crankshaft
End play
Journal section oil clearance
Cylinder block
Upper surface strain
Upper surface grinding limit (in combination with combined cylinder head)
Cylinder bore
Cylindricity
Clearance between piston and cylinder
0.05 - 0.25
0.03 - 0.04
0.05
-
85.0
0.01 or less
0.02 - 0.040.4
0.1
0.1
0.2
-
-
-
Turbocharger
Waste gate actuator operation pressure100 kPa-
Alternator
Alternator
Rotor coil resistanceΩ
Brush protrusion length
3-5
--
2
Starter motor
Starter motor
Deviation on commutator periphery
Commutator outer diameter
Undercut depth
0.05
29.4
0.50.1
28.8
0.2
Page 478 of 1449

ENGINE OVERHAUL -Timing Belt11B-24
INSPECTION
1. TIMING BELT
Inspect each section of the belt in detail, and if any of
the following type of damage is found, replace the belt
with a new part.
(1) Hardening of backface rubber.
The backface is glossy, marks are not made even
when a fingernail is run cross it, and there is no
elasticity.
(2) Cracking of backface rubber.
(3) Cracking of canvas.
(4) Cracking at root.
(5) Cracking on side of belt.
(6) Abnormal wear on side of belt.
NOTE
The state is normal if the cutting surface is neat as
if cut with a sharp knife.
(7) Abnormal wear of teeth.
First stages: Canvas is worn (canvas fibres are raised,
rubber is removed and whitish, and canvas seams
are unclear).
Latter stages: Canvas is worn off, and rubber is
exposed (face width is narrow).
(8) Teeth are missing.
2. AUTO TENSIONER
(1) Check for oil leaks. If any leaks are found, replace.
(2) Check whether the rod end is worn or damaged,
and replace if necessary.
(3) Measure the rod protrusion length. If not at the
standard value, replace the auto tensioner.
Standard value: 12 mm
Crack
Crack
Peeling of canvas
Cracking
on side
Cracking at root
Edges are rounded
Abnormal wear
(The core wires are frayed.)
Rubber exposed due to
worn canvas
Teeth are missing
12 mm
Page 491 of 1449

ENGINE OVERHAUL -Rocker Arm and Camshaft11B-37
INSPECTION
1. CAMSHAFT
Measure the cam height (length). Replace if it exceeds
the limit value.
Standard value:
Intake 35.79 mm
Exhaust 35.49 mm
Limit value:
Intake 35.29 mm
Exhaust 34.99 mm
2. LASH ADJUSTER
Caution
(1) The lash adjuster is a sophisticated part, so make
sure that foreign matter, such as dirt, does not
enter it.
(2) Do not disassemble the lash adjuster.
(3) When cleaning the lash adjuster, use clean diesel
oil.
(1) Prepare three vats and approx. five litres of diesel
oil.
Fill the vats with diesel oil so that the lash adjuster
will be submerged when placed standing in the vat.
(2) Submerge the lash adjuster in vat A, and clean the
outside.
NOTE
Use a nylon brush if the lash adjuster is heavily
contaminated.
For
preliminary
cleaningFor
cleaningFor
filling
diesel oil
ABC
Diesel oil
Page 496 of 1449

ENGINE OVERHAUL -Cylinder Head and Valve11B-42
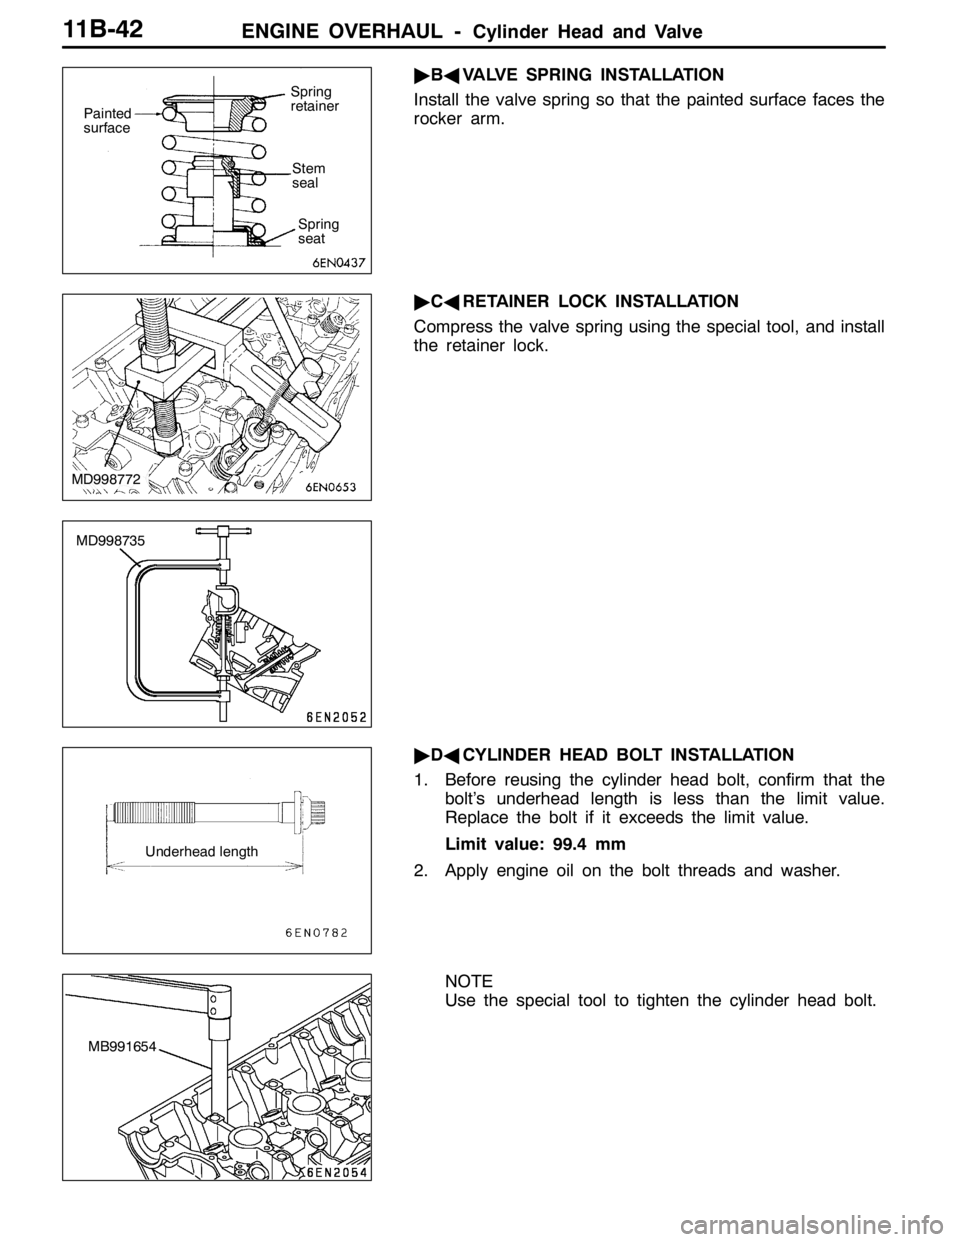
"BAVALVE SPRING INSTALLATION
Install the valve spring so that the painted surface faces the
rocker arm.
"CARETAINER LOCK INSTALLATION
Compress the valve spring using the special tool, and install
the retainer lock.
"DACYLINDER HEAD BOLT INSTALLATION
1. Before reusing the cylinder head bolt, confirm that the
bolt’s underhead length is less than the limit value.
Replace the bolt if it exceeds the limit value.
Limit value: 99.4 mm
2. Apply engine oil on the bolt threads and washer.
NOTE
Use the special tool to tighten the cylinder head bolt.
Painted
surfaceSpring
retainer
Stem
seal
Spring
seat
MD998772
MD998735
Underhead length
MB991654