ESP MITSUBISHI MIRAGE 2017 6.G Owner's Manual
[x] Cancel search | Manufacturer: MITSUBISHI, Model Year: 2017, Model line: MIRAGE, Model: MITSUBISHI MIRAGE 2017 6.GPages: 307, PDF Size: 9.02 MB
Page 139 of 307
Warning lights 5-78 Features and controls
5
N00520600313
This light comes on in the event of a malfunc- tion in the charging system or when the igni-tion switch is turned to the “ON” position (engine off) or the operation mode is put in ON. When the engine
is started, the light
should go out. Check to make sure that the light has gone out before driving.
N00520700170
This light comes on when the engine oil pres-sure is below normal. If the light stays on while driving, stop the
engine as soon as pos-
sible. Do not run the e
ngine until the cause of
the low oil pressure is corrected.
N00575700011
This light comes on in red if the coolant tem- perature becomes excessively high.
N00520901342
This light comes on when any door is open ornot completely closed. When the vehicle is moving at more than 5 mph (8 km/h) and any door is open or ajar, atone will sound 4 times to inform the driver that any door is not properly shut.
NOTE
Do not disconnect the ba
ttery cable when the
engine malfunction i
ndicator (“SERVICE
ENGINE SOON” or “Che
ck engine light”) is
on. The engine electronic
control module stores
critical OBD information (especially exhaustemission data), which ma
y be lost if the bat-
tery cable is disconne
cted while the engine
malfunction indicator is
on. This will make it
difficult to diagnose th
e cause of future prob-
lems.
Charging system warning light
CAUTION If the warning light stays on while the engine is running, park your ve
hicle in a safe place
as soon as possible and
contact an authorized
Mitsubishi Motors dealer
or a repair facility
of your choice to have the system checked.
Oil pressure warning light
CAUTION If this light comes on when the engine oil level is not low, have
your vehicle checked at
an authorized Mitsubish
i Motors dealer or a
repair facility of your choice. This warning light does not show the amount of oil in the crankcase. This can only be determined by checking the oil level with the dipstick with the engine turned off.
High coolant temperature warning light - red
CAUTION If the light comes on
during vehicle opera-
tion, it indicates that
the engine is possibly
overheating. Continued driving could makethe engine fail. Immedi
ately stop the vehicle
in a safe place and ta
ke appropriate action.
(Refer to “Engine overh
eating” on page 8-4.)
NOTE
The high coolant temp
erature warning light
may illuminate when
the vehicle has been
driven at high speeds or on hilly roads. This illuminating does not ne
cessarily indicate a
problem. It should stop if you keep the engine running for a wh
ile or continue driv-
ing the vehicle.
Door-ajar warning light and buzzer
CAUTION Before driving, make sure that the door-ajar warning light is off.
BK0236100US.book 78 ページ 2016年2月1日 月曜日 午前10時15分
Page 151 of 307
Bluetooth® 2.0 interface (if so equipped) 5-90 Features and controls
5
If a passcode has been set and the security function is enabled, the voice guide will say“Hands-free system is lo
cked. State the pass-
code to continue” when the SPEECH button is pressed to enter voice recognition mode.Say the 4-digit passcode number to enter the passcode. If the entered passcode
is wrong, the voice
guide will say “<4-digi
t passcode>, Incorrect
passcode. Please try again.” Enter the correct passcode.
Use the following procedure to turn off the security function by di
sabling the passcode.
1. Press the SPEECH button. 2. Say “Setup.” 3. Say “Passcode.”4. The voice guide w
ill say “Passcode is
enabled. Would you like to disable it?” Answer “Yes.” the passcode and return to the main menu. 5. When the disabling of the passcode iscompleted, the voice
guide will say “Pass-
code is disabled” and the system will return to the main menu.
N00564700011
The Bluetooth
® 2.0 interface can use the
speaker enrollment function to create a voicemodel for one person per language. This makes it easier for the Bluetooth
® 2.0
interface to recognise
voice commands said
by you.
You can turn a voice model registered with the speaker enrollment function on and offwhenever you want.
N00564800038
It takes about 2 to 3 minutes to complete thespeaker enrollment process. To ensure the best results, run through the process while in the driver’s seat, in an envi- ronment that is as qu
iet as possible (when
there is no rain or strong winds and the vehi-cle windows are closed). Please turn off your phone while in speaker enrollment to prevent interruption of the process.Use the following procedure for speaker enrollment. 1. Stop your vehicle in a safe area, put the gearshift lever in the “N” (Neutral) posi-tion (manual transaxle), or the selector lever in the “P” (PARK) position (contin- uously variable transmission (CVT)), andpull the parking brake lever. 2. Press the SPEECH button.
It is required for a little time after engine stop that the entered passcode is actuallyrecorded in the system.If the ignition switch
or the operation mode
is made to ACC or ON or the engine is started immediately afte
r engine stop, there
is a case when the entered passcode is not recorded in the system. At this time, please try to enter the passcode again.
Entering the passcode
NOTE
You can reenter the passcode as many times as you want. If you have forgotten your passcode, say “Cancel” to quit the voice input mode and then check with an authorized Mitsubishi Motors dealer.NOTE
Disabling the passcode
NOTE
System must be unlocke
d to disable the pass-
code.
Speaker enrollment function
Speaker enrollment
NOTE
Speaker enrollment is not possible unless the vehicle is parked. Make sure you park the vehicle in a safe area before attemptingspeaker enrollment.
BK0236100US.book 90 ページ 2016年2月1日 月曜日 午前10時15分
Page 152 of 307
Bluetooth® 2.0 interface (if so equipped)
Features and controls 5-91
5
3. Say “Voice training.” 4. The voice guide will say “This operationmust be performed in a quiet environment while the vehicle is
stopped. See the
owner’s manual for the list of requiredtraining phrases. Press and release the SPEECH button when you are ready to begin. Press the HANG-UP button to can-cel at any time.”
ton to start the
speaker enrollment process. 5. The voice guide will prompt for phrase 1. Repeat the correspondi
ng phrase listed in
table “Enrollment commands” on page 5-105.The system will register your voice and then move on to the registration of the next command. Continue the process untilall phrases have been registered.
6. When all enrollme
nt commands have
been read out, the vo
ice guide will say
“Speaker enrollment is complete.” The system will then end the speaker enroll-ment process and return to the main menu.
N00564900055
You can turn a voice model registered with the speaker enrollment function on and off whenever you want. You can also retrain the system.Use the following procedure to perform these actions. 1. Press the SPEECH button.
2. Say “Voice training.” 3. If you have completed a speaker enroll-ment process once already, the voice guide will say eith
er “Enrollment is
enabled. Would you like to disable orretrain?” or “Enrollment is disabled. Would you like to enable or retrain?” 4. When enrollment is “enabled,” the voicemodel is on; when enrollment is “dis- abled,” the voice model is off. Say the command that fits your needs. Say “Retrain” to start the speaker enroll- ment process and re
create a new voice
model. (Refer to “Speaker enrollment” on page 5-90.)
N00565001366
Before you can make
or receive hands-free
calls or play music using the Bluetooth
® 2.0
interface function, you must pair the Blue- tooth
® device and Bluetooth
® 2.0 interface.
NOTE
If you do not start the speaker enrollment process within 3 minut
es after pressing the
SPEECH button, the speaker enrollmentfunction will time out. The voice guide will say “Speaker enroll- ment has timed out.”
The system will then
beep and the voice reco
gnition mode will be
deactivated.
NOTE
To repeat the most re
cent voice training com-
mand, press and rele
ase the SPEECH button.
If you press the HANG-UP button anytime during the process, the
system will beep and
stop the speaker en
rollment process.
NOTE
Completing the speaker enrollment process will turn on the voice model automatically. The commands “Help” a
nd “Cancel” will not
work in this mode.
Enabling and disabling the voice model and retraining
Connecting the Bluetooth
® 2.0
interface and Bluetooth
® device
BK0236100US.book 91 ページ 2016年2月1日 月曜日 午前10時15分
Page 153 of 307
Bluetooth® 2.0 interface (if so equipped) 5-92 Features and controls
5
Up to 7 Bluetooth
® devices can be paired
with the Bluetooth
® 2.0 interface.
If multiple paired Bluetooth
® devices are
available in the vehicle,
the cellular phone or
music player most recently connected is auto- matically connected to the Bluetooth
® 2.0
interface. You can also change a Bluetooth
® device to
be connected. To pair a Bluetooth
® device with the Blue-
tooth
® 2.0 interface, foll
ow the steps below.
1. Stop your vehicle in a safe area, put the gearshift lever in the “N” (Neutral) posi-tion (manual transaxle), or the selector lever in the “P” (PARK) position (contin- uously variable transmission (CVT)), andpull the parking brake lever. 2. Press the SPEECH button. 3. Say “Pair Device.”
4. The voice guide will say “Start pairing procedure on the device. See the device manual for instructi
ons.” and then will
say “The pairing code
is
NOTE
Pairing is required only when the device is used for the first time. Once the device has been paired with the Bluetooth
® 2.0 inter-
face, all you need is to
bring the device into
the vehicle next time
and the device will
connect to the Bluetooth
® 2.0 interface auto-
matically (if supported
by the device). The
device must have Bluetooth
® turned ON to
connect.
To p a i r
NOTE
You cannot pair any Bluetooth
® device with
the Bluetooth
® 2.0 interface unless the vehi-
cle is parked. Before pairing a Bluetooth
®
device with the Bluetooth
® 2.0 interface,
confirm that the vehicle is parked in a safe location.NOTE
The following procedure ( to ) can also be used instead of
saying “Pair Device.”
dure if you prefer. Say “Setup.” Say “Pairing Options.” The voice guide will
say “Select one of
the following: pair, edit, delete, list or set code.”
ady been paired, the
voice guide will say “Maximum devicespaired” and then the system will end thepairing process. To re
gister a ne
w device,
delete one device and th
en repeat the pairing
process.(Refer to
Page 155 of 307
Bluetooth® 2.0 interface (if so equipped) 5-94 Features and controls
5
4. After the voice guide says “Please say,”device tags of
corresponding cellular
phones will be read out in order, starting with the cellular phone that has been mostrecently connected. Say the number of the cellular phone that you want to connect to.When the confirmation function is on, the system will ask you again whether the phone that you want to connect to is cor- rect. Answer “Yes” to continue and con- nect to the cellular phone.Answer “No,” and the voice guide will say “Please say.” Say the number of the phone that you want to connect to. 5. The selected phone w
ill be connected to
the Bluetooth
® 2.0 interface. The voice
guide will say “
main menu.
1. Press the SPEECH button. 2. Say “Setup.”3. Say “Select music player.”
says “Please say,”
device tags of corresponding music play- ers will be read out in
order, starting with
the music player that has been mostrecently connected. Say the number of the music player that you want to connect to. When the confirmation function is on, the system will ask you again whether themusic player that you want to connect to is correct. Answer “Yes” to continue and connect to the music player.Answer “No,” and th
e voice guide will
say “Please say.” Say the number of the music player that you want to connect to. 5. The selected music player will be con- nected to the Bluetooth
® 2.0 interface.
The voice guide will
say “
selected” and then the system will returnto the main menu.
Use the following procedure to delete a paired Bluetooth
® device from the Blue-
tooth
® 2.0 interface.
1. Press the SPEECH button. 2. Say “Setup.” 3. Say “Pairing Options.”4. The voice guide will say “Select one of the following: pair, edit, delete, or list.” tags of corresponding de
vices will be read
out in order, starting with the device that has been most recent
ly connected. After it
completes reading all pairs, the voiceguide will say “or all.” Say the number of the device that you want to delete from the system.If you want to delete
all paired phones
from the system, say “All.” 6. For confirmation purposes, the voiceguide will say “Del
eting
rrect?” or “Deleting
all devices. Is this correct?”
NOTE
You can connect to a phone at any time by pressing the SPEECH button and saying thenumber, even before all of the paired num- bers and device tags of corresponding cellu- lar phones are read out by the system.
To select a music player
NOTE
You can connect to a music player at any time by pressing the SPEECH button andsaying the number, even before all of the paired numbers and de
vice tags of corre-
sponding music players are read out by thesystem.
Deleting a device
BK0236100US.book 94 ページ 2016年2月1日 月曜日 午前10時15分
Page 156 of 307
Bluetooth® 2.0 interface (if so equipped)
Features and controls 5-95
5
Answer “No,” the system will return to Step 4.7. The voice guide will
say “Deleted,” and
then the system will end the device dele- tion process.
N00565200013
You can check a paired Bluetooth
® device by
following the steps below. 1. Press the SPEECH button. 2. Say “Setup.” 3. Say “Pairing Options.” 4. The voice guide will
say “Select one of
the following: pair, edit, delete, or list.”of corresponding device
s in order, starting
with the Bluetooth
® device that has been
most recently connected.
6. After the device tags
of all paired Blue-
tooth
® devices have been read, the system
will say “End of li
st, would you like to
start from the beginning?” To hear the list again from the beginning,answer “Yes.” When you are done, answer “No” to return to the main menu.
N00565300014
You can change the device tag of a paired cel- lular phone or music player. Follow the steps below to change a devicetag. 1. Press the SPEECH button. 2. Say “Setup.” 3. Say “Pairing Options.”4. The voice guide will
say “Select one of
the following: pair, edit, delete, or list.” 5. The voice guide will
say “Please say,” and
read out the numbers of the Bluetooth
®
devices and device ta
gs of corresponding
devices in order, starting with the Blue- tooth
® that has been most recently con-
nected. After all paired devi
ce tags have been
read, the voice guide will say “Whichdevice, please?” Say the number of the device tag you want to change.
NOTE
If the device deletion
process fails for some
reason, the voice guide
will say “Delete
failed” and then the system will cancel delet-ing the device.
To check a paired Bluetooth
®
device
NOTE
If you press and release the SPEECH button and say “Continue” or “Previous” while the list is being read, the system will advance or rewind the list.Say “Continue” to procee
d to the device with
the next highest num
ber or “Previous” to
return to the phone with the previous num-ber. You can change the device tag by pressing and releasing the SP
EECH button and then
saying “Edit” while the
list is being read.
You can change the
phone to be connected
by pressing and releasing the SPEECH but- ton and then saying “S list is being read. You can change the music player to be con- nected by pressing and releasing the SPEECH button and then saying “Select music player” while the list is being read.
Changing a device tag
NOTE
You can press and release the SPEECH but- ton while the list is
being read, and immedi-
ately say the number of the device tag you want to change.
BK0236100US.book 95 ページ 2016年2月1日 月曜日 午前10時15分
Page 159 of 307
Bluetooth® 2.0 interface (if so equipped) 5-98 Features and controls
5
You can redial the last
number called, based
on the history of dialed calls in the paired cel-lular phone. Use the following procedure to redial. 1. Press the SPEECH button. 2. Say “Redial.”
N00565700018
During a call, press
the SPEECH button to
enter voice recognition mode, then say“
N00565800035
If an incoming phone call is received whilethe ignition switch or
the operation mode is in
ON or ACC, the audio sy
stem will be auto-
matically turned on and switched to the incoming call, even when the audio system was originally off.The voice guide announcement for the incoming call will be output from the front passenger’s seat speaker. If the CD player or radio was playing when the incoming call was received, the audio sys-tem will mute the sound from the CD player or radio and output only the incoming call. To receive the call, press the PICK-UP buttonon the steering wheel control switch. When the call is over, the audio system will return to its previous state.
N00565900010
At any time during a
call, you can mute the
vehicle microphone. Pressing the SPEECH but
ton and then saying
“Mute” during a call will turn ON the mute function and mute the microphone.Saying “Mute off” in the same way will turn off the mute function and cancel the mute on the microphone.
N00566600014
The Bluetooth
® 2.0 interface
can switch
between hands-free mode
(hands-free calls)
and private mode (calls
using cellular phone).
If you press the SPEECH button and say“Transfer call” during a hands-free call, you can stop the hands-free mode and talk in pri- vate mode. To return to hands-free mode, press the SPEECH button again and say “Transfercall.”The Bluetooth
® 2.0 interface
has 2 types of
unique phonebooks that are different from the phonebook stored in the cellular phone. They are the vehicle phonebook and the mobilephonebook. These phonebooks are used to register tele- phone numbers and make
calls to desired
numbers via voice re
cognition function.
NOTE
When the confirmation function is on, the system will check if
the name and location of
the receiver are correct. If the name is cor-rect, answer “Yes.” answer “No.” The system will return to Step3.
RedialingSend function
Receiving calls
Mute function
Switching between hands-free mode and private mode
Phonebook function
NOTE
Disconnecting the ba
ttery cable will not
delete information registered in the phone- book.
BK0236100US.book 98 ページ 2016年2月1日 月曜日 午前10時15分
Page 175 of 307
HomeLink® Wireless Control System (if so equipped) 5-114 Features and controls
5
3. Once the door has stopped, press and release the “Learn”
or “Smart” button on
the garage door opener (refer to your garage door opener owner’s manual for the location of the “Learn” button). Both the HomeLink
® garage door operation
indicators will fl
ash rapidly green upon
successful synchronization with the dooropener (within 5 seconds).
N00585000020
To operate, simply press and release the pro- grammed HomeLink
® button. Activation will
now occur for the trained device (i.e. garagedoor opener, gate operat
or, security system,
entry door lock, home/of
fice lighting, etc.).
For convenience, the hand-held transmitter ofthe device may also be
used at any time.
N00585200022
The HomeLink
® has the capability of receiv-
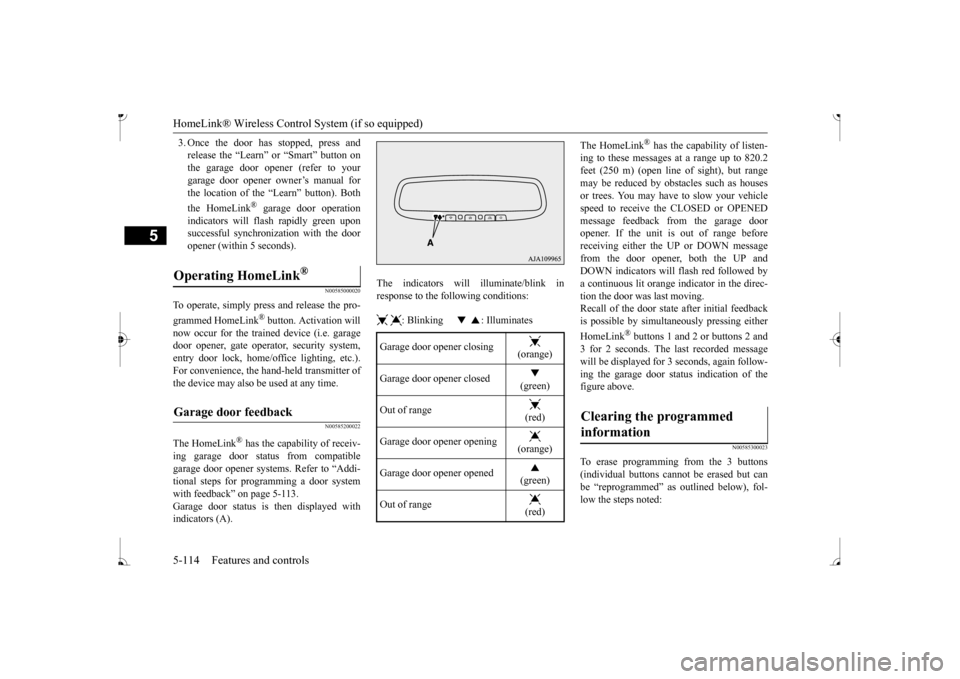
ing garage door status from compatible garage door opener systems. Refer to “Addi- tional steps for programming a door systemwith feedback” on page 5-113. Garage door status is then displayed with indicators (A).
The indicators will illuminate/blink in response to the following conditions: : Blinking : Illuminates
The HomeLink
® has the capability of listen-
ing to these messages at a range up to 820.2feet (250 m) (open line of sight), but range may be reduced by obst
acles such as houses
or trees. You may have to slow your vehiclespeed to receive the CLOSED or OPENED message feedback from the garage door opener. If the unit is out of range beforereceiving either the UP or DOWN message from the door opener, both the UP and DOWN indicators will
flash red followed by
a continuous lit orange indicator in the direc- tion the door was last moving.Recall of the door state after initial feedback is possible by simulta
neously pressing either
HomeLink
® buttons 1 and 2 or buttons 2 and
3 for 2 seconds. The la
st recorded message
will be displayed for 3 seconds, again follow- ing the garage door stat
us indication of the
figure above.
N00585300023
To erase programming from the 3 buttons (individual buttons cannot
be erased but can
be “reprogrammed” as
outlined below), fol-
low the steps noted:
Operating HomeLink
®
Garage door feedback
Garage door opener closing
(orange) (green)
Out of range
(red)
Garage door opener opening
(orange) (green)
Out of range
(red)
Clearing the programmed information
BK0236100US.book 114 ページ 2016年2月1日 月曜日 午前10時15分
Page 176 of 307
Interior lights
Features and controls 5-115
5
1. Press and hold the 2 outer HomeLink
®
buttons for at least
10 seconds. The indi-
cator will change from continuous yellow to rapidly flashing green. 2. Release both buttons. 3. HomeLink
® is now in the train (or learn-
ing) mode and can be programmed at anytime beginning with
“Programming a new
HomeLink
®” step 1.
N00585400024
To reprogram a HomeLink
® button, complete
the following. 1. Press and hold the desired HomeLink
®
button. Do not release the button. 2. The indicator light
will begin to slowly
flash orange after 20 seconds. The Home- Link
® button can be released at this point.
Proceed with “Programming a new HomeLink
®” step 2.
N00585600026
Your HomeLink
® system operates on a radio
frequency subject to
Federal Communica-
tions Commission (FCC)
Rules (For vehicles
sold in U.S.A.) and Industry Canada Rules (For vehicles sold in
Canada). This device
complies with Part 15 of the FCC Rules and RSS- 210 of the Industry Canada Rules. Operation is subject to
the following two con-
ditions. This device may not
cause harmful inter-
ference. This device must ac
cept any interference
that may be received, including interfer- ence that may caus
e undesired operation.
This equipment complies with FCC radiation exposure limits set fo
rth for an uncontrolled
environment. End Users must follow the spe- cific operating instruct
ions for satisfying RF
exposure compliance. This transmitter must be at least 12 inches (20 cm) from the user and must not be co-loc
ated or operating in
conjunction with any other antenna or trans- mitter. The term “IC:” before
the certification/regis-
tration number only si
gnifies that Industry
Canada technical specifications were met.
N00525301644
NOTE
Do not hold for longer than 20 seconds.
Reprogramming a single HomeLink
® button
NOTE
If you do not complete the programming of a new device to the button, it will revert to thepreviously stored programming.For questions or comments, visit www.homelink.com, www.youtube.com/HomeLinkGentex, or by calling the HomeLink
® Hotline.
General information
CAUTION The transmitter has been tested and complies with FCC and IC rules.Changes or modifica
tions not expressly
approved by the party responsible for com- pliance could void the user’s authority to operate the device.
Interior lights
NOTE
Be aware that leaving the light illuminated with the engine off may run the batterydown. Never leave the vehi
cle without checking
that the light is off.
BK0236100US.book 115 ページ 2016年2月1日 月曜日 午前10時15分
Page 186 of 307
Braking
Driving safety 6-5
6
Please read this section in conjunction with the “Engine coolant” on page 9-7.
N00629500521
All parts of the brake system are critical to safety. Have the vehicle serviced by an autho- rized Mitsubishi Motors dealer or a repairfacility of your choice at regular intervals according to the “WARRANTY AND MAINTENANCE MANUAL”. Check the brake system while driving at a low speed immediately
after starting, espe-
cially when the brakes are wet, to confirm they work normally. A film of water can be formed on the brakediscs or brake drums, and prevent normal braking after driving in heavy rain or through large puddles, or after the vehicle is washed.If this occurs, dry the brakes out by driving slowly while lightly depressing the brake pedal.
On snowy roads, ice can form on the braking system, making the brak
es less effective.
While driving in such conditions, pay closeattention to surrounding
vehicles and to the
condition of the road surface. From time to time, lightly depress the brake pedal andcheck how effective the brakes are. It is important to take
advantage of the engine
braking by downshifting while driving on steep downhill roads in order to prevent thebrakes from overheating.
N00629601372
When parking on a hill, set the parking brake,and turn the front wheels toward the curb on a downhill, or away from
the curb on an uphill.
If necessary, apply chocks to the wheels.
Place the gearshift lever into the “R” hill slope, into the 1st position when parking on an uphill slope. Be sure that the parking brake is firmly set when parked and that the selector lever is in the “P” (PARK) position.When parking on a hill, it is important to set the parking brake before
moving the selector
lever to the “P” (PARK) position. This pre-vents loading the parking brake against the transaxle. When this happens, it is difficult to move the selector lever out of the “P” Never leave the engine running while you take a short nap or rest. Also, never leave the engine running in a closed or poorly venti-lated place.
WA R N I N G Never open the radiator cap when the radiator is hot. You could be seriously burned.
Braking When brakes are wet
When driving in cold weather When driving downhill Parking Parking on a hill
For vehicles equipped with man- ual transaxle For vehicles equipped with contin- uously variable transmission (CVT) Parking with the engine run- ning
BK0236100US.book 5 ページ 2016年2月1日 月曜日 午前10時15分