Circuit diagram MITSUBISHI MONTERO 1987 1.G Workshop Manual
[x] Cancel search | Manufacturer: MITSUBISHI, Model Year: 1987, Model line: MONTERO, Model: MITSUBISHI MONTERO 1987 1.GPages: 284, PDF Size: 14.74 MB
Page 21 of 284
8-1
ELECTRICAL
CONTENTS
NOBAA-
ACCESSORY ......................................................
188
Cigarette Lighter ............................................
,190
Clock ...............................................................
,191
AUDIO SYSTEM ................................................
.192
AUTOMATIC FREE-WHEELING HUB
INDICATOR SYSTEM ........................................
208
Automatic Free-wheeling Hub
Indicator Control Unit
..................................... ,216
Pulse Generator ..............................................
215
BACK DOOR WINDOW DEFOGGER
................ .203
Defogger switch ............................................
,206
Printed Heater Lines
...................................... ,207
CHARGING SYSTEM .........................................
71
Alternator ........................................................
83
Service Adjustment Procedures
..................... 77
Battery Charging ........................................
82
Inspection of Battery ..................................
81
Output Current Test ...................................
78
Regulated Voltage Test ..............................
79
Voltage Drop Test of Alternator Output
Wire ............................................................
77
ELECTRICAL SYSTEM PARTS LOCATION
...... 2
Diode ...............................................................
5
Fusible Link and Fuse
..................................... 6
Grounding .......................................................
7
Relay and Control Unit ....................................
2
Sensor .............................................................
4
HORN ..................................................................
184
Horn Switch
.................................................... 187
IGNITION SYSTEM ............................................
105
Ignition Switch
................................................ 122
Ignition System ...............................................
1 14
Service Adjustment Procedures
.................... .l 1 1
Checking Ignition System
..........................
11 1
Checking Ignition Timing
...........................
11 1
Spark Plug Cable Test
................................
1 12
Spark Plug Test
.......................................... 1 12 INSPECTION OF HARNESS CONNECTOR ...... 9
Check for Improper Engagement of
Terminal .......................................................... 9
Continuity and Voltage Test for Connector .... 9
Engaging and Disengaging of Connector
Terminal ..........................................................
9
LIGHTING SYSTEM ........................................... 143
Column Switch
................................ .
.............. .I59
Dimmer Control Switch
................................. .I62
Hazard Warning Switch
................................. .I61
Headlight ........................................................ ,158
Service Adjustment Procedures
.................... .I57
Headlight Aiming .......................................
157
METERS AND GAUGES .................................... 123
Service Adjustment Procedures
.................... .I30
Fuel Gauge Simple Test ................................. .I31
Fuel Gauge Unit Inspection ........................... .I31
Oil Pressure Gauge Simple Test
.................... .I32
Oil Pressure Gauge Unit Simple Test
............ ,132
Speedometer Inspection
............................... .I30
Tachometer Inspection .................................. ,130
Voltage Meter Simple Test
............................ .I33
Water Temperature Gauge Simple Test
....... ..I3 1
Water Temperature Gauge Unit Inspection
. ..I3 2
STARTING SYSTEM .......................................... 91
Starter Motor ............ ....................................... 97
WIPER AND WASHER SYSTEM
....................... .163
WIRING HARNESS ............................................ 13
Centralized Junction ....................................... 69
Circuit Diagram ............................................... 34
Configuration Diagram .................................... 27
How to Read Wiring Diagrams ....................... 20
Troubleshooting .............................................. 13
Page 33 of 284
WIRING HARNESS - Troubleshooting 8-13
WIRING HARNESS
TROUBLESHOOTING NO8DAAA
The most important point in troubleshooting is to determine “Probable Causes”. Once the probable causes are
determined, parts to be checked can be limited to those associated with such probable causes. Therefore, unnec-
essary checks can be eliminated. The determination of the probable causes must be based on a theory and be
supported by facts and must not be based on intuition only.
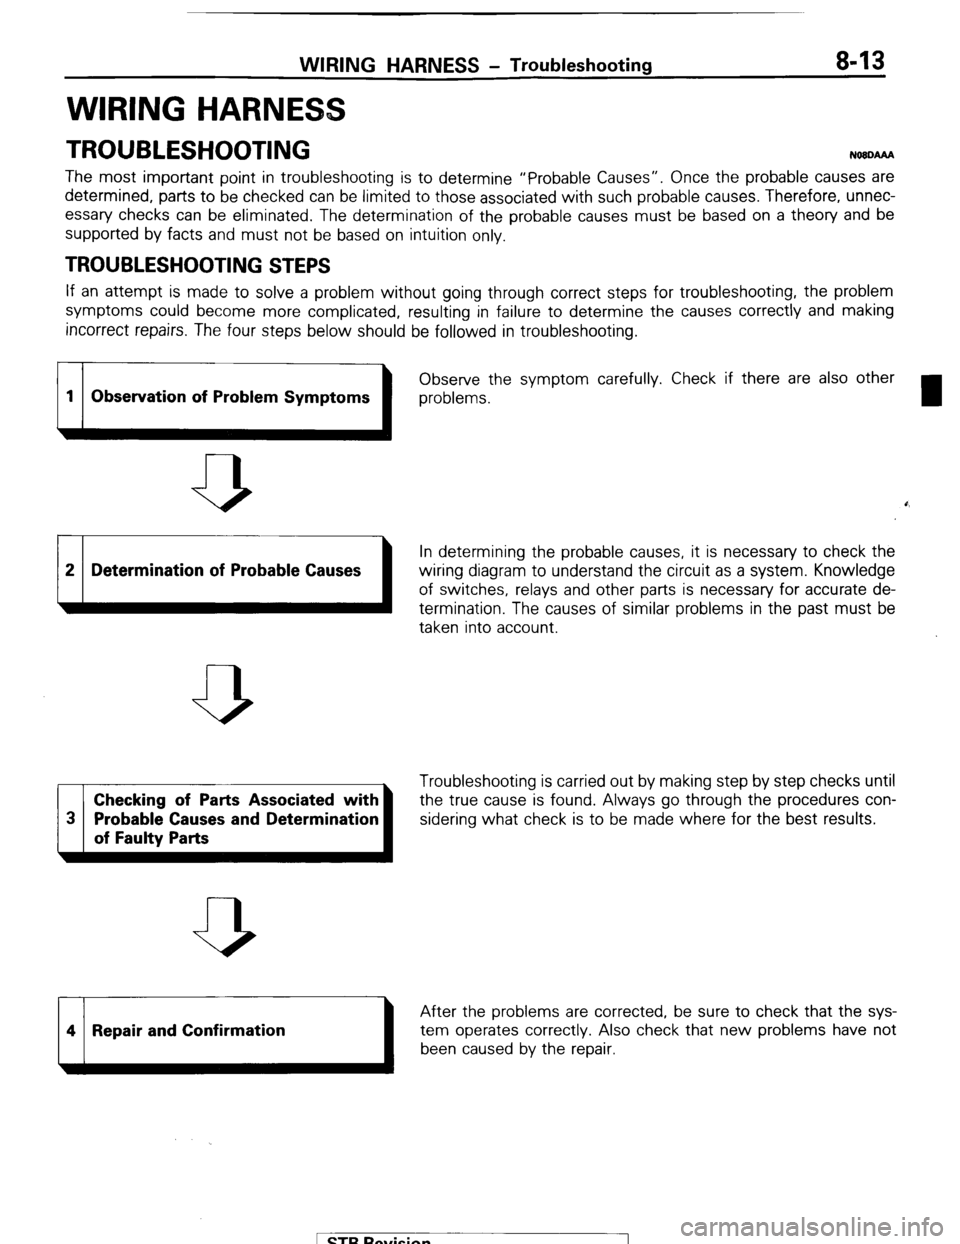
TROUBLESHOOTING STEPS
If an attempt is made to solve a problem without going through correct steps for troubleshooting, the problem
symptoms could become more complicated, resulting in failure to determine the causes correctly and making
incorrect repairs. The four steps below should be followed in troubleshooting.
1 1 Observe the
1 problems. symptom carefully. Check if there are also other
1 Observation of Problem Symptoms
b
0,
2 Determination of Probable Causes
In determining the probable causes, it is necessary to check the
wiring diagram to understand the circuit as a system. Knowledge
of switches, relays and other parts is necessary for accurate de-
termination. The causes of similar problems in the past must be
taken into account.
Checking of Parts Associated with Troubleshooting is carried out by making step by step checks until
the true cause is found. Always go through the procedures con-
sidering what check is to be made where for the best results.
14 1 Repair and Confirmation
After the problems are corrected, be sure to check that the sys-
1 been caused by the repair, tem operates correctly Also check that new problems have not
1 STB Revision
1
Page 35 of 284
WIRING HARNESS - Troubleshooting 8-15
1660227
Black lead wire
Ground y
1680228
Normal open (NO) type
OFF
ax
Current does not flow ON
Current flows
Normal close (NC) type
OFF
l-2
Current flows ON
-op--
IX
Current does not flow
1680229
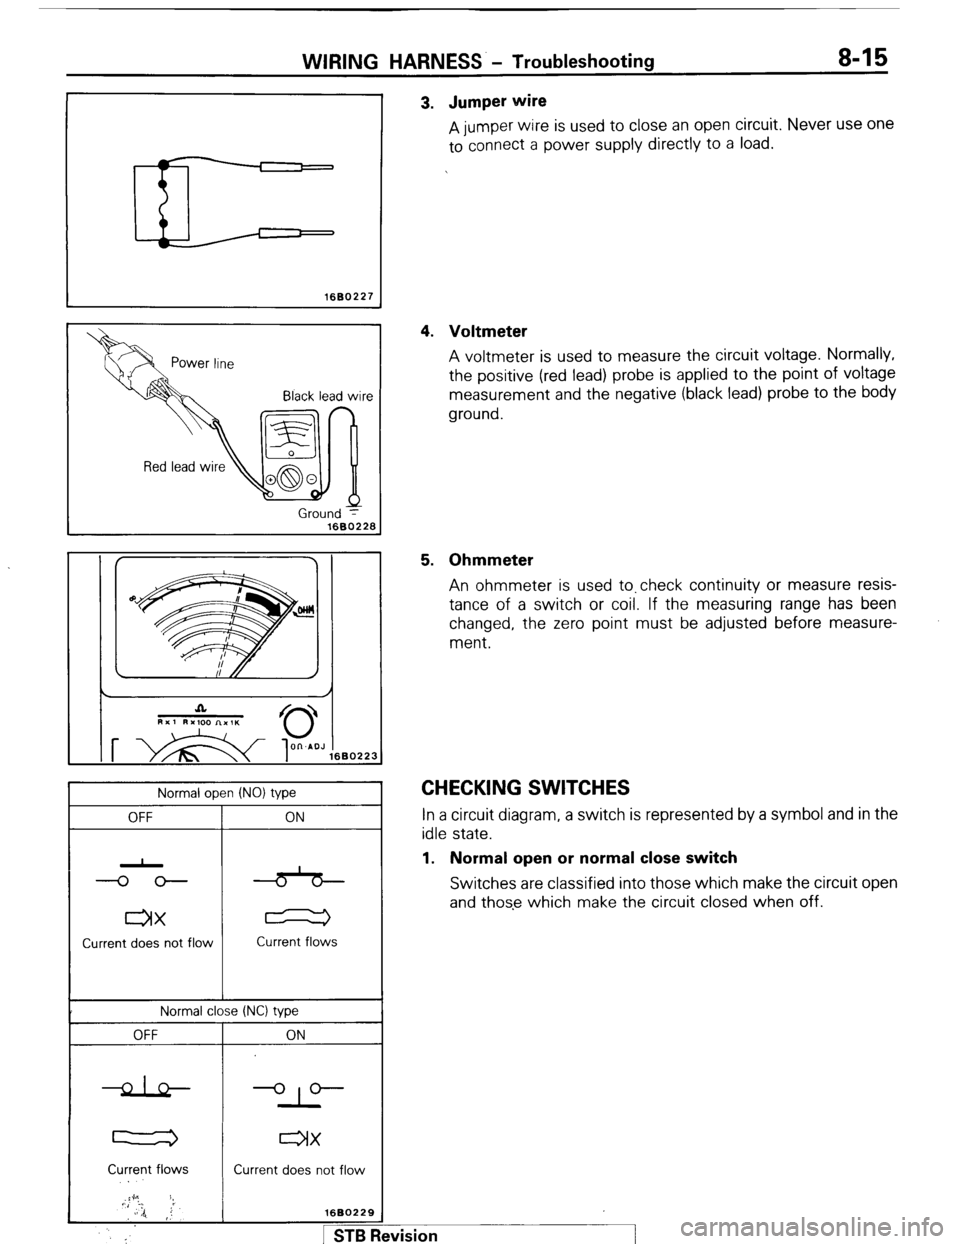
pm I 3. Jumper wire
A jumper wire is used to close an open circuit. Never use one
to connect a power supply directly to a load.
4. Voltmeter
A voltmeter is used to measure the circuit voltage. Normally,
the positive (red lead) probe is applied to the point of voltage
measurement and the negative (black lead) probe to the body
ground.
5. Ohmmeter
An ohmmeter is used to.check continuity or measure resis-
tance of a switch or coil. If the measuring range has been
changed, the zero point must be adjusted before measure-
ment.
CHECKING SWITCHES In a circuit diagram, a switch is represented by a symbol and in the
idle state.
1. Normal open or normal close switch
Switches are classified into those which make the circuit open
and those which make the circuit closed when off.
#vision
I
Page 40 of 284
8-20 WIRING HARNESS - How to Read Wiring Diagrams
HOW TO READ WIRING DIAGRAM NOEDBAE
HOW TO READ CONFIGURATION DIAGRAMS
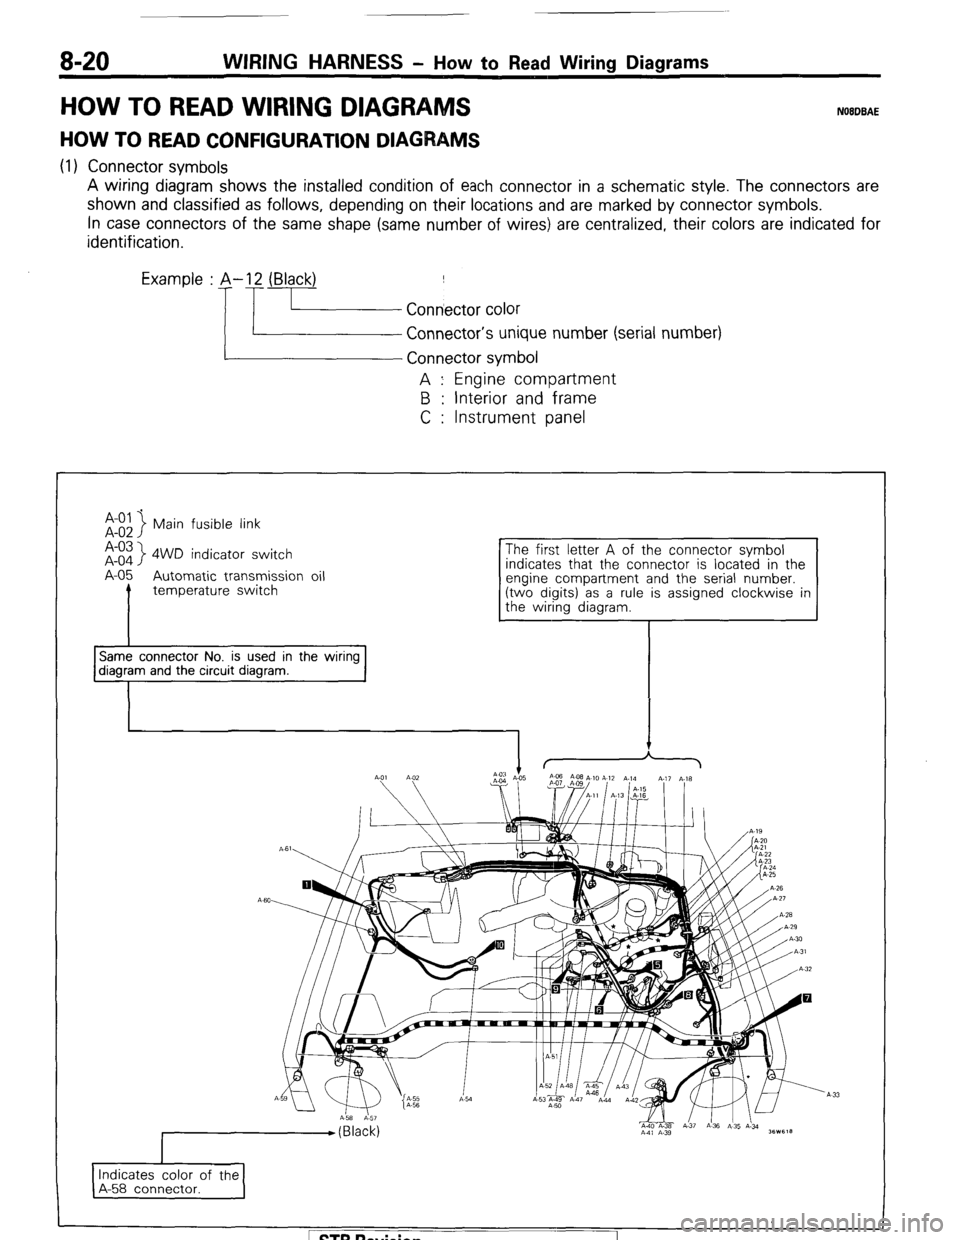
(1) Connector symbols
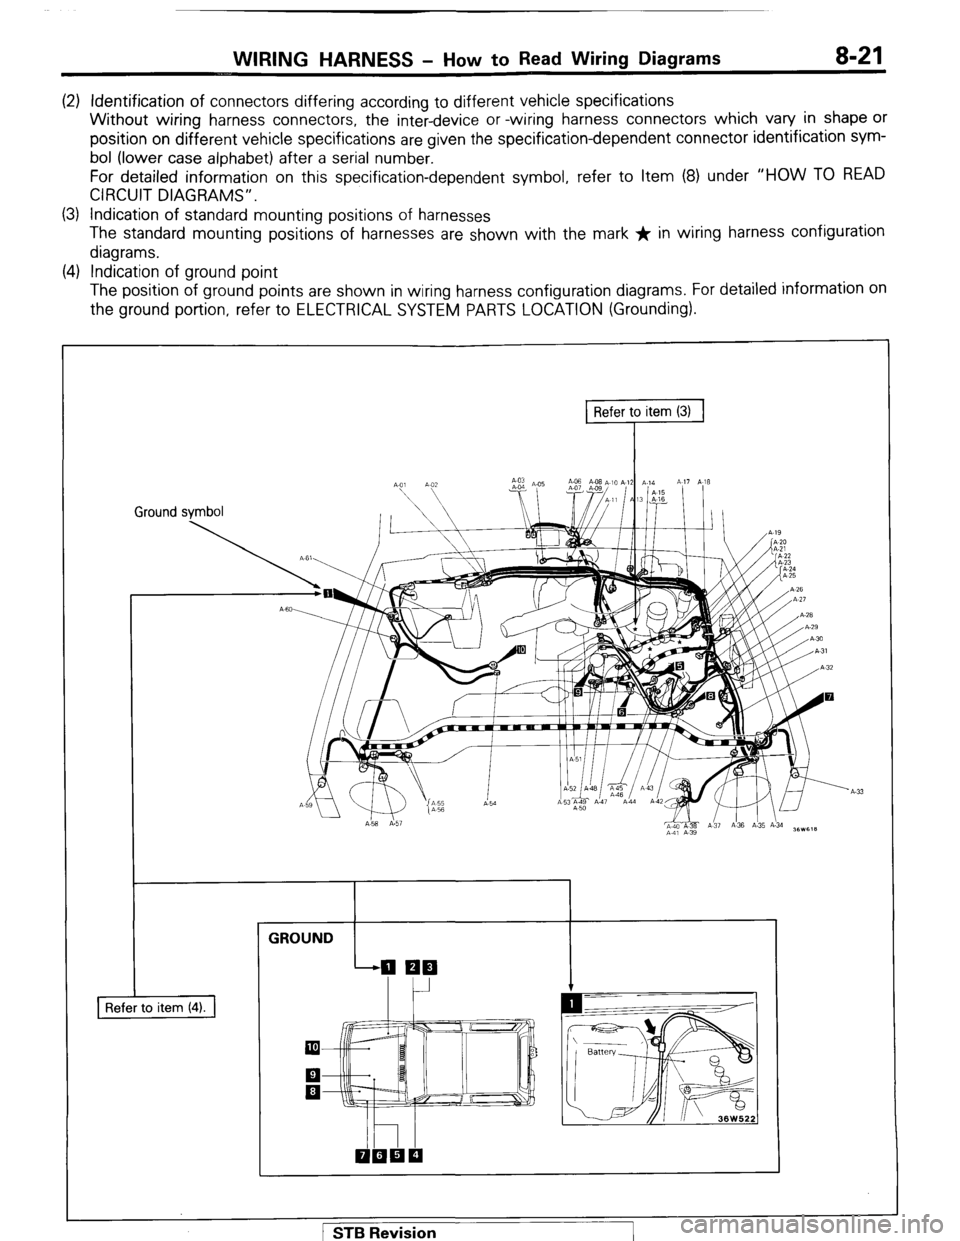
A wiring diagram shows the installed condition of each connector in a schematic style. The connectors are
shown and classified as follows, depending on their locations and are marked by connector symbols.
In case connectors of the same shape (same number of wires) are centralized, their colors are indicated for
identification.
Examp’e : p.!- f.~~~~ ~;~~o,
Connector’s unique number (serial number)
A : Engine compartment
B : Interior and frame
C : Instrument panel
Main fusible link
A-03
A-o4
> 4WD indicator switch
A-05 Automatic transmission oil
I temperature switch indicates that the connector is located in the
Same connector No. is used in the wiring diagram and the circuit diagram.
I Indicates color of the
A-58 connector. I
1 ST6 Revision
Page 41 of 284
WIRING HARNESS - HOW to Read Wiring Diagrams 8-21
(2) Identification of connectors differing according to different vehicle specifications
Without wiring harness connectors, the inter-device or -wiring harness connectors which vary in shape or
position on different vehicle specifications are
given the specification-dependent connector identification svm-
bol (lower case alphabet) after a serial number.
For detailed information on this specification-dependent symbol, refer to Item (8) under “HOW
TO READ
CIRCUIT DIAGRAMS”.
(3) Indication of standard mounting positions of harnesses
The standard mounting positions of harnesses are shown with the mark * in wiring harness configuration
diagrams.
(4) Indication of ground point
The position of ground points are shown in wiring harness configuration diagrams. For detailed information on
the ground portion, refer to ELECTRICAL SYSTEM PARTS LOCATION (Grounding).
Refer to item (3)
7
Ground symbol / STB Revision
Page 42 of 284
8-22 WIRING HARNESS - How to Read Wiring Diagrams
HOW TO READ CIRCUIT DIAGRAMS
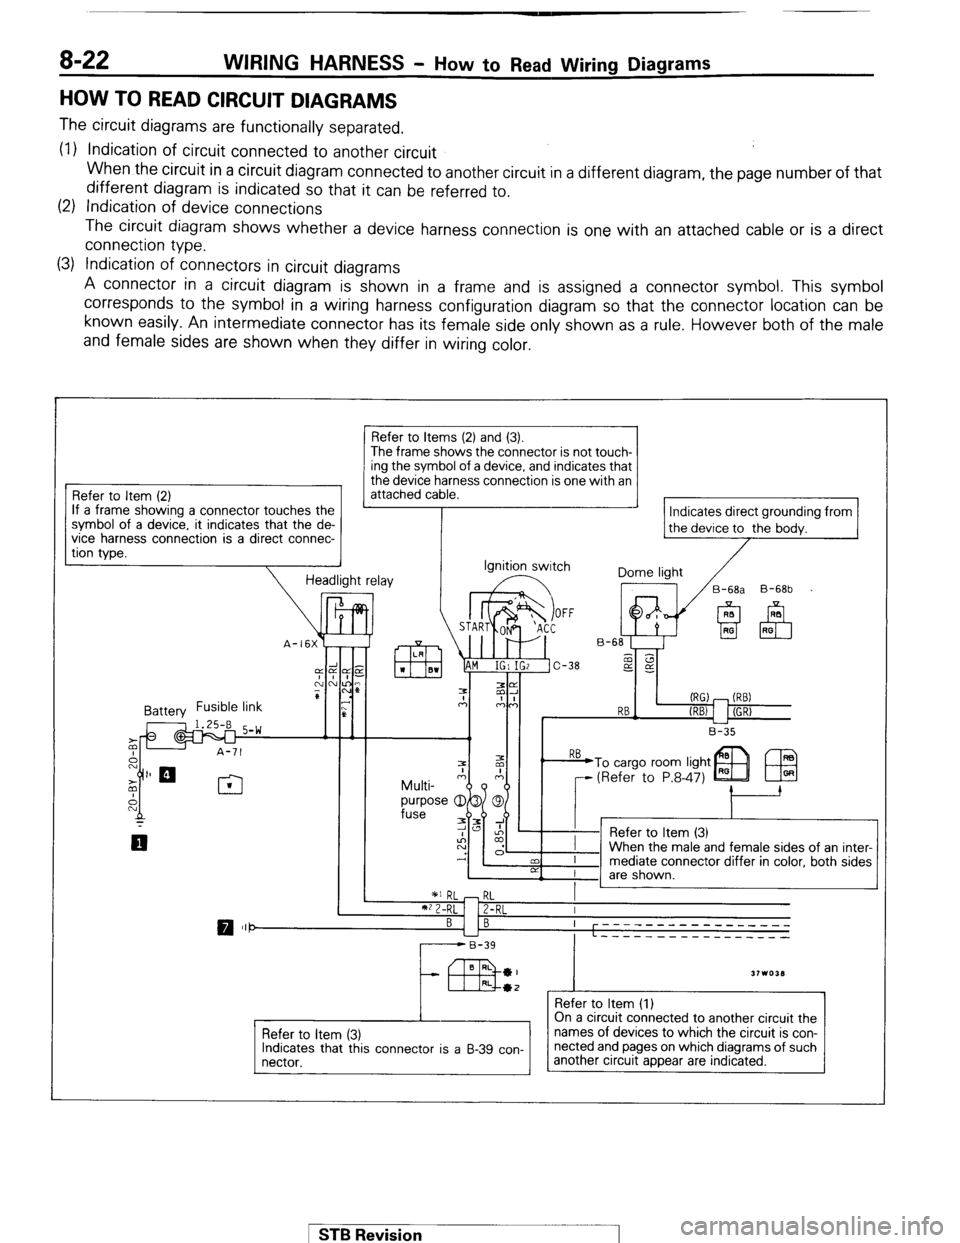
The circuit diagrams are functionally separated.
(1) Indication of circuit connected to another circuit
When the circuit in a circuit diagram connected to another circuit in a different diagram, the page number of that
different diagram is indicated so that it can be referred to.
(2) Indication of device connections
The circuit diagram shows whether a device harness connection is one with an attached cable or is a direct
connection type.
(3) Indication of connectors in circuit diagrams
A connector in a circuit diagram is shown in a frame and is assigned a connector symbol. This symbol
corresponds to the symbol in a wiring harness configuration diagram so that the connector location can be
known easily. An intermediate connector has its female side only shown as a rule. However both of the male
and female sides are shown when they differ in wiring color.
Refer to Item (2)
If a frame showing a connector touches the
?. it indicates that the de-
a direct connec- symbol of a device
vice
harness connectlon IS
tion type.
Refer to Items (2) and (3).
The frame shows the connector is not touch- ing the symbol of a device, and indicates that
the device harness connection is one with an
attached cable.
Indicates direct grounding from
the device to the bodv.
Ignition switch
Dome light
/
17 /B-6& B-68b
(RG) - (RB)
RB-
(REV 1 I (GR)
L-2
B-35
1 *I RL - RL
I
**2-RL 1 Z-RL I
BI B ----- ---- --------
L ----_ __---___----
r------B-39
43 BRL *I
31103LI RL*2 _
Refer to Item (1)
Refer to item (3)
Indicates that this connector is a B-39 con-
nectar. On a circuit connected to another circuit the
names of devices to which the circuit is con-
nected and pages on which diagrams of such
another circuit appear are indicated.
1 STB Revision 1
Page 43 of 284
WIRING HARNESS - HOW BO Read Wiring Diagrams 8-23
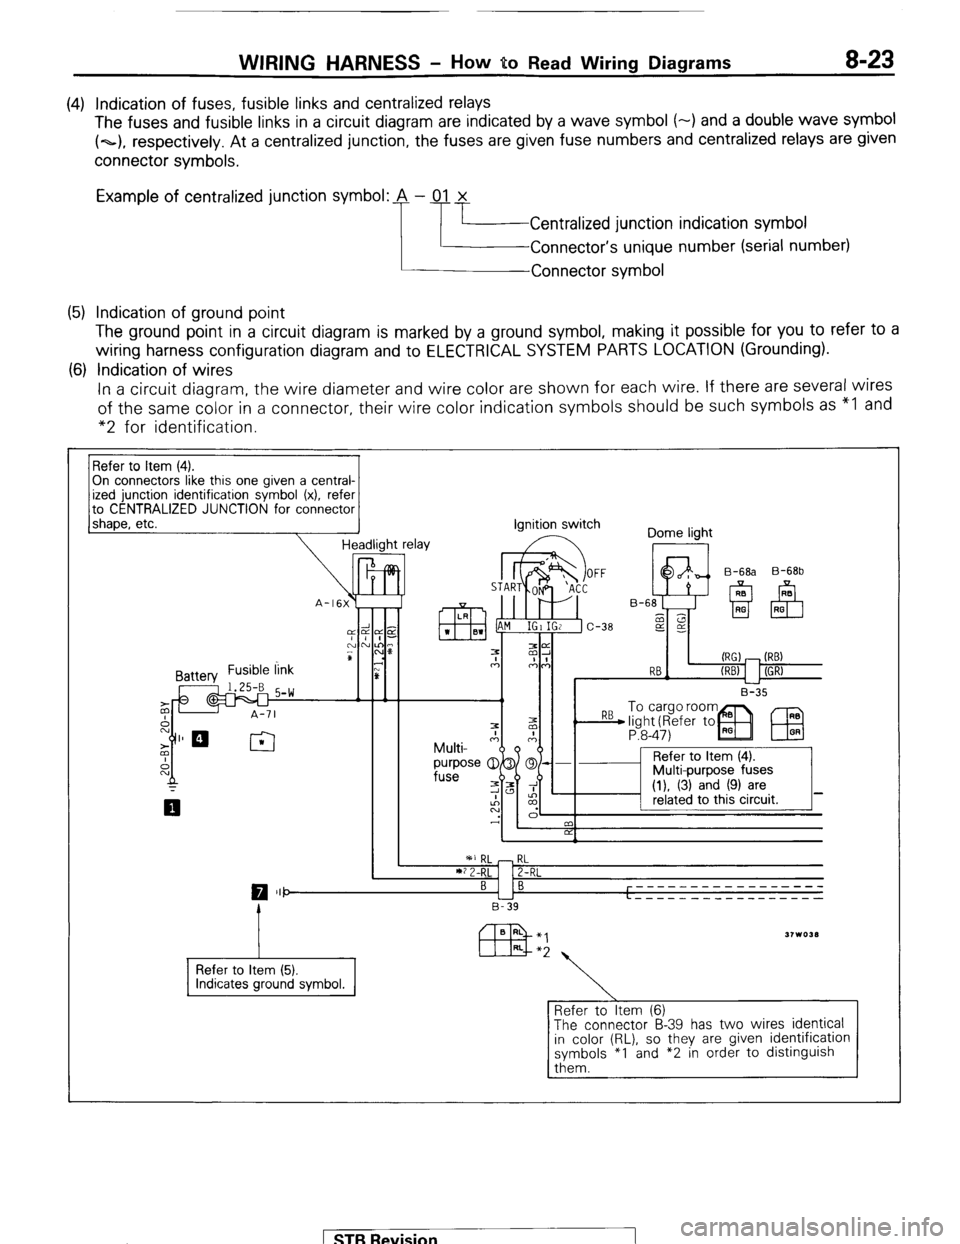
(4) Indication of fuses, fusible links and centralized relays
The fuses and fusible links in a circuit diagram are indicated by a wave symbol (-) and a double wave symbol
(~1, respectively. At a centralized junction, the fuses are given fuse numbers and centralized relays are given
connector symbols.
Example of centralized junction symbol: A - 01 x
Centralized junction indication symbol
Connector’s unique number (serial number)
Connector symbol
(5) Indication of ground point
The ground point in a circuit diagram is marked by a ground symbol, making it possible for you to refer to a
wiring harness configuration diagram and to ELECTRICAL SYSTEM PARTS LOCATION (Grounding).
(6) Indication of wires
In a circuit diagram, the wire diameter and wire color are shown for each wire. If there are several wires
of the same color in a connector, their wire color indication symbols should be such symbols as “I and
“2 for identification.
On connectors like this one given a central-
to CENTRALIZED JUNCTION for connector
1 shaoe. etc.
-I Headlight relay ignition switch
Dome light
I II I B-35 B-68b
P:8-47)
IEU
I ’ 2 I
RL
2-RL
0 III- BI B -----____________
L - - - - - _ _ _ _ _ __ _ _ _ _ _
B-39
Refer to Item (5).
Refer to Item (6)
The connector B-39 has two wires identical
in color (RL), so they are given identification
symbols *I and *2 in order to distinguish
them. 1 ST6 Revision
Page 44 of 284
8-24 WIRING HARNESS - How to Read Wiring Diagrams
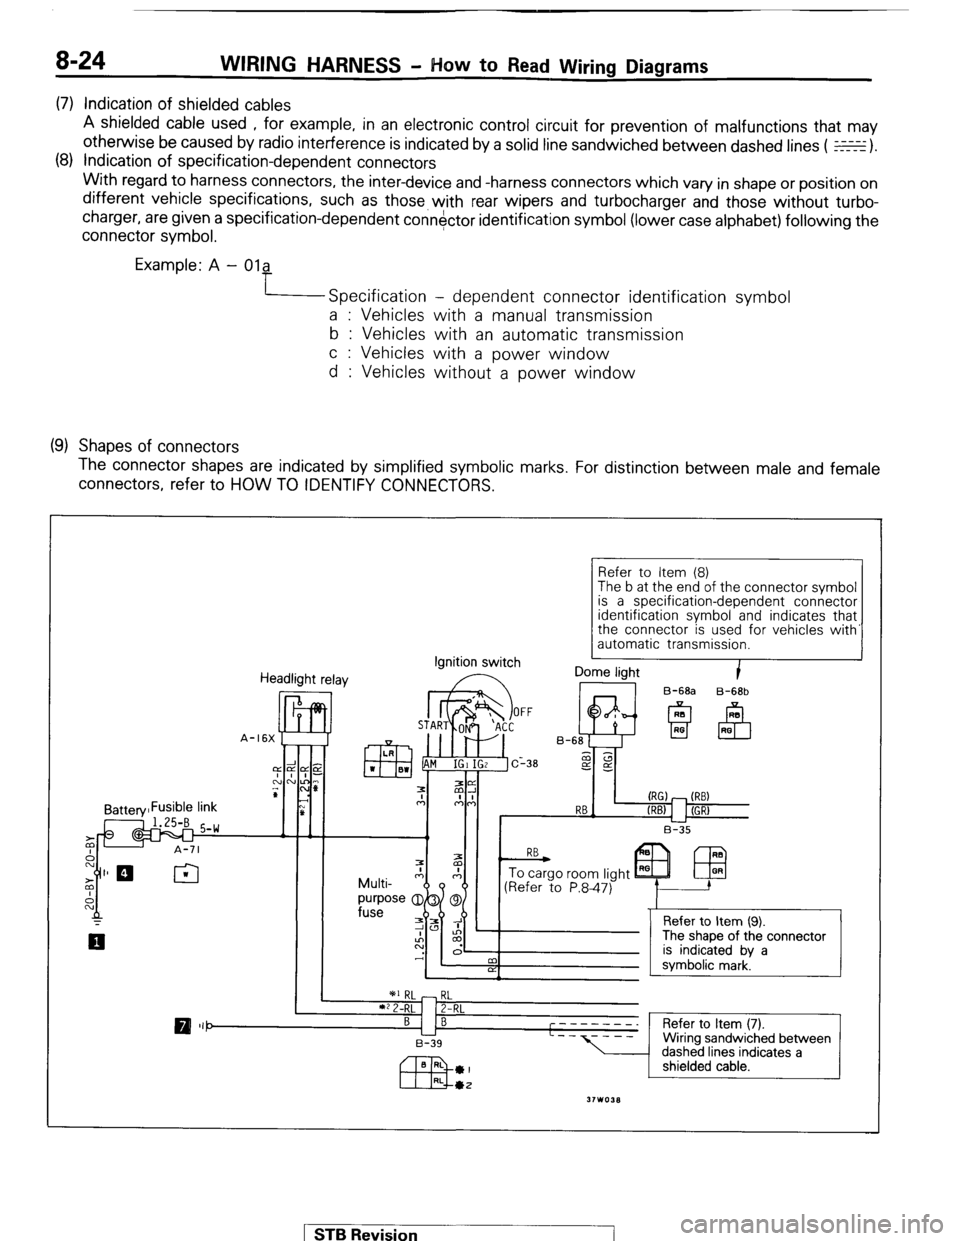
(7) Indication of shielded cables
A shielded cable used , for example, in an electronic control circuit for prevention of malfunctions that may
otherwise be caused by radio interference is indicated by a solid line sandwiched between dashed lines ( E).
(8) Indication of specification-dependent connectors
With regard to harness connectors, the inter-device and -harness connectors which vary in shape or position on
different vehicle specifications, such as those with rear wipers and turbocharger and those without turbo-
charger, are given a specification-dependent connector identification symbol (lower case alphabet) following the
connector symbol.
Example: A - Ola
Specification - dependent connector identification symbol
a : Vehicles with a manual transmission
b : Vehicles with an automatic transmission
c : Vehicles with a power window
d : Vehicles without a power window
(9) Shapes of connectors
The connector shapes are indicated by simplified symbolic marks. For distinction between male and female
connectors, refer to HOW TO IDENTIFY CONNECTORS.
Refer to Item (8)
The b at the end of the connector symbol
is a specification-dependent connector
identification
symbol and indicates that
the connector is used for vehicles with’
automatic transmission.
Headlight relay Ignition
switch I Dome light
B-68a B-68b STB Revision
Page 45 of 284
Position of guide to prevent
improper connection
fl!liB
9-wire connector
WIRING HARNESS - How to Read Wiring Diagrams 8-25
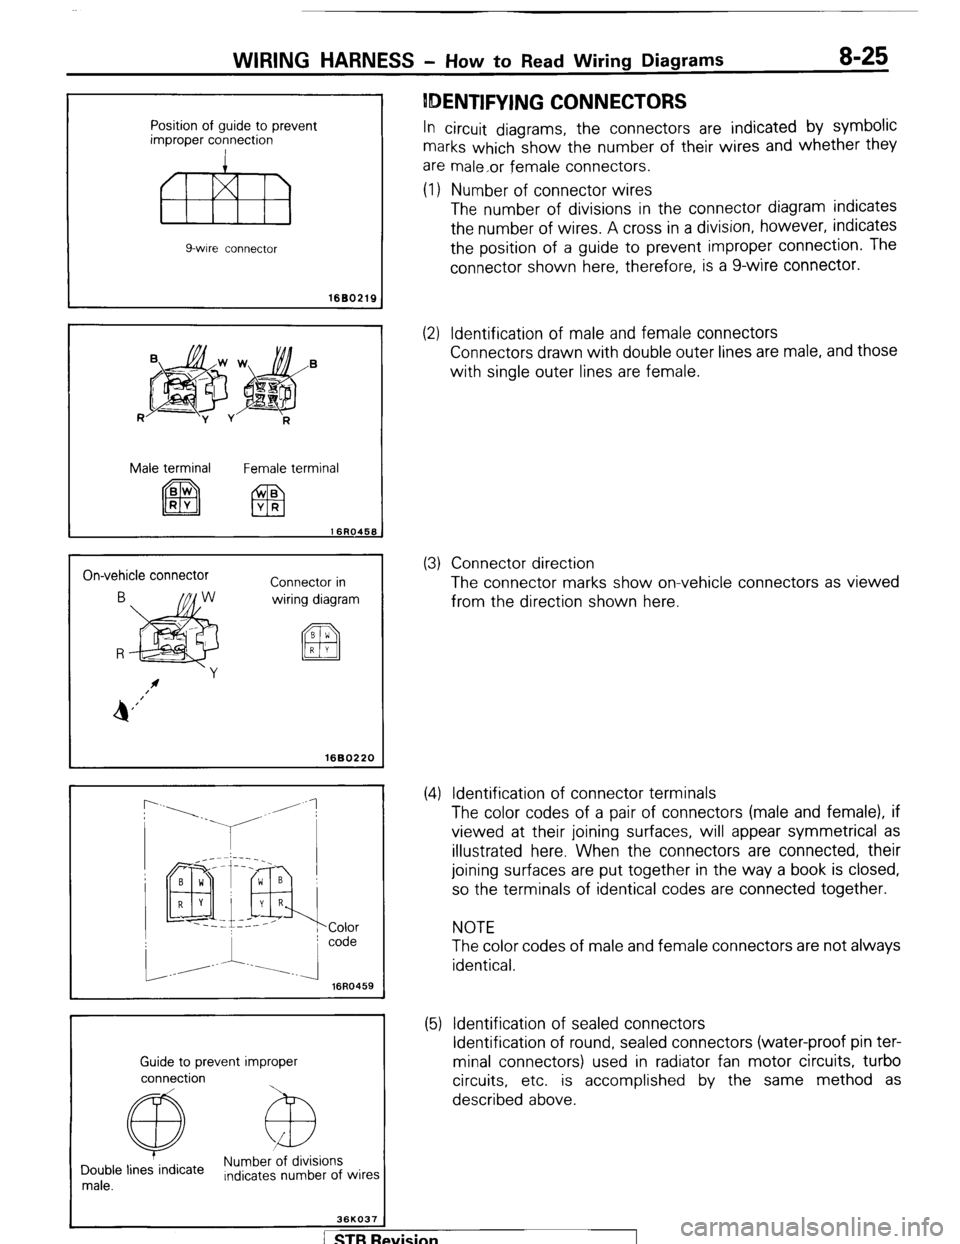
IDENTIFYING CONNECTORS
In circuit diagrams, the connectors are indicated by symbolic
marks which show the number of their wires and whether they
are male,or female connectors.
(1) Number of connector wires
The number of divisions in the connector diagram indicates
the number of wires. A cross in a division, however, indicates
the position of a guide to prevent improper connection. The
connector shown here, therefore, is a g-wire connector.
1680219
R
jpg$&’
-y v
R
Male terminal
Female terminal
On-vehicle connector
Connector in
wiring diagram
I 1680220
r
16R0459
Guide to prevent improper
connection
@ Numb&ions
Double lines indicate
male. Indicates number of wires
36KO37
(2) Identification of male and female connectors
Connectors drawn with double outer lines are male, and those
with single outer lines are female.
(3) Connector direction
The connector marks show on-vehicle connectors as viewed
from the direction shown here.
(4) Identification of connector terminals
The color codes of a pair of connectors (male and female), if
viewed at their joining surfaces, will appear symmetrical as
illustrated here. When the connectors are connected, their
joining surfaces are put together in the way a book is closed,
so the terminals of identical codes are connected together.
NOTE
The color codes of male and female connectors are not always
identical.
(5) Identification of sealed connectors
Identification of round, sealed connectors (water-proof pin ter-
minal connectors) used in radiator fan motor circuits, turbo
circuits, etc. is accomplished by the same method as
described above.
/ STB Revision
Page 46 of 284
8-26 WIRING HARNESS - HOW to Read Wiring Diagrams
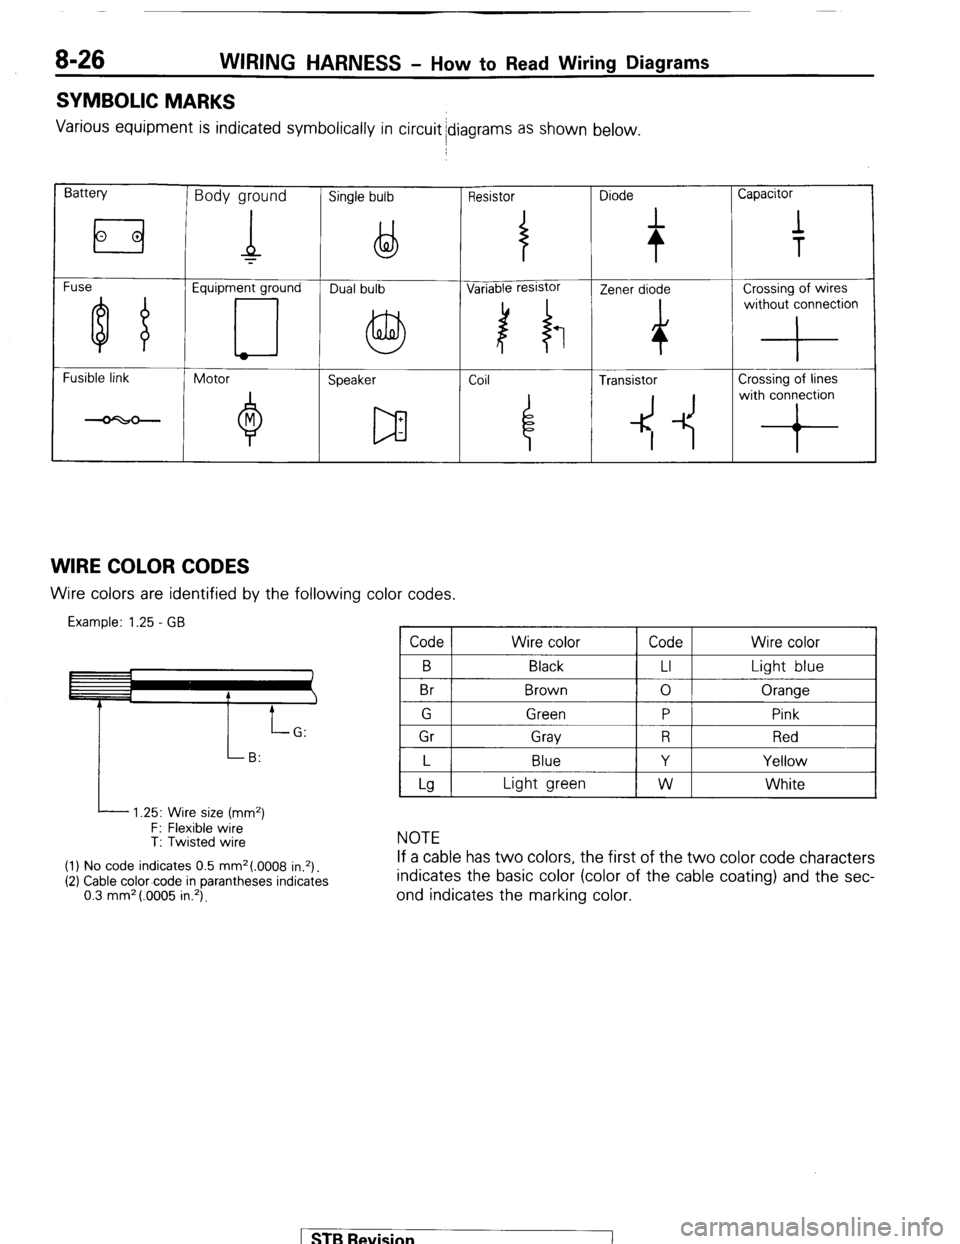
SYMBOLIC MARKS
Various equipment is indicated symbolically in circuit idiagrams as shown below.
Battery Body ground Single bulb Resistor Diode Capacitor
Fuse Equipment ground
Fusible link
Motor
Speaker Coil ~
4 Transistor Crossing of lines
4 -1~ with conron
WIRE COLOR CODES Wire colors are identified by the following color codes.
Example: 1.25 - GB Code Wire color Code Wire color
B
Br Black
Brown LI
0 Light blue
Oranqe
I P
i 1 Gr 1 Grav 1 R 1 Red I
I L I Blue
I Y I Yellow I
L 1.25: Wire size (mm2)
F: Flexible wire
T: Twisted wire
(1) No code indicates 0.5 mm2(.0008 in.*).
(2) Cable color-code in parantheses indicates
0.3 mm* (.0005 in.‘).
Lg Light green W White
NOTE
If a cable has two colors, the first of the two color code characters
indicates the basic color (color of the cable coating) and the sec-
ond indicates the marking color.
STB Revision