key MITSUBISHI OUTLANDER 2014 3.G Manual PDF
[x] Cancel search | Manufacturer: MITSUBISHI, Model Year: 2014, Model line: OUTLANDER, Model: MITSUBISHI OUTLANDER 2014 3.GPages: 451, PDF Size: 49.08 MB
Page 306 of 451
Parking 6-6 Driving safety
6
N00629601330
When parking on a hill, set the parking brake, and turn the front wheels toward the curb on a downhill, or away from
the curb on an uphill.
If necessary, apply chocks to the wheels. Be sure that the parki
ng brake is firmly set
when parked and that the selector lever is in the “P” (PARK) position. When parking on a hill, it
is important to set
the parking brake before moving the selector lever to the “P” (PARK) position. This pre- vents loading the parking brake against thetransaxle. When this ha
ppens, it is difficult to
move the selector lever out of the “P” (PARK) position. Never leave the engine running while you take a short nap or rest. Also, never leave the engine running in a closed or poorly venti- lated place.
Your front bumper can be damaged if you scrape it over curbs or parking stop blocks.Be careful when traveling up or down steep slopes where your bumper can scrape the road. Always remove the key from the ignition switch and lock all doors and the liftgate when leaving the
vehicle unattended.
Always try to park your vehicle in a well lit area.
Move effort could be required to turn the steering wheel.Refer to “Electric power steering system (EPS)” on page 5-89.
N00629900352
It is very important to know how much weight your vehicle can carry. This weight iscalled the vehicle ca
pacity weight and
includes the weight of
all occupants, cargo
(including the roof load), non-factory-installed options, and the tongue weight of the trailer, if any, being towed. The tire and loading information placard located on thedriver’s door sill of
your vehicle will show
how much weight it may properly carry. It is important to familiarize yourself with the following terms before
loading your vehicle:
Parking Parking on a hill Parking with the engine run- ning
WA R N I N G Leaving the engine ru
nning risks injury or
death from accidentally moving the selec-tor lever or the accumulation of toxicexhaust fumes in the passenger compart- ment.
Where you park
WA R N I N G Do not park your vehicle in areas where combustible materials
such as dry grass or
leaves can come in contact with a hotexhaust, since a fire could occur.
When leaving the vehicle
Do not keep the steering wheel fully turned for a long time Loading information
WA R N I N G Never overload your ve
hicle. Overloading
can damage your vehicle, adversely affectvehicle performance, including handling and braking, cause tire failure, and result in an accident.
BK0200500US.book 6 ページ 2013年2月12日 火曜日 午前9時46分
Page 317 of 451
7
Comfort controlsVents .................................................................................................7-2 Automatic climate control air conditioner .
..............
...........
.........
.....7-5
Important air conditioning operating tips ...
...........
...........
.........
.....7-14
Air purifier ......................................................................................7-14 AM/FM radio/CD player (if so equipped) .....................................7-15 Handling of Discs ..........................................................................7-18Audio Files (MP3/WMA/AAC) ....................................................7-20 Important Points on Safety for the Customer ................................7-24 Operation Keys ..............................................................................7-25Listen to Radio ...............................................................................7-28 Listen to Satellite Radio (if so equipped) .......................................7-29 Listen to CDs .................................................................................7-31Listen to MP3s ...............................................................................7-32 Listen to an iPod ............................................................................7-33 Listen to Audio Files on a USB Device .........................................7-35Listen to Bluetooth Audio (if so equipped) ....................................7-38 Display Indicator ...........................................................................7-40 Audio Quality and Volume Balance Adjustment ...........................7-41System Settings ..............................................................................7-42 Troubleshooting ...........
...........
...........
...........
...........
.........
.........
.....7-45
Antenna ...........................................................................................7-47General information about your radio ......
...........
...........
...........
.....7-48
BK0200500US.book 1 ページ 2013年2月12日 火曜日 午前9時46分
Page 341 of 451
Operation Keys
Comfort controls 7-25
7
N00716300021 N00716400022
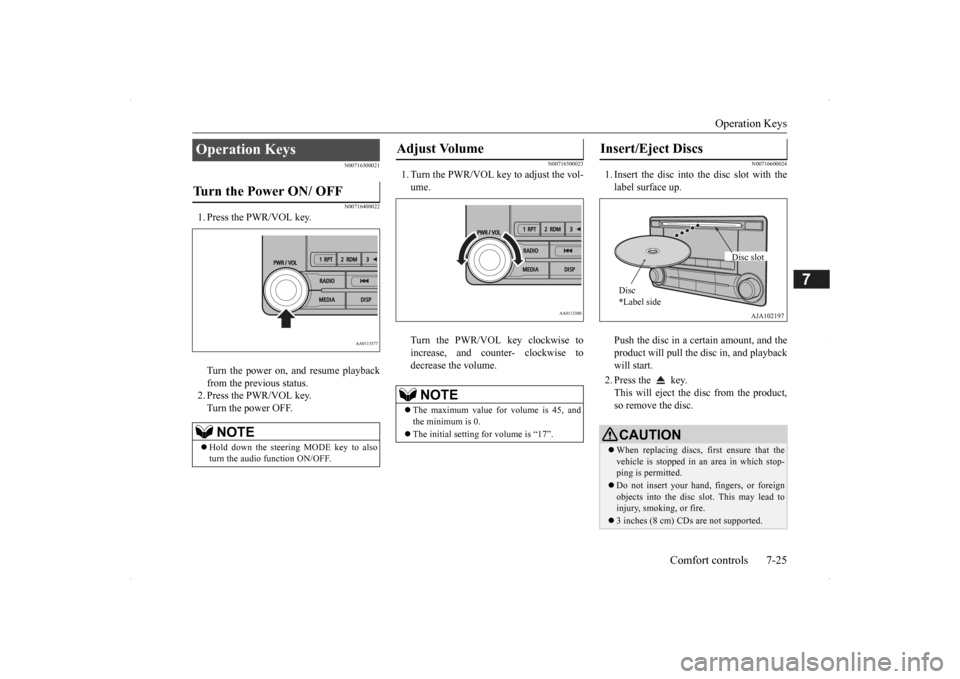
1. Press the PWR/VOL key. Turn the power on, and resume playback from the previous status.2. Press the PWR/VOL key. Turn the power OFF.
N00716500023
1. Turn the PWR/VOL key to adjust the vol-ume. Turn the PWR/VOL key clockwise to increase, and counter- clockwise to decrease the volume.
N00716600024
1. Insert the disc into the disc slot with thelabel surface up. Push the disc in a certain amount, and the product will pull the disc in, and playback will start. 2. Press the key. This will eject the disc from the product,so remove the disc.
Operation Keys Turn the Power ON/ OFF
NOTE
Hold down the steering MODE key to also turn the audio function ON/OFF.
Adjust Volume
NOTE
The maximum value for volume is 45, and the minimum is 0. The initial setting for volume is “17”.
Insert/Eject Discs
CAUTIONWhen replacing discs, first ensure that the vehicle is stopped in an
area in which stop-
ping is permitted. Do not insert your hand, fingers, or foreign objects into the disc slot. This may lead to injury, smoking, or fire. 3 inches (8 cm) CDs are not supported.Disc * Label side
Disc slot
BK0200500US.book 25 ページ 2013年2月12日 火曜日 午前9時46分
Page 342 of 451
Operation Keys 7-26 Comfort controls
7
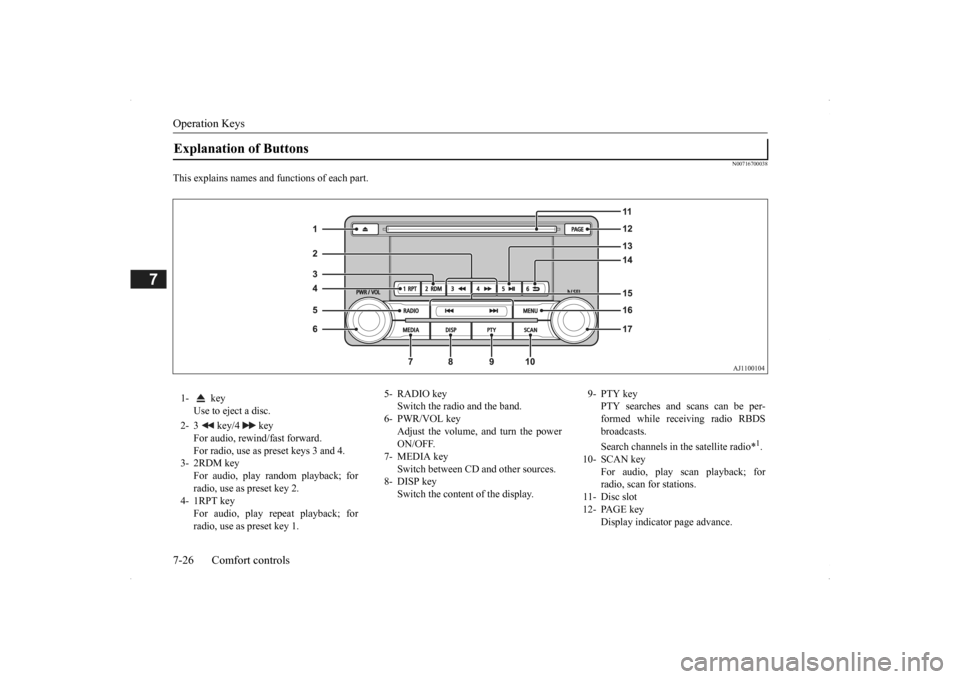
N00716700038
This explains names and functions of each part.Explanation of Buttons 1- key
Use to eject a disc.
2- 3 key/4 key
For audio, rewind/fast forward. For radio, use as preset keys 3 and 4.
3- 2RDM key
For audio, play random playback; for radio, use as preset key 2.
4- 1RPT key
For audio, play repeat playback; for radio, use as preset key 1.
5- RADIO key
Switch the radio and the band.
6- PWR/VOL key
Adjust the volume, and turn the powerON/OFF.
7- MEDIA key
Switch between CD
and other sources.
8- DISP key
Switch the content of the display.
9- PTY key
PTY searches and scans can be per- formed while receiving radio RBDS broadcasts. Search channels in the satellite radio*
1.
10- SCAN key
For audio, play scan playback; forradio, scan for stations.
11- Disc slot 12- PAGE key
Display indicator page advance.
BK0200500US.book 26 ページ 2013年2月12日 火曜日 午前9時46分
Page 343 of 451
Operation Keys
Comfort controls 7-27
7
N00716800042
13-
5 key Play/Pause Bluetooth Audio
*2, and use
as preset key 5 for radio.
14-
6 key Return during audio track search, and stop Bluetooth Audio
*2.
For radio, use as preset key 6.
15-
key/ key
For audio, select a
udio track/file; for
radio, perform auto
matic station selec-
tion. Select channels in the satellite radio*
1.
16- MENU key
Switch to Menu mode.
17- /SEL key
Adjust audio quality
and select items.
For radio, manually select stations. Select channels in the satellite radio*
1.
*1: Requires a satellite
tuner connection.
*2: Requires a separately
-purchased Blue-
tooth-capable audio
device in equip-
ment by type (vehicles with a Bluetooth
® 2.0 interface).
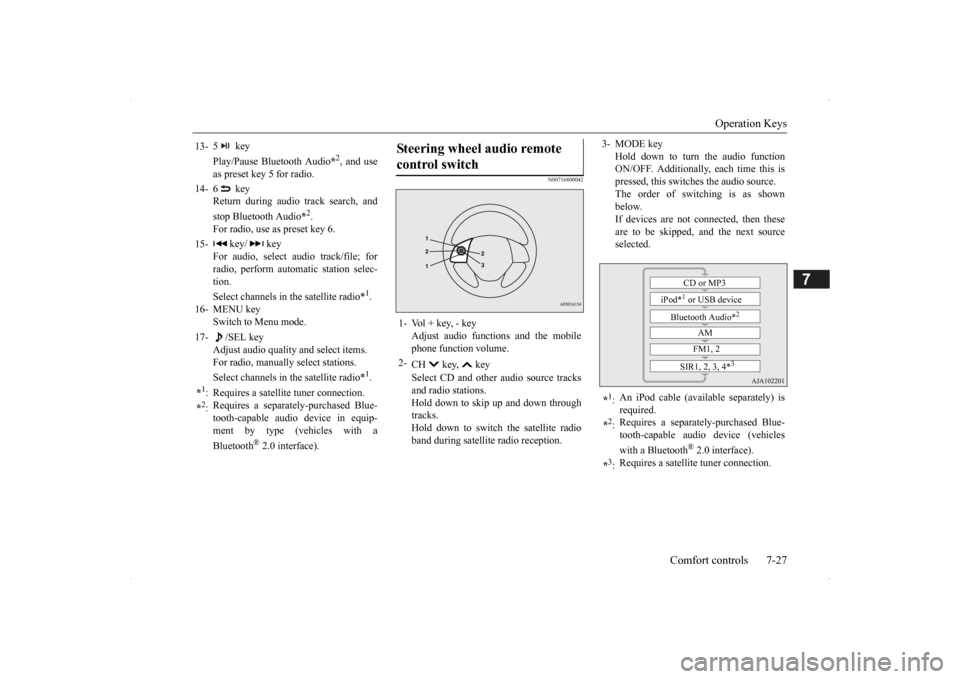
Steering wheel audio remote control switch 1- Vol + key, - key
Adjust audio functions and the mobile phone function volume.
2-
CH key, key Select CD and other
audio source tracks
and radio stations. Hold down to skip up and down through tracks.Hold down to switch the satellite radio band during satellit
e radio reception.
3- MODE key
Hold down to turn the audio function ON/OFF. Additionally, each time this ispressed, this switches the audio source. The order of switching is as shown below.If devices are not connected, then these are to be skipped, and the next source selected.
*1: An iPod cable (availa
ble separately) is
required.
*2: Requires a separately
-purchased Blue-
tooth-capable audio device (vehicles with a Bluetooth
® 2.0 interface).
*3: Requires a satellit
e tuner connection.CD or MP3
iPod*
1 or USB device
Bluetooth Audio*
2
AM FM1, 2
SIR1, 2, 3, 4*
3
BK0200500US.book 27 ページ 2013年2月12日 火曜日 午前9時46分
Page 344 of 451
Listen to Radio 7-28 Comfort controls
7
N00716900027
This explains how to listen to AM and FM radio broadcasts. Press the RADIO key to switch the band. Switch between AM and FM bands. The selected band is indicated on the display. *: When a satellite
tuner is connected
Turn the /SEL key to the frequency to lis- ten to.
Collective search for stations that can be received. Press the SCAN key.When a station is received, this is played for 5 seconds, then the product searches for the next station. Register the broadcast st
ation in advance, and
select this at a later time. 1. Tune in to the frequency to register.
2. Hold down any of the keys from the 1RPT key to the 6 key. A “Beep” sounds, and the preset key is registered.
During RBDS broadcast
reception,
select
PTY (program conten
t), and automatically
scan for stations. 1. During FM reception,
press the PTY key.
This switches to the PTY selection mode. 2. Press the PTY key to select PTY. 3. Press the key or key. The PTY (program cont
ent) indicator will
flash, and station selection will automati- cally start.When a station is received, the frequency is displayed.
Listen to Radio To Listen to the Radio
NOTE
Bands switch in the order AM, FM1, FM2, SIR1*, SIR2*, SIR3*, and SIR4*. If no signal is receiv
ed, bands will not be
switched to SIR2, SIR3, or SIR4.
Manual/Seek Station Selection
/SEL key (counter- clockwise)
Reduces the frequency being received.
/SEL key (clockwise)
Increases the frequency being received.
key
(hold down)
Release the button to start seek station selection, and when a station is received, scanning stops.
key
(hold down)Scan Station Selection
NOTE
Press this button again while receiving the station to return
to normal reception.
Preset Memory
NOTE
The preset memory can register a maximum of 6 stations for each band. If a preset key that al
ready has a station reg-
istered is selected, then this is overwritten with the new preset. Pressing the preset ke
y will select the previ-
ously registered frequency.
PTY Search
BK0200500US.book 28 ページ 2013年2月12日 火曜日 午前9時46分
Page 345 of 451
Listen to Satellite Radio (if so equipped)
Comfort controls 7-29
7
During RBDS broadcast
reception, select
PTY (program content) to perform a collec-tive search for stations. 1. During FM reception, press the PTY key. This switches to the PTY selection mode. 2. Press the PTY key to select PTY.3. Press the SCAN key. When a broadcast station is received, this is played for 5 seconds, then the productsearches for the next station.
N00717000025
This section explains how
to listen to satellite
radio. Press the RADIO key to switch the band. Switches between SIR1, SIR2, SIR3, and SIR4 bands. The selected band is indicated on the display.
Press the key or ke
y to select the sta-
tion.
NOTE
This receives the station detected first. 10 seconds after reception, PTY search mode will be cancelled. To receive a different station, press the key or key again.
PTY Scan
NOTE
Press this key again while receiving the sta- tion to return to normal reception.
Listen to Satellite Radio
(if so
equipped)
NOTE
A subscription is require
d to listen to satel-
lite radio. Satellite
radio cannot be received
after the free tria
l period has expired.
If no subscription has been made when the free trial period expire
s, the display will
alternate between “CALL” and “888-539-SIRI”.
To listen to Satellite Radio
NOTE
Bands switch in the order AM, FM1, FM2, SIR1, SIR2*, SIR3*, and SIR4*. Switch satellite radi
o bands by holding down
the key or key on the steering remote control switch.
*:If no signal is received, bands will not be switched.
Select a Station
key
Go down one step from the channel being received.
key
Go up one step from the channel being received.
key
(Hold down)
While the key is held down, it will cycle down through the channels being received.
key
(Hold down)
While the key is held down, it will cycle up through the channels being received.
NOTE
When cycling up/down through channels, the channel number display
in the upper level of
the display changes. When channel number “
000” is selected, the
SIRIUS ID (12 digi
ts) is displayed.
BK0200500US.book 29 ページ 2013年2月12日 火曜日 午前9時46分
Page 346 of 451

Listen to Satellite Radio (if so equipped) 7-30 Comfort controls
7
Channels are received in order and take 10 seconds each. Press the SCAN key. All of the channels are scanned. 1. Press the PTY key. Switches to the category search mode, and the category name is indicated on thedisplay. 2. Turn the /SEL key to select the cate- gory.3. Press the SCAN key. The channels in the selected category are scanned.
Register the channel in
advance, and select
this at a later time. 1. Tune in to the channel to register. 2. Hold down any of the keys from the 1RPT key to the 6 key. A “Beep” sounds, and the preset key is registered.
Other channels can be
selected while listen-
ing to a channel. 1. Press the PTY key. Switches to the category search mode,and the category name is indicated on the display. 2. Turn the /SEL key to select the cate- gory. 3. Press the /SEL key. Switches to channe
l search mode.
4. Turn the /SEL key to select the chan- nel. 5. Press the /SEL key. A “Beep” sounds, and the selected chan- nel is received. (Channel preliminary set-ting mode) The channel name shown on the display flashes. Press the /SEL key again to cancel the search mode and retu
rn to normal recep-
tion. 6. To continue the search, turn the /SEL key to select the channel. The selected channel is received. 7. Press the /SEL key. Cancels the search mode and returns tonormal reception.
Scan Station Selection
Scan All Channels
NOTE
Press this key again while receiving the channel to return to normal reception. Selecting a channel will cancel this.
Scan Category Channels
NOTE
Press the SCAN key or PTY key again while receiving the channel to return to normalreception. Turning the /SET key will cancel.
Preset Memory
NOTE
The preset memory can register a maximum of 6 stations per band. If a preset key that already has a channel reg- istered is selected, then this is overwritten with the new preset. Pressing the preset key will select the previ- ously registered channel.The preset channels on the display are shown as “P1” though “P6”.
Channel Search
BK0200500US.book 30 ページ 2013年2月12日 火曜日 午前9時46分
Page 347 of 451
Listen to CDs
Comfort controls 7-31
7
The CODE required for changing the LOCK settings in the satellite settings is initialized. (The factory setting is “1111”.) When the power is off, press the PWR/VOL key while holding dow
n the /SEL key.
“Turn the Power ON/OFF” (P7-25)
N00717100026
This explains how to
listen to audio CDs
(CD-DA/CD-TEXT). Insert the disc. Insert a disc to automatically start playback. “Insert/Eject Discs” (P.7-25) If a disc is already within the product, press the MEDIA key to switch to CD as the source. Press the key or key to select the track. This enables selection of
the next or previous
track. Hold down the 3 key or the 4 key. Fast forward/rewind is possible.
Repeat playback, random
playback, and scan
playback are possible. Press the 1RPT key. Repeat playback of the track currently being played. Press the 2RDM key. Play the tracks on the disc in a random order.
NOTE
After making preliminar
y settings in the
channel search mode, this will switch to thechannel being received. Channel number “000” is for the SIRUS ID display, so it cannot be searched. If the “PTY ALL” category is selected, all channels can be searched in the channelsearch mode. In the category mode, press the PTY key to cancel search mode. In the channel search mode, press the 6 key to return to the category search mode. In the channel pre
liminary setting mode,
press the 6 key to return to the category search mode without returning to the previ- ous channel search mode. If there is no operation for 10 seconds, the search mode wi
ll be cancelled.
Initialize the CODE (Passcode)
Listen to CDs Play CDs Select the Track Fast Forward or Rewind
Switch Playback Mode Repeat Playback (RPT)
NOTE
Pressing again will cancel. Selecting a track, ejec
ting, fast forwarding,
or rewinding will cancel.
Random Playback (RDM)
NOTE
Pressing again will cancel. Ejecting will cancel this.
BK0200500US.book 31 ページ 2013年2月12日 火曜日 午前9時46分
Page 348 of 451
Listen to MP3s 7-32 Comfort controls
7
Press the SCAN key. Play the first 10 seconds of each of the tracks on the whole disc in order.
N00717200027
This explains how to li
sten to audio files on a
disc. Insert the disc. Insert a disc to automatically start playback. “Insert/Eject Discs” (P.7-25)
If a disc is already wi
thin the product, press
the MEDIA key to switch to CD as thesource. Press the key or key to select the track. This enables selection of the next or previous track. Hold down the 3 key or the 4 key. Fast forward/rewind is possible. Repeat playback, random
playback, and scan
playback are possible.
Press the 1RPT key. Repeat playback of th
e track currently being
played. Hold down the 1RPT key. Repeat playback of the tracks within the folder currently being played. Press the 2RDM key.
Scan Playback (SCAN)
NOTE
Press this button again during playback if you wish to hear that track, and that track will play normally.
Listen to MP3s
CAUTION CD-ROM and CD-R/RW media can only play back MP3 fo
rmat audio files.
To Listen to MP3s
NOTE
Depending on the file st
ructure, it may take
some time to read the contents of the disc.
Select the Track (File) Fast Forward or Rewind Switch Playback Mode
Repeat Playback (RPT)
NOTE
Pressing again will cancel. Selecting a file, ejecti
ng, fast forwarding, or
rewinding will cancel.
Folder Repeat Playback
NOTE
Pressing again will cancel. Even if the file is
selected, folder repeat
playback will not
be cancelled.
Random Playback (RDM)
BK0200500US.book 32 ページ 2013年2月12日 火曜日 午前9時46分