MITSUBISHI OUTLANDER 2015 3.G Owners Manual
Manufacturer: MITSUBISHI, Model Year: 2015, Model line: OUTLANDER, Model: MITSUBISHI OUTLANDER 2015 3.GPages: 446, PDF Size: 59.52 MB
Page 311 of 446
Trailer towing 6-12 Driving safety
6
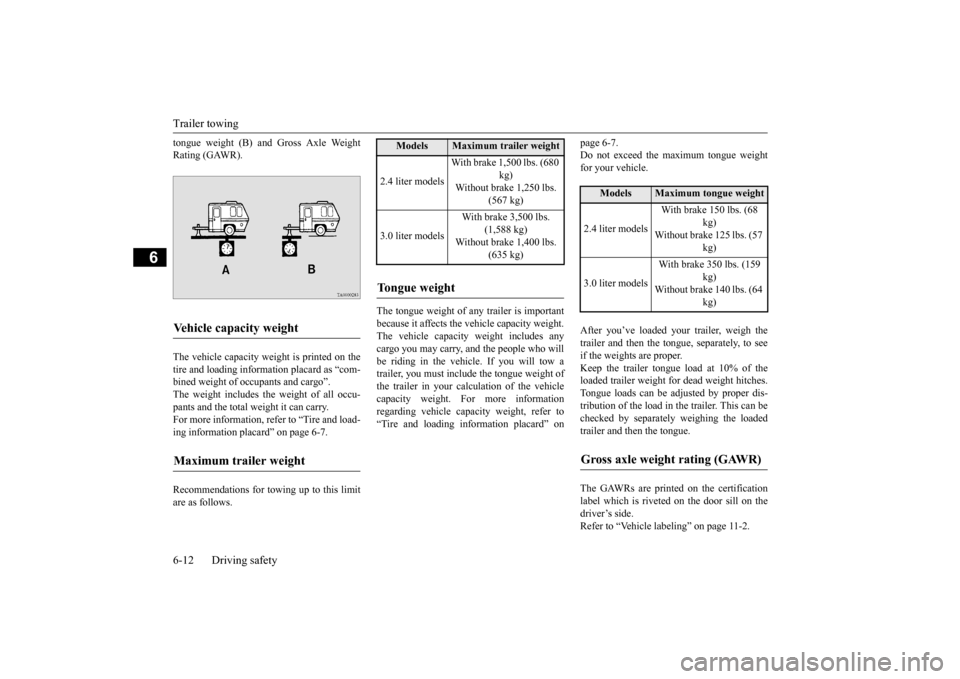
tongue weight (B) and Gross Axle Weight Rating (GAWR). The vehicle capacity weight is printed on the tire and loading inform
ation placard as “com-
bined weight of oc
cupants and cargo”.
The weight includes the weight of all occu- pants and the total weight it can carry.For more information, refer to “Tire and load- ing information plac
ard” on page 6-7.
Recommendations for towing up to this limit are as follows.
The tongue weight of any trailer is important because it affects the vehicle capacity weight. The vehicle capacity weight includes anycargo you may carry, and the people who will be riding in the vehicl
e. If you will tow a
trailer, you must include the tongue weight ofthe trailer in your calc
ulation of the vehicle
capacity weight. For more information regarding vehicle capa
city weight, refer to
“Tire and loading information placard” on
page 6-7. Do not exceed the maximum tongue weightfor your vehicle. After you’ve loaded your trailer, weigh the trailer and then the to
ngue, separately, to see
if the weights are proper. Keep the trailer tongue load at 10% of the loaded trailer weight fo
r dead weight hitches.
Tongue loads can be adjusted by proper dis- tribution of the load in the trailer. This can be checked by separately weighing the loadedtrailer and then the tongue. The GAWRs are printed on the certification label which is riveted on the door sill on the driver’s side. Refer to “Vehicle labeling” on page 11-2.
Vehicle capacity weight Maximum trailer weight
Models
Maximum trailer weight
2.4 liter models
With brake 1,500 lbs. (680
kg)
Without brake 1,250 lbs.
(567 kg)
3.0 liter models
With brake 3,500 lbs.
(1,588 kg)
Without brake 1,400 lbs.
(635 kg)
Tongue weight
Models
Maximum tongue weight
2.4 liter models
With brake 150 lbs. (68
kg)
Without brake 125 lbs. (57
kg)
3.0 liter models
With brake 350 lbs. (159
kg)
Without brake 140 lbs. (64
kg)
Gross axle weight rating (GAWR)
BK0211800US.book 12 ページ 2014年3月12日 水曜日 午後2時42分
Page 312 of 446
Trailer towing
Driving safety 6-13
6
Choose a proper hitch and ball, and make sure it is installed at a height that is compati- ble with the trailer.Use a good equalizing hitch which uniformly distributes the trailer tongue load throughout the frame. A safety chain must al
ways be used between
the towing vehicle and the trailer. Leave suf- ficient slack in the chain for turns. The chain
should cross under the trailer tongue to pre- vent the tongue from dropping to the groundin case it becomes damaged or separated. For correct safety chai
n procedures, consult
your authorized Mitsub
ishi Motors dealer.
Your vehicle will need service more often when you’re towing a trailer. Refer to “WAR- RANTY AND MAINTENANCE MAN-UAL”. Especially important in trailer operation are manual transaxle oil, automatic transaxle fluid, engine oi
l, rear axle oil, belt,
cooling system and brake system. Each of these is covered in this manual. For details, please refer to the “Vehicle careand maintenance” section. Check periodically to se
e that all hitch nuts
and bolts are tight.
Mitsubishi Motors recommends that any trailer having a total we
ight of 1,250 lbs (567
kg) or more (2400 models), 1,400 lbs (635kg) or more (3000 mode
ls) be equipped with
its own electric or surge-type brakes. If you choose electric br
akes, be sure they are
electrically actuated. Do not attempt to tap into your vehicle’s hydraulic system. No mat- ter how successful it
may seem, any attempt
to attach trailer brakes to your vehicle’s hydraulic system will lower braking effec- tiveness and create a potential hazard. Trailer lights and equipment must comply with federal, state,
and local regulations.
Check with your local
recreational vehicle
dealer for the requirements in your area, and use only equipment designed for your vehi-cle. Since lighting and wiring vary by trailer type and brand, you should have a qualified tech- nician install a suitable
connector between the
vehicle and the trailer. Improper equipment or installation can cause
damage to your vehi-
Trailer hitches
WA R N I N GIf you make any holes in the body of your vehicle for installing
a trailer hitch, be
sure to seal the holes later when you remove the hitch. If
you don’t seal them,
deadly carbon monoxide (CO) from your exhaust can enter your vehicle. Refer to “Exhaust system” on page 9-24.NOTE
Mitsubishi Motors recommends that sway control be used whenever you are towing, to improve towing stability. For further informati
on, please contact your
authorized Mitsubish
i Motors dealer.
Safety chains
CAUTIONNever tow a trailer wi
thout using a safety
chain securely attached to both the trailer and the vehicle. If the
coupling unit or hitch
ball experiences a probl
em, the trailer may
separate from
your vehicle.
Maintenance when trailer tow- ing
Trailer brakes Trailer lights
BK0211800US.book 13 ページ 2014年3月12日 水曜日 午後2時42分
Page 313 of 446
Trailer towing 6-14 Driving safety
6
cle’s electrical system
and affect your vehicle
warranty. Many states and Canadi
an provinces require
special outside mirrors when towing a trailer.Even if not required,
you should install spe-
cial mirrors if you ca
nnot clearly see behind
you, or if the trailer
creates a blind spot.
Ask your trailer sales or
rental agency if any
other items are recomm
ended or required for
your towing situation.
Towing a trailer requires a certain amount of experience. Before setting out for the open road, you’ll want to get to know your trailer. Acquaintyourself with the feel of handling and braking with the added weight of the trailer. Always keep in mind that the vehicle you are drivingis now a good deal longer and not nearly as responsive as your vehicle is without a trailer. Before you start, check the trailer hitch, safety chains, tires and mirror adjustment.
Be sure your vehicle’s ti
res are inflated to the
cold inflation pressure listed in the manual. You’ll find these numbe
rs on the tire and
loading information placard at the sill of the driver’s door. Refer to “Tire inflati
on pressures” on page
9-18. Stay at least twice as far behind the vehicle ahead as you would when driving your vehi-cle without a trailer.
This can help you avoid
situations that require
heavy braking and sud-
den turns. You’ll need more passing distance up ahead when you’re towing a trailer. And, becauseyou’re a good deal longer, you’ll need to go much farther beyond the passed vehicle before you can return to your lane.
Additional trailer equipment Operating hints
WA R N I N G If you have a rear
window open and you
tow a trailer with yo
ur vehicle, carbon
monoxide gas which
you cannot see or
smell could come into your vehicle. It can cause unconsciousness or death. Refer to“Exhaust system” on page 9-24. To maximize your safety when towing a trailer: Have your exhaust system inspected for leaks, and make necessary repairs beforestarting on your trip. Keep the rear
windows closed.
If exhaust does come into your vehicle through a window or
another opening,
drive with your front, main heating orcooling system on an
d with the blower on
any speed. This will
bring fresh, outside
air into your vehicle. Do not use recircula-tion because it only recirculates the air inside your vehicle. Refer to “Air selection switch” on page 7-9.
Driver preparation Vehicle preparation
WA R N I N G
Tire Following distance Passing
BK0211800US.book 14 ページ 2014年3月12日 水曜日 午後2時42分
Page 314 of 446
Trailer towing
Driving safety 6-15
6
Hold the bottom of the steering wheel with one hand. Then, to move the trailer to the left, just move that hand to the left. To move thetrailer to the right, move your hand to the right. Always back up sl
owly and, if possible,
have someone guide you. When you’re turning with a trailer, make wider than normal turns to help prevent the trailer from striking shoulders, curbs, roadsigns, trees or other objects. Avoid jerky or sudde
n maneuvers. Signal
well in advance. Towing a trailer puts a
dditional burden on the
engine and transaxle,
which may cause over-
heating. Following ar
e some suggestions to
reduce overheating: When towing at high al
titudes, engine coolant
and automatic transaxle oil will overheat at a lower temperature than at normal altitudes.If you turn your engine off immediately after towing at high altitude
on steep uphill grades,
your vehicle may show
signs similar to over-
heating. To avoid this
, let the engine run
while parked (preferably on level ground) with the automatic transaxle in the “P”(PARK) position for a few minutes before turning the engine off. If the engine coolant temperature indica- tor flashes on the in
formation screen in
the multi-information display or the engine power drops suddenly, refer to “Engine overheating” on page 8-4.
If the warning display or warning display illuminates, re
fer to “Warning dis-
play” on page 5-62, 5-69.
Reduce speed and downshift before you start down a long or steep downgrade. If you don’t downshift, over using the brakes can cause reduced brake efficiency. You can tow in “D” (DRIVE) position. You may want to shift the selector lever to the 3rd or a lower position, under heavy loads or hillyconditions. Always place chocks or blocks under both the vehicle and trailer wheels when parking. Be sure that the parking brake is firmly set and that the selector lever is in the “P” (PARK)position. Avoid parki
ng on a hill with a
trailer, but if it cannot be avoided, do so only after performing the following: 1. Apply the brakes and keep them applied. 2. Have someone plac
e chocks or blocks
under both the vehicle
and trailer wheels.
Backing up Making turns
CAUTION Making sharp turns while towing a trailer could cause the
trailer to come in contact
with the vehicle. Your
vehicle could be dam-
aged. Avoid making sharp turns while tow- ing a trailer.
Overheating
Cause of overheating
Solution
Air conditioning on Turn off Highway speeds Reduce speed Going up hills Select lower gear posi-
tion
Stop-and-go city traf- fic
With the vehicle stopped, shift to the “N” (NEUTRAL) position and idle the engine at high idle.
Driving on hills Parking
BK0211800US.book 15 ページ 2014年3月12日 水曜日 午後2時42分
Page 315 of 446

Trailer towing 6-16 Driving safety
6
3. When the chocks or blocks are in place, release your brakes slowly until thechocks or blocks absorb the load. 4. Apply the parking brake firmly. 5. Set the selector lever to the “P” (PARK)position and turn off the engine.
When restarting out after parking on a hill: 1. Check that the selector lever is set to the “P” (PARK) position. 2. Start the engine. Be sure to keep the brake pedal depressed. 3. Set the selector lever to the “D” (DRIVE)position or “R” (REVERSE) position. 4. Release the parking brake and brake pedal and slowly pull or back away from thechocks or blocks. Stop and apply your brakes. 5. Have someone retrieve the chocks orblocks.
BK0211800US.book 16 ページ 2014年3月12日 水曜日 午後2時42分
Page 316 of 446
7
Comfort controlsVents ................................................................................................7-2 Automatic climate control air conditioner
..............
...........
.........
.....7-5
Important air conditioning operating tips ..
...........
...........
.........
.....7-14
Air purifier .....................................................................................7-14 AM/FM radio/CD player (if so equipped) .....................................7-15 Handling of Discs ..........................................................................7-18Audio Files (MP3/WMA/AAC) ....................................................7-20 Important Points on Safety for the Customer ................................7-24 Operation Keys ..............................................................................7-24Listen to Radio ...............................................................................7-28 Listen to Satellite Radio (if so equipped) .......................................7-29 Listen to CDs .................................................................................7-31Listen to MP3s ...............................................................................7-32 Listen to an iPod ............................................................................7-33 Listen to Audio Files on a USB Device .........................................7-35Listen to Bluetooth Audio (if so equipped) ....................................7-38 Display Indicator ...........................................................................7-40 Audio Quality and Volume Balance Adjustment ...........................7-41System Settings ..............................................................................7-42 Troubleshooting ..........
...........
...........
...........
...........
.........
.........
.....7-45
Antenna ..........................................................................................7-47General information about your radio .....
...........
...........
...........
.....7-48
BK0211800US.book 1 ページ 2014年3月12日 水曜日 午後2時42分
Page 317 of 446
Vents 7-2 Comfort controls
7
N00729901288
N00730201340
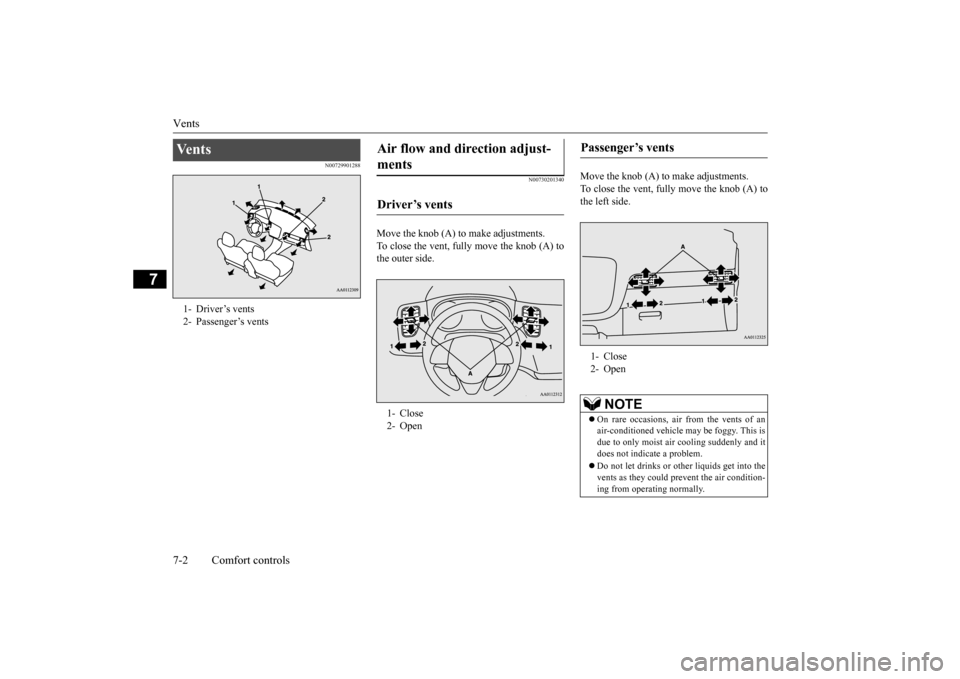
Move the knob (A) to make adjustments. To close the vent, fully move the knob (A) tothe outer side.
Move the knob (A) to make adjustments. To close the vent, fully move the knob (A) to the left side.
Ve n t s 1- Driver’s vents2- Passenger’s vents
Air flow and direction adjust- ments Driver’s vents 1- Close 2- Open
Passenger’s vents 1- Close 2- Open
NOTE
On rare occasions, air from the vents of an air-conditioned vehicle
may be foggy. This is
due to only moist air
cooling suddenly and it
does not indica
te a problem.
Do not let drinks or ot
her liquids get into the
vents as they could pr
event the air condition-
ing from operating normally.
BK0211800US.book 2 ページ 2014年3月12日 水曜日 午後2時42分
Page 318 of 446
Vents
Comfort controls 7-3
7
N00736401605
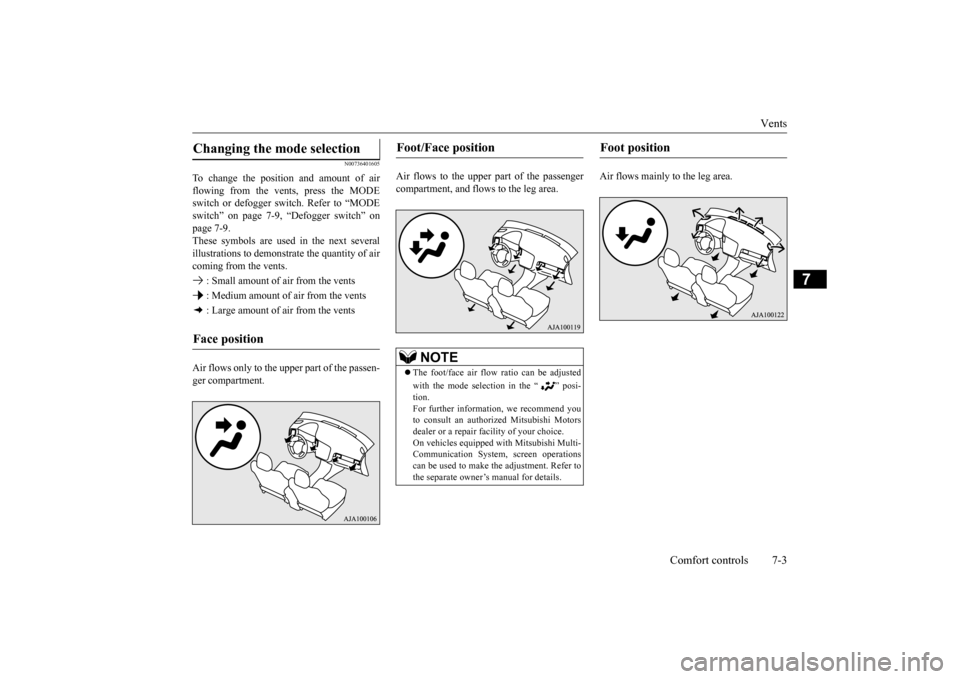
To change the position and amount of air flowing from the vents, press the MODE switch or defogger sw
itch. Refer to “MODE
switch” on page 7-9, “Defogger switch” on page 7-9. These symbols are used in the next severalillustrations to demonstr
ate the quantity of air
coming from the vents. : Small amount of air from the vents : Medium amount of air from the vents : Large amount of air from the vents Air flows only to the upper part of the passen- ger compartment.
Air flows to the upper part of the passenger compartment, and flows to the leg area.
Air flows mainly to the leg area.
Changing the mode selection Face position
Foot/Face position
NOTE
The foot/face air flow ratio can be adjusted with the mode selection in the “ ” posi- tion.For further information, we recommend you to consult an authorized Mitsubishi Motors dealer or a repair fa
cility of your choice.
On vehicles equipped
with Mitsubishi Multi-
Communication System, screen operations can be used to make
the adjustment. Refer to
the separate owner’s manual for details.
Foot position
BK0211800US.book 3 ページ 2014年3月12日 水曜日 午後2時42分
Page 319 of 446
Vents 7-4 Comfort controls
7
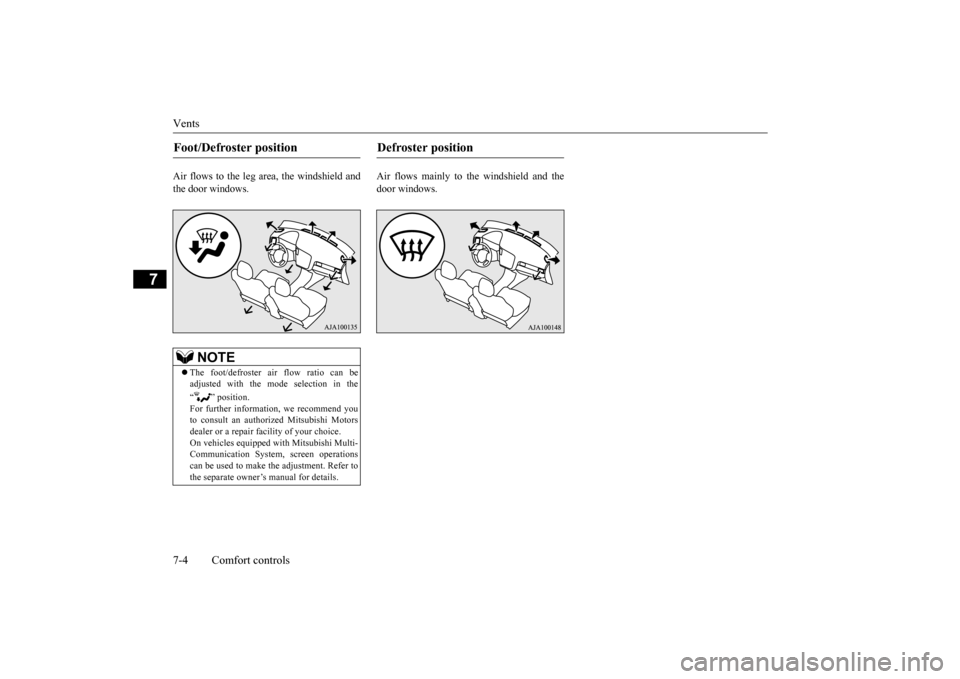
Air flows to the leg area, the windshield and the door windows.
Air flows mainly to the windshield and the door windows.
Foot/Defroster position
NOTE
The foot/defroster air flow ratio can be adjusted with the mode selection in the “ ” position. For further information, we recommend you to consult an authorized Mitsubishi Motors dealer or a repair fa
cility of your choice.
On vehicles e
quipped with Mitsubishi Multi-
Communication System, screen operations can be used to make the adjustment. Refer tothe separate owner’s manual for details.
Defroster position
BK0211800US.book 4 ページ 2014年3月12日 水曜日 午後2時42分
Page 320 of 446
Automatic climate cont
rol air conditioner
Comfort controls 7-5
7
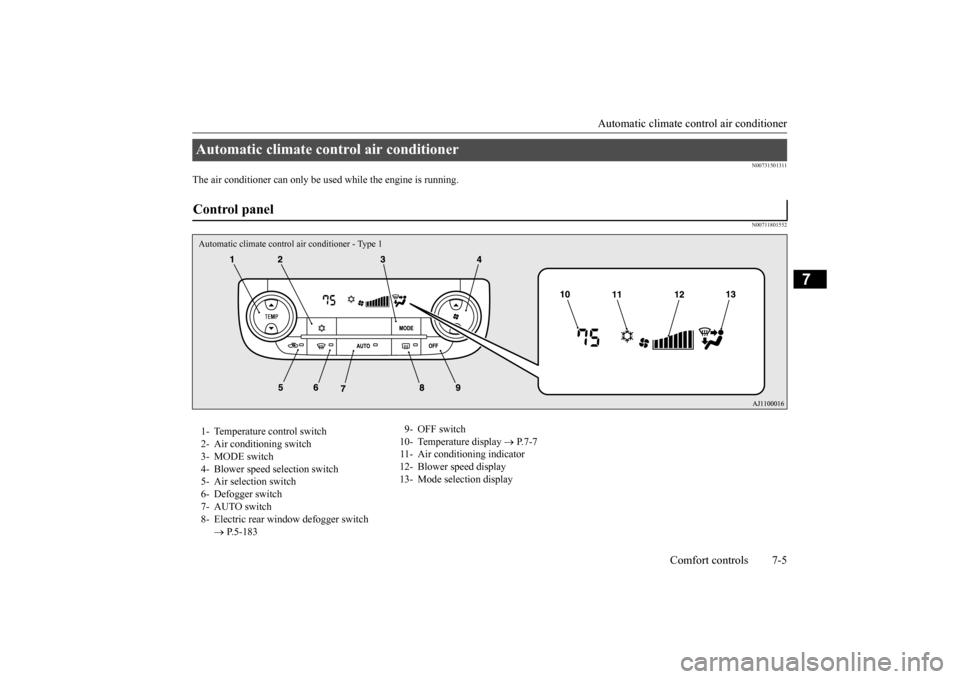
N00731501311
The air conditioner can only be us
ed while the engine is running.
N00711801552
Automatic climate control air conditioner Control panel Automatic climate control air conditioner - Type 11- Temperature control switch 2- Air conditioning switch 3- MODE switch 4- Blower speed
selection switch
5- Air selection switch 6- Defogger switch 7- AUTO switch8- Electric rear wi
ndow defogger switch
P.5-183
9- OFF switch 10- Temperature display
P.7-7
11- Air conditioning indicator 12- Blower speed display 13- Mode selection display
BK0211800US.book 5 ページ 2014年3月12日 水曜日 午後2時42分