low beam MITSUBISHI OUTLANDER SPORT 2014 3.G Owners Manual
[x] Cancel search | Manufacturer: MITSUBISHI, Model Year: 2014, Model line: OUTLANDER SPORT, Model: MITSUBISHI OUTLANDER SPORT 2014 3.GPages: 384, PDF Size: 46.94 MB
Page 8 of 384
Outside
Overview 1-6
1
N00100601349
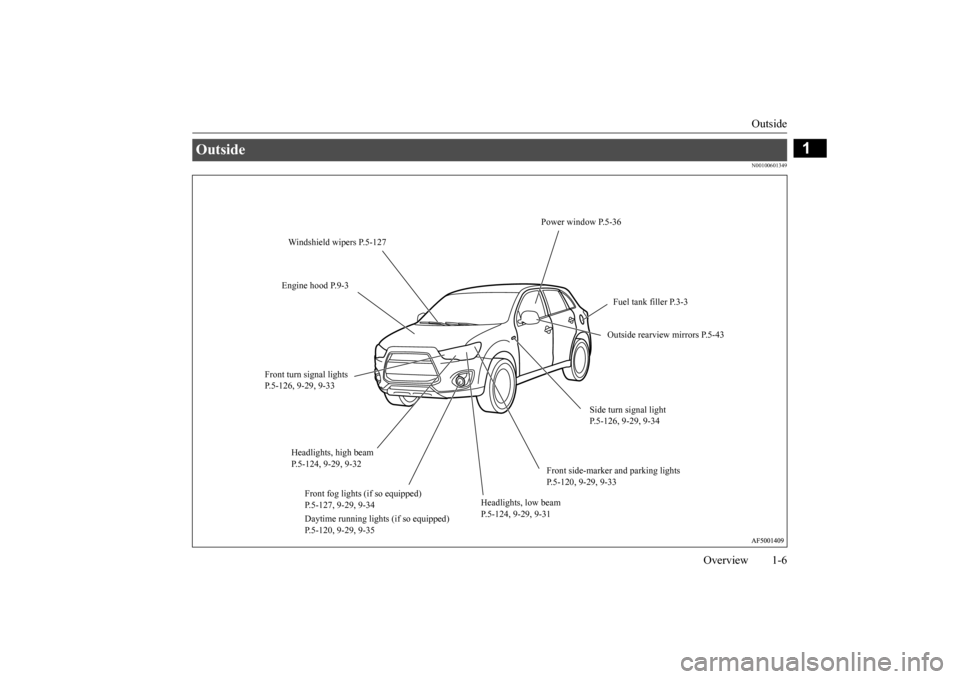
Outside
Power window P.5-36
Windshield wipers P.5-127 Engine hood P.9-3
Fuel tank filler P.3-3 Outside rearview mirrors P.5-43
Front turn signal lights P.5-126, 9-29, 9-33
Side turn signal light P.5-126, 9-29, 9-34
Headlights, high beam P.5-124, 9-29, 9-32
Front side-marker and parking lights P.5-120, 9-29, 9-33
Front fog lights (if so equipped) P.5-127, 9-29, 9-34
Headlights, low beam P.5-124, 9-29, 9-31
Daytime running lights (if so equipped) P.5-120, 9-29, 9-35
BK0202700US.bo
ok 6 ページ 2013年3月28日 木曜日 午前11時54分
Page 180 of 384
Warning lights
Features and controls 5-117
5
N00520100086
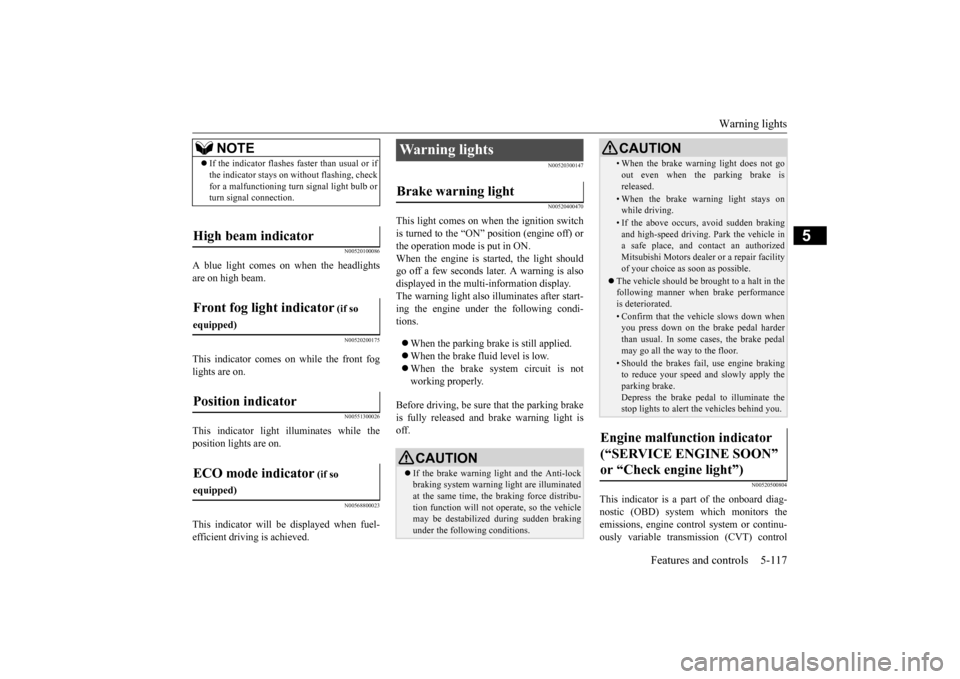
A blue light comes on when the headlights are on high beam.
N00520200175
This indicator comes on while the front fog lights are on.
N00551300026
This indicator light illuminates while theposition lights are on.
N00568800023
This indicator will be displayed when fuel-efficient driving is achieved.
N00520300147 N00520400470
This light comes on when the ignition switch is turned to the “ON” position (engine off) orthe operation mode is put in ON. When the engine is started, the light should go off a few seconds later. A warning is alsodisplayed in the multi-information display.The warning light also illuminates after start- ing the engine under the following condi- tions. When the parking brake is still applied. When the brake fluid level is low. When the brake system circuit is not working properly.
Before driving, be sure that the parking brake is fully released and brake warning light is off.
N00520500804
This indicator is a part of the onboard diag- nostic (OBD) system which monitors the emissions, engine control system or continu- ously variable transmission (CVT) control
NOTE
If the indicator flashes faster than usual or if the indicator stays on without flashing, check for a malfunctioning turn signal light bulb or turn signal connection.
High beam indicator Front fog light indicator
(if so
equipped)Position indicator ECO mode indicator
(if so
equipped)
Warning lights Brake warning light
CAUTION If the brake warning light and the Anti-lock braking system warning light are illuminated at the same time, the braking force distribu- tion function will not operate, so the vehiclemay be destabilized during sudden braking under the following conditions.
• When the brake warning light does not goout even when the parking brake is released.• When the brake warning light stays onwhile driving.• If the above occurs, avoid sudden brakingand high-speed driving. Park the vehicle in a safe place, and contact an authorized Mitsubishi Motors dealer or a repair facilityof your choice as soon as possible.
The vehicle should be brought to a halt in the following manner when brake performance is deteriorated.• Confirm that the vehicle slows down whenyou press down on the brake pedal harder than usual. In some cases, the brake pedalmay go all the way to the floor.• Should the brakes fail, use engine brakingto reduce your speed and slowly apply the parking brake. Depress the brake pedal to illuminate thestop lights to alert the vehicles behind you.
Engine malfunction indicator (“SERVICE ENGINE SOON” or “Check engine light”)
CAUTION
BK0202700US.book
117 ページ 2013年3月28日 木曜日 午前11時54分
Page 187 of 384
Combination headlights and dimmer switch 5-124 Features and controls
5
the light switch to the
“OFF” position to stop
the tone.
N00549900142
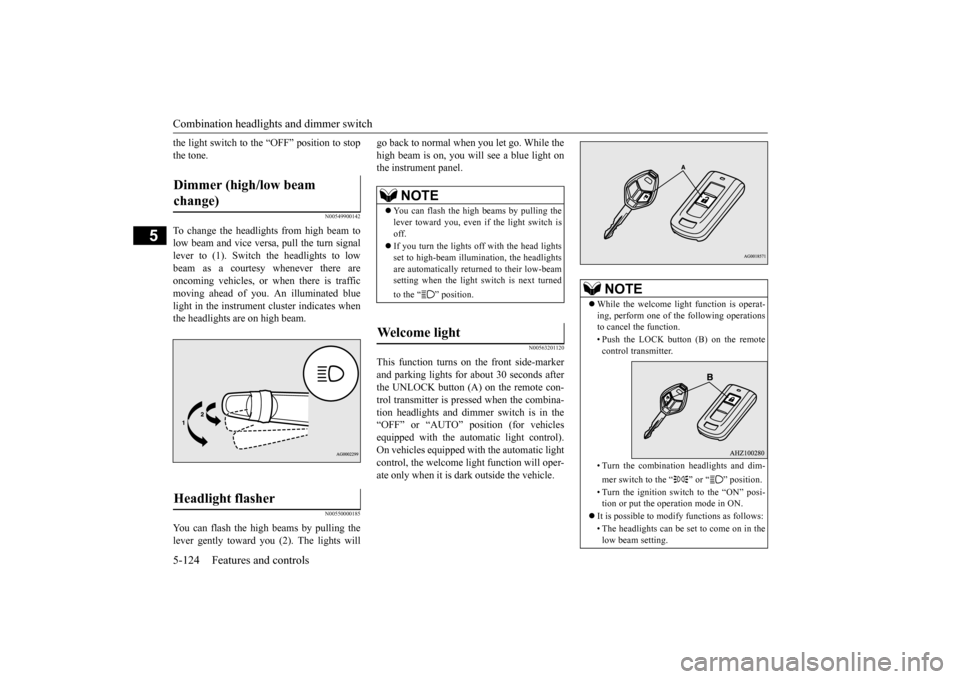
To change the headlights from high beam to low beam and vice versa, pull the turn signal lever to (1). Switch the headlights to lowbeam as a courtesy whenever there areoncoming vehicles, or when there is traffic moving ahead of you. An illuminated blue light in the instrument cluster indicates whenthe headlights are on high beam.
N00550000185
You can flash the high beams by pulling thelever gently toward you (2). The lights will
go back to normal when you let go. While the high beam is on, you will see a blue light on the instrument panel.
N00563201120
This function turns on the front side-marker and parking lights for about 30 seconds after the UNLOCK button (A) on the remote con- trol transmitter is pressed when the combina-tion headlights and dimmer switch is in the “OFF” or “AUTO” position (for vehicles equipped with the automatic light control).On vehicles equipped with the automatic lightcontrol, the welcome light function will oper- ate only when it is dark outside the vehicle.
Dimmer (high/low beam change) Headlight flasher
NOTE
You can flash the high beams by pulling the lever toward you, even if the light switch is off. If you turn the lights off with the head lights set to high-beam illumination, the headlights are automatically returned to their low-beamsetting when the light switch is next turned to the “ ” position.
Welcome light
NOTE
While the welcome light function is operat- ing, perform one of the following operations to cancel the function. • Push the LOCK button (B) on the remote control transmitter. • Turn the combination headlights and dim- mer switch to the “ ” or “ ” position. • Turn the ignition switch to the “ON” posi- tion or put the operation mode in ON.
It is possible to modify functions as follows: • The headlights can be set to come on in the low beam setting.
BK0202700US.book
124 ページ 2013年3月28日 木曜日 午前11時54分
Page 188 of 384
Headlight leveling switch (if so equipped)
Features and controls 5-125
5
N00547301123
This function turns on the headlights in the low beam setting for about 30 seconds afterthe ignition switch is turned to the “OFF” position or the operation mode is put in OFF. 1. Turn the combination headlights and dim- mer switch to the “OFF” or “AUTO”position (for vehicles equipped with the automatic light control). 2. Turn the ignition switch to the “OFF”position or put the operation mode in OFF. Also, if a key was used to start the engine, remove the key from the ignitionswitch.
3. Within 60 seconds of turning the ignition switch to the “OFF” position or putting the operation mode in OFF, pull the turn signal lever toward you. 4. The headlights will come on in the low beam setting for about 30 seconds. After the headlights go off, the headlights can be turned on again in the low beam settingfor about 30 seconds by pulling the turnsignal lever toward you within 60 seconds of turning the ignition switch to the “OFF” position or putting the operationmode in OFF. To turn on the headlights again after 60 seconds of turning the igni- tion switch to the “OFF” position or put-ting the operation mode in OFF, repeat the process from step 1.
N00537100105
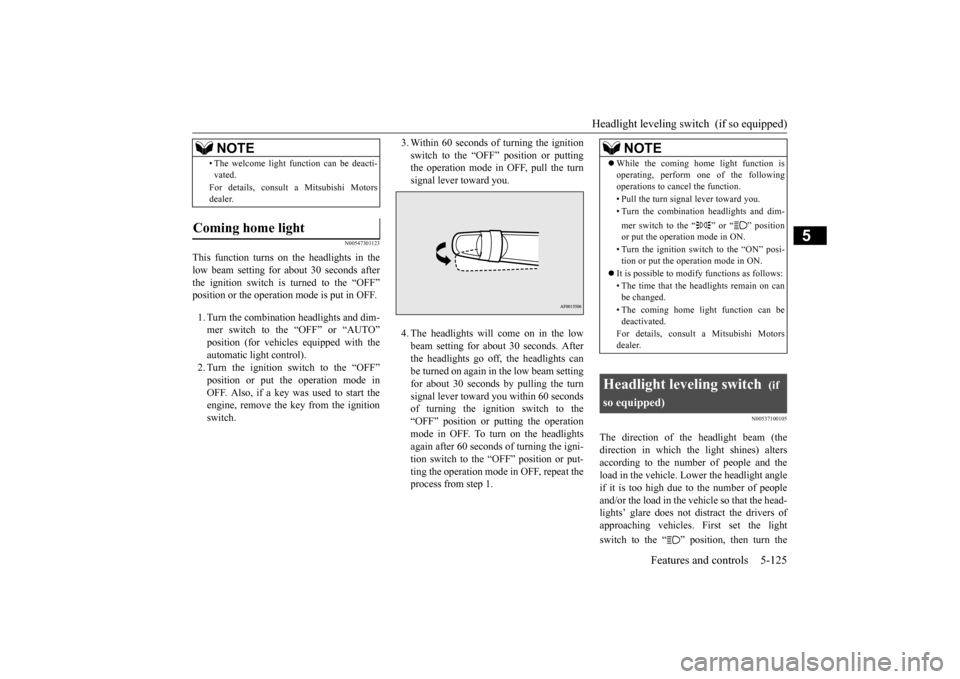
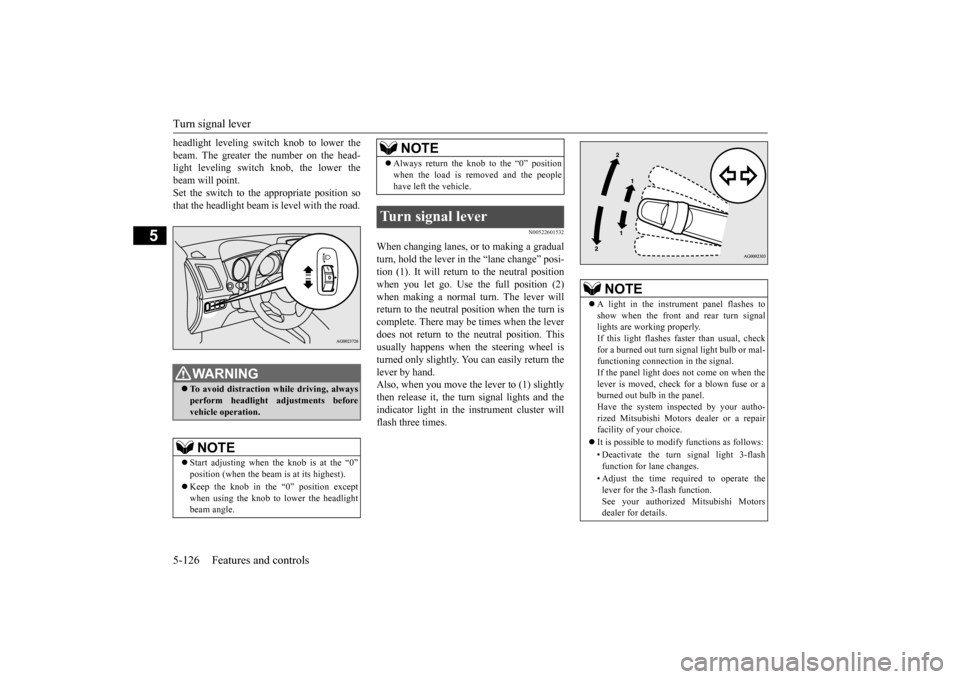
The direction of the headlight beam (the direction in which the light shines) altersaccording to the number of people and the load in the vehicle. Lower the headlight angle if it is too high due to the number of peopleand/or the load in the vehicle so that the head- lights’ glare does not distract the drivers of approaching vehicles. First set the light switch to the “ ” position, then turn the
• The welcome light function can be deacti- vated. For details, consult a Mitsubishi Motors dealer.
Coming home light
NOTE
NOTE
While the coming home light function is operating, perform one of the following operations to cancel the function. • Pull the turn signal lever toward you.• Turn the combination headlights and dim- mer switch to the “ ” or “ ” position or put the operation mode in ON. • Turn the ignition switch to the “ON” posi- tion or put the operation mode in ON.
It is possible to modify functions as follows: • The time that the headlights remain on can be changed. • The coming home light function can be deactivated. For details, consult a Mitsubishi Motors dealer.
Headlight leveling switch
(if
so equipped)
BK0202700US.book
125 ページ 2013年3月28日 木曜日 午前11時54分
Page 189 of 384
Turn signal lever 5-126 Features and controls
5
headlight leveling switch knob to lower the beam. The greater the number on the head- light leveling switch knob, the lower the beam will point.Set the switch to the appropriate position so that the headlight beam is level with the road.
N00522601532
When changing lanes, or to making a gradual turn, hold the lever in the “lane change” posi-tion (1). It will return to the neutral positionwhen you let go. Use the full position (2) when making a normal turn. The lever will return to the neutral position when the turn iscomplete. There may be times when the lever does not return to the neutral position. This usually happens when the steering wheel isturned only slightly. You can easily return the lever by hand. Also, when you move the lever to (1) slightlythen release it, the turn signal lights and the indicator light in the instrument cluster will flash three times.
WA R N I N G To avoid distraction while driving, always perform headlight adjustments beforevehicle operation.NOTE
Start adjusting when the knob is at the “0” position (when the beam is at its highest). Keep the knob in the “0” position except when using the knob to lower the headlightbeam angle.
Always return the knob to the “0” position when the load is removed and the people have left the vehicle.
Turn signal lever
NOTE
NOTE
A light in the instrument panel flashes to show when the front and rear turn signal lights are working properly.If this light flashes faster than usual, check for a burned out turn signal light bulb or mal- functioning connection in the signal.If the panel light does not come on when the lever is moved, check for a blown fuse or a burned out bulb in the panel.Have the system inspected by your autho- rized Mitsubishi Motors dealer or a repair facility of your choice. It is possible to modify functions as follows: • Deactivate the turn signal light 3-flash function for lane changes. • Adjust the time required to operate the lever for the 3-flash function. See your authorized Mitsubishi Motorsdealer for details.
BK0202700US.book
126 ページ 2013年3月28日 木曜日 午前11時54分
Page 190 of 384
Hazard warning flasher switch Features and controls 5-127
5
N00522700275
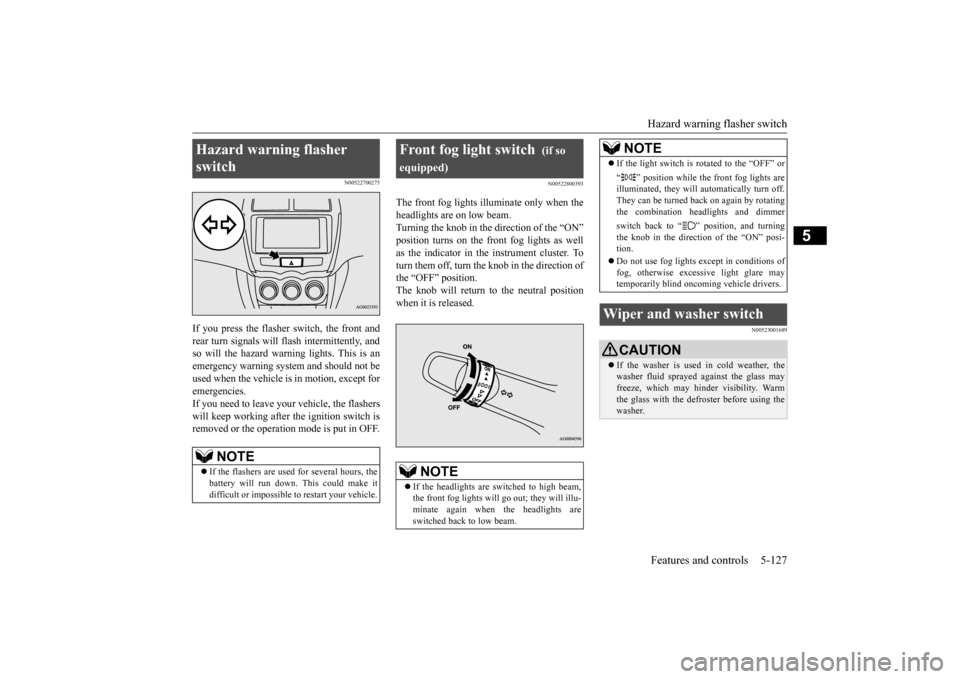
If you press the flasher switch, the front and rear turn signals will flash intermittently, andso will the hazard warning lights. This is an emergency warning system and should not be used when the vehicle is in motion, except foremergencies.If you need to leave your vehicle, the flashers will keep working after the ignition switch is removed or the operation mode is put in OFF.
N00522800393
The front fog lights illuminate only when theheadlights are on low beam. Turning the knob in the direction of the “ON” position turns on the front fog lights as wellas the indicator in the instrument cluster. To turn them off, turn the knob in the direction of the “OFF” position.The knob will return to the neutral positionwhen it is released.
N00523001689
Hazard warning flasher switch
NOTE
If the flashers are used for several hours, the battery will run down. This could make it difficult or impossible to restart your vehicle.
Front fog light switch
(if so
equipped)
NOTE
If the headlights are switched to high beam, the front fog lights will go out; they will illu-minate again when the headlights are switched back to low beam.
If the light switch is rotated to the “OFF” or “ ” position while the front fog lights are illuminated, they will automatically turn off. They can be turned back on again by rotatingthe combination headlights and dimmer switch back to “ ” position, and turning the knob in the direction of the “ON” posi- tion. Do not use fog lights
except in conditions of
fog, otherwise excessive light glare maytemporarily blind oncoming vehicle drivers.
Wiper and washer switch
CAUTION If the washer is used in cold weather, the washer fluid sprayed against the glass may freeze, which may hinder visibility. Warm the glass with the defroster before using thewasher.NOTE
BK0202700US.book
127 ページ 2013年3月28日 木曜日 午前11時54分
Page 235 of 384
Vehicle preparation before driving 6-4 Driving safety
6
N00629000669
For a safer and more enjoyable trip, always check for the following: Before starting the vehicle, make certain that you and all passengers are seated and wearing their seat belts properly (with children in the rear seat, in appropriaterestraints), and that all the doors and lift- gate are locked. Move the driver’s seat as far backward as possible, while still keeping good visibil- ity, and good control of the steering wheel, brakes, accelerator, and controls.Check the instrument panel indicators and multi-information display for any possible problem. In the same way, the front passenger seat should also be moved as far back as possi- ble. Make sure that infants and small children are properly restrained in accordance with all laws and regulations.
Check these by selecting the defroster mode, and set the blower switch on high. Youshould be able to feel the air blowing against the windshield. Refer to “Defrosting or defogging (wind-shield, door windows)” on page 7-8, 7-13, 7-19, 7-24. Check all the tires for heavy tread wear or uneven wear patterns. Look for stones, nails, glass, or other objects stuck in the tread. Look for any tread cuts or sidewall cracks. Checkthe wheel nuts for tightness, and the tires (including spare tire) for proper pressure. Replace your tires before they are heavilyworn out. As your vehicle is equipped with a tire pres- sure monitoring system, there is a risk ofdamage to the tire inflation pressure sensors when the tire is replaced on the rim. Tire replacement should, therefore, be performedonly by an authorized Mitsubishi Motors dealer.
Have someone watch while you turn all the exterior lights on and off. Also check the turnsignal indicators and high-beam indicators on the instrument panel. Check the ground under the vehicle after parking overnight, for fuel, water, oil, or other leaks. Make sure all the fluid levels are correct. Also, if you can smell fuel, you needto find out why immediately and have it fixed.
N00629200094
Even this vehicle’s safety equipment, andyour safest driving, cannot guarantee that you can avoid an accident or injury. However, ifyou give extra attention to the following areas, you can better protect yourself and your passengers: Drive defensively. Be aware of traffic, road and weather conditions. Leave plenty of stopping distance between your vehicle and the vehicle ahead.
Vehicle preparation before driving Seat belts and seats
Defrosters Tires
Lights Fluid leaks Safe driving techniques
BK0202700US.bo
ok 4 ページ 2013年3月28日 木曜日 午前11時54分
Page 348 of 384
Fuses
Vehicle care and maintenance 9-27
9
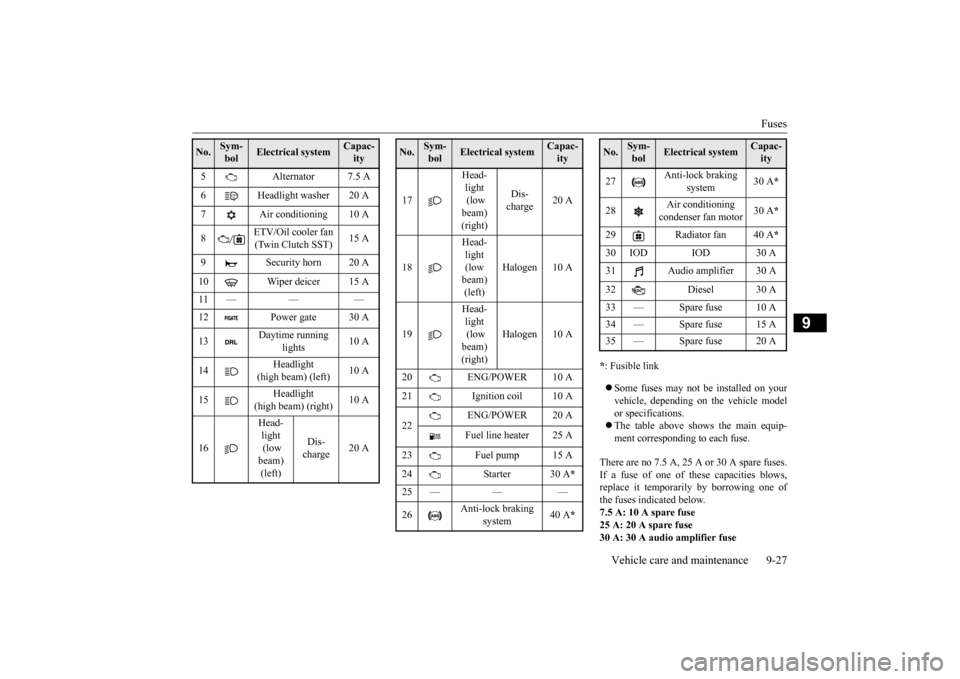
* : Fusible link Some fuses may not be installed on your vehicle, depending on the vehicle modelor specifications. The table above shows the main equip- ment corresponding to each fuse.
There are no 7.5 A, 25 A or 30 A spare fuses. If a fuse of one of these capacities blows,replace it temporarily by borrowing one of the fuses indicated below. 7.5 A: 10 A spare fuse25 A: 20 A spare fuse 30 A: 30 A audio amplifier fuse
5 Alternator 7.5 A 6 Headlight washer 20 A 7 Air conditioning 10 A 8
ETV/Oil cooler fan (Twin Clutch SST)
15 A
9 Security horn 20 A 10 Wiper deicer 15 A 11 — — — 12 Power gate 30 A 13
Daytime running
lights
10 A
14
Headlight
(high beam) (left)
10 A
15
Headlight
(high beam) (right)
10 A
16
Head- light (low beam) (left)
Dis- charge
20 A
No.
Sym- bol
Electrical system
Capac-ity
17
Head- light (low beam) (right)
Dis- charge
20 A
18
Head- light (low beam) (left)
Halogen 10 A
19
Head- light (low beam) (right)
Halogen 10 A
20 ENG/POWER 10 A 21 Ignition coil 10 A 22
ENG/POWER 20 A Fuel line heater 25 A
23 Fuel pump 15 A 24 Starter 30 A
*
25 — — — 26
Anti-lock braking
system
40 A
*
No.
Sym- bol
Electrical system
Capac-ity
27
Anti-lock braking
system
30 A
*
28
Air conditioning condenser fan motor
30 A
*
29 Radiator fan 40 A
*
30 IOD IOD 30 A31 Audio amplifier 30 A 32 Diesel 30 A 33 — Spare fuse 10 A 34 — Spare fuse 15 A35 — Spare fuse 20 ANo.
Sym- bol
Electrical system
Capac-ity
BK0202700US.bo
ok 27 ページ 2013年3月28日 木曜日 午前11時54分
Page 350 of 384
Replacement of light bulbs
Vehicle care and maintenance 9-29
9
N00942900310
Before replacing the bulb, be sure the light is
off. Do not touch the glass part of the new
bulb with your bare fingers; the oil from your
skin will stay on the glass and dim or destroy
the bulb when it gets hot.
N00943000132
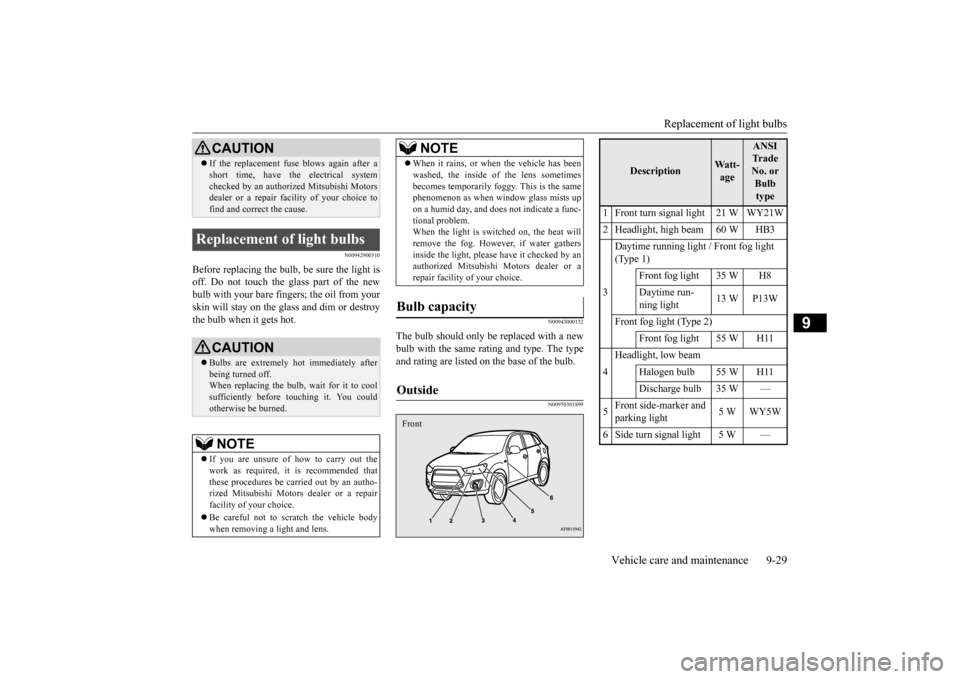
The bulb should only be replaced with a new
bulb with the same rating and type. The type
and rating are listed on the base of the bulb.
N00950301899
If the replacement fuse blows again after a
short time, have the electrical system
checked by an authorized Mitsubishi Motors
dealer or a repair faci lity of your choice to
find and correct the cause.Replacement of light bulbs
CAUTION Bulbs are extremely hot immediately after
being turned off.
When replacing the bulb, wait for it to cool
sufficiently before touching it. You could
otherwise be burned.
NOTE
If you are unsure of how to carry out the
work as required, it is recommended that
these procedures be carried out by an autho-
rized Mitsubishi Motors dealer or a repair
facility of your choice.
Be careful not to scratch the vehicle body
when removing a light and lens.CAUTION
When it rains, or when the vehicle has been
washed, the inside of the lens sometimes
becomes temporarily foggy. This is the same
phenomenon as when window glass mists up
on a humid day, and does not indicate a func-
tional problem.
When the light is switched on, the heat will
remove the fog. However, if water gathers
inside the light, please have it checked by an
authorized Mitsubishi Motors dealer or a
repair facility of your choice.Bulb capacity Outside
NOTE
Front
Description
Watt-
age
ANSI
Tr a d e
No. or Bulb type
1 Front turn signal light 21 W WY21W
2 Headlight, high beam 60 W HB3
3 Daytime running light / Front fog light
(Type 1)
Front fog light 35 W H8
Daytime run-
ning light 13 W P13W
Front fog light (Type 2) Front fog light 55 W H11
4 Headlight, low beam
Halogen bulb 55 W H11
Discharge bulb 35 W —
5 Front side-marker and
parking light 5 W WY5W
6 Side turn signal light 5 W —
BK0202700US.bo ok 29 ページ 2013年4月4日 木曜日 午後6時8分
Page 352 of 384
Replacement of light bulbs
Vehicle care and maintenance 9-31
9
N00901801144
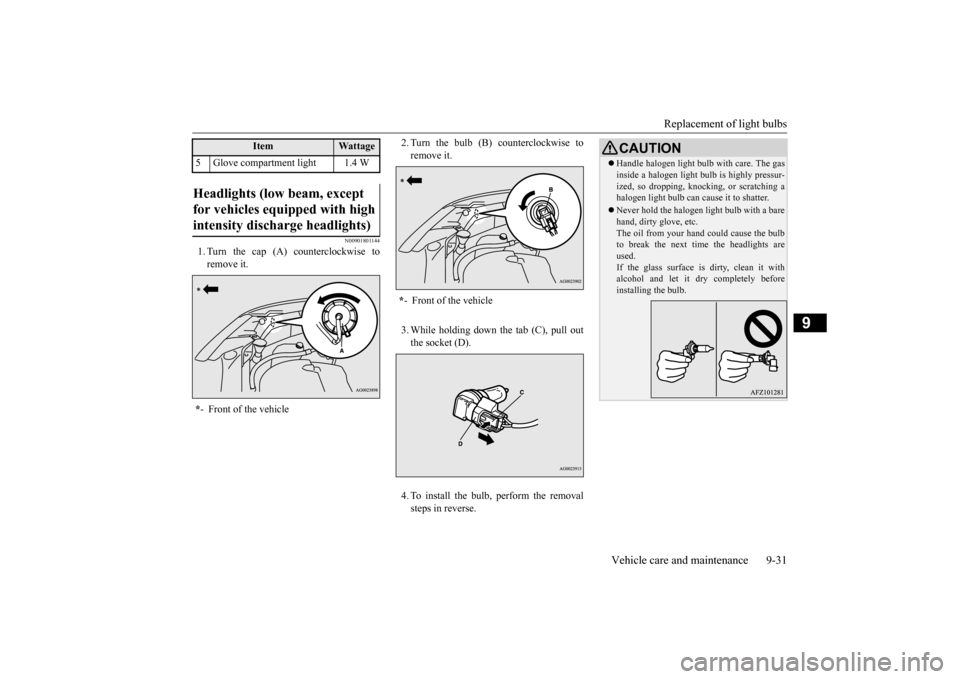
1. Turn the cap (A) counterclockwise to remove it.
2. Turn the bulb (B) counterclockwise to remove it. 3. While holding down the tab (C), pull out the socket (D). 4. To install the bulb, perform the removal steps in reverse.
5 Glove compartment light 1.4 WHeadlights (low beam, except for vehicles equipped with high intensity discharge headlights) * - Front of the vehicle
Item
Wattage
*- Front of the vehicle
CAUTIONHandle halogen light bulb with care. The gas inside a halogen light bulb is highly pressur- ized, so dropping, knocking, or scratching a halogen light bulb can cause it to shatter. Never hold the halogen light bulb with a bare hand, dirty glove, etc. The oil from your hand could cause the bulbto break the next time the headlights are used. If the glass surface is dirty, clean it withalcohol and let it dry completely before installing the bulb.
BK0202700US.bo
ok 31 ページ 2013年3月28日 木曜日 午前11時54分