ECO mode MITSUBISHI PAJERO IV 2011 Owners Manual
[x] Cancel search | Manufacturer: MITSUBISHI, Model Year: 2011, Model line: PAJERO IV, Model: MITSUBISHI PAJERO IV 2011Pages: 377, PDF Size: 29.43 MB
Page 7 of 377
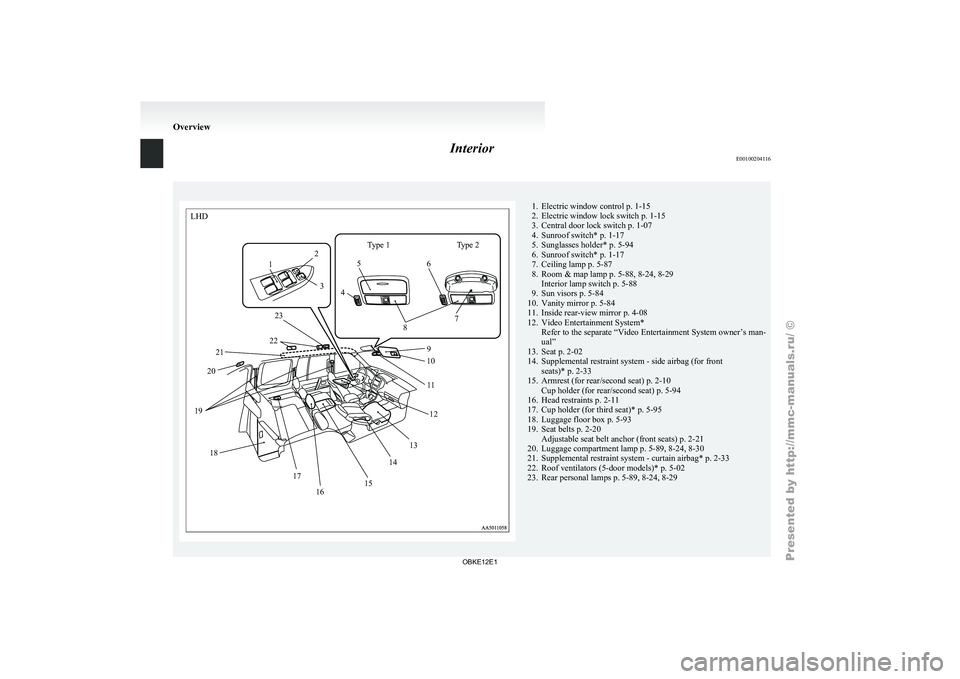
Interior
E00100204116LHD
Type 1
1 2
3 45
6
7
8
9
10
11
12
13
14
15
16
17
18
19
20
21 23
22 Type 2 1. Electric window control p. 1-15
2. Electric window lock switch
p. 1-15
3.
Central door lock switch p. 1-07
4. Sunroof switch* p. 1-17
5. Sunglasses holder* p. 5-94
6. Sunroof switch* p. 1-17
7. Ceiling lamp p. 5-87
8. Room & map lamp p. 5-88, 8-24, 8-29 Interior lamp switch p. 5-88
9. Sun visors p. 5-84
10. Vanity mirror p. 5-84
11. Inside rear-view mirror p. 4-08
12. Video Entertainment System* Refer to the separate “Video Entertainment System owner’s man-
ual”
13. Seat p. 2-02
14. Supplemental restraint system - side airbag (for front seats)* p. 2-33
15. Armrest (for rear/second seat) p. 2-10 Cup holder (for rear/second seat) p. 5-94
16. Head restraints p. 2-11
17. Cup holder (for third seat)* p. 5-95
18. Luggage floor box p. 5-93
19. Seat belts p. 2-20 Adjustable seat belt anchor (front seats) p. 2-21
20. Luggage compartment lamp p. 5-89, 8-24, 8-30
21. Supplemental restraint system - curtain airbag* p. 2-33
22. Roof ventilators (5-door models)* p. 5-02
23. Rear personal lamps p. 5-89, 8-24, 8-29 Overview
OBKE12E1
Page 8 of 377
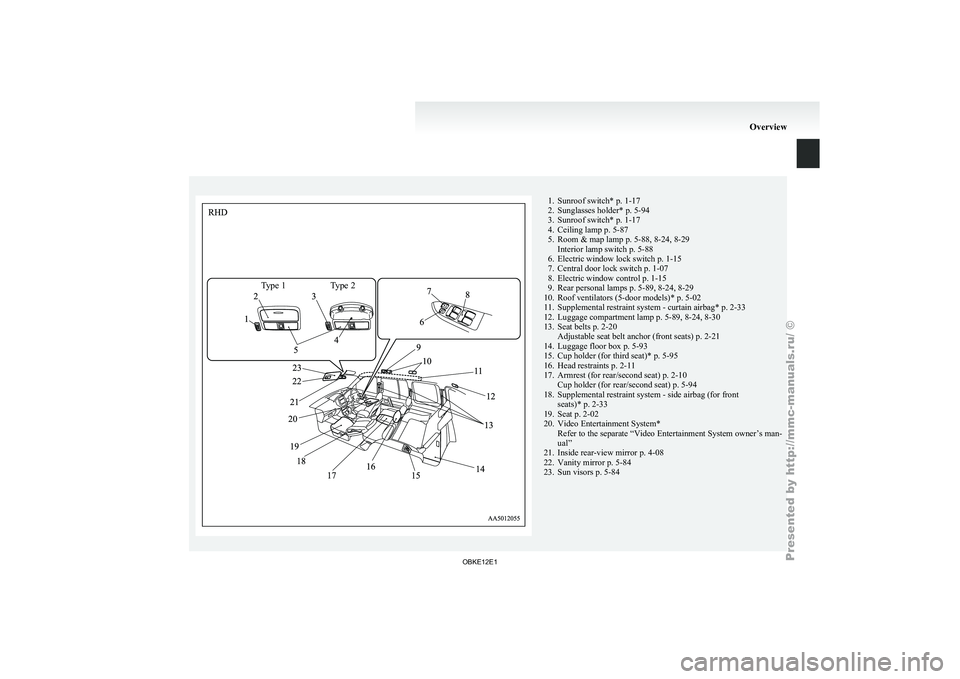
Type 1 Type 21. Sunroof switch* p. 1-17
2. Sunglasses holder* p. 5-94
3. Sunroof switch* p. 1-17
4.
Ceiling lamp p. 5-87
5. Room & map lamp p. 5-88, 8-24, 8-29 Interior lamp switch p. 5-88
6. Electric window lock switch p. 1-15
7. Central door lock switch p. 1-07
8. Electric window control p. 1-15
9. Rear personal lamps p. 5-89, 8-24, 8-29
10. Roof ventilators (5-door models)* p. 5-02
11. Supplemental restraint system - curtain airbag* p. 2-33
12. Luggage compartment lamp p. 5-89, 8-24, 8-30
13. Seat belts p. 2-20 Adjustable seat belt anchor (front seats) p. 2-21
14. Luggage floor box p. 5-93
15. Cup holder (for third seat)* p. 5-95
16. Head restraints p. 2-11
17. Armrest (for rear/second seat) p. 2-10 Cup holder (for rear/second seat) p. 5-94
18. Supplemental restraint system - side airbag (for front seats)* p. 2-33
19. Seat p. 2-02
20. Video Entertainment System* Refer to the separate “Video Entertainment System owner’s man-
ual”
21. Inside rear-view mirror p. 4-08
22. Vanity mirror p. 5-84
23. Sun visors p. 5-84 Overview
OBKE12E1
Page 13 of 377
Fuel selection
E00200102587Recom-
mended
fuel
Petrol-powered vehicles
Unleaded petrol octane
num-
ber (EN228) 90 RON or higher (3000
models)
95 RON or higher (3800
models)
Diesel-powered vehicles
Vehicles to comply with the Euro 4
and Euro 5 regulation Cetane number (EN590)51 or higher
Vehicles to comply with the Euro 3
regulation Cetane number45 or higher CAUTION
l
For petrol-powered vehicles,
the use of lea-
ded fuel can result in serious damage to
the engine and catalytic converter. Do not
use leaded fuel.
l Diesel-powered vehicles to comply with
the Euro 4 and Euro 5 regulation are de-
signed to use only diesel fuel that meets
the EN 590 standard.
Use of any other type of diesel fuel would
adversely affect the engine’s performance
and durability. CAUTION
l
For diesel-powered vehicles,
if proper
“winter” fuel is not used in winter, the die-
sel preheat indication lamp may blink
and the engine speed may not rise above
the idling speed because of fuel freezing.
In this case, keep the engine idling for
about ten minutes, then turn off the igni-
tion switch and immediately turn it on
again to confirm that the diesel preheat in-
dication lamp is off. (Refer to “Diesel pre-
heat indication lamp” on page 3-08)
NOTE l It is advisable to sufficiently warm up the en-
gine
after starting
it when the outside temper-
ature is below zero °C.
l Due to the separation of paraffin, the fluidity
of the fuel decreases considerably as the tem-
perature falls. Because of this fact there are
two kinds of fuel: “summer” and “winter”.
This must be considered in winter use.
Select either of the two kinds of fuel in ac-
cordance with ambient temperature.
Above -5 °C: “Summer” diesel
Below -5 °C: “Winter” diesel
When travelling abroad, find out in advance
about the fuels served in local service stations.
l Petrol-powered vehicles have the knock con-
trol system so that you can use unleaded pet-
rol 91 RON as an emergent measure in case
unleaded petrol 95 RON or higher is not avail-
able on journey, etc. In such a case, you
don’t need to adjust the engine specially.
In case of using unleaded petrol 91 RON, the
engine performance level is reduced. l
In petrol-powered
vehicles,
repeatedly driv-
ing short distances at low speeds can cause
deposits to form in the fuel system and en-
gine, resulting in poor starting and poor accel-
eration.
If these problems occur, you are advised to
add a detergent additive to the gasoline when
you refuel the vehicle. The additive will re-
move the deposits, thereby returning the en-
gine to a normal condition. Be sure to use a
genuine MITSUBISHI FUEL SYSTEM
CLEANER. Using an unsuitable additive
could make the engine malfunction.
For details, please contact a MITSUBISHI
MOTORS Authorized Service Point.
l Poor quality petrol can cause problems such
as difficult starting, stalling, engine noise
and hesitation. If you experience these prob-
lems, try another brand and/or grade of petrol.
If the check engine warning lamp flashes,
have the system checked as soon as possible
at a MITSUBISHI MOTORS Authorized
Service Point.
l In diesel-powered vehicles, poor-quality die-
sel fuel can cause deposits form in the injec-
tor, resulting in black smoke and rough idling.
If these problems occur, you are advised to
add a cleaning additive to the diesel fuel
when you refuel the vehicle. The additive
will break up and remove the deposits, there-
by returning the engine to a normal condition.
Be sure to use a genuine MITSUBISHI DIE-
SEL FUEL SYSTEM CLEANER. Using an
unsuitable additive could make the engine
malfunction. For details, please contact a
MITSUBISHI MOTORS Authorized Service
Point. General information
02
OBKE12E1
Page 25 of 377
“Child-protection” rear doors (5-
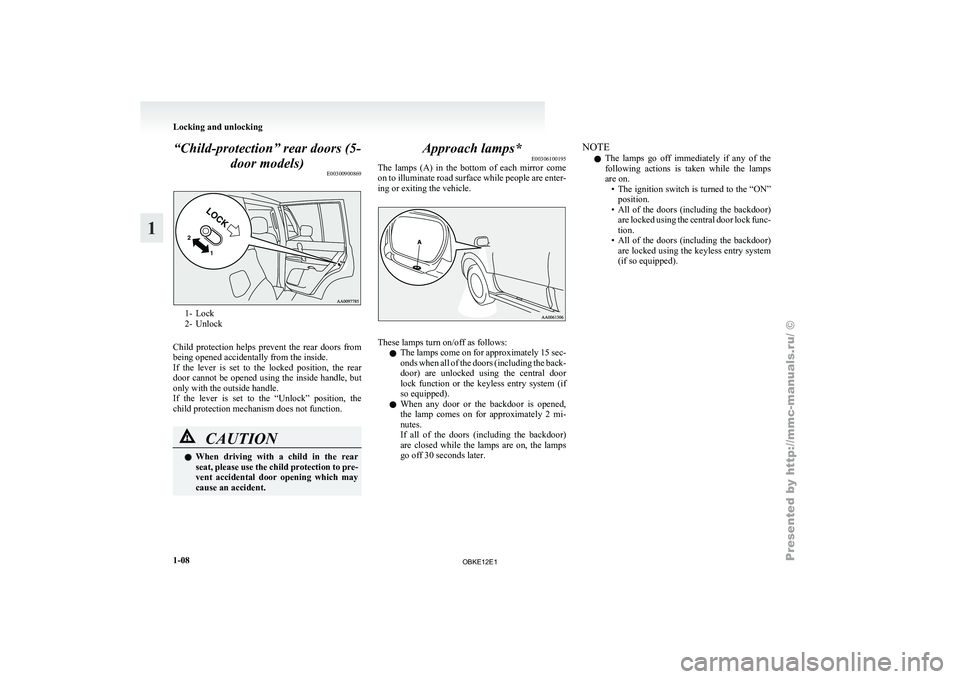
door models) E003009008691- Lock
2- Unlock
Child protection
helps prevent the rear doors from
being opened accidentally from the inside.
If the lever is set to the locked position, the rear
door cannot be opened using the inside handle, but
only with the outside handle.
If the lever is set to the “Unlock” position, the
child protection mechanism does not function. CAUTION
l
When driving with
a child in the rear
seat, please use the child protection to pre-
vent accidental door opening which may
cause an accident. Approach lamps*
E00306100195
The lamps (A)
in the bottom of each mirror come
on to illuminate road surface while people are enter-
ing or exiting the vehicle. These lamps turn on/off as follows:
l The lamps come
on for approximately 15 sec-
onds when all of the doors (including the back-
door) are unlocked using the central door
lock function or the keyless entry system (if
so equipped).
l When any door or the backdoor is opened,
the lamp comes on for approximately 2 mi-
nutes.
If all of the doors (including the backdoor)
are closed while the lamps are on, the lamps
go off 30 seconds later. NOTE
l The
lamps go
off immediately if any of the
following actions is taken while the lamps
are on. • The ignition switch is turned to the “ON”position.
• All of the doors (including the backdoor) are locked using the central door lock func-
tion.
• All of the doors (including the backdoor) are locked using the keyless entry system
(if so equipped). Locking and unlocking
1-08
1
OBKE12E1
Page 28 of 377
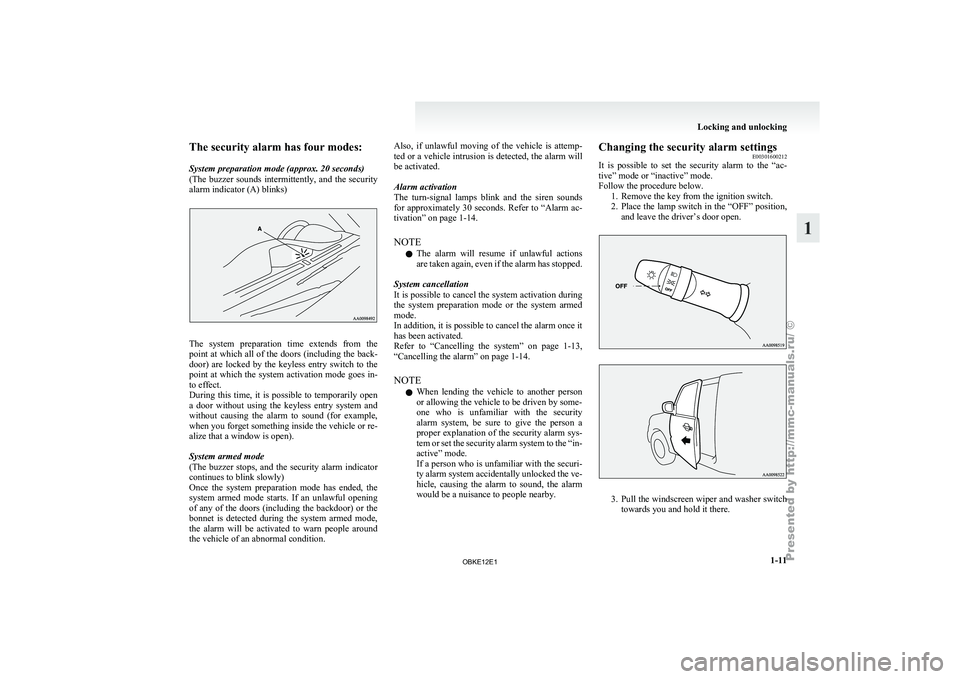
The security alarm has four modes:
System preparation mode (approx. 20 seconds)
(The buzzer
sounds
intermittently, and the security
alarm indicator (A) blinks) The system preparation time extends from the
point at
which
all of the doors (including the back-
door) are locked by the keyless entry switch to the
point at which the system activation mode goes in-
to effect.
During this time, it is possible to temporarily open
a door without using the keyless entry system and
without causing the alarm to sound (for example,
when you forget something inside the vehicle or re-
alize that a window is open).
System armed mode
(The buzzer stops, and the security alarm indicator
continues to blink slowly)
Once the system preparation mode has ended, the
system armed mode starts. If an unlawful opening
of any of the doors (including the backdoor) or the
bonnet is detected during the system armed mode,
the alarm will be activated to warn people around
the vehicle of an abnormal condition. Also, if unlawful moving of the vehicle is attemp-
ted or
a
vehicle intrusion is detected, the alarm will
be activated.
Alarm activation
The turn-signal lamps blink and the siren sounds
for approximately 30 seconds. Refer to “Alarm ac-
tivation” on page 1-14.
NOTE
l The alarm will resume if unlawful actions
are taken again, even if the alarm has stopped.
System cancellation
It is possible to cancel the system activation during
the system preparation mode or the system armed
mode.
In addition, it is possible to cancel the alarm once it
has been activated.
Refer to “Cancelling the system” on page 1-13,
“Cancelling the alarm” on page 1-14.
NOTE l When lending the vehicle to another person
or allowing the vehicle to be driven by some-
one who is unfamiliar with the security
alarm system, be sure to give the person a
proper explanation of the security alarm sys-
tem or set the security alarm system to the “in-
active” mode.
If a person who is unfamiliar with the securi-
ty alarm system accidentally unlocked the ve-
hicle, causing the alarm to sound, the alarm
would be a nuisance to people nearby. Changing the security alarm settings
E00301600212
It is possible
to set the security alarm to the “ac-
tive” mode or “inactive” mode.
Follow the procedure below. 1. Remove the key from the ignition switch.
2. Place the lamp switch in the “OFF” position,and leave the driver’s door open. 3. Pull
the windscreen wiper and washer switch
towards you and hold it there. Locking and unlocking
1-11 1
OBKE12E1
Page 29 of 377
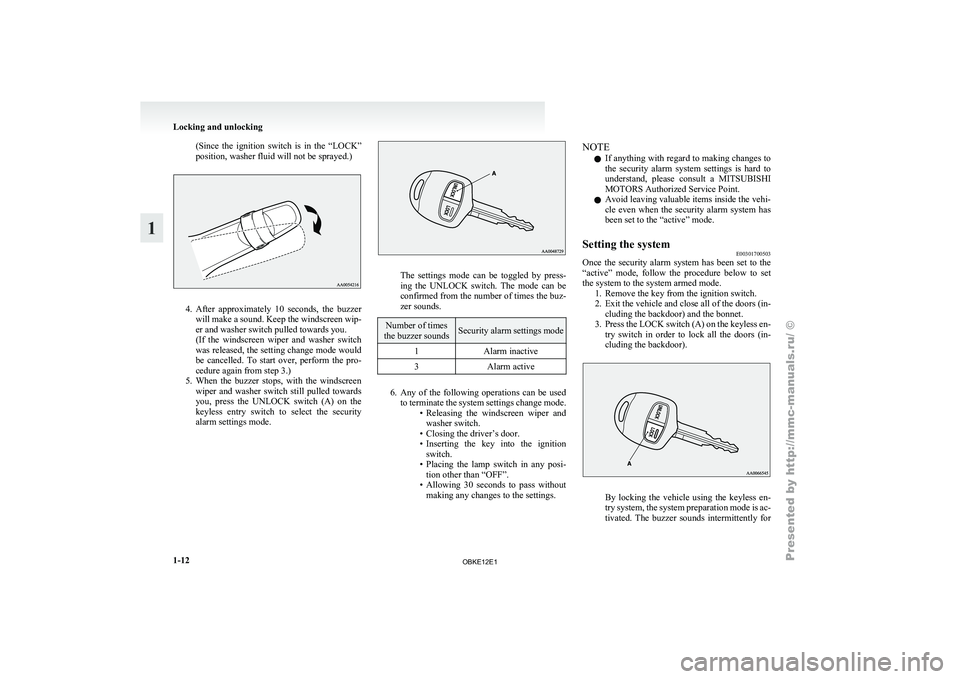
(Since the ignition switch is in the “LOCK”
position, washer fluid will not be sprayed.)
4. After approximately 10 seconds, the buzzer
will make
a sound. Keep the windscreen wip-
er and washer switch pulled towards you.
(If the windscreen wiper and washer switch
was released, the setting change mode would
be cancelled. To start over, perform the pro-
cedure again from step 3.)
5. When the buzzer stops, with the windscreen wiper and washer switch still pulled towards
you, press the UNLOCK switch (A) on the
keyless entry switch to select the security
alarm settings mode. The settings mode can be toggled by press-
ing the
UNLOCK
switch. The mode can be
confirmed from the number of times the buz-
zer sounds. Number of times
the buzzer sounds Security alarm settings mode
1 Alarm inactive
3 Alarm active 6. Any of the following operations can be used
to terminate
the system settings change mode.
• Releasing the windscreen wiper and washer switch.
• Closing the driver’s door.
• Inserting the key into the ignition switch.
• Placing the lamp switch in any posi- tion other than “OFF”.
• Allowing 30 seconds to pass without making any changes to the settings. NOTE
l If
anything with
regard to making changes to
the security alarm system settings is hard to
understand, please consult a MITSUBISHI
MOTORS Authorized Service Point.
l Avoid leaving valuable items inside the vehi-
cle even when the security alarm system has
been set to the “active” mode.
Setting the system E00301700503
Once the security alarm system has been set to the
“active” mode, follow
the procedure below to set
the system to the system armed mode. 1. Remove the key from the ignition switch.
2. Exit the vehicle and close all of the doors (in-cluding the backdoor) and the bonnet.
3. Press the LOCK switch (A) on the keyless en- try switch in order to lock all the doors (in-
cluding the backdoor). By locking the vehicle using the keyless en-
try system,
the
system preparation mode is ac-
tivated. The buzzer sounds intermittently for Locking and unlocking
1-12
1
OBKE12E1
Page 30 of 377
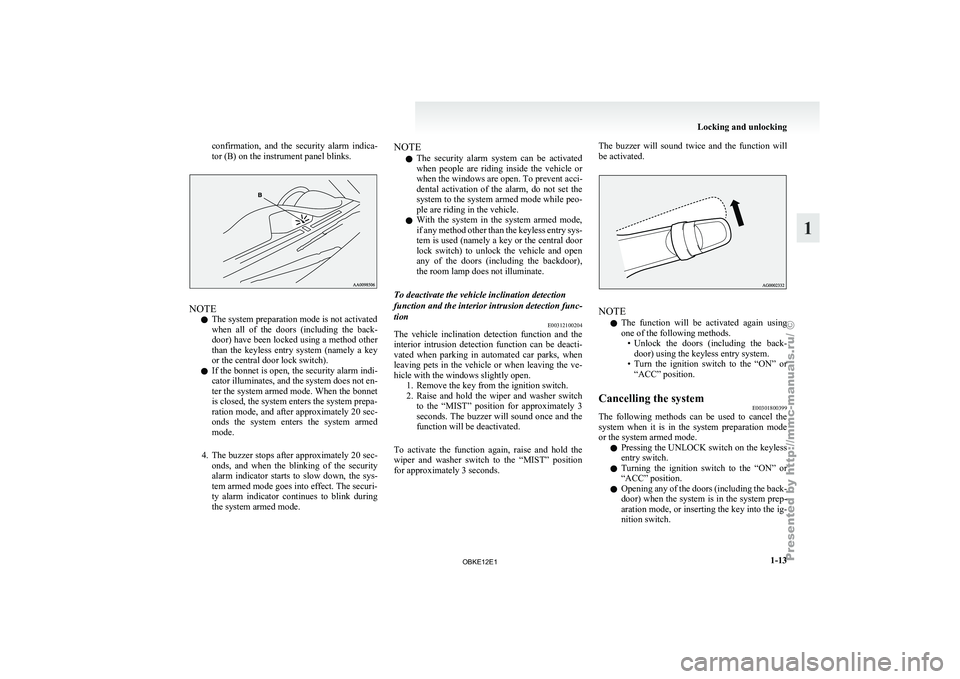
confirmation, and the security alarm indica-
tor (B) on the instrument panel blinks.
NOTE
l The system preparation mode is not activated
when
all of
the doors (including the back-
door) have been locked using a method other
than the keyless entry system (namely a key
or the central door lock switch).
l If the bonnet is open, the security alarm indi-
cator illuminates, and the system does not en-
ter the system armed mode. When the bonnet
is closed, the system enters the system prepa-
ration mode, and after approximately 20 sec-
onds the system enters the system armed
mode.
4. The buzzer stops after approximately 20 sec- onds, and when the blinking of the security
alarm indicator starts to slow down, the sys-
tem armed mode goes into effect. The securi-
ty alarm indicator continues to blink during
the system armed mode. NOTE
l The security
alarm
system can be activated
when people are riding inside the vehicle or
when the windows are open. To prevent acci-
dental activation of the alarm, do not set the
system to the system armed mode while peo-
ple are riding in the vehicle.
l With the system in the system armed mode,
if any method other than the keyless entry sys-
tem is used (namely a key or the central door
lock switch) to unlock the vehicle and open
any of the doors (including the backdoor),
the room lamp does not illuminate.
To deactivate the vehicle inclination detection
function and the interior intrusion detection func-
tion E00312100204
The vehicle inclination detection function and the
interior intrusion
detection
function can be deacti-
vated when parking in automated car parks, when
leaving pets in the vehicle or when leaving the ve-
hicle with the windows slightly open. 1. Remove the key from the ignition switch.
2. Raise and hold the wiper and washer switchto the “MIST” position for approximately 3
seconds. The buzzer will sound once and the
function will be deactivated.
To activate the function again, raise and hold the
wiper and washer switch to the “MIST” position
for approximately 3 seconds. The buzzer will sound twice and the function will
be activated.
NOTE
l The
function will
be activated again using
one of the following methods. • Unlock the doors (including the back-door) using the keyless entry system.
• Turn the ignition switch to the “ON” or “ACC” position.
Cancelling the system E00301800399
The following methods can be used to cancel the
system when it
is in the system preparation mode
or the system armed mode.
l Pressing the UNLOCK switch on the keyless
entry switch.
l Turning the ignition switch to the “ON” or
“ACC” position.
l Opening any of the doors (including the back-
door) when the system is in the system prep-
aration mode, or inserting the key into the ig-
nition switch. Locking and unlocking
1-13 1
OBKE12E1
Page 31 of 377
NOTE
l If
the bonnet
is opened during the system prep-
aration mode, the system preparation mode
is suspended. The system returns to the sys-
tem preparation mode when the bonnet is
closed.
l If the battery terminals are disconnected
while the system is in the system preparation
mode, the memory will be erased.
l It is possible to register up to 4 remote con-
trol switches. As long as they are registered,
any of the 4 remote control switches, other
than the one used to activate the system, can
be used to cancel the system.
If you want to register additional remote con-
trol switches, please contact a MITSUBISHI
MOTORS Authorized Service Point.
l The activation distance for the keyless entry
system is approximately 4 m.
If it is not possible to lock or unlock the vehi-
cle by pressing the switch at the correct dis-
tance or the security alarm system cannot be
set or cancelled using the switch, the battery
may need to be replaced.
For further information, please consult a
MITSUBISHI MOTORS Authorized Service
Point.
If you replace the battery yourself, refer to
“Procedure for replacing the remote control
switch battery” on page 1-05. l
If
the
UNLOCK switch is pressed and no
door is (including the backdoor) opened with-
in 30 seconds, the doors will automatically re-
lock. In this case as well, the system prepara-
tion mode will go into effect.
The time between pressing the UNLOCK
switch and automatic locking can be adjus-
ted. Consult a MITSUBISHI MOTORS Au-
thorized Service Point.
Alarm activation E00301900840
When the system is in the system armed mode, the
alarm will be
activated as follows if the vehicle is
unlocked and any of the doors (including the back-
door) or bonnet is opened using a method other
than pressing the UNLOCK switch on the keyless
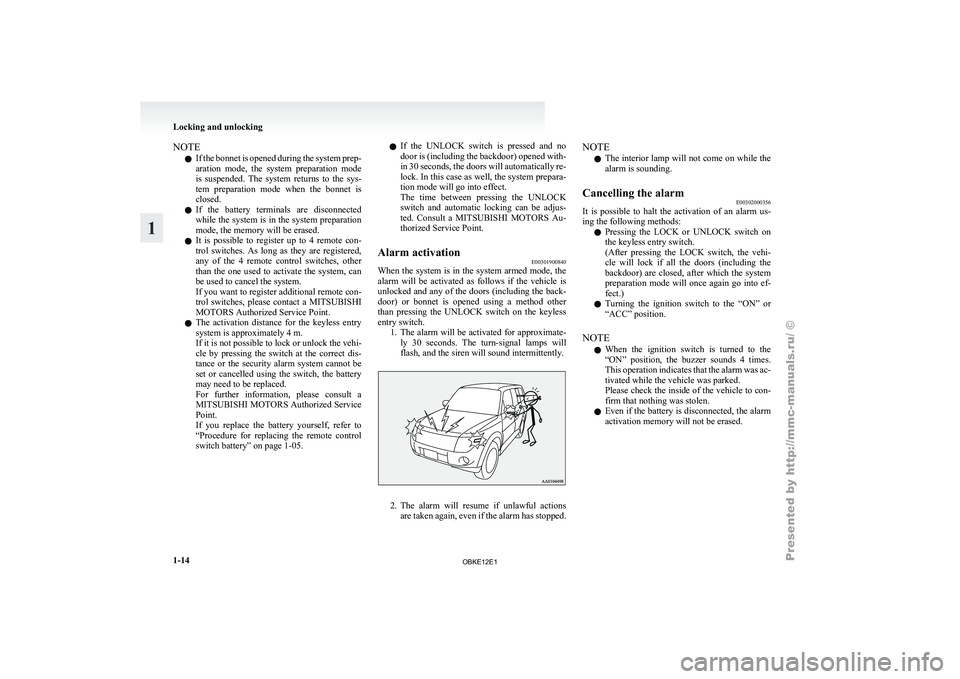
entry switch. 1. The alarm will be activated for approximate-ly 30 seconds. The turn-signal lamps will
flash, and the siren will sound intermittently. 2. The alarm will resume if unlawful actions
are taken
again, even if the alarm has stopped. NOTE
l The
interior lamp
will not come on while the
alarm is sounding.
Cancelling the alarm E00302000356
It is possible to halt the activation of an alarm us-
ing the following methods:
l Pressing the
LOCK
or UNLOCK switch on
the keyless entry switch.
(After pressing the LOCK switch, the vehi-
cle will lock if all the doors (including the
backdoor) are closed, after which the system
preparation mode will once again go into ef-
fect.)
l Turning the ignition switch to the “ON” or
“ACC” position.
NOTE l When the ignition switch is turned to the
“ON” position, the buzzer sounds 4 times.
This operation indicates that the alarm was ac-
tivated while the vehicle was parked.
Please check the inside of the vehicle to con-
firm that nothing was stolen.
l Even if the battery is disconnected, the alarm
activation memory will not be erased. Locking and unlocking
1-14
1
OBKE12E1
Page 33 of 377
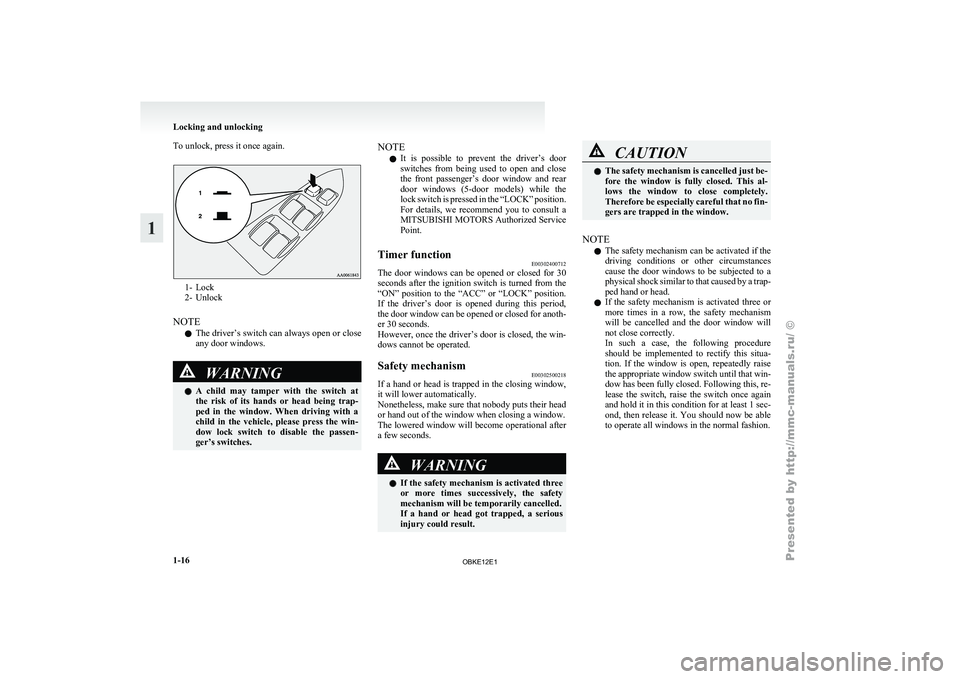
To unlock, press it once again.
1- Lock
2- Unlock
NOTE l The
driver’s
switch can always open or close
any door windows. WARNING
l A
child
may
tamper with the switch at
the risk of its hands or head being trap-
ped in the window. When driving with a
child in the vehicle, please press the win-
dow lock switch to disable the passen-
ger’s switches. NOTE
l It
is possible
to prevent the driver’s door
switches from being used to open and close
the front passenger’s door window and rear
door windows (5-door models) while the
lock switch is pressed in the “LOCK” position.
For details, we recommend you to consult a
MITSUBISHI MOTORS Authorized Service
Point.
Timer function E00302400712
The door windows can be opened or closed for 30
seconds after the
ignition switch is turned from the
“ON” position to the “ACC” or “LOCK” position.
If the driver’s door is opened during this period,
the door window can be opened or closed for anoth-
er 30 seconds.
However, once the driver’s door is closed, the win-
dows cannot be operated.
Safety mechanism E00302500218
If a hand or head is trapped in the closing window,
it will lower automatically.
Nonetheless, make sure
that nobody puts their head
or hand out of the window when closing a window.
The lowered window will become operational after
a few seconds. WARNING
l If the
safety
mechanism is activated three
or more times successively, the safety
mechanism will be temporarily cancelled.
If a hand or head got trapped, a serious
injury could result. CAUTION
l
The safety mechanism
is cancelled just be-
fore the window is fully closed. This al-
lows the window to close completely.
Therefore be especially careful that no fin-
gers are trapped in the window.
NOTE l The
safety mechanism
can be activated if the
driving conditions or other circumstances
cause the door windows to be subjected to a
physical shock similar to that caused by a trap-
ped hand or head.
l If the safety mechanism is activated three or
more times in a row, the safety mechanism
will be cancelled and the door window will
not close correctly.
In such a case, the following procedure
should be implemented to rectify this situa-
tion. If the window is open, repeatedly raise
the appropriate window switch until that win-
dow has been fully closed. Following this, re-
lease the switch, raise the switch once again
and hold it in this condition for at least 1 sec-
ond, then release it. You should now be able
to operate all windows in the normal fashion. Locking and unlocking
1-16
1
OBKE12E1
Page 36 of 377
l
Release the
switch as soon as the sunroof rea-
ches the fully open or fully closed position.
l If the sunroof does not operate when the sun-
roof switch is operated, release the switch
and check whether something is trapped by
the sunroof. If nothing is trapped, we recom-
mend you to have the sunroof checked.
l Depending on the model of ski carriers or
roof carriers, the sunroof may make contact
with the carrier when the sunroof is tilted up.
Be careful when tilting up the sunroof if such
a ski carrier or a roof carrier is installed.
l Be sure to close the sunroof completely
when washing the vehicle or when leaving
the vehicle.
l Be careful, not to put any wax on the weath-
erstrip (black rubber) around the sunroof
opening. If stained with wax, the weather-
strip cannot maintain a weatherproof seal
with the sunroof.
l After washing the vehicle or after it has
rained, wipe off any water that is on the sun-
roof before operating it.
l Operating the sunroof repeatedly with the en-
gine stationary will run down the battery. Op-
erate the sunroof while the engine is running. Sunshade
E00307900103
Slide the sunshade manually to open and close it. CAUTION
l
Be careful that
hands are not trapped
when closing the sunshade. To open
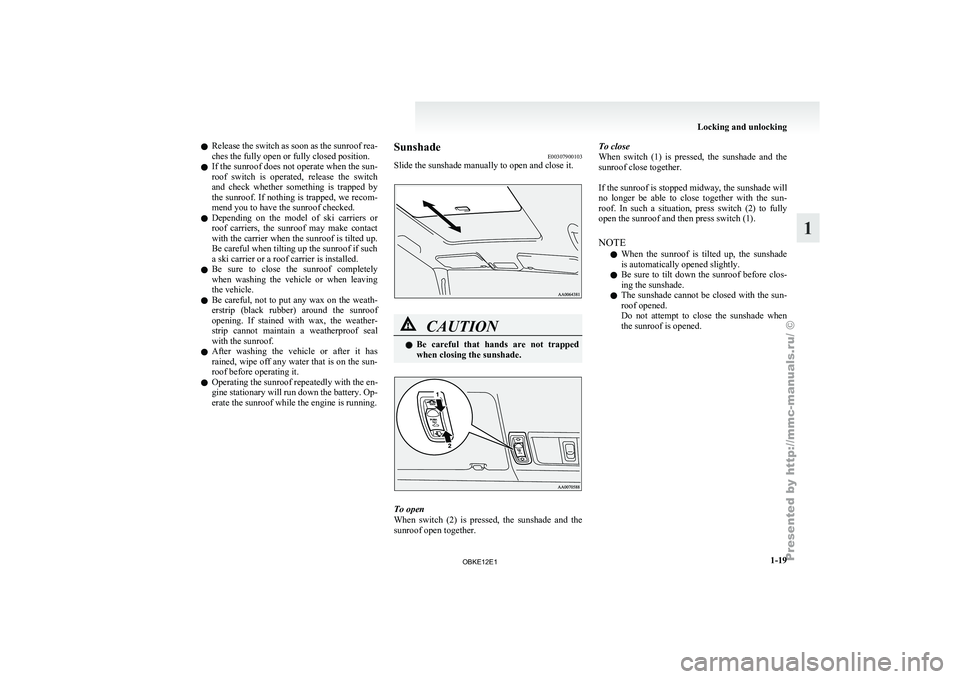
When switch
(2)
is pressed, the sunshade and the
sunroof open together. To close
When switch
(1)
is pressed, the sunshade and the
sunroof close together.
If the sunroof is stopped midway, the sunshade will
no longer be able to close together with the sun-
roof. In such a situation, press switch (2) to fully
open the sunroof and then press switch (1).
NOTE
l When the sunroof is tilted up, the sunshade
is automatically opened slightly.
l Be sure to tilt down the sunroof before clos-
ing the sunshade.
l The sunshade cannot be closed with the sun-
roof opened.
Do not attempt to close the sunshade when
the sunroof is opened. Locking and unlocking
1-19 1
OBKE12E1