ESP MITSUBISHI SHOGUN 2008 (in English) User Guide
[x] Cancel search | Manufacturer: MITSUBISHI, Model Year: 2008, Model line: SHOGUN, Model: MITSUBISHI SHOGUN 2008Pages: 538, PDF Size: 25.09 MB
Page 113 of 538
Seat and seat belts
2-67
2
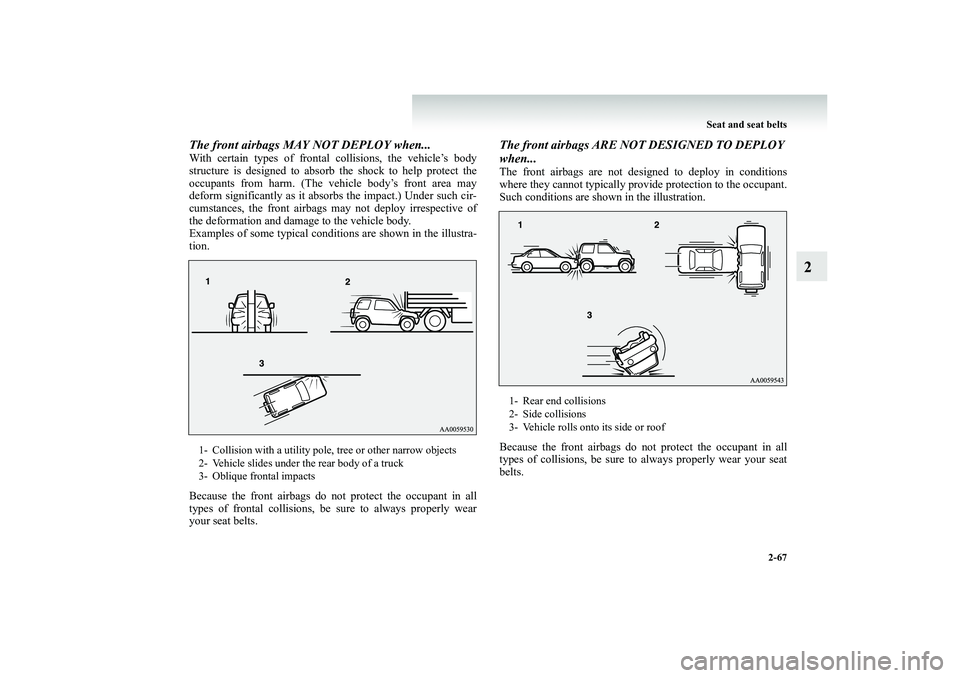
The front airbags MAY NOT DEPLOY when...With certain types of frontal collisions, the vehicle’s body structure is designed to absorb the shock to help protect the occupants from harm. (The vehicle body’s front area may deform significantly as it abso
rbs the impact.) Under such cir-
cumstances, the front airbags
may not deploy irrespective of
the deformation and damage to the vehicle body. Examples of some typical conditions are shown in the illustra-tion. Because the front airbags do not
protect the occupant in all
types of frontal collisions, be sure to always properly wear your seat belts.
The front airbags ARE NOT
DESIGNED TO DEPLOY
when...The front airbags are not designed to deploy in conditions where they cannot typically provide protection to the occupant. Such conditions are shown in the illustration. Because the front airbags do not
protect the occupant in all
types of collisions, be sure to always properly wear your seatbelts.
1- Collision with a utility pole, tree or other narrow objects 2- Vehicle slides under the rear body of a truck 3- Oblique frontal impacts
1- Rear end collisions 2- Side collisions3- Vehicle rolls onto its side or roof
BK-BK2008E1ENUK.en-uk-Section5.fm Page
67 Wednesday, January 9, 2008 4:28 PM
Page 117 of 538
Seat and seat belts
2-71
2
Deployment of side airbags and curtain airbags
E00407700375
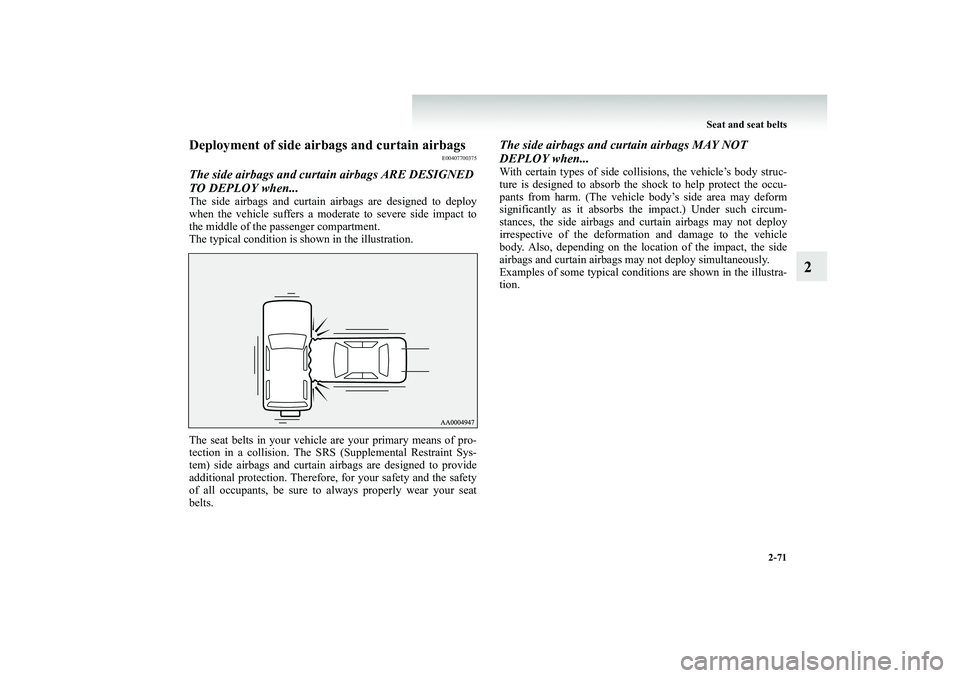
The side airbags and curtain airbags ARE DESIGNED TO DEPLOY when...The side airbags and curtain
airbags are designed to deploy
when the vehicle suffers a moderate to severe side impact to the middle of the passenger compartment.The typical condition is shown in the illustration. The seat belts in your vehicle are your primary means of pro- tection in a collision. The SRS (Supplemental Restraint Sys-tem) side airbags and curtain
airbags are designed to provide
additional protection. Therefore,
for your safety and the safety
of all occupants, be sure to always properly wear your seatbelts.
The side airbags and curtain airbags MAY NOT DEPLOY when...With certain types of side collisions, the vehicle’s body struc- ture is designed to absorb the
shock to help protect the occu-
pants from harm. (The vehicle body’s side area may deform significantly as it absorbs th
e impact.) Under such circum-
stances, the side airbags and
curtain airbags may not deploy
irrespective of the deformatio
n and damage to the vehicle
body. Also, depending on the location of the impact, the sideairbags and curtain airbags ma
y not deploy simultaneously.
Examples of some typical conditions are shown in the illustra- tion.
BK-BK2008E1ENUK.en-uk-Section5.fm Page
71 Wednesday, January 9, 2008 4:28 PM
Page 131 of 538
Instruments and controls
3-7
3
1. Push the reset button (D) to view the number of months
and driving distance remaining until the next inspection.
2. Give the reset button (D) a long push (at least two sec-
onds) to make the spanner mark (A) start flashing. (If youdo not touch the reset button for 10 seconds while the spanner mark is flashing, the display will revert to its orig- inal indication.)
3. Give the reset button (D) a gentle push while the spanner
mark is flashing. The “-----” indication (B) will change to “cLEAr” (C).
4. The number of months and driving distance remaining
until the next inspection will be shown.
NOTE●
It is not possible to reset the “-----” indication (B) with the ignition switch in the “ON” position.
●
When a certain distance has
been driven and a certain
period has elapsed after app
earance of the “-----” indica-
tion (B), the indication is automatically reset and the number of months until the next periodic inspection isshown.
●
If you accidentally reset th
e display, consult a MITSU-
BISHI MOTORS Author
ized Service Point.
Fuel gauge
E00500700638
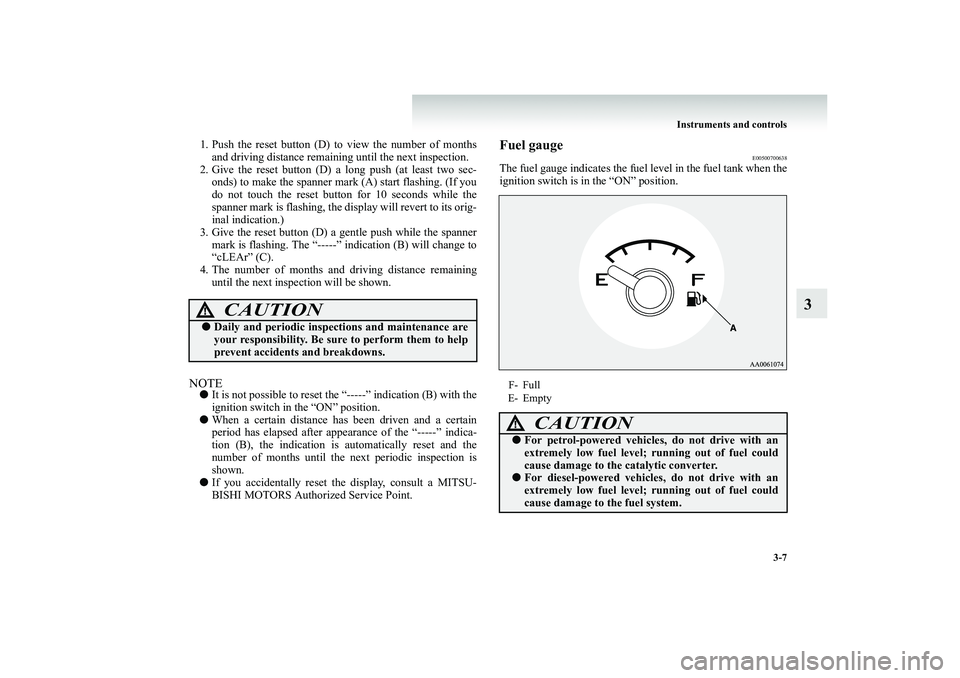
The fuel gauge indicates the fuel
level in the fuel tank when the
ignition switch is in the “ON” position.
CAUTION
!●
Daily and periodic inspect
ions and maintenance are
your responsibility. Be sure to perform them to help prevent accidents and breakdowns.
F- Full E- Empty
CAUTION
!●
For petrol-powered vehicles, do not drive with an extremely low fuel level;
running out of fuel could
cause damage to the catalytic converter.
●
For diesel-powered vehicl
es, do not drive with an
extremely low fuel level;
running out of fuel could
cause damage to the fuel system.
BK-BK2008E1ENUK.en-uk-Section6.fm Page 7 Wednesday, January 9, 2008 4:32 PM
Page 138 of 538
3-14 Instruments and controls
3
NOTE●
In certain cases immediately after the engine has been started or when the brake pedal is depressed repeatedly, a noise gen- erated by operation of brake devices may beheard coming from
the engine compart-
ment. This type of noise is normal and there is no need for concer
n. In fact, it indicates
that the corresponding devices are operating normally.
●
The brake system uses
brake fluid pressu-
rized by the pump. Please refer to “Braking” on page 4-56.
CAUTION
!●
In the situations listed below, brake performance may be compromised orthe vehicle may become unstable if brakes are applied suddenly; conse- quently, avoid driving at high speedsor applying the brakes suddenly. Fur- thermore, the vehicle should be brought to a stop in a safe location andto have it checked.• The brake warning lamp does notilluminate when the parking brake is applied or does not turn off when the parking brake is released.• The brake warning lamp remains illuminated during driving. • The brake warning buzzer does notturn off.
●
The vehicle should be brought to a halt in the following manner when brake performance has deteriorated.• Depress the brake pedal harder than usual. Even if the brake pedal moves downto the very end of its possible stroke, keep it pressed down hard. • Should the brakes fail, use enginebraking to reduce your speed and pull the parking brake lever. Depress the brake pedal to operate the stop lamp to
alert the vehicles
behind you.CAUTION
!
BK-BK2008E1ENUK.en-uk-Section6.fm Page
14 Wednesday, January 9, 2008 4:32 PM
Page 139 of 538
Instruments and controls
3-15
3
Check engine warning lamp
E00502600093
This lamp is a part of an onboard diagnostic sys- tem which monitors the emissions, engine and automatic transmission control systems. If a problem is detected
in one of these systems,
this lamp illuminates. Although your vehicle will usually be drivable and not need towing, we recommend you to havethe system checked as soon as possible. This lamp will also illuminate for a few seconds when the ignition switch is turned to the “ON”position. If it does not go off after a few seconds, we recommend you to have the vehicle checked.
NOTE●
The engine electr
onic control module
accommodating the onboard diagnostic sys- tem has various fault data (especially about the exhaust emission) stored.This data will be erased
if a battery cable is
disconnected which will make a rapid diag- nosis difficult. Do not disconnect a batterycable when the check engine warning lamp is ON.
CAUTION
!●
Prolonged driving with this lamp on may cause further damage to the emis- sion control system.
It could also affect
fuel economy and drivability.
●
If the lamp does not illuminate when the ignition switch is turned to the“ON” position, we recommend you to have the system checked.
●
If the lamp illuminates while the engine is running, avoid driving at high speeds and we recommend you to have the system checked.Accelerator pedal and brake pedal response may be negatively influenced under these conditions.
BK-BK2008E1ENUK.en-uk-Section6.fm Page
15 Wednesday, January 9, 2008 4:32 PM
Page 196 of 538
3-72 Instruments and controls
3
NOTE●
To protect the rubber parts of
the wipers, this operation of
the wipers does not take place
when the vehicle is station-
ary and the ambient temperature is about 0 °C or lower.
●
Do not cover the sensor by affixing a sticker or label to the windscreen. Also, do not put any water-repellent coating on the windscreen. The rain
sensor would not be able to
detect the extent of rain, and the wipers might stop work-ing normally.
●
In the following cases, the rain sensor may be malfunc- tioning.Have the vehicle inspected by a MITSUBISHI MOTORS Authorized Service Point. • When the wipers operate at
a constant interval despite
changes in the extent of rain. • When the wipers do not operate even though it is rain- ing.
●
The wipers may automatically
operate when things such
as rain, dust, mud, insects, tr
ee sap, oil or salt are affixed
to the windscreen on top of the rain sensor or when thewindscreen is frozen. (Wrong operation may also occur due to strong electromagnetic
waves, etc.) Objects affixed
to the windscreen wi
ll stop the wipers when the wipers
cannot remove them. To make the wipers operate
again, place the lever in the
“LO” or “HI” position.
●
Contact a MITSUBISHI MOTORS Authorized Service Point when replacing the winds
creen or reinforcing the
glass around the sensor.
To adjust the sensitivity of the rain sensor
E00517100038
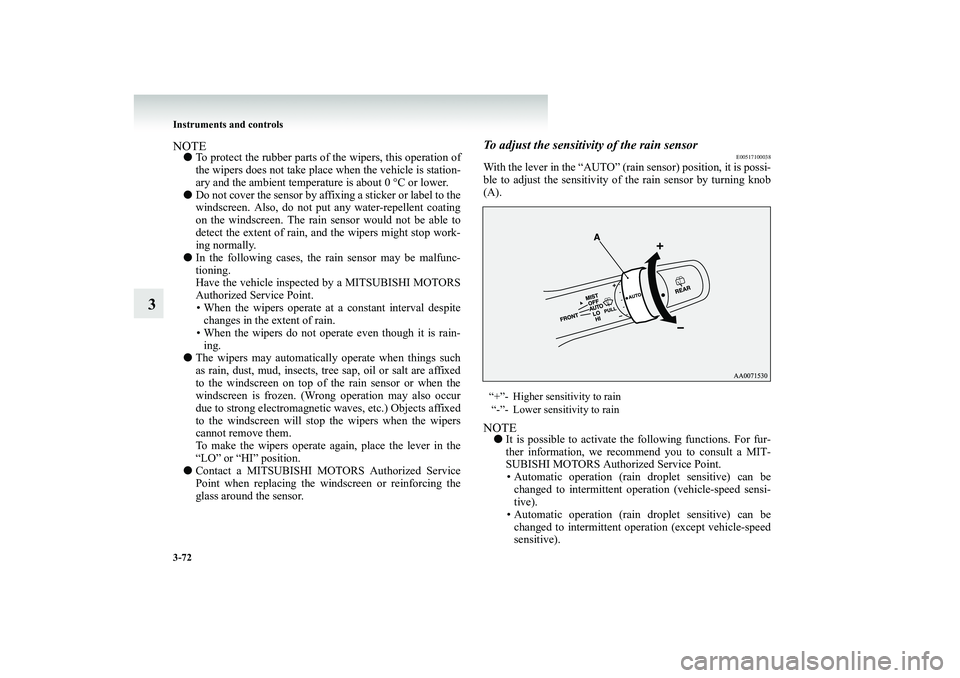
With the lever in the “AUTO” (rain sensor) position, it is possi- ble to adjust the sensitivity of the rain sensor by turning knob (A).NOTE●
It is possible to activate the following functions. For fur- ther information, we reco
mmend you to consult a MIT-
SUBISHI MOTORS Authorized Service Point. • Automatic operation (rain droplet sensitive) can be changed to intermittent ope
ration (vehicle-speed sensi-
tive). • Automatic operation (rain droplet sensitive) can be changed to intermittent oper
ation (except vehicle-speed
sensitive).
“+”- Higher sensitivity to rain “-”- Lower sensitivity to rain
BK-BK2008E1ENUK.en-uk-Section6.fm Page
72 Wednesday, January 9, 2008 4:32 PM
Page 204 of 538
4-2 Starting and driving
4
Economical driving
E00600100561
For economical driving, there ar
e some technical requirements
that have to be met. The prerequisite for low fuel consumption is a properly adjusted engine. In order to achieve longer life ofthe vehicle and the most econo
mical operation, we recommend
you to have the vehicle checked
at regular intervals in accord-
ance with the service standards.Fuel economy and generation of exhaust gas and noise are highly influenced by personal driving habits as well as the par- ticular operating conditions. The following points should beobserved in order to minimize w
ear of brakes, tyres and engine
as well as to reduce environmental pollution.StartingAvoid rapid acceleration and sudden starts; such operation will result in higher fuel consumption.ShiftingShift only at an appropriate
speed and engine speed. Always
use the highest gear possible. The transfer shift lever should be set to “2H” when driving on normal roads and express ways to obtain best possible fueleconomy.City trafficFrequent starting and stopping
increases the average fuel con-
sumption. Use roads with smooth
traffic flow whenever possi-
ble. When driving on congested
roads, avoid use of a low gear
at high engine speeds.
IdlingThe vehicle consumes fuel even during idling. Avoid extended idling whenever possible.SpeedAt higher vehicle speed, more fu
el is consumed. Avoid driving
at full speed. Even a slight re
lease of the accelerator pedal will
save a significant amount of fuel.Tyre inflation pressureCheck the tyre inflation pressure
s at regular intervals. Low tyre
inflation pressure increases ro
ad resistance and fuel consump-
tion. In addition, low tyre pres
sures adversely affect tyre wear
and driving stability.LoadDo not drive with unnecessary articles in the luggage compart- ment. Especially during city dr
iving where frequent starting
and stopping is necessary, the increased weight of the vehicle will greatly affect fuel consumption. Also avoid driving with unnecessary luggage or carriers,
etc., on the roof; the increased
air resistance will increase fuel consumption.Cold engine startingStarting of a cold engine consumes more fuel. Unnecessary fuel consumption
is also caused by keeping a hot
engine running. After the engine is started, commence driving as soon as possible.Air conditioningThe use of the air conditioning
will increase the fuel consump-
tion.
BK-BK2008E1ENUK.en-uk-Section7.fm Page 2 Wednesday, January 9, 2008 4:36 PM
Page 234 of 538
4-32 Starting and driving
4
Operation of the A/T
E00604200342
Passing acceleration
E00604500156
To gain extra acceleration in
“D” (DRIVE) position, push the
accelerator to the floor. The auto
matic transmission will auto-
matically downshift.NOTE●
In “Sports mode”, downshifts
do not take place when the
accelerator is depressed all the way to the floor.
Uphill/downhill driving
E00610500089
DRIVING UPHILL The transmission may not upshift
to a higher gear if the com-
puter determines the current sp
eed cannot be maintained once a
higher gear is engaged. For smoother vehicle performance, if you release the throttlewhile climbing a steep grade, th
e transmission may not upshift.
This is normal, as the computer
is temporarily preventing shift-
ing. After reaching the top of th
e hill, normal gear shift func-
tion will resume. DRIVING DOWNHILL When travelling down steep grad
es, the computer may auto-
matically select a lower gear. Th
is function assists engine brak-
ing efforts, reducing the need
for using the service brakes.
CAUTION
!●
Before selecting a gear with the engine running and the vehicle stationary, fully depress the brake pedalto prevent the vehicle from creeping. The vehicle will begin to move as soon as the gear is engaged, especially when th
e engine speed is high, at
fast idle or with the ai
r conditioning
operating, the
brakes should only be released when you are ready to drive away.
●
Depress the brake pedal with the right foot at all times. Using the left foot co
uld cause driver movement
delay in case of an emergency.
●
Operating the accelerator
pedal while the other foot
is resting on the brake peda
l will affect braking effi-
ciency and may cause pr
emature wear of brake
pads.
●
To prevent sudden accel
eration, never race the
engine when shifting from
the “P” (PARK) or “N”
(NEUTRAL) position.
●
Do not race the engine wi
th brake pedal pressed
when the vehicle is stationary. This can damage the A/T. Also, when you depress the accelerator pedal whileholding down the brake peda
l with the selector lever
in the “P” (PARK), “N” (NEUTRAL) or “D” (DRIVE) position, the increa
se in engine revolutions
may be limited.
BK-BK2008E1ENUK.en-uk-Section7.fm Page
32 Wednesday, January 9, 2008 4:36 PM
Page 237 of 538
Starting and driving
4-35
4
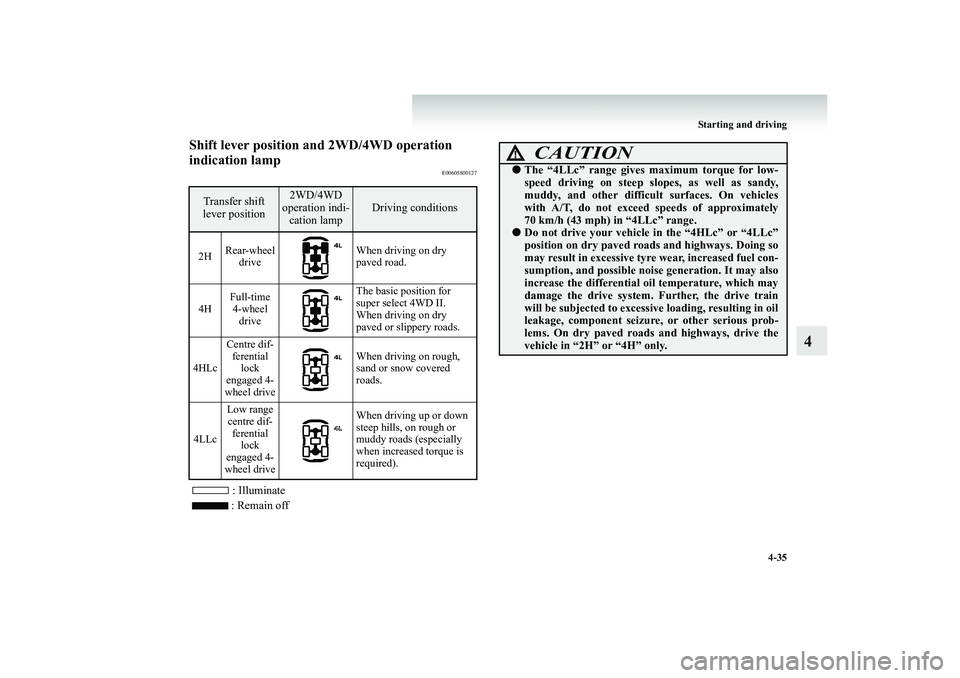
Shift lever position and 2WD/4WD operation indication lamp
E00605800127
: Illuminate : Remain off
Transfer shift lever position
2WD/4WD operation indi-cation lamp
Driving conditions
2H
Rear-wheel
drive
When driving on dry paved road.
4H
Full-time 4-wheel drive
The basic position for super select 4WD II.When driving on dry paved or slippery roads.
4HLc
Centre dif- ferential lock
engaged 4-wheel drive
When driving on rough, sand or snow covered roads.
4LLc
Low range centre dif-ferential lock
engaged 4-wheel drive
When driving up or down steep hills, on rough or muddy roads (especially when increased torque is required).
CAUTION
!●
The “4LLc” range gives maximum torque for low- speed driving on steep slopes, as well as sandy,muddy, and other difficul
t surfaces. On vehicles
with A/T, do not exceed
speeds of approximately
70 km/h (43 mph) in “4LLc” range.
●
Do not drive your vehicle in the “4HLc” or “4LLc” position on dry paved roads and highways. Doing so may result in excessive tyre wear, increased fuel con-sumption, and possible nois
e generation. It may also
increase the differential
oil temperature, which may
damage the drive system.
Further, the drive train
will be subjected to excessive loading, resulting in oil leakage, component seizure,
or other serious prob-
lems. On dry paved roads and highways, drive the vehicle in “2H” or “4H” only.
BK-BK2008E1ENUK.en-uk-Section7.fm Page
35 Wednesday, January 9, 2008 4:36 PM
Page 251 of 538
Starting and driving
4-49
4
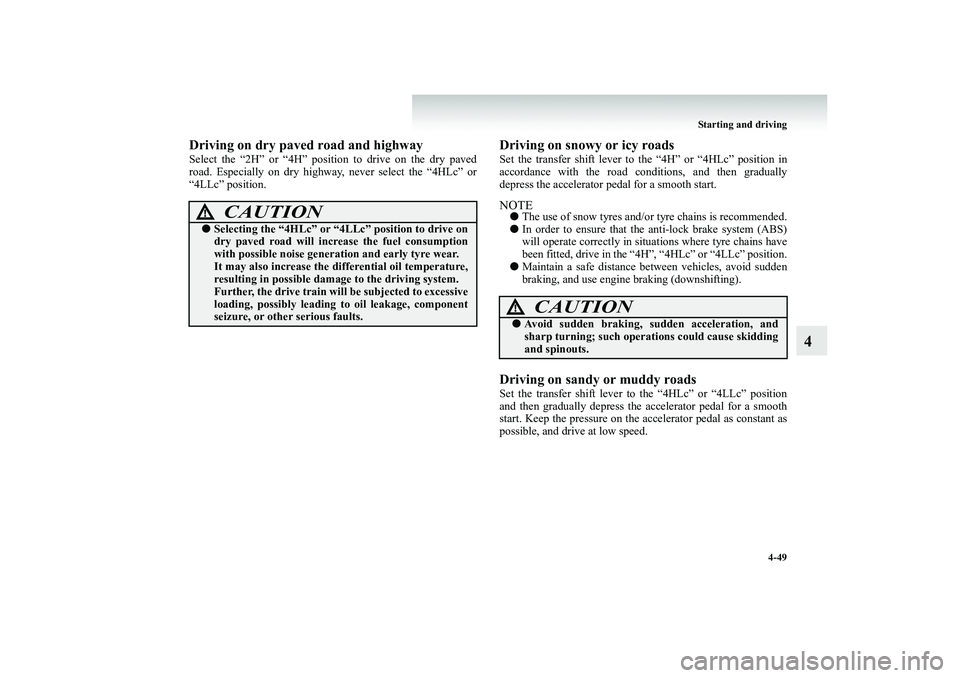
Driving on dry paved road and highwaySelect the “2H” or “4H” position to drive on the dry paved road. Especially on dry highway
, never select the “4HLc” or
“4LLc” position.
Driving on snowy or icy roads Set the transfer shift lever to
the “4H” or “4HLc” position in
accordance with the road conditions, and then graduallydepress the accelerator pe
dal for a smooth start.
NOTE●
The use of snow tyres and/or tyre chains is recommended.
●
In order to ensure that the
anti-lock brake
system (ABS)
will operate correctly in situ
ations where tyre chains have
been fitted, drive in the “4
H”, “4HLc” or “4LLc” position.
●
Maintain a safe distance between vehicles, avoid sudden braking, and use engine braking (downshifting).
Driving on sandy or muddy roadsSet the transfer shift lever to the “4HLc” or “4LLc” positionand then gradually depress th
e accelerator pedal for a smooth
start. Keep the pressure on th
e accelerator pedal as constant as
possible, and drive at low speed.
CAUTION
!●
Selecting the “4HLc” or “4LLc” position to drive on dry paved road will increase the fuel consumption with possible noise genera
tion and early tyre wear.
It may also increase the di
fferential oil temperature,
resulting in possible damage to the driving system. Further, the drive train wi
ll be subjected to excessive
loading, possibly leading
to oil leakage, component
seizure, or other serious faults.
CAUTION
!●
Avoid sudden braking, sudden acceleration, and sharp turning; such opera
tions could cause skidding
and spinouts.
BK-BK2008E1ENUK.en-uk-Section7.fm Page
49 Wednesday, January 9, 2008 4:36 PM