MITSUBISHI SHOGUN 2008 Owner's Manual (in English)
Manufacturer: MITSUBISHI, Model Year: 2008, Model line: SHOGUN, Model: MITSUBISHI SHOGUN 2008Pages: 538, PDF Size: 25.09 MB
Page 421 of 538
For emergencies
6-17
6
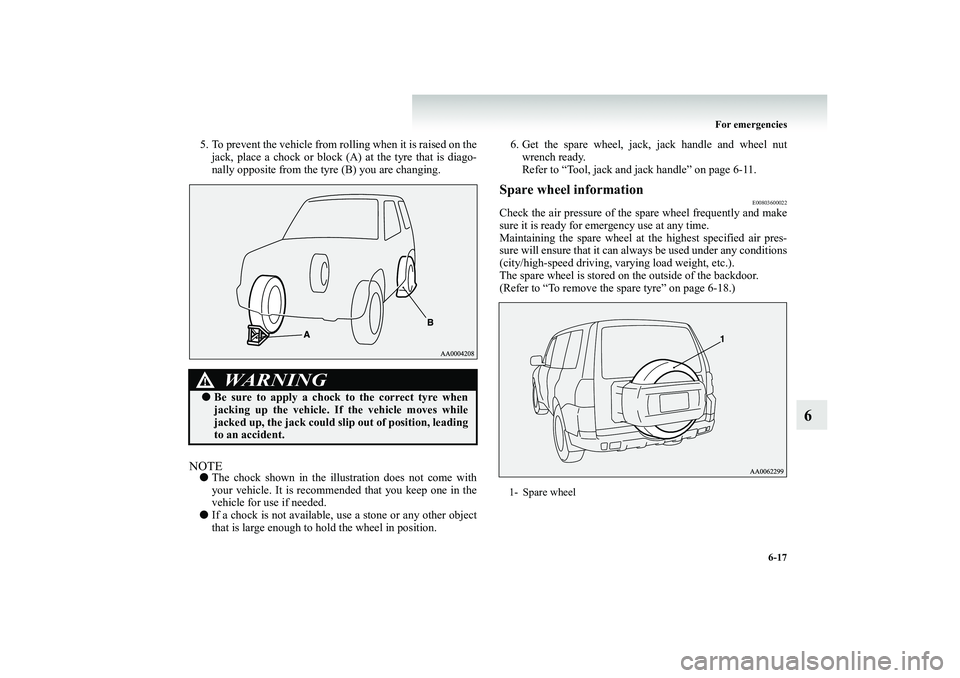
5. To prevent the vehicle from rol
ling when it is raised on the
jack, place a chock or block (A)
at the tyre that is diago-
nally opposite from the tyre (B) you are changing.
NOTE●
The chock shown in the illustration does not come with your vehicle. It is recommended that you keep one in thevehicle for use if needed.
●
If a chock is not available,
use a stone or any other object
that is large enough to hold the wheel in position.
6. Get the spare wheel, jack,
jack handle and wheel nut
wrench ready. Refer to “Tool, jack and jack handle” on page 6-11.
Spare wheel information
E00803600022
Check the air pressure of the
spare wheel frequently and make
sure it is ready for emergency use at any time. Maintaining the spare wheel at
the highest specified air pres-
sure will ensure that it can al
ways be used under any conditions
(city/high-speed driving, varying load weight, etc.). The spare wheel is stored on
the outside of the backdoor.
(Refer to “To remove the spare tyre” on page 6-18.)
WARNING
!●
Be sure to apply a chock to the correct tyre when jacking up the vehicle. If
the vehicle moves while
jacked up, the jack could sl
ip out of position, leading
to an accident.
1- Spare wheel
BK-BK2008E1ENUK.en-uk-Section9.fm Page
17 Wednesday, January 9, 2008 4:46 PM
Page 422 of 538
6-18 For emergencies
6
To remove the spare tyre
E00803300016
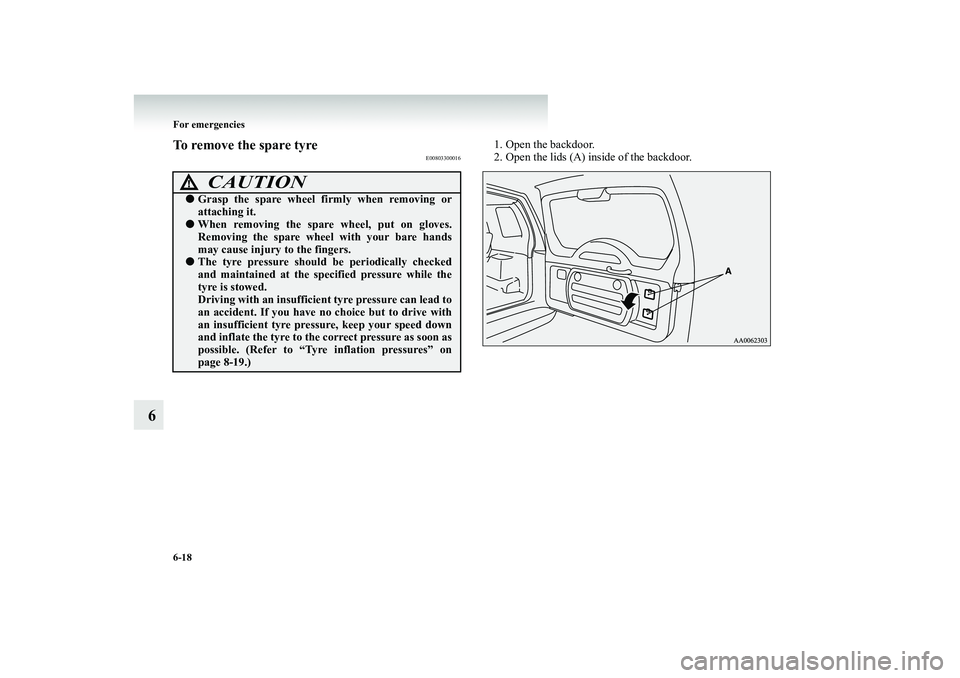
1. Open the backdoor. 2. Open the lids (A) inside of the backdoor.
CAUTION
!●
Grasp the spare wheel firmly when removing or attaching it.
●
When removing the spare wheel, put on gloves. Removing the spare wheel with your bare hands may cause injury to the fingers.
●
The tyre pressure should
be periodically checked
and maintained at the speci
fied pressure while the
tyre is stowed.Driving with an insufficient tyre pressure can lead to an accident. If you have no choice but to drive with an insufficient tyre pres
sure, keep your speed down
and inflate the tyre to the
correct pressure as soon as
possible. (Refer to “Tyre
inflation pressures” on
page 8-19.)
BK-BK2008E1ENUK.en-uk-Section9.fm Page
18 Wednesday, January 9, 2008 4:46 PM
Page 423 of 538
For emergencies
6-19
6
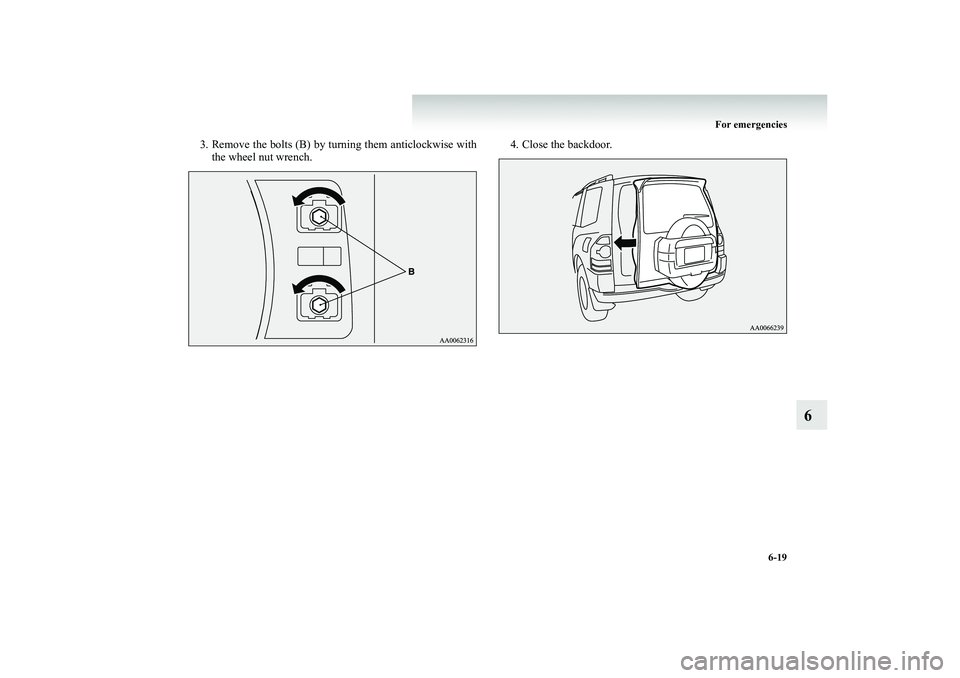
3. Remove the bolts (B) by turning them anticlockwise with
the wheel nut wrench.
4. Close the backdoor.
BK-BK2008E1ENUK.en-uk-Section9.fm Page
19 Wednesday, January 9, 2008 4:46 PM
Page 424 of 538
6-20 For emergencies
6
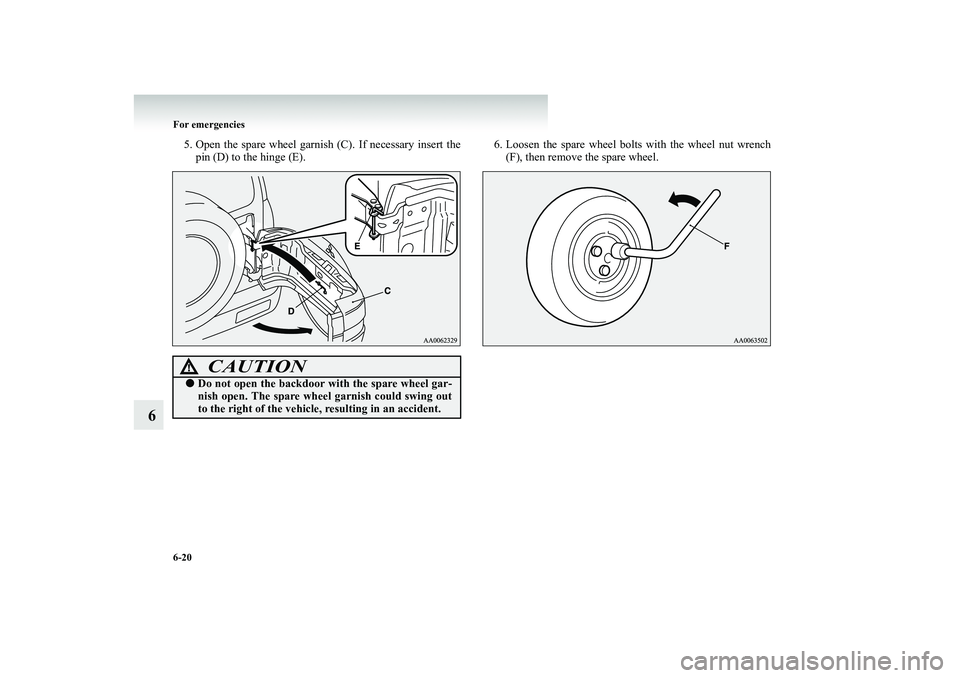
5. Open the spare wheel garnish
(C). If necessary insert the
pin (D) to the hinge (E).
6. Loosen the spare wheel bolts
with the wheel nut wrench
(F), then remove the spare wheel.
CAUTION
!●
Do not open the backdoor
with the spare wheel gar-
nish open. The spare wheel
garnish could swing out
to the right of the vehicle,
resulting in an accident.
BK-BK2008E1ENUK.en-uk-Section9.fm Page
20 Wednesday, January 9, 2008 4:46 PM
Page 425 of 538
For emergencies
6-21
6
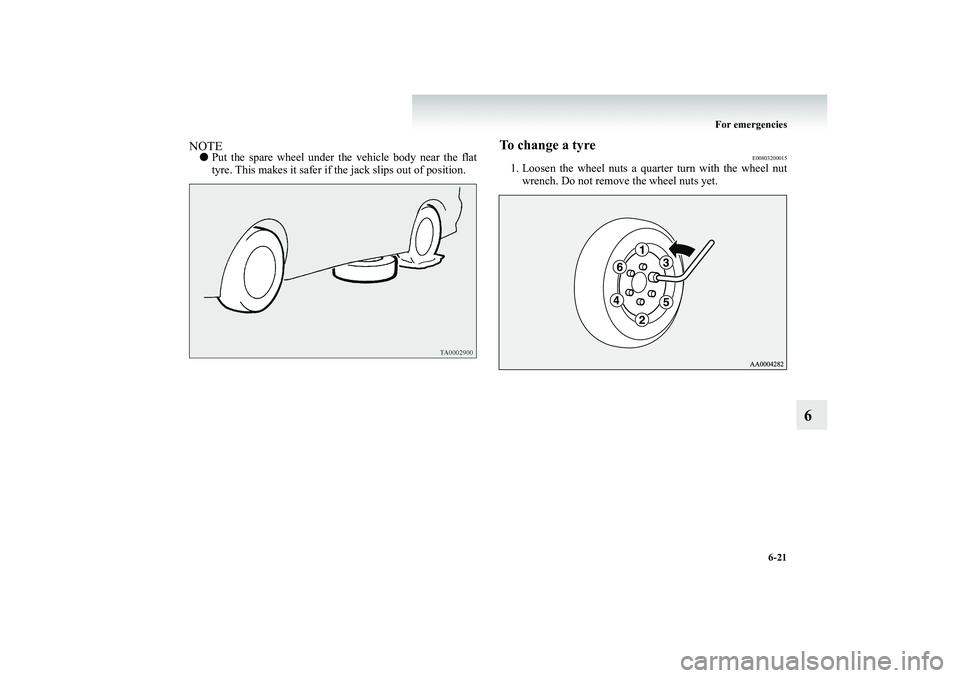
NOTE●
Put the spare wheel under th
e vehicle body near the flat
tyre. This makes it safer if the jack slips out of position.
To change a tyre
E00803200015
1. Loosen the wheel nuts a quar
ter turn with the wheel nut
wrench. Do not remove the wheel nuts yet.
BK-BK2008E1ENUK.en-uk-Section9.fm Page
21 Wednesday, January 9, 2008 4:46 PM
Page 426 of 538
6-22 For emergencies
6
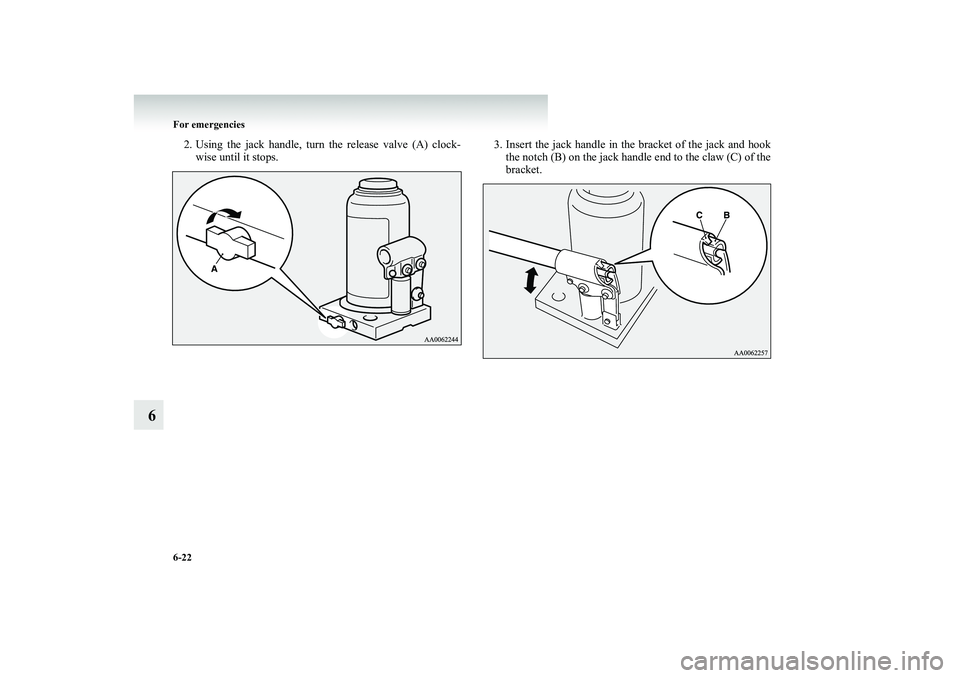
2. Using the jack handle, turn
the release valve (A) clock-
wise until it stops.
3. Insert the jack handle in the bracket of the jack and hook
the notch (B) on the jack handle
end to the claw (C) of the
bracket.
BK-BK2008E1ENUK.en-uk-Section9.fm Page
22 Wednesday, January 9, 2008 4:46 PM
Page 427 of 538
For emergencies
6-23
6
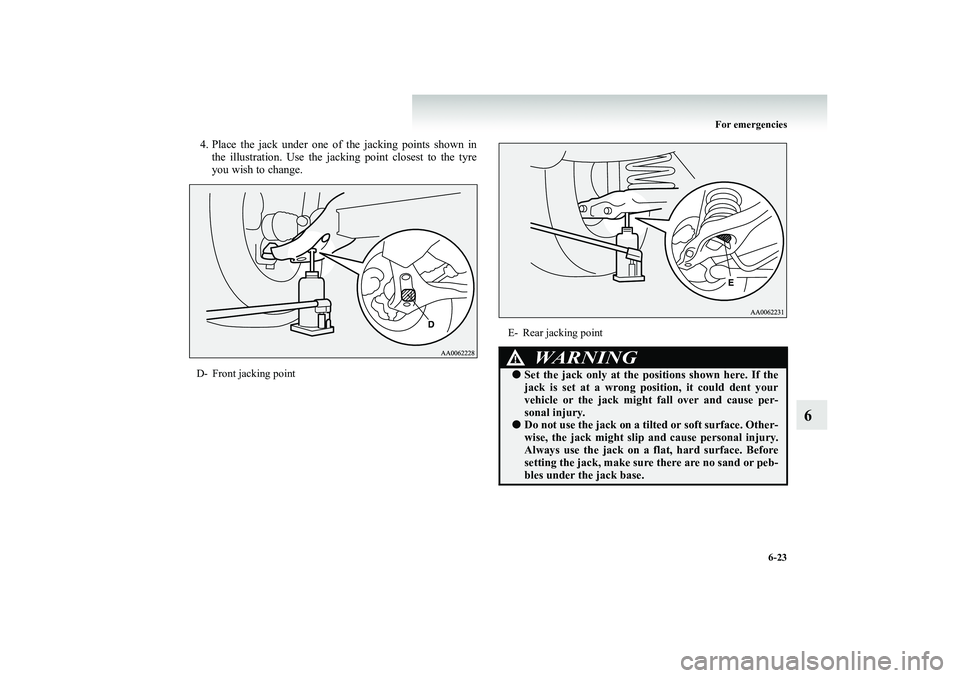
4. Place the jack under one of
the jacking points shown in
the illustration. Use the jack
ing point closest to the tyre
you wish to change.
D- Front jacking point
E- Rear jacking point
WARNING
!●
Set the jack only at the po
sitions shown here. If the
jack is set at a wrong position, it could dent yourvehicle or the jack might
fall over and cause per-
sonal injury.
●
Do not use the jack on a tilt
ed or soft surface. Other-
wise, the jack might slip
and cause personal injury.
Always use the jack on a
flat, hard surface. Before
setting the jack, make sure there are no sand or peb-bles under the jack base.
BK-BK2008E1ENUK.en-uk-Section9.fm Page
23 Wednesday, January 9, 2008 4:46 PM
Page 428 of 538
6-24 For emergencies
6
5. Move the jack handle up a
nd down to raise the ram until
just before the jack contacts
the jacking point of the vehi-
cle. Ensure that the jack will
properly contact the vehicle
jacking point.
NOTE●
This jack is a 3 stage expansion type.
6. Raise the vehicle until the tyre is slightly off the ground.
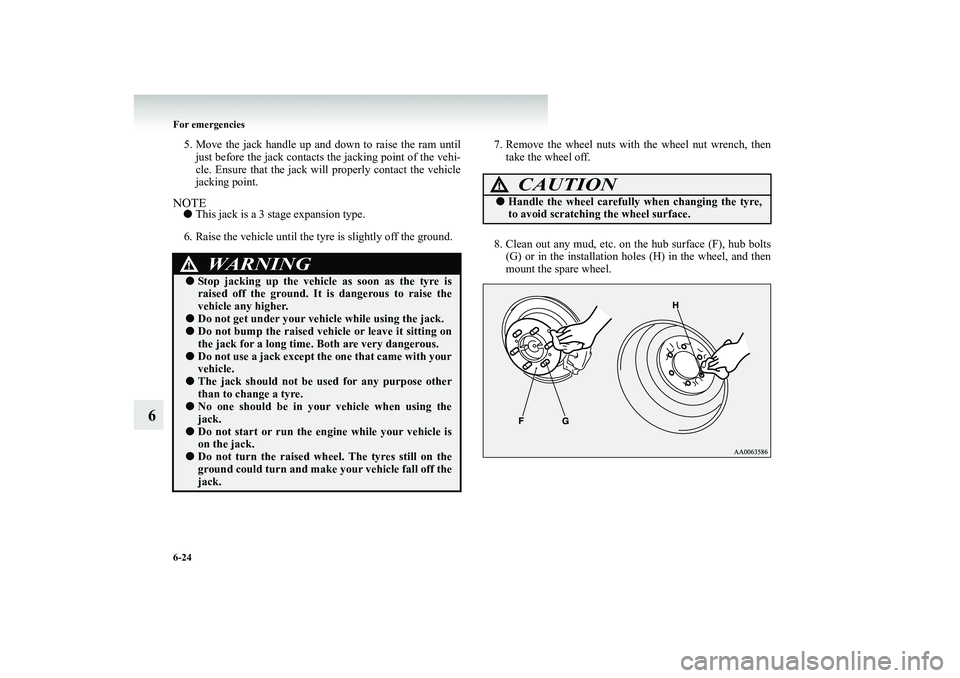
7. Remove the wheel nuts with the wheel nut wrench, then
take the wheel off.
8. Clean out any mud, etc. on
the hub surface
(F), hub bolts
(G) or in the installation holes (H) in the wheel, and thenmount the spare wheel.
WARNING
!●
Stop jacking up the vehicle as soon as the tyre is raised off the ground. It
is dangerous to raise the
vehicle any higher.
●
Do not get under your vehicle while using the jack.
●
Do not bump the raised vehicle or leave it sitting on the jack for a long time.
Both are very dangerous.
●
Do not use a jack except th
e one that came with your
vehicle.
●
The jack should not be us
ed for any purpose other
than to change a tyre.
●
No one should be in your vehicle when using the jack.
●
Do not start or run the en
gine while your vehicle is
on the jack.
●
Do not turn the raised wheel. The tyres still on the ground could turn and make your vehicle fall off thejack.
CAUTION
!●
Handle the wheel carefully
when changing the tyre,
to avoid scratching the wheel surface.
BK-BK2008E1ENUK.en-uk-Section9.fm Page
24 Wednesday, January 9, 2008 4:46 PM
Page 429 of 538
For emergencies
6-25
6
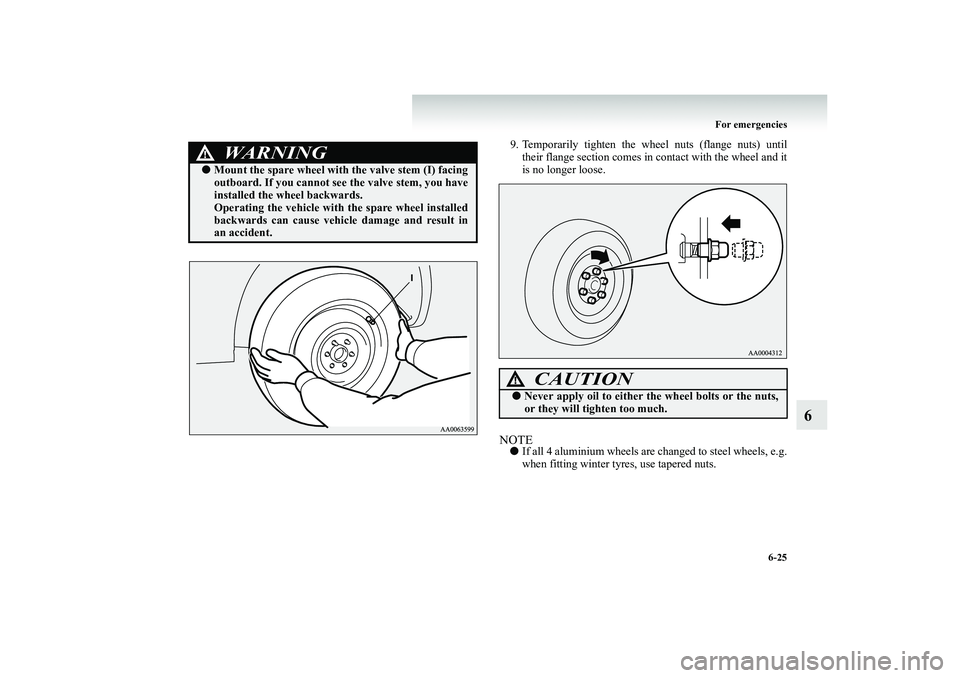
9. Temporarily tighten the wheel nuts (flange nuts) until
their flange section
comes in contact with the wheel and it
is no longer loose.
NOTE●
If all 4 aluminium wheels are
changed to steel wheels, e.g.
when fitting winter tyres, use tapered nuts.
WARNING
!●
Mount the spare wheel with the valve stem (I) facing outboard. If you cannot s
ee the valve stem, you have
installed the wheel backwards. Operating the vehicle with
the spare wheel installed
backwards can cause vehicle damage and result inan accident.
CAUTION
!●
Never apply oil to either the wheel bolts or the nuts, or they will tighten too much.
BK-BK2008E1ENUK.en-uk-Section9.fm Page
25 Wednesday, January 9, 2008 4:46 PM
Page 430 of 538
6-26 For emergencies
6
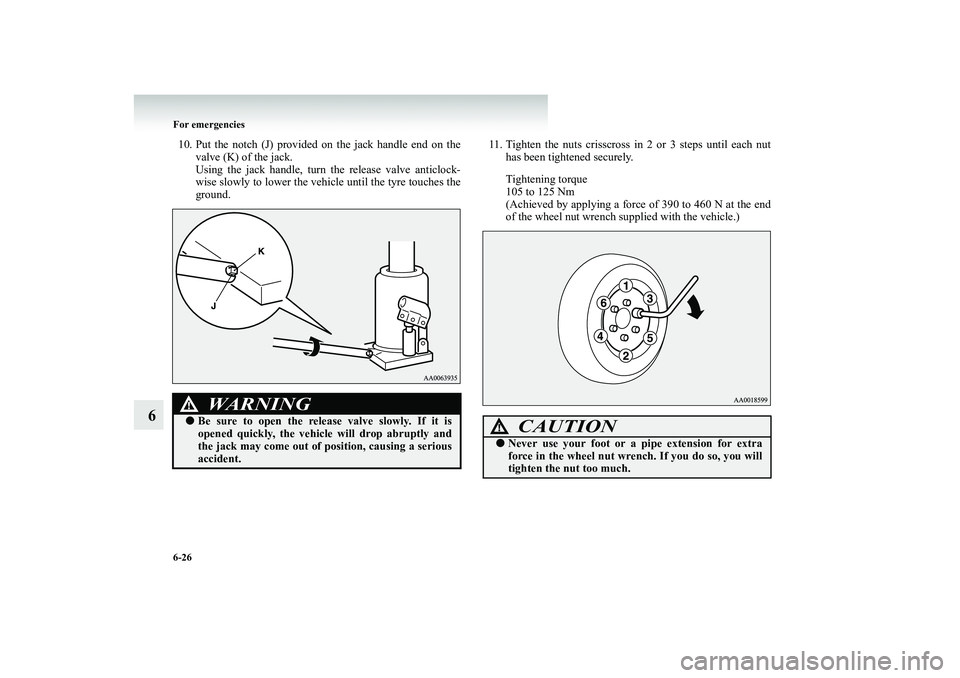
10. Put the notch (J) provided on the jack handle end on the
valve (K) of the jack. Using the jack handle, turn the release valve anticlock- wise slowly to lower the vehicle until the tyre touches theground.
11. Tighten the nuts crisscross
in 2 or 3 steps until each nut
has been tightened securely. Tightening torque 105 to 125 Nm (Achieved by applying a force of 390 to 460 N at the endof the wheel nut wrench s
upplied with the vehicle.)
WARNING
!●
Be sure to open the release valve slowly. If it is opened quickly, the vehicl
e will drop abruptly and
the jack may come out of
position, causing a serious
accident.
CAUTION
!●
Never use your foot or a pipe extension for extra force in the wheel nut wren
ch. If you do so, you will
tighten the nut too much.
BK-BK2008E1ENUK.en-uk-Section9.fm Page
26 Wednesday, January 9, 2008 4:46 PM