service MITSUBISHI SHOGUN 2017 (in English) User Guide
[x] Cancel search | Manufacturer: MITSUBISHI, Model Year: 2017, Model line: SHOGUN, Model: MITSUBISHI SHOGUN 2017Pages: 394, PDF Size: 19 MB
Page 70 of 394
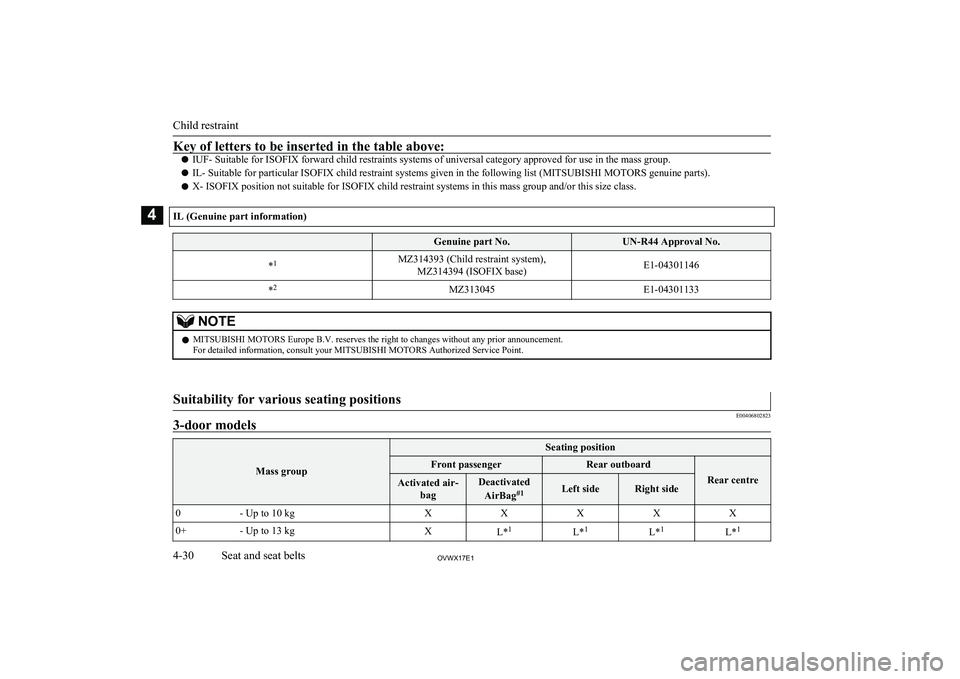
Key of letters to be inserted in the table above:
lIUF- Suitable for ISOFIX forward child restraints systems of universal category approved for use in the mass group.
l IL- Suitable for particular ISOFIX child restraint systems given in the following list (MITSUBISHI MOTORS genuine parts).
l X- ISOFIX position not suitable for ISOFIX child restraint systems in this mass group and/or this size class.IL (Genuine part information) Genuine part No.UN-R44 Approval No.*1MZ314393 (Child restraint system),
MZ314394 (ISOFIX base)E1-04301146*2MZ313045E1-04301133NOTEl
MITSUBISHI MOTORS Europe B.V. reserves the right to changes without any prior announcement.
For detailed information, consult your MITSUBISHI MOTORS Authorized Service Point.
Suitability for various seating positions
E00406802823
3-door models
Mass group
Seating positionFront passengerRear outboard
Rear centre
Activated air-
bagDeactivated
AirBag #1Left sideRight side0- Up to 10 kgXXXXX0+- Up to 13 kgXL*1L*1L*1L*1
Child restraint
4-30OVWX17E1Seat and seat belts4
Page 72 of 394

NOTElThere is no applicable MITSUBISHI MOTORS Genuine Parts to the Mass Group “0-Up to 10 kg”.
l MITSUBISHI MOTORS Europe B.V. reserves the right to changes without any prior announcement.
For detailed information, consult your MITSUBISHI MOTORS Authorized Service Point.5-door models
Mass group
Seating positionFront PassengerRear out-
boardIntermediate OutboardIntermediate CentreActivated air- bagDeactivated
AirBag #1Left sideRight side0- Up to 10 kgXXXUUX0+- Up to 13 kgXL*1L*1U, L* 1U, L*1L*1I-9 to 18 kgL*2L*2L*2U, L* 2U, L*2L*2II & III-15 to 36 kgL*3L*3L*3U, L* 3U, L*3L*3
#1
: With front passenger’s airbag deactivated by means of front passenger’s airbag ON-OFF switch.
CAUTIONl When installing a child restraint system, remove the head restraint from the seat.
l When installing a “universal” category child restraint system on the intermediate outboard seat, adjust the seatback of the intermediate seat to its most up-
right position.
l When installing a child restraint system that’s a
MITSUBISHI MOTORS genuine part for the mass group “0+ up to 13 kg” in a rear outboard seating posi-
tion, remove the head restraint from the rear outboard seating position and tip the rear outboard seatback fully rearward.
l Do not sit in the middle seating position of the second seat when installing a child restraint system to the right side of the second outboard.
Child restraint
4-32OVWX17E1Seat and seat belts4
Page 73 of 394
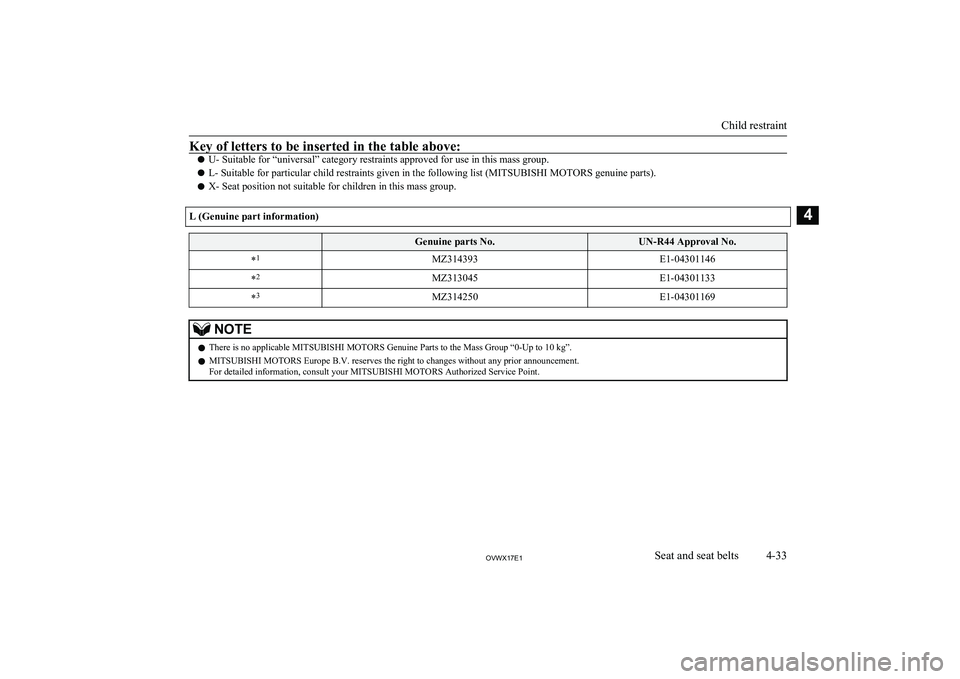
Key of letters to be inserted in the table above:
lU- Suitable for “universal” category restraints approved for use in this mass group.
l L- Suitable for particular child restraints given in the following list (MITSUBISHI MOTORS genuine parts).
l X- Seat position not suitable for children in this mass group.L (Genuine part information) Genuine parts No.UN-R44 Approval No.*1MZ314393E1-04301146*2MZ313045E1-04301133*3MZ314250E1-04301169NOTEl
There is no applicable MITSUBISHI MOTORS Genuine Parts to the Mass Group “0-Up to 10 kg”.
l MITSUBISHI MOTORS Europe B.V. reserves the right to changes without any prior announcement.
For detailed information, consult your MITSUBISHI MOTORS Authorized Service Point.
Child restraint
4-33OVWX17E1Seat and seat belts4
Page 76 of 394

2.Fasten the seat belt to secure the child
restraint system. Make sure you hear a “click” when you insert the latch plate in
the buckle.
3. Remove all slack by using the locking
clip.
4. Push and pull the child restraint in all di-
rections to be sure it is secure.WARNINGl For some types of child restraint, the lock-
ing clip (A) should be used to help avoid personal injury during a collision or sud-den manoeuvre.
It must be fitted and used in accordance
with the child restraint manufacturer’s instructions.
The locking clip must be removed when the child restraint is removed.Seat belt inspection
E00406301690
Check the belts for cuts, worn or frayed web- bing and for cracked or deformed metallic
parts. Replace the belt assembly if it is defec-
tive.WARNINGl We recommend you to have all seat belt
assemblies including retractors and at-
taching hardware inspected after any col- lision. We recommend that seat belt as-
semblies in use during a collision be re- placed unless the collision was minor and
the belts show no damage and continue to operate properly.
l Do not attempt to repair or replace any
part of the seat belt assemblies; we recom-
mend you to have this work done by a MITSUBISHI MOTORS Authorized
Service Point. Incorrect repair or replace-
ment could reduce the effectiveness of the
belts and could result in serious injury in the event of a collision.
l Once the pretensioner has been activated,
it cannot be re-used.
It must be replaced together with the re-
tractor.WARNINGl Do not insert any foreign objects (pieces
of plastic, paper clips, buttons, etc.) in the
buckle or retractor mechanism. In addi- tion, do not modify, remove or install the
seat belt. Otherwise, the seat belt may not be able to provide adequate protection in a collision or other situation.
l A dirty belt should be cleaned with neu-
tral detergent in warm water. After rins-
ing in water, let it dry in the shade. Do not
attempt to bleach or re-dye the belts be-
cause this will affect their characteristics.
Supplemental restraint
system (SRS) - airbag E00407203397
The information written in this Supplemental
Restraint System (SRS) section contains im- portant points concerning the driver, front
passenger, side and curtain airbags.
Seat belt inspection
4-36OVWX17E1Seat and seat belts4
Page 80 of 394
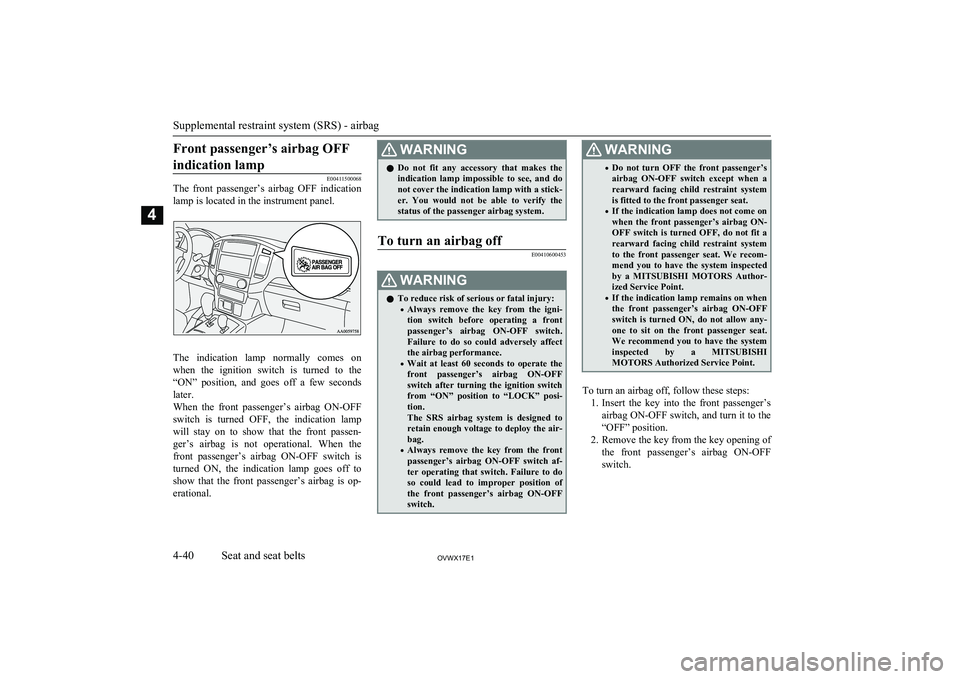
Front passenger’s airbag OFFindication lamp
E00411500068
The front passenger’s airbag OFF indication
lamp is located in the instrument panel.
The indication lamp normally comes on when the ignition switch is turned to the
“ON” position, and goes off a few seconds later.
When the front passenger’s airbag ON-OFF switch is turned OFF, the indication lamp
will stay on to show that the front passen-
ger’s airbag is not operational. When the
front passenger’s airbag ON-OFF switch is turned ON, the indication lamp goes off to
show that the front passenger’s airbag is op-
erational.
WARNINGl Do not fit any accessory that makes the
indication lamp impossible to see, and do
not cover the indication lamp with a stick- er. You would not be able to verify thestatus of the passenger airbag system.To turn an airbag off
E00410600453WARNINGl To reduce risk of serious or fatal injury:
• Always remove the key from the igni-
tion switch before operating a front
passenger’s airbag ON-OFF switch. Failure to do so could adversely affect
the airbag performance.
• Wait at least 60 seconds to operate the
front passenger’s airbag ON-OFF switch after turning the ignition switch
from “ON” position to “LOCK” posi- tion.
The SRS airbag system is designed to retain enough voltage to deploy the air-
bag.
• Always remove the key from the front
passenger’s airbag ON-OFF switch af-ter operating that switch. Failure to do
so could lead to improper position of the front passenger’s airbag ON-OFF switch.WARNING• Do not turn OFF the front passenger’s
airbag ON-OFF switch except when a rearward facing child restraint system
is fitted to the front passenger seat.
• If the indication lamp does not come on
when the front passenger’s airbag ON-
OFF switch is turned OFF, do not fit a rearward facing child restraint system
to the front passenger seat. We recom- mend you to have the system inspected
by a MITSUBISHI MOTORS Author-
ized Service Point.
• If the indication lamp remains on when
the front passenger’s airbag ON-OFF switch is turned ON, do not allow any-
one to sit on the front passenger seat. We recommend you to have the systeminspected by a MITSUBISHI
MOTORS Authorized Service Point.
To turn an airbag off, follow these steps:
1. Insert the key into the front passenger’s
airbag ON-OFF switch, and turn it to the “OFF” position.
2. Remove the key from the key opening of
the front passenger’s airbag ON-OFF switch.
Supplemental restraint system (SRS) - airbag
4-40OVWX17E1Seat and seat belts4
Page 83 of 394

The front airbags MAY DE-PLOY when…
The front airbags may deploy if the bottom ofthe vehicle suffers a moderate-to-severe im-
pact (undercarriage damage).
Examples of some typical conditions are shown in the illustration.
1- Collision with an elevated median/island
or kerb
2- Vehicle travels over a deep hole/pothole
3- Vehicle drives down a steep slope and
hits the ground
Because the front airbags may deploy in cer- tain types of unexpected impacts as shown in
the illustration that can easily move you out
of position, it is important to always properly wear your seat belts. Your seat belts will help
keep you a safe distance from the steering
wheel and instrument panel during the initial
stages of airbag deployment. The initial stage of airbag inflation is the most forceful andcan possibly cause serious or fatal injuries if
you contact it at this stage.WARNINGl Do not attach anything to the steering
wheel padded cover, such as trim materi- al, badges, etc. It might strike and injure
an occupant if the airbag inflates.
l Do not set anything on, or attach anything
to, the instrument panel above the glove box. It might strike and injure an occu- pant if the airbag inflates.WARNINGl Do not attach accessories to, or put them
in front of, the windscreen. These objects
could restrict the airbag inflation, or strike and injure an occupant if the air-
bags inflate.
l Do not put packages, pets or other objects
between the airbags and the driver orfront passenger. It could affect airbagperformance, or could cause injury when the airbag inflates.
l Right after the airbag inflation, several
airbag system components will be hot. Do
not touch them; you could be burned.
l The airbag system is designed to work on-
ly once. Once the airbags have deployed, they will not work again. They must
promptly be replaced, and we recommend
you to have the entire airbag system in- spected by a MITSUBISHI MOTORS
Authorized Service Point.Side airbag system*
E00407600198
The side airbags (A) are contained in the
driver and front passenger seatbacks.
Supplemental restraint system (SRS) - airbag
4-43OVWX17E1Seat and seat belts4
Page 86 of 394

WARNINGlThe side airbags and curtain airbags are
designed to supplement the driver and passenger seat belts in certain side im-
pacts. Seat belts should always be worn properly, and the driver and passenger
should sit well back and upright without
leaning against the window or door.
l The side airbag and curtain airbag inflate
with great force. The driver and passen- ger should not put their arms out of the window, and should not lean against the
door, in order to reduce the risk of serious
or possible fatal injury from the deploying
side airbag and curtain airbag.WARNINGl Do not allow any rear seat occupant to
hold onto the seatback of either front seat,
in order to reduce the risk of injury from
a deploying side airbag. Special care
should be taken with children.WARNINGl Do not place any objects near or in front
of the seatback of either front seat. They could interfere with proper side airbag in-
flation, and also could cause injury if thrown free by side airbag deployment.
l Do not place stickers, labels or additional
trim on the seatback of either front seat.
They could interfere with proper side air- bag inflation.
l Do not install seat covers on seats with
side airbags. Do not re-cover the seats with side airbags. They could interfere
with proper side airbag inflation.
l Do not attach a microphone (A) or any
other device or object around the part where the curtain airbags activate such as
on the windscreen, side door glass, front and rear pillars and roof side or assistgrips. When the curtain airbags inflate,
the microphone or other device or object will be hurled with great force or the cur- tain airbags may not activate correctly,resulting in death or serious injury.WARNINGl Do not put a hanger or any heavy or poin-
ted object on the coat hook.
If the curtain airbag was activated, any
such item could be propelled away with
great force and could prevent the curtain
airbag from inflating correctly. Hang clothes directly on the coat hook (withoutusing a hanger).
Make sure there are no heavy or sharp objects in the pockets of clothes that you
hang on the coat hook.
l Do not allow a child to lean against or
close to the front door even if the child is seated in a child restraint system.
The child’s head should also not lean
against or be close to the area where the side airbag and curtain airbag are loca-
ted. It is dangerous if the side airbag and
curtain airbag inflate.
Failure to follow all of these instructions
could lead to serious or fatal injury to the child.
l We recommend work around and on the
side airbags and curtain airbags system to
be done by a MITSUBISHI MOTORS
Authorized Service Point.
Supplemental restraint system (SRS) - airbag
4-46OVWX17E1Seat and seat belts4
Page 87 of 394

SRS warning lamp
E00407801706
There is a Supplemental Restraint System
(“SRS”) warning lamp on the instrument panel. The system checks itself every time the ignition switch is turned to the “ON” po-
sition. The SRS warning lamp will come on
for several seconds and then go out. This is
normal and means the system is working properly. If there is a problem involving one or more of the SRS components, the warning
lamp will come on and stay on.
The SRS warning lamp is shared by the SRS
airbag and the seat belt pretensioner system.
WARNINGl If any of the following conditions occur,
there may be a problem with the SRS air- bags and/or seat belt pretensioners, and they may not function properly in a colli-WARNINGsion or may suddenly activate without a
collision:
• Even when the ignition switch is
in“ON” position, the SRS warning lamp does not come on or it remains
on.
• The SRS warning lamp comes on while
driving.
The SRS airbags and seat belt pretension- ers are designed to help reduce the risk of
serious injury or death in certain colli- sions. If either of the above conditions oc-
curs, immediately have your vehicle checked by a MITSUBISHI MOTORS
Authorized Service Point.SRS servicing
E00407901390
WARNINGl We recommend any maintenance per-
formed on or near the components of the
SRS to be performed by a MITSUBISHI
MOTORS Authorized Service Point.
Improper work on the SRS components
or wiring could result in inadvertent de- ployment of the airbags, or could render
the SRS inoperative; either situation could result in serious injury.WARNINGl Do not modify your steering wheel, seat
belt retractor or any other SRS compo- nents. For example, replacement of the
steering wheel, or modifications to the
front bumper or body structure can ad- versely affect SRS performance and lead
to possible injury.
l If your vehicle has sustained any damage,
we recommend you to have the SRS in- spected to ensure it is in proper workingorder.
l On vehicles equipped with side airbags,
do not modify your front seats, centre pil- lar and centre console.
It can adversely affect SRS performance and lead to possible injury. If you found
any tear, scratch, crack or damage to the
seat fabric near the side airbag, the por-
tion of the front and rear pillars and roof side rail, you should have the SRS inspec- ted by a MITSUBISHI MOTORS Au-
thorized Service Point.NOTEl When you transfer ownership of the vehicle
to some other person, we urge you to alert
the new owner that it is equipped with the SRS and refer the new owner to the applica- ble section in this owner’s manual.
Supplemental restraint system (SRS) - airbag
4-47OVWX17E1Seat and seat belts4
Page 90 of 394

InstrumentsE00500102896
1- Speedometer (km/h or mph + km/h)
2- Tachometer
3- Tripmeter reset button/Daytime dipper button
4- Fuel gauge
5- Odometer/Tripmeter/Service reminder/ Tyre pressure monitoring system*
6- Gearshift indicator ® p. 6-17
7- Water temperature gauge
Tachometer
E00500300458
The tachometer indicates the engine speed
(r/min). The tachometer helps you to obtain
more economical driving and also warns you
of excessive engine speeds (Red zone).
CAUTIONl When driving, watch the tachometer to make
sure that the engine speed indication does not rise into the red zone (excessive enginerpm).Odometer/Tripmeter/Service
reminder/Tyre pressure moni-toring system*
E00500602237
With the ignition switch in the “ON” posi-
tion, odometer, tripmeter, service reminder
and tyre pressure monitoring system indica-
tions are given.
A- Odometer/Tripmeter/Service reminder/ Tyre pressure monitoring system*
B- Reset button
Each time you press the reset button (B) less
than 1 second, the display switches in the fol- lowing order.
Instruments
5-02OVWX17E1Instruments and controls5
Page 91 of 394

1- Odometer/Tripmeter
2- Odometer/Tripmeter
3- Service reminder
4- Tyre pressure monitoring system*
® p. 6-48
NOTEl When the ignition switch is in the “ACC”
or“LOCK” position or while driving, the tyre pressure monitoring system is not dis-played even if you operate the reset button
(B).
Odometer
The odometer indicates the total distance the
vehicle has travelled.
Tripmeter
The tripmeter indicates the distance travelled during a particular trip or period.
There are two tripmeter displays: and .
Tripmeter
can be used to measure the dis-
tance travelled since the current trip began. At the same time, Tripmeter
can be used
to measure the distance from an intermediate location.
NOTEl If you do not push the button for about
10 seconds while the service reminder is
showing, the display will return to the odom-
eter indication.
l The odometer, tripmeter, and service re-
minder indications are given for 30 seconds
after the ignition switch has been turned to the “ACC” or “LOCK” position.
l After the odometer, tripmeter, and service
reminder indications have gone off, they come back on for about 30 seconds if either
of the following actions takes place.
• The driver’s door is opened.
• The reset button is pressed.
To reset the tripmeter
To return the display to “0”, press the reset
button (B) for more than 2 seconds. Only the
currently displayed value will be reset.
NOTEl When disconnecting the battery terminal for
a long time, the memory of tripmeter display
and are cleared, and the display re-
turns to “0”.
Service reminder
E00517701187
The service reminder shows the number of
months (1) and driving distance (3) remain-
ing until the next 12-monthly (15,000 km or
9,000 miles) inspection. When the next in-
spection is nearly due, the display shows
“-----”. At this time, a spanner mark (2) is
shown for a few seconds whenever the igni- tion switch is turned from the “OFF” positionto the “ON” position.
Instruments
5-03OVWX17E1Instruments and controls5