MITSUBISHI TRITON 2011 Owners Manual
Manufacturer: MITSUBISHI, Model Year: 2011, Model line: TRITON, Model: MITSUBISHI TRITON 2011Pages: 369, PDF Size: 26.15 MB
Page 221 of 369
To listen to tracks from a device con-
nected via Bluetooth
®
E00762700225
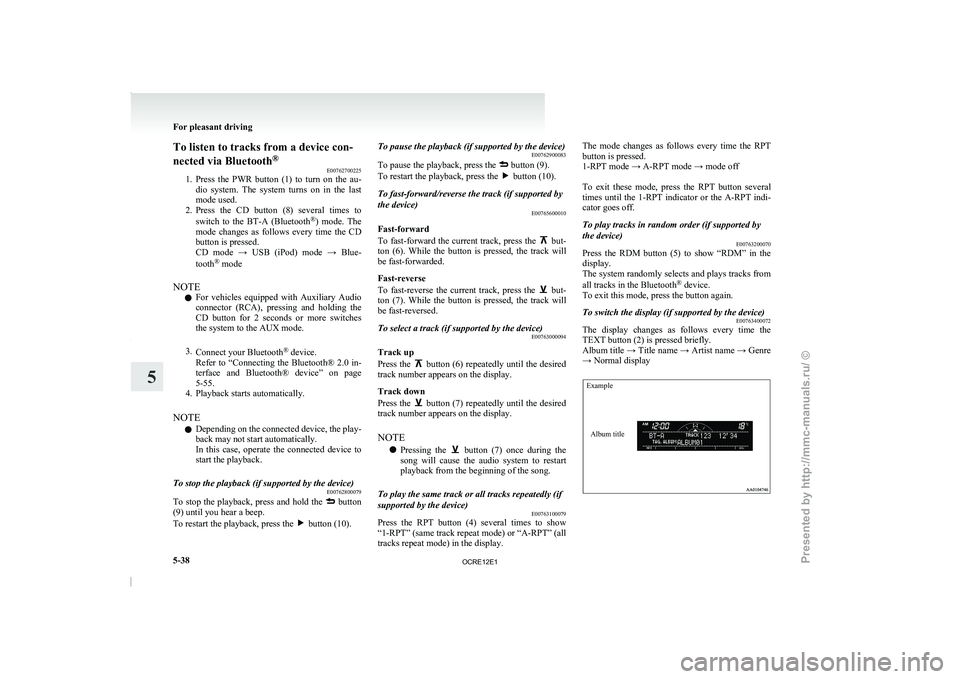
1. Press the PWR button (1)
to turn on the au-
dio system. The system turns on in the last
mode used.
2. Press the CD button (8) several times to
switch to the BT-A (Bluetooth ®
) mode. The
mode changes as follows every time the CD
button is pressed.
CD mode → USB (iPod) mode → Blue-
tooth ®
mode
NOTE l For vehicles equipped with Auxiliary Audio
connector (RCA), pressing and holding the
CD button for 2 seconds or more switches
the system to the AUX mode.
3. Connect your Bluetooth ®
device.
Refer to “Connecting the Bluetooth® 2.0 in-
terface and Bluetooth® device” on page
5-55.
4. Playback starts automatically.
NOTE l Depending on the connected device, the play-
back may not start automatically.
In this case, operate the connected device to
start the playback.
To stop the playback (if supported by the device) E00762800079
To stop the playback, press and hold the button
(9) until you hear a beep.
To restart the playback, press the button (10).To pause the playback (if supported by the device)
E00762900083
To pause the playback, press the button (9).
To restart the playback, press the button (10).
To fast-forward/reverse the track (if supported by
the device) E00765600010
Fast-forward
To fast-forward the current
track,
press the but-
ton (6). While the button
is pressed, the track will
be fast-forwarded.
Fast-reverse
To fast-reverse the current track, press the but-
ton (7). While the button
is pressed, the track will
be fast-reversed.
To select a track (if supported by the device) E00763000094
Track up
Press the button (6) repeatedly until the desired
track number appears on the display.
Track down
Press the button (7) repeatedly until the desired
track number appears on the display.
NOTE
l Pressing
the button (7) once during the
song will cause the audio
system to restart
playback from the beginning of the song.
To play the same track or all tracks repeatedly (if
supported by the device) E00763100079
Press the RPT button (4) several times to show
“1-RPT” (same track repeat mode)
or “A-RPT” (all
tracks repeat mode) in the display. The mode changes as follows every time the RPT
button is pressed.
1-RPT mode → A-RPT mode → mode off
To exit these mode,
press
the RPT button several
times until the 1-RPT indicator or the A-RPT indi-
cator goes off.
To play tracks in random order (if supported by
the device) E00763200070
Press the RDM button (5) to show “RDM” in the
display.
The system randomly selects and
plays tracks from
all tracks in the Bluetooth ®
device.
To exit this mode, press the button again.
To switch the display (if supported by the device) E00763400072
The display changes as follows every time the
TEXT button (2) is pressed briefly.
Album title → Title name
→ Artist name → Genre
→ Normal display
Example
Album title For pleasant driving
5-38
5
OCRE12E1
Presented by http://mmc-manuals.ru/ \251
Page 222 of 369
NOTE
l Press
and hold the TEXT
button (2) again un-
til you hear a beep, and the tag information
disappears.
l Up to 16 characters are shown in the display
at once. If the title is cut off in the middle,
press the PAGE button (3). The next charac-
ters are displayed every time this button is
pressed.
l If no title is stored, “NO TITLE” is shown in
the display.
l Characters that cannot be displayed are sub-
stituted by “ ”. To use the external audio input
function* E00732200843
Auxiliary Audio connector
(RCA)
Auxiliary Video connector
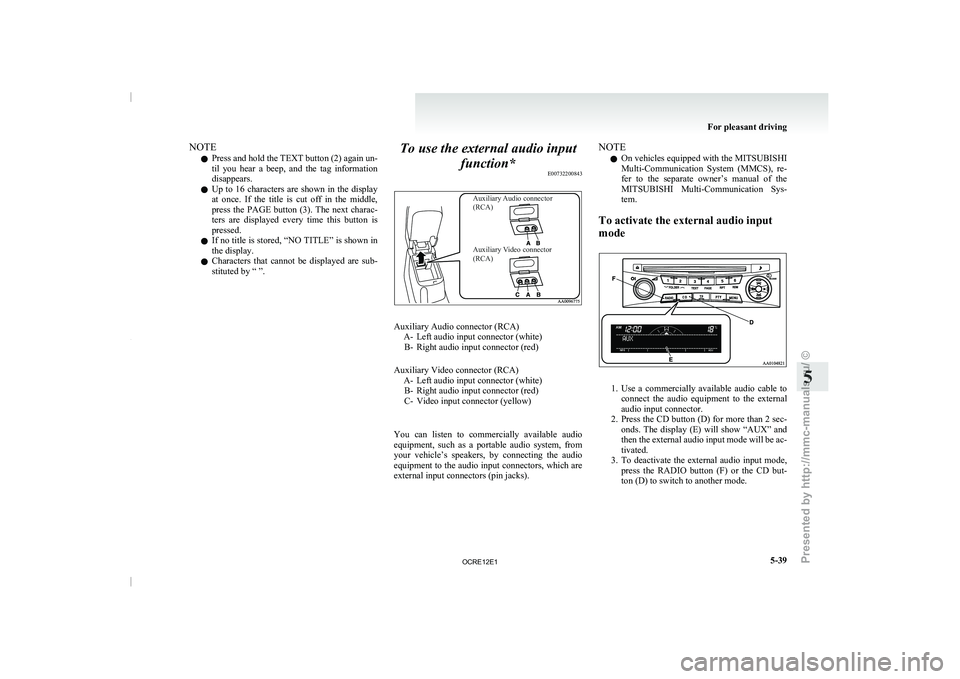
(RCA) Auxiliary Audio connector (RCA)
A- Left audio input connector (white)B- Right audio input connector (red)
Auxiliary Video connector (RCA) A- Left audio input connector (white)B- Right audio input connector (red)
C-
Video input connector (yellow)
You can listen to commercially available audio
equipment, such as a portable audio system, from
your vehicle’s speakers, by connecting the audio
equipment to the audio input connectors, which are
external input connectors (pin jacks). NOTE
l On
vehicles equipped
with the
MITSUBISHI
Multi-Communication System (MMCS), re-
fer to the separate owner’s manual of the
MITSUBISHI Multi-Communication Sys-
tem.
To activate the external audio input
mode 1. Use a commercially available audio cable to
connect the audio equipment
to the external
audio input connector.
2. Press the CD button (D) for more than 2 sec- onds. The display (E) will show “AUX” and
then the external audio input mode will be ac-
tivated.
3. To deactivate the external audio input mode, press the RADIO button (F) or the CD but-
ton (D) to switch to another mode. For pleasant driving
5-39 5
OCRE12E1
Presented by http://mmc-manuals.ru/ \251
Page 223 of 369
CAUTION
l
Do not operate the connected audio equip-
ment while driving.
This could distract you and an accident
might occur.
NOTE l The
connected audio equipment cannot
be op-
erated with the vehicle’s audio system.
l Depending on the connected audio equip-
ment, it may produce noise from the speakers.
l Use the connected audio equipment’s own
power source, such as its battery.
Noise may be produced from the speakers if
the connected audio equipment is used while
charging it using the accessory socket of the
vehicle.
l Do not activate the external audio input
mode when no audio equipment is connected.
Otherwise, noise may be produced from the
speakers.
l Connect audio equipment when the external
audio input mode is deactivated or lower the
vehicle’s speaker volume before connecting it.
Noise may be produced from the speakers if
audio equipment is connected after the exter-
nal audio input mode is activated.
l For information on how to connect and oper-
ate the audio equipment, refer to the owner’s
manual for the equipment. Steering wheel remote control
switch* E00710000955
The remote control switches are
located on the left
side of the steering wheel.
These switches can be used when the ignition
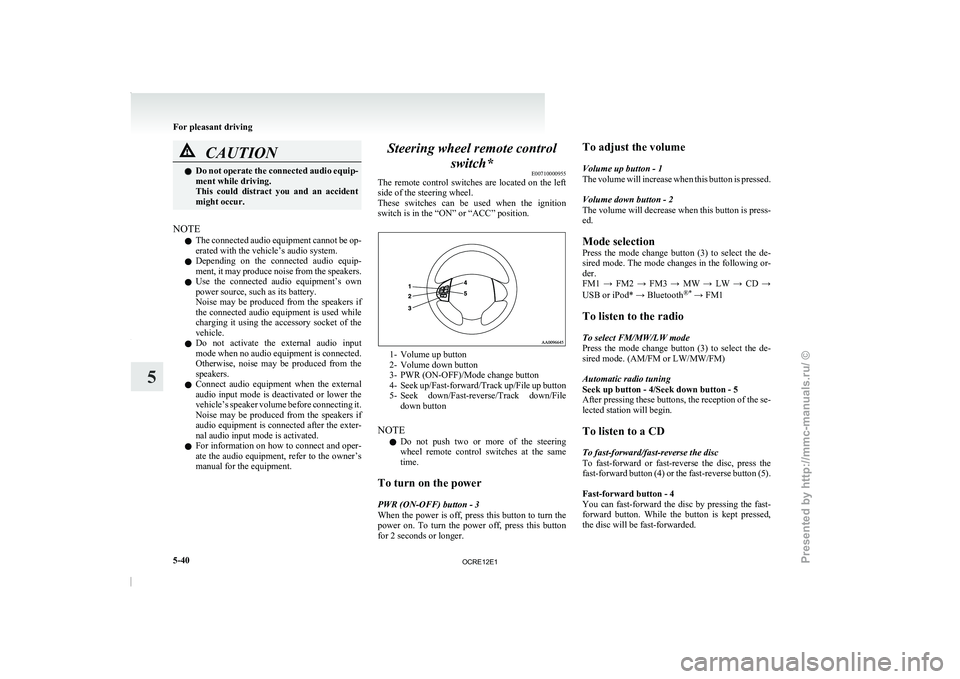
switch is in the “ON” or “ACC” position. 1- Volume up button
2-
Volume down button
3- PWR (ON-OFF)/Mode change button
4- Seek up/Fast-forward/Track
up/File up button
5- Seek down/Fast-reverse/Track down/File down button
NOTE l Do not push two or more of the steering
wheel remote control switches at the same
time.
To turn on the power
PWR (ON-OFF) button - 3
When the power is off, press this button to turn the
power on. To turn the power off, press this button
for 2 seconds or longer. To adjust the volume
Volume up button - 1
The volume will increase
when
this button is pressed.
Volume down button - 2
The volume will decrease when this button is press-
ed.
Mode selection
Press the mode change button (3) to select the de-
sired mode. The mode changes in the following or-
der.
FM1 → FM2 → FM3 → MW → LW → CD →
USB or iPod* → Bluetooth ®*
→ FM1
To listen to the radio
To select FM/MW/LW mode
Press the mode change button (3) to select the de-
sired mode. (AM/FM or LW/MW/FM)
Automatic radio tuning
Seek up button - 4/Seek down button - 5
After pressing these buttons, the reception of the se-
lected station will begin.
To listen to a CD
To fast-forward/fast-reverse the disc
To fast-forward or fast-reverse the disc, press the
fast-forward button (4) or the fast-reverse button (5).
Fast-forward button - 4
You can fast-forward the disc by pressing the fast-
forward button. While the button is kept pressed,
the disc will be fast-forwarded.
For pleasant driving
5-40
5
OCRE12E1
Presented by http://mmc-manuals.ru/ \251
Page 224 of 369
Fast-reverse button - 5
You can fast-reverse the disc
by pressing the fast-
reverse button. While the button is kept pressed,
the disc will be fastreversed.
NOTE
l In the case of an MP3 CD, you can fast-for-
ward and fast-reverse tracks in the same fold-
er.
To select a desired track
Track up button - 4
Press the button repeatedly until the desired track
number appears on the display.
Track down button - 5
Press the button repeatedly until the desired track
number appears on the display.
To listen to an iPod
Press the mode change button (3) and select iPod
mode.
To select a desired track
Track up button - 4
Press the button repeatedly until the desired track
number appears on the display.
NOTE l The track number increases continuously
while the button is pressed.
Track down button - 5
Press the button repeatedly until the desired track
number appears on the display. NOTE
l The
track number decreases continuously
while the button is pressed.
To listen to a USB memory device
Press
the mode change button (3) and select USB
mode.
To select a desired file
File up button — 4
Press the button repeatedly until the desired track
number appears on the display.
NOTE
l The track number increases continuously
while the button is pressed.
File down button — 5
Press the button repeatedly until the desired track
number appears on the display.
NOTE l The track number decreases continuously
while the button is pressed. For pleasant driving
5-41 5
OCRE12E1
Presented by http://mmc-manuals.ru/ \251
Page 225 of 369
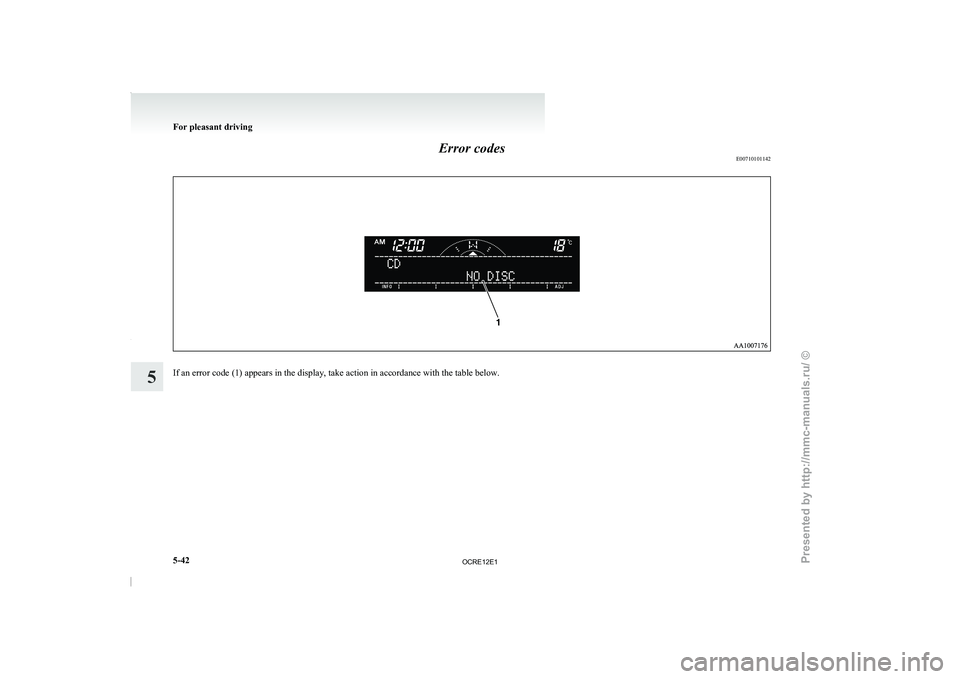
Error codes
E00710101142If an error code (1) appears in the display, take action in accordance with the table below.For pleasant driving
5-42
5
OCRE12E1
Presented by http://mmc-manuals.ru/ \251
Page 226 of 369
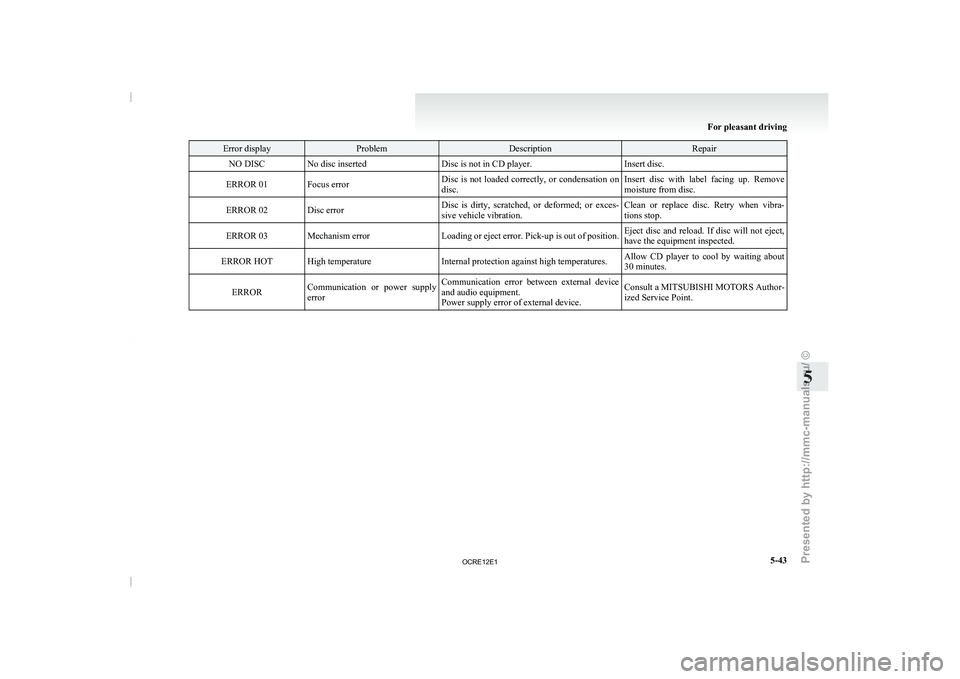
Error display Problem Description Repair
NO DISC No disc inserted Disc is not in CD player.Insert disc.
ERROR 01 Focus error Disc is not loaded correctly, or condensation on
disc.Insert disc with label facing up. Remove
moisture from disc.
ERROR 02 Disc error Disc is dirty, scratched, or deformed; or exces-
sive vehicle vibration.Clean or replace disc. Retry when vibra-
tions stop.
ERROR 03 Mechanism error Loading or eject error. Pick-up is out of position.Eject disc and reload. If disc will not eject,
have the equipment inspected.
ERROR HOT High temperature Internal protection against high temperatures.Allow CD player to cool by waiting about
30 minutes.
ERROR Communication or power supply
error Communication error between external device
and audio equipment.
Power supply error of external device. Consult a MITSUBISHI MOTORS Author-
ized Service Point. For pleasant driving
5-43 5
OCRE12E1
Presented by http://mmc-manuals.ru/ \251
Page 227 of 369
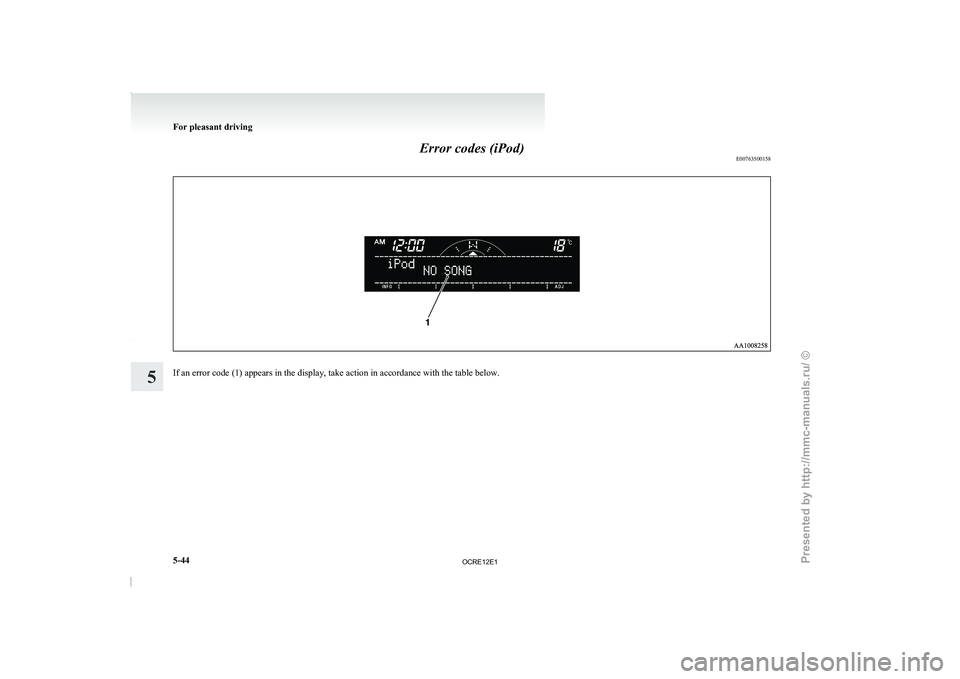
Error codes (iPod)
E00763500158If an error code (1) appears in the display, take action in accordance with the table below.For pleasant driving
5-44
5
OCRE12E1
Presented by http://mmc-manuals.ru/ \251
Page 228 of 369
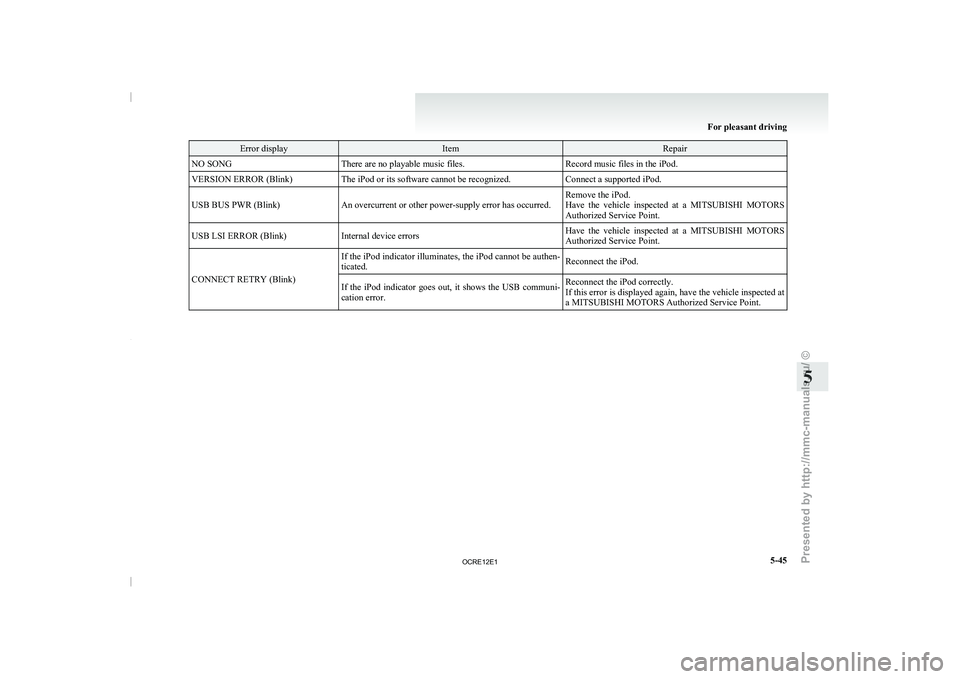
Error display Item Repair
NO SONG There are no playable music files. Record music files in the iPod.
VERSION ERROR (Blink) The iPod or its software cannot be recognized. Connect a supported iPod.
USB BUS PWR (Blink) An overcurrent or other power-supply error has occurred. Remove the iPod.
Have the vehicle inspected at
a MITSUBISHI MOTORS
Authorized Service Point.
USB LSI ERROR (Blink) Internal device errors Have the vehicle inspected at a MITSUBISHI MOTORS
Authorized Service Point.
CONNECT RETRY (Blink) If the iPod indicator illuminates, the iPod cannot be authen-
ticated.
Reconnect the iPod.
If the iPod indicator goes out, it shows the USB communi-
cation error. Reconnect the iPod correctly.
If this error is displayed
again, have the vehicle inspected at
a MITSUBISHI MOTORS Authorized Service Point. For pleasant driving
5-45 5
OCRE12E1
Presented by http://mmc-manuals.ru/ \251
Page 229 of 369
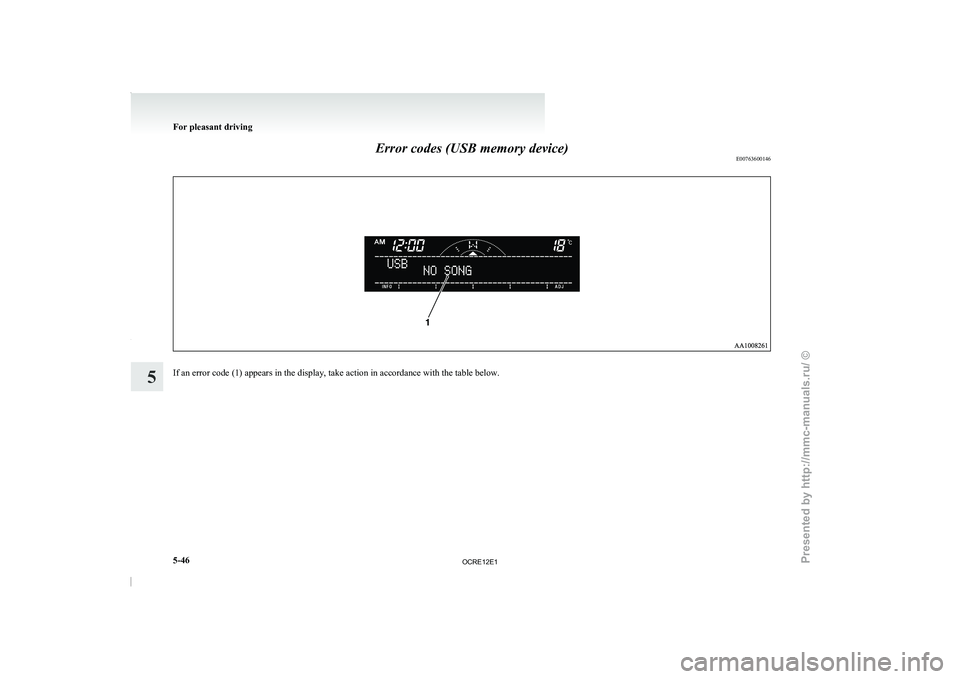
Error codes (USB memory device)
E00763600146If an error code (1) appears in the display, take action in accordance with the table below.For pleasant driving
5-46
5
OCRE12E1
Presented by http://mmc-manuals.ru/ \251
Page 230 of 369
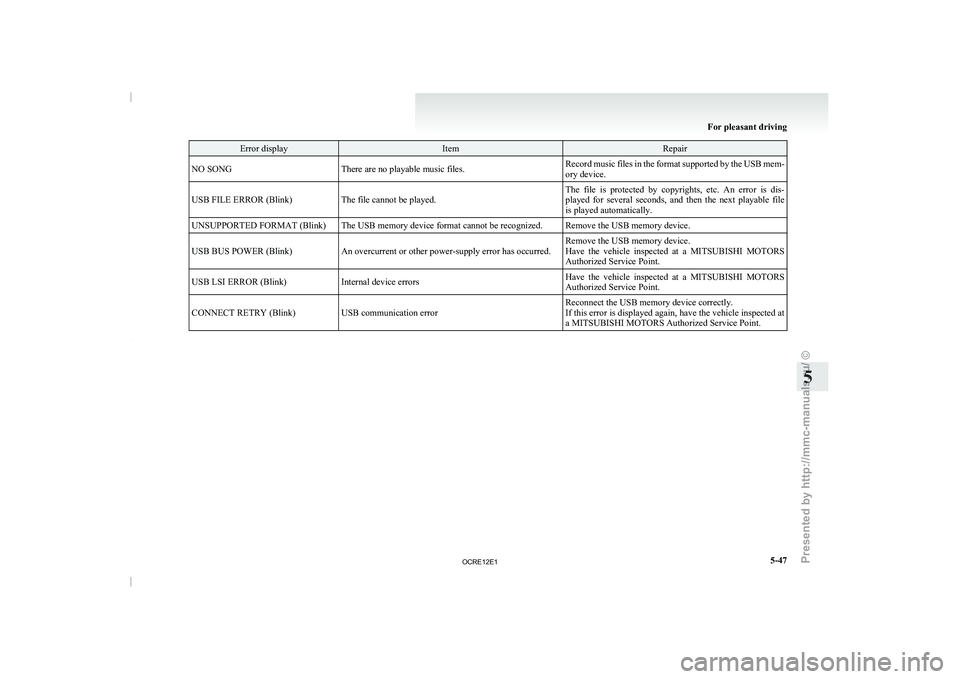
Error display Item Repair
NO SONG There are no playable music files. Record music files in the format supported by the USB mem-
ory device.
USB FILE ERROR (Blink) The file cannot be played. The file is protected by copyrights, etc. An error is dis-
played for several seconds, and
then the next playable file
is played automatically.
UNSUPPORTED FORMAT (Blink) The USB memory device format cannot be recognized. Remove the USB memory device.
USB BUS POWER (Blink) An overcurrent or other power-supply error has occurred. Remove the USB memory device.
Have the vehicle inspected at
a MITSUBISHI MOTORS
Authorized Service Point.
USB LSI ERROR (Blink) Internal device errors Have the vehicle inspected at a MITSUBISHI MOTORS
Authorized Service Point.
CONNECT RETRY (Blink) USB communication error Reconnect the USB memory device correctly.
If this error is displayed
again, have the vehicle inspected at
a MITSUBISHI MOTORS Authorized Service Point. For pleasant driving
5-47 5
OCRE12E1
Presented by http://mmc-manuals.ru/ \251