stop start NISSAN 370Z COUPE 2011 Owner's Manual
[x] Cancel search | Manufacturer: NISSAN, Model Year: 2011, Model line: 370Z COUPE, Model: NISSAN 370Z COUPE 2011Pages: 419, PDF Size: 3.61 MB
Page 245 of 419
Black plate (241,1)
Model "Z34-D" EDITED: 2010/ 7/ 27
WARNING
.Use a phone after stopping your
vehicle in a safe location. If you
have to use a phone while driving,
exercise extreme caution at all
times so full attention may be given
to vehicle operation.
. If you find yourself unable to devote
full attention to vehicle operation
while talking on the phone, pull off
the road to a safe location and stop
your vehicle before doing so.
CAUTION
To avoid draining the vehicle battery,
use a phone after starting the engine.
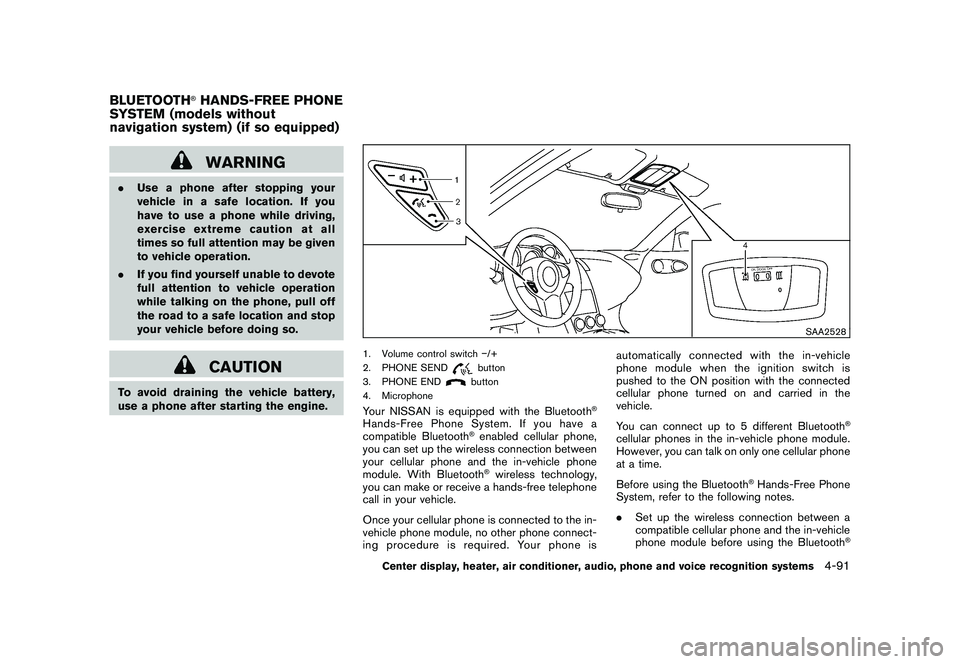
SAA2528
1. Volume control switch �/+
2. PHONE SEND
button
3. PHONE ENDbutton
4. Microphone
Your NISSAN is equipped with the Bluetooth
®
Hands-Free Phone System. If you have a
compatible Bluetooth
®enabled cellular phone,
you can set up the wireless connection between
your cellular phone and the in-vehicle phone
module. With Bluetooth®wireless technology,
you can make or receive a hands-free telephone
call in your vehicle.
Once your cellular phone is connected to the in-
vehicle phone module, no other phone connect-
ing procedure is required. Your phone is automatically connected with the in-vehicle
phonemodulewhentheignitionswitchis
pushed to the ON position with the connected
cellular phone turned on and carried in the
vehicle.
You can connect up to 5 different Bluetooth
®
cellular phones in the in-vehicle phone module.
However, you can talk on only one cellular phone
at a time.
Before using the Bluetooth
®Hands-Free Phone
System, refer to the following notes.
. Set up the wireless connection between a
compatible cellular phone and the in-vehicle
phone module before using the Bluetooth
®
BLUETOOTH
®HANDS-FREE PHONE
SYSTEM (models without
navigation system) (if so equipped)
Center display, heater, air conditioner, audio, phone and voice recognition systems
4-91
Page 284 of 419
Black plate (280,1)
Model "Z34-D" EDITED: 2010/ 7/ 27
WARNING
.Do not leave children or adults who
would normally require the support
of others alone in your vehicle. Pets
should not be left alone either. They
could accidentally injure themselves
or others through inadvertent op-
eration of the vehicle. Also, on hot,
sunny days, temperatures in a
closed vehicle could quickly become
high enough to cause severe or
possibly fatal injuries to people or
animals.
. Properly secure all cargo to help
prevent it from sliding or shifting.
Do not place cargo higher than the
seatbacks. In a sudden stop or
collision, unsecured cargo could
cause personal injury (Coupe mod-
els) .
. Closely supervise children when
they are around cars to prevent
them from playing and becoming
locked in the trunk where they could
be seriously injured. Keep the car
locked with the trunk closed when
not in use, and prevent children’s access to car keys (Roadster mod-
els) .
If the engine oil temperature is high, the
engine protection mode, which helps re-
duce the chance of engine damage, could
activate and automatically decrease en-
gine power. Driving while the engine oil
temperature is high may result in engine
damage.
EXHAUST GAS (carbon monoxide)
WARNING
. Do not breathe exhaust gases; they
contain colorless and odorless car-
bon monoxide. Carbon monoxide is
dangerous. It can cause uncon-
sciousness or death.
. If you suspect that exhaust fumes
are entering the vehicle, drive with
all windows fully open, and have the
vehicle inspected immediately.
. Do not run the engine in closed
spaces such as a garage.
. Do not park the vehicle with the
engine running for any extended
length of time. .
Keep the rear hatch/trunk lid closed
while driving, otherwise exhaust
gases could be drawn into the
passenger compartment. If you
must drive with the rear hatch/trunk
lid open, follow these precautions:
1) Open all the windows.
2) Set the
air recirculation to
off and the fan control to high to
circulate the air.
. The exhaust system and body
should be inspected by a qualified
mechanic whenever:
— The vehicle is raised for service.
— You suspect that exhaust fumes
are entering into the passenger
compartment.
— You notice a change in the sound of the exhaust system.
— You have had an accident invol- ving damage to the exhaust
system, underbody, or rear of
the vehicle.
THREE-WAY CATALYSTThe three-way catalyst is an emission control
device installed in the exhaust system. Exhaust
gases in the three-way catalyst are burned at
PRECAUTIONS WHEN STARTING
AND DRIVING5-2
Starting and driving
Page 285 of 419
Black plate (281,1)
Model "Z34-D" EDITED: 2010/ 7/ 27
high temperatures to help reduce pollutants.
WARNING
.The exhaust gas and the exhaust
system are very hot. Keep people,
animals or flammable materials
away from the exhaust system com-
ponents.
. Do not stop or park the vehicle over
flammable materials such as dry
grass, waste paper or rags. They
may ignite and cause a fire.
CAUTION
.Do not use leaded gasoline. Depos-
its from leaded gasoline seriously
reduce the three-way catalyst’s abil-
ity to help reduce exhaust pollu-
tants.
. Keep your engine tuned up. Mal-
functions in the ignition, fuel injec-
tion, or electrical systems can cause
overrich fuel flow into the three-way
catalyst, causing it to overheat. Do
not keep driving if the engine mis-
fires, or if noticeable loss of perfor-
mance or other unusual operating conditions are detected. Have the
vehicle inspected promptly by a
NISSAN dealer.
. Avoid driving with an extremely low
fuel level. Running out of fuel could
cause the engine to misfire, dama-
ging the three-way catalyst.
. Do not race the engine while warm-
ing it up.
. Do not push or tow your vehicle to
start the engine.
TIRE PRESSURE MONITORING SYS-
TEM (TPMS)Each tire, including the spare (if provided) ,
should be checked monthly when cold and
inflated to the inflation pressure recommended
by the vehicle manufacturer on the vehicle
placard or tire inflation pressure label. (If your
vehicle has tires of a different size than the size
indicated on the vehicle placard or tire inflation
pressure label, you should determine the proper
tire inflation pressure for those tires.)
As an added safety feature, your vehicle has
been equipped with a Tire Pressure Monitoring
System (TPMS) that illuminates a low tire
pressure telltale when one or more of your tires
is significantly under-inflated. Accordingly, when
the low tire pressure telltale illuminates, you should stop and check your tires as soon as
possible, and inflate them to the proper pres-
sure. Driving on a significantly under-inflated tire
causes the tire to overheat and can lead to tire
failure. Under-inflation also reduces fuel effi-
ciency and tire tread life, and may affect the
vehicle’s handling and stopping ability.
Please note that the TPMS is not a substitute for
proper tire maintenance, and it is the driver’s
responsibility to maintain correct tire pressure,
even if under-inflation has not reached the level
to trigger illumination of the TPMS low tire
pressure telltale.
Your vehicle has also been equipped with a
TPMS malfunction indicator to indicate when the
system is not operating properly. The TPMS
malfunction indicator is combined with the low
tire pressure telltale. When the system detects a
malfunction, the telltale will flash for approxi-
mately one minute and then remain continuously
illuminated. This sequence will continue upon
subsequent vehicle start-ups as long as the
malfunction exists. When the malfunction indi-
cator is illuminated, the system may not be able
to detect or signal low tire pressure as intended.
TPMS malfunctions may occur for a variety of
reasons, including the installation of replace-
ment or alternate tires or wheels on the vehicle
that prevent the TPMS from functioning properly.
Always check the TPMS malfunction telltale
after replacing one or more tires or wheels on
Starting and driving
5-3
Page 286 of 419
Black plate (282,1)
Model "Z34-D" EDITED: 2010/ 7/ 27
your vehicle to ensure that the replacement or
alternate tires and wheels allow the TPMS to
continue to function properly.Additional information.The TPMS does not monitor the tire
pressure of the spare tire.
. The TPMS will activate only when the
vehicle is driven at speeds above 16 MPH
(25 km/h) . Also, this system may not detect
a sudden drop in tire pressure (for example a
flat tire while driving) .
. The low tire pressure warning light does not
automatically turn off when the tire pressure
is adjusted. After the tire is inflated to the
recommended pressure, the vehicle must be
driven at speeds above 16 MPH (25 km/h)
to activate the TPMS and turn off the low tire
pressure warning light. Use a tire pressure
gauge to check the tire pressure.
. Tire pressure rises and falls depending on
the heat caused by the vehicle’s operation
and the outside temperature. Low outside
temperature can lower the temperature of
the air inside the tire which can cause a
lower tire inflation pressure. This may cause
the low tire pressure warning light to
illuminate. If the warning light illuminates in
low ambient temperature, check the tire
pressure for all four tires. For additional information, see “Low tire pres-
sure warning light” in the “2. Instruments and
controls” section and “TIRE PRESSURE MON-
ITORING SYSTEM (TPMS)” in the “6. In case of
emergency” section.
WARNING
.
If the low tire pressure warning light
illuminates while driving, avoid sud-
den steering maneuvers or abrupt
braking, reduce vehicle speed, pull
off the road to a safe location and
stop the vehicle as soon as possi-
ble. Driving with under-inflated tires
may permanently damage the tires
and increase the likelihood of tire
failure. Serious vehicle damage
could occur and may lead to an
accident and could result in serious
personal injury. Check the tire pres-
sure for all four tires. Adjust the tire
pressure to the recommended COLD
tire pressure shown on the Tire and
Loading Information label to turn
the low tire pressure warning light
OFF. If the light still illuminates
while driving after adjusting the tire
pressure, a tire may be flat. If you
have a flat tire, replace it with a spare tire as soon as possible. (See
“FLAT TIRE” in the “6. In case of
emergency” section for changing a
flat tire.)
. When a spare tire is mounted or a
wheel is replaced, the TPMS will not
function and the low tire pressure
warning light will flash for approxi-
mately 1 minute. The light will
remain on after 1 minute. Contact
your NISSAN dealer as soon as
possible for tire replacement and/
or system resetting.
. Replacing tires with those not ori-
ginally specified by NISSAN could
affect the proper operation of the
TPMS.
. Do not inject any tire liquid or
aerosol tire sealant into the tires,
as this may cause a malfunction of
the tire pressure sensors (for mod-
els not equipped with the emer-
gency tire puncture repair kit) .
. If you used the Emergency Tire
Sealant to repair a minor tire punc-
ture, your NISSAN dealer will also
need to replace the TPMS sensor in
addition to repairing or replacing
5-4
Starting and driving
Page 288 of 419
Black plate (284,1)
Model "Z34-D" EDITED: 2010/ 7/ 27
Seat belts help reduce the risk of injury in
collisions and rollovers.In a rollover crash, an
unbelted or improperly belted person is
significantly more likely to be injured or
killed than a person properly wearing a
seat belt.OFF-ROAD RECOVERYWhile driving, the right side or left side wheels
may unintentionally leave the road surface. If this
occurs, maintain control of the vehicle by
following the procedure below. Please note that
this procedure is only a general guide. The
vehicle must be driven as appropriate based on
the conditions of the vehicle, road and traffic.
1. Remain calm and do not overreact.
2. Do not apply the brakes.
3. Maintain a firm grip on the steering wheel
with both hands and try to hold a straight
course.
4. When appropriate, slowly release the accel- erator pedal to gradually slow the vehicle.
5. If there is nothing in the way, steer the vehicle to follow the road while the vehicle
speed is reduced. Do not attempt to drive
the vehicle back onto the road surface until
vehicle speed is reduced.
6. When it is safe to do so, gradually turn the steering wheel until both tires return to the
road surface. When all tires are on the road
surface, steer the vehicle to stay in the
appropriate driving lane.
.
If you decide that it is not safe to return
the vehicle to the road surface based on
vehicle, road or traffic conditions, gra-
dually slow the vehicle to a stop in a safe
place off the road.
RAPID AIR PRESSURE LOSSRapid air pressure loss or a “blow-out” can
occur if the tire is punctured or is damaged due
to hitting a curb or pothole. Rapid air pressure
loss can also be caused by driving on under-
inflated tires.
Rapid air pressure loss can affect the handling
and stability of the vehicle, especially at highway
speeds.
Help prevent rapid air pressure loss by main-
taining the correct air pressure and visually
inspect the tires for wear and damage. See
“WHEELS AND TIRES” in the “8. Maintenance
and do-it-yourself” section of this manual.
If a tire rapidly loses air pressure or “blows-out”
while driving maintain control of the vehicle by
following the procedure below. Please note that
this procedure is only a general guide. The
vehicle must be driven as appropriate based on
the conditions of the vehicle, road and traffic.
WARNING
The following actions can increase the
chance of losing control of the vehicle if
there is a sudden loss of tire air
pressure. Losing control of the vehicle
may cause a collision and result in
personal injury.
. The vehicle generally moves or pulls
in the direction of the flat tire.
. Do not rapidly apply the brakes.
. Do not rapidly release the accelera-
tor pedal.
. Do not rapidly turn the steering
wheel.
1. Remain calm and do not overreact.
2. Maintain a firm grip on the steering wheel with both hands and try to hold a straight
course.
3. When appropriate, slowly release the accel- erator pedal to gradually slow the vehicle.
4. Gradually steer the vehicle to a safe location off the road and away from traffic if possible.
5. Lightly apply the brake pedal to gradually stop the vehicle.
5-6
Starting and driving
Page 289 of 419
Black plate (285,1)
Model "Z34-D" EDITED: 2010/ 7/ 27
6. Turn on the hazard warning flashers andeither contact a roadside emergency service
to change the tire or see “CHANGING A
FLAT TIRE (for models with spare tire)” in
the “6. In case of emergency” section of this
Owner’s Manual.DRINKING ALCOHOL/DRUGS AND
DRIVING
WARNING
Never drive under the influence of
alcohol or drugs. Alcohol in the blood-
stream reduces coordination, delays
reaction time and impairs judgement.
Driving after drinking alcohol increases
the likelihood of being involved in an
accident injuring yourself and others.
Additionally, if you are injured in an
accident, alcohol can increase the se-
verity of the injury.
NISSAN is committed to safe driving. However,
you must choose not to drive under the influence
of alcohol. Every year thousands of people are
injured or killed in alcohol-related accidents.
Although the local laws vary on what is
considered to be legally intoxicated, the fact is
that alcohol affects all people differently and
most people underestimate the effects of alcohol.
Remember, drinking and driving don’t mix! And
that is true for drugs, too (over-the-counter,
prescription, and illegal drugs) . Don’t drive if
your ability to operate your vehicle is impaired by
alcohol, drugs, or some other physical condition.
WARNING
Do not operate the push-button ignition
switch while driving the vehicle except
in an emergency. (The engine will stop
when the ignition switch is pushed 3
consecutive times or the ignition switch
is pushed and held for more than 2
seconds.) If the engine stops while the
vehicle is being driven, this could lead
to a crash and serious injury.
Before operating the push-button ignition
switch, be sure to move the selector lever to
the P (Park) position (for automatic transmission
model) or the shift lever to the N (Neutral)
position (for manual transmission model) .PUSH-BUTTON IGNITION SWITCH
Starting and driving
5-7
Page 293 of 419
Black plate (289,1)
Model "Z34-D" EDITED: 2010/ 7/ 27
1. Apply the parking brake.
2.Automatic Transmission (AT) model:
Move the selector lever to the P (Park) or N
(Neutral) position. (P is recommended.)
The starter is designed not to operate unless
the selector lever is in either of the above
positions.
Manual Transmission (MT) model:
Move the shift lever to the N (Neutral)
position. Depress the clutch pedal fully to
the floor.
The starter is designed not to operate unless
the clutch pedal is fully depressed.
The Intelligent Key must be carried
when operating the ignition switch.
3. Push the ignition switch to the ON position. Depress the brake pedal (AT model) or the
clutch pedal (MT model) and push the
ignition switch to start the engine.
To start the engine immediately, push and
release the ignition switch while depressing
the brake pedal with the ignition switch in
any position.
.If the engine is very hard to start in
extremely cold weather or when restart-
ing, depress the accelerator pedal a little (approximately 1/3 to the floor) and
while holding, crank the engine. Release
the accelerator pedal when the engine
starts.
. If the engine is very hard to start
because it is flooded, depress the
accelerator pedal all the way to the floor
and hold it. Push the ignition switch to
the ON position to start cranking the
engine. After 5 or 6 seconds, stop
cranking by pushing the ignition switch
to OFF. After cranking the engine,
release the accelerator pedal. Crank
the engine with your foot off the
accelerator pedal by depressing the
brake pedal and pushing the push-
button ignition switch to start the engine.
If the engine starts, but fails to run,
repeat the above procedure.
CAUTION
Do not operate the starter for more
than 15 seconds at a time. If the engine
does not start, push the ignition switch
to OFF and wait 10 seconds before
cranking again, otherwise the starter
could be damaged. 4.
Warm-up
Allow the engine to idle for at least 30
seconds after starting. Do not race the
engine while warming it up. Drive at
moderate speed for a short distance first,
especially in cold weather. In cold weather,
keep the engine running for a minimum of 2 -
3 minutes before shutting it off. Starting and
stopping the engine over a short period of
time may make the vehicle more difficult to
start.
When racing the engine up to 4,500 rpm or
more under no load condition, the engine
will enter the fuel cut mode.
5. To stop the engine, shift the selector lever to the P (Park) position (AT model) or move the
shift lever to the N (Neutral) position (MT
model) , and push the ignition switch to the
OFF position.
STARTING THE ENGINE
Starting and driving
5-11
Page 294 of 419
Black plate (290,1)
Model "Z34-D" EDITED: 2010/ 7/ 27
AUTOMATIC TRANSMISSION
7 speed automatic transmissionThe automatic transmission in your vehicle is
electronically controlled by a transmission con-
trol module to produce maximum efficiency and
smooth operation.
Shown on the following pages are the recom-
mended operating procedures for this transmis-
sion. Follow these procedures for maximum
vehicle performance and driving enjoyment.Starting the vehicleAfter starting the engine, fully depress the foot
brake pedal and push the selector lever button
before shifting the selector lever to the R
(Reverse) , N (Neutral) , D (Drive) or Manual shift
mode position. Be sure the vehicle is fully
stopped before attempting to shift the selector
lever.
This automatic transmission model is de-
signed so that the foot brake pedal must
be depressed before shifting from P (Park)
to any drive position while the ignition
switch position is ON.
The selector lever cannot be moved out of
the P (Park) position and into any of the
other gear positions if the ignition switch
is pushed to the LOCK, OFF or ACC
position.1. Keep the foot brake pedal depressed and
push the selector lever button to shift into a
driving gear.
2. Release the parking brake and foot brake, then gradually start the vehicle in motion.
WARNING
.Do not depress the accelerator
pedal while shifting from P (Park)
or N (Neutral) to R (Reverse) D
(Drive) , or manual shift mode. Al-
ways depress the brake pedal until
shifting is completed. Failure to do
so could cause you to lose control
and have an accident.
. Cold engine idle speed is high, so
use caution when shifting into a
forward or reverse gear before the
engine has warmed up.
. Never shift to P (Park) or R (Re-
verse) while vehicle is moving for-
ward. Never shift to P (Park) or D
(Drive) while vehicle is moving rear-
ward. Failure to do so could cause
you to lose control and have an
accident.
CAUTION
.When stopping the vehicle on an
uphill grade, do not hold the vehicle
by depressing the accelerator pedal.
The foot brake should be used for
this purpose.
. Do not downshift abruptly on slip-
pery roads. This may cause a loss of
control.
DRIVING THE VEHICLE5-12
Starting and driving
Page 295 of 419
Black plate (291,1)
Model "Z34-D" EDITED: 2010/ 7/ 27
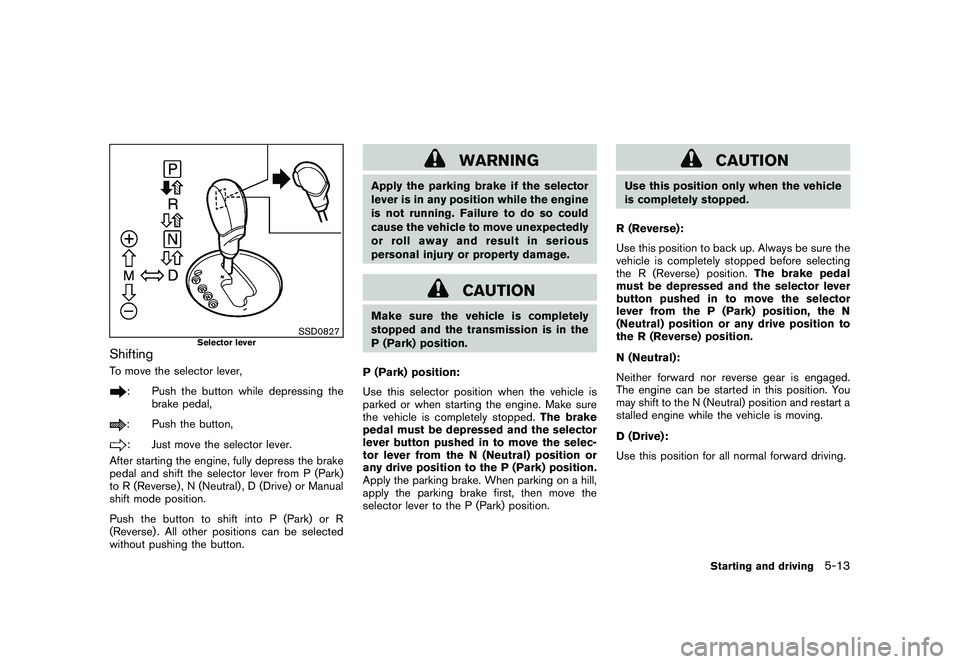
SSD0827
Selector lever
ShiftingTo move the selector lever,
: Push the button while depressing thebrake pedal,: Push the button,: Just move the selector lever.
After starting the engine, fully depress the brake
pedal and shift the selector lever from P (Park)
to R (Reverse) , N (Neutral) , D (Drive) or Manual
shift mode position.
Push the button to shift into P (Park) or R
(Reverse) . All other positions can be selected
without pushing the button.
WARNING
Apply the parking brake if the selector
lever is in any position while the engine
is not running. Failure to do so could
cause the vehicle to move unexpectedly
or roll away and result in serious
personal injury or property damage.
CAUTION
Make sure the vehicle is completely
stopped and the transmission is in the
P (Park) position.
P (Park) position:
Use this selector position when the vehicle is
parked or when starting the engine. Make sure
the vehicle is completely stopped. The brake
pedal must be depressed and the selector
lever button pushed in to move the selec-
tor lever from the N (Neutral) position or
any drive position to the P (Park) position.
Apply the parking brake. When parking on a hill,
apply the parking brake first, then move the
selector lever to the P (Park) position.
CAUTION
Use this position only when the vehicle
is completely stopped.
R (Reverse):
Use this position to back up. Always be sure the
vehicle is completely stopped before selecting
the R (Reverse) position. The brake pedal
must be depressed and the selector lever
button pushed in to move the selector
lever from the P (Park) position, the N
(Neutral) position or any drive position to
the R (Reverse) position.
N (Neutral):
Neither forward nor reverse gear is engaged.
The engine can be started in this position. You
may shift to the N (Neutral) position and restart a
stalled engine while the vehicle is moving.
D (Drive):
Use this position for all normal forward driving.
Starting and driving
5-13
Page 296 of 419
Black plate (292,1)
Model "Z34-D" EDITED: 2010/ 7/ 27
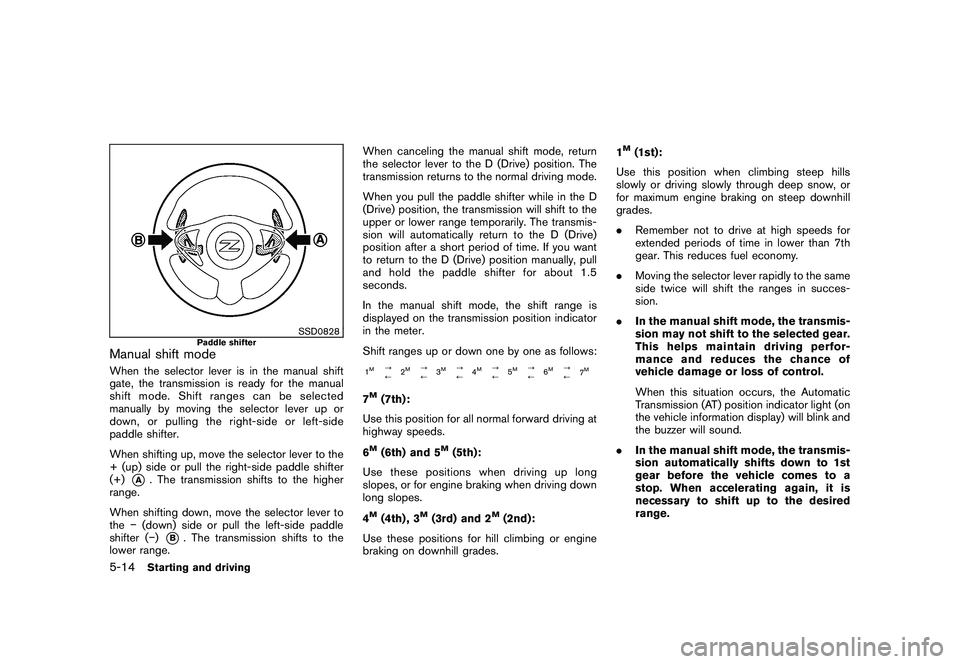
SSD0828
Paddle shifter
Manual shift modeWhen the selector lever is in the manual shift
gate, the transmission is ready for the manual
shift mode. Shift ranges can be selected
manually by moving the selector lever up or
down, or pulling the right-side or left-side
paddle shifter.
When shifting up, move the selector lever to the
+ (up) side or pull the right-side paddle shifter
(+)
*A
. The transmission shifts to the higher
range.
When shifting down, move the selector lever to
the �(down) side or pull the left-side paddle
shifter ( �)
*B. The transmission shifts to the
lower range. When canceling the manual shift mode, return
the selector lever to the D (Drive) position. The
transmission returns to the normal driving mode.
When you pull the paddle shifter while in the D
(Drive) position, the transmission will shift to the
upper or lower range temporarily. The transmis-
sion will automatically return to the D (Drive)
position after a short period of time. If you want
to return to the D (Drive) position manually, pull
and hold the paddle shifter for about 1.5
seconds.
In the manual shift mode, the shift range is
displayed on the transmission position indicator
in the meter.
Shift ranges up or down one by one as follows:
1M
?
/
2
M
?
/3
M
?
/4
M
?
/5
M
?
/6
M
?
/
7
M
7M(7th):
Use this position for all normal forward driving at
highway speeds.
6M(6th) and 5
M(5th):
Use these positions when driving up long
slopes, or for engine braking when driving down
long slopes.
4
M(4th) , 3
M(3rd) and 2
M(2nd):
Use these positions for hill climbing or engine
braking on downhill grades. 1
M(1st):
Use this position when climbing steep hills
slowly or driving slowly through deep snow, or
for maximum engine braking on steep downhill
grades.
. Remember not to drive at high speeds for
extended periods of time in lower than 7th
gear. This reduces fuel economy.
. Moving the selector lever rapidly to the same
side twice will shift the ranges in succes-
sion.
. In the manual shift mode, the transmis-
sion may not shift to the selected gear.
This helps maintain driving perfor-
mance and reduces the chance of
vehicle damage or loss of control.
When this situation occurs, the Automatic
Transmission (AT) position indicator light (on
the vehicle information display) will blink and
the buzzer will sound.
. In the manual shift mode, the transmis-
sion automatically shifts down to 1st
gear before the vehicle comes to a
stop. When accelerating again, it is
necessary to shift up to the desired
range.
5-14
Starting and driving