width NISSAN ALMERA N15 1995 User Guide
[x] Cancel search | Manufacturer: NISSAN, Model Year: 1995, Model line: ALMERA N15, Model: NISSAN ALMERA N15 1995Pages: 1701, PDF Size: 82.27 MB
Page 1218 of 1701
T(Margin thickness)
--1,-
ml
a
III' ~
o
~-
-L
d
SEM8928
I
.\
SEM188A
CYLINDER
HEAD
Inspection (Conl'd)
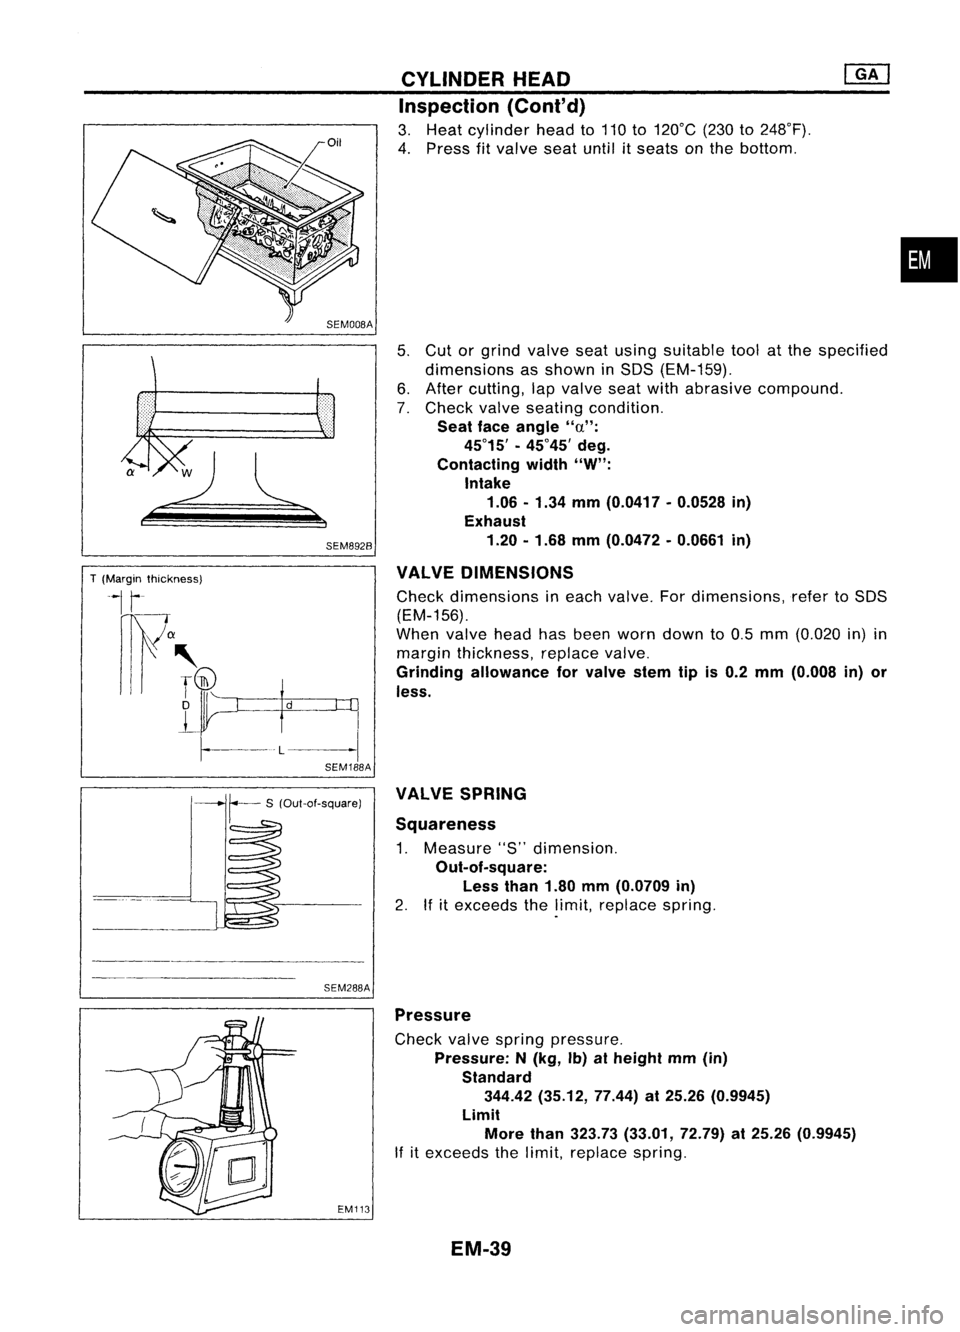
3. Heat cylinder headto110 to120°C (230to248°F).
4. Press fitvalve seatuntilitseats onthe bottom .
5. Cut orgrind valve seatusing suitable toolatthe specified
dimensions asshown inSOS (EM-159).
6. After cutting, lapvalve seatwithabrasive compound.
7. Check valveseating condition.
Seat faceangle "a":
45°15' -45°45' deg.
Contacting width"W":
Intake
1.06 -1.34 mm(0.0417 -0.0528 in)
Exhaust
1.20 -1.68 mm(0.0472 -0.0661 in)
VALVE DIMENSIONS
Check dimensions ineach valve. Fordimensions, refertoSOS
(EM-156).
When valveheadhasbeen worn down to0.5 mm (0.020 in)in
margin thickness, replacevalve.
Grinding allowance forvalve stemtipis0.2 mm (0.008 in)or
less.
•
SEM288A VALVE
SPRING
Squareness
1. Measure "S"dimension.
Out-of-square: Less than1.80mm(0.0709 in)
2. Ifitexceeds thelimit, replace spring.
EM113
Pressure
Check valvespring pressure.
Pressure: N(kg, Ib)atheight mm(in)
Standard 344.42 (35.12, 77.44)at25.26 (0.9945)
Limit More than323.73 (33.01, 72.79)at25.26 (0.9945)
If itexceeds thelimit, replace spring.
EM-39
Page 1271 of 1701
T(Margin thickness)
~I
r
nw
a
III' ~
D
L
-l
d
SEM892B
SEM188A CYLINDER
HEAD
Inspection (Cont'd)
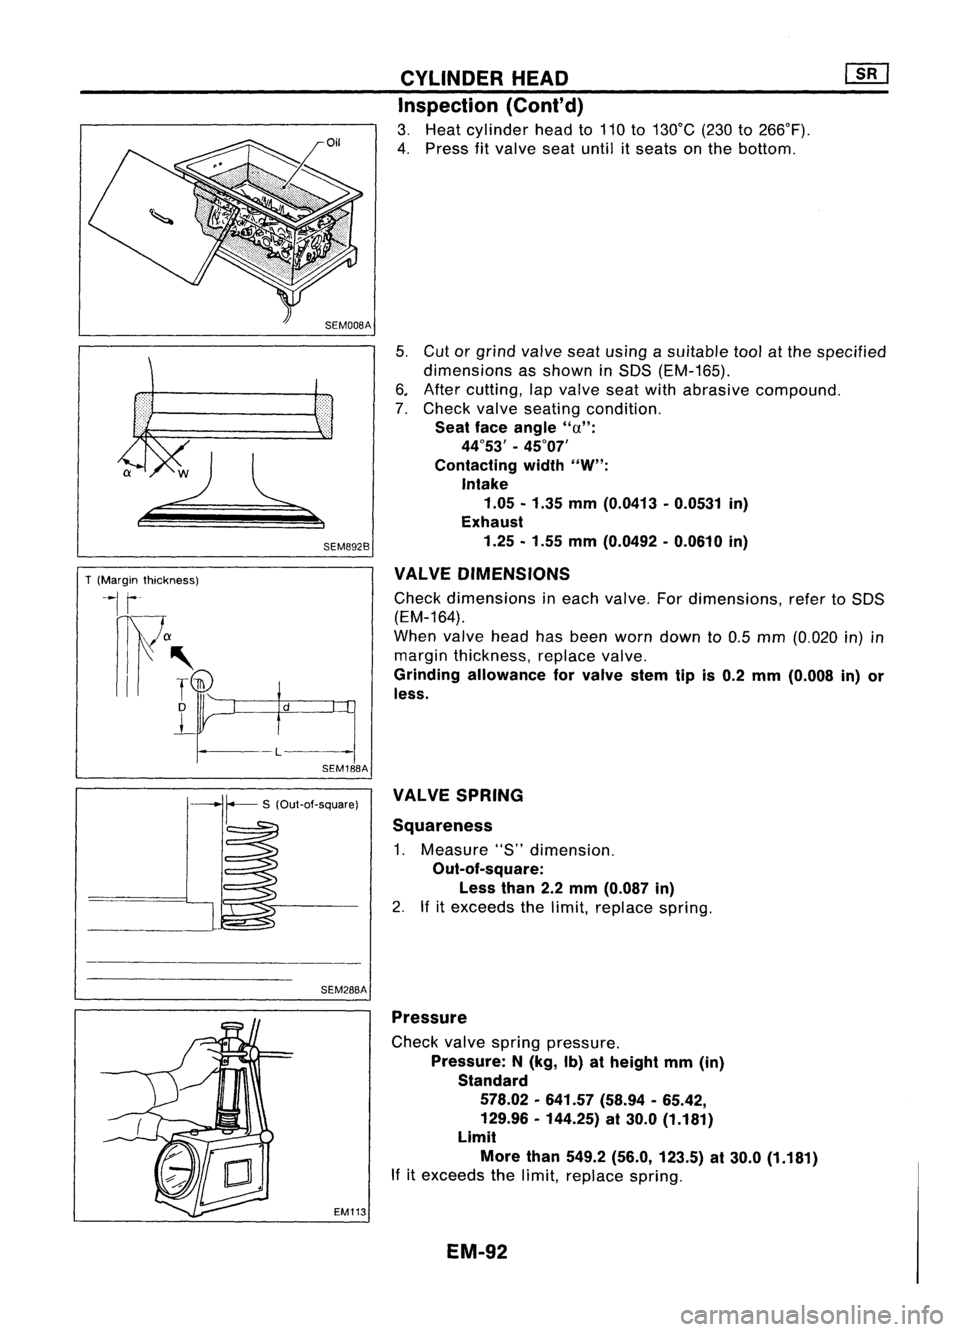
3. Heat cylinder headto110 to130°C (230to266°F).
4. Press fitvalve seatuntil itseats onthe bottom.
5. Cut orgrind valve seatusing asuitable toolatthe specified
dimensions asshown inSDS (EM-165).
6. After cutting, lapvalve seatwithabrasive compound.
7. Check valveseating condition.
Seat faceangle
"u":
44°53' -45°07'
Contacting width
"W":
Intake 1.05 -1.35 mm(0.0413 -0.0531 in)
Exhaust
1.25 -1.55 mm(0.0492 -0.0610 in)
VALVE DIMENSIONS
Check dimensions ineach valve. Fordimensions, refertoSDS
(EM-164).
When valveheadhasbeen worn down to0.5 mm (0.020 in)in
margin thickness, replacevalve.
Grinding allowance forvalve stemtipis0.2 mm (0.008 in)or
less.
SEM288A VALVE
SPRING
Squareness
1. Measure "S"dimension.
Out-of-square:
Less than2.2mm (0.087 in)
2. Ifitexceeds thelimit, replace spring.
EM113 Pressure
Check valvespring pressure.
Pressure: N(kg, Ib)atheight mm(in)
Standard
578.02 -641.57 (58.94-65.42,
129.96 -144.25) at30.0 (1.181)
Limit
More than549.2 (56.0, 123.5) at30.0 (1.181)
If itexceeds thelimit, replace spring.
EM-92
Page 1315 of 1701
![NISSAN ALMERA N15 1995 User Guide SEM202
SEM731BA
Grade number
Tightening sequence
r
1
@@
~.~.~
o
,..0
W
@
@ @
Facing frontofengine
(position 2)
SEM528DCYLINDER
HEAD
[£Q]
Inspection {Cont'd)
4. Remove cambracket capsan NISSAN ALMERA N15 1995 User Guide SEM202
SEM731BA
Grade number
Tightening sequence
r
1
@@
~.~.~
o
,..0
W
@
@ @
Facing frontofengine
(position 2)
SEM528DCYLINDER
HEAD
[£Q]
Inspection {Cont'd)
4. Remove cambracket capsan](/img/5/57349/w960_57349-1314.png)
SEM202
SEM731BA
Grade number
Tightening sequence
r
1
@@
~.~.~
o
,..0
W
@
@ @
Facing frontofengine
(position 2)
SEM528DCYLINDER
HEAD
[£Q]
Inspection {Cont'd)
4. Remove cambracket capsandmeasure maximum widthof
plastigage. Camshaft bearingclearance:
Limit
0.1 mm (0.004 in)
5. Ifclearance appearstoexceed thelimit, replace camshaft
or cylinder head.
• Which partstobe replaced shouldbedecided uponafter
measuring thediameters ofthe parts concerned.
Assembly
1. Install valvecomponent parts.
Install valvespring withitsnarrow pitchsidetoward cylinder
head side.
• Always installnewvalve oilseals.
Refer tooil seal replacement.
• Before installing oilseal, install valve-spring seat.
• When installing valve,applyengine oilonthe valve stem
and lipofvalve oilseal.
• Check whether thevalve faceisfree from foreign matter.
• Install valvespring retainers onthe intake sideandvalve
rotators onthe exhaust side.
• Valve rotators cannotbedisassembled.
2. Install camshaft andbrackets andtighten bracket nutstothe
specified torqueintwo orthree stages.
Camshaft-bracket nuts:
~: 18-22 N'm (1.8-2.2 kg-m, 13-16 ft-Ib)
• Tighten bracketfromcenter tooutside.
• Apply sealant tobrackets No.1and No.5.
• When installing "brackets, setcamshaft sothat thepinof
camshaft fronthead isuppermost.
• Install newcamshaft oilseals.
Refer tooil seal replacement.
17.5 (0.689)
o
o
13.0
(0.512)
NO.1 journal bracket No.5journal bracket
Unit: mm(in)
SEM676D
EM-136
Page 1344 of 1701
SERVICEDATAANDSPECIFICATIONS (SOS)
Inspection andAdjustment (Cont'd)
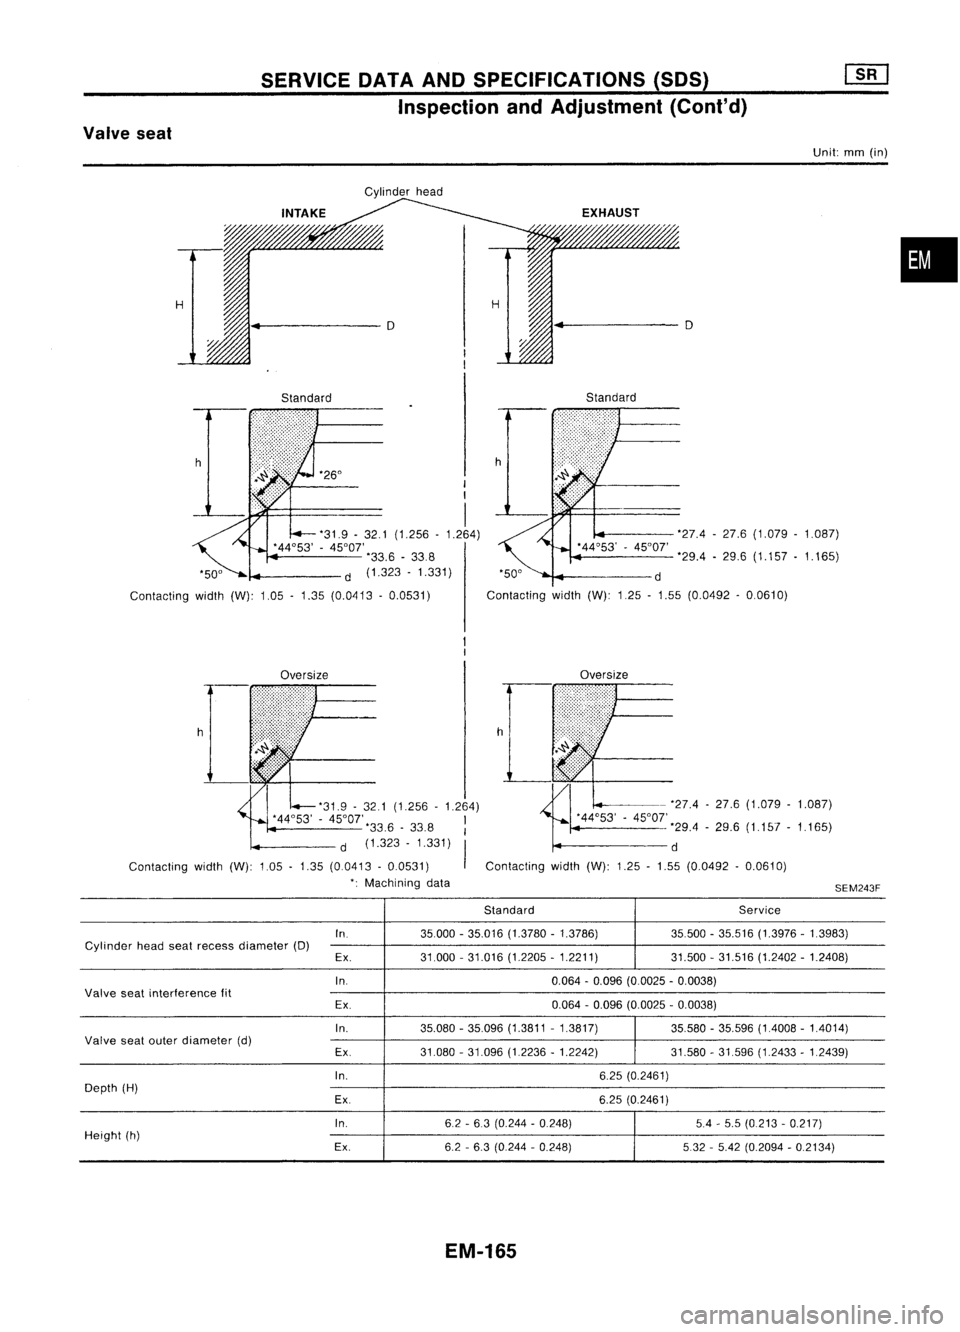
Valve seat
Unit:mm(in)
Cylinder head
•
H H
4
D D
Standard Standard
h '26°
I
I
I
'31.9 -32.1 (1.256 -1.264)
'44°53' -45°01'
'33.6-338
d (1.323 -1.331)
Contacting width(W):1.05-1.35 (0.0413 -0.0531) '27.4
-27.6 (1.079 -1.087)
'29.4 -29.6 (1.157 -1.165)
'50° d
Contacting width(W):125-1.55 (0.0492 -0.0610)
Oversize Oversize
'31.9 -321 (1.256 -1.264)
'44°53' -45°01', I
33.6 -33.8 I
d (1.323 -1.331)
I
Contacting width(W):1.05-1.35 (00413 -0.0531)
': Machining data h
-'27.4 -27.6 (1.079 -1.087)
'44°53' -45°01'
'29.4-29.6 (1.157 -1.165)
d
Contacting width(W):1.25-1.55 (0.0492 -0.0610)
SEM243F
Standard Service
In. 35000-35.016 (1.3780 -1.3786) 35500-35.516 (1.3976 -1.3983)
Cylinder headseatrecess diameter (D)
Ex. 31.000
-31.016 (1.2205 -1.2211) 31.500-31.516 (1.2402 -1.2408)
In. 0.064-0.096 (0.0025 -0.0038)
Valve seatinterference fit
Ex. 0.064
-0.096 (0.0025 -0.0038)
In. 35.080-35.096 (1.3811 -1.3817) 35.580-35.596 (1.4008 -1.4014)
Valve seatouter diameter (d)
Ex.31.080-31.096 (1.2236 -1.2242) 31.580-31.596 (1.2433 -1.2439)
In. 6.25(0.2461)
Depth (H)
Ex. 6.25(0.2461)
In. 62-63 (0.244 -0.248) 5.4-5.5 (0.213 -0.217)
Height (h)
Ex.6.2-6.3 (0.244 -0.248) 532-5.42 (0.2094 -0.2134)
EM-165
Page 1349 of 1701
SEM685D
#5
#4 ~
~il hole #3~~ \)
#2 ~~'
#1~~~ ~~
L2 ~~
Engine front~
MAIN
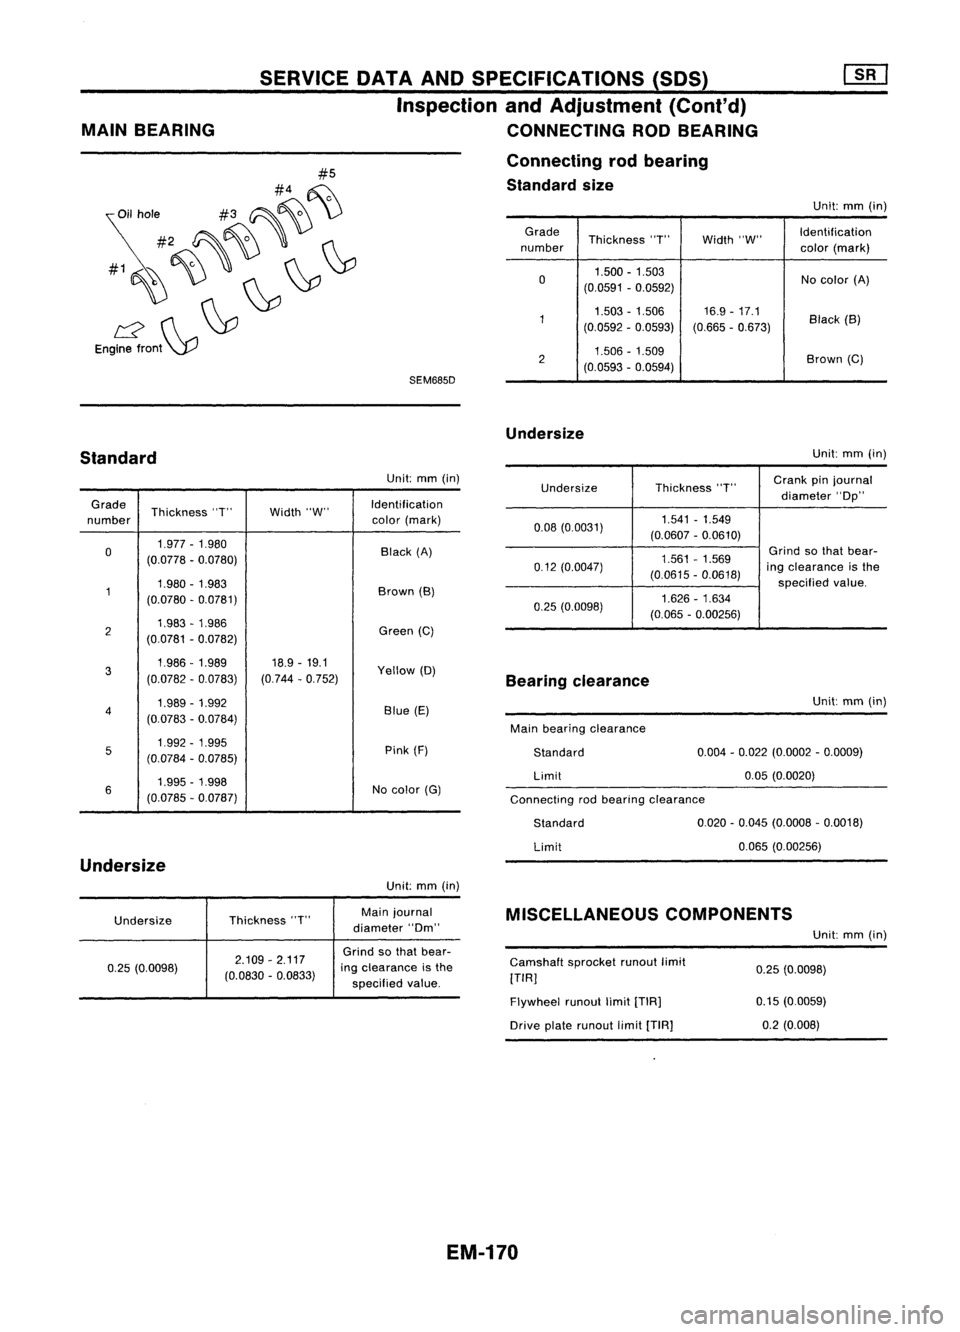
BEARING SERVICE
DATAANDSPECIFICATIONS (SOS)
Inspection andAdjustment (Cont'd)
CONNECTING RODBEARING
Connecting rodbearing
Standard size
Unit:mm(in)
Grade Thickness"T"Width"W" Identification
number color(mark)
0 1.500
-1.503
Nocolor (A)
(0.0591 -0.0592)
1 1.503
-1.506 16.9-17.1
Black(B)
(0.0592 -0.0593) (0.665-0.673)
2 1.506
-1.509
Brown(C)
(0.0593 -0.0594)
Undersize
Standard
Unit:
mm(in)
Connecting rodbearing clearance
Undersize
Thickness
"T"
Crank
pinjournal
diameter "Op"
0.08 (0.0031) 1.541
-1.549
(0.0607 -0.0610)
1.561 -1.569
Grind
sothat bear-
0.12 (0.0047)
(0.0615-0.0618)
ing
clearance isthe
specified value.
0.25 (0.0098) 1.626
-1.634
(0.065 -0.00256)
Unit:
mm(in)
Grade Thickness "T"Width"W" Identification
number color
(mark)
0 1.977
-1.980
Black(A)
(0.0778 -0.0780)
1 1.980
-1.983
Brown(B)
(0.0780 -0.0781)
2 1.983
-1.986
Green(C)
(0.0781 -0.0782)
3 1.986-1.989
18.9-19.1
Yellow(D)
(0.0782 -0.0783) (0.744
-0.752)
4 1.989
-1.992
Blue(E)
(0.0783 -0.0784)
5 1.992
-1.995
Pink(F)
(0.0784 -0.0785)
6 1.995
-1.998
Nocolor (G)
(0.0785 -0.Q787)
Undersize
Unit:mm(in)
Bearing
clearance
Main bearing clearance
Standard
Limit
Standard
Limit Unit:
mm(in)
0.004 -0.022 (0.0002 -0.0009)
0.05 (0.0020)
0.020 -0.045 (0.0008 -0.0018)
0.065 (0.00256)
Undersize Thickness
"T" Main
journal
diameter "Om"
MISCELLANEOUS
COMPONENTS
Unit:mm(in)
0.25 (0.0098) 2.109
-2.117
(0.0830 -0.0833)
Grind
sothat bear-
ing clearance isthe
specified value. Camshaft
sprocketrunoutlimit
[TIR]
Flywheel runoutlimit[TIR]
Drive platerunout limit[TIA]
0.25
(0.0098)
0.15 (0.0059)
0.2 (0.008)
EM-170
Page 1354 of 1701
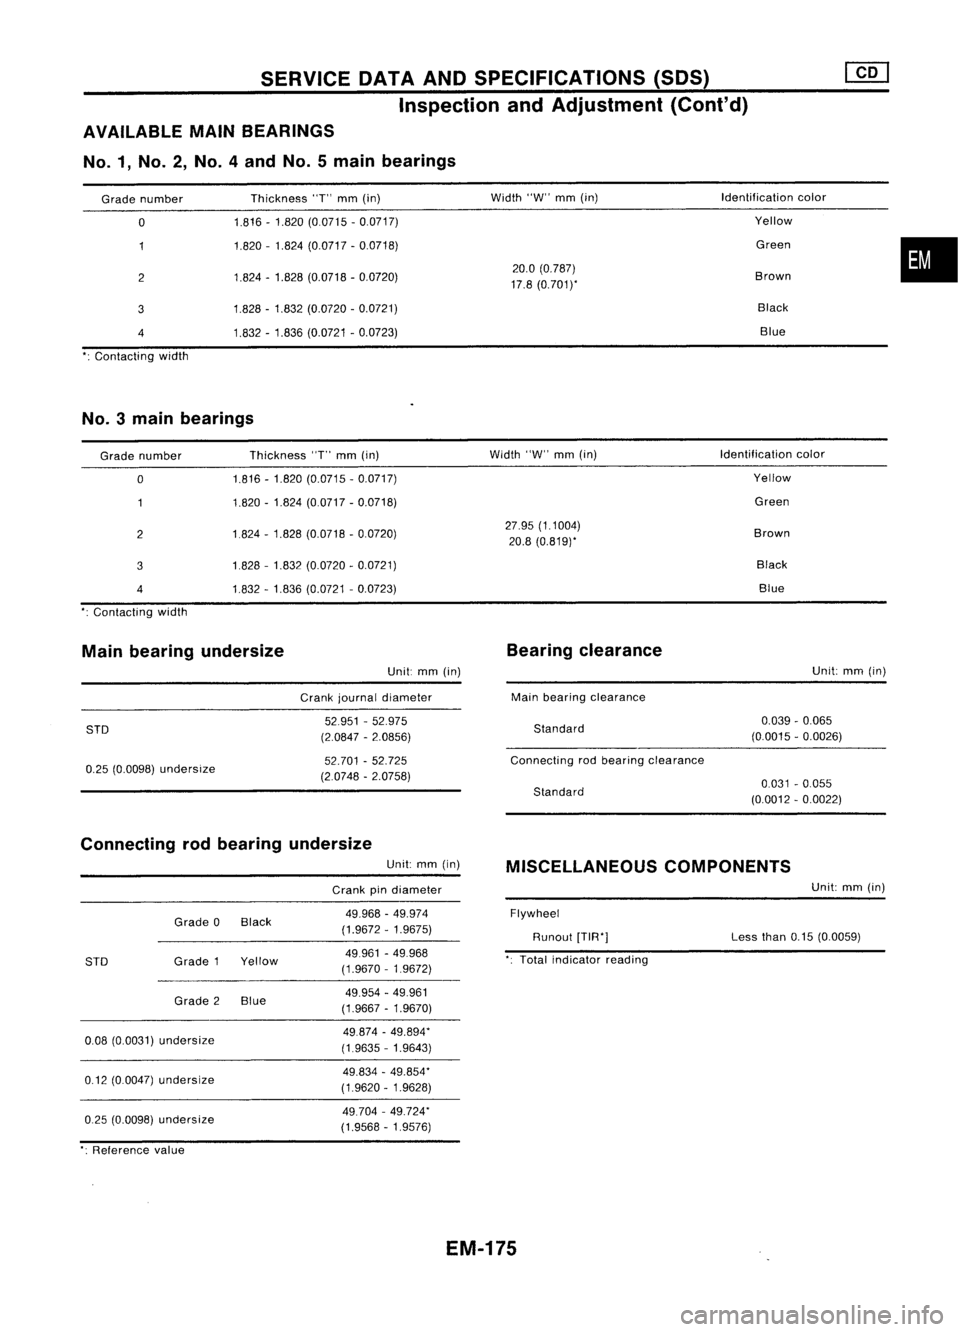
SERVICEOATAAND SPECIFICATIONS (SOS)
Inspection andAdjustment (Cont'd)
AVAILABLE MAINBEARINGS
No.1, No.2, No.4andNo.5main bearings
Grade number
o
2
3
4
Contacting width Thickness
"T"
mm
(in)
1.816 -1.820 (0.0715 -0.0717)
1.820 -1.824 (0.0717 -0.0718)
1.824 -1.828 (0.0718 -0.0720)
1.828 -1.832 (0.0720 -0.0721)
1.832 -1.836 (0.0721 -0.0723)
Width
"W"
mm
(in)
20.0 (0.787)
17.8 (0.7011'
Identification
color
Yellow
Green
Brown Black Blue
•
No.3 mainbearings
Grade number
o
2
3
4
Contacting width Thickness
"T"
mm
(in)
1.816 -1.820 (0.0715 -0.0717)
1.820 -1.824 (0.0717 -0.0718)
1.824 -1.828 (0.0718 -0.0720)
1828 -1.832 (0.0720 -0.0721)
1.832 -1.836 (0.0721 -0.0723)
Width
"W"
mm
(in)
27.95 (1.1004)
20.8 (0.819)'
Identification
color
Yellow
Green
Brown BlackBlue
Main bearing undersize
Unit:
mm
(in)
Crank journal diameter
Bearing
clearance
Main bearing clearance Unit:
mm
(in)
STD
0.25 (0.0098)
undersize
52951
-52.975
(2.0847 -2.0856)
52.701 -52.725
(2.0748 -2.0758)
Standard
Connecting rodbearing clearance
Standard
0.039
-0.065
(0.0015 -0.0026)
0.031 -0.055
(0.0012 -0.0022)
Connecting rodbearing undersize
Unit:
mm
(in)
Crank pindiameter
MISCELLANEOUS
COMPONENTS
Unit:
mm
(in)
0.25 (0.0098)
undersize
0.08
(0.0031)
undersize
0.12 (0.0047)
undersize
STD
Grade
0Black
Grade 1Yellow
Grade 2Blue
49.968
-49.974
(1.9672 -1.9675)
49961 -49.968
(1.9670 -1.9672)
49.954 -49.961
(1.9667 -1.9670)
49.874 -49.894"
(1.9635 -1.9643)
49.834 -49.854"
(1.9620 -1.9628)
49.704 -49.724"
(1.9568 -1.9576)
Flywheel
Runout
[TIR"]
Total indicator reading Less
than
0.15(0.0059)
": Reference value
EM-175
Page 1393 of 1701
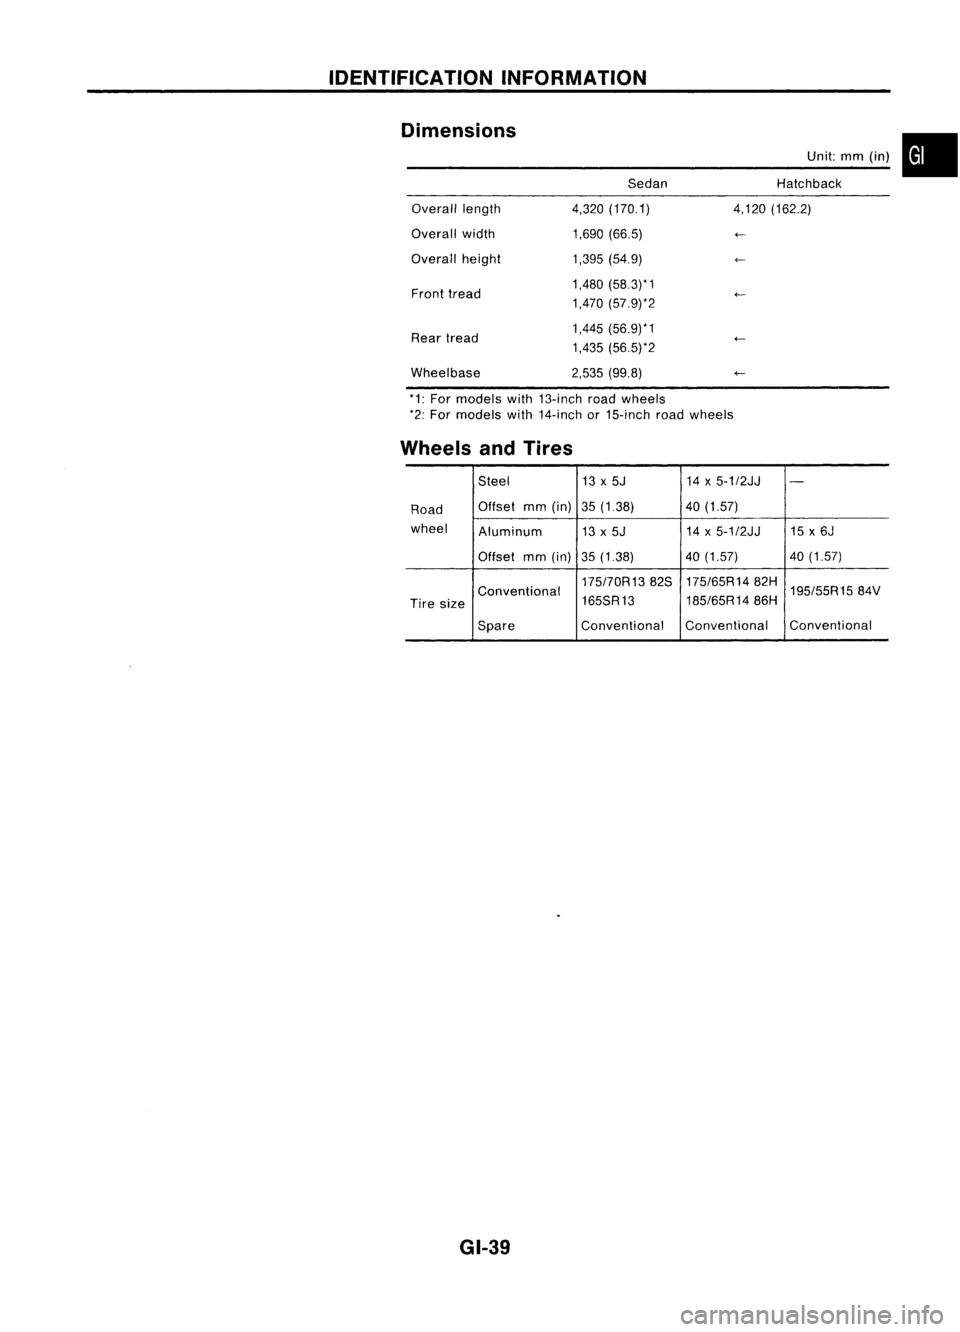
IDENTIFICATIONINFORMATION
Dimensions SedanUnit:
mm(in) •
Hatchback
Overall length
Overall width
Overall height
Front tread
Rear tread
Wheelbase 4,320
(170.1)
1,690 (66.5)
1,395 (54.9)
1,480 (58.3)* 1
1,470 (57.9)*2
1,445 (56.9)*1
1,435 (56.5)*2
2,535 (99.8) 4,120
(162.2)
*1: For models with13-inch roadwheels
*2: For models with14-inch or15-inch roadwheels
Wheels andTires
Steel 13x5J 14x5-1/2JJ
-
Road Offset
mm(in) 35(1.38) 40(1.57)
wheel Aluminum 13x5J 14
x5-1/2JJ 15x6J
Offset mm(in)
35(1.38) 40
(1.57) 40(1.57)
175170R1382S 175/65R1482H
195/55R1584V
Conventional
185/65R1486H
Tire size 165SR13
Spare Conventional
Conventional Conventional
GI-39