NISSAN ALMERA TINO 2001 Service Repair Manual
ALMERA TINO 2001
NISSAN
NISSAN
https://www.carmanualsonline.info/img/5/57352/w960_57352-0.png
NISSAN ALMERA TINO 2001 Service Repair Manual
Trending: fuel cap release, sunroof, air suspension, spark plugs, radio, language, seats
Page 2681 of 3051
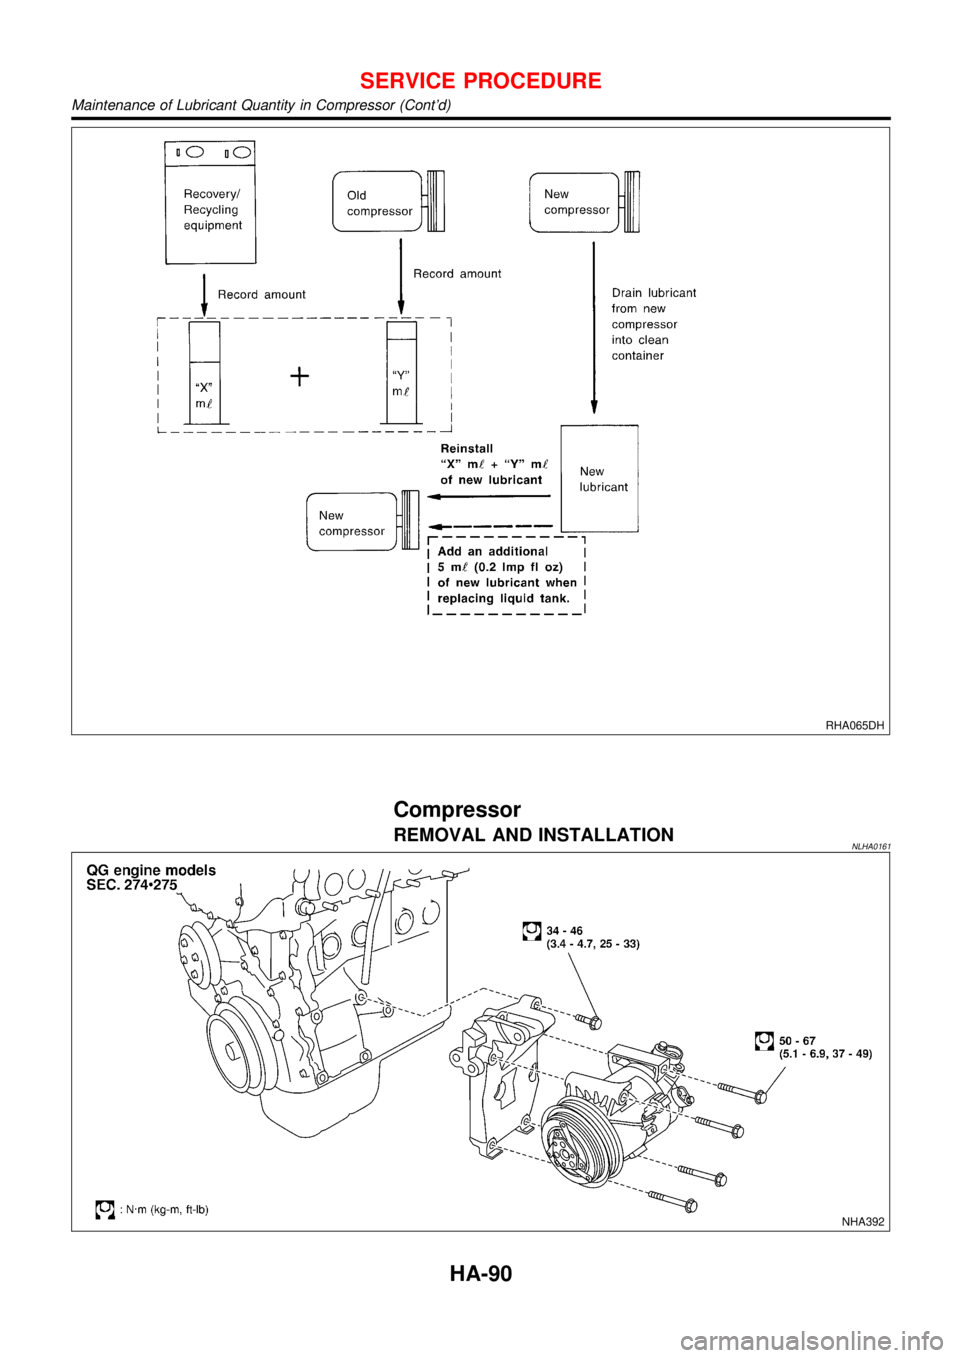
RHA065DH
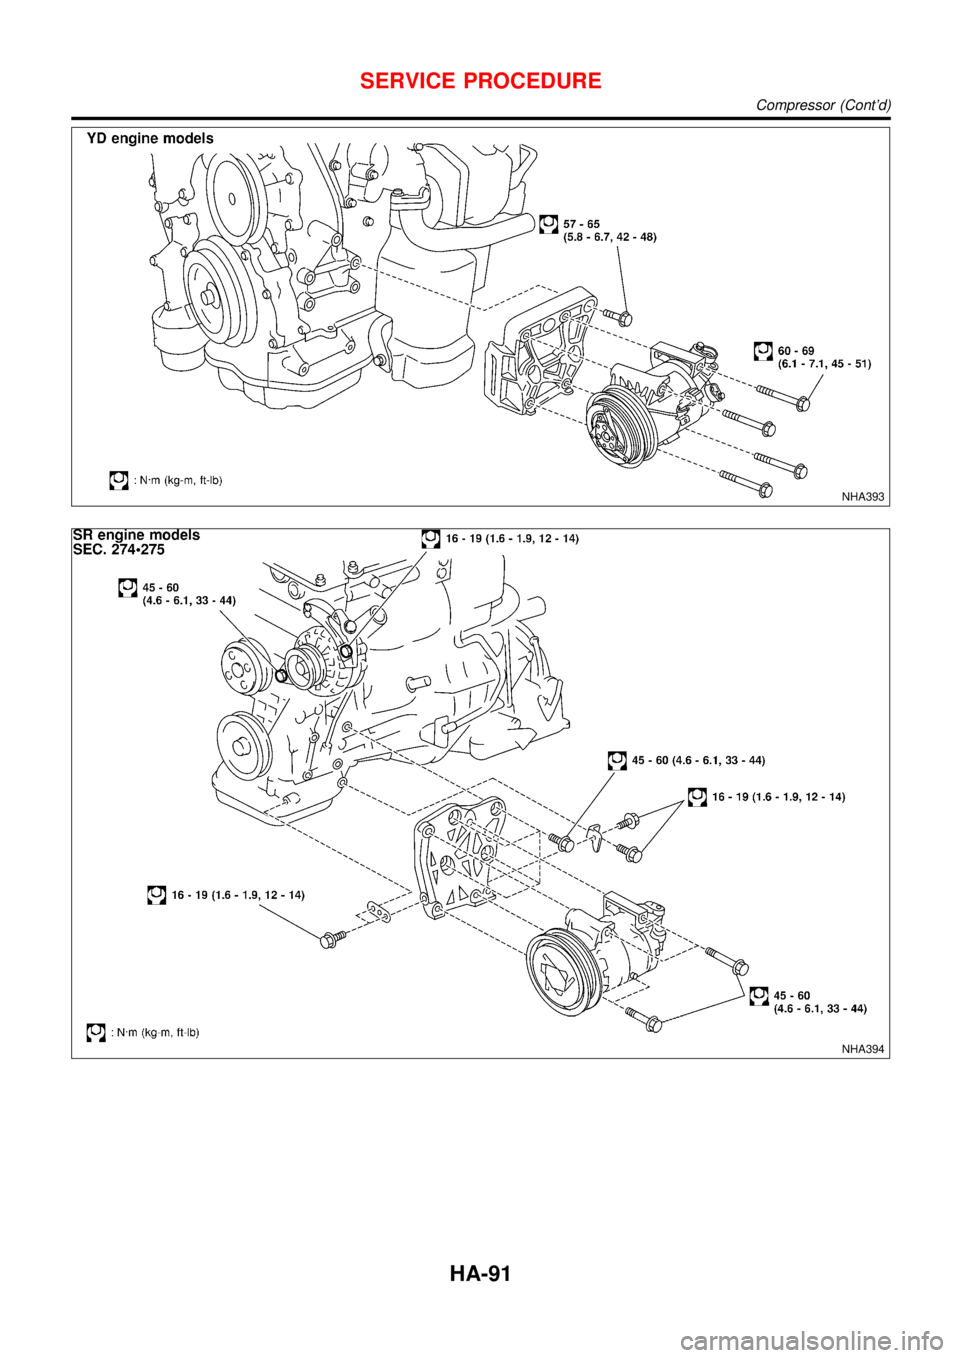
Compressor
REMOVAL AND INSTALLATIONNLHA0161
NHA392
SERVICE PROCEDURE
Maintenance of Lubricant Quantity in Compressor (Cont’d)
HA-90
Page 2682 of 3051
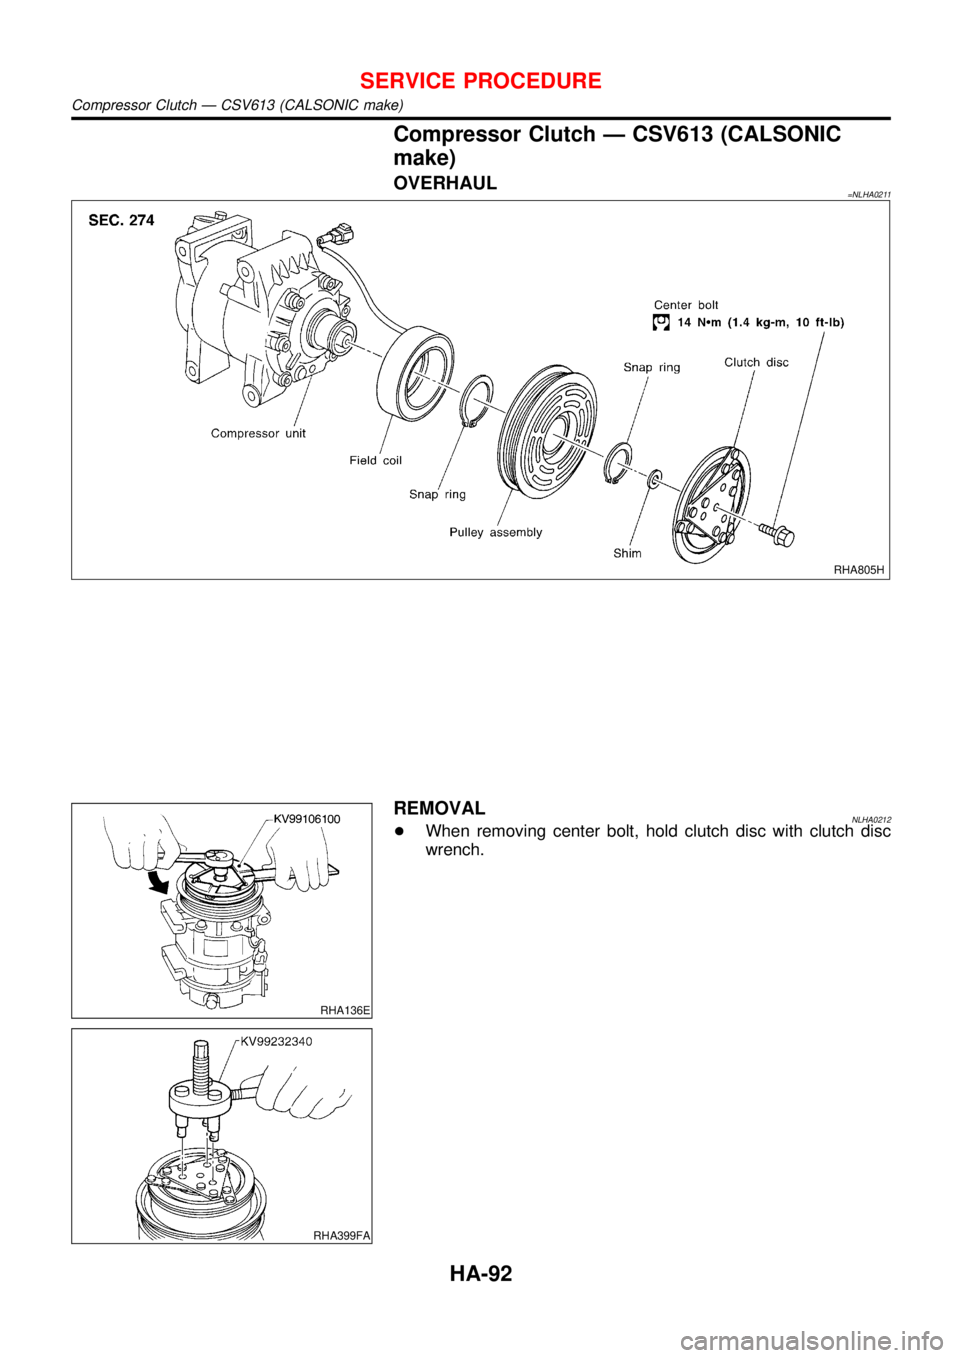
NHA393
NHA394
SERVICE PROCEDURE
Compressor (Cont’d)
HA-91
Page 2683 of 3051
Compressor Clutch—CSV613 (CALSONIC
make)
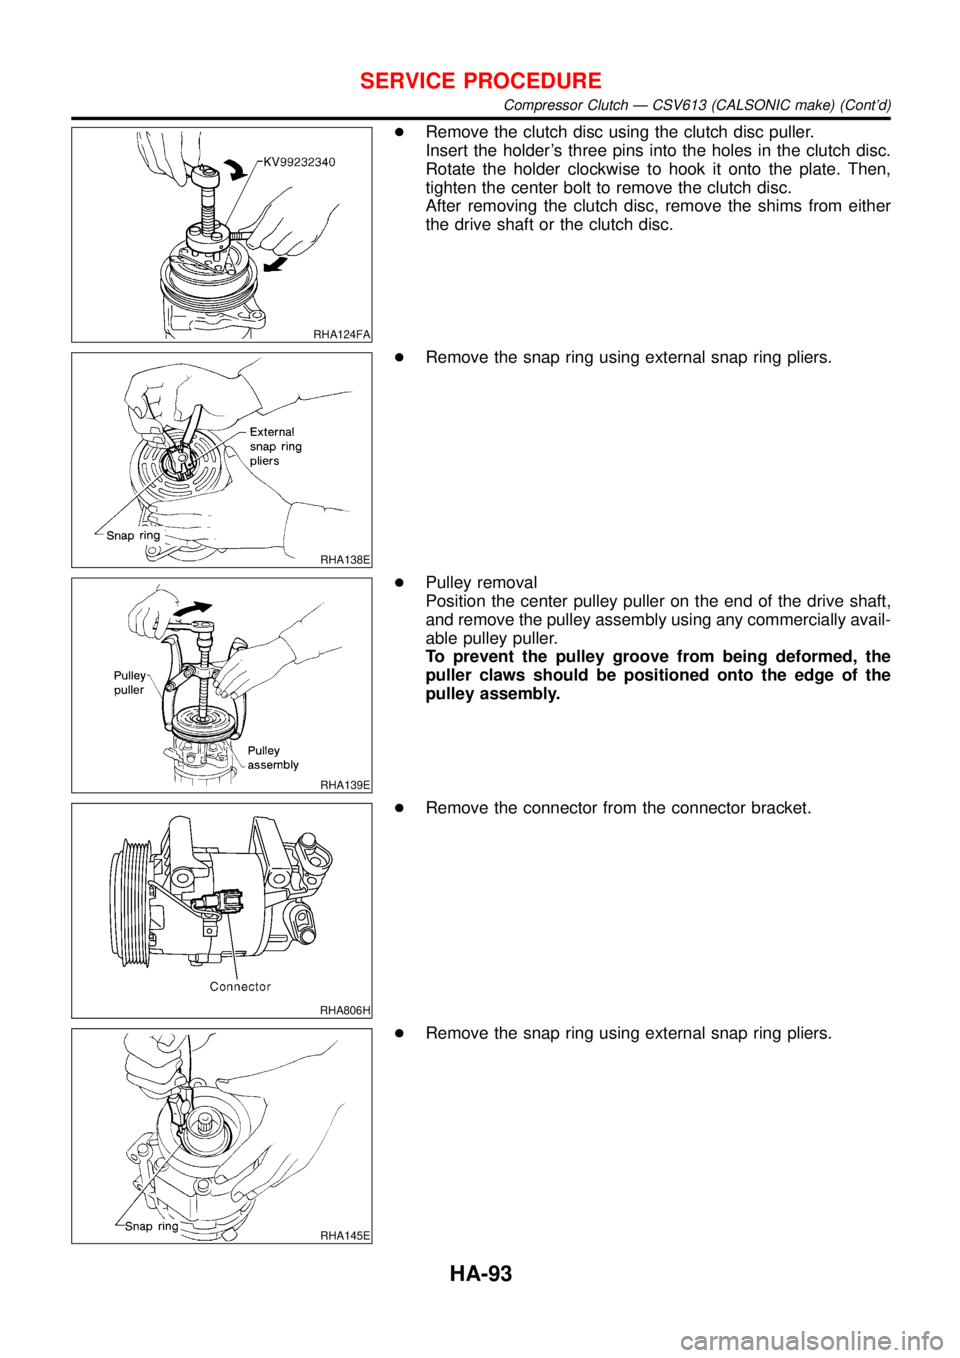
OVERHAUL=NLHA0211
RHA805H
RHA136E
REMOVALNLHA0212+When removing center bolt, hold clutch disc with clutch disc
wrench.
RHA399FA
SERVICE PROCEDURE
Compressor Clutch—CSV613 (CALSONIC make)
HA-92
Page 2684 of 3051
RHA124FA
+Remove the clutch disc using the clutch disc puller.
Insert the holder’s three pins into the holes in the clutch disc.
Rotate the holder clockwise to hook it onto the plate. Then,
tighten the center bolt to remove the clutch disc.
After removing the clutch disc, remove the shims from either
the drive shaft or the clutch disc.
RHA138E
+Remove the snap ring using external snap ring pliers.
RHA139E
+Pulley removal
Position the center pulley puller on the end of the drive shaft,
and remove the pulley assembly using any commercially avail-
able pulley puller.
To prevent the pulley groove from being deformed, the
puller claws should be positioned onto the edge of the
pulley assembly.
RHA806H
+Remove the connector from the connector bracket.
RHA145E
+Remove the snap ring using external snap ring pliers.
SERVICE PROCEDURE
Compressor Clutch—CSV613 (CALSONIC make) (Cont’d)
HA-93
Page 2685 of 3051
RHA126F
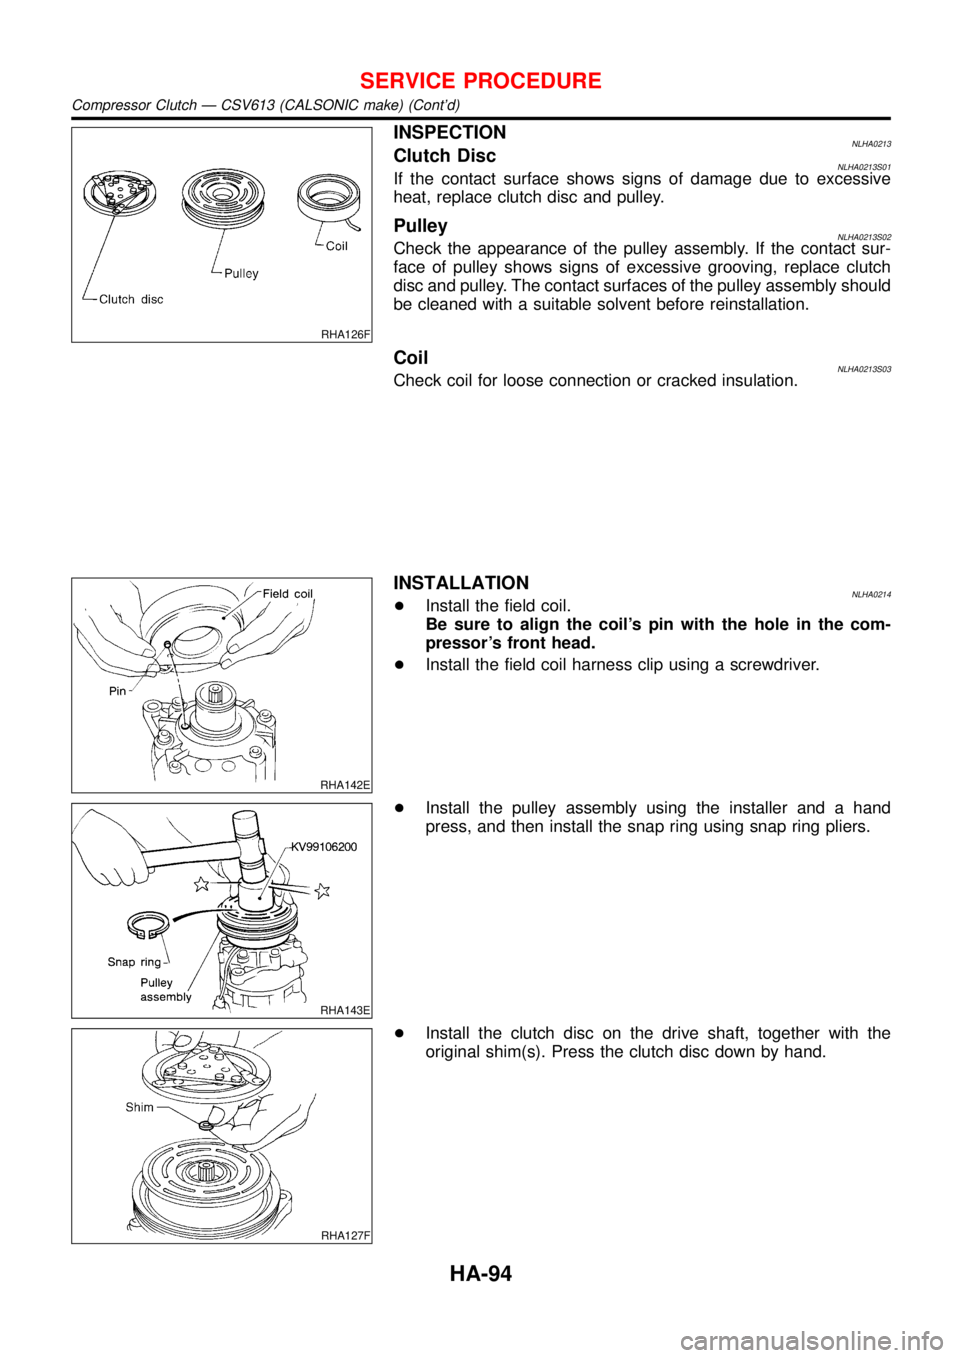
INSPECTIONNLHA0213Clutch DiscNLHA0213S01If the contact surface shows signs of damage due to excessive
heat, replace clutch disc and pulley.
PulleyNLHA0213S02Check the appearance of the pulley assembly. If the contact sur-
face of pulley shows signs of excessive grooving, replace clutch
disc and pulley. The contact surfaces of the pulley assembly should
be cleaned with a suitable solvent before reinstallation.
CoilNLHA0213S03Check coil for loose connection or cracked insulation.
RHA142E
INSTALLATIONNLHA0214+Install the field coil.
Be sure to align the coil’s pin with the hole in the com-
pressor’s front head.
+Install the field coil harness clip using a screwdriver.
RHA143E
+Install the pulley assembly using the installer and a hand
press, and then install the snap ring using snap ring pliers.
RHA127F
+Install the clutch disc on the drive shaft, together with the
original shim(s). Press the clutch disc down by hand.
SERVICE PROCEDURE
Compressor Clutch—CSV613 (CALSONIC make) (Cont’d)
HA-94
Page 2686 of 3051
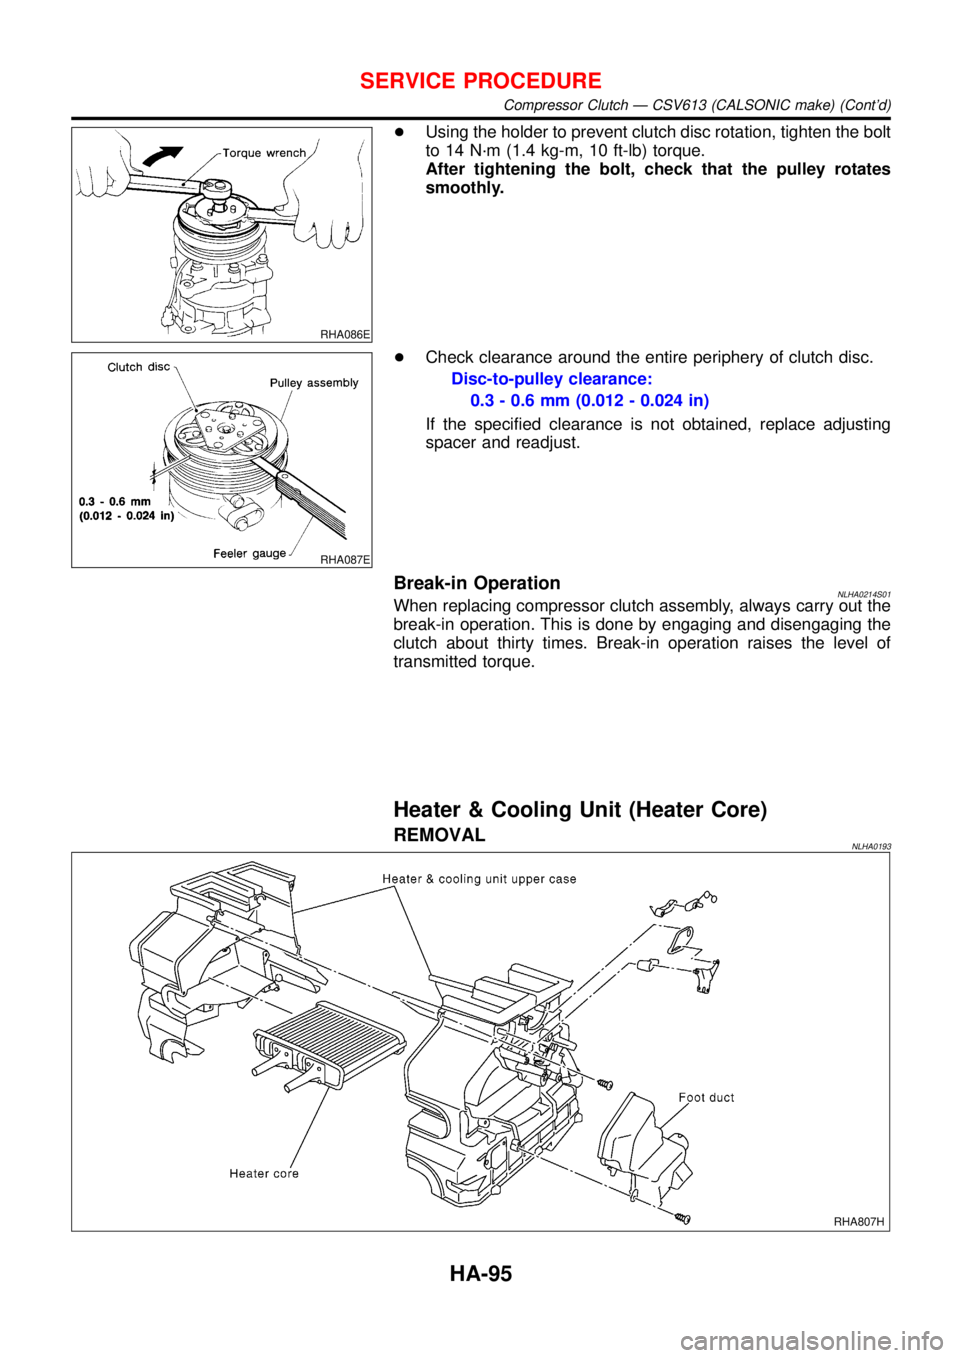
RHA086E
+Using the holder to prevent clutch disc rotation, tighten the bolt
to 14 N·m (1.4 kg-m, 10 ft-lb) torque.
After tightening the bolt, check that the pulley rotates
smoothly.
RHA087E
+Check clearance around the entire periphery of clutch disc.
Disc-to-pulley clearance:
0.3 - 0.6 mm (0.012 - 0.024 in)
If the specified clearance is not obtained, replace adjusting
spacer and readjust.
Break-in OperationNLHA0214S01When replacing compressor clutch assembly, always carry out the
break-in operation. This is done by engaging and disengaging the
clutch about thirty times. Break-in operation raises the level of
transmitted torque.
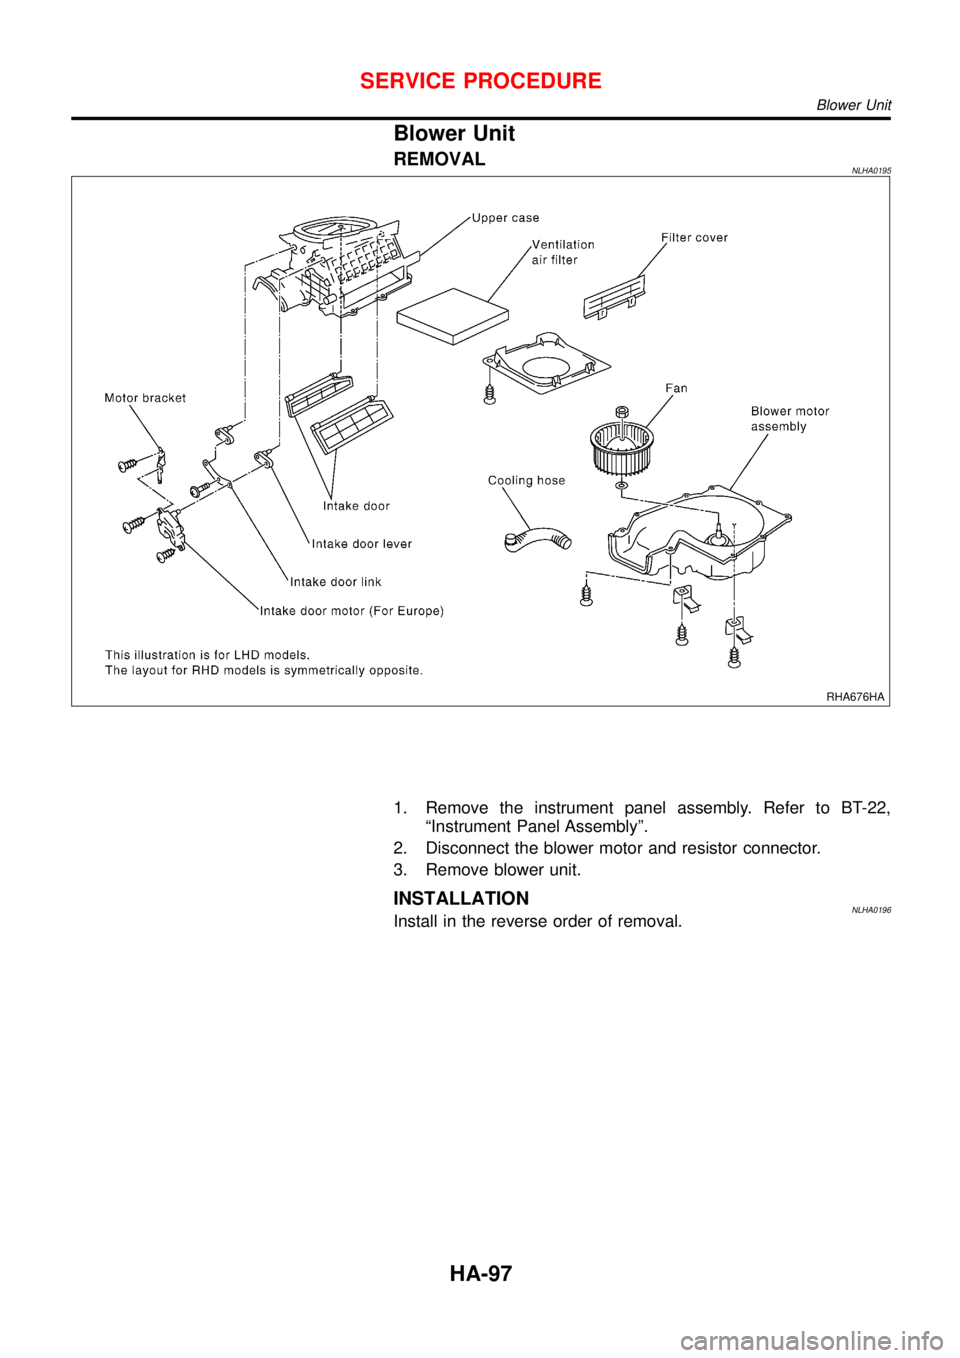
Heater & Cooling Unit (Heater Core)
REMOVALNLHA0193
RHA807H
SERVICE PROCEDURE
Compressor Clutch—CSV613 (CALSONIC make) (Cont’d)
HA-95
Page 2687 of 3051
1. Drain the cooling system. Refer to LC-19 (QG), LC-38 (SR),
LC-59 (YD),“Changing Engine Coolant”.
2. Discharge the A/C system. Refer to HA-85.
3. Disconnect the two heater hoses from inside the engine com-
partment.
4. Remove the blower unit. Refer to HA-97.
5. Remove the steering member assembly. Refer to BT-22,
“Instrument Panel Assembly”.
6. Remove the heater unit.
7. Separate the heater & cooling unit case, and remove the
heater core.
INSTALLATIONNLHA0194Install in the reverse order of removal.
When filling radiator with coolant, refer to LC-20 (QG), LC-38
(SR), LC-60 (YD),“Refilling Engine Coolant”.
Recharge the A/C system. Refer to HA-85.
RHA673H
A/C Evaporator
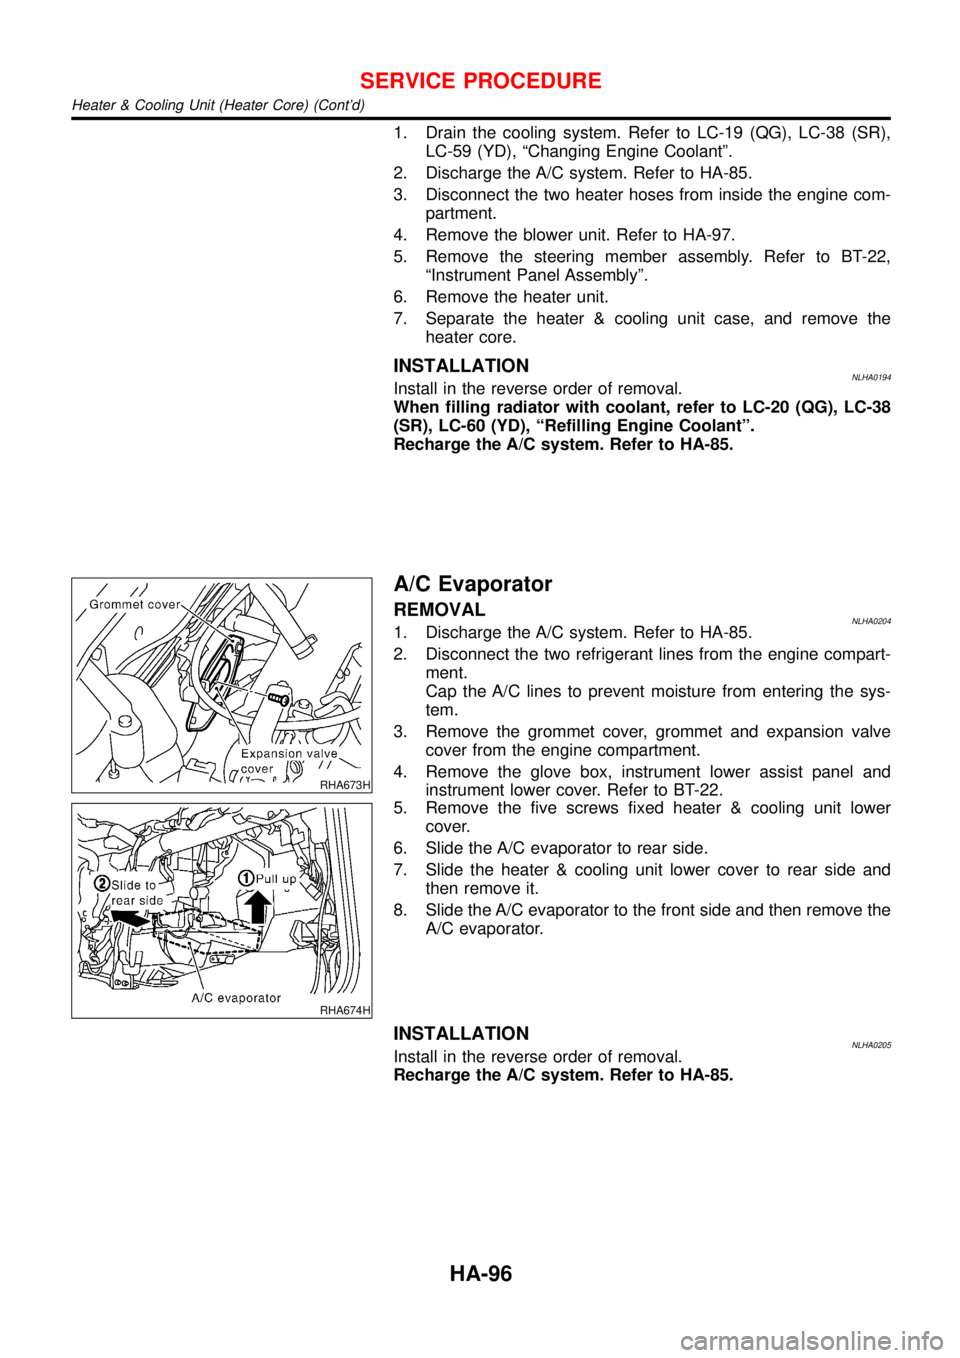
REMOVALNLHA02041. Discharge the A/C system. Refer to HA-85.
2. Disconnect the two refrigerant lines from the engine compart-
ment.
Cap the A/C lines to prevent moisture from entering the sys-
tem.
3. Remove the grommet cover, grommet and expansion valve
cover from the engine compartment.
4. Remove the glove box, instrument lower assist panel and
instrument lower cover. Refer to BT-22.
RHA674H
5. Remove the five screws fixed heater & cooling unit lower
cover.
6. Slide the A/C evaporator to rear side.
7. Slide the heater & cooling unit lower cover to rear side and
then remove it.
8. Slide the A/C evaporator to the front side and then remove the
A/C evaporator.
INSTALLATIONNLHA0205Install in the reverse order of removal.
Recharge the A/C system. Refer to HA-85.
SERVICE PROCEDURE
Heater & Cooling Unit (Heater Core) (Cont’d)
HA-96
Page 2688 of 3051
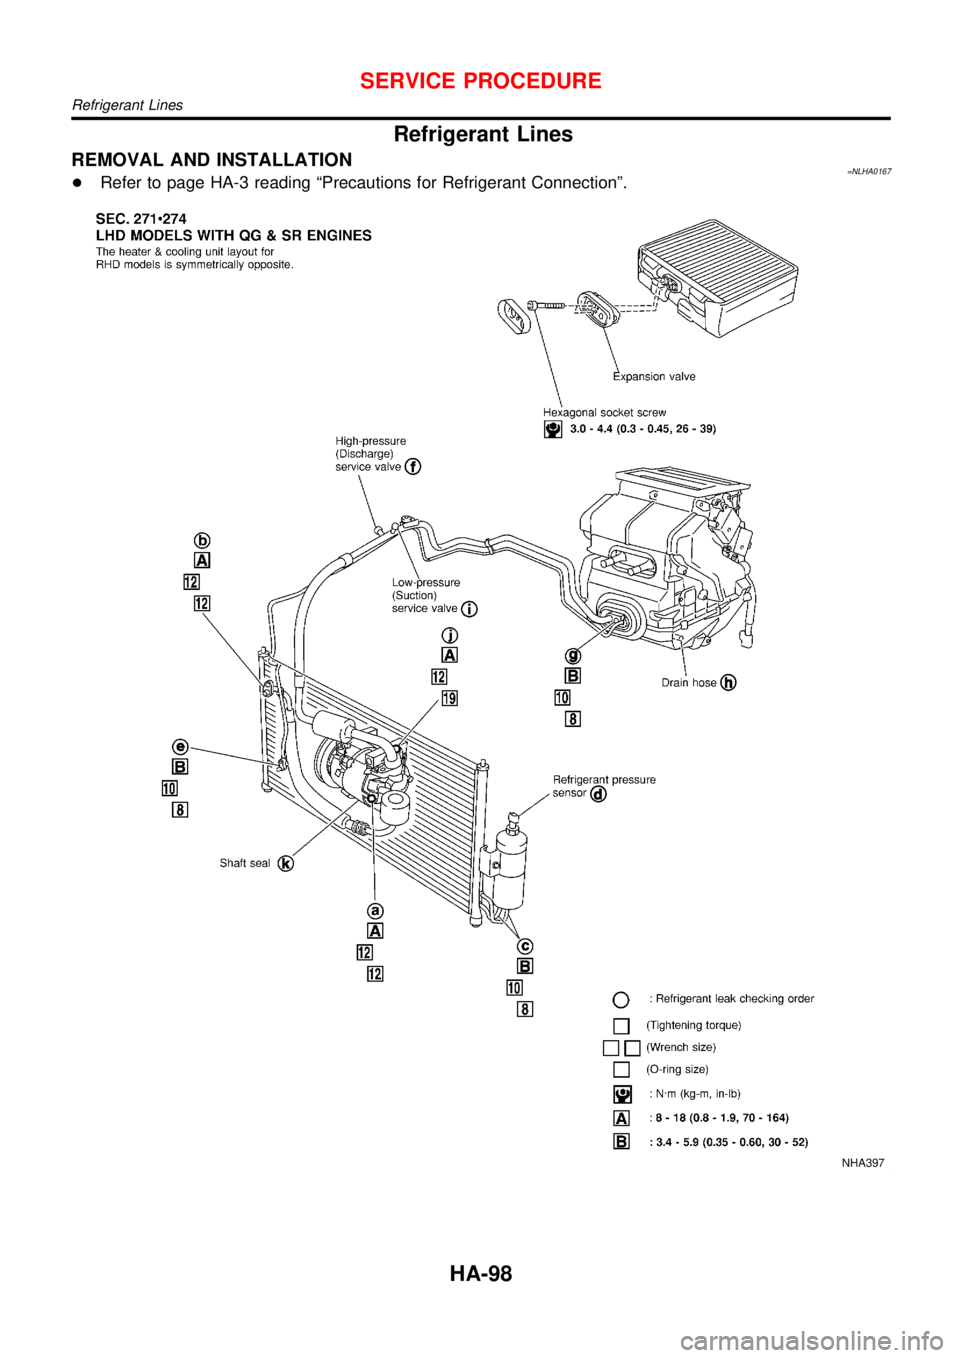
Blower Unit
REMOVALNLHA0195
RHA676HA
1. Remove the instrument panel assembly. Refer to BT-22,
“Instrument Panel Assembly”.
2. Disconnect the blower motor and resistor connector.
3. Remove blower unit.
INSTALLATIONNLHA0196Install in the reverse order of removal.
SERVICE PROCEDURE
Blower Unit
HA-97
Page 2689 of 3051
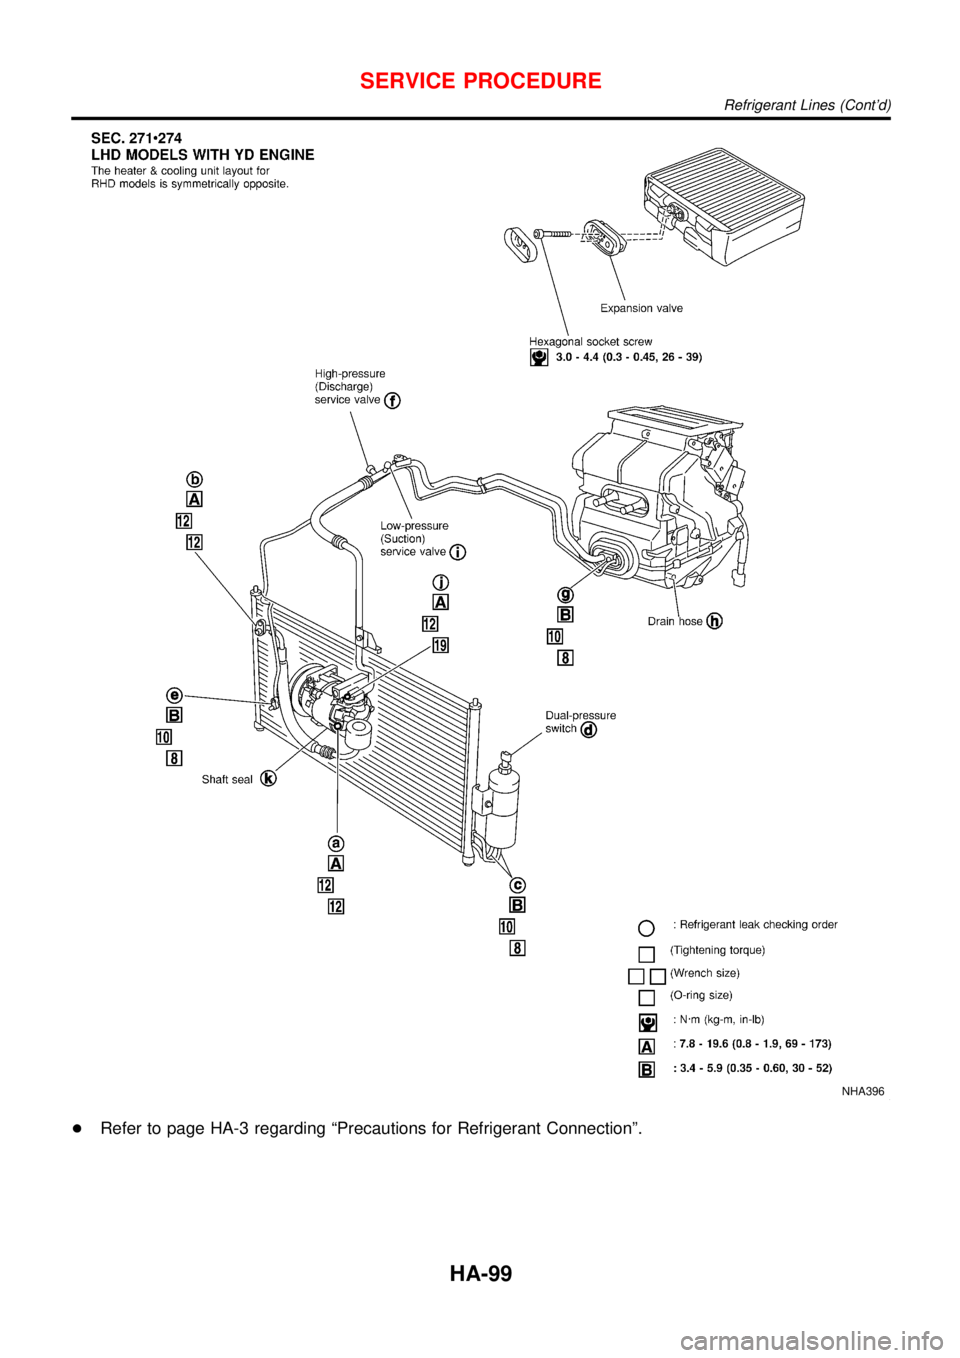
Refrigerant Lines
REMOVAL AND INSTALLATION=NLHA0167+Refer to page HA-3 reading“Precautions for Refrigerant Connection”.
NHA397
SERVICE PROCEDURE
Refrigerant Lines
HA-98
Page 2690 of 3051
NHA396
+Refer to page HA-3 regarding“Precautions for Refrigerant Connection”.
SERVICE PROCEDURE
Refrigerant Lines (Cont’d)
HA-99
Trending: rims, driver seat adjustment, OBD port, sunroof, immobilizer, schematic relay, maintenance
