door lock NISSAN ALMERA TINO 2001 Service Owner's Manual
[x] Cancel search | Manufacturer: NISSAN, Model Year: 2001, Model line: ALMERA TINO, Model: NISSAN ALMERA TINO 2001Pages: 3051, PDF Size: 46.38 MB
Page 1929 of 3051
System Description=NLEL0463The rear window defogger system is controlled by the time control unit. The rear window defogger operates
only for approximately 15 minutes.
Power is supplied at all times
+through 15A fuse [No. 7, located in the fuse block (J/B)]
+to rear window defogger relay terminal 5 (B8 relay models) or 3 (B7 relay models)
+through 10A fuse [No. 13, located in the fuse block (J/B)]
+to rear window defogger relay terminal 6 (B6 relay models).
+through 15A fuse [No. 5, located in the fuse block (J/B)]
+to time control unit terminal 9.
With the ignition switch in the ON or START position, power is supplied
+through 10A fuse [No. 10, located in the fuse block (J/B)]
+to the rear window defogger relay terminal 1 and
+to time control unit terminal 1.
Ground is supplied to terminal 5 of the rear window defogger switch through body grounds M28 and M48.
When the rear defogger switch is turned ON, ground is supplied
+through terminal 3 of the rear defogger switch
+to time control unit terminal 3.
Terminal 13 of time control unit then supplies ground to the rear window defogger relay terminal 2.
With power and ground supplied, the rear window defogger relay is energized.
Power is supplied
+through terminals 5 and 7 of the rear window defogger relay (B7 relay models) or
+through terminal 3 of the rear window defogger relay (B8 relay models)
+to the rear window defogger (and door mirror defogger).
The rear window defogger has an independent ground.
With power and ground supplied, the rear window defogger filaments heat and defog the rear window.
When the system is activated, the rear window defogger indicator illuminates in the rear window defogger
switch.
REAR WINDOW DEFOGGER
System Description
EL-198
Page 1939 of 3051
System Description=NLEL0497Refer to Owner's Manual for audio system operating instructions.
Power is supplied at all times
+through 15A fuse
+to audio unit terminal 9
+to CD auto changer terminal 32.
With the ignition switch in the ACC or ON position, power is supplied
+through 10A fuse [No. 1, located in the fuse block (J/B)]
+to audio unit terminal 3,
+to CD auto changer terminal 36 and
Ground is supplied through the case of the audio unit.
Audio signals are supplied
+through audio unit terminals 7, 10, 11, 12, 13, 14, 15, 16
+to terminals 1 and 2 of front door speaker LH and RH,
+to terminals 1 and 2 of rear door speaker LH and RH and
+to terminals 1 and 2 of pillar tweeter LH and RH (with 6 speakers)
When the navigation system is triggered,
power is supplied
+through navi control unit terminal 46
+to speaker relay terminal 2
Ground is supplied
+through navi control unit terminal 44
+to speaker relay terminal 1
With power and ground supplied, the relay is energized, and then audio signal is interrupted to front door
speaker RH (LHD models) or LH (RHD models), and pillar tweeter RH (LHD models) or LH (RHD models)
For detailed, refer to ªNAVIGATION SYSTEMº.
NATS AUDIO LINKNLEL0497S01DescriptionNLEL0497S0101The link with the NATS IMMU implies that the audio unit can basically only be operated if connected to the
matching NATS IMMU to which the audio unit was initially fitted on the production line.
Since radio operation is impossible after the link with the NATS is disrupted theft of the audio unit is basically
useless since special equipment is required to reset the audio unit.
Initialization process for audio units that are linked to the NATS IMMU
New audio units will be delivered to the factories in the ªNEWº state, i.e. ready to be linked with the vehicle's
NATS. When the audio unit in ªNEWº state is first switched on at the factory, it will start up communication
with the vehicle's immobiliser control unit (IMMU) and send a code (the ªaudio unit Codeº) to the IMMU. The
IMMU will then store this code, which is unique to each audio unit, in its (permanent) memory.
Upon receipt of the code by the IMMU, the NATS will confirm correct receipt of the audio unit code to the audio
unit. Hereafter, the audio unit will operate as normal.
During the initialisation process, ªNEWº is displayed on the audio unit display. Normally though, communica-
tion between audio unit and IMMU takes such a short time (300 ms) that the audio unit seems to switch on
directly without showing ªNEWº on its display.
Normal operation
Each time the audio unit is switched on afterwards, the audio unit code will be verified between the audio unit
and the NATS before the audio unit becomes operational. During the code verification process, ªWAITº is
shown on the audio unit display. Again, the communication takes such a short time (300 ms) that the audio
unit seems to switch on directly without showing ªWAITº on its display.
When the radio is locked
In case of a audio unit being linked with the vehicle's NATS (immobilizer system), disconnection of the link
between the audio unit and the IMMU will cause the audio unit to switch into the lock (ªSECUREº) mode in
which the audio unit is fully inoperative. Hence, repair of the audio unit is basically impossible, unless the audio
unit is reset to the ªNEWº state for which special decoding equipment is required.
Clarion has provided their authorized service representatives with so called ªdecoder boxesº which can bring
the audio unit back to the ªNEWº state, enabling the audio unit to be switched on after which repair can be
AUDIO
System Description
EL-208
Page 1976 of 3051
System Description=NLEL0498Power is supplied at all times
+from 30A fusible link
+to circuit breaker terminal 1
+through circuit breaker terminal 2
+to power window relay terminal 5
With ignition switch in ON or START position, power is supplied
+through 10A fuse [No. 10, located in the fuse block (J/B)]
+to power window relay terminal 1
Ground is supplied to power window relay terminal 2
+through body grounds M28 and M48.
The power window relay is energized and power is supplied
+through power window relay terminal 3
+to power window main switch terminal 1,
+to front power window sub-switch terminal 5,
+to rear power window sub-switch LH and RH terminals 5 (models with rear power window).
MANUAL OPERATIONNLEL0498S01Front Door (Driver Side)NLEL0498S0101Ground is supplied
+to power window main switch terminal 3
+through body grounds M28 and M48.
WINDOW UP
When the driver's window switch in the power window main switch is pressed in the up position, power is
supplied
+through power window main switch terminal 9
+to driver side power window regulator terminal 1.
Ground is supplied
+through power window main switch terminal 2
+to driver side power window regulator terminal 8.
Then, the motor raises the window until the switch is released.
WINDOW DOWN
When the driver's window switch in the power window main switch is pressed in the down position, power is
supplied
+through power window main switch terminal 8
+to driver side power window regulator terminal 2.
Ground is supplied
+to driver side power window regulator terminal 1
+through power window main switch terminal 9.
Then, the motor lowers the window until the switch is released.
Front Door (Passenger Side)NLEL0498S0102Ground is supplied
+to power window main switch terminal 3
+through body grounds M28 and M48.
NOTE:
Numbers in parentheses are terminal numbers, when power window switch is pressed in the UP and DOWN
positions respectively.
POWER WINDOW MAIN SWITCH OPERATION
Power is supplied
+through power window main switch (5, 6)
+to front power window sub-switch (3, 4).
POWER WINDOW
System Description
EL-245
Page 1977 of 3051
The subsequent operation is the same as the front power window sub-switch operation.
FRONT POWER WINDOW SUB-SWITCH OPERATION
Power is supplied
+through front power window sub-switch (1, 2)
+to front passenger side power window regulator (1, 2).
Ground is supplied
+to front passenger side power window regulator (2, 1)
+through front power window sub-switch (2, 1)
+to front power window sub-switch (4, 3)
+through power window main switch (6, 5).
Then, the motor raises or lowers the window until the switch is released.
Rear DoorNLEL0498S0103Rear door windows will raise and lower in the same manner as passenger's door window.
POWER WINDOW LOCKNLEL0498S02The power window lock is designed to lock operation of all windows except for driver's door window.
When the lock switch is pressed to lock position, ground of the sub-switches in the power window main switch
is disconnected. This prevents the power window motors from operating.
AUTO OPERATIONNLEL0498S03The power window AUTO feature enables the driver to open the driver's window without holding the window
switch in the down position.
The AUTO feature operates on the driver's window.
POWER WINDOW
System Description (Cont'd)
EL-246
Page 1988 of 3051
Component Parts and Harness Connector
Location/LHD Models
NLEL0526For details, refer to ªELECTRICAL UNIT LOCATIONº (EL-442) and ªHARNESS LAYOUTº (EL-452).
System Description/LHD ModelsNLEL0502OPERATIONNLEL0502S02Power door lock/unlock operation by door key cylinder
+With the key inserted into front door key cylinder, turning it to LOCK will lock all doors.
+With the key inserted into front door key cylinder, turning it to UNLOCK will unlock all doors.
Power door lock/unlock operation by multi-remote controller (If equipped)
+Pressing multi-remote controller LOCK button will lock all doors.
+Pressing multi-remote controller UNLOCK button once will unlock driver door. Then, if an unlock signal is
sent from the remote controller again within 5 seconds, all other doors will be unlocked.
Power door lock/unlock operation by lock/unlock switch
+With lock/unlock switch on driver door trim setting to LOCK will lock all doors.
+With lock/unlock switch on driver door trim setting to UNLOCK will unlock all doors.
Key reminder system
+If the ignition key is in the ignition key cylinder and driver door is open, setting lock/unlock switch, lock
knob, key or multi-remote controller to ªLOCKº locks the door once but then immediately unlocks all doors.
(signal from door unlock sensor driver side)
POWER DOOR LOCK
Component Parts and Harness Connector Location/LHD Models
EL-257
Page 1989 of 3051
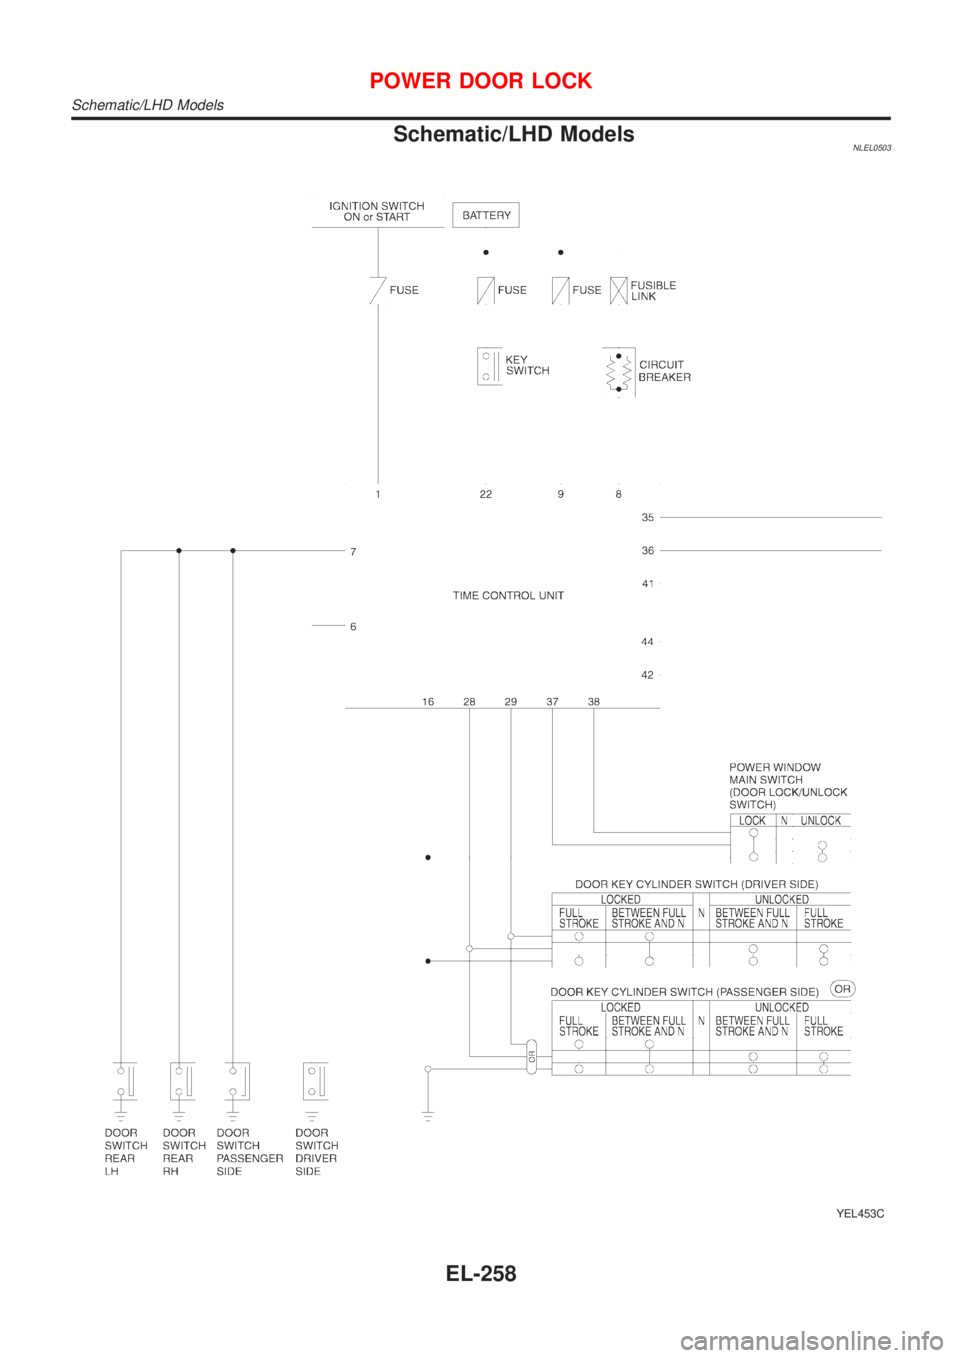
Schematic/LHD ModelsNLEL0503
YEL453C
POWER DOOR LOCK
Schematic/LHD Models
EL-258
Page 1990 of 3051
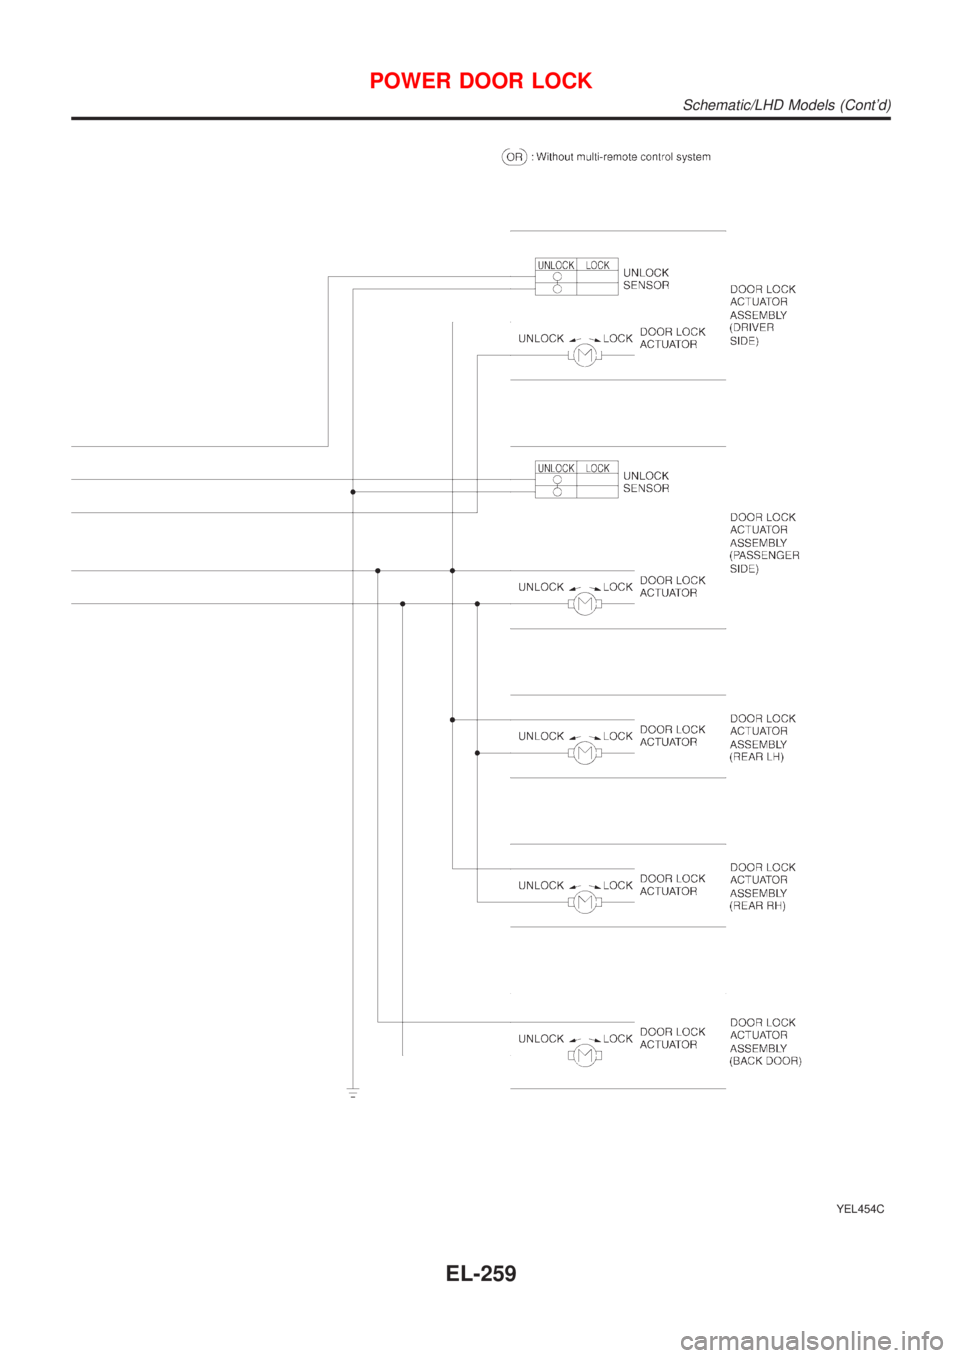
YEL454C
POWER DOOR LOCK
Schematic/LHD Models (Cont'd)
EL-259
Page 1991 of 3051
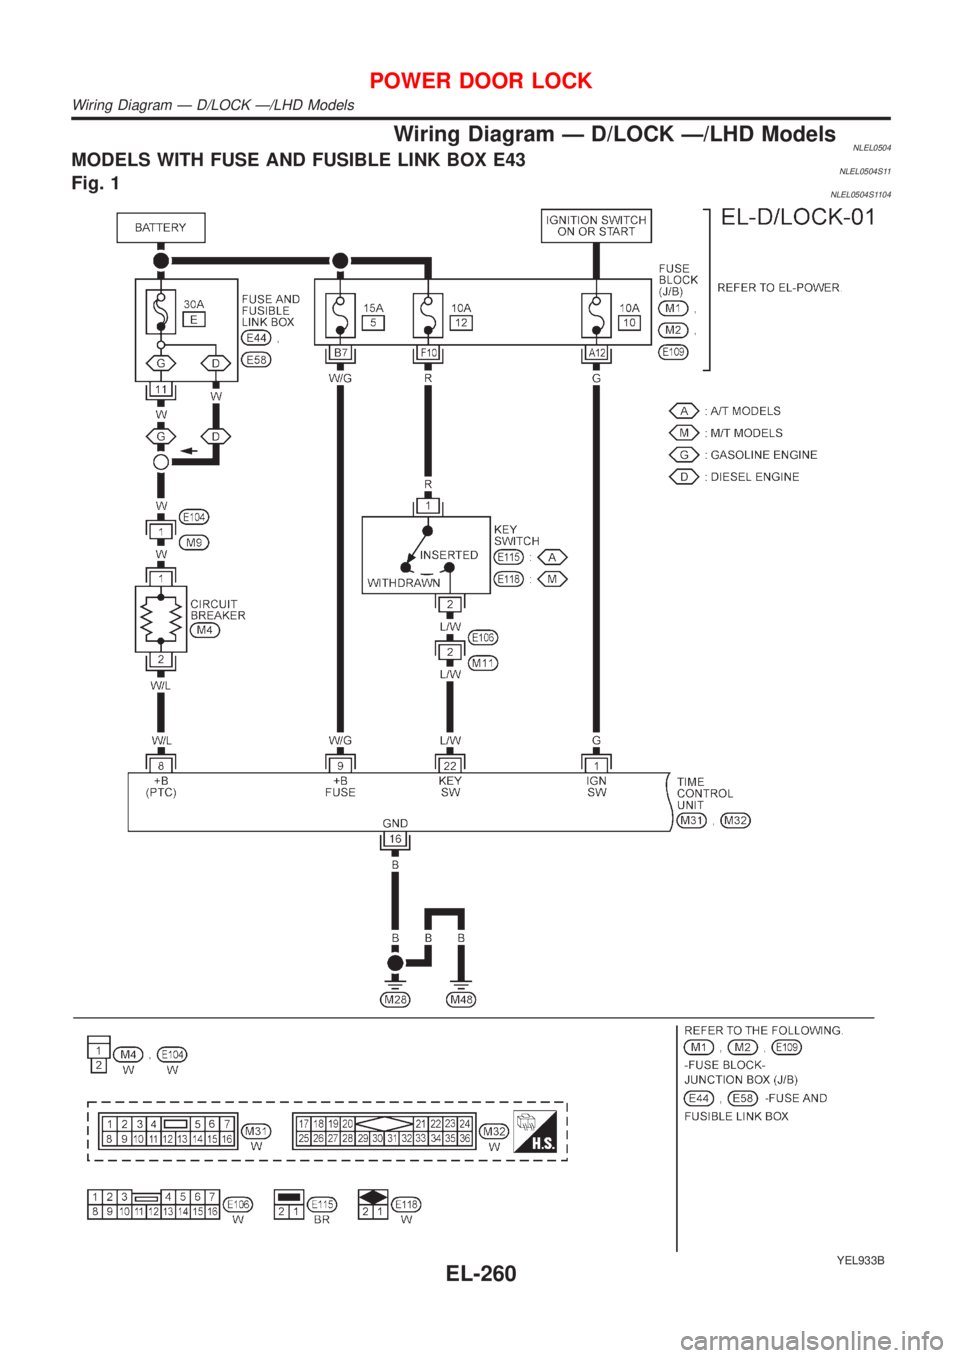
Wiring Diagram Ð D/LOCK Ð/LHD ModelsNLEL0504MODELS WITH FUSE AND FUSIBLE LINK BOX E43NLEL0504S11Fig. 1NLEL0504S1104
YEL933B
POWER DOOR LOCK
Wiring Diagram Ð D/LOCK Ð/LHD Models
EL-260
Page 1992 of 3051
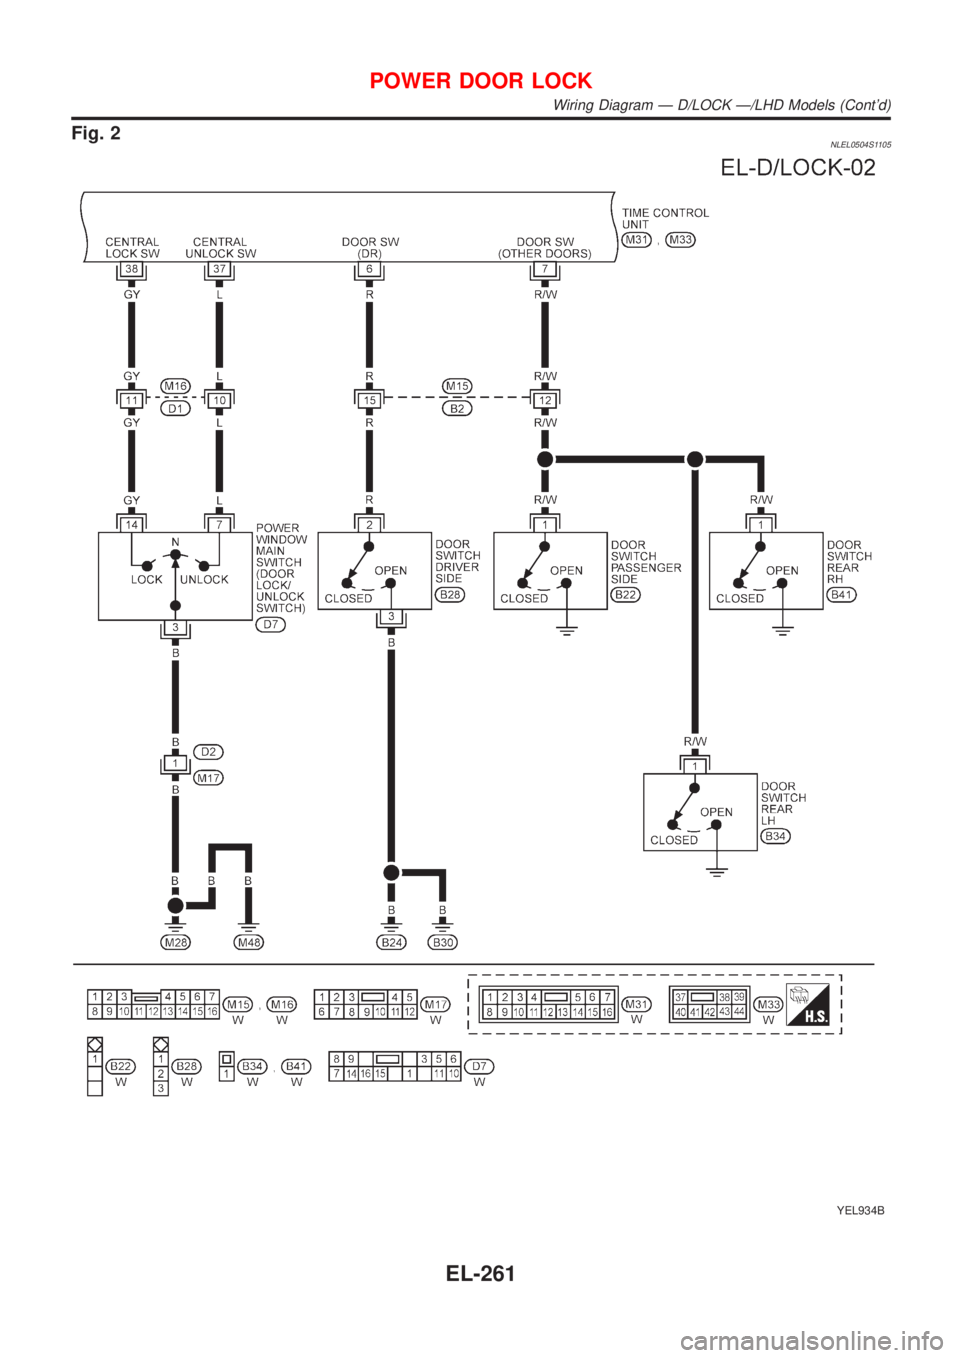
Fig. 2NLEL0504S1105
YEL934B
POWER DOOR LOCK
Wiring Diagram Ð D/LOCK Ð/LHD Models (Cont'd)
EL-261
Page 1993 of 3051
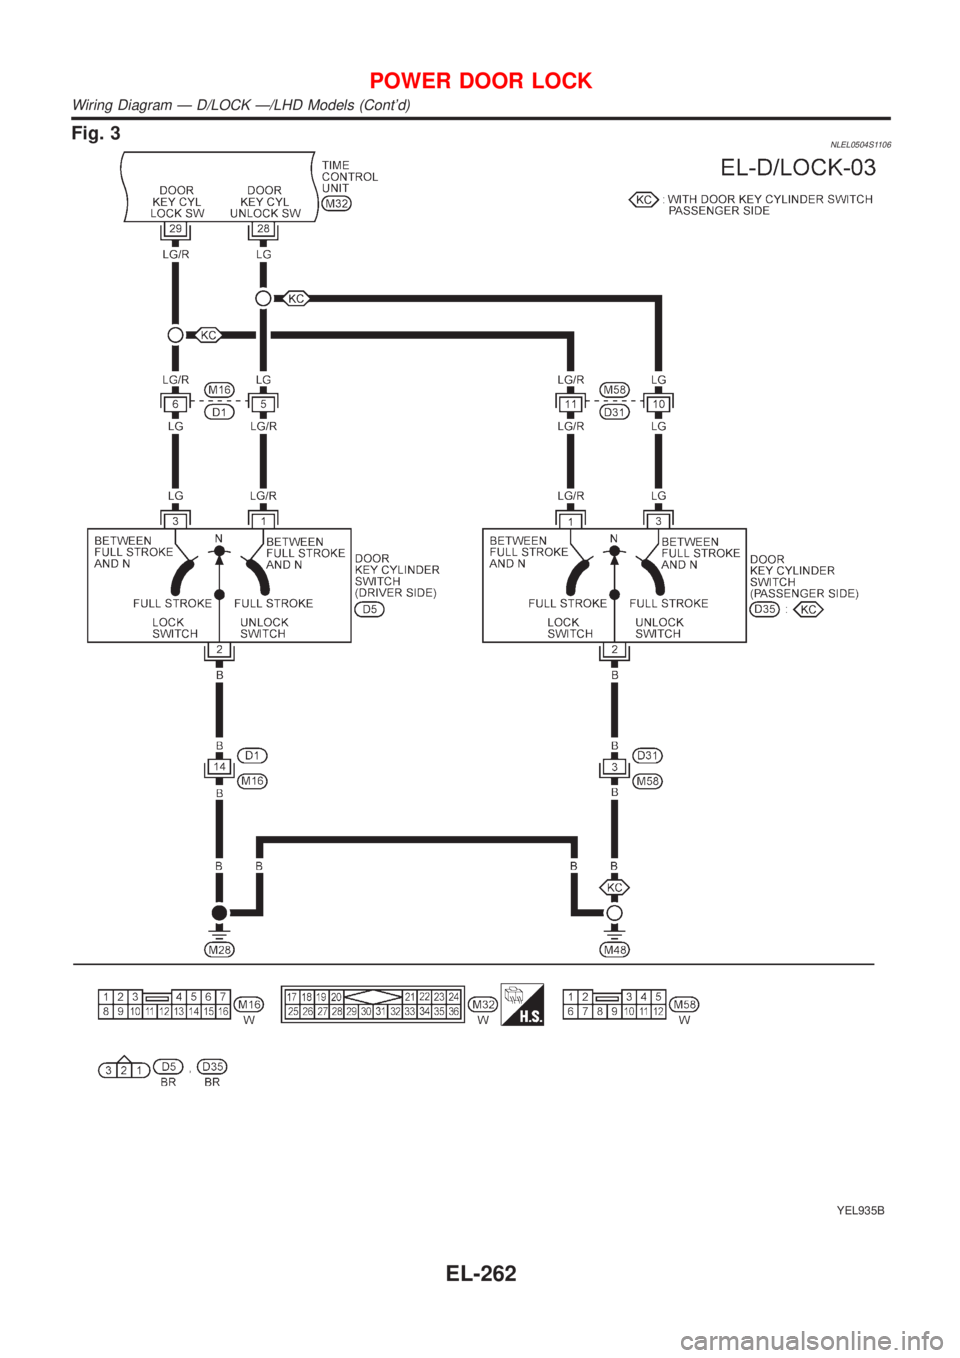
Fig. 3NLEL0504S1106
YEL935B
POWER DOOR LOCK
Wiring Diagram Ð D/LOCK Ð/LHD Models (Cont'd)
EL-262