climate settings NISSAN ALTIMA 2023 Owners Manual
[x] Cancel search | Manufacturer: NISSAN, Model Year: 2023, Model line: ALTIMA, Model: NISSAN ALTIMA 2023Pages: 644, PDF Size: 4.12 MB
Page 212 of 644
Refer to the digital NissanConnect® Own-
er’s manual using the QR code on this
page, or your printed NissanConnect®
Owner’s manual (if so equipped). This
manual includes the following information:
• NissanConnect® Services (if so equipped)
• Navigation system (if so equipped)
• Audio system
• Apple CarPlay® (if so equipped)
• Android Auto
TM(if so equipped)
• Bluetooth® Hands-Free Phone system
• Viewing information
• Other settings • Voice recognition
• General system information
LHA5538
NISSANCONNECT® OWNER’S
MANUAL
4-2Monitor, climate, audio, phone and voice recognition systems
Page 214 of 644
HOW TO USE THE TOUCH-SCREEN
CAUTION
• The glass display screen may break if
it is hit with a hard or sharp object. If
the glass screen breaks, do not touch
it. Doing so could result in an injury.
• To clean the display, never use a
rough cloth, alcohol, benzine, thinner
or any kind of solvent or paper towel
with a chemical cleaning agent. They
will scratch or deteriorate the panel.
• Do not splash any liquid such as wa-
ter or car fragrance on the display.
Contact with liquid will cause the sys-
tem to malfunction. To help ensure safe driving, some functions
cannot be operated while driving.
The on-screen functions that are not avail-
able while driving will be “grayed out” or
muted.
WARNING
• ALWAYS give your full attention to
driving.
• Avoid using vehicle features that
could distract you. If distracted, you
could lose control of your vehicle and
cause an accident.
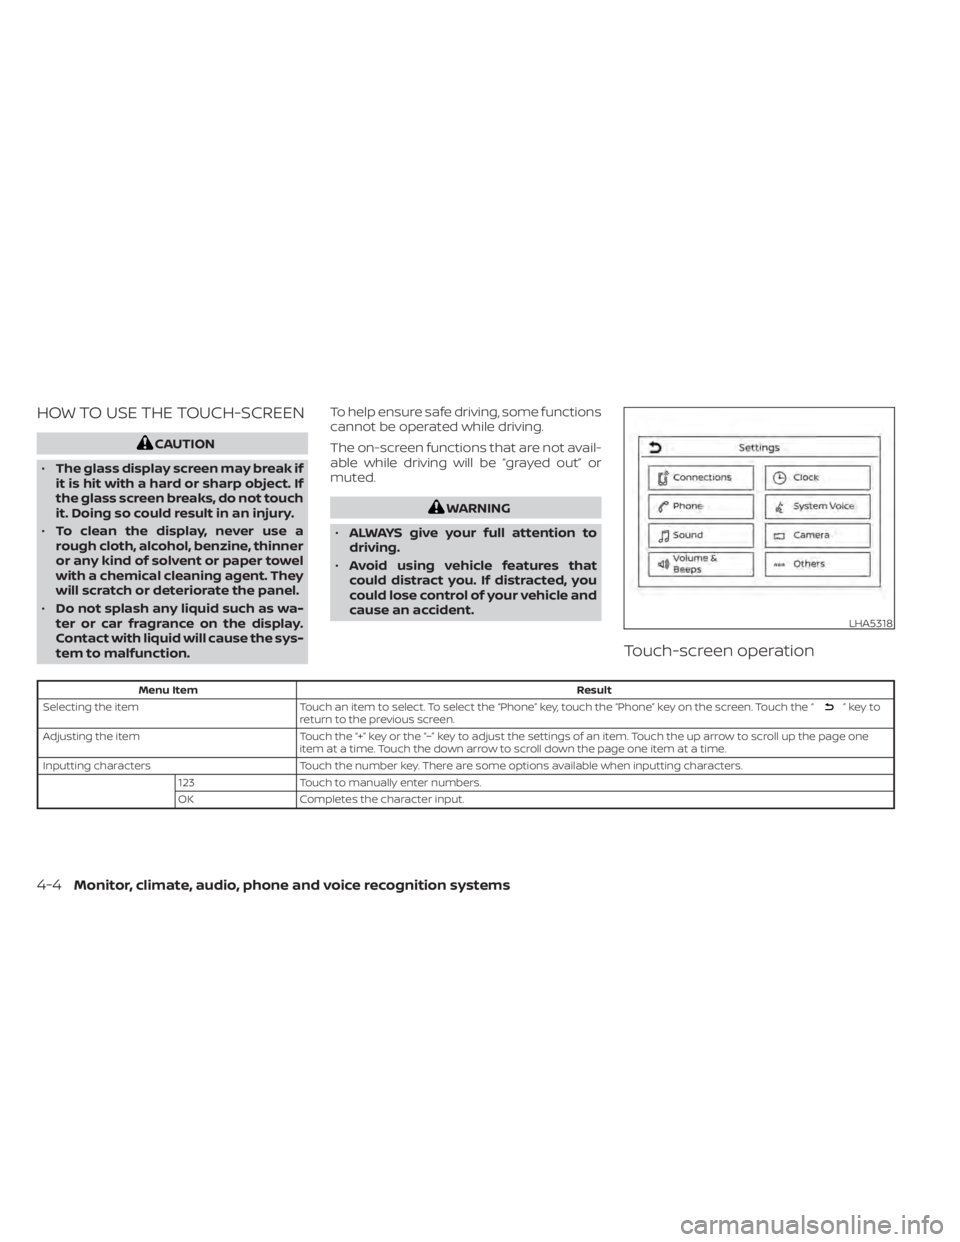
Touch-screen operation
Menu Item Result
Selecting the item Touch an item to select. To select the “Phone” key, touch the “Phone” key on the screen. Touch the “
”keyto
return to the previous screen.
Adjusting the item Touch the “+” key or the “−” key to adjust the settings of an item. Touch the up arrow to scroll up the page one
item at a time. Touch the down arrow to scroll down the page one item at a time.
Inputting characters Touch the number key. There are some options available when inputting characters.
123 Touch to manually enter numbers.
OK Completes the character input.
LHA5318
4-4Monitor, climate, audio, phone and voice recognition systems
Page 215 of 644
Touch-screen maintenance
If you clean the display screen, use a dry,
sof t cloth. If additional cleaning is neces-
sary, use a small amount of neutral deter-
gent with a sof t cloth. Never spray the
screen with water or detergent. Dampen
the cloth first and then wipe the screen.
HOW TO USE THEMENU
BUTTON
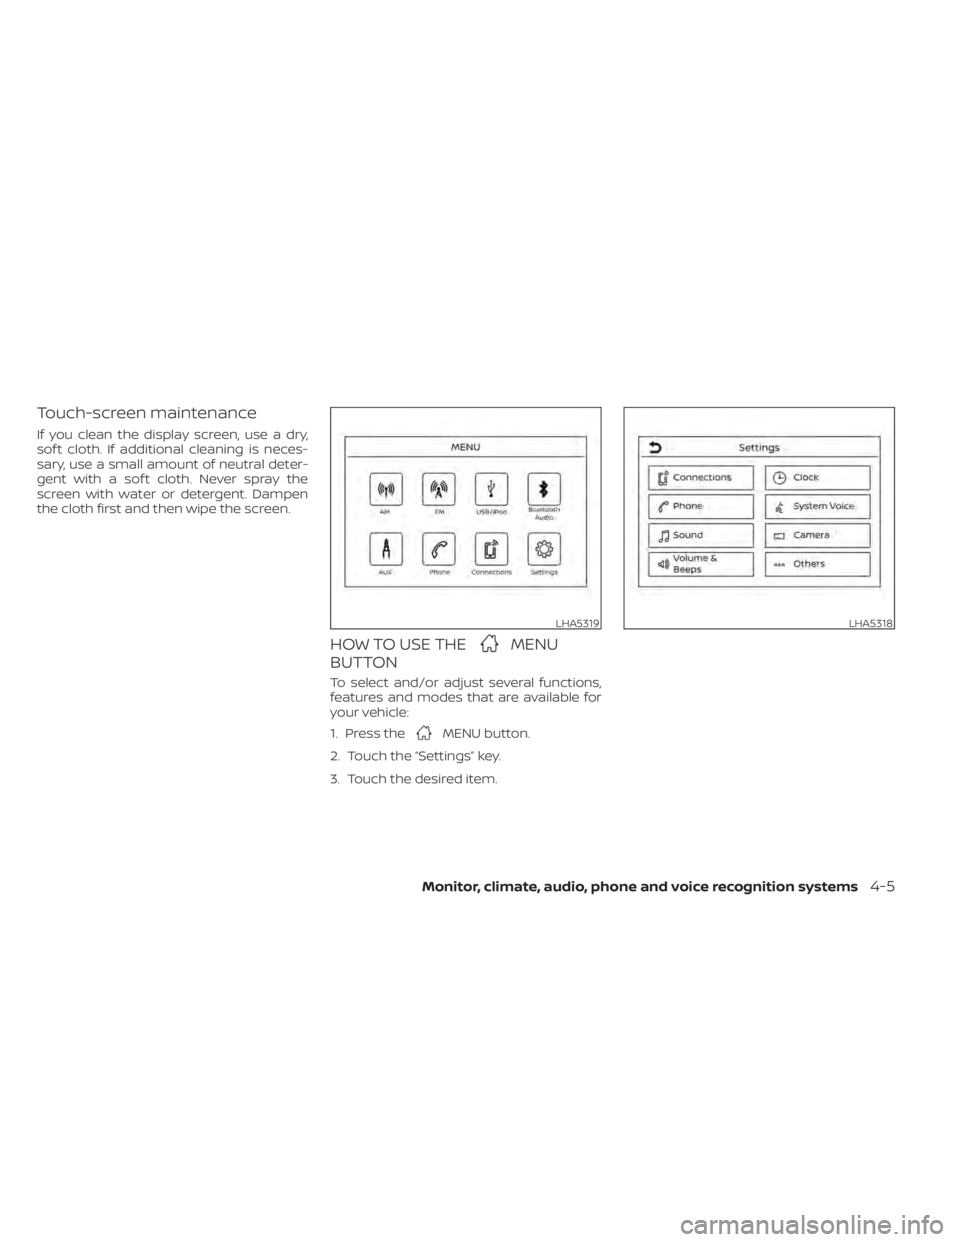
To select and/or adjust several functions,
features and modes that are available for
your vehicle:
1. Press the
MENU button.
2. Touch the “Settings” key.
3. Touch the desired item.
LHA5319LHA5318
Monitor, climate, audio, phone and voice recognition systems4-5
Page 216 of 644
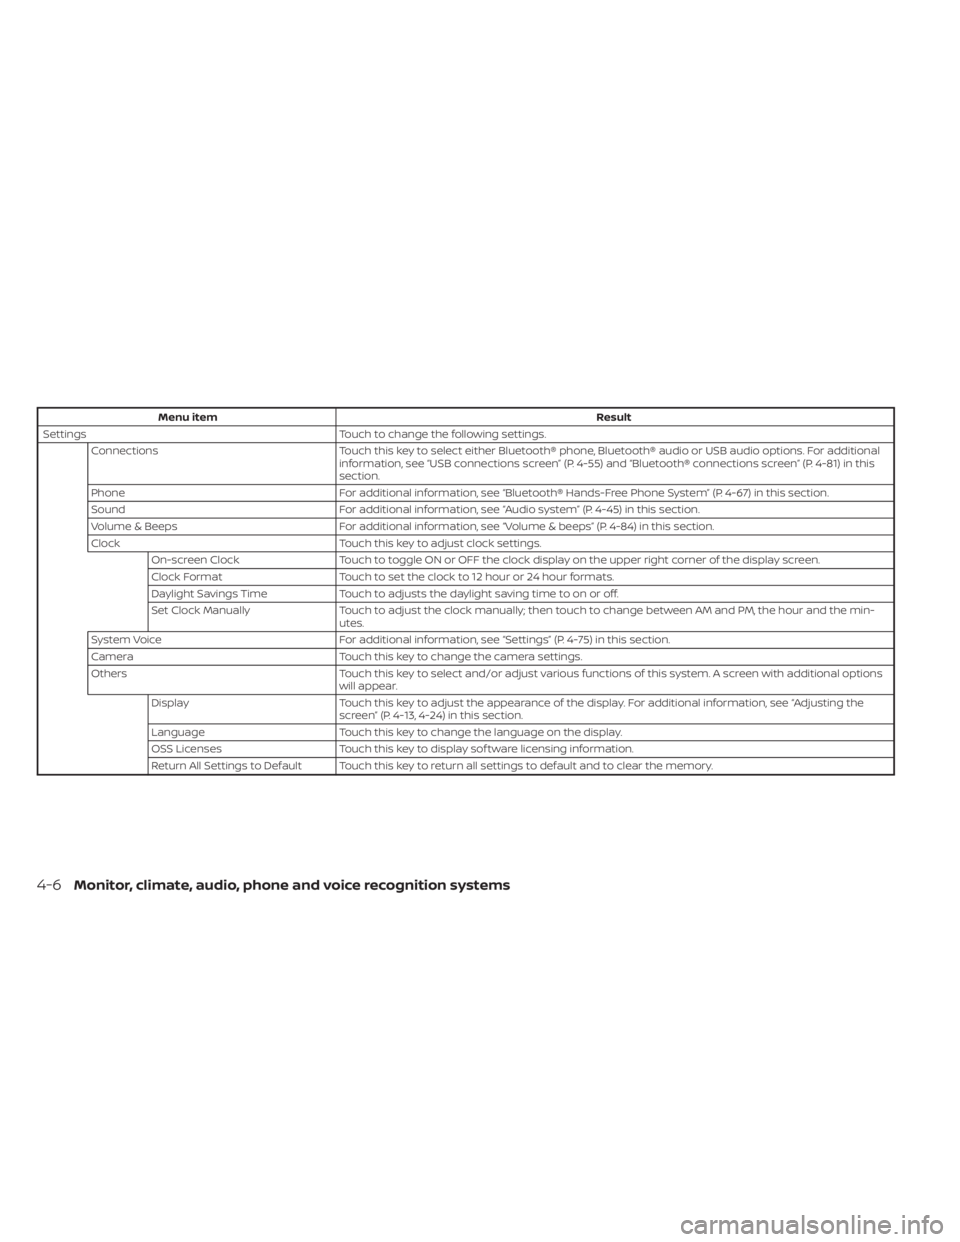
Menu itemResult
Settings Touch to change the following settings.
Connections Touch this key to select either Bluetooth® phone, Bluetooth® audio or USB audio options. For additional
information, see “USB connections screen” (P. 4-55) and “Bluetooth® connections screen” (P. 4-81) in this
section.
Phone For additional information, see “Bluetooth® Hands-Free Phone System” (P. 4-67) in this section.
Sound For additional information, see “Audio system” (P. 4-45) in this section.
Volume & Beeps For additional information, see “Volume & beeps” (P. 4-84) in this section.
Clock Touch this key to adjust clock settings.
On-screen Clock Touch to toggle ON or OFF the clock display on the upper right corner of the display screen.
Clock Format Touch to set the clock to 12 hour or 24 hour formats.
Daylight Savings Time Touch to adjusts the daylight saving time to on or off.
Set Clock Manually Touch to adjust the clock manually; then touch to change between AM and PM, the hour and the min-
utes.
System Voice For additional information, see “Settings” (P. 4-75) in this section.
Camera Touch this key to change the camera settings.
Others Touch this key to select and/or adjust various functions of this system. A screen with additional options
will appear.
Display Touch this key to adjust the appearance of the display. For additional information, see “Adjusting the
screen” (P. 4-13, 4-24) in this section.
Language Touch this key to change the language on the display.
OSS Licenses Touch this key to display sof tware licensing information.
Return All Settings to Default Touch this key to return all settings to default and to clear the memory.
4-6Monitor, climate, audio, phone and voice recognition systems
Page 217 of 644
(brightness control) BUTTON
To change the display brightness, press thebutton. Pressing the button again will
change the display to the day or the night
display.
Press and hold the
button for more
than 2 seconds to turn the display off. Press
and hold the button again to turn the dis-
play on.
HOW TO USE THE VOL (volume)
KNOB / PUSH
(power)
BUTTON
Press the PUSH(power) button to turn
audio function on and off. Turn the VOL
(volume) knob to adjust audio volume.
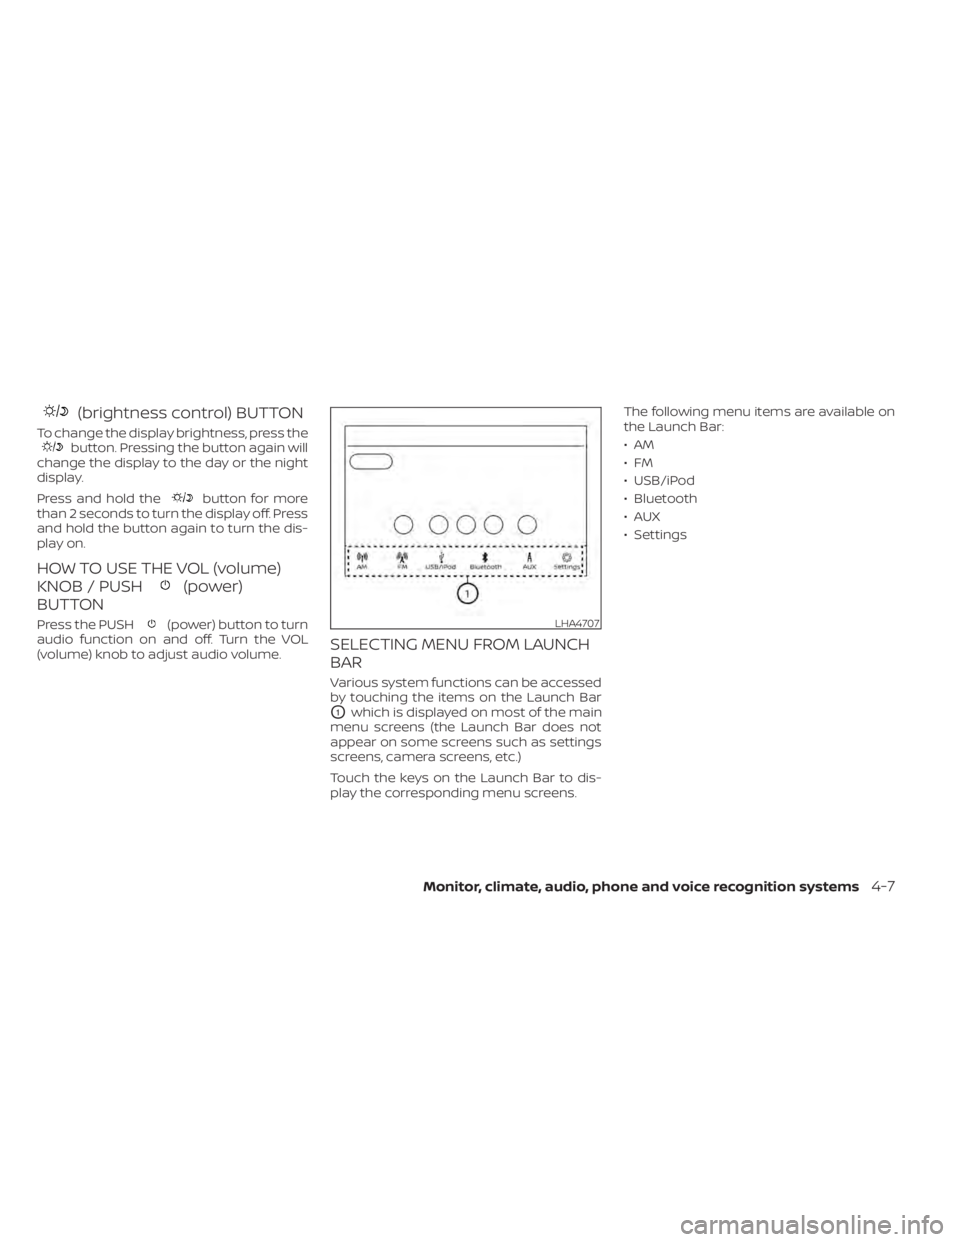
SELECTING MENU FROM LAUNCH
BAR
Various system functions can be accessed
by touching the items on the Launch Bar
O1which is displayed on most of the main
menu screens (the Launch Bar does not
appear on some screens such as settings
screens, camera screens, etc.)
Touch the keys on the Launch Bar to dis-
play the corresponding menu screens. The following menu items are available on
the Launch Bar:
•AM
•FM
• USB/iPod
• Bluetooth
•AUX
• Settings
LHA4707
Monitor, climate, audio, phone and voice recognition systems4-7
Page 223 of 644
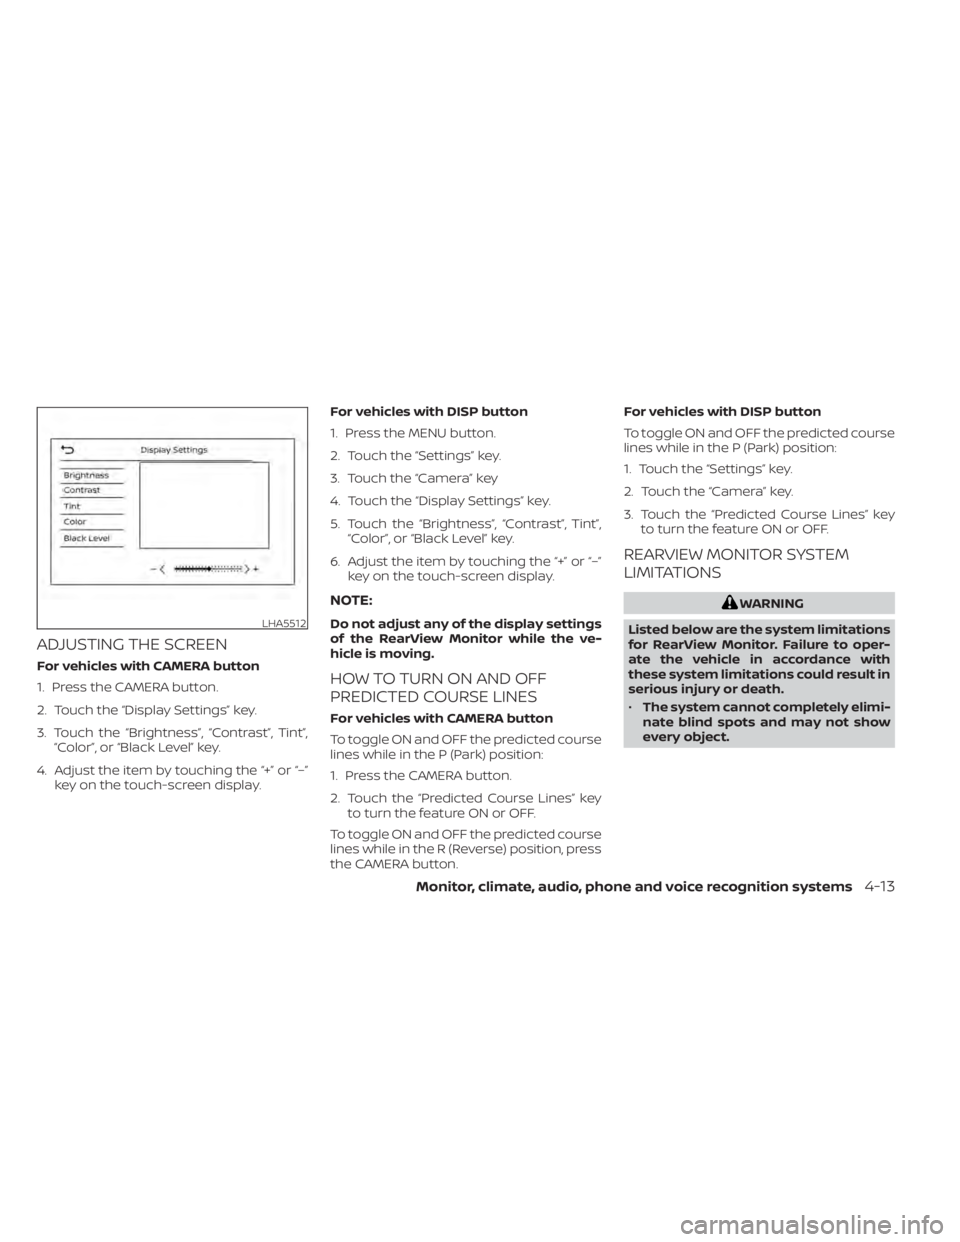
ADJUSTING THE SCREEN
For vehicles with CAMERA button
1. Press the CAMERA button.
2. Touch the “Display Settings” key.
3. Touch the “Brightness”, “Contrast”, Tint”,“Color”, or “Black Level” key.
4. Adjust the item by touching the “+” or “–” key on the touch-screen display. For vehicles with DISP button
1. Press the MENU button.
2. Touch the “Settings” key.
3. Touch the “Camera” key
4. Touch the “Display Settings” key.
5. Touch the “Brightness”, “Contrast”, Tint”,
“Color”, or “Black Level” key.
6. Adjust the item by touching the “+” or “–” key on the touch-screen display.
NOTE:
Do not adjust any of the display settings
of the RearView Monitor while the ve-
hicle is moving.
HOW TO TURN ON AND OFF
PREDICTED COURSE LINES
For vehicles with CAMERA button
To toggle ON and OFF the predicted course
lines while in the P (Park) position:
1. Press the CAMERA button.
2. Touch the “Predicted Course Lines” keyto turn the feature ON or OFF.
To toggle ON and OFF the predicted course
lines while in the R (Reverse) position, press
the CAMERA button. For vehicles with DISP button
To toggle ON and OFF the predicted course
lines while in the P (Park) position:
1. Touch the “Settings” key.
2. Touch the “Camera” key.
3. Touch the “Predicted Course Lines” key
to turn the feature ON or OFF.
REARVIEW MONITOR SYSTEM
LIMITATIONS
WARNING
Listed below are the system limitations
for RearView Monitor. Failure to oper-
ate the vehicle in accordance with
these system limitations could result in
serious injury or death.
• The system cannot completely elimi-
nate blind spots and may not show
every object.
LHA5512
Monitor, climate, audio, phone and voice recognition systems4-13
Page 234 of 644
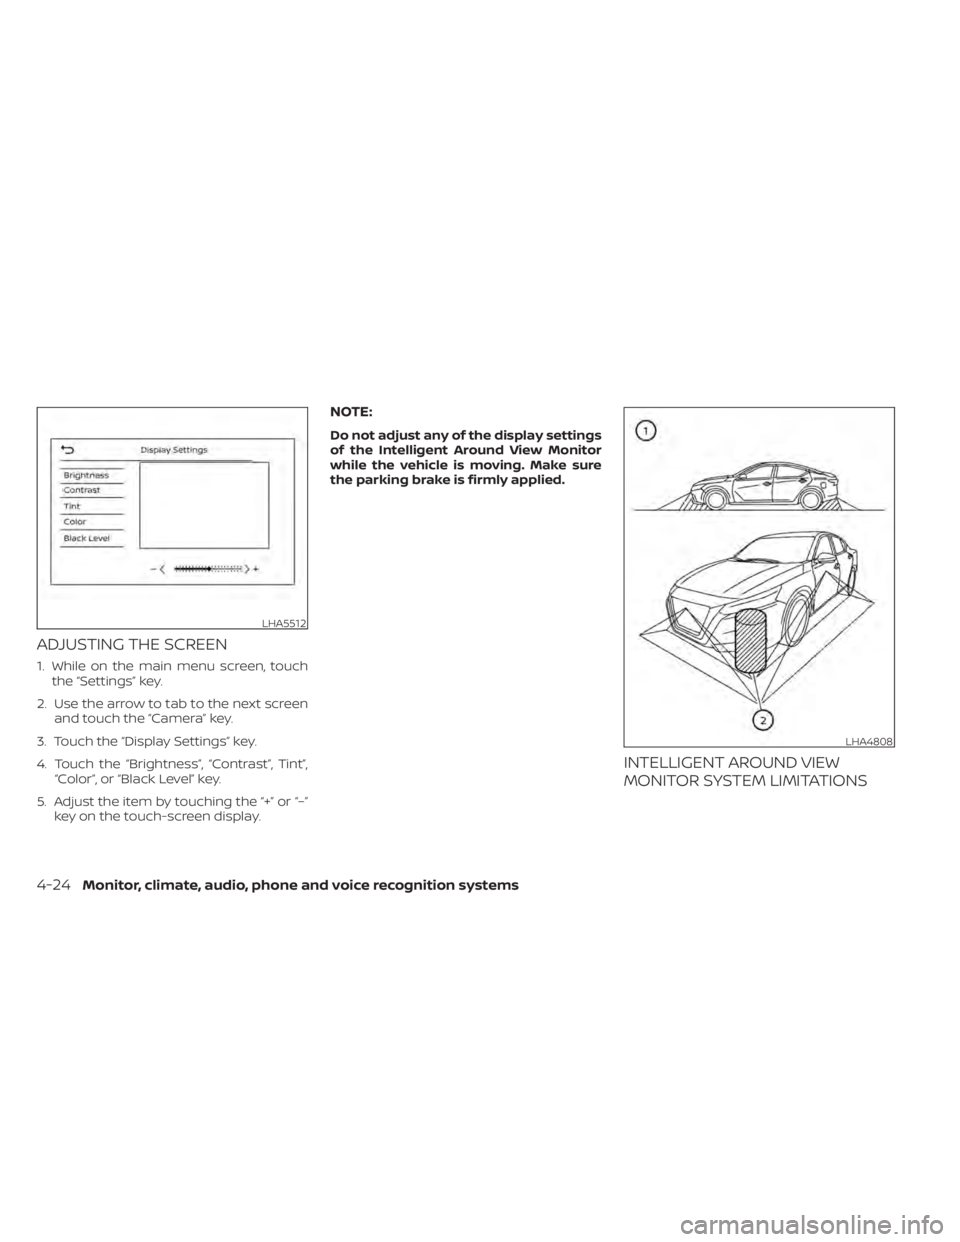
ADJUSTING THE SCREEN
1. While on the main menu screen, touchthe “Settings” key.
2. Use the arrow to tab to the next screen and touch the “Camera” key.
3. Touch the “Display Settings” key.
4. Touch the “Brightness”, “Contrast”, Tint”, “Color”, or “Black Level” key.
5. Adjust the item by touching the “+” or “–” key on the touch-screen display.
NOTE:
Do not adjust any of the display settings
of the Intelligent Around View Monitor
while the vehicle is moving. Make sure
the parking brake is firmly applied.
INTELLIGENT AROUND VIEW
MONITOR SYSTEM LIMITATIONS
LHA5512
LHA4808
4-24Monitor, climate, audio, phone and voice recognition systems
Page 251 of 644
• When parking, set the heater and airconditioner controls to turn off air re-
circulation to allow fresh air into the
passenger compartment. This should
help reduce odors inside the vehicle.
AUTOMATIC OPERATION
Cooling and/or dehumidified
heating (AUTO)
This mode may be used all year round as
the system automatically works to keep a
constant temperature. Air flow distribution,
air intake control, and fan speed are also
controlled automatically.
1. Press the AUTO button on.
2. Turn the temperature control dial to the lef t or right to set the desired
temperature.
• Adjust the temperature display to about 75°F (24°C) for normal operation.
• The temperature of the passenger com- partment will be maintained automati-
cally. Air flow distribution, air intake con-
trol and fan speed are also controlled
automatically. • A visible mist may be seen coming from
the vents in hot, humid conditions as the
air is cooled rapidly. This does not indicate
a malfunction.
3. You can individually set driver's and front passenger's side temperature using
each temperature control dial. To syn-
chronize the driver’s and front passen-
ger’s temperature settings, press the
SYNC button.
Heating (A/C OFF)
The air conditioner does not activate. When
you need to heat only, use this mode.
1. Press the AUTO button.
2. Turn the temperature control dial to set the desired temperature.
• The temperature of the passenger com- partment will be maintained automati-
cally. Air flow distribution and fan speed
are also controlled automatically.
• Do not set the temperature lower than the outside air temperature. Otherwise,
the system may not work properly.
• Not recommended if windows fog up.
Dehumidified defrosting or
defogging
1. Press thefront defroster button on.
2. Turn the temperature control dial to set the desired temperature.
• To quickly remove ice from the outside of the windows, use the
fan speed con-
trol buttons to set the fan speed to
maximum.
• As soon as possible af ter the windshield is clean, press the AUTO button to return
to the automatic mode.
• When the
front defroster button is
pressed, the air conditioner will automati-
cally be turned on at outside tempera-
tures above 36°F (2°C). The air recirculate
mode automatically turns off, allowing
outside air to be drawn into the passen-
ger compartment to further improve the
defogging performance.
Remote Engine Start with
Intelligent Climate Control (if so
equipped)
Vehicles equipped with automatic climate
controls and Remote Engine Start function
may go into automatic heating or cooling
Monitor, climate, audio, phone and voice recognition systems4-41
Page 253 of 644
Synchronize climate settings
Press the SYNC button to synchronize cli-
mate settings. The sync indicator will turn
on.
Pressing SYNC will synchronize driver's and
front passenger's climate settings.
To change climate settings when SYNC is
active (the SYNC indicator is on):
• The driver's side temperature control dialwill control the driver and front passenger
temperatures.
• The fan speed control dial will control the fan speeds.
To exit SYNC:
• To remove the front passenger from SYNC, turn the passenger's side tem-
perature control dial.
• Pressing SYNC multiple times will re- activate SYNC.
To turn system off
Press the ON-OFF button.
Rear window and outside mirror
defroster switch
For additional information, see “Rear win-
dow and outside mirror (if so equipped)
defroster switch” (P. 2-56).
Heated seat switches
For additional information, see “Heated
seat switches” (P. 2-64).
Heated steering wheel switch
For additional information, see “Heated
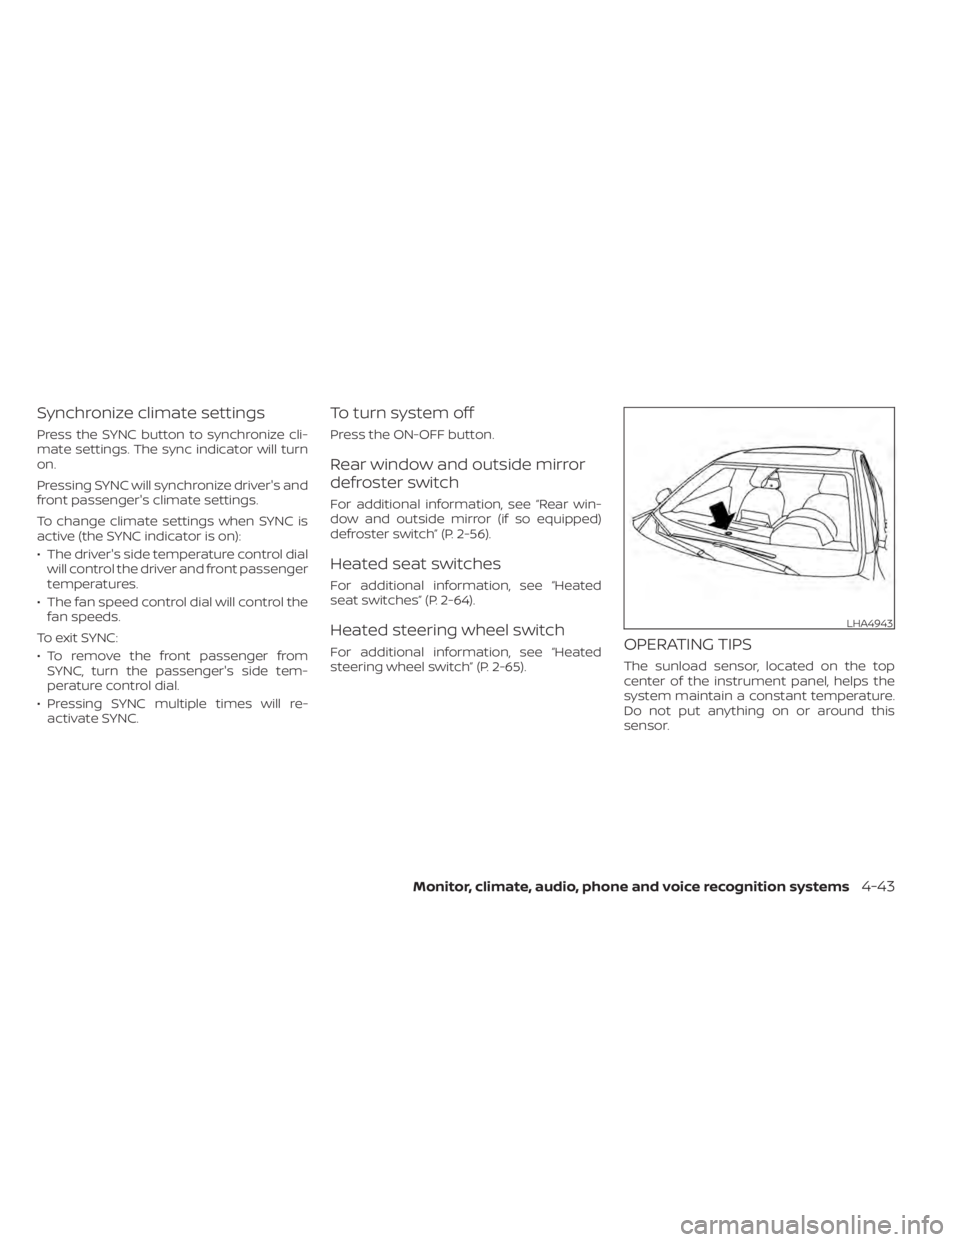
steering wheel switch” (P. 2-65).OPERATING TIPS
The sunload sensor, located on the top
center of the instrument panel, helps the
system maintain a constant temperature.
Do not put anything on or around this
sensor.
LHA4943
Monitor, climate, audio, phone and voice recognition systems4-43
Page 254 of 644
• When the climate system is in automaticoperation and the engine coolant tem-
perature and outside air temperature are
low, the air flow outlet may default to de-
froster mode for a maximum of 2 min-
utes 30 seconds. This is not a malfunc-
tion. Af ter the engine coolant
temperature warms up, the air flow outlet
will return to foot mode and operation will
continue normally.
• When the outside and interior cabin tem- peratures are moderate to high, the in-
take setting may default to turn off air
recirculation to allow fresh air into the
passenger compartment. You may no-
tice air flow from the foot mode, bi-level
mode, or side demist vent outlets for a
maximum of 15 seconds. This may occur
when the previous climate setting was
turned off. This is not a malfunction. Af ter
the initial warm air is expelled, the intake
will return to automatic control, the air
flow outlet will return to previous settings,
and operation will continue normally. To
exit, press any climate control button.
• Keep the moonroof (if so equipped) closed while the air conditioner is in
operation. • If you feel that the air flow mode you have
selected and the outlets the air is coming
out do not match, select the
mode.
• When you change the air flow mode, you may feel air flow from the foot outlets for
just a moment. This is not a malfunction. The air conditioner system in your NISSAN
vehicle is charged with a refrigerant de-
signed with the environment in mind.
This refrigerant does not harm the
earth's ozone layer.
Special charging equipment and lubricant
is required when servicing your NISSAN air
conditioner. Using improper refrigerants or
lubricants will cause severe damage to
your air conditioner system. For additional
information, see “Air conditioner system re-
frigerant and oil recommendations”
(P. 10-8).
It is recommended that you visit a NISSAN
dealer to service your “environmentally
friendly ” air conditioner system.
WARNING
The air conditioner system contains re-
frigerant under high pressure. To avoid
personal injury, any air conditioner ser-
vice should be done only by an experi-
enced technician with proper
equipment.
SERVICING AIR CONDITIONER
4-44Monitor, climate, audio, phone and voice recognition systems