heater NISSAN ARMADA 2020 Owner´s Manual
[x] Cancel search | Manufacturer: NISSAN, Model Year: 2020, Model line: ARMADA, Model: NISSAN ARMADA 2020Pages: 528, PDF Size: 2.1 MB
Page 7 of 528

Illustrated table of contents0
Safety — seats, seat belts and supplemental restraint
system1
Instruments and controls
Pre-driving checks and adjustments
Monitor, heater, air conditioner, audio, phone and voice
recognition systems
Starting and driving
In case of emergency
Appearance and care
Do-it-yourself
Maintenance and schedules
Technical and consumer information
2
3
4
5
6
7
8
9
10
Table of
Contents
Index11
Page 15 of 528

JVC1093X
1. Side ventilator (P.4-34)
2. Meters and gauges (P.2-5)
3. Center ventilator (P.4-34)
4. Center multi-function control panel (SeeNissanConnect® Owner’s Manual)
5. Center display (See NissanConnect® Own- er’s Manual) — Intelligent Around View Monitor (if so
equipped) (P.4-10)
— RearView Monitor (if so equipped)
(P.4-3)
— Navigation system (if so equipped) (See
NissanConnect® Owner’s Manual)
6. Hazard warning flasher switch (P.6-2) 7. Defroster switch (P.2-36)/Deicer switch (if
so equipped) (P.2-36)
8. Front passenger supplemental air bag (P.1-54)
9. Fuse box (P.8-20)
10. Parking brake (P.5-22)
11. Hood release handle (P.3-21)
12. Steering wheel — Horn (P.2-42)
— Driver supplemental air bag (P.1-54)
— Power steering (P.5-130)
13. Push-button ignition switch (P.5-13)
14. Climate controlled seat switch (if so equipped) (P.2-45)/Heated seat switch (if
so equipped) (P.2-43)
15. Front passenger air bag status light (P.1-62)
16. Power outlet (P.2-50)
17. USB connection port (See NissanCon- nect® Owner’s Manual)
18. Cup holder (P.2-53)/Tray (P.2-58)
19. Heater and air conditioner (P.4-35)
20. Audio system (See NissanConnect® Own- er’s Manual)
21. Glove box (P.2-56)
Illustrated table of contents0-7
INSTRUMENT PANEL
Page 94 of 528

2-4Instruments and controls
JVC1093X
1. Side ventilator
2. Meters and gauges
3. Center ventilator
4. Center multi-function control panel
5. Center display— Intelligent Around View Monitor (if so
equipped) — RearView Monitor (if so equipped)
— Navigation system (if so equipped)
6. Hazard warning flasher switch
7. Defroster switch/Deicer switch (if so equipped)
8. Front passenger supplemental air bag
9. Fuse box 10. Parking brake
11. Hood release handle
12. Steering wheel
— Horn
— Driver supplemental air bag
— Power steering
13. Push-button ignition switch
14. Climate controlled seat switch (if so equipped)/Heated seat switch (if so
equipped)
15. Front passenger air bag status light
16. Power outlet
17. USB connection port
18. Cup holder/Tray
19. Heater and air conditioner
20. Audio system
21. Glove box
INSTRUMENT PANEL
Page 133 of 528

WARNING
Do not use or allow occupants to use
the seat heater if you or the occu-
pants cannot monitor elevated seat
temperatures or have an inability to
feel pain in body parts that contact
the seat. Use of the seat heater by
such people could result in serious
injury.
CAUTION
.The battery could run down if the
seat heater is operated while the
engine is not running.
. Do not use the seat heater for
extended periods or when no one
is using the seat.
. Do not put anything on the seat
which insulates heat, such as a
blanket, cushion, seat cover, etc.
Otherwise, the seat may become
overheated.
. Do not place anything hard or
heavy on the seat or pierce it with
a pin or similar object. This may
result in damage to the heater. .
Any liquid spilled on the heated
seat should be removed immedi-
ately with a dry cloth.
. When cleaning the seat, never use
gasoline, thinner, or any similar
materials.
. If any malfunctions are found or
the heated seat does not operate,
turn the switch off and have the
system checked. It is recom-
mended you visit a NISSAN dealer
for this service.
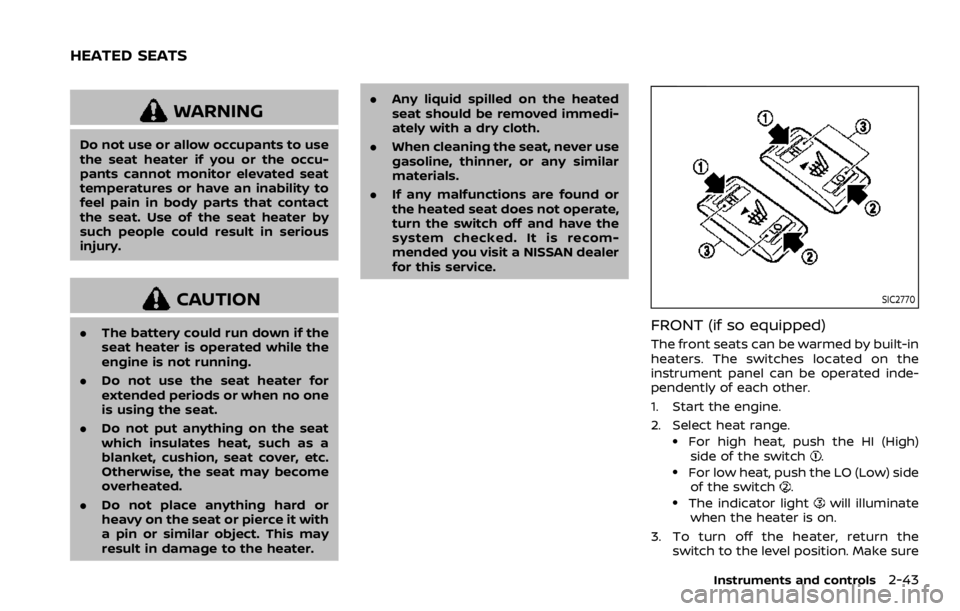
SIC2770
FRONT (if so equipped)
The front seats can be warmed by built-in
heaters. The switches located on the
instrument panel can be operated inde-
pendently of each other.
1. Start the engine.
2. Select heat range.
.For high heat, push the HI (High)
side of the switch..For low heat, push the LO (Low) sideof the switch..The indicator lightwill illuminate
when the heater is on.
3. To turn off the heater, return the switch to the level position. Make sure
Instruments and controls2-43
HEATED SEATS
Page 134 of 528

2-44Instruments and controls
the indicator light turns off.
SIC2770
REAR (if so equipped)
The 2nd row outboard seats are warmed
by built-in heaters. The switches located
on the back side of the center console
can be operated independently of each
other.
1. Start the engine.
2. Select heat range.
For high heat, push the HI (High)
side of the switch.
For low heat, push the LO (Low) side
of the switch.
The indicator light in the switch
will
illuminate when the heater is on. 3. To turn off the heater, return the
switch to the level position. Make sure
the indicator light turns off.
The heater is controlled by a thermo-
stat, automatically turning the heater
on and off. The indicator light will
remain on as long as the switch is on.
When the vehicle’s interior is warmed,
or before you leave the vehicle, be
sure to turn off the switch.
Page 135 of 528

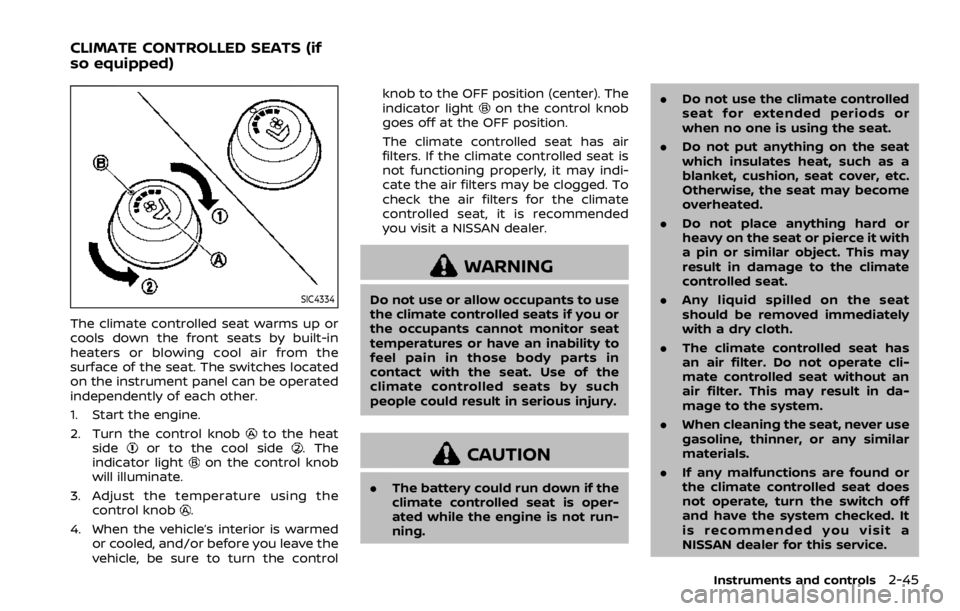
SIC4334
The climate controlled seat warms up or
cools down the front seats by built-in
heaters or blowing cool air from the
surface of the seat. The switches located
on the instrument panel can be operated
independently of each other.
1. Start the engine.
2. Turn the control knob
to the heat
sideor to the cool side. The
indicator lighton the control knob
will illuminate.
3. Adjust the temperature using the control knob
.
4. When the vehicle’s interior is warmed or cooled, and/or before you leave the
vehicle, be sure to turn the control knob to the OFF position (center). The
indicator light
on the control knob
goes off at the OFF position.
The climate controlled seat has air
filters. If the climate controlled seat is
not functioning properly, it may indi-
cate the air filters may be clogged. To
check the air filters for the climate
controlled seat, it is recommended
you visit a NISSAN dealer.
WARNING
Do not use or allow occupants to use
the climate controlled seats if you or
the occupants cannot monitor seat
temperatures or have an inability to
feel pain in those body parts in
contact with the seat. Use of the
climate controlled seats by such
people could result in serious injury.
CAUTION
. The battery could run down if the
climate controlled seat is oper-
ated while the engine is not run-
ning. .
Do not use the climate controlled
seat for extended periods or
when no one is using the seat.
. Do not put anything on the seat
which insulates heat, such as a
blanket, cushion, seat cover, etc.
Otherwise, the seat may become
overheated.
. Do not place anything hard or
heavy on the seat or pierce it with
a pin or similar object. This may
result in damage to the climate
controlled seat.
. Any liquid spilled on the seat
should be removed immediately
with a dry cloth.
. The climate controlled seat has
an air filter. Do not operate cli-
mate controlled seat without an
air filter. This may result in da-
mage to the system.
. When cleaning the seat, never use
gasoline, thinner, or any similar
materials.
. If any malfunctions are found or
the climate controlled seat does
not operate, turn the switch off
and have the system checked. It
is recommended you visit a
NISSAN dealer for this service.
Instruments and controls2-45
CLIMATE CONTROLLED SEATS (if
so equipped)
Page 213 of 528

4 Monitor, heater, air conditioner, audio,phone and voice recognition systems
NissanConnect® Owner’s Manual .................................... 4-2
Safety note ........................................................................\
................ 4-2
RearView Monitor (if so equipped) ................................. 4-3
RearView Monitor system operation ..................... 4-4
How to read the displayed lines ................................ 4-4
Difference between predictive and actual
distances ........................................................................\
............... 4-5
How to park with predictive course lines .......... 4-6
Sonar indicator ........................................................................\
4-7
Adjusting the screen ........................................................... 4-8
Predictive course line settings .................................... 4-8
RearView Monitor system limitations .................... 4-8
System maintenance .......................................................... 4-9
Intelligent Around View Monitor
(if so equipped) ........................................................................\
.... 4-10 Intelligent Around View Monitor system
operation ........................................................................\
........... 4-12
How to adjust the screen view ................................ 4-19
Intelligent Around View Monitor settings ....... 4-20
Intelligent Around View Monitor
system limitations .............................................................. 4-22
System maintenance ....................................................... 4-24
Camera aiding sonar function (models with
Intelligent Around View Monitor) .................................. 4-25 Sonar system operation ................................................ 4-25 Turning on and off the sonar function .......... 4-26
Sonar system limitations ........................................... 4-27
System temporarily unavailable ........................... 4-28
System maintenance .................................................... 4-28
Moving Object Detection (MOD) ................................... 4-29 MOD system operation ................................................ 4-30
Turning on and off the MOD system ............... 4-31
MOD system limitations .............................................. 4-32
System maintenance .................................................... 4-33
Ventilators ........................................................................\
.............. 4-34
Center ventilators ............................................................ 4-34
Side ventilators .................................................................. 4-34
Rear ventilators .................................................................. 4-34
Heater and air conditioner ................................................ 4-35 Automatic air conditioner ......................................... 4-36
Rear automatic air conditioning system ....... 4-39
Operating tips ..................................................................... 4-43
Linking Intelligent Key (if so equipped) ........... 4-43
In-cabin microfilter .......................................................... 4-43
Servicing air conditioner ............................................. 4-43
Antenna ........................................................................\
.................... 4-43 Window antenna ............................................................... 4-43
Satellite antenna ............................................................... 4-44
Car phone or CB radio ......................................................... 4-44
Page 214 of 528

4-2Monitor, heater, air conditioner, audio, phone and voice recognition systems
For models with NissanConnect® with
Navigation (if so equipped) and Services
(if so equipped), refer to the NissanCon-
nect® Owner’s Manual regarding the fol-
lowing information.
.Audio system
. Bluetooth® Hands-Free Phone
. NissanConnect® Services
. SiriusXM Traffic
TM
.SiriusXM® Travel Link
. SiriusXM® Radio
. Navigation system
. Voice Recognition System
. Information and settings viewable on
NissanConnect®
WARNING
.Do not disassemble or modify
this system. If you do, it may
result in accidents, fire, or electric
shock.
. Do not use this system if you
notice any abnormality, such as
a frozen screen or lack of sound.
Continued use of the system may
result in accident, fire or electric
shock.
. In case you notice any foreign
object in the system hardware,
spill liquid on it, or notice smoke
or smell coming from it, stop
using the system immediately. It
is recommended you visit a
NISSAN dealer for servicing.
Ignoring such conditions may
lead to accidents, fire, or electric
shock.
. Park the vehicle in a safe location
and apply the parking brake to
view the images on the front
center display screen.
CAUTION
Do not use the system when the
engine is not running for extended
periods of time to prevent battery
discharge.
Do not attempt to operate the system in
extreme temperature conditions [below
−4°F (−20°C) and above 158°F (70°C)].
Operating this system under these con-
ditions may result in system malfunc-
tions.
NISSANCONNECT® OWNER’S MANUALSAFETY NOTE
Page 215 of 528

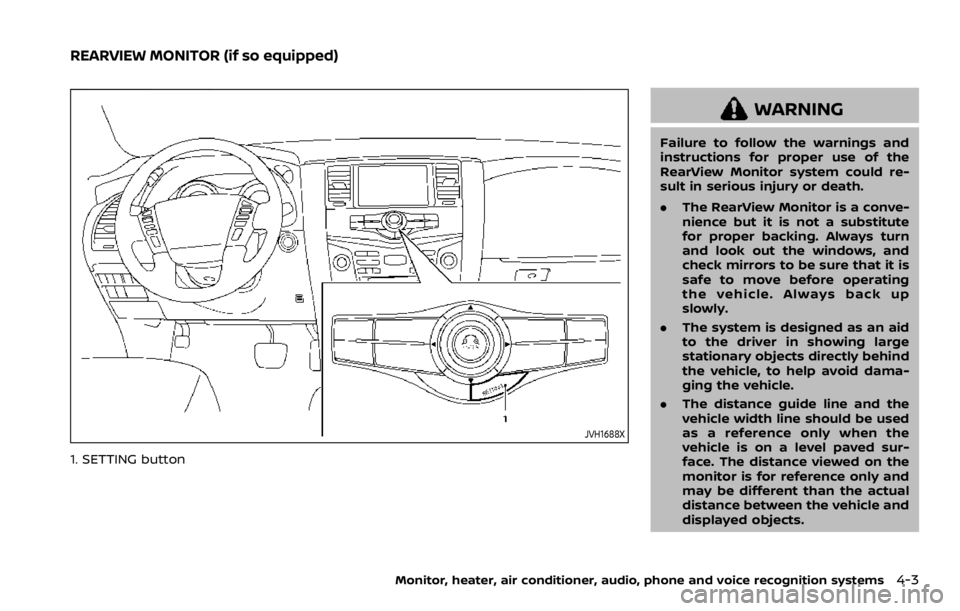
JVH1688X
1. SETTING button
WARNING
Failure to follow the warnings and
instructions for proper use of the
RearView Monitor system could re-
sult in serious injury or death.
.The RearView Monitor is a conve-
nience but it is not a substitute
for proper backing. Always turn
and look out the windows, and
check mirrors to be sure that it is
safe to move before operating
the vehicle. Always back up
slowly.
. The system is designed as an aid
to the driver in showing large
stationary objects directly behind
the vehicle, to help avoid dama-
ging the vehicle.
. The distance guide line and the
vehicle width line should be used
as a reference only when the
vehicle is on a level paved sur-
face. The distance viewed on the
monitor is for reference only and
may be different than the actual
distance between the vehicle and
displayed objects.
Monitor, heater, air conditioner, audio, phone and voice recognition systems4-3
REARVIEW MONITOR (if so equipped)
Page 216 of 528

4-4Monitor, heater, air conditioner, audio, phone and voice recognition systems
CAUTION
Do not scratch the camera lens when
cleaning dirt or snow from the front
of camera.
The RearView Monitor system automati-
cally shows a rear view of the vehicle
when the shift lever is placed in the R
(Reverse) position.
The radio can still be heard while the
RearView Monitor is active.
JVH1395X
To display the rear view, the RearView
Monitor system uses a cameralocated
just above the vehicle’s license plate.
REARVIEW MONITOR SYSTEM OP-
ERATION
With the ignition switch in the ON posi-
tion, move the shift lever to the R
(Reverse) position to operate the Rear-
View Monitor.
SAA1896
HOW TO READ THE DISPLAYED
LINES
Guiding lines which indicate the vehicle
width and distances to objects with
reference to the bumper line
are
displayed on the monitor.
Distance guide lines:
Indicate distances from the bumper.
. Red line
: approx. 1.5 ft (0.5 m)
. Yellow line
: approx. 3 ft (1 m)
. Green line
: approx. 7 ft (2 m)
. Green line
(if so equipped): approx.
10 ft (3 m)
Vehicle width guide lines
:
Indicate the approximate vehicle width