stop NISSAN FRONTIER 2023 Owner's Manual
[x] Cancel search | Manufacturer: NISSAN, Model Year: 2023, Model line: FRONTIER, Model: NISSAN FRONTIER 2023Pages: 572, PDF Size: 6.58 MB
Page 71 of 572

a secure place. Be sure to reinstall the
head restraint/headrest when the child
restraint is removed. For additional infor-
mation, see “Head restraints/headrests”
(P. 1-9).
2. Position the top tether strap as shown.
3. Secure the tether strap to the tether an- chor point as shown.
4. Return the seatback to the locked position.
5. Refer back to child restraint installation steps before tightening the tether strap.
If you have any questions when install-
ing a top tether strap, it is recommended
that you visit a NISSAN dealer for this
service.
FORWARD-FACING CHILD
RESTRAINT INSTALLATION USING
LATCH — JUMP SEAT (King Cab®
models)
WARNING
• If a child restraint system is not in-
stalled properly, the child could be
seriously injured or killed in a sudden
stop or collision.
– Do not install a child restraint sys-
tem on the passenger's side jump
seat without unfolding the seat
extender. –
For forward-facing child seats
and boosters, DO NOT install if the
child restraint base extends past
the forward edge of the driver's
side seat cushion.
LRS2360
Safety-Seats, seat belts and supplemental restraint system1-49
Page 75 of 572

Installing top tether strap — jump
seat (King Cab® models)
WARNING
• Do not secure the top tether strap to
the routing bracket. If the child re-
straint is not anchored properly, the
risk of a child being injured or killed
in a collision or a sudden stop greatly
increases.
• Child restraint anchorages are de-
signed to withstand only those loads
imposed by correctly fitted child re-
straints. Under no circumstances are
they to be used to attach adult seat
belts, or other items or equipment to
the vehicle. Doing so could damage
the child restraint anchorages. The
child restraint will not be properly in-
stalled using the damaged anchor-
ages, and a child could be seriously
injured or killed in a collision. The child restraint top tether strap must be
used when installing the child restraint with
LATCH lower anchor attachments.
First, secure the child restraint with the LATCH
lower anchors (rear seating positions).
1. Pull the cover plate off to access the top
tether strap routing bracket for the jump
seat.
2. Route the top tether strap through the routing bracket.
3. Secure the top tether strap to the tether anchor point as shown.
4. Refer back to child restraint installation steps before tightening the tether strap.
If you have any questions when install-
ing a top tether strap, it is recommended
that you visit a NISSAN dealer for this
service.
LRS0561
Jump seat (King Cab® models)
1. Top tether strap
2. Routing bracket
3. Tether anchor point
Safety-Seats, seat belts and supplemental restraint system1-53
Page 76 of 572
FORWARD-FACING CHILD
RESTRAINT INSTALLATION USING
THE SEAT BELTS — FRONT
PASSENGER AND REAR BENCH
SEAT (Crew Cab models)
WARNING
The three-point seat belt with Auto-
matic Locking Retractor (ALR) must be
used when installing a child restraint.
Failure to use the ALR mode will result
in the child restraint not being properly
secured. The restraint could tip over or
be loose and cause injury to a child in a
sudden stop or collision. Also, it can
change the operation of the front pas-
senger air bag. For additional informa-
tion, see “Front passenger air bag and
status light” (P. 1-80).
For additional information, see “Child safety”
(P. 1-23) and “Child restraints” (P. 1-26) for all
Warnings and Cautions before installing a
child restraint.
Do not use the lower anchors if the com-
bined weight of the child and the child re-
straint exceeds 65 lbs. (29.5 kg). If the com-
bined weight of the child and the child
restraint is greater than 65 lbs. (29.5 kg), use
the vehicle's seat belt (not the lower an-
chors) to install the child restraint. Be sure
to follow the child restraint manufacturer's
instructions for installation. Follow these steps to install a forward-
facing child restraint using the vehicle seat
belt in the rear seats (Crew Cab models) or
in the front passenger seat:
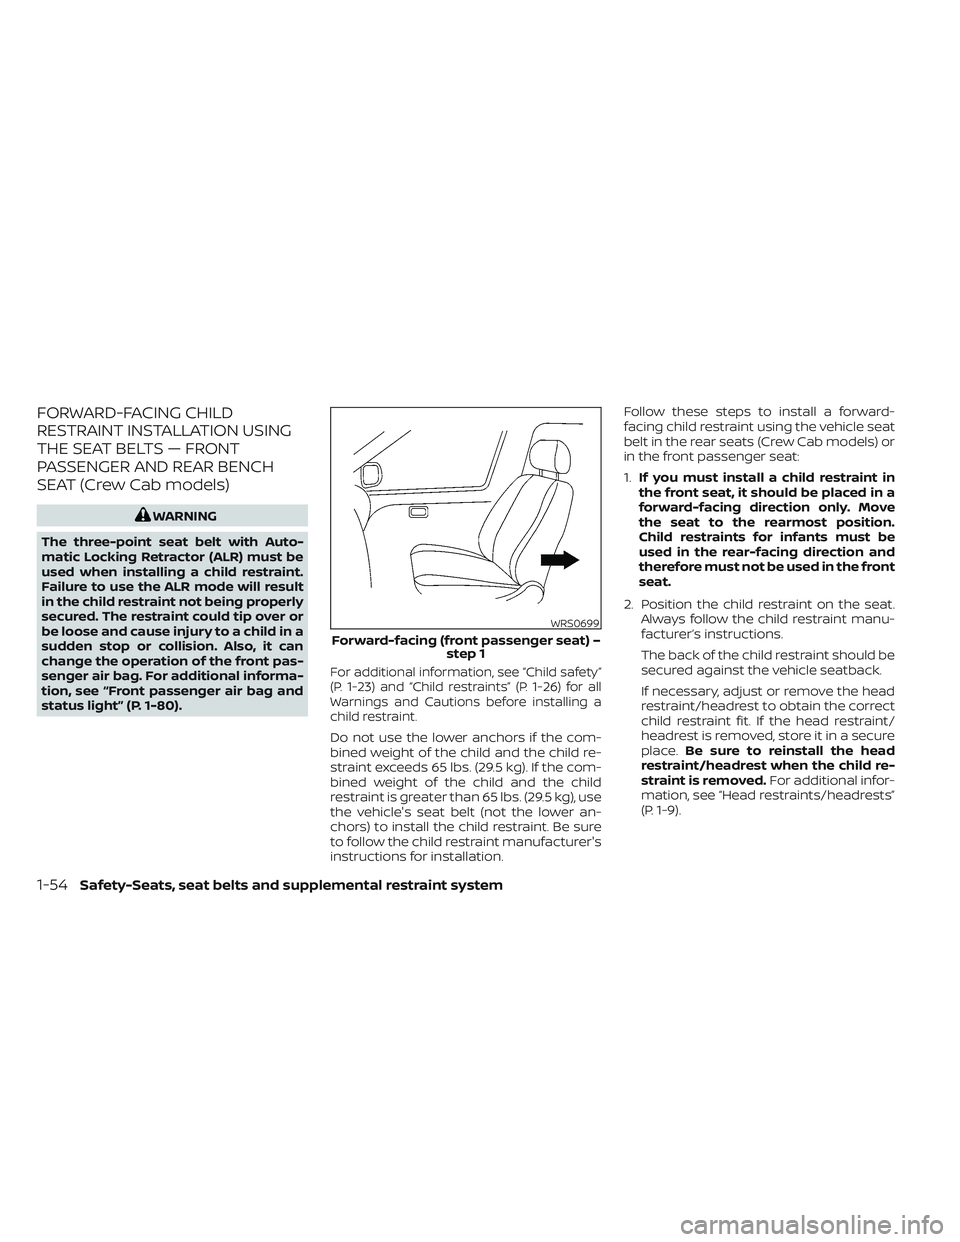
1.
If you must install a child restraint in
the front seat, it should be placed in a
forward-facing direction only. Move
the seat to the rearmost position.
Child restraints for infants must be
used in the rear-facing direction and
therefore must not be used in the front
seat.
2. Position the child restraint on the seat. Always follow the child restraint manu-
facturer’s instructions.
The back of the child restraint should be
secured against the vehicle seatback.
If necessary, adjust or remove the head
restraint/headrest to obtain the correct
child restraint fit. If the head restraint/
headrest is removed, store it in a secure
place. Be sure to reinstall the head
restraint/headrest when the child re-
straint is removed. For additional infor-
mation, see “Head restraints/headrests”
(P. 1-9).
WRS0699
Forward-facing (front passenger seat) – step 1
1-54Safety-Seats, seat belts and supplemental restraint system
Page 81 of 572
FORWARD-FACING CHILD
RESTRAINT INSTALLATION USING
THE SEAT BELTS — FRONT
PASSENGER AND JUMP SEATS
(King Cab® models)
WARNING
• The three-point seat belt with Auto-
matic Locking Retractor (ALR) must
be used when installing a child re-
straint. Failure to use the ALR mode
will result in the child restraint not
being properly secured. The restraint
could tip over or be loose and cause
injury to a child in a sudden stop or
collision. Also, it can change the op-
eration of the front passenger air
bag. For additional information, see
“Front passenger air bag and status
light” (P. 1-80).
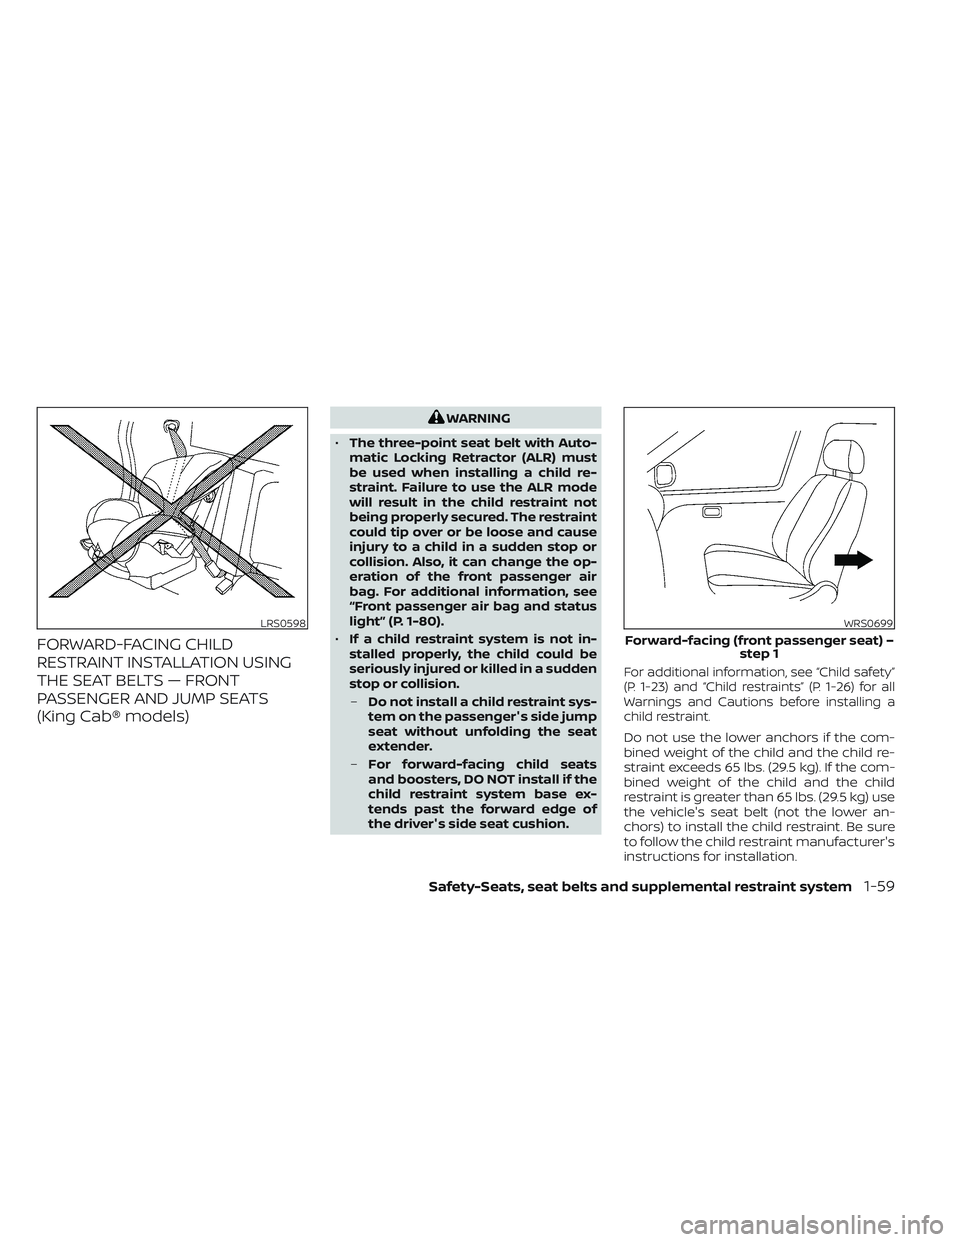
• If a child restraint system is not in-
stalled properly, the child could be
seriously injured or killed in a sudden
stop or collision.
– Do not install a child restraint sys-
tem on the passenger's side jump
seat without unfolding the seat
extender.
– For forward-facing child seats
and boosters, DO NOT install if the
child restraint system base ex-
tends past the forward edge of
the driver's side seat cushion.
For additional information, see “Child safety”
(P. 1-23) and “Child restraints” (P. 1-26) for all
Warnings and Cautions before installing a
child restraint.
Do not use the lower anchors if the com-
bined weight of the child and the child re-
straint exceeds 65 lbs. (29.5 kg). If the com-
bined weight of the child and the child
restraint is greater than 65 lbs. (29.5 kg) use
the vehicle's seat belt (not the lower an-
chors) to install the child restraint. Be sure
to follow the child restraint manufacturer's
instructions for installation.
LRS0598WRS0699
Forward-facing (front passenger seat) –
step 1
Safety-Seats, seat belts and supplemental restraint system1-59
Page 86 of 572
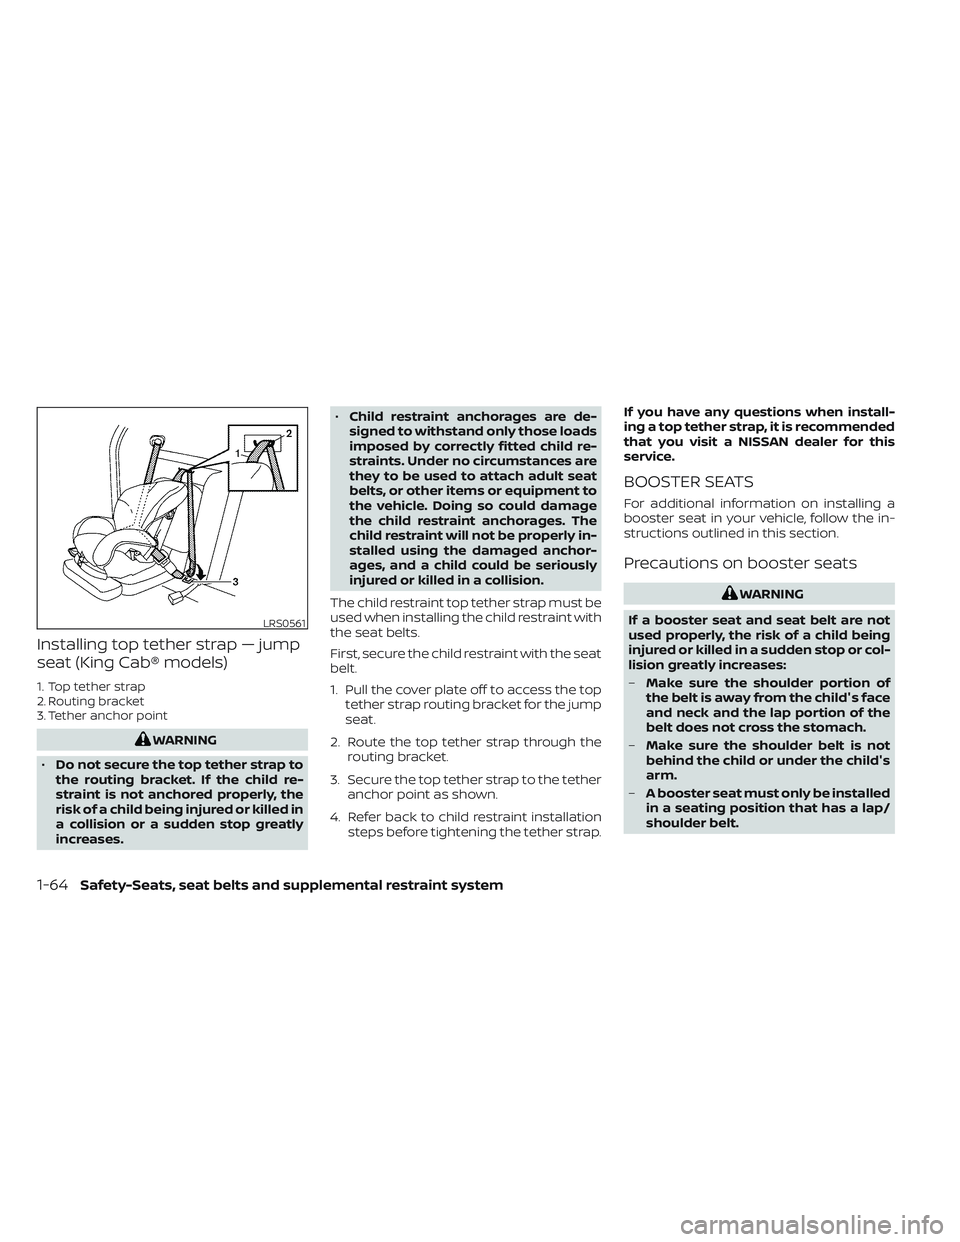
Installing top tether strap — jump
seat (King Cab® models)
1. Top tether strap
2. Routing bracket
3. Tether anchor point
WARNING
• Do not secure the top tether strap to
the routing bracket. If the child re-
straint is not anchored properly, the
risk of a child being injured or killed in
a collision or a sudden stop greatly
increases. •
Child restraint anchorages are de-
signed to withstand only those loads
imposed by correctly fitted child re-
straints. Under no circumstances are
they to be used to attach adult seat
belts, or other items or equipment to
the vehicle. Doing so could damage
the child restraint anchorages. The
child restraint will not be properly in-
stalled using the damaged anchor-
ages, and a child could be seriously
injured or killed in a collision.
The child restraint top tether strap must be
used when installing the child restraint with
the seat belts.
First, secure the child restraint with the seat
belt.
1. Pull the cover plate off to access the top tether strap routing bracket for the jump
seat.
2. Route the top tether strap through the routing bracket.
3. Secure the top tether strap to the tether anchor point as shown.
4. Refer back to child restraint installation steps before tightening the tether strap. If you have any questions when install-
ing a top tether strap, it is recommended
that you visit a NISSAN dealer for this
service.
BOOSTER SEATS
For additional information on installing a
booster seat in your vehicle, follow the in-
structions outlined in this section.
Precautions on booster seats
WARNING
If a booster seat and seat belt are not
used properly, the risk of a child being
injured or killed in a sudden stop or col-
lision greatly increases:
– Make sure the shoulder portion of
the belt is away from the child's face
and neck and the lap portion of the
belt does not cross the stomach.
– Make sure the shoulder belt is not
behind the child or under the child's
arm.
– A booster seat must only be installed
in a seating position that has a lap/
shoulder belt.
LRS0561
1-64Safety-Seats, seat belts and supplemental restraint system
Page 90 of 572
7. If the booster seat is installed in the frontpassenger seat, place the ignition switch
in the ON position. The front passenger
air bag status light
may or may not
illuminate, depending on the size of the
child and the type of booster seat being
used. For additional information, see
“Front passenger air bag and status
light” (P. 1-80).
Booster seat installation — jump
seat (King Cab® models)
WARNING
• If a child restraint system is not in-
stalled properly, the child could be
seriously injured or killed in a sudden
stop or collision.
– For boosters, DO NOT install if the
child restraint system base ex-
tends past the forward edge of
the seat cushion.
– Do not install a child restraint sys-
tem on the passenger's side jump
seat without unfolding the seat
extender.
• To avoid injury to child, do not use the
lap/shoulder belt in the Automatic
Locking Retractor (ALR) mode when
using a booster seat with the seat
belts.
For additional information, see “Child
safety” (P. 1-23), “Child restraints” (P. 1-26) and
“Booster seats” (P. 1-64) for all Warnings and
Cautions before installing a child restraint.
Follow these steps to install a booster seat
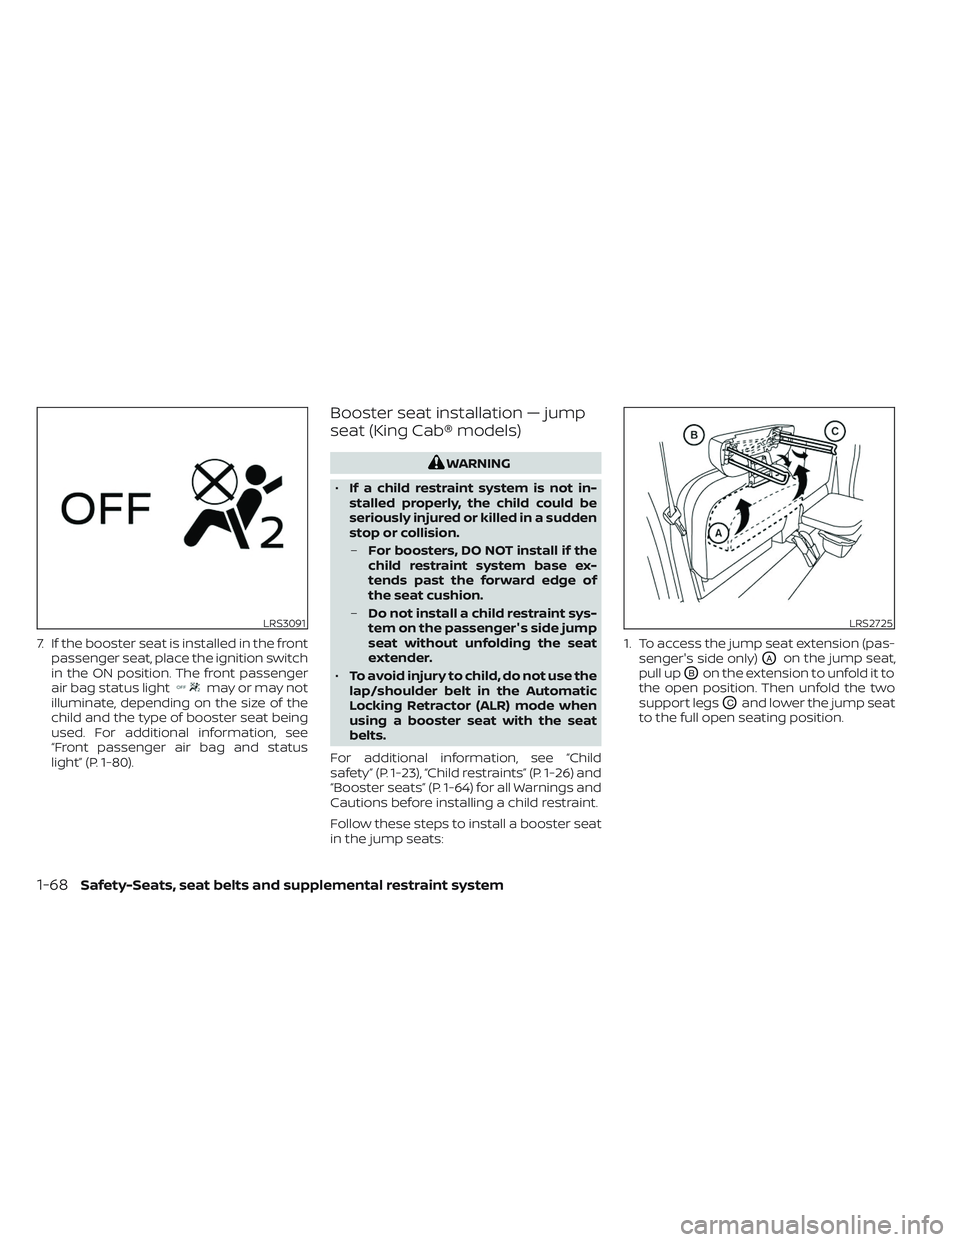
in the jump seats: 1. To access the jump seat extension (pas-
senger's side only)
OAon the jump seat,
pull up
OBon the extension to unfold it to
the open position. Then unfold the two
support legs
OCand lower the jump seat
to the full open seating position.
LRS3091LRS2725
1-68Safety-Seats, seat belts and supplemental restraint system
Page 103 of 572
Front passenger air bag
The front passenger air bag and front pas-
senger supplemental knee air bag are de-
signed to automatically turn OFF when the
vehicle is operated under some conditions
as described below in accordance with U.S.
regulations. If the front passenger air bag
and front passenger supplemental knee
air bag are OFF it will not inflate in a crash.
The driver air bag and other air bags in your
vehicle are not part of this system.
The purpose of the regulation is to help
reduce the risk of injury or death from an
inflating air bag to certain front passenger
seat occupants, such as children, by requir-
ing the air bag to be automatically turned
OFF. Certain sensors are used to meet the
requirements.
The occupant classification sensor in this
vehicle is a weight sensor. It is designed to
detect an occupant and objects on the
seat by weight. For example, if a child up to
the approximate size and weight of a one
year old is properly restrained in the front
passenger seat, the NISSAN Advanced Air
Bag System is designed to turn the front
passenger air bag and front passenger
supplemental knee air bag OFF. For a prop-
erly restrained child who is larger than the
approximate size and weight of a one yearold, the front passenger air bag and front
passenger supplemental knee air bag may
or may not be automatically turned OFF,
depending on the size of the child and the
type of child restraint being used. Af ter in-
stalling the child restraint and positioning
the child, place the ignition switch in the ON
position: if the front passenger air bag sta-
tus light is illuminated, the front passenger
air bag and front passenger supplemental
knee air bag are OFF. If the front passenger
air bag status light is not illuminated, the air
bag will inflate in a crash.
The front passenger seat belt sensors are
designed to detect if the seat belt is buck-
led. Based on the weight on the seat de-
tected by the occupant classification sen-
sor, the NISSAN Advanced Air Bag System
determines whether the front passenger
air bag and front passenger supplemental
knee air bag should be automatically
turned OFF as required by the regulations.
Front passenger seat adult occupants who
are properly seated and using the seat belt
as outlined in this manual should not
cause the front passenger air bag and
front passenger supplemental knee air
bag to be automatically turned OFF. For
small adults it may be turned OFF, however,
if the occupant does not sit in the seat
properly (for example, by not sitting upright,
by sitting on an edge of the seat, or by
otherwise being out of position), this could
cause the sensor to turn the front passen-
ger air bag and front passenger supple-
mental knee air bag OFF. Always be sure to
be seated and wearing the seat belt prop-
erly for the most effective protection by the
seat belt and supplemental air bag.
NISSAN recommends that pre-teens and
children be properly restrained in a rear
seat. NISSAN also recommends that ap-
propriate child restraints and booster
seats be properly installed in a rear seat. If
this is not possible, the occupant classifica-
tion sensor is designed to operate as de-
scribed above to turn the front passenger
air bag and front passenger supplemental
knee air bag OFF for specified child re-
straints as required by the regulations. Fail-
ing to properly secure child restraints and
to use the ALR mode may allow the re-
straint to tip or move in a collision or sud-
den stop. This can also result in the front
passenger air bag and front passenger
supplemental knee air bag inflating in a
crash instead of being OFF. For additional
information, see “Child restraints” (P. 1-26).
Safety-Seats, seat belts and supplemental restraint system1-81
Page 105 of 572
Steps
1. Adjust the seat as outlined in the “Seats”section of this manual. Sit upright, lean-
ing against the seatback, and centered
on the seat cushion with your feet com-
fortably extended to the floor.
2. Make sure there are no objects on your lap.
3. Fasten the seat belt as outlined in the “Seat belts” section of this manual.
4. Remain in this position for 30 seconds allowing the system to classif y the front
passenger before the vehicle is put into
motion.
5. Ensure proper classification by checking the front passenger air bag status light.NOTE:
This vehicle’s occupant classification
sensor system locks the classification
during driving so it is important that you
confirm that the front passenger is prop-
erly classified prior to driving. Also, the
occupant classification sensor system
may recalculate the weight of the occu-
pant when the vehicle comes to a stop
(i.e. stop light, stop sign, etc.), so front
passenger seat occupants should con-
tinue to remain seated as outlined
above.
Troubleshooting
If you think the front passenger air bag
status light is incorrect:
1. If the light is ON with an adult occupyingthe front passenger seat:
• Occupant is a small adult — the air bag light is functioning as intended. The front
passenger air bag and front passenger
supplemental knee air bag are sup-
pressed. However, if the occupant is not a small
adult, then this may be due to the following
conditions that may be interfering with the
weight sensors:
• Occupant is not sitting upright, leaning
against the seatback, and centered on
the seat cushion with his/her feet com-
fortably extended to the floor.
• A child restraint or other object pressing against the rear of the seatback.
• A rear passenger pushing or pulling on the back of the front passenger seat.
• Forcing the front seat or seatback against an object on the seat or floor be-
hind it.
• An object placed under the front passen- ger seat.
• An object placed between the seat cush- ion and center console or between the
seat cushion and the door.
If the vehicle is moving, please come to a
stop when it is safe to do so. Check and
correct any of the above conditions. Re-
start the vehicle and wait 1 minute.
Safety-Seats, seat belts and supplemental restraint system1-83
Page 106 of 572
NOTE:
A system check will be performed during
which the front passenger air bag status
light will remain lit for about 7 seconds
initially.
If the light is still ON af ter this, the person
should be advised not to ride in the front
passenger seat and the vehicle should be
checked as soon as possible. It is recom-
mended that you visit a NISSAN dealer for
this service.
2. If the light is OFF with a small adult, childor child restraint occupying the front
passenger seat.
This may be due to the following condi-
tions that may be interfering with the
weight sensors:
• Small adult or child is not sitting upright, leaning against the seatback, and cen-
tered on the seat cushion with his/her
feet comfortably extended to the floor.
• The child restraint is not properly in- stalled, as outlined in the “Child restraints”
section of this manual.
• An object weighing over 9.1 lbs. (4 kg) hanging on the seat or placed in the seat-
back pocket. • A child restraint or other object pressing
against the rear of the seatback.
• A rear passenger pushing or pulling on the back of the front passenger seat.
•
Forcing the front seat or seatback against
an object on the seat or floor behind it.
• An object placed under the front passen- ger seat.
• An object placed between the seat cush- ion and center console.
If the vehicle is moving, please come to a
stop when it is safe to do so. Check and
correct any of the above conditions. Re-
start the vehicle and wait 1 minute.
NOTE:
A system check will be performed during
which the front passenger air bag status
light will remain lit for about 7 seconds
initially.
If the light is still OFF af ter this, the small
adult, child or child restraint should be re-
positioned in the rear seat and the vehicle
should be checked as soon as possible. It is
recommended that you visit a NISSAN
dealer for this service. 3. If the light is OFF with no front passenger
and no objects on the front passenger
seat, the vehicle should be checked. It is
recommended that you visit a NISSAN
dealer as soon as possible.
Other supplemental front-impact air
bag precautions
WARNING
• Do not place any objects on the
steering wheel pad or on the instru-
ment panel. Also, do not place any
objects between any occupant and
the steering wheel or instrument
panel. Such objects may become
dangerous projectiles and cause in-
jury if the front air bags inflate.
• Immediately af ter inflation, several
front air bag system components will
be hot. Do not touch them; you may
severely burn yourself.
•
No unauthorized changes should be
made to any components or wiring of
the supplemental air bag system. This
is to prevent accidental inflation of the
supplemental air bag or damage to
the supplemental air bag system.
1-84Safety-Seats, seat belts and supplemental restraint system
Page 118 of 572
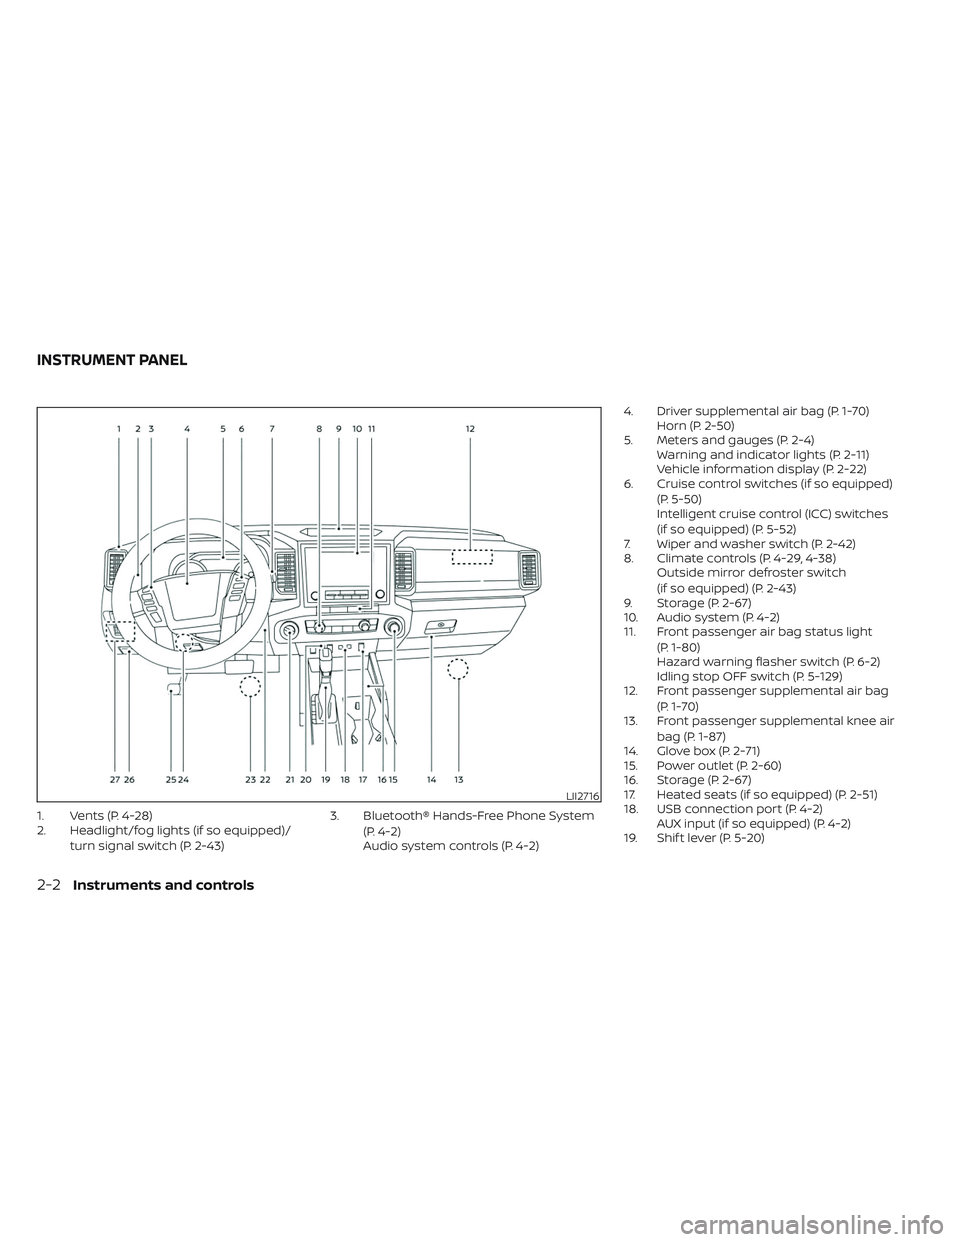
1. Vents (P. 4-28)
2. Headlight/fog lights (if so equipped)/turn signal switch (P. 2-43) 3. Bluetooth® Hands-Free Phone System
(P. 4-2)
Audio system controls (P. 4-2) 4. Driver supplemental air bag (P. 1-70)
Horn (P. 2-50)
5. Meters and gauges (P. 2-4) Warning and indicator lights (P. 2-11)
Vehicle information display (P. 2-22)
6. Cruise control switches (if so equipped)
(P. 5-50)
Intelligent cruise control (ICC) switches
(if so equipped) (P. 5-52)
7. Wiper and washer switch (P. 2-42)
8. Climate controls (P. 4-29, 4-38) Outside mirror defroster switch
(if so equipped) (P. 2-43)
9. Storage (P. 2-67)
10. Audio system (P. 4-2)
11. Front passenger air bag status light
(P. 1-80)
Hazard warning flasher switch (P. 6-2)
Idling stop OFF switch (P. 5-129)
12. Front passenger supplemental air bag
(P. 1-70)
13. Front passenger supplemental knee air
bag (P. 1-87)
14. Glove box (P. 2-71)
15. Power outlet (P. 2-60)
16. Storage (P. 2-67)
17. Heated seats (if so equipped) (P. 2-51)
18. USB connection port (P. 4-2) AUX input (if so equipped) (P. 4-2)
19. Shif t lever (P. 5-20)
LII2716
INSTRUMENT PANEL
2-2Instruments and controls